Setup time: 5 Min
What this integration does
- Creates ServiceNow incidents when All Quiet incidents are forwarded according to your settings.
- Updates the linked ServiceNow incident as the All Quiet incident changes.
- Applies to incidents from any source: observability, email, webhook, or ServiceNow via the inbound integration. The outbound integration operates on All Quiet incidents as configured. It does not require the incident to have originated in ServiceNow.
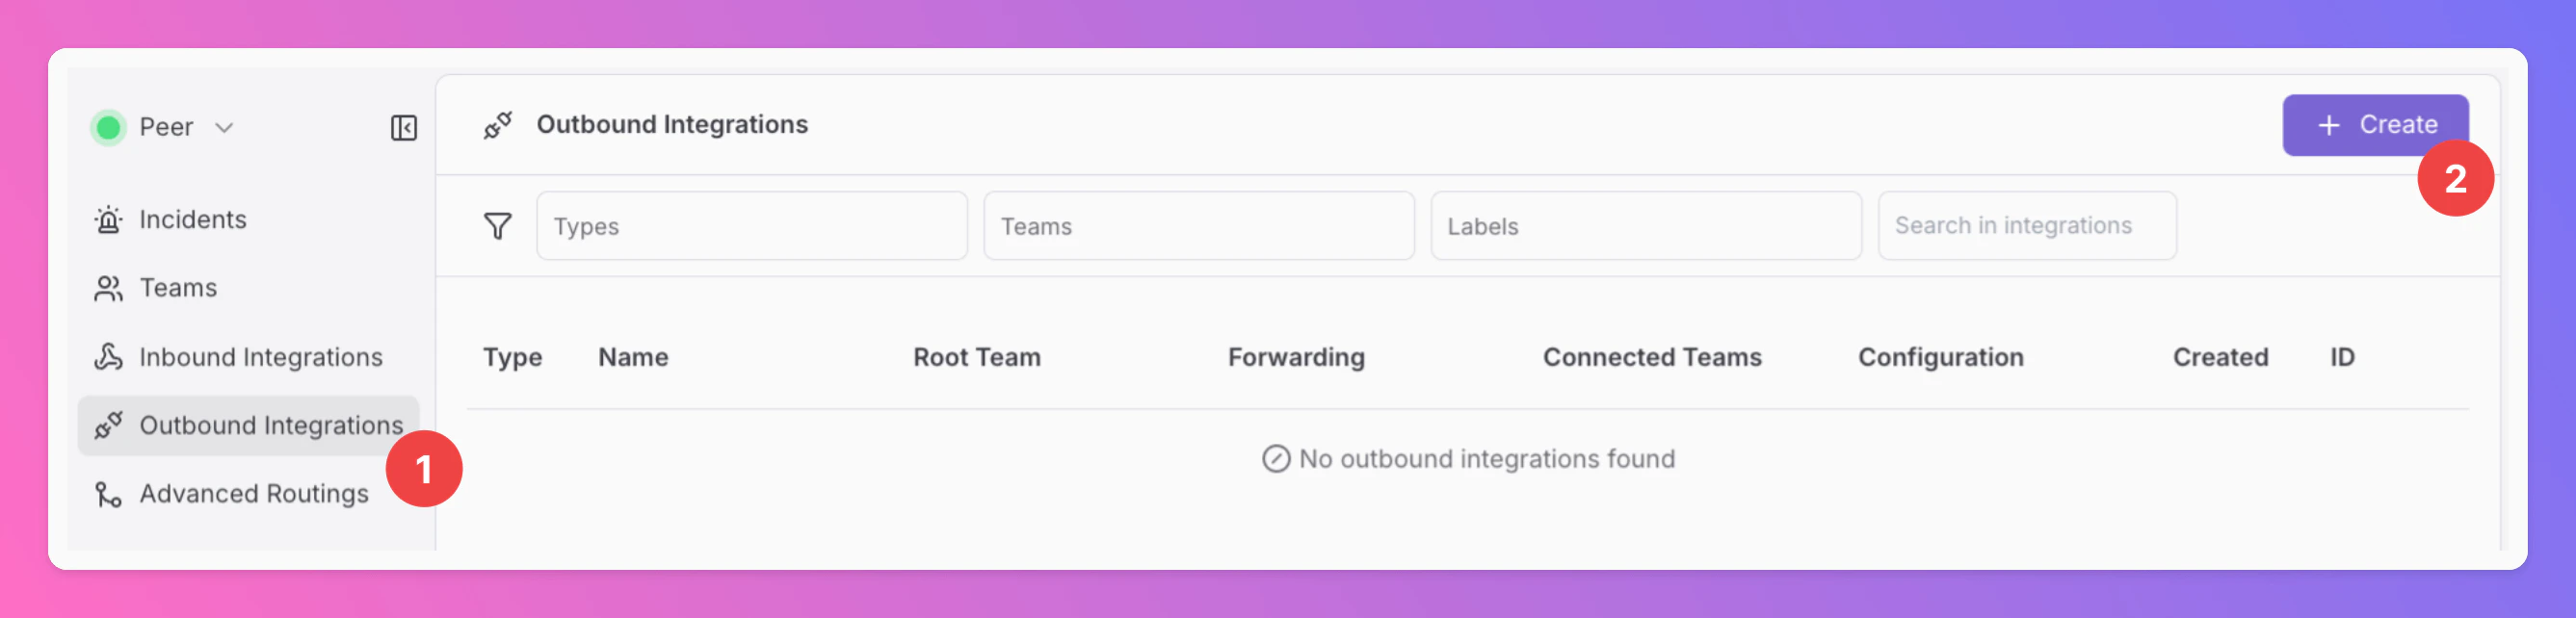
Create ServiceNow Outbound integration
- Open the
Outbound Integrationstab. - Click
+ Create.
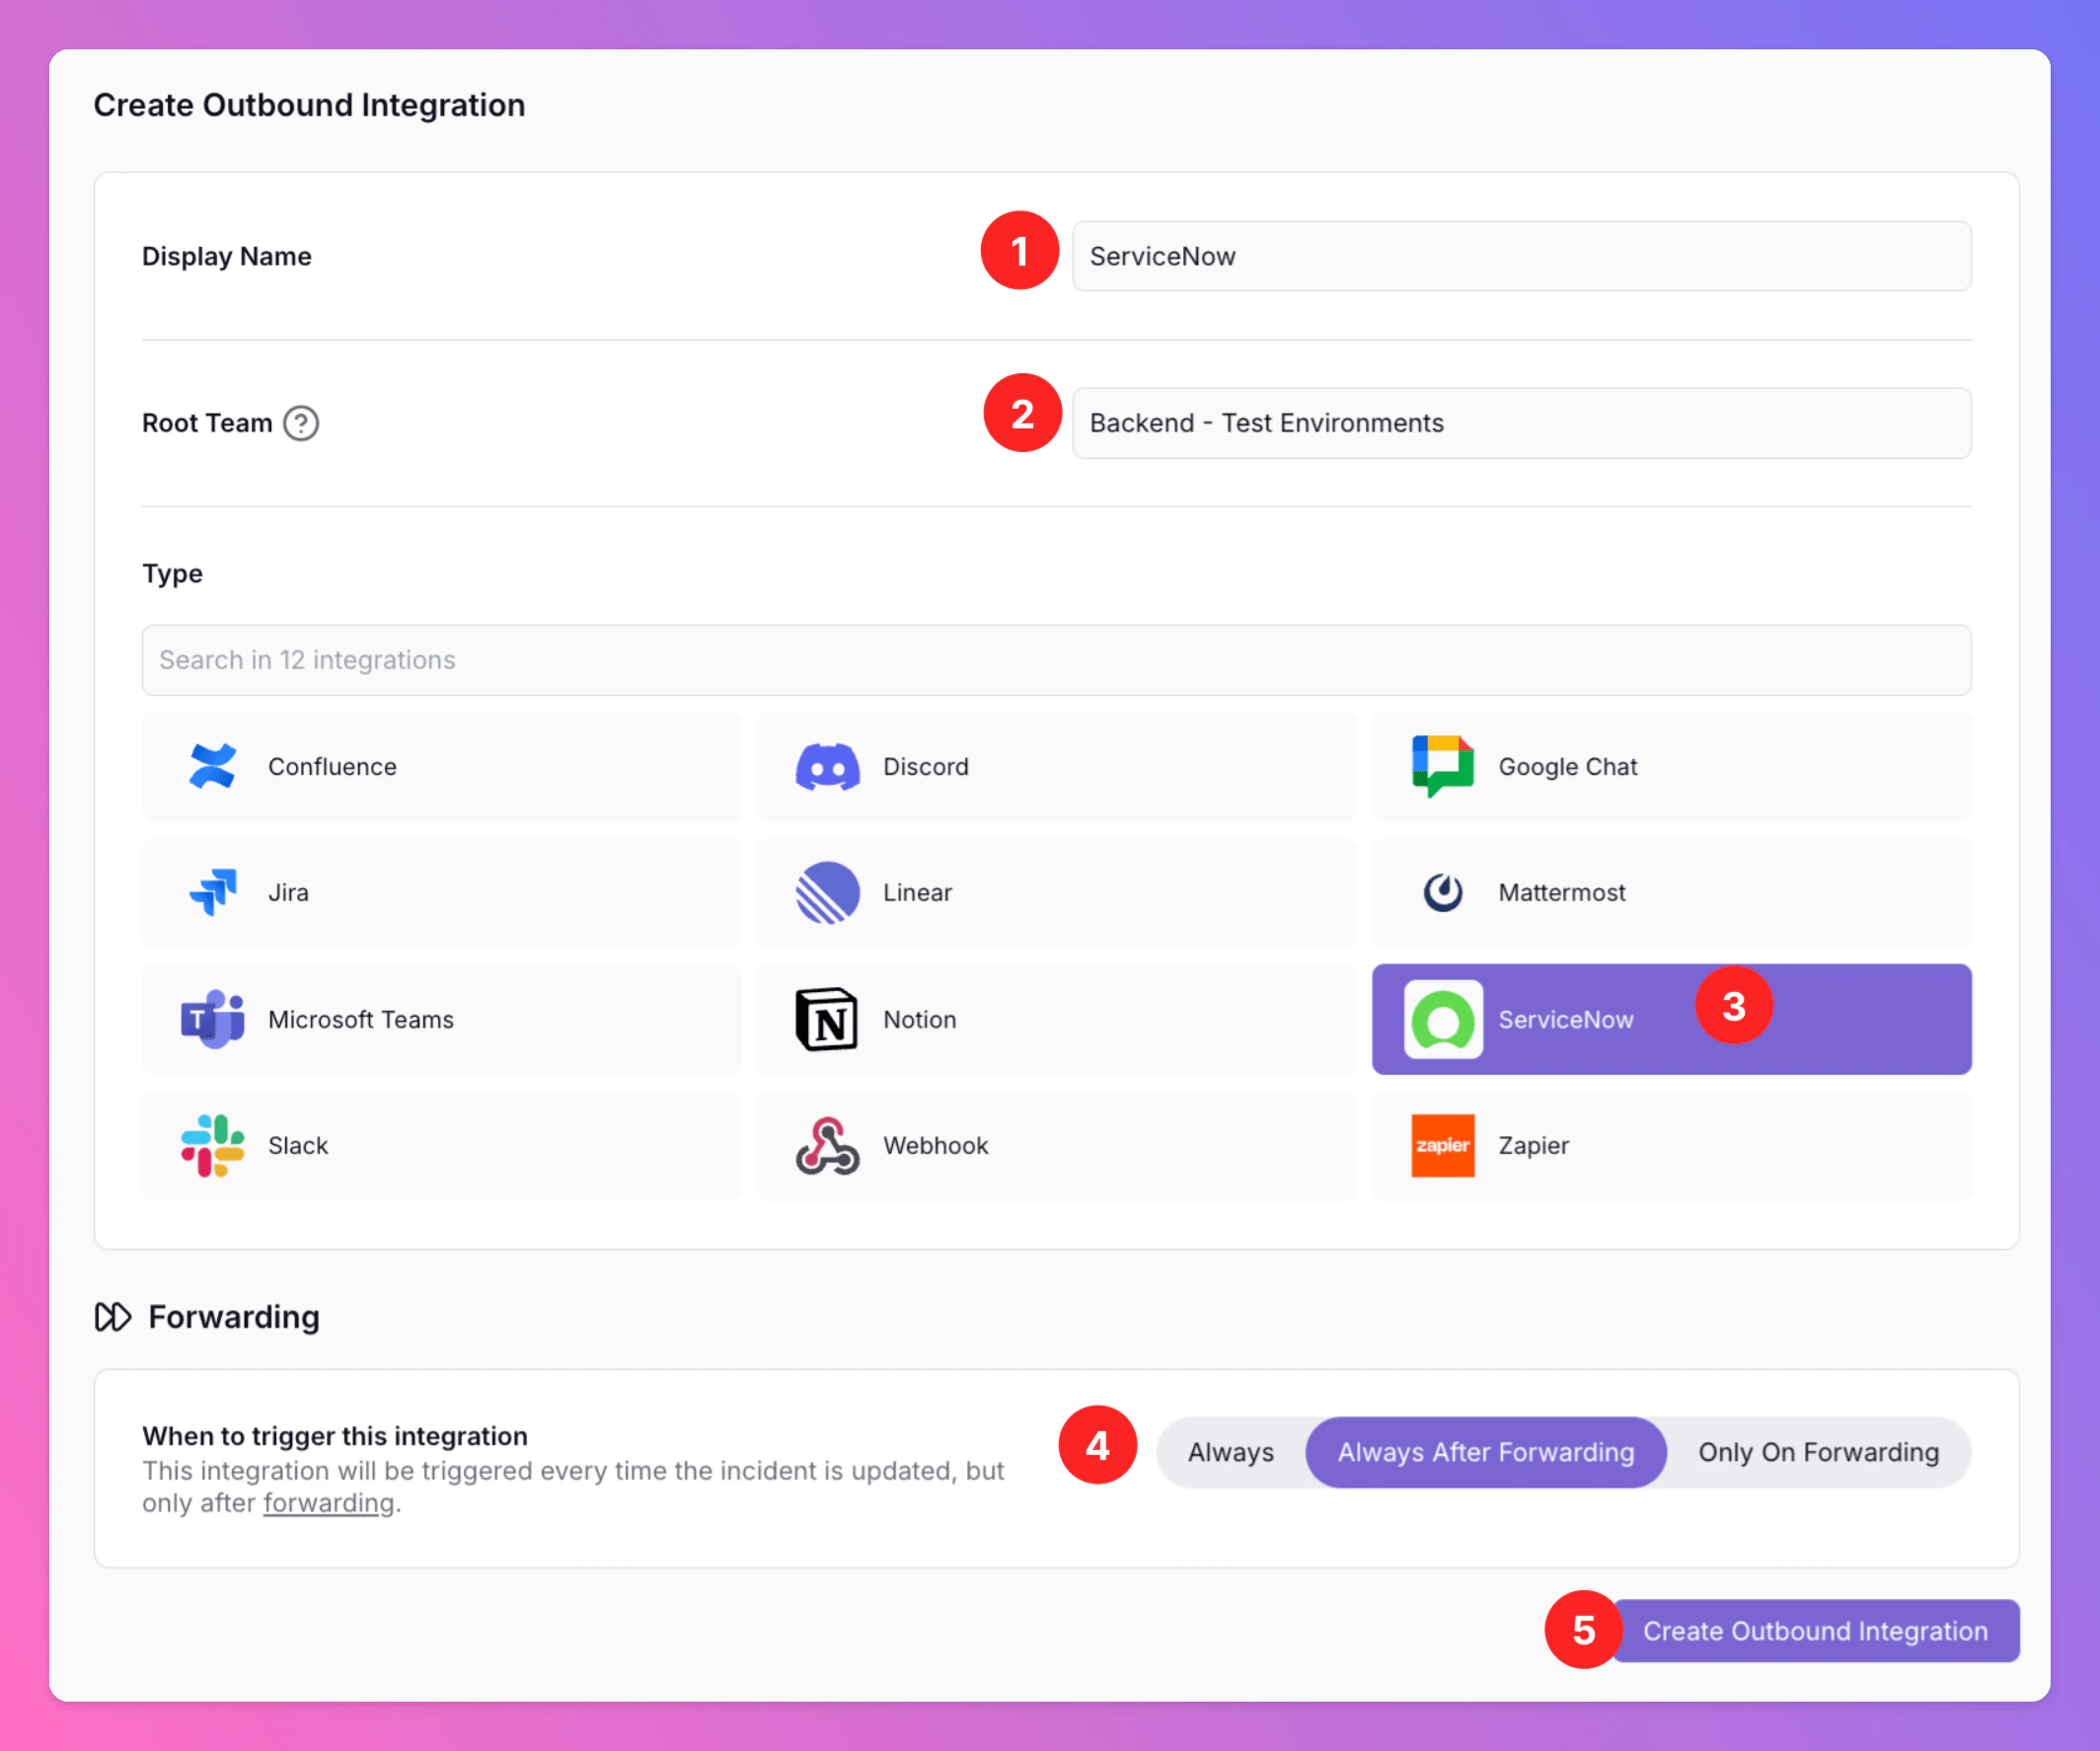
- Enter a Display Name (for example
ServiceNow). - Select a Root Team. For organizations on Pro or Enterprise, you can add further team connections where your plan allows.
- Choose ServiceNow as the integration type.
- Forwarding settings (same idea as other outbound integrations):
- Default:
Always After Forwarding— ServiceNow incidents are created when users manually forward incidents or when advanced routing forwards them automatically. - Alternative 1:
Always— forward all incidents to ServiceNow unless excluded by routing rules. - Alternative 2:
Only On Forwarding— forward a snapshot of the current incident history to ServiceNow in the moment users manually forward or if you set up advanced routing for your ServiceNow Outbound integration that automatically forwards incidents in specific scenarios. We will not send any incident updates to ServiceNow afterwards. 5Í. ClickCreate Outbound Integration.
- Default:
Step 2 — Add your ServiceNow instance URL and authentication details
Goal: All Quiet uses Basic authentication (username + password) to call the ServiceNow Table API (/api/now/table/...): read and write rows on your table (default incident), and optionally read sys_choice so the All Quiet UI can load dropdown values for state, close code, and severity fields.
Create the All Quiet user in ServiceNow
- In ServiceNow, use the filter navigator (usually top left). Type users, then open User Administration → Users.
- Click New.
- Fill User ID (this is the username you’ll later enter in your All Quiet ServiceNow Outbound integration), Name, and set a Password if the instance uses local authentication — or follow your organization’s SSO and password policy.
- Save the user.
- Open the Roles tab (or the Roles related list) and assign roles — see Roles below.
Optional: if your organization uses Web service access only for integration accounts, configure that according to your policy (not always required).
What access the integration needs
Roles
Minimum for a real instance: A custom role (or clone of a small role) whose ACLs allow Table API read/write on incident (and your configured table) and read onsys_choice — exact names depend on your instance; your ServiceNow admin should confirm.
Common “it works” combo on many instances (still confirm with your admin): itil — typically covers incident operations used by agents and is often enough for Table API on incident if REST access is not blocked by other policies.
If choice lists fail with HTTP 403 on sys_choice: an admin must grant read on sys_choice (direct ACL or an additional role that includes that read). Roles that include broader dictionary or choice access vary by instance — do not assume a second generic role name; use ACLs or admin guidance.
After creating the user — connect from All Quiet
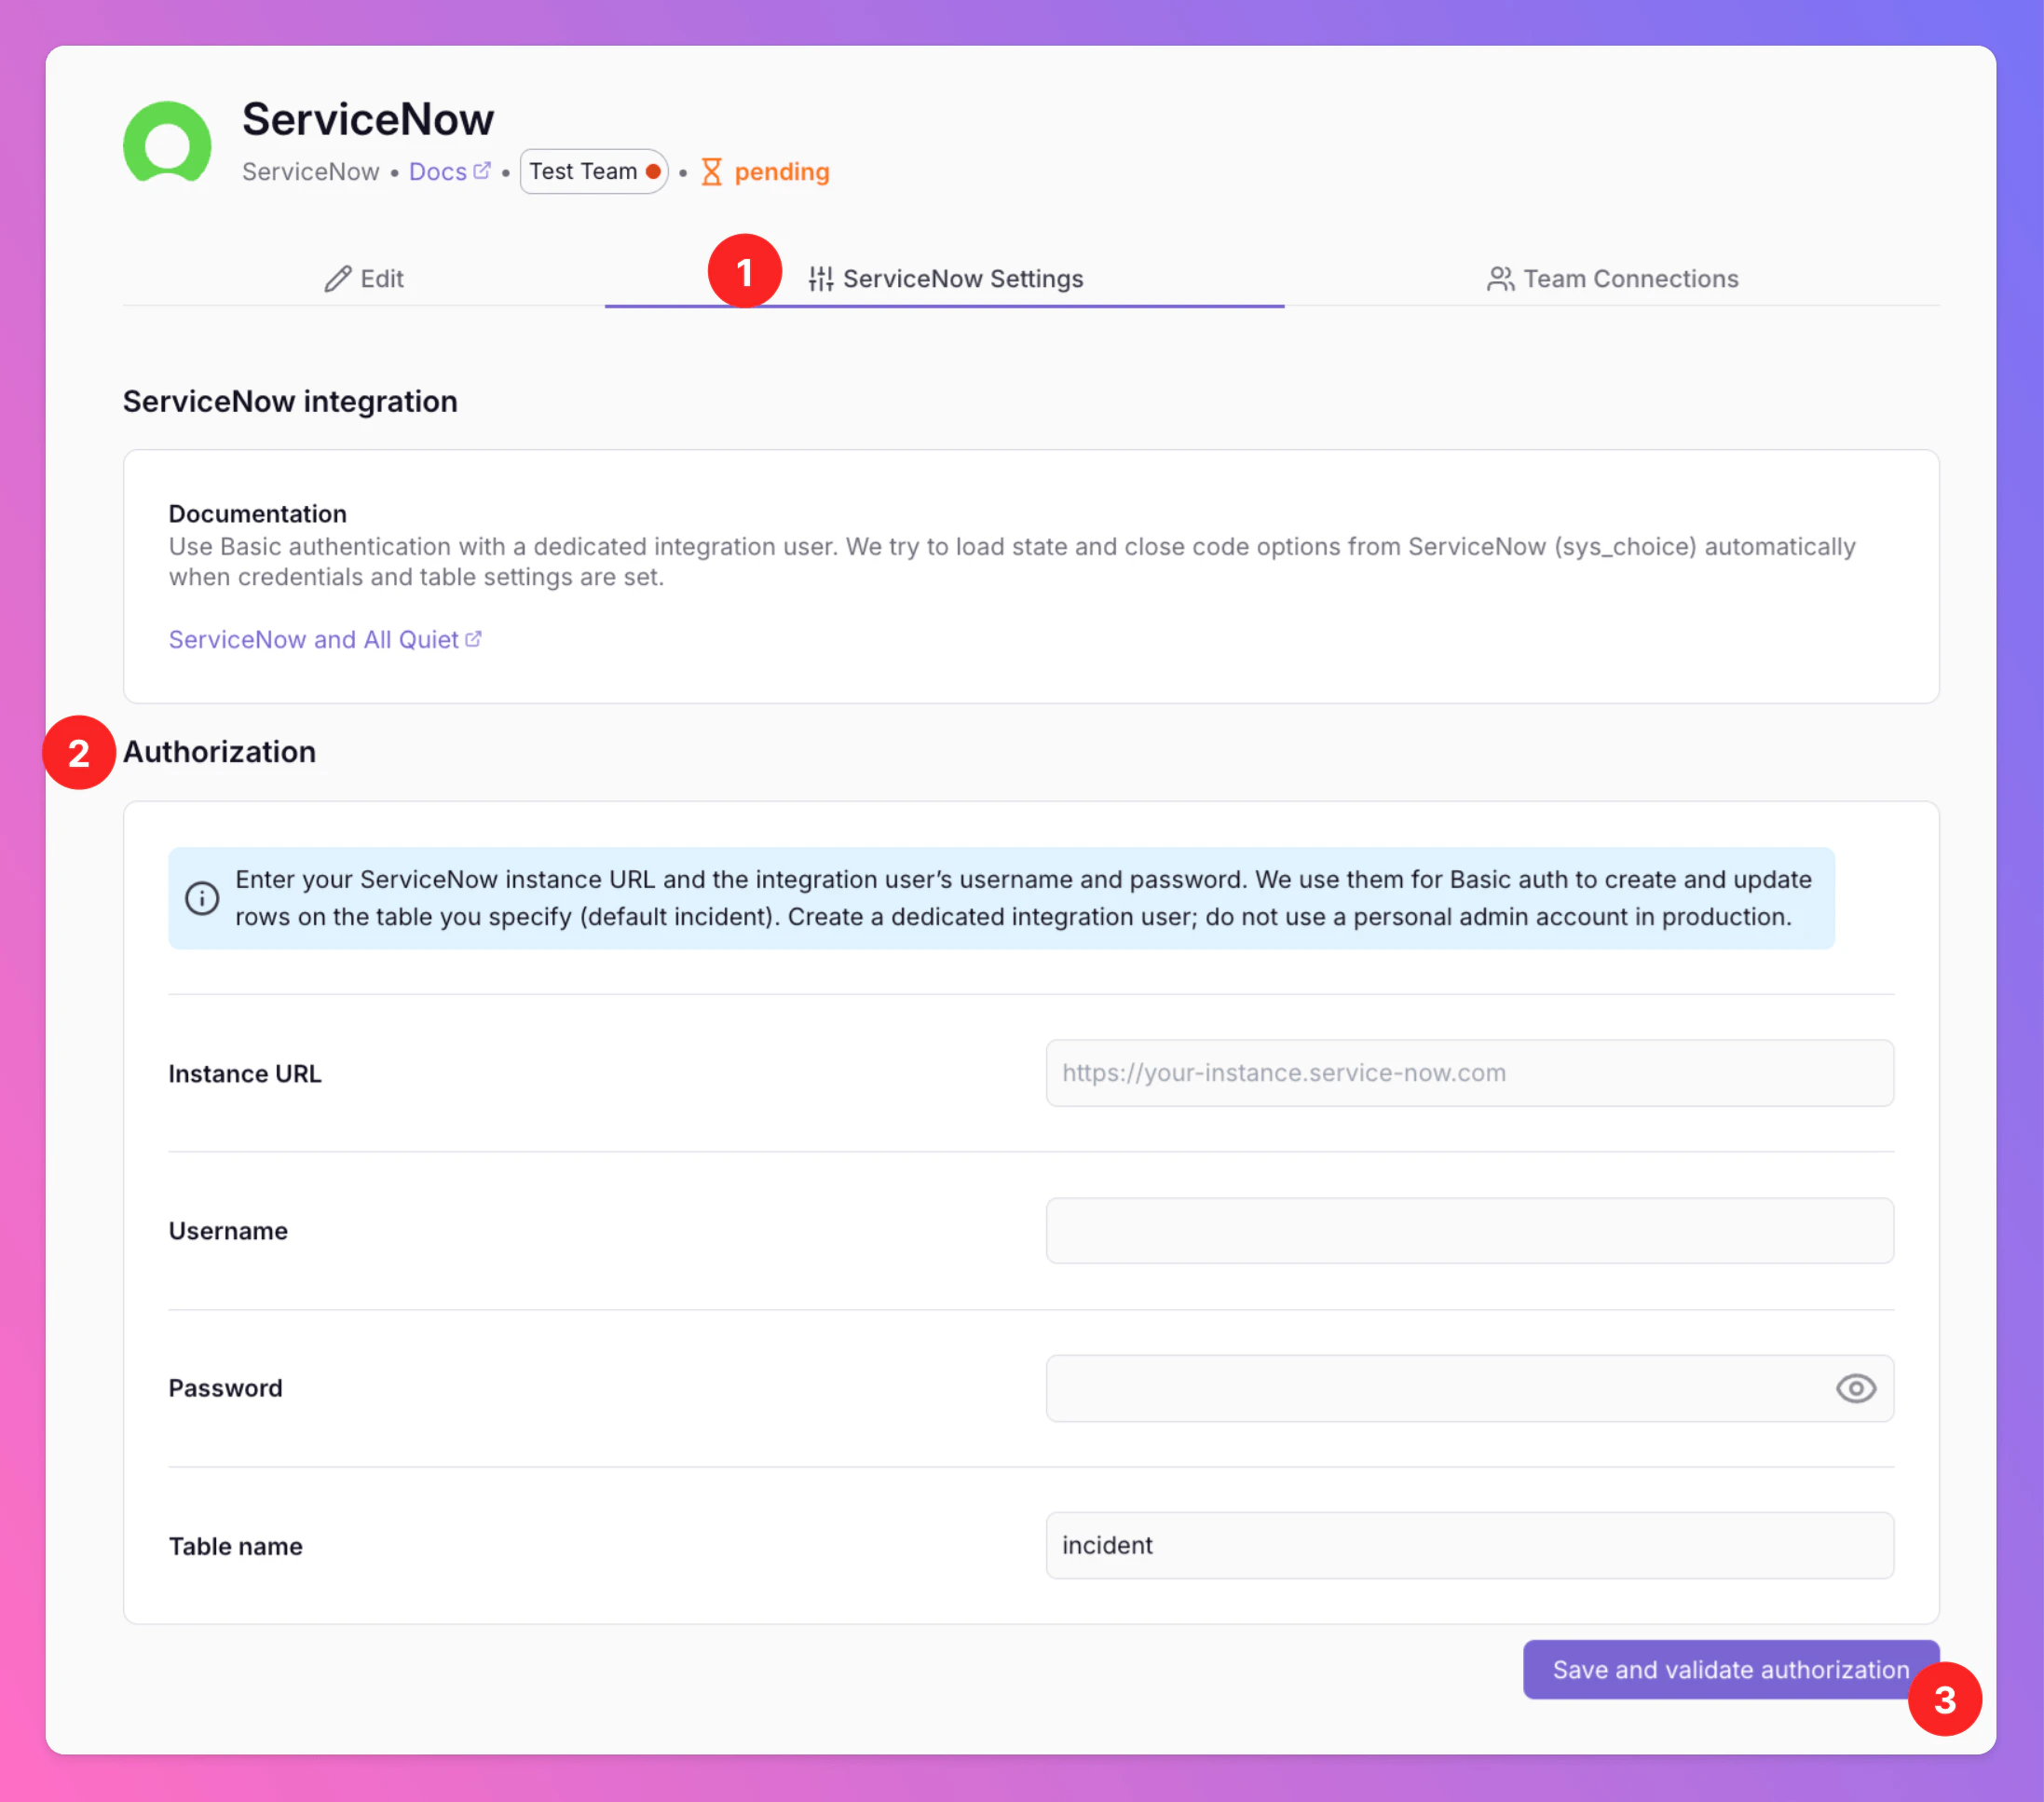
- In All Quiet, open the team’s ServiceNow outbound integration → ServiceNow Settings → Authorization (or equivalent settings for instance credentials).
- Enter Instance URL (for example
https://your-instance.service-now.com), Username (the User ID you created in ServiceNow), Password, and Table name (defaultincident). - Click Save and Test Connection.
sys_choice and adjust ServiceNow read access as described above.
In the Edit tab you can adjust forwarding and other general options for this integration.
Configure updates and sync
On the integration’s ServiceNow Settings, configure how All Quiet maps to your ServiceNow table for create and update. Defaults assume theincident table and standard field names; change them if your instance differs.
When you also use ServiceNow Inbound, align these rules with your inbound flow so you do not create conflicting loops — the product settings define which system wins for each transition.
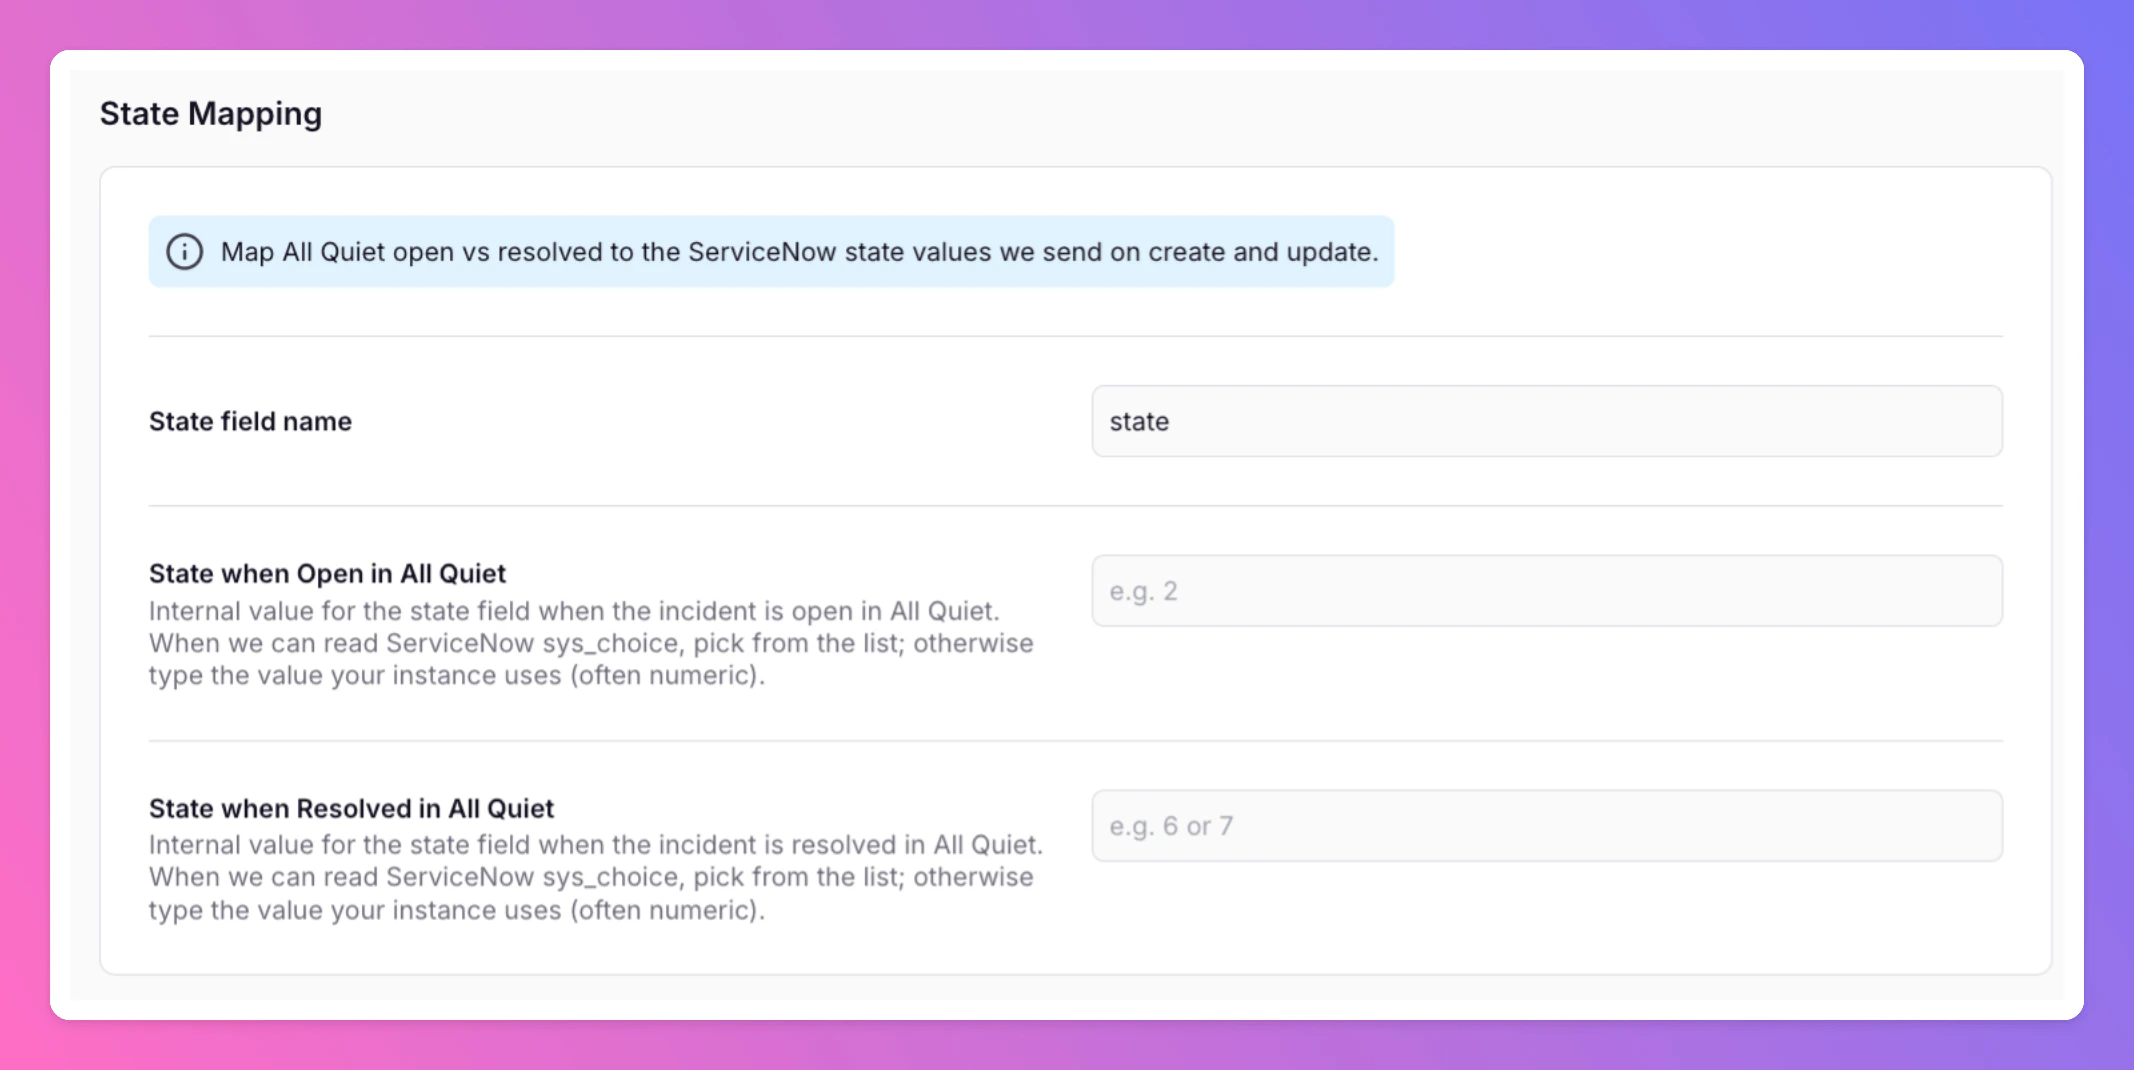
State Mapping
Mapping applies to thestate field by default.
State when Open in All QuietInternal ServiceNow value for the state field when the incident is open in All Quiet. When All Quiet can read ServiceNow
sys_choice, pick from the list; otherwise enter the value your instance uses (often numeric).
State when Resolved in All QuietInternal ServiceNow value for the state field when the incident is resolved in All Quiet. Same as above: use the dropdown when
sys_choice is available, or type the internal ServiceNow value your instance expects.
Resolving Mapping
ServiceNow usually requires additional information when resolving an incident. We will send these values to ServiceNow when you resolve an incident in All Quiet. Close code field nameOn incident, this is usually
close_code. Change it if your table uses another field for the resolution reason. The standard is close_code.
Close notes field nameOn incident, this is usually
close_notes. Many ServiceNow data policies require close notes when resolving. The standard is close_notes.
Close code when Resolved in All QuietResolution reason sent when resolving (for example
incident.close_code). Required. When sys_choice is readable, pick from the list; otherwise enter the internal choice value.
Close notes when Resolved in All QuietFallback text for the close-notes field when resolving (for example
incident.close_notes) if the resolve action in All Quiet has no comment. If the user enters a comment while resolving, that text is sent instead. A typical default is Resolved from All Quiet.

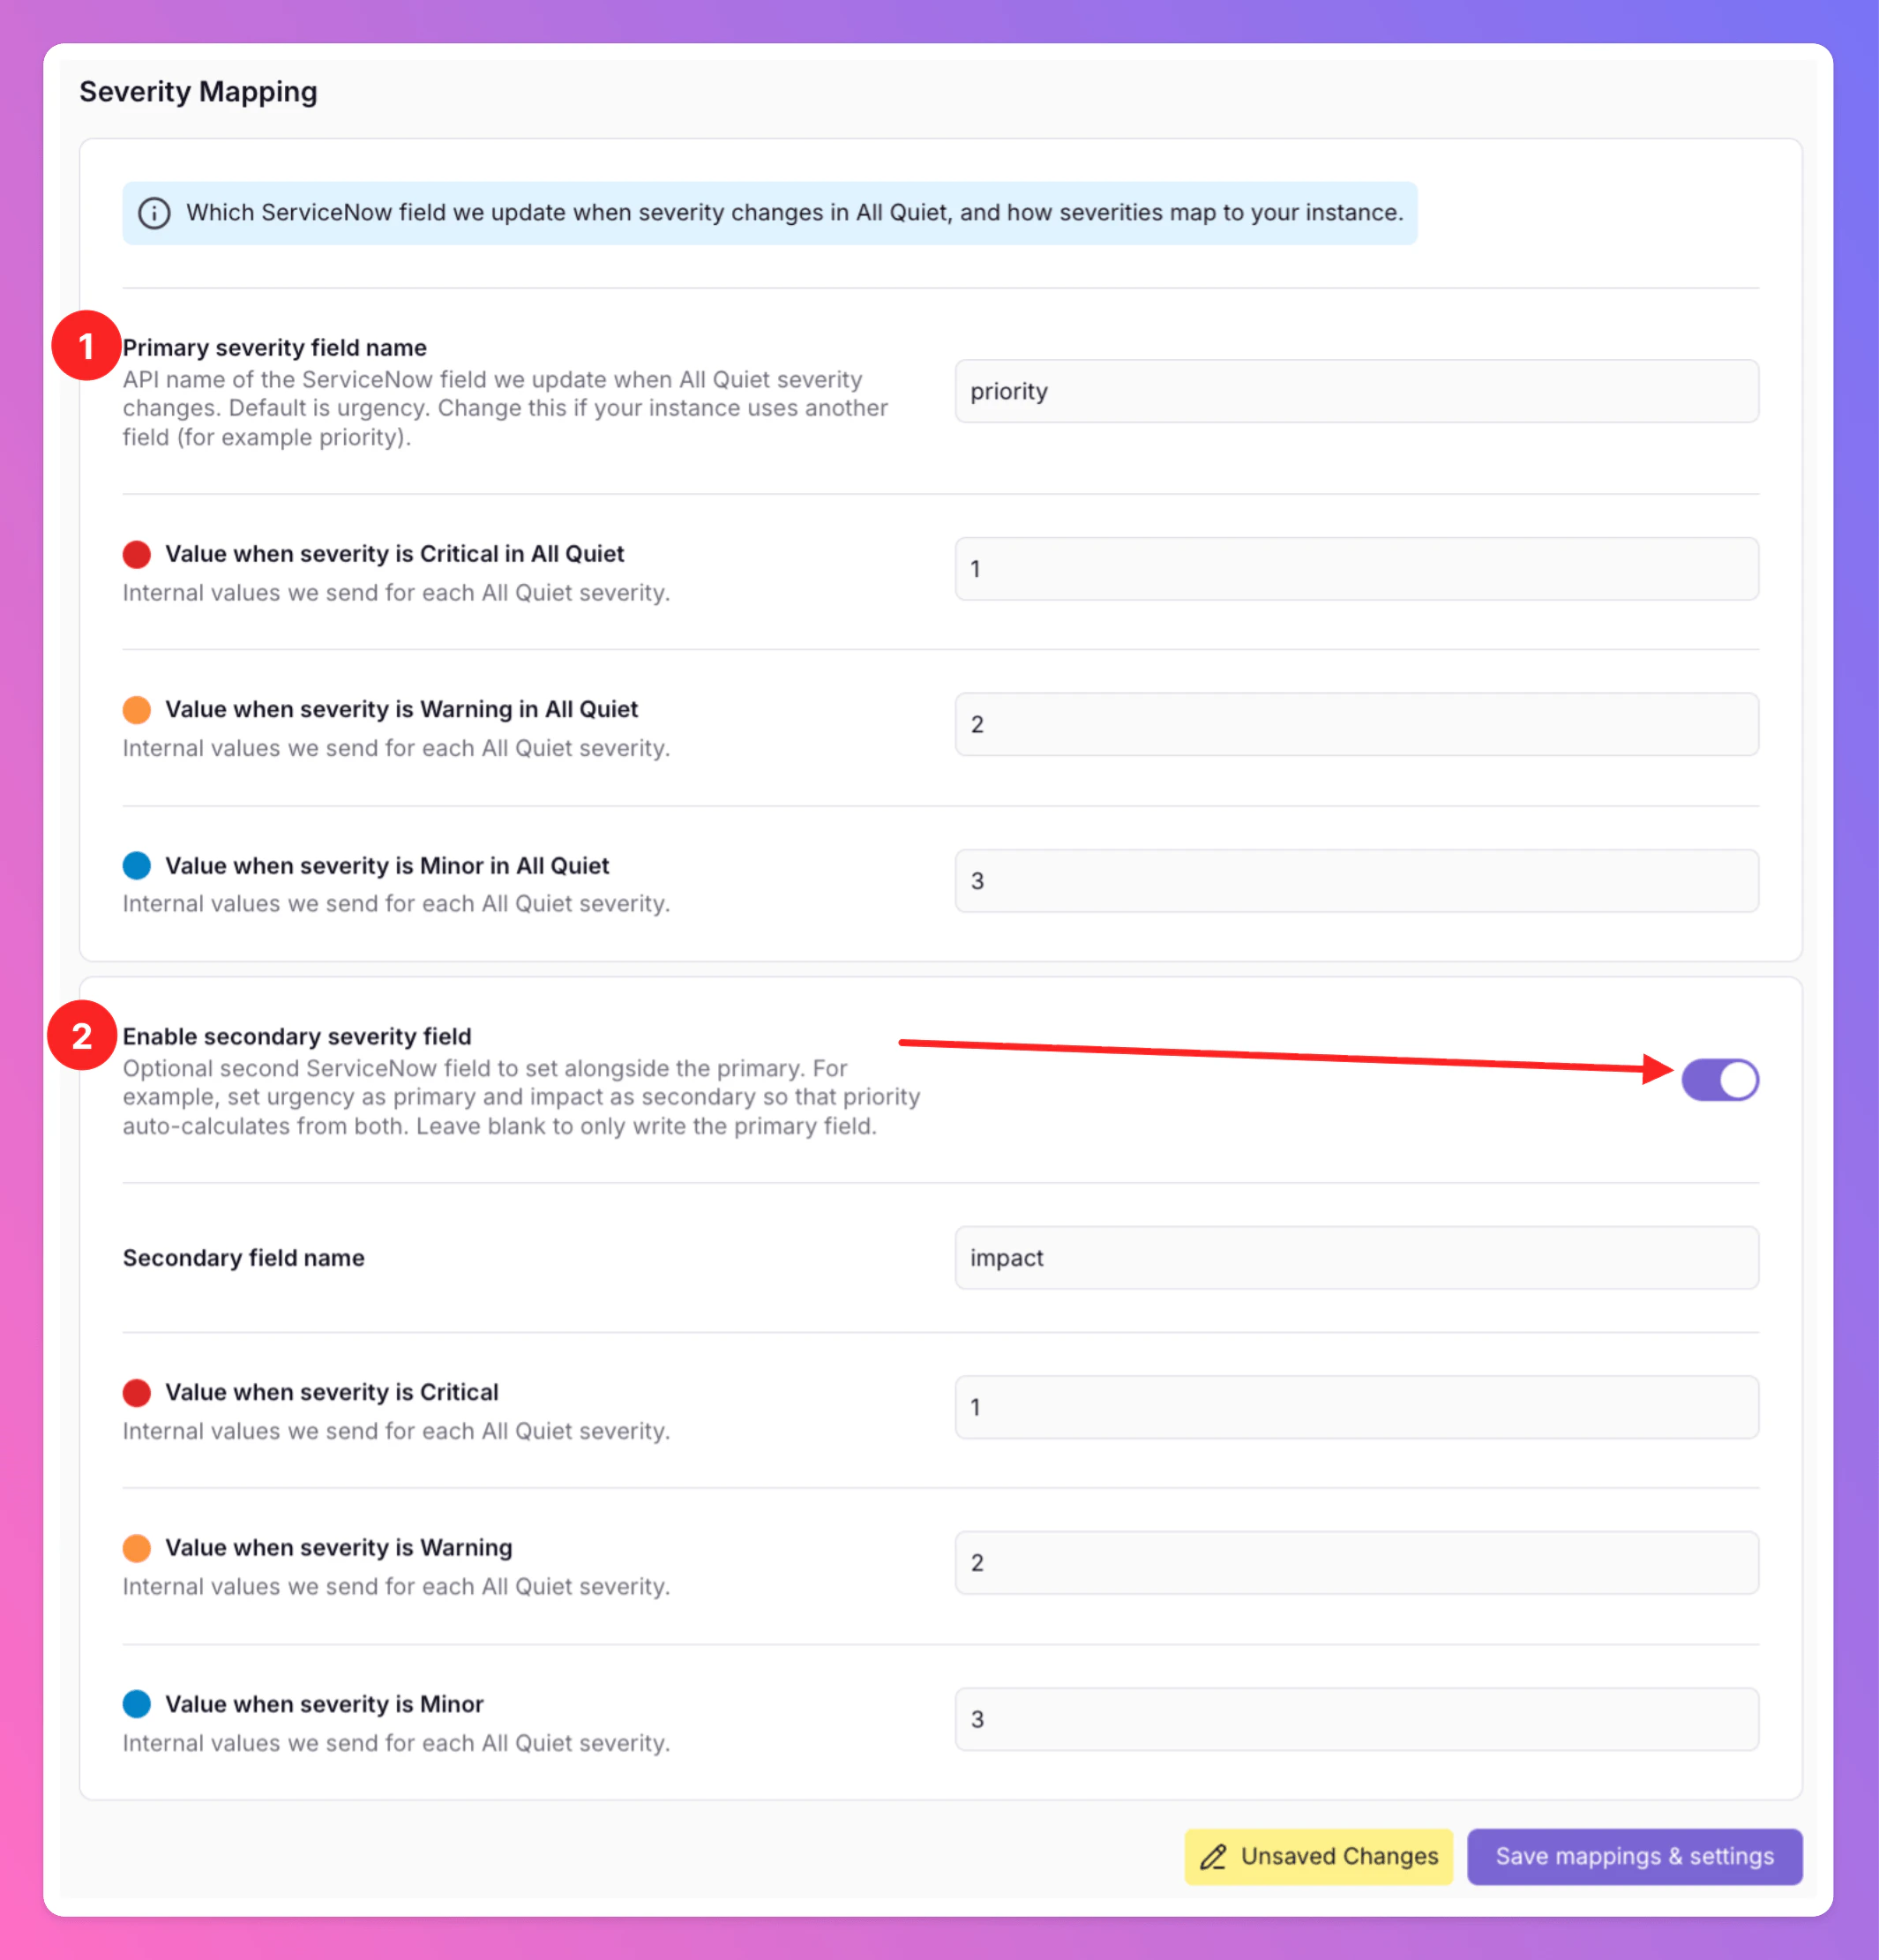
Severity mapping
All Quiet uses a primary + optional secondary field model for severity:- Primary field — The main ServiceNow field we update from All Quiet severity. Default API name:
urgency. Change it if your process uses another primary field. - Secondary field (optional) — Enable with a toggle in the UI (for example
impact). When enabled, we write both the primary and secondary fields on create and whenever severity changes in All Quiet.
urgency and impact as primary and secondary fields, it lets ServiceNow derive priority from its urgency / impact matrix instead of writing priority directly, which matches how many instances calculate incident priority.
If the secondary field is off, only the primary field is updated. Choice lists for each field still come from
sys_choice when your integration user can read them; otherwise enter internal values per field.urgency)
Internal values we send for each All Quiet severity to the primary field by default. When you enable a secondary field, configure its mappings in the UI as well (your instance’s valid values for that field may differ from urgency).
ServiceNow is now integrated with All Quiet. Depending on your setup, All Quiet incidents can now be forwarded manually to your ServiceNow Instance or automatically create incidents in ServiceNow.
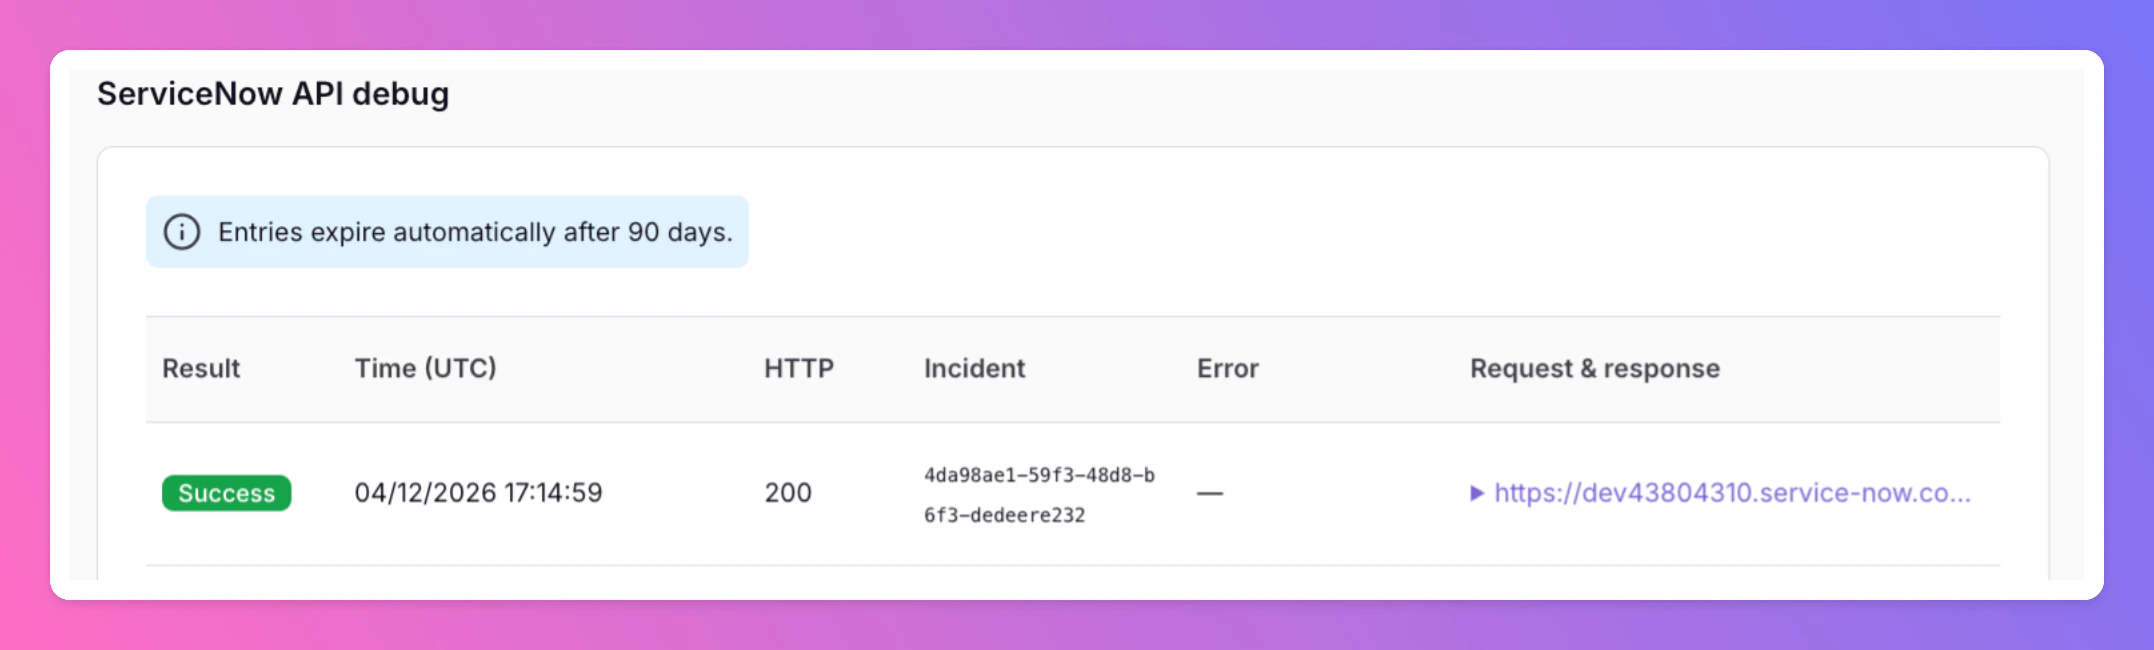
ServiceNow API Debugging
If you encounter issues with the integration, you can debug the API calls by looking at the bottom of yourServiceNow Settings tab in All Quiet. You will find the API calls and their responses there.
This view is separate from the integration History tab, which records general outbound integration activity across all operations (same as other outbound integrations).
Troubleshooting
Team Administrators, Organization Administrators, and Organization Owners can troubleshoot this integration using the History tab (Outbound History) on the integration details page. See Outbound History for what is logged, who can access it, and how to read outcomes. This is separate from ServiceNow API Debugging on the integration settings tab. For broader checks when outbound tools do not fire, see Outbound integrations — Troubleshooting and advanced routing.Related
- ServiceNow Inbound — open and resolve All Quiet incidents from ServiceNow
- Outbound Integrations — forwarding modes and concepts
- Advanced routing — control which incidents reach ServiceNow