Find the list of all built-in inbound integrations at the bottom of this page.
- Create the integration
- Receiving a payload
- Mapping payload attributes to incidents
Create Inbound Integration
Only Team Administrators, Organization Administrators and Organization Owners have the permissions to create and edit Integrations.
Call Routing Numbers are an exception: only Organization Administrators and Organization Owners can create them. Team Administrators can edit existing numbers whose Root Team is a team they administer. See Live Call Routing.
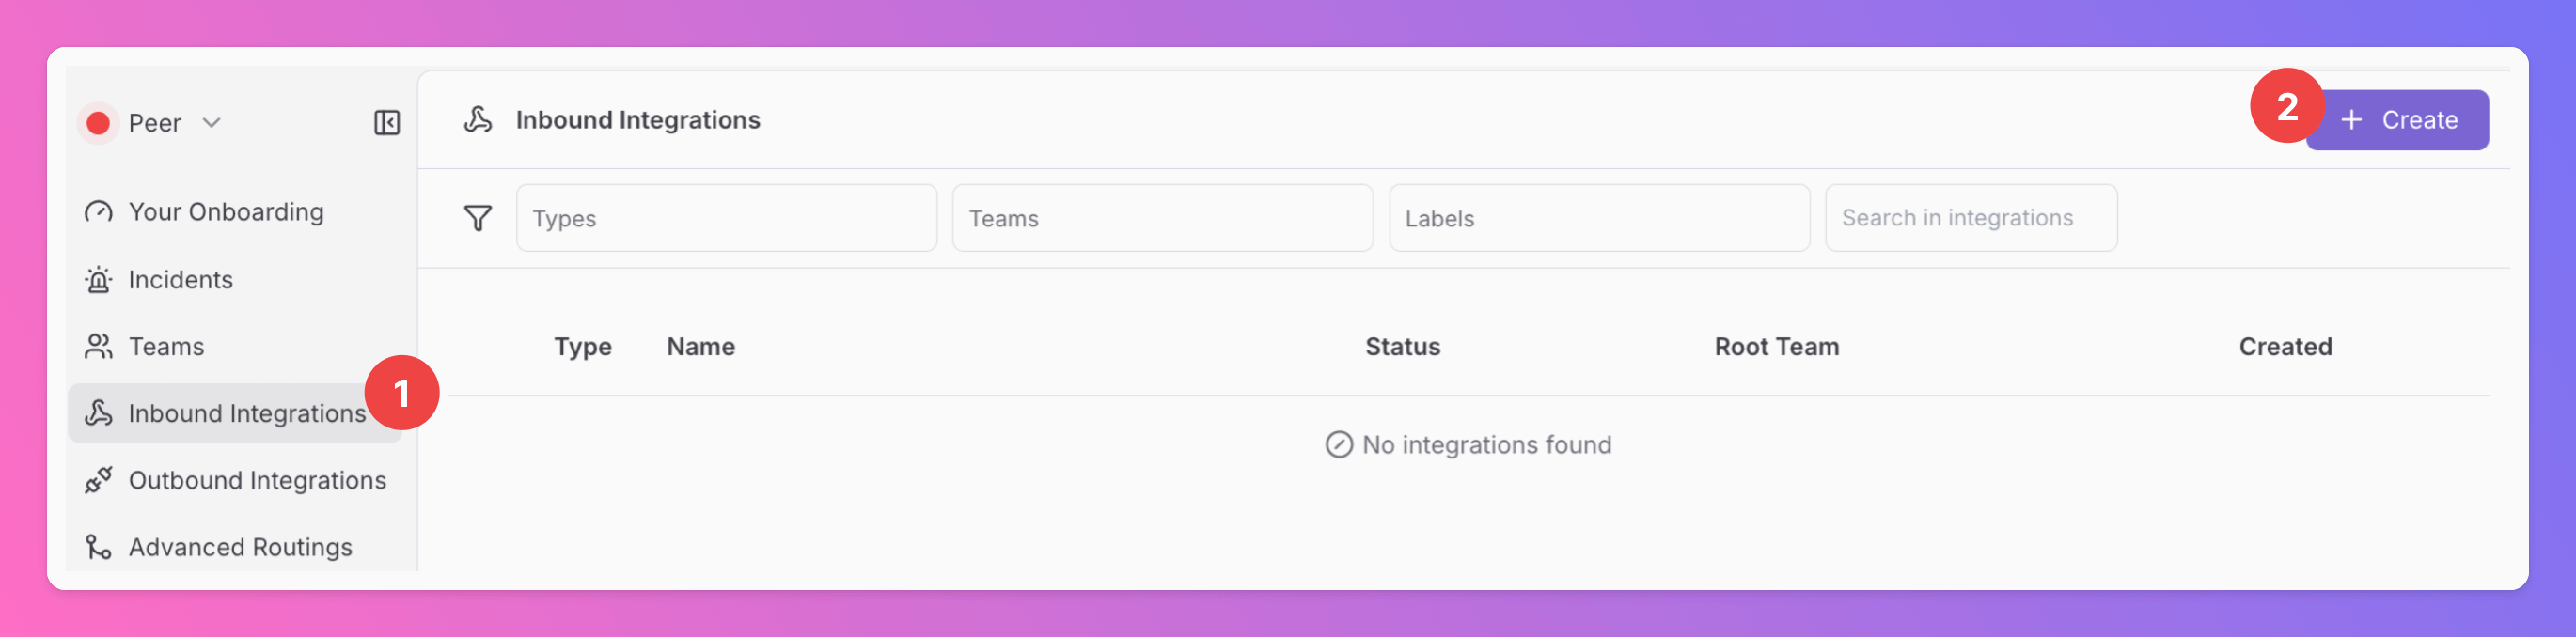
To create a new integration,
- navigate to the
Inbound Integrationstab. - Click on
+ Create.
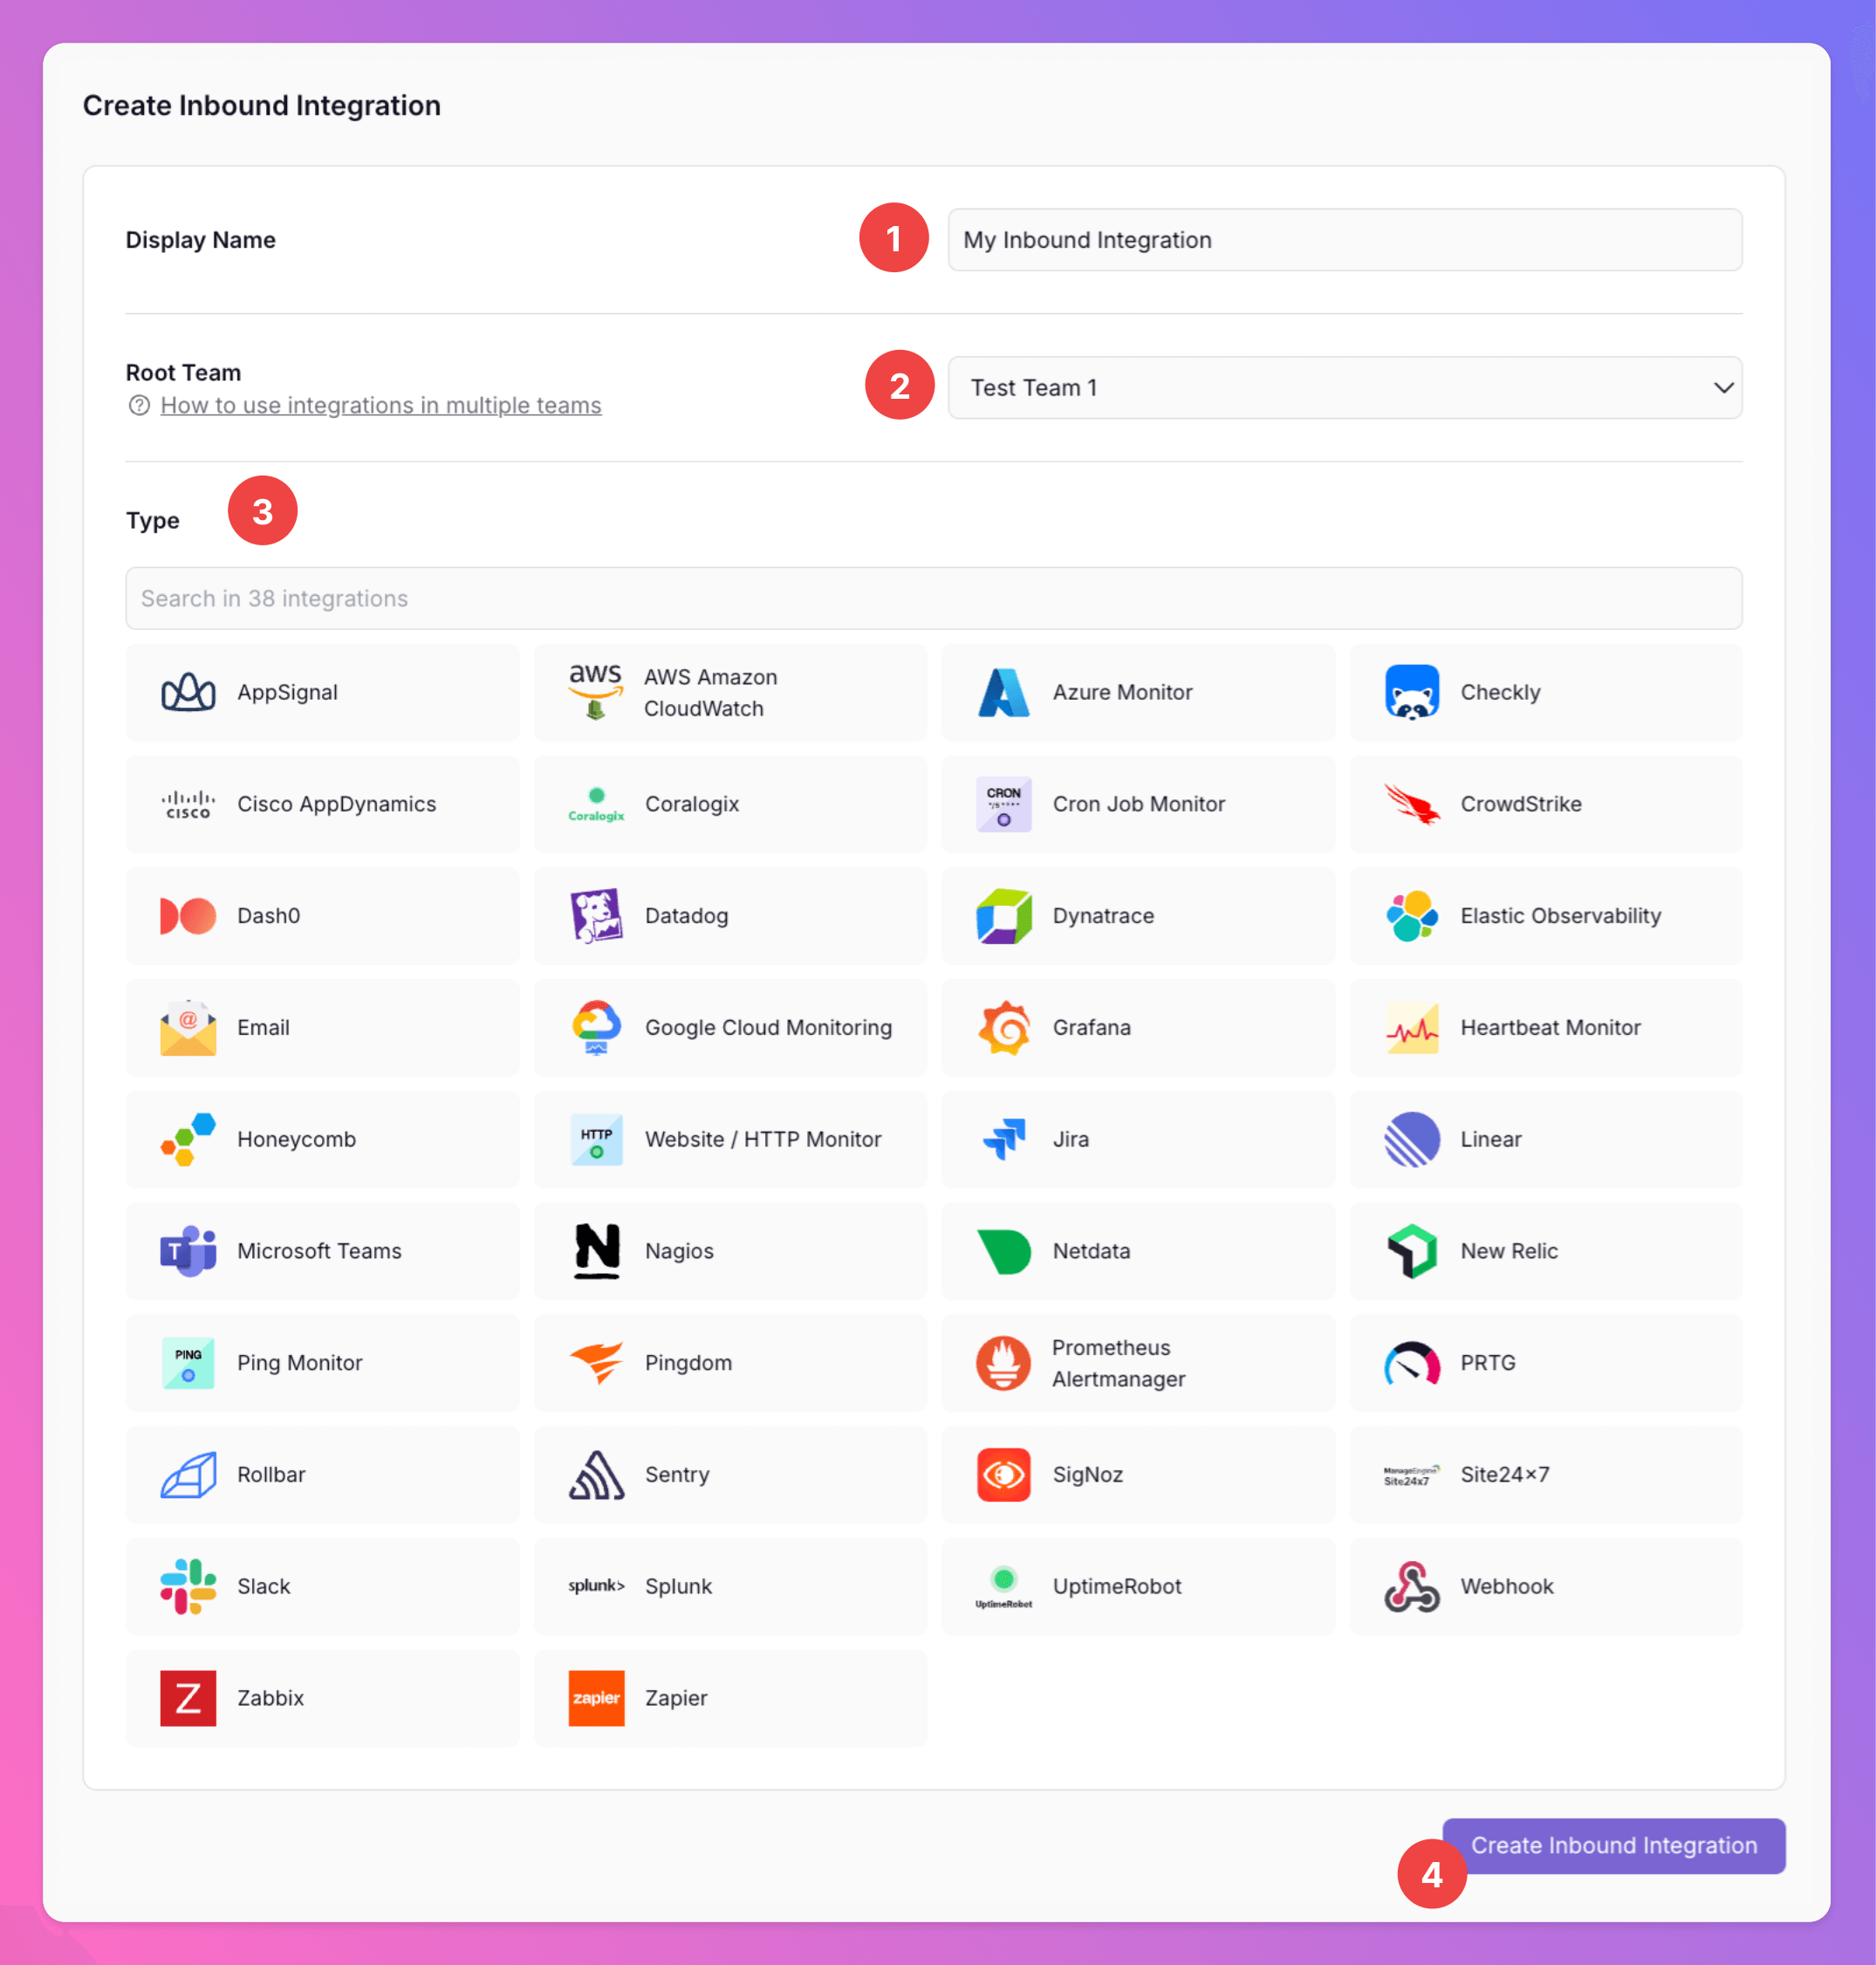
- Give your integration a
Display Name, such as “My Inbound Webhook”. - You’ll also need to choose which team the integration should belong to, as this can’t be changed later.
- Select the type of integration. Keep in mind that the integration type can’t be changed later.
- Click
Create Inbound Integration
- The Edit tab, in which you can find some generic information about your integration.
- Receiving a payload by connecting All Quiet to your Inbound Integration using a unique Webhook URL.
- Mapping payload attributes to All Quiet incidents.
- Later, you may add Snooze settings
- and Maintenance Windows for your integration.
- Last, for each integration you can find your Incident KPIs in the
Incidentstab.
Webhook Integration.
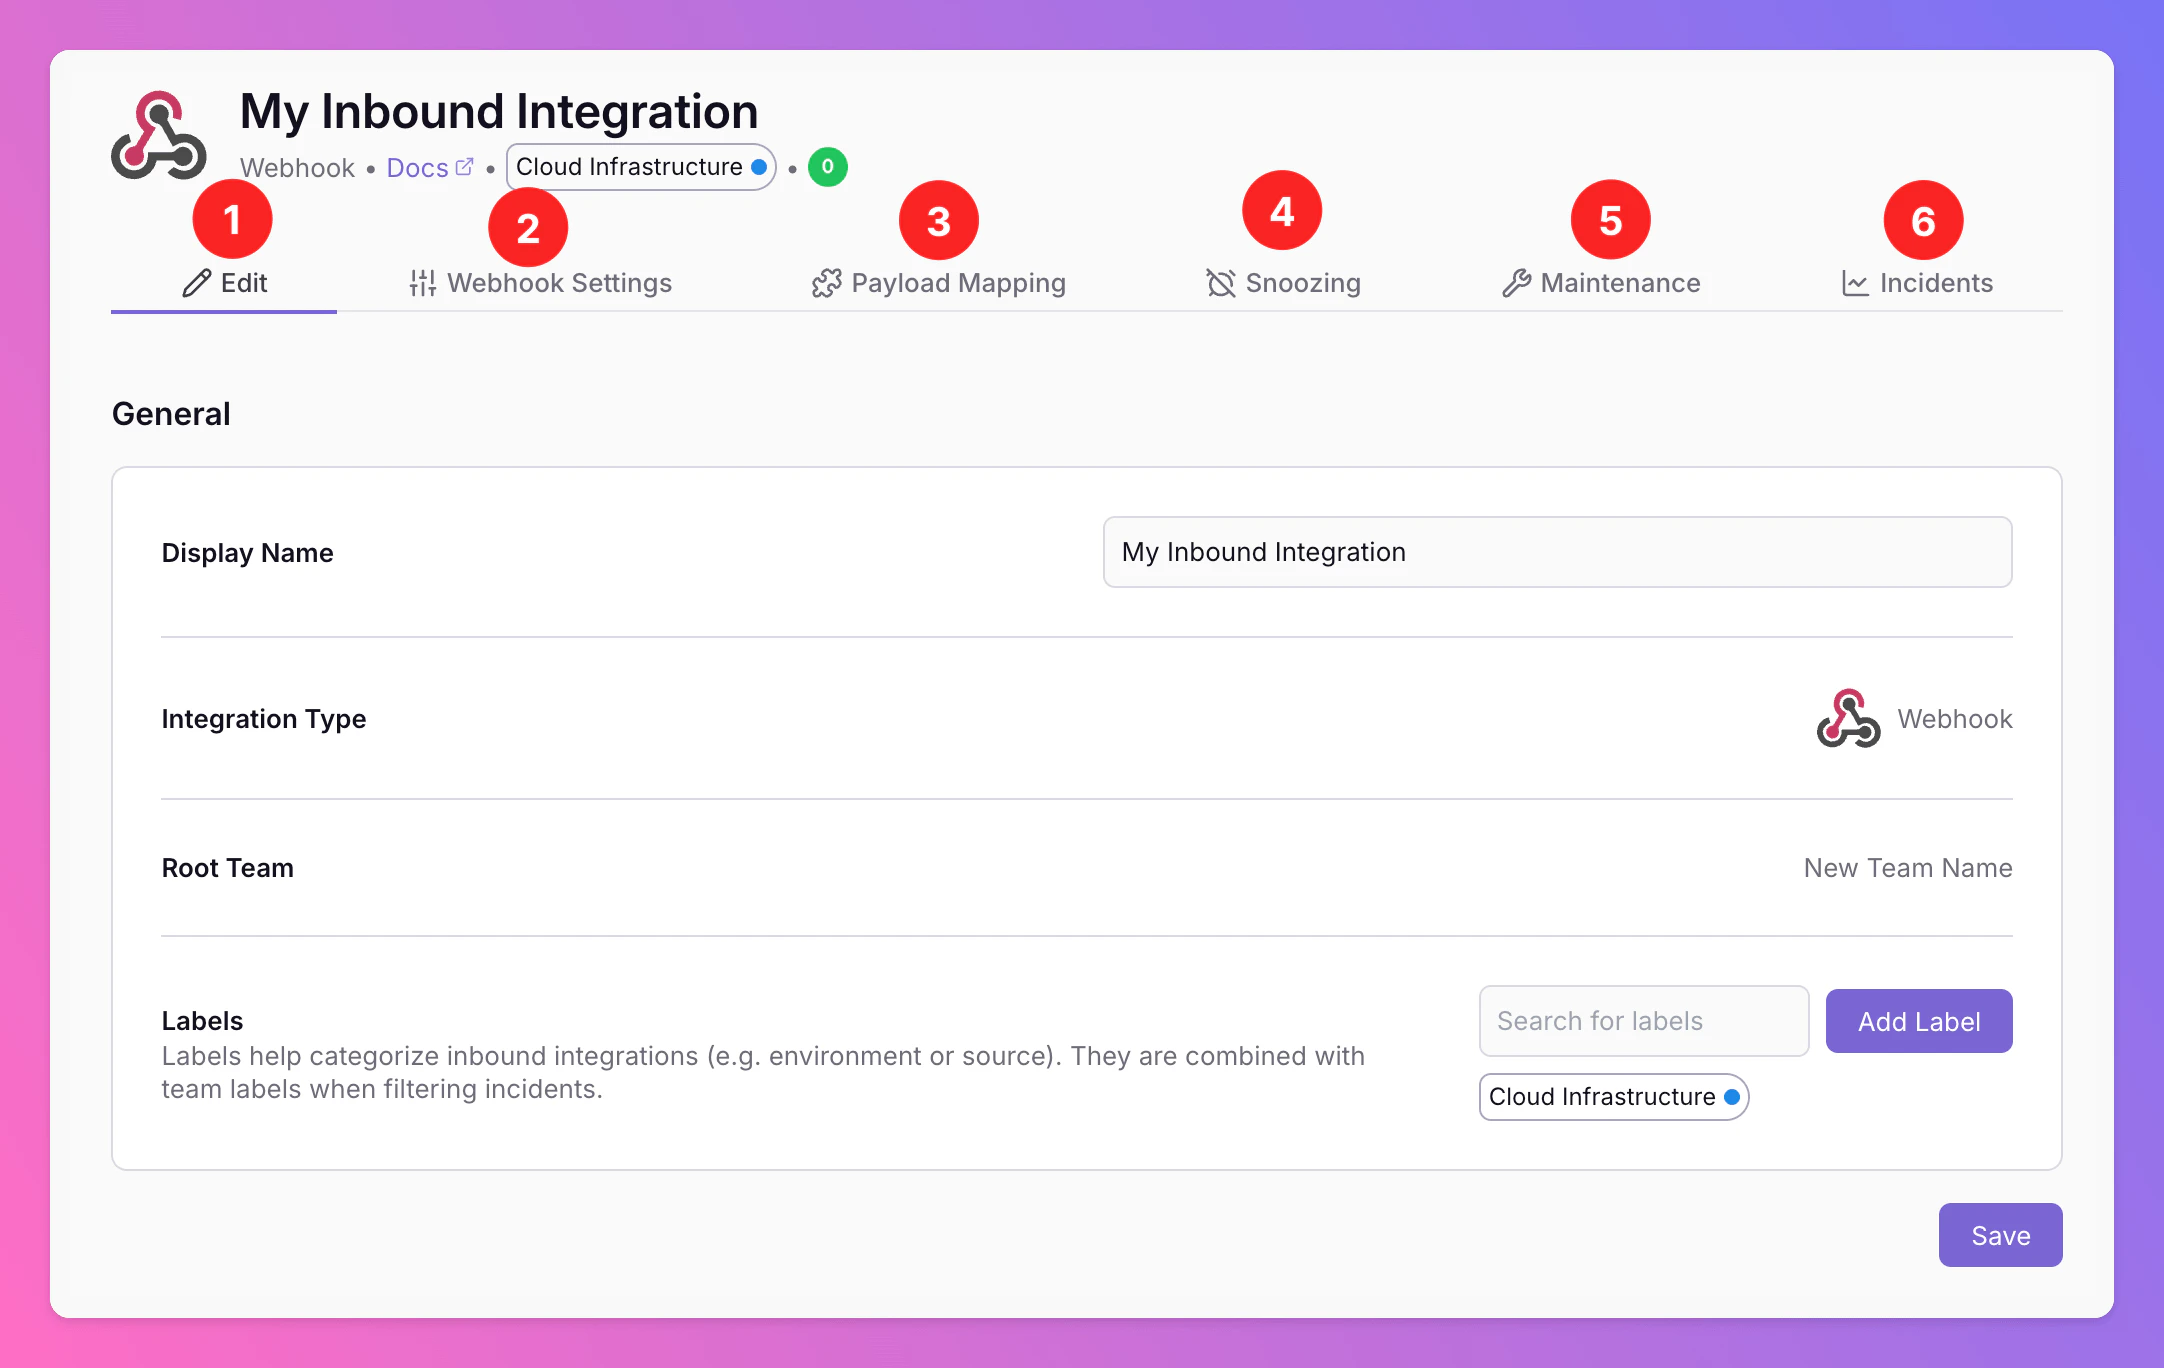
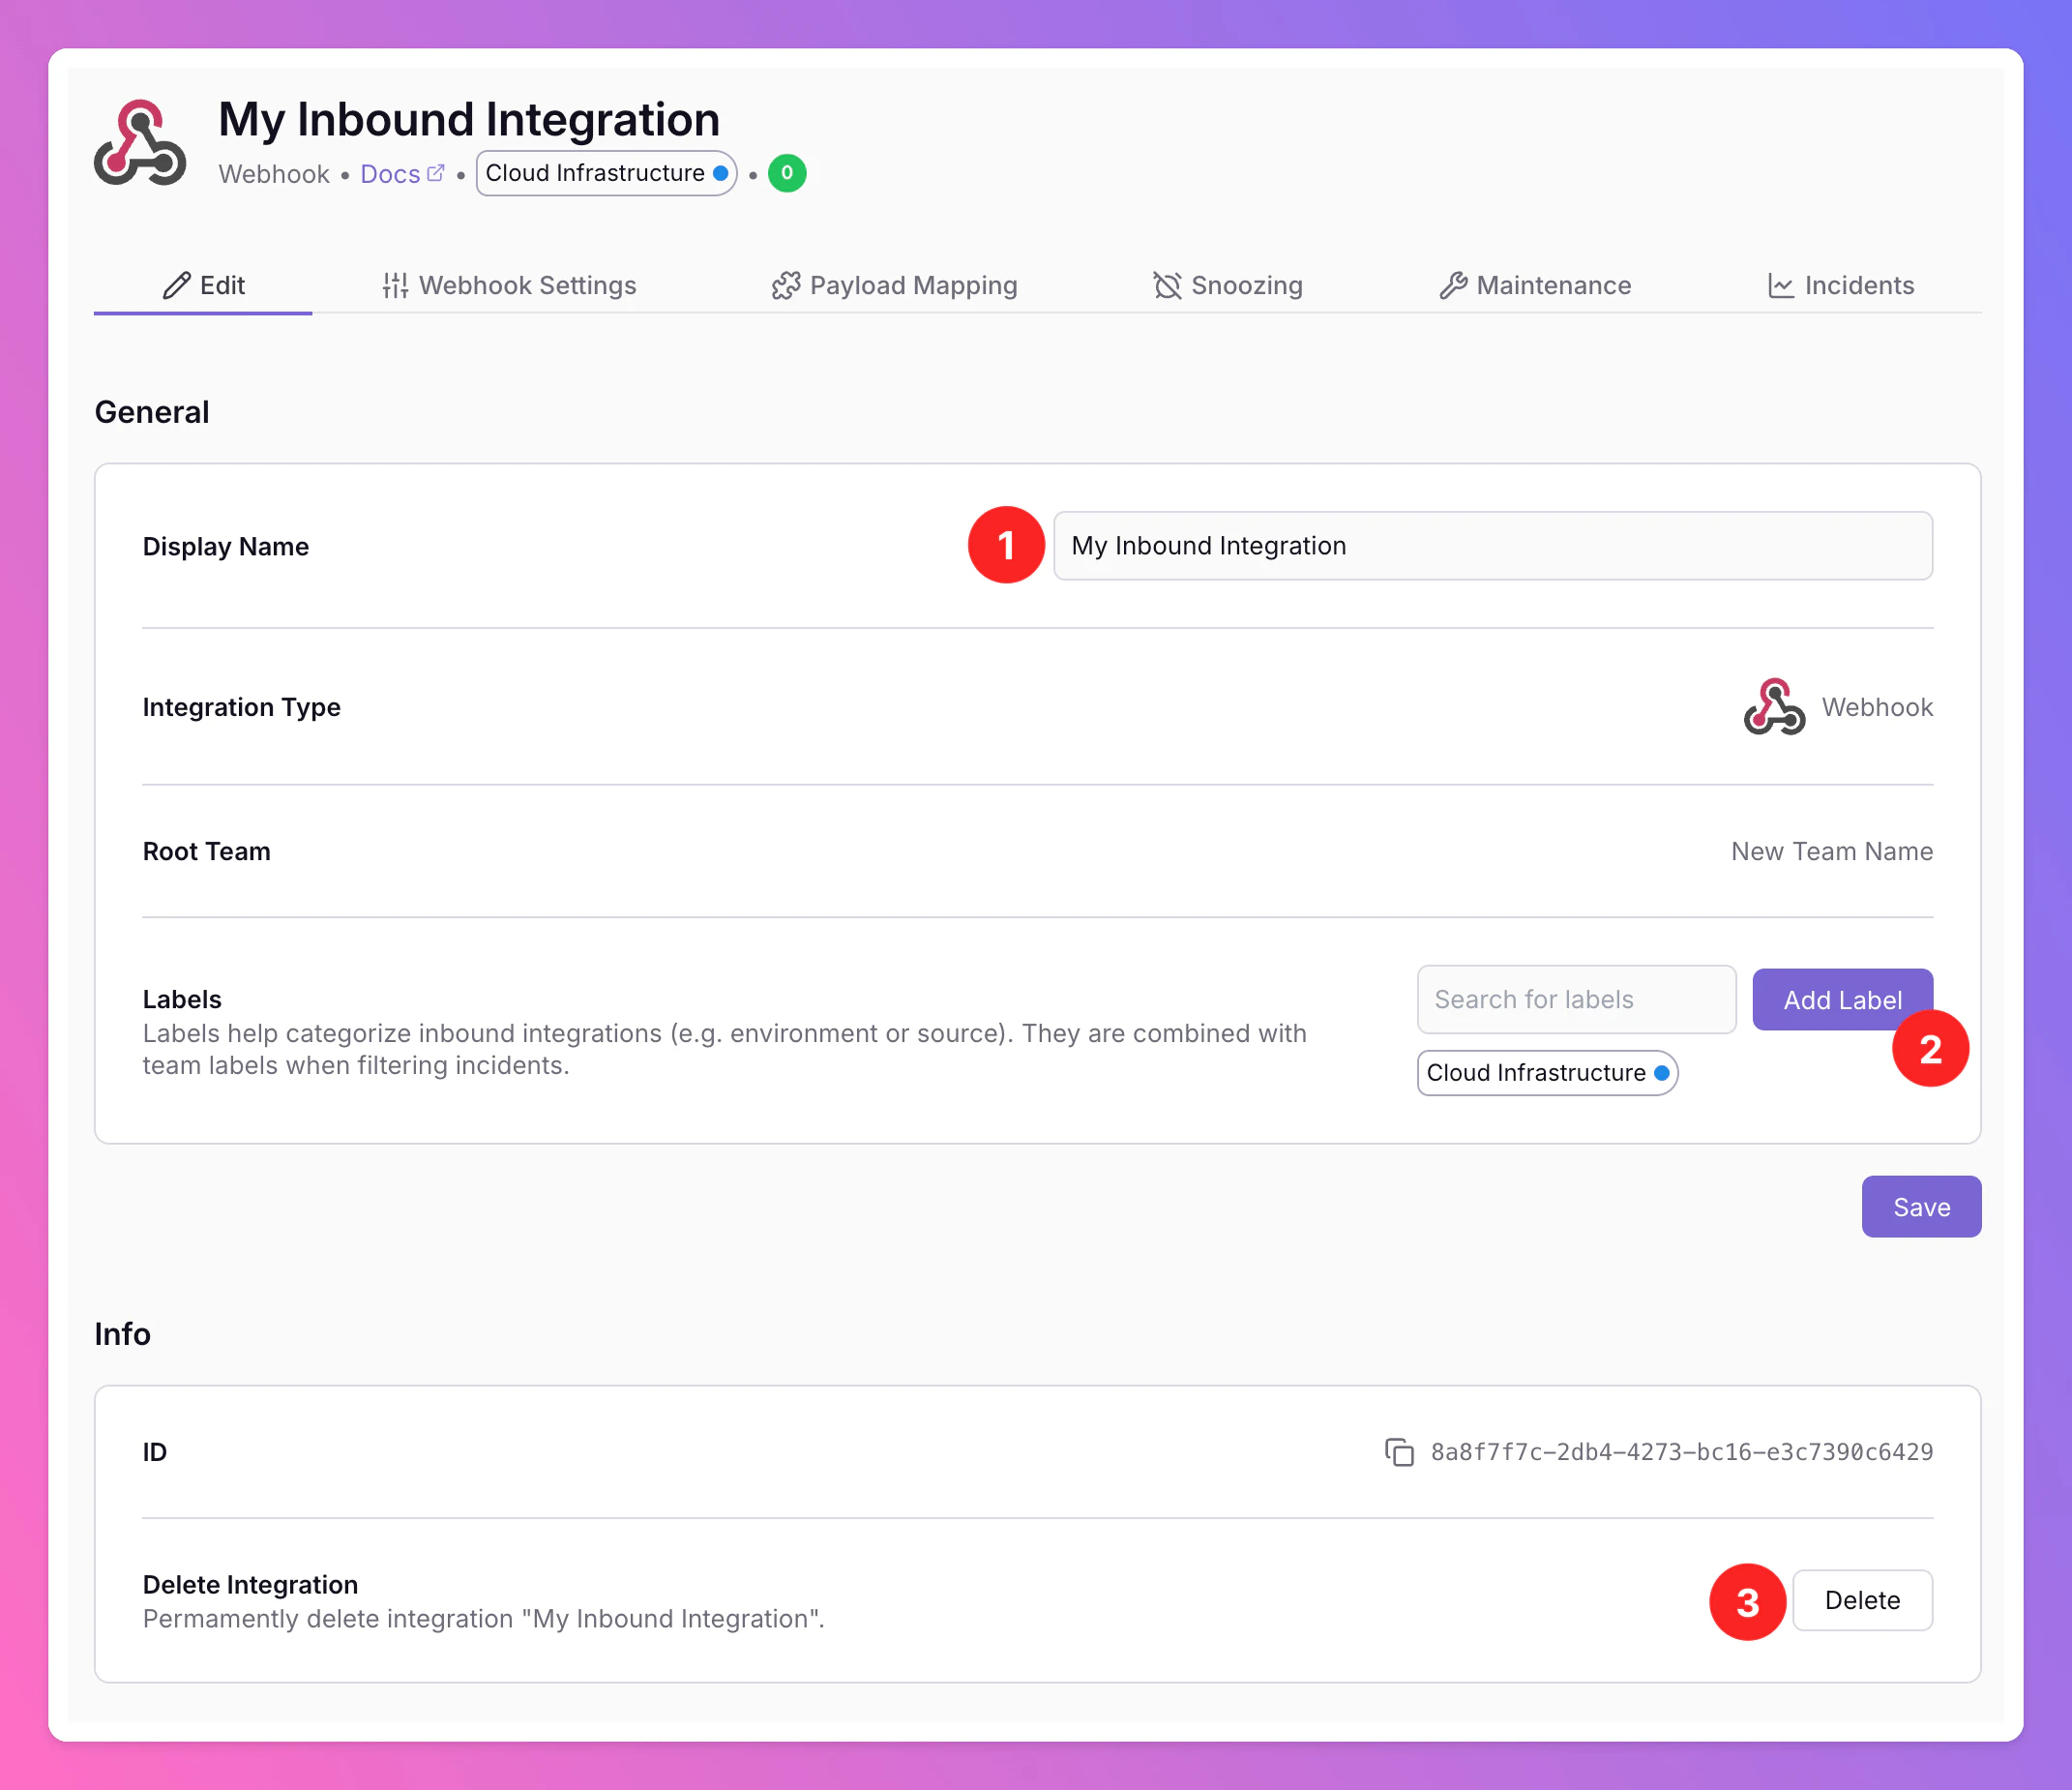
Edit Your Integration’s General Settings
In this tab, you can make some general changes to your integration:- You can change your integration’s
Display Namefor your team. - You may add
Labelsto your integration. Labels help categorize inbound integrations (e.g. by environment or source). They are combined with team labels when filtering incidents.
Receiving Payloads
- After creating a new integration, we find ourselved on the
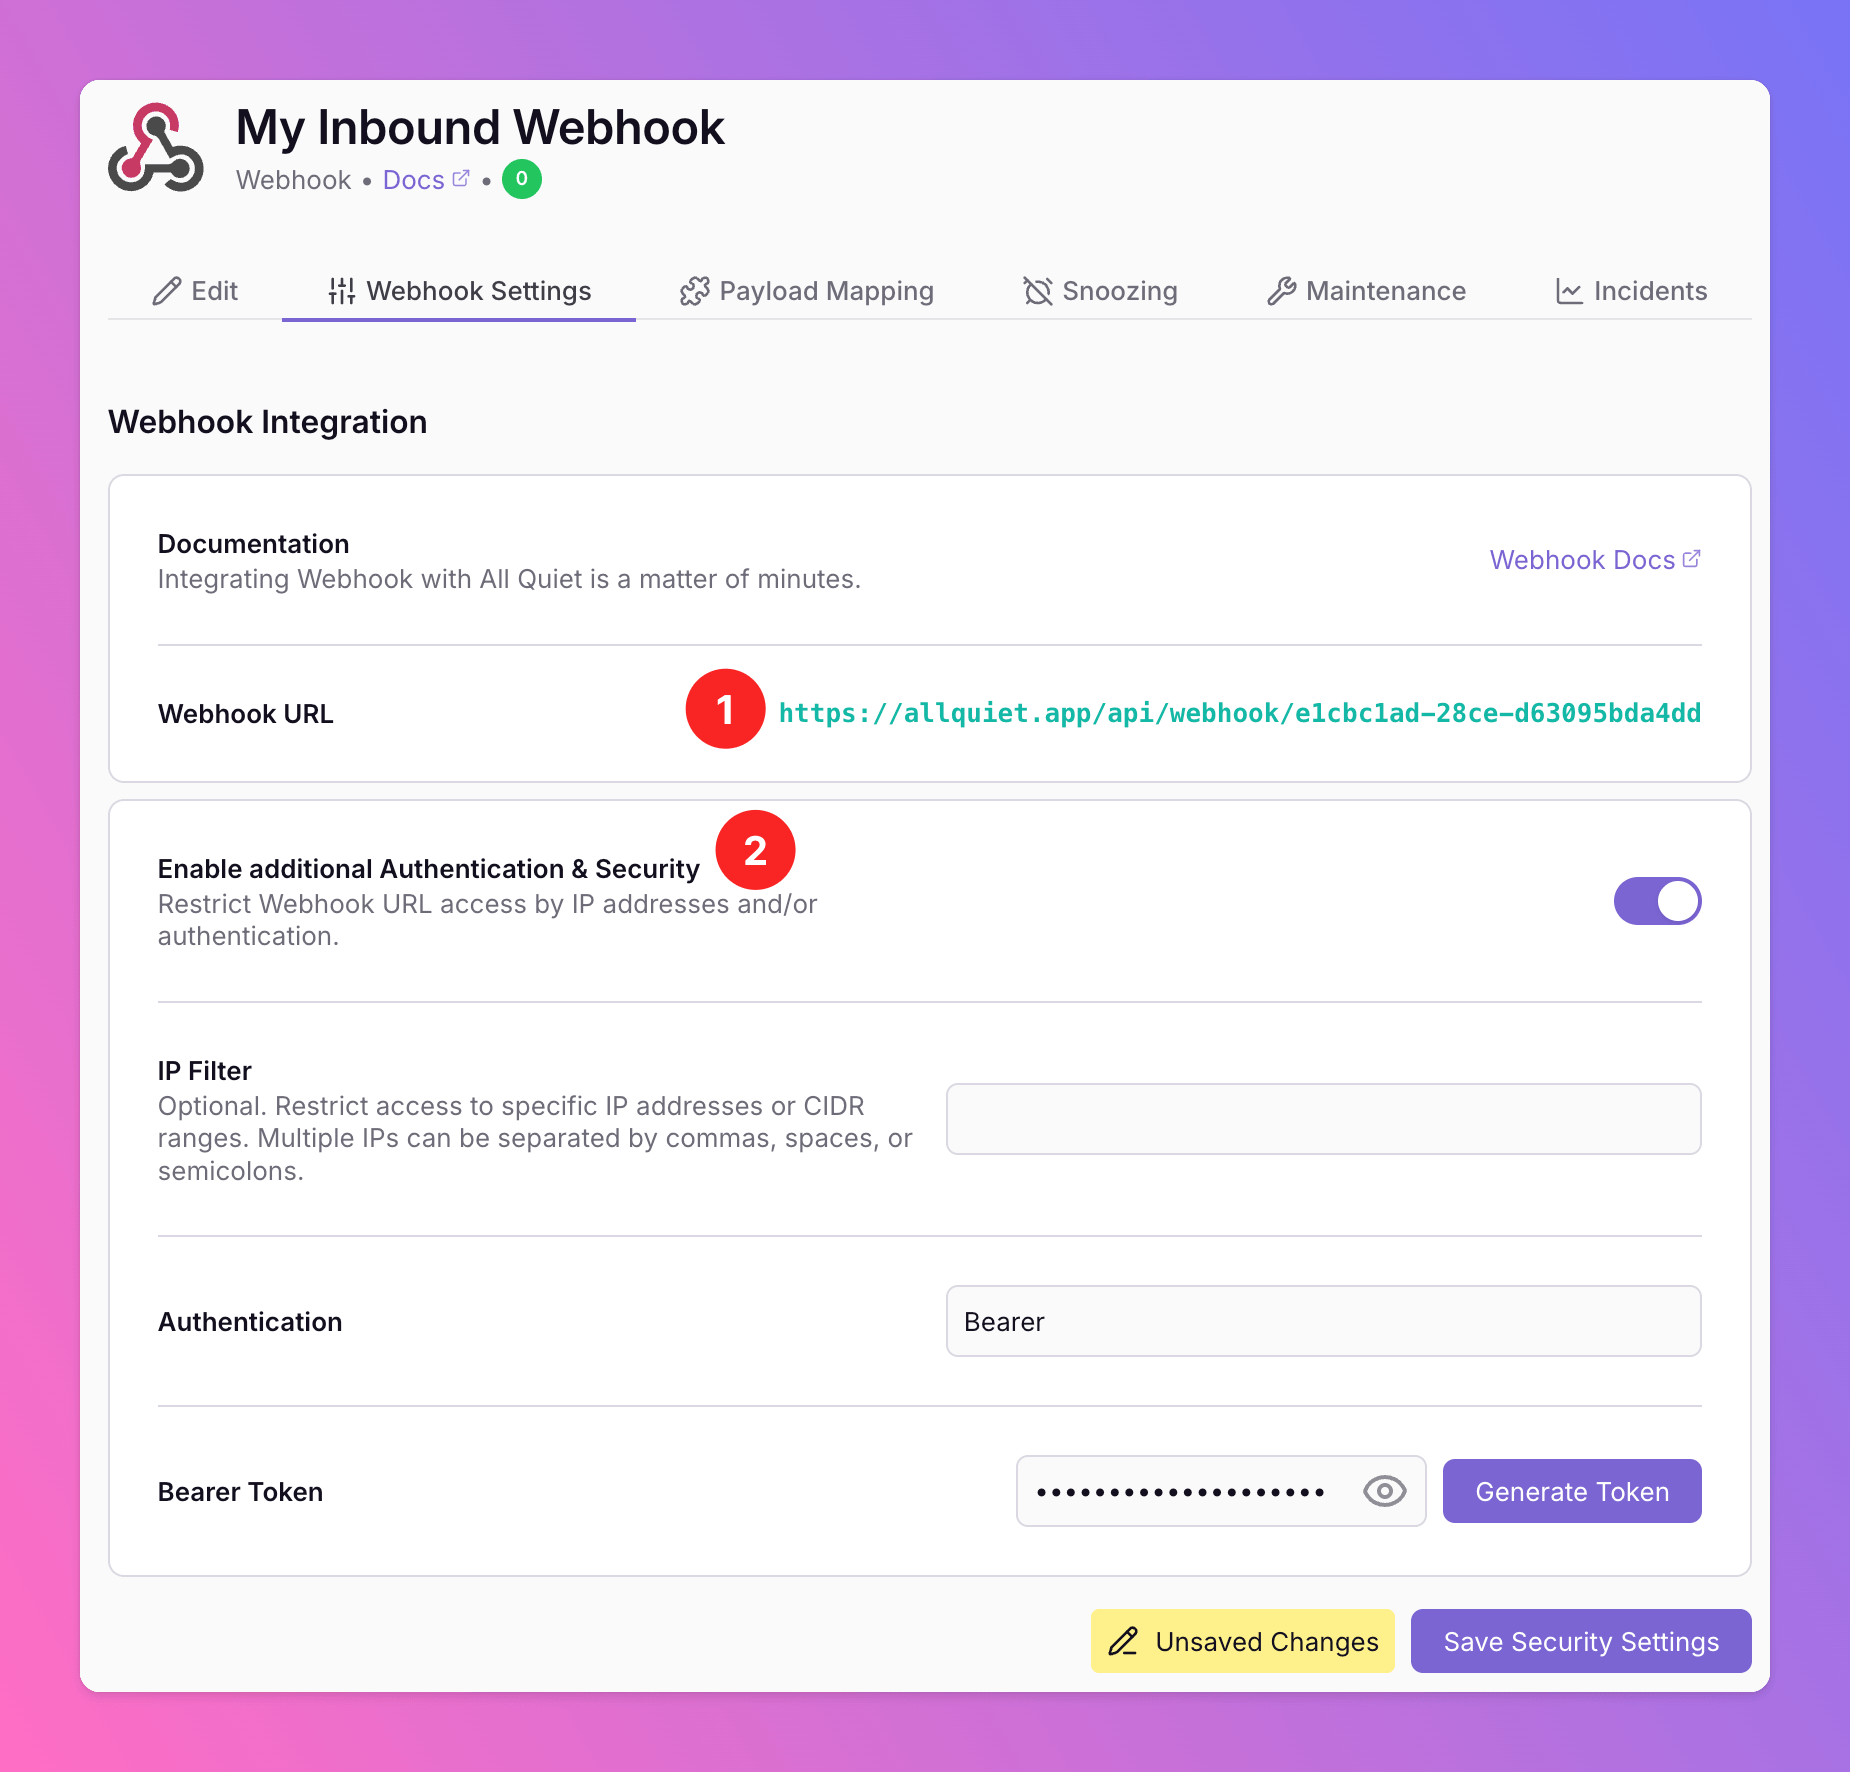
Settingstab of the integration details page. Here you can find integration’s unique Webhook URL. Every request sent to this address will show up as a new payload in thePayload Mappingtab, from which we’ll extract attributes and map these to incidents. - On webhook-based inbound integrations, optionally toggle
Enable additional Authentication & Securitybelow the webhook URL to restrict who can POST payloads:- IP Filter — Allow requests only from specific IPs or CIDR ranges. Failed checks return 404 Not Found.
- Bearer authentication — Require
Authorization: Bearer YOUR_TOKEN. Missing or invalid tokens return 401 Unauthorized. - If both are enabled, the request must pass both checks to be accepted.
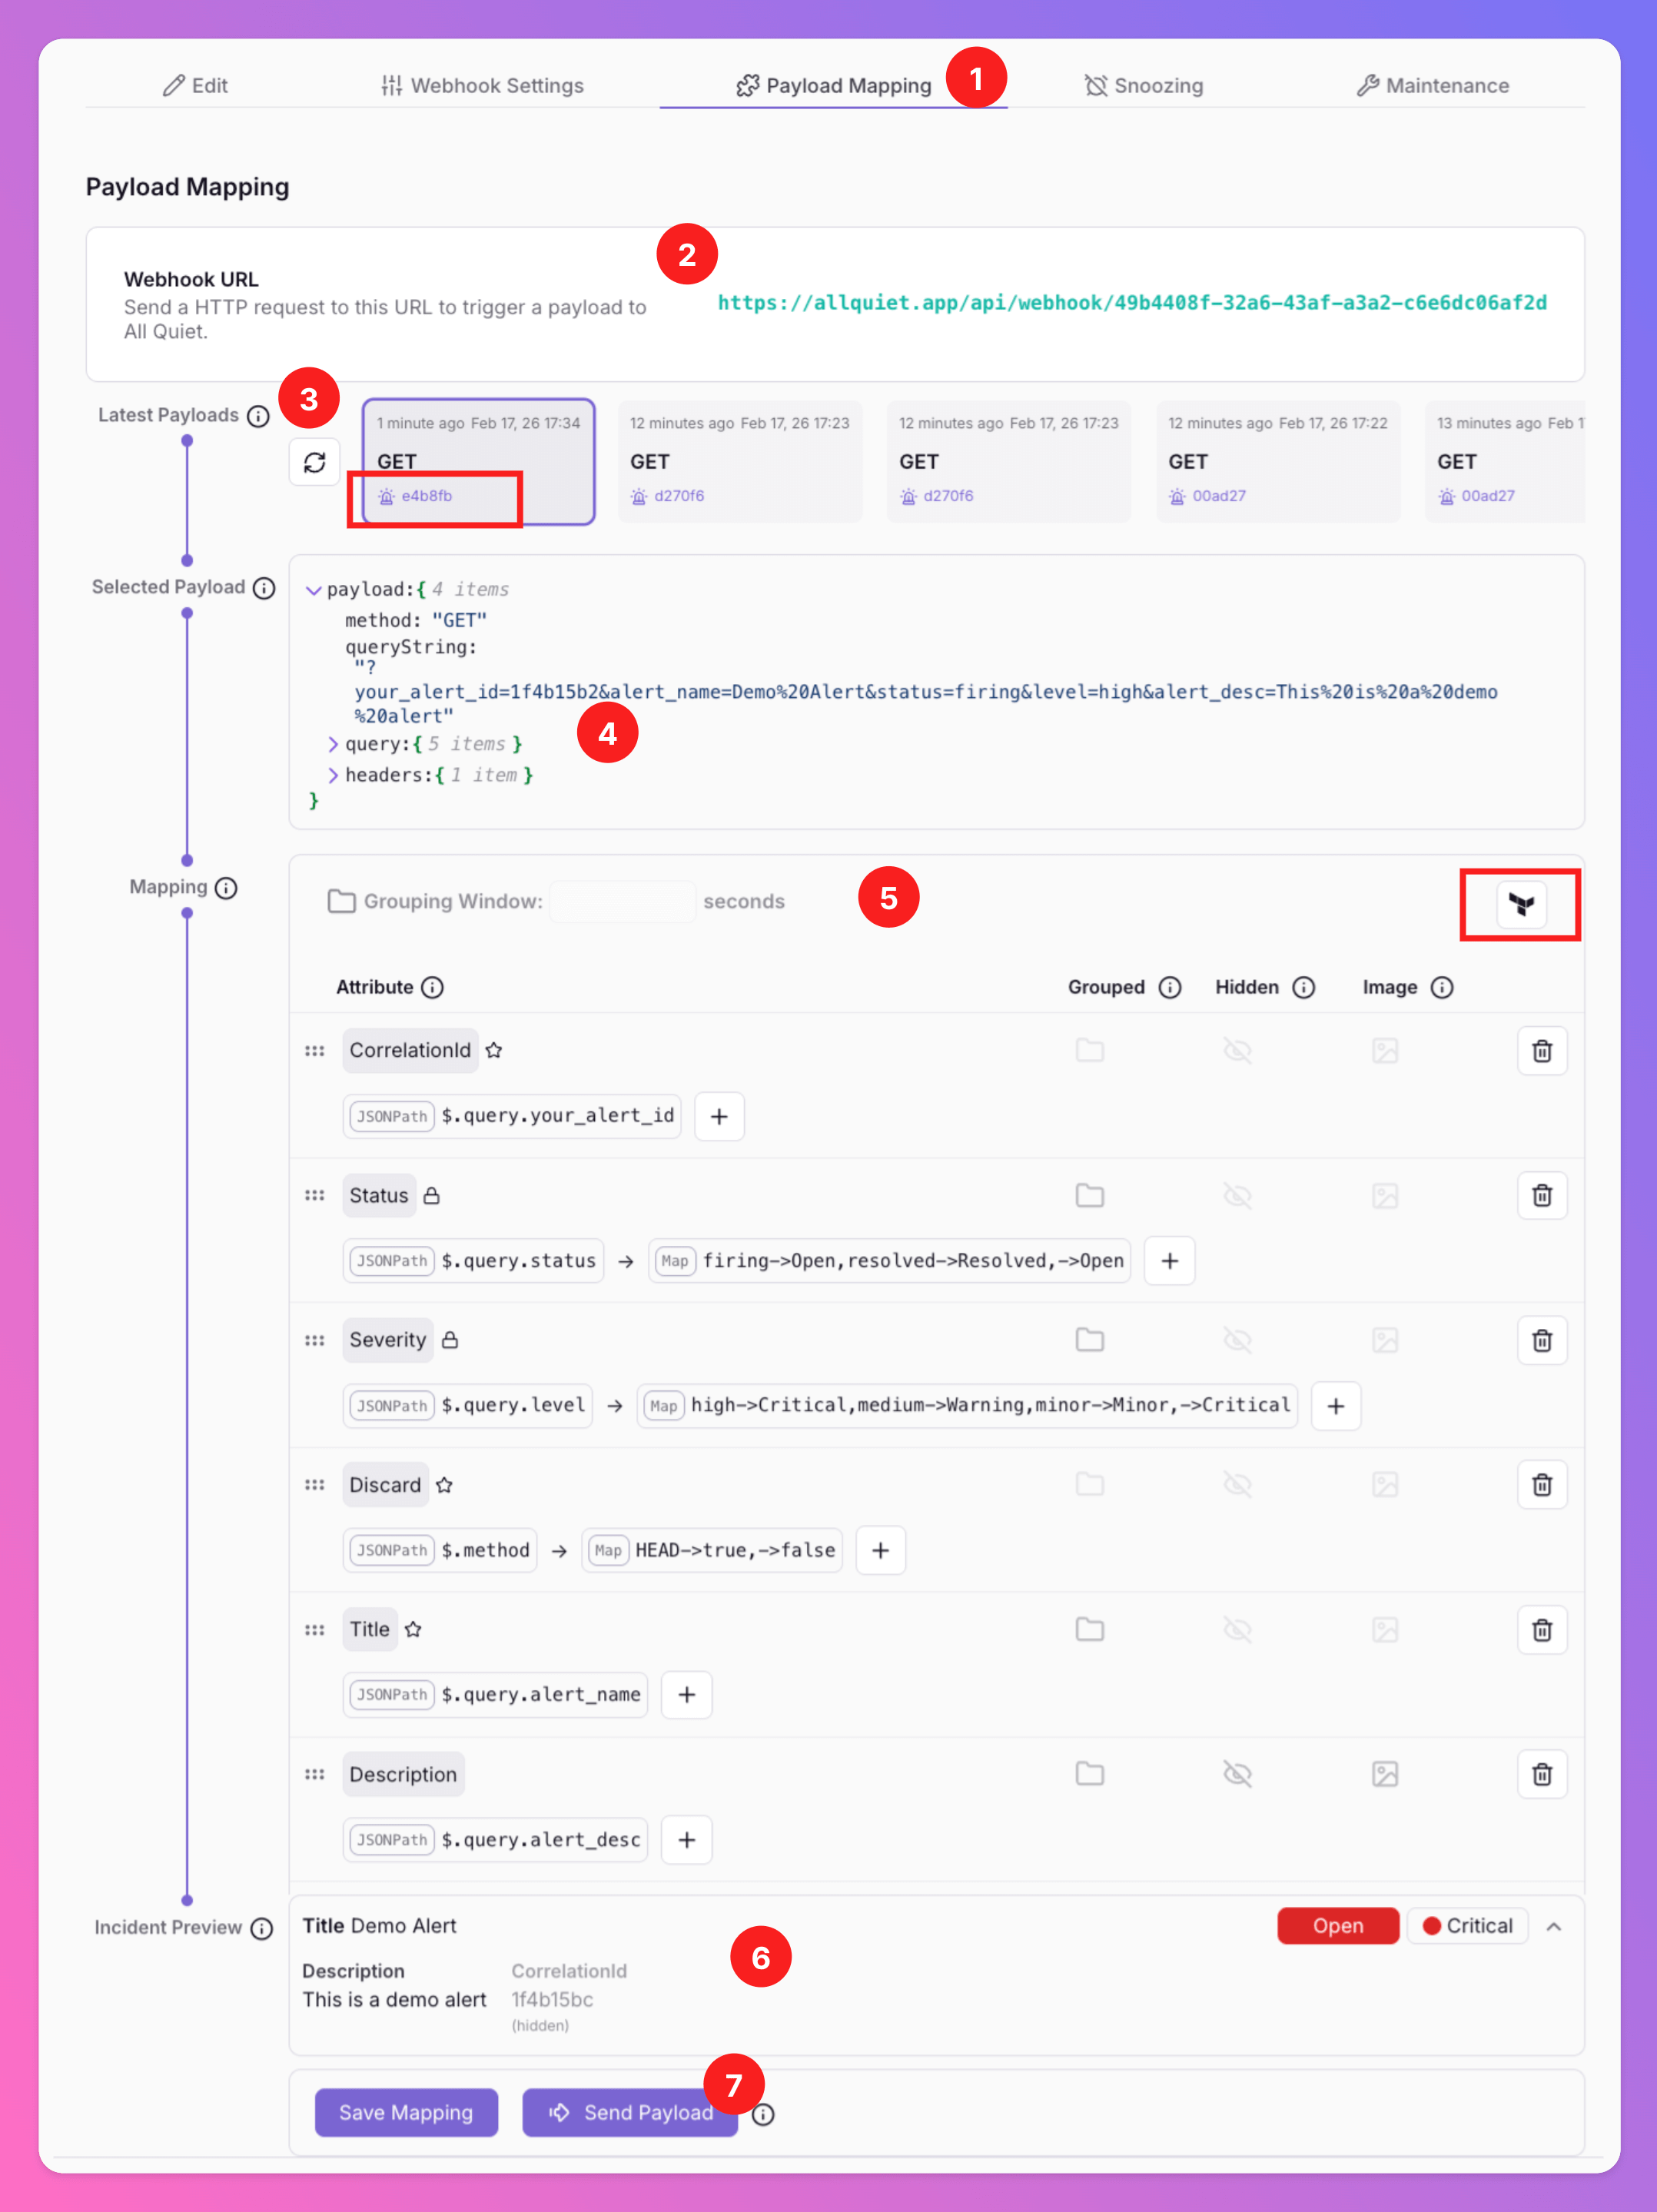
- Now it’s time to look at the
Payload Mappingtab. - You can find the
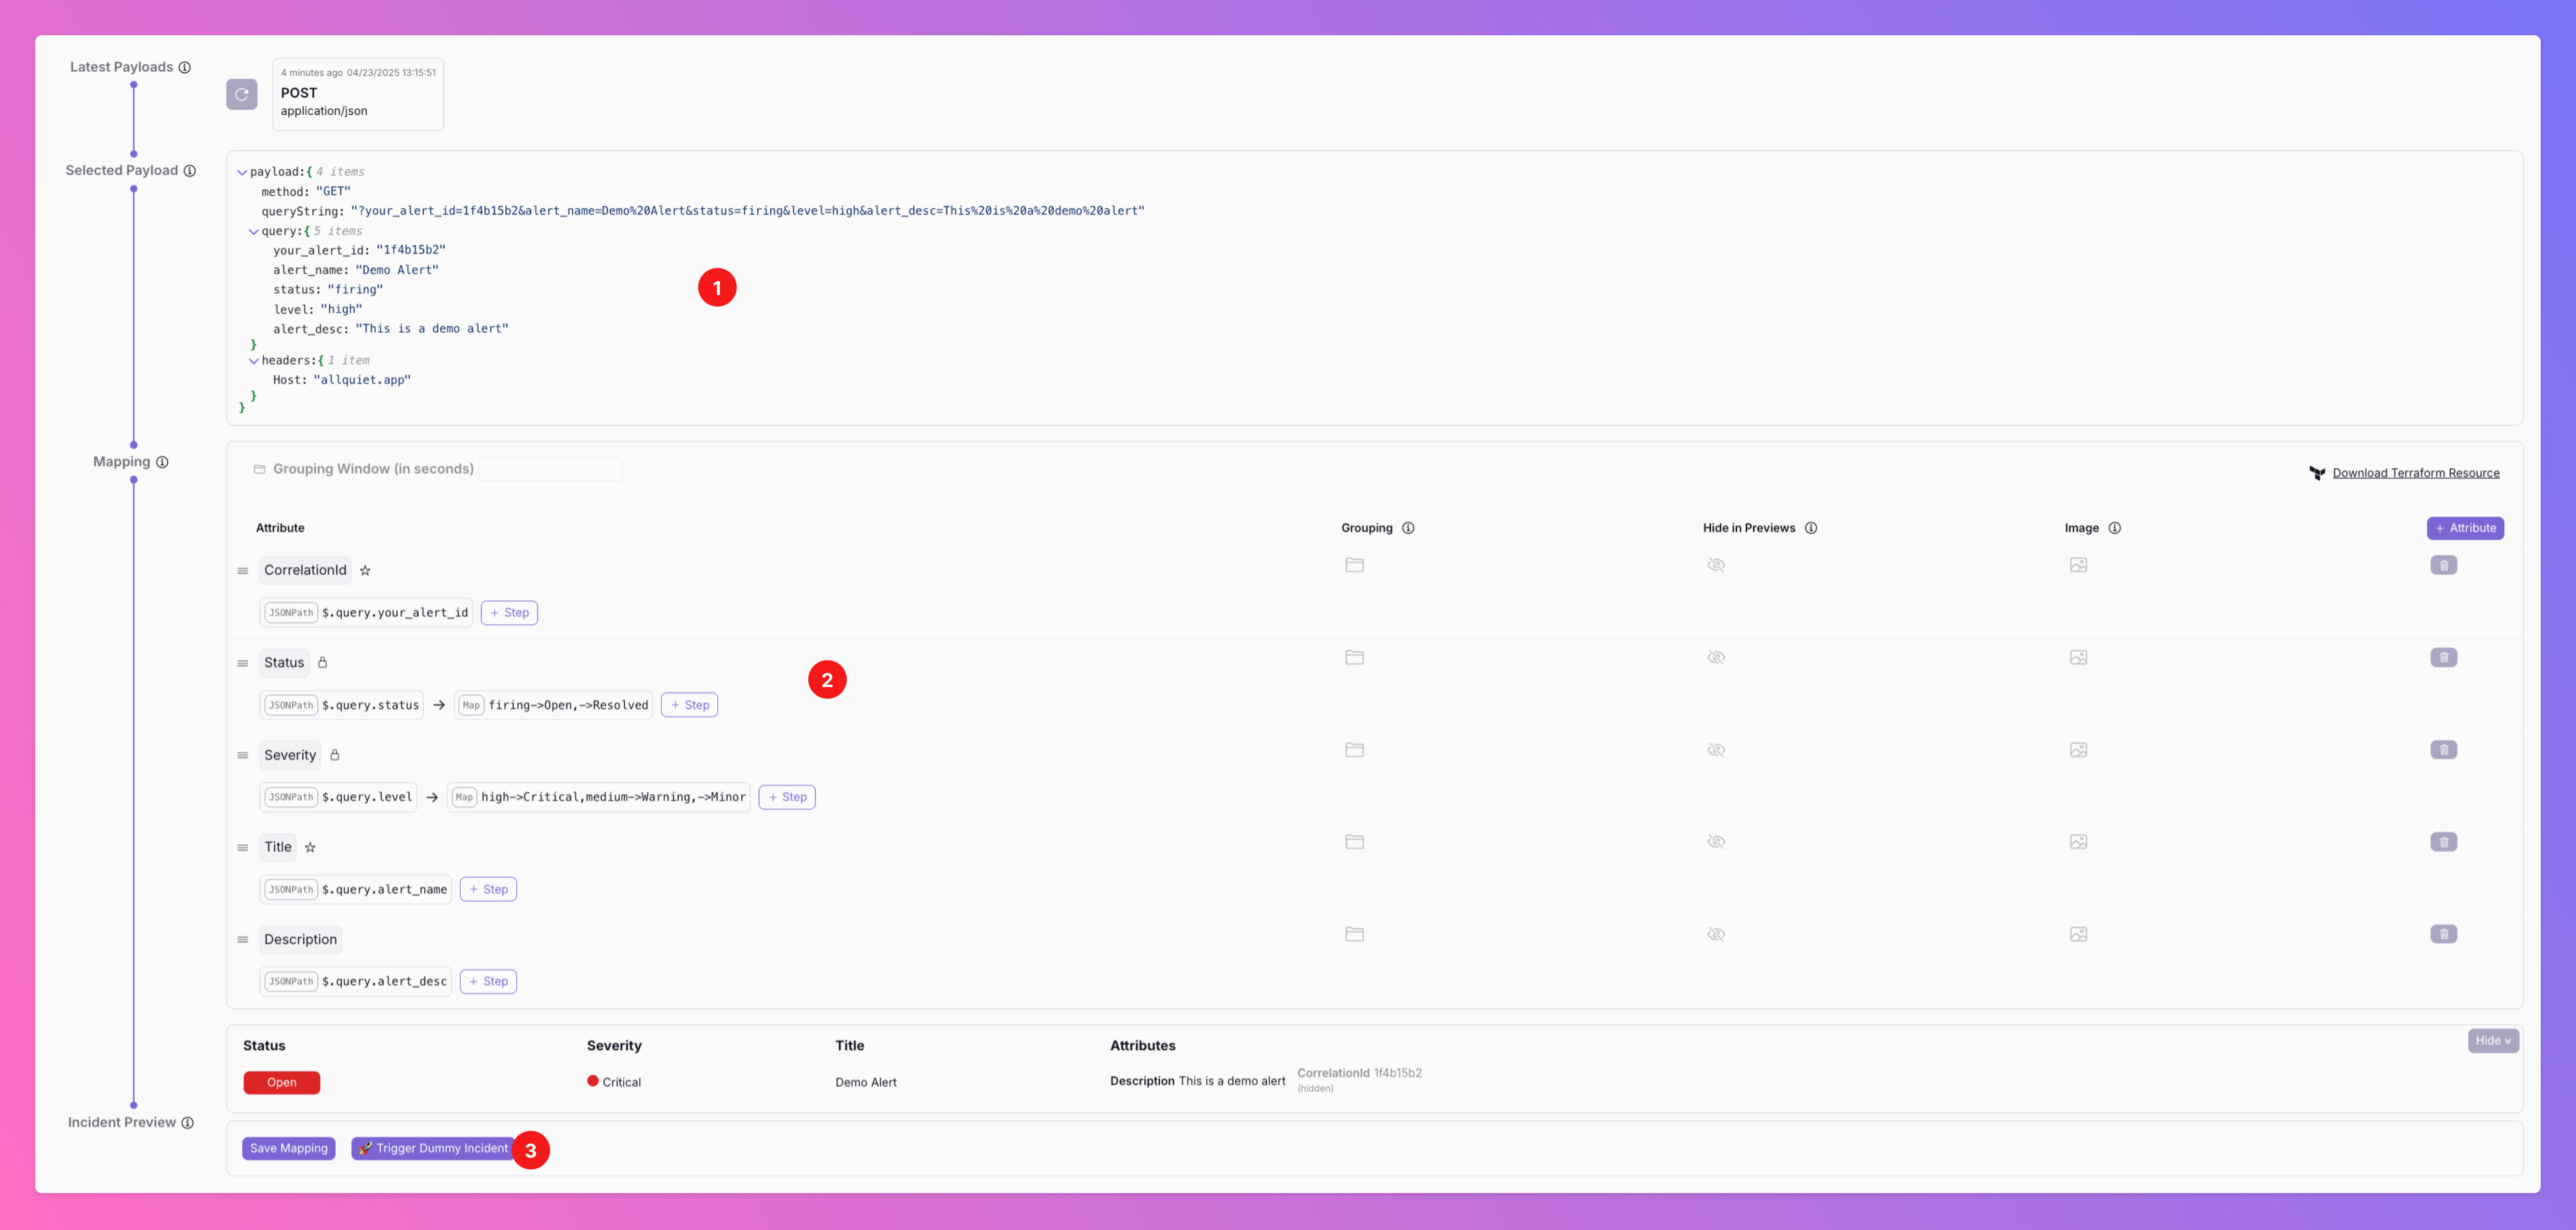
Webhook URLyou need to send alerts to All Quiet on top of the tab. - You can see payloads that were received by All Quiet in the top row pane and select them as a template / example for your attribute mapping. For each payload, you can see which incident it belongs to. Navigate to the incident by clicking on the shortened incident id on the payload tile.
- The payload will always be in JSON format and wrap other formats like HTML or XML depending on your payload. We show the JSON in a
json-edit-reactcomponent for better visability and usability. - Below you can find the mapping component that maps the payload to an All Quiet incident. More on that in the next section. You can download your current payload mapping as Terraform resource by clicking the Terraform icon.
- We always show a live preview of an incident created from payload and mapping, so you always get immediate feedback when configuring the mapping.
- You can safe mapping changes and trigger test incidents to see if everything works as expected and save your mapping.
cURL command to send a form post to a webhook integration. The payload will show up under the field Latest Payloads. Please note that you need to adjust the URL to your unique integration’s URL.
Mapping Payloads
To map a payload’s JSON to an actual incident you need to define a set of mapping rules. Those rules are defined in an intuitive UI. To allow you to conveniently configure your mapping, your changes are automatically applied to a preview of an incident.How does attribute mapping work?
With attribute mapping you can map the payload of your integration to the defined data structure of All Quiet’s incidents.Quick Example
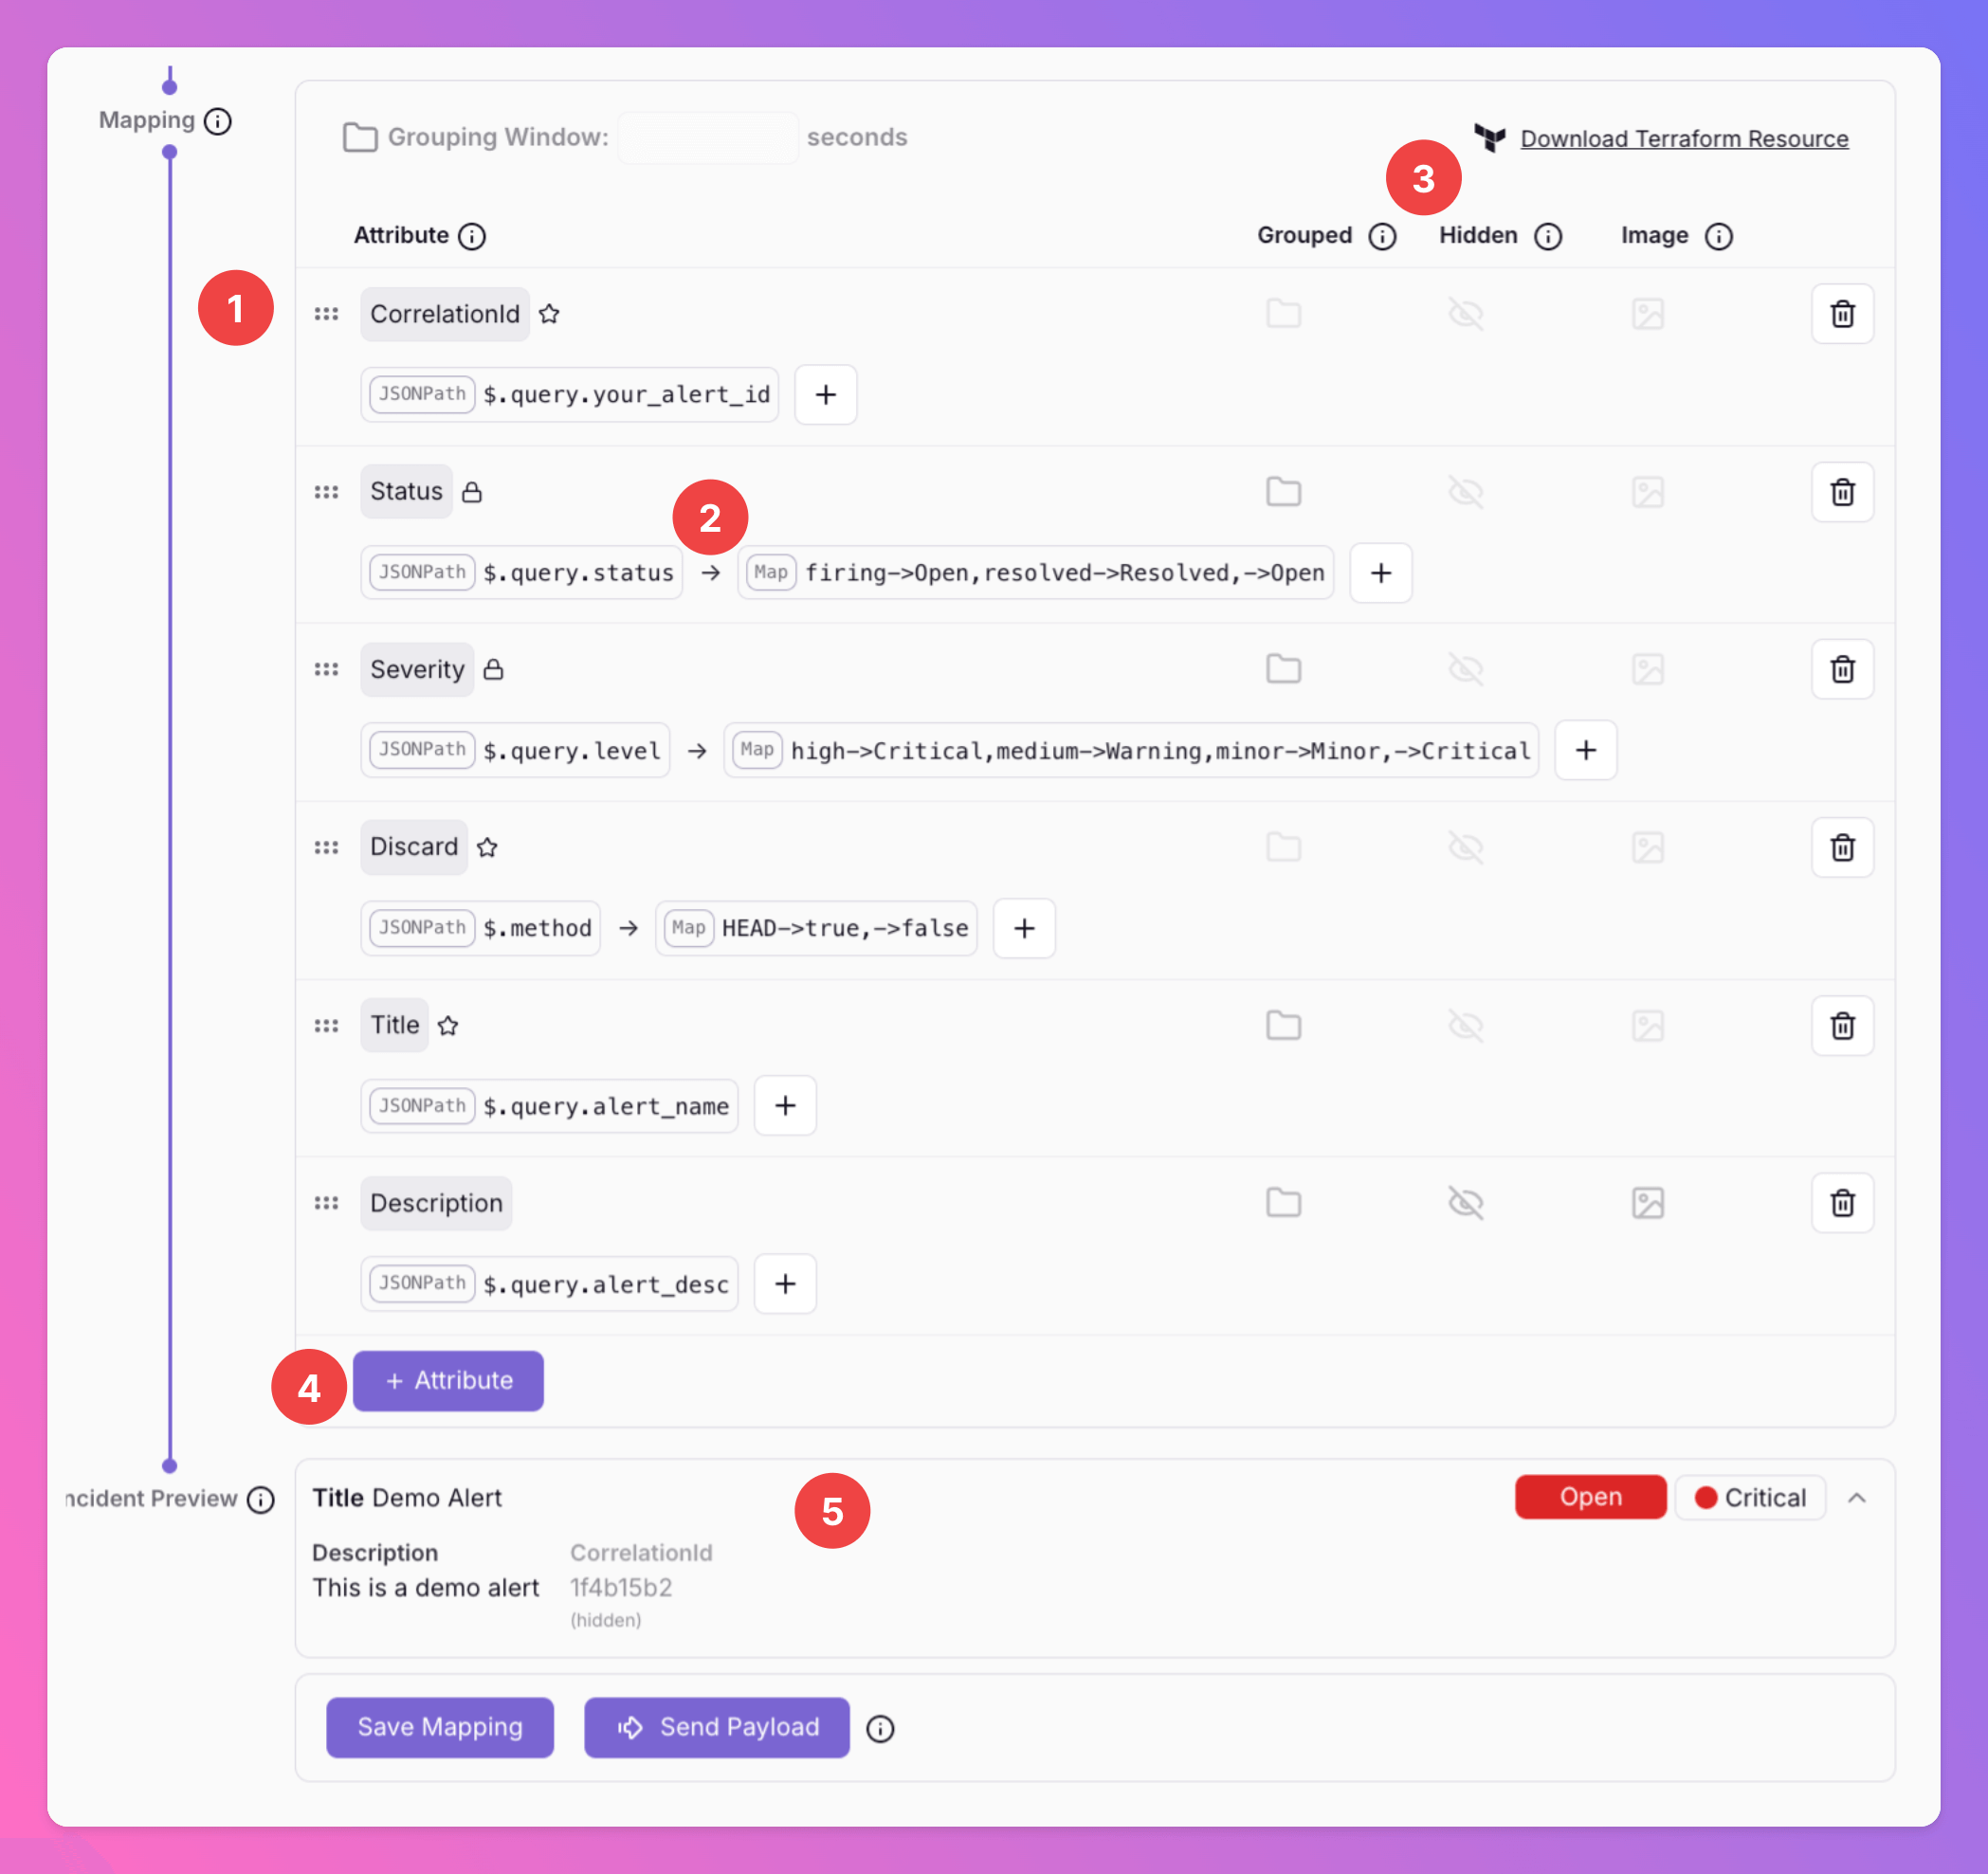
Let’s assume, we’ve created an integration of type Webhook. We can use the following CURL command below as an example to trigger the webhook:- We can see all attributes. We will evaluate all attributes from first to last element. Learn more about reserved and required as attribute types below.
- For each
attributeinattributeswe will evaluate all mappings from the first to the last element. The result of a mapping will be passed on to the next mapping element as an input. The last result will be the attribute’s value. In this example, the attributeStatusis first mapped by a jsonPath and then by a map evaluation. See below for more about our evaluation types and mapping variables. - You can mark each attribute with
Grouped,Hidden,ImageorExpandkey. More on this, here. - You can add further attributes for customization anytime.
- Below, you will always see a live preview of your All Quiet incident based on the current mapping.
Handling Multiple Payloads
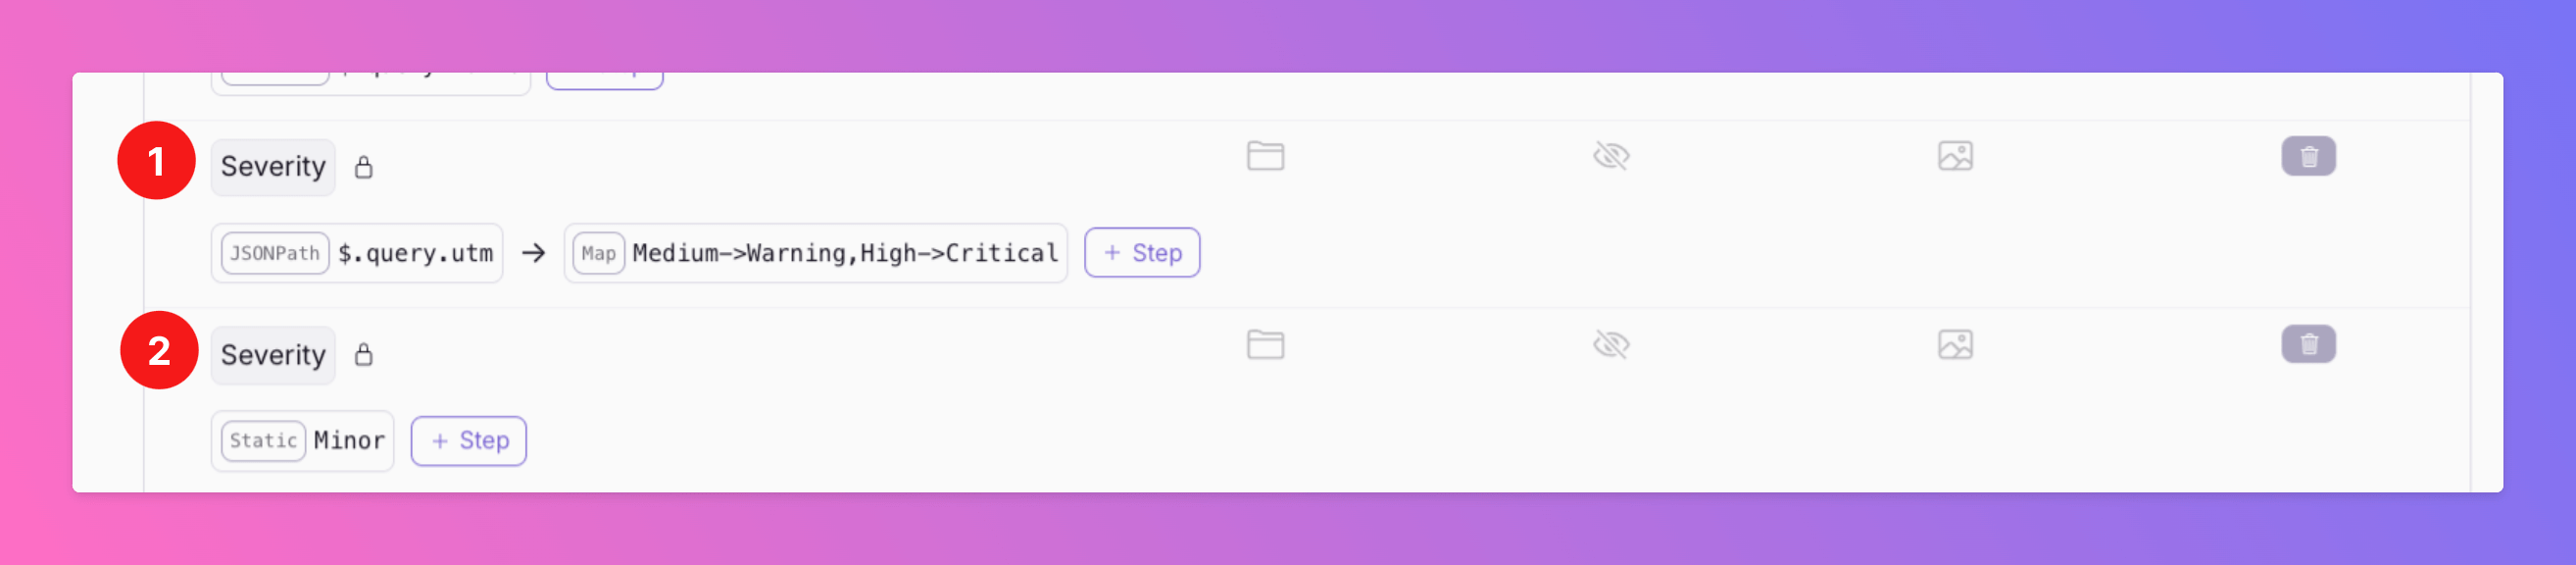
If your payloads can have different structures, you can adjust your payload mapping to account for that. You can simply add several entries for the same attributes that are evaluating different part of the payload. The first attribute that can be evaluated successfully will be added to the incident. In the example below,- we first check if the JSONPath
$.query.utmcontains the valueMediumorHighto define the Severity. - If none of those values can be found, we use the second Severity attribute in our mapping to statically set the Severity to Minor as our fallback.
Payload Mapping in Terraform
For our Terraform Provider, we’ve written a separate payload mapping ressource allquiet_integration_mapping. If you don’t use this resource, your integrations will implicitly follow our default mappings. If you want to adjust the mapping, we’ve prepared templateallquiet_integration_mapping resources.
- Template Download (Example with Integration_ID = “Datadog”): https://allquiet.app/api/integrations/terraform/default/Datadog.tf.
- Each Integration_ID can be found here: https://allquiet.app/api/public/v1/inbound-integration/types
Reserved and required attributes
You can map as many attributes with any name you like. There are a few reserved and required attributes though:
| Property | Description | Allowed Values | |
|---|---|---|---|
CorrelationId | Optional | Use this attribute to uniquely identify and correlate your incidents. If omitted, a hash of all mapped custom attribute values is used — a payload is linked to the same incident if and only if all mapped attribute values are exactly the same. This is recommended to avoid creating new incidents when sending changing metrics (for example CPU consumption). | |
Status | Required | Open, Resolved | |
Severity | Required | Minor, Warning, Critical. | |
Title | Optional | If omitted, defaults to your integration’s name. | |
Discard | Optional | True, False: Setting Discard = true in payload mapping discards the incident before it is created. This is useful if you want to ignore certain payloads for instance based on HTTP method. Note that incidents Discarded via payload mapping are therefore not included in incident reports / statistics. In contrast, incidents discarded via a routing rule are created first and are therefore counted in the statistics. |
CorrelationId Flowchart
When a new payload is mapped, All Quiet usesCorrelationId to decide whether to open a new incident or merge into an existing one:
The payload’s mapped Status (Open or Resolved) determines whether the matched incident is updated or resolved. If you omit CorrelationId, All Quiet hashes all mapped custom attribute values instead — the same flow applies, but a payload is linked to an existing incident only if every mapped attribute value matches exactly.
Optional, additional attribute Keys
| Type | Description | Values | How it Works |
|---|---|---|---|
Image | Optional | Boolean | If your payload includes a URL, you can use this as an additional specification of an object to show the image in All Quiet |
Hidden | Optional | Boolean | When activated for attributes, these will not be shown in incident email and on the incident overview in Web and App, but only in the incident details. |
Grouped | Optional | Boolean | When setting Grouping = true for certain attributes, incidents that have the same values for these attributes will be grouped as long as one of the group is Open and not Resolved. If you set isGroupingKey = true for more than one attribute, incidents will only be grouped if the values for all attributes match. When grouping is active for an integration, All Quiet checks the grouping attribute(s) before CorrelationId. A payload can only be correlated to (and update or resolve) an existing incident if the grouping attribute(s) also match. By including “groupingWindowInSeconds” in your mapping, any new incidents that match the grouping criteria will only create incidents within the group within the grouping window that is defined by seconds since last update of any incident in the group. After the grouping window is over, new incidents will create new incident groups and alert your on-call colleagues. |
Expand | Optional | Boolean | When enabled, after all mapping steps for this attribute the pipeline value is parsed as JSON. Each top-level object key or array index becomes a separate incident attribute (for example, jsonBody.cluster, jsonBody.alertname) for use in routing rules. Nested values stay a single string per key. The last value must be valid JSON (object, array, or scalar), otherwise Expand = true will break the attribute. Use any mapping steps you need to produce that string. |
Grouped Flowchart
WhenGrouped is enabled on one or more attributes, All Quiet checks grouping before CorrelationId. Incidents with the same values for all grouping attributes are collected into one group while that group is Open:
If you mark more than one attribute as Grouped, values must match on all of them for incidents to land in the same group. After the group is Resolved, the next matching payload creates a new group and alerts your on-call colleagues again.
Map
groupingWindowInSeconds to enable the grouping window. The window is measured in seconds since the last update on any incident in the group. After it expires, matching payloads create a new group — even if a previous group with the same grouping values is still Open.Evaluation Types
Each attribute must hold exactly one of the following evaluation types:
| Type | Description |
|---|---|
jsonPath | A JSONPath expression to map JSON (goessner.net/articles/JsonPath) |
xPath | A XPath expression to map HTML or XML. ( w3schools) |
regex | A regular expression to extract parts of text. The regex is evaluated with the .NET/C# flavor. If groups are matched, the named group “result” is returned. If no group is named “result” the last group is returned. If no groups are found the whole match is returned. ( regex101.com) |
map | A simple map expression mapping values from A to B. The expression A->1,B->2,->3 will map the value “A” to “1” and “B” to “2” and fallback to “3” if no match is found. You can also omit the fallback. The result will then evaluate to the original value. |
static | A static string. The result will always be this string. |
Variables
You can also use variables in any of your mapping steps if the related attribute was already defined above.
For example:
{{ previousIncident.status }} will work if attribute “status” was already defined in a mapping above. If the attribute “status” is defined below the attribute that uses the variable {{ previousIncident.status }}, the variable won’t work.
Variables are evaluated once all mappings within an attribute have been evaluated. The names are case-insensitive.
You can reference the current incident with {{ currentIncident.someAttributeName }} and the previous incident with {{ previousIncident.someAttributeName }}.
Common examples
Combine strings of other attributes
To combine the values of the “Category” and “Threshold” attributes use the following attribute mappings:ConcatenationWithVariables.JSON
JSONPath examples
Extract elements by property To get the value of the “Return-Path” field of the “headers” array, use$.headers[?(@.field=='Return-Path')].value for the following JSON:
JSONPathExample.JSON
XPath examples
Extract elements by preceding tag value To get the value of the “Server” field, i.e. the value of the td that follows a td with value “Server” use//table/tr[td='Server']/td[2] for the following HTML:
Regex examples
- Extract value after colon
- Extract value after specific label
- Extract value before colon
To get the value “my-server” after a colon followed by space use Note the use of the named group “result”. Since it’s the only group, the naming of the group could also be ommitted.
[: ](?[^: ]*)$ for the following text:Triggering Dummy Incidents
To get a practical understanding of All Quiet’s incident handling, you have the option to initiate a dummy incident. This feature allows you to simulate a real incident by using the current request payload example alongside your established mapping configurations. When you trigger a dummy incident, the system will execute all the usual processing steps. This includes sending out notifications to your teams and managing any outgoing integrations. This simulation is an effective way to experience firsthand how All Quiet will respond in an actual operational scenario. It’s an invaluable tool for verifying that your configurations and mappings will behave as expected during a live incident. Here’s how to trigger a dummy incident:- Navigate to the Payload section, where you’ll see your saved request payload for testing.
- Review your Mapping settings to ensure they’re correctly configured to simulate the desired incident conditions.
- Click on
Send Payloadto start the simulation. You’ll observe the full cycle of incident processing as if it were a genuine alert.
Snoozing Inbound Integrations
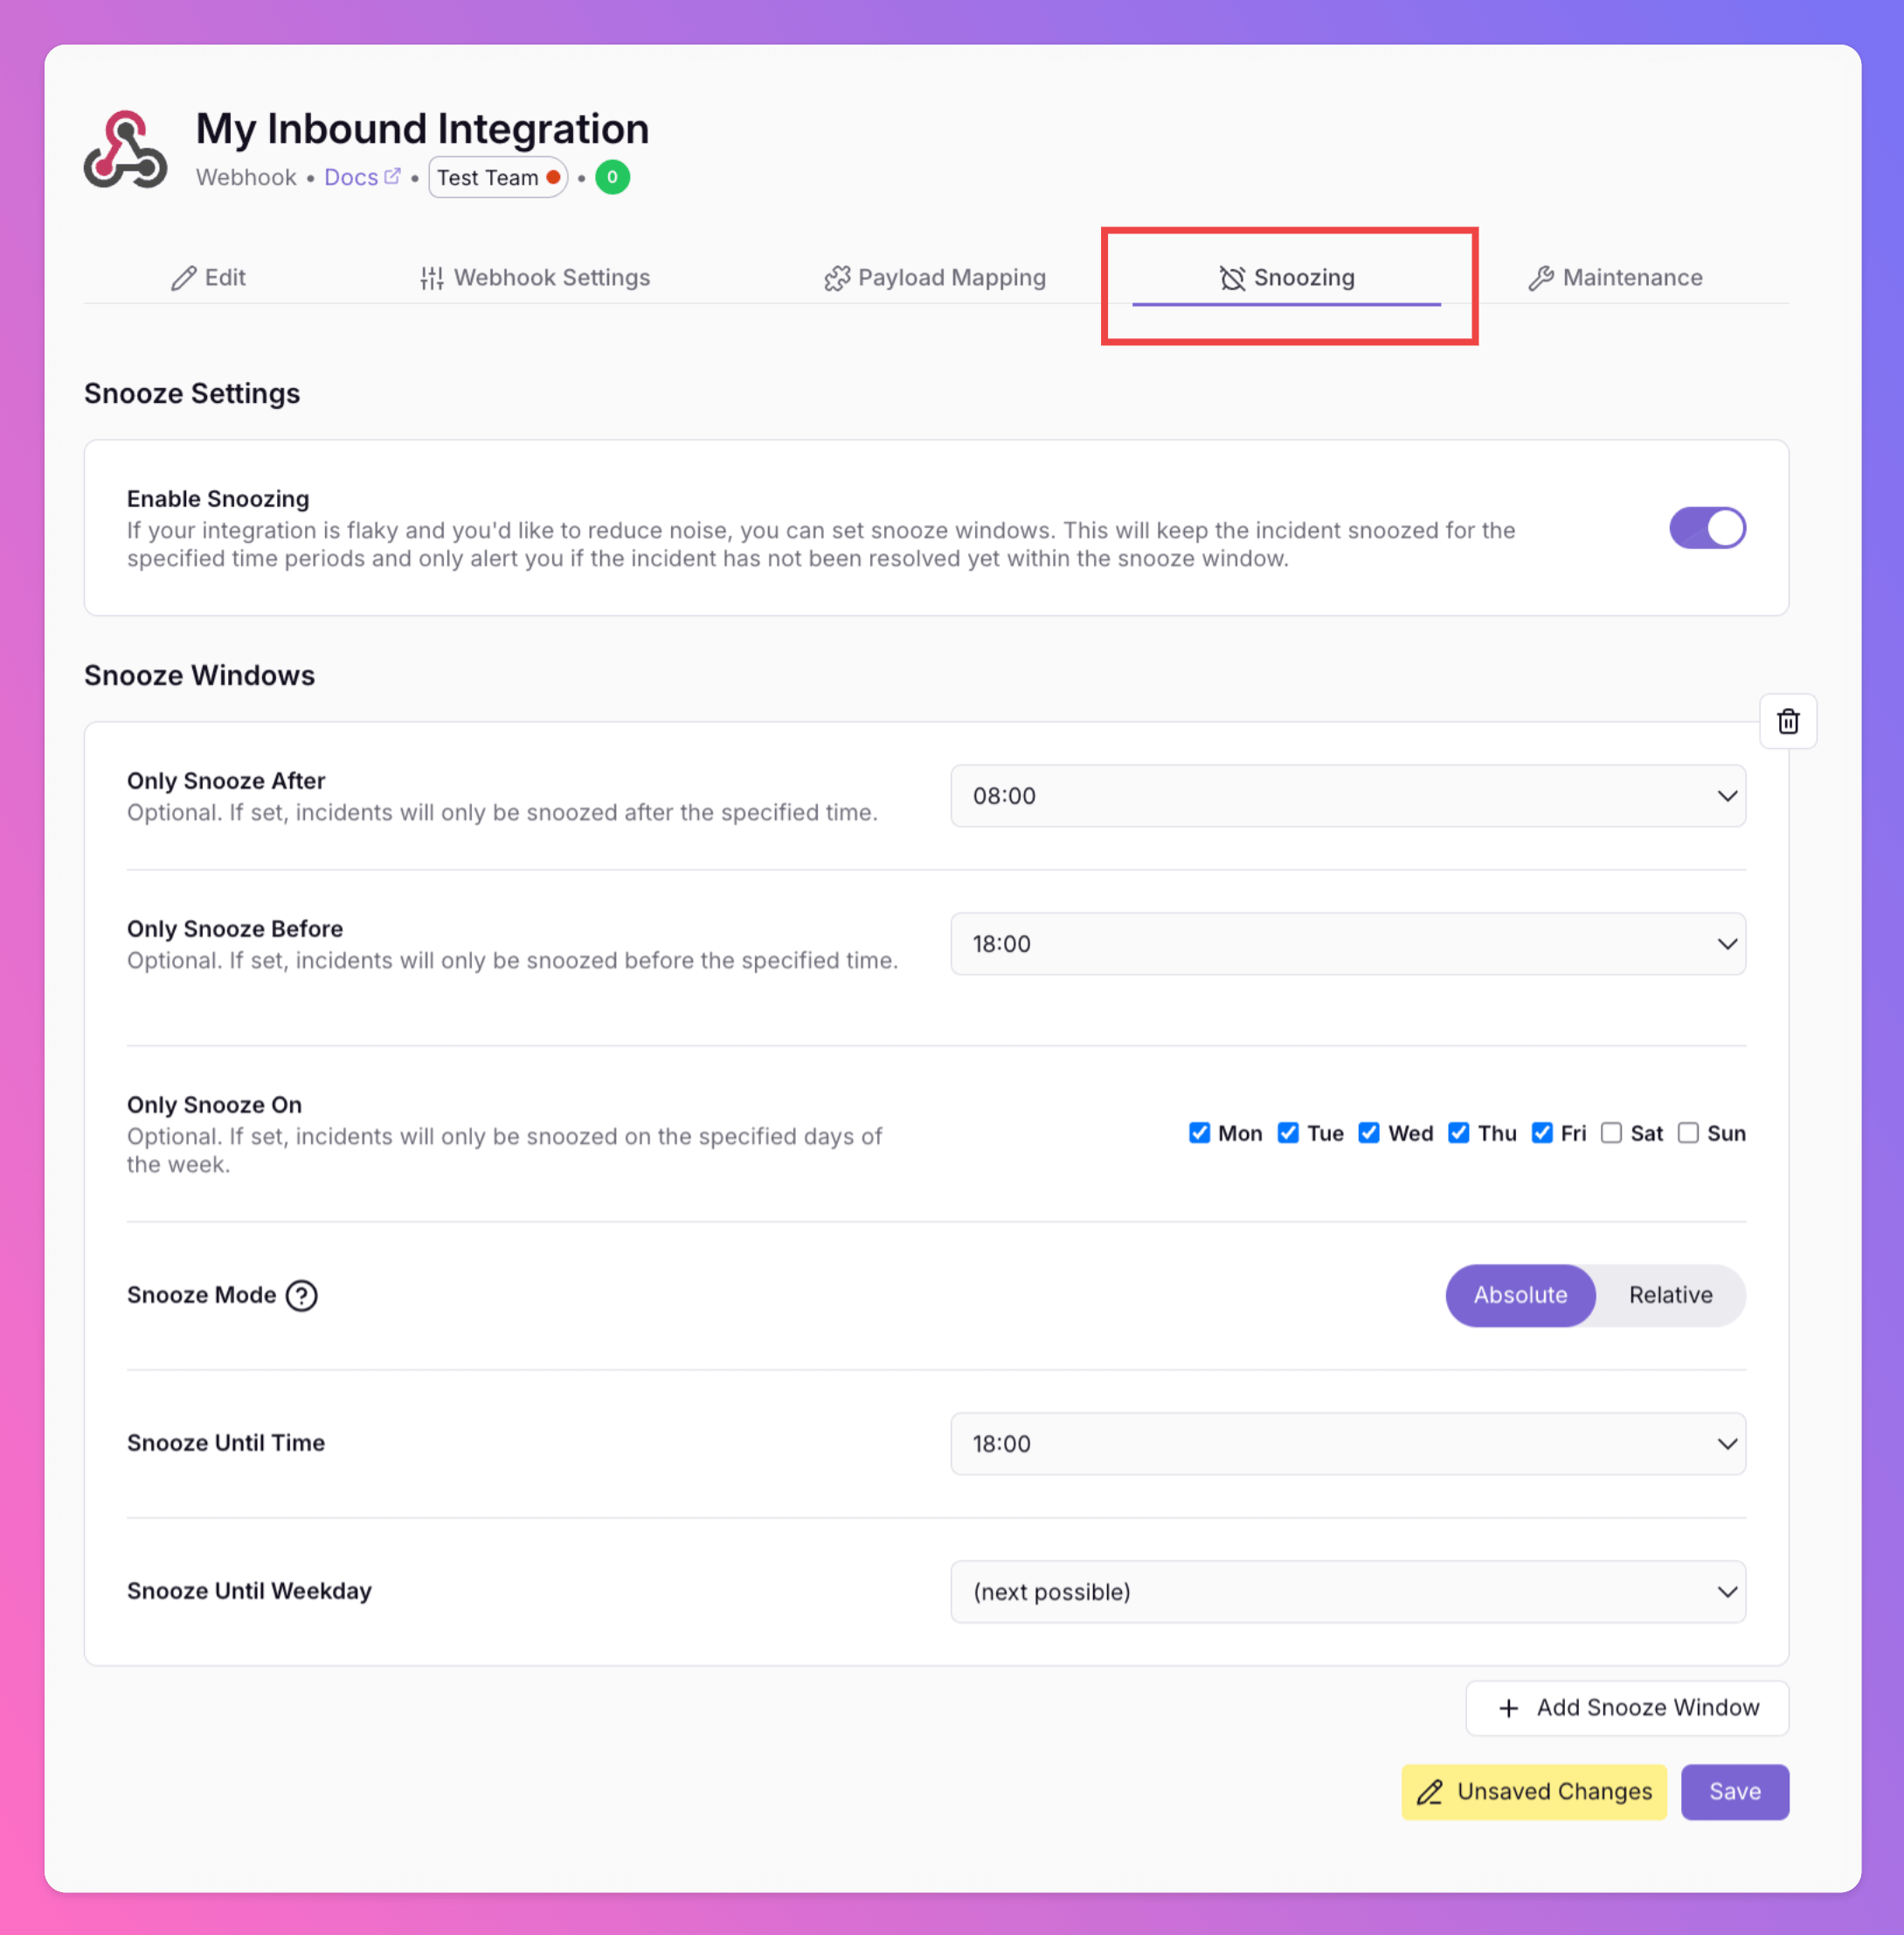
Is your integration unreliable, sometimes triggering incidents that auto-resolve just minutes later? Or would you prefer to suppress incidents during specific times and have them surface later? Reduce noise and minimize stress for your on-call colleagues. Team Administrators can enableSnoozing for the integration.
- When activated, newly created incidents are automatically snoozed. They will only alert on-call members once the snooze window ends or if the incident is manually unsnoozed. Choose between two modes:
- Snooze mode Relative: Snooze incidents for a specified timeframe, e.g. 10 minutes.
- Snooze mode Absolute: Snooze an incident until a specified time of day. By default, the incident will unsnooze the next time (“Next Possible”) the selected time is reached after the snooze period ends. Optionally, you can choose a weekday to specify exactly when it should unsnooze.
- While snoozed, there are no auto-escalations, and no notifications are sent regarding the incident. Also, outbound integrations are muted while an incident is snoozed - except incidents are explicitly forwarded. In this case, a one-time request is sent to the specific outbund integration.
- Once unsnoozed - no matter if manually or because the snooze window ends - Tier 1 on-call members are alerted and any potential auto-escalations will begin.
- If an incident resolves itself during the snooze period, it remains snoozed and does not alert your team.
- To view and manage snoozed incidents, enable the
Include Snoozedfilter in the incident overview.
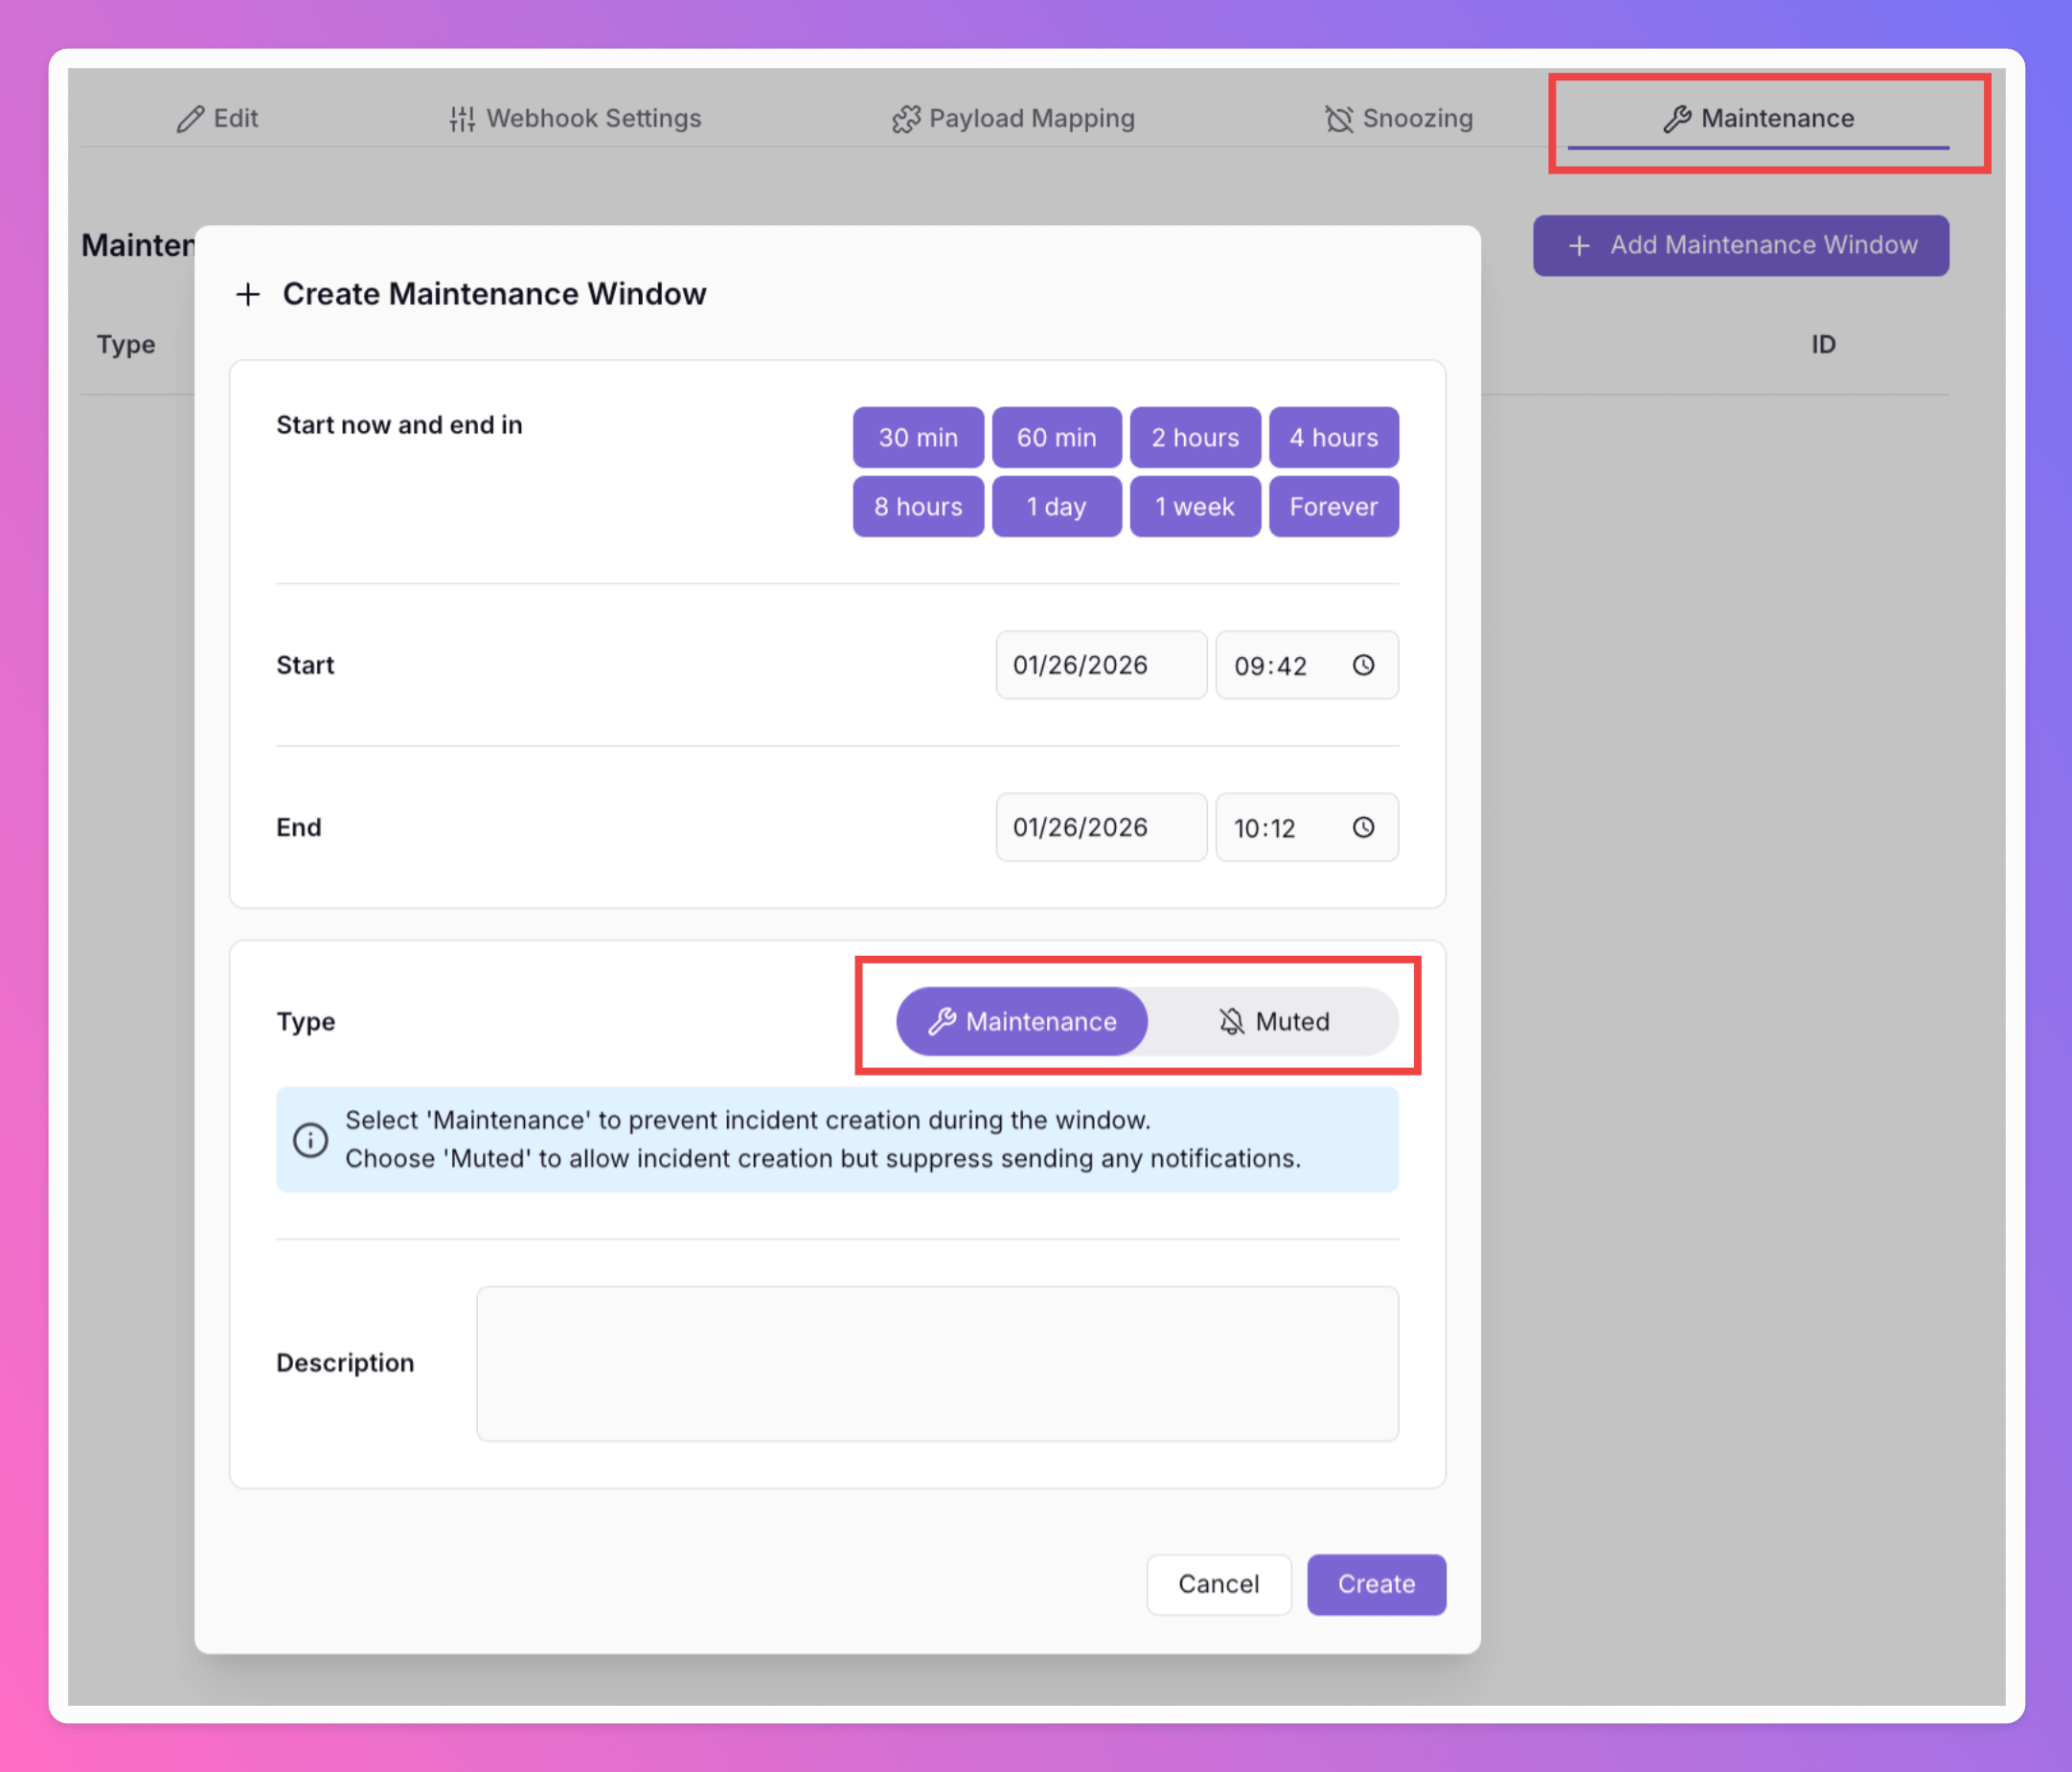
Maintenance for Inbound Integrations
In this tab, Team Administrators_ can addMaintenance Windows for the integration.
- Muted: For muted integrations, you will receive a payload and we’ll create an incident. However, we won’t send any notifications.
- Maintenance: For maintenanced integrations, you will receive a payload. However, we won’t create an incident nor will we send any notifications.
Incident Report for Inbound Integrations
To learn more about your Integration’s Incident KPIs, check our your Integration’s Incident Report.Troubleshooting: Missing or Unexpected Incidents
If an alert did not show up the way you expected—no new incident was created, no notification was sent, or it feels like the event “disappeared”—that rarely means the payload is missing. Inbound requests typically appear in the integration’s Latest Payloads on the Payload Mapping tab. What varies is what All Quiet did with the payload:- The incident may have been discarded (maintenance, payload mapping, or routing ruled that the payload should not be creating an incident).
- It may have updated an existing Open incident (same
CorrelationId, Grouping attributes, or equivalent matching) instead of creating a new one. Can especially happen with older Open incidents that weren’t Resolved that are muted, snoozed, archived, or otherwise not notifying, so you only see a quiet update. - Advanced routing can still mute channels, mute outbound integrations, or snooze and discard after creation.
Latest Payloads: See Which Incident Received the Payload
- Open the integration’s Payload Mapping tab and inspect Latest Payloads.
- Each tile shows which incident the payload was applied to. Click the shortened incident id on the tile to open that incident—this is the fastest way to see whether a new incident was created or an existing one was updated.

The Payload was Discarded
Discardin payload mapping: If mapping evaluatesDiscardtotruefor this payload, nothing is created—see Reserved and required attributes.- Routing rule with Discard: Advanced routing can Discard matching incidents after creation.
- Integration maintenance: Under Maintenance for inbound integrations, Maintenance mode accepts the payload but does not create an incident.
- Team maintenance: Maintenance (non-Muted) on the team prevents new incidents during the window.
The Payload Updated an Existing Incident and No Notification was Sent
New payloads are often merged into an alreadyOpen incident that shares the same CorrelationId (or the same mapped attributes when CorrelationId is not set). See Reserved and required attributes. It could also match an existing Open incident Grouping and create a new subincident.
Per default, notifications for simple updates of incident attributes or new subincidents are not sent.
- Use Latest Payloads (above) to see which incident received the update.
- Inspect that incident: it may be snoozed or sitting under an integration / team that is muted, so no notifications fire even though the payload was processed.
- Find the
CorrelationId(or Grouping attributes) and search for other Open incidents with the same value. Resolve or clean up incidents that should no longer receive correlation so new events surface as expected. - Check archived incidents and use Include Snoozed on the overview so hidden incident that might have swollowed the payload because of matching correlation are visible.
New Incident Exists but Still no Notification
If Latest Payloads shows a new incident was created, but nobody was alerted:- Created as
Resolved? Check incident details, or go to Payload Mapping, select the payload tile under Latest Payloads, and read the preview. If the mapping produces aResolvedincident, you will not get the usual notifications and escalations as for anOpenincident. - Integration snooze? New incidents can be created already snoozed—use Include Snoozed.
- Integration or team muted? Muted integration or team maintenance (Muted) suppresses notifications.
- Advanced routing: Check whether any routing rule whose conditions match this incident (after payload mapping) runs an action that suppresses alerting—for example
Discardor or Snooze via Configure Actions. Under Choose Channels, you can mute all channels, all outbound integrations, or a subset of channels or outbound integrations. If this all is not the case, and outbound tools still never see the incident, also review Forwarding.
Duplicating Integrations
If you want to create a new integration based on one you’ve already set up, you can duplicate it via the inbound integrations overview.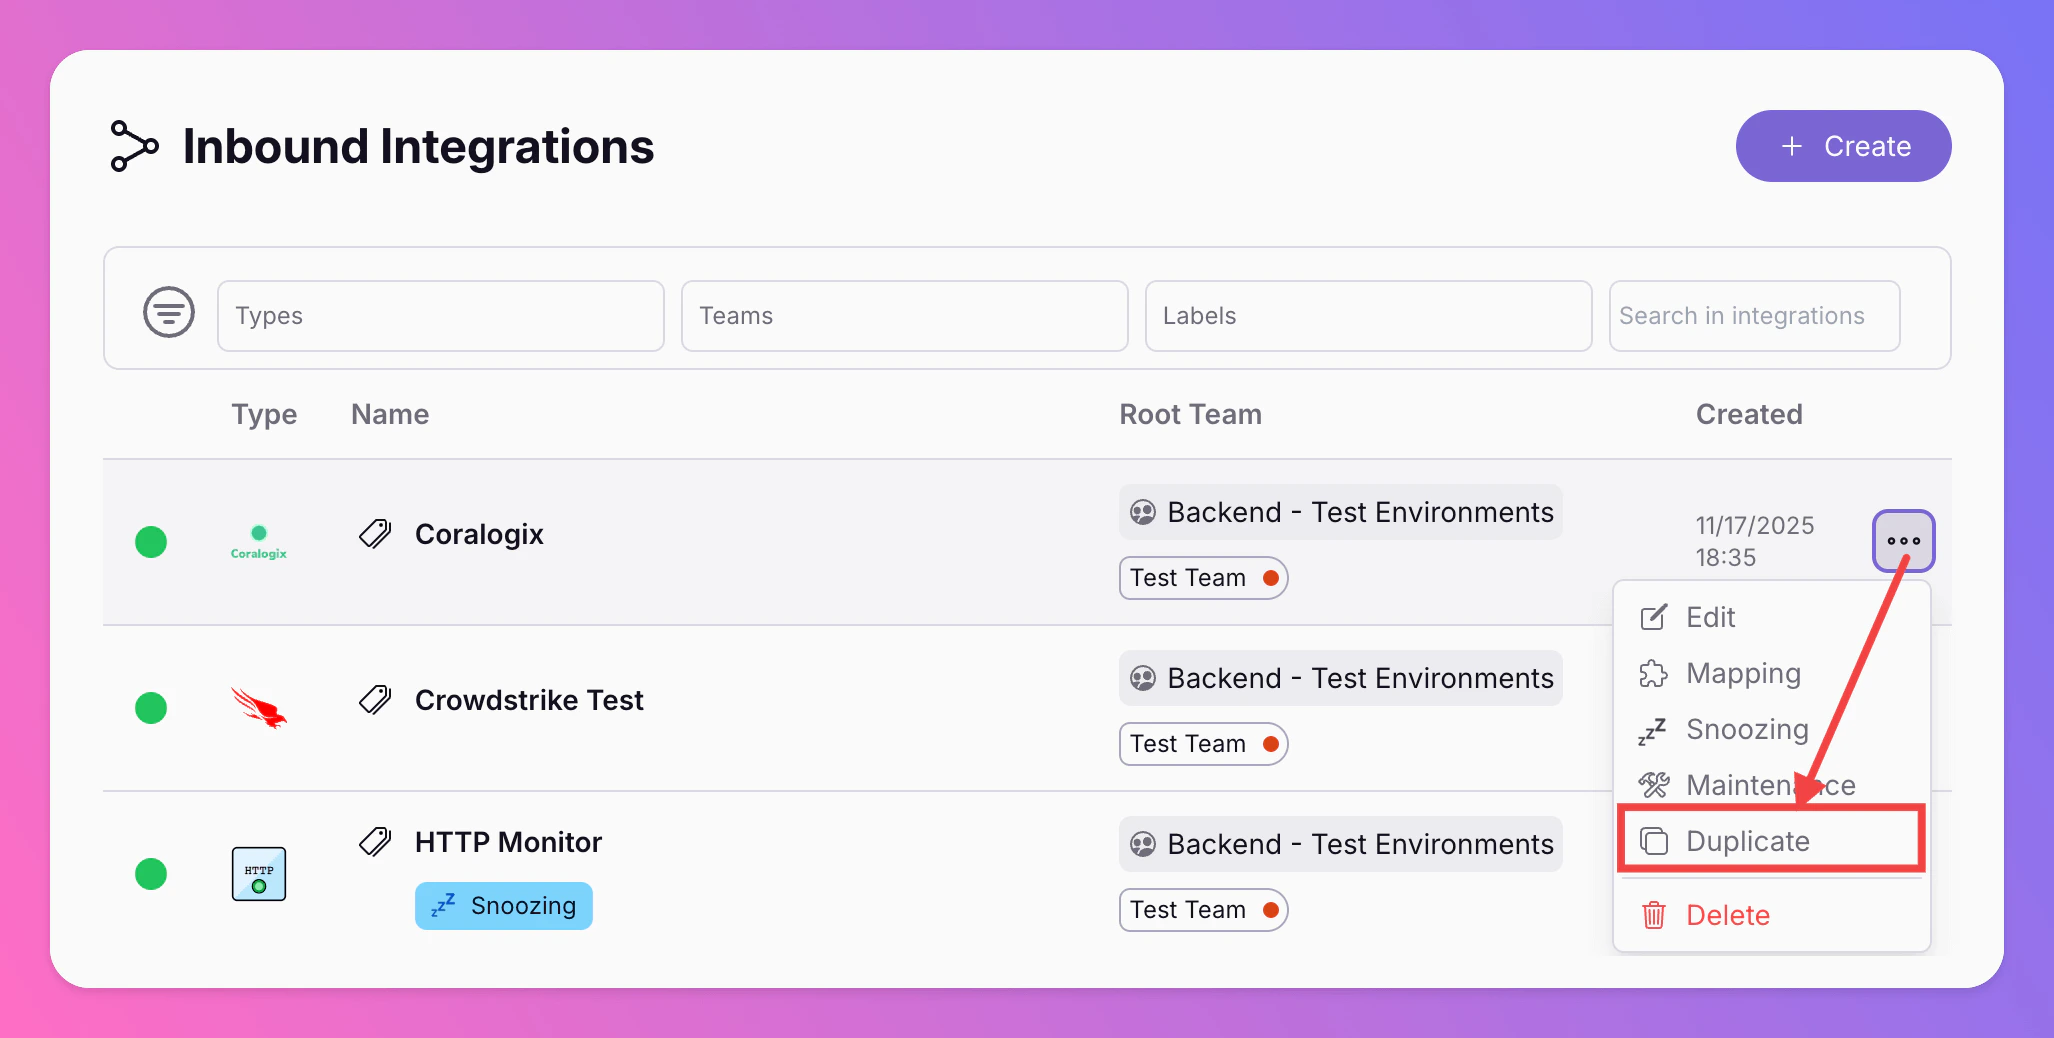
How to Use One Integration For Several Teams
To route incidents from one integration to several teams, all teams need to be within one Organization. Organizations are available on Pro and Enterprise plans.
- Same source, different on-call: One Datadog monitor, AWS account, or webhook sends everything to All Quiet; routing assigns incidents to Platform, Backend, or Mobile so each team’s escalation policy runs.
- Split by topic or ownership: Payload fields such as
service,team,product, ornamespace(mapped in payload mapping) decide which team gets the incident—one integration, many destinations. - Severity-based handoff: Critical incidents from the same integration go to a platform or incident-response team; Warnings and Minors stay with the product team that owns the service.
- Environment or region: One integration for staging and production (or
euvsus); route byENV,region, or similar attributes so only the right team is paged. - Central “Root” team, no on-call there: Integrations live in a Root team with no schedules; all real paging happens in domain teams after Assign to Team routing.
- Create a “Root” team. This team is only used to create integrations that are shared across several teams. There should be no on-call schedules for your Root team.
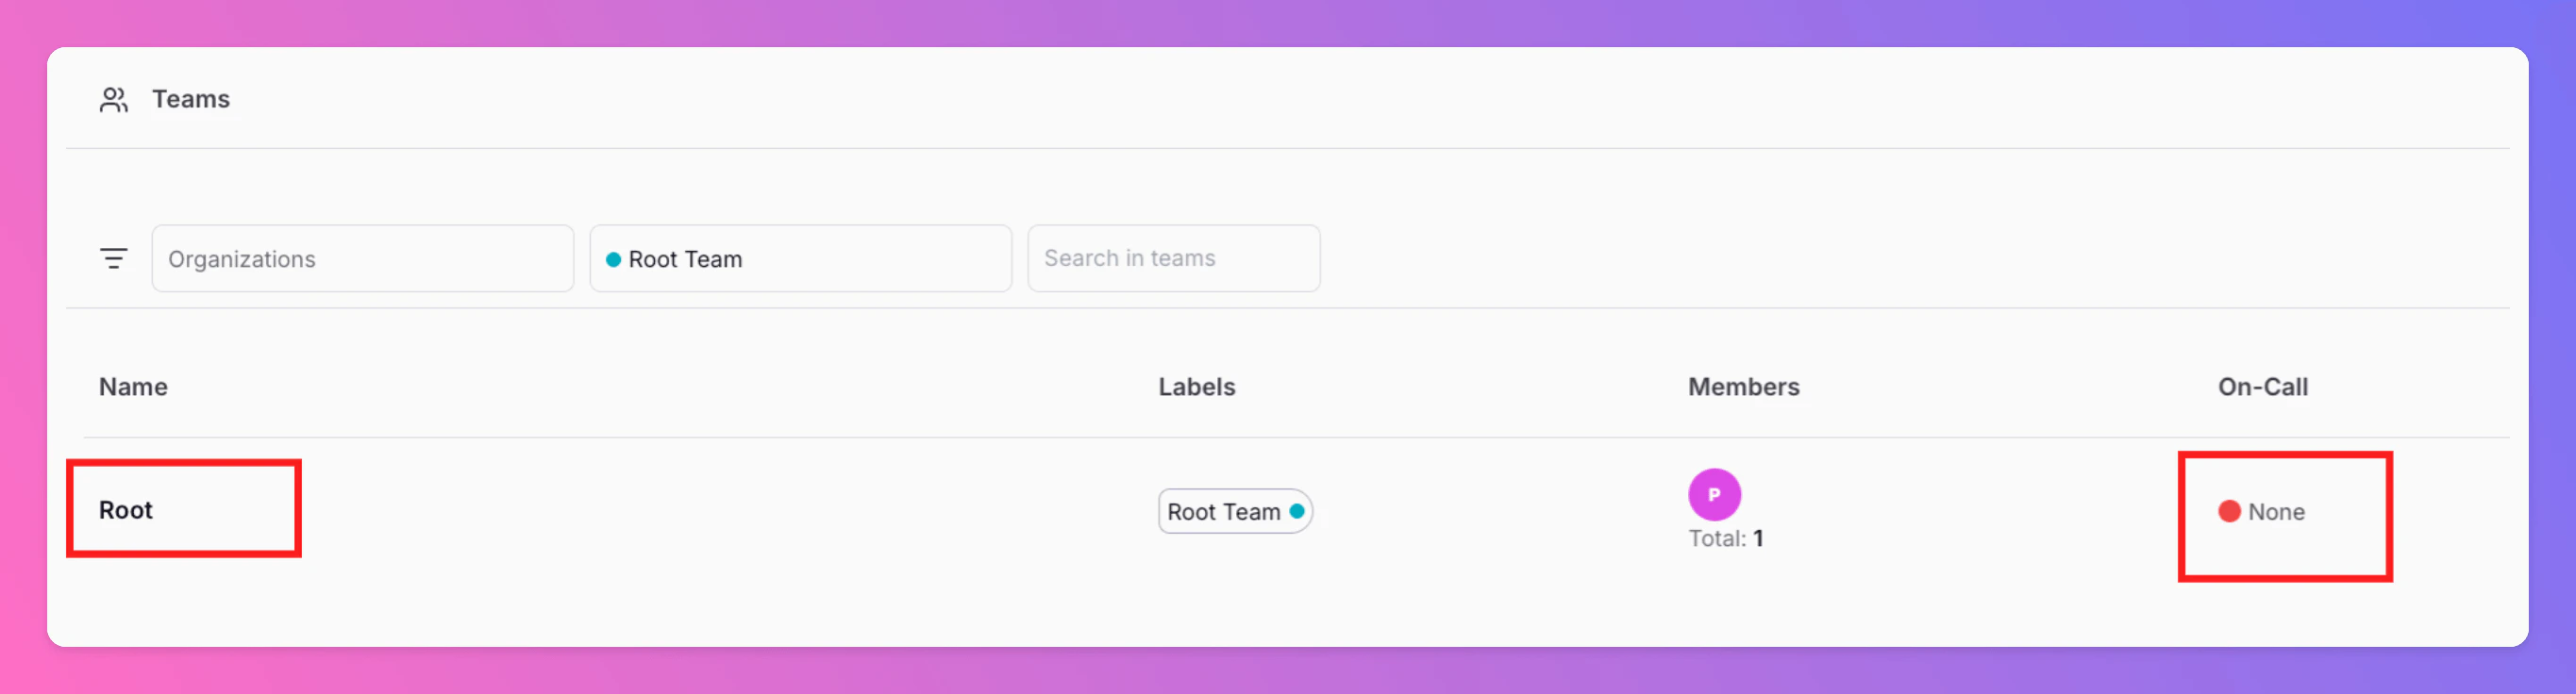
- Create the integrations you want to share across multiple teams in your “Root” team.

- Create advanced routing rules in the root team. Define for which conditions incidents are assigned to different teams.
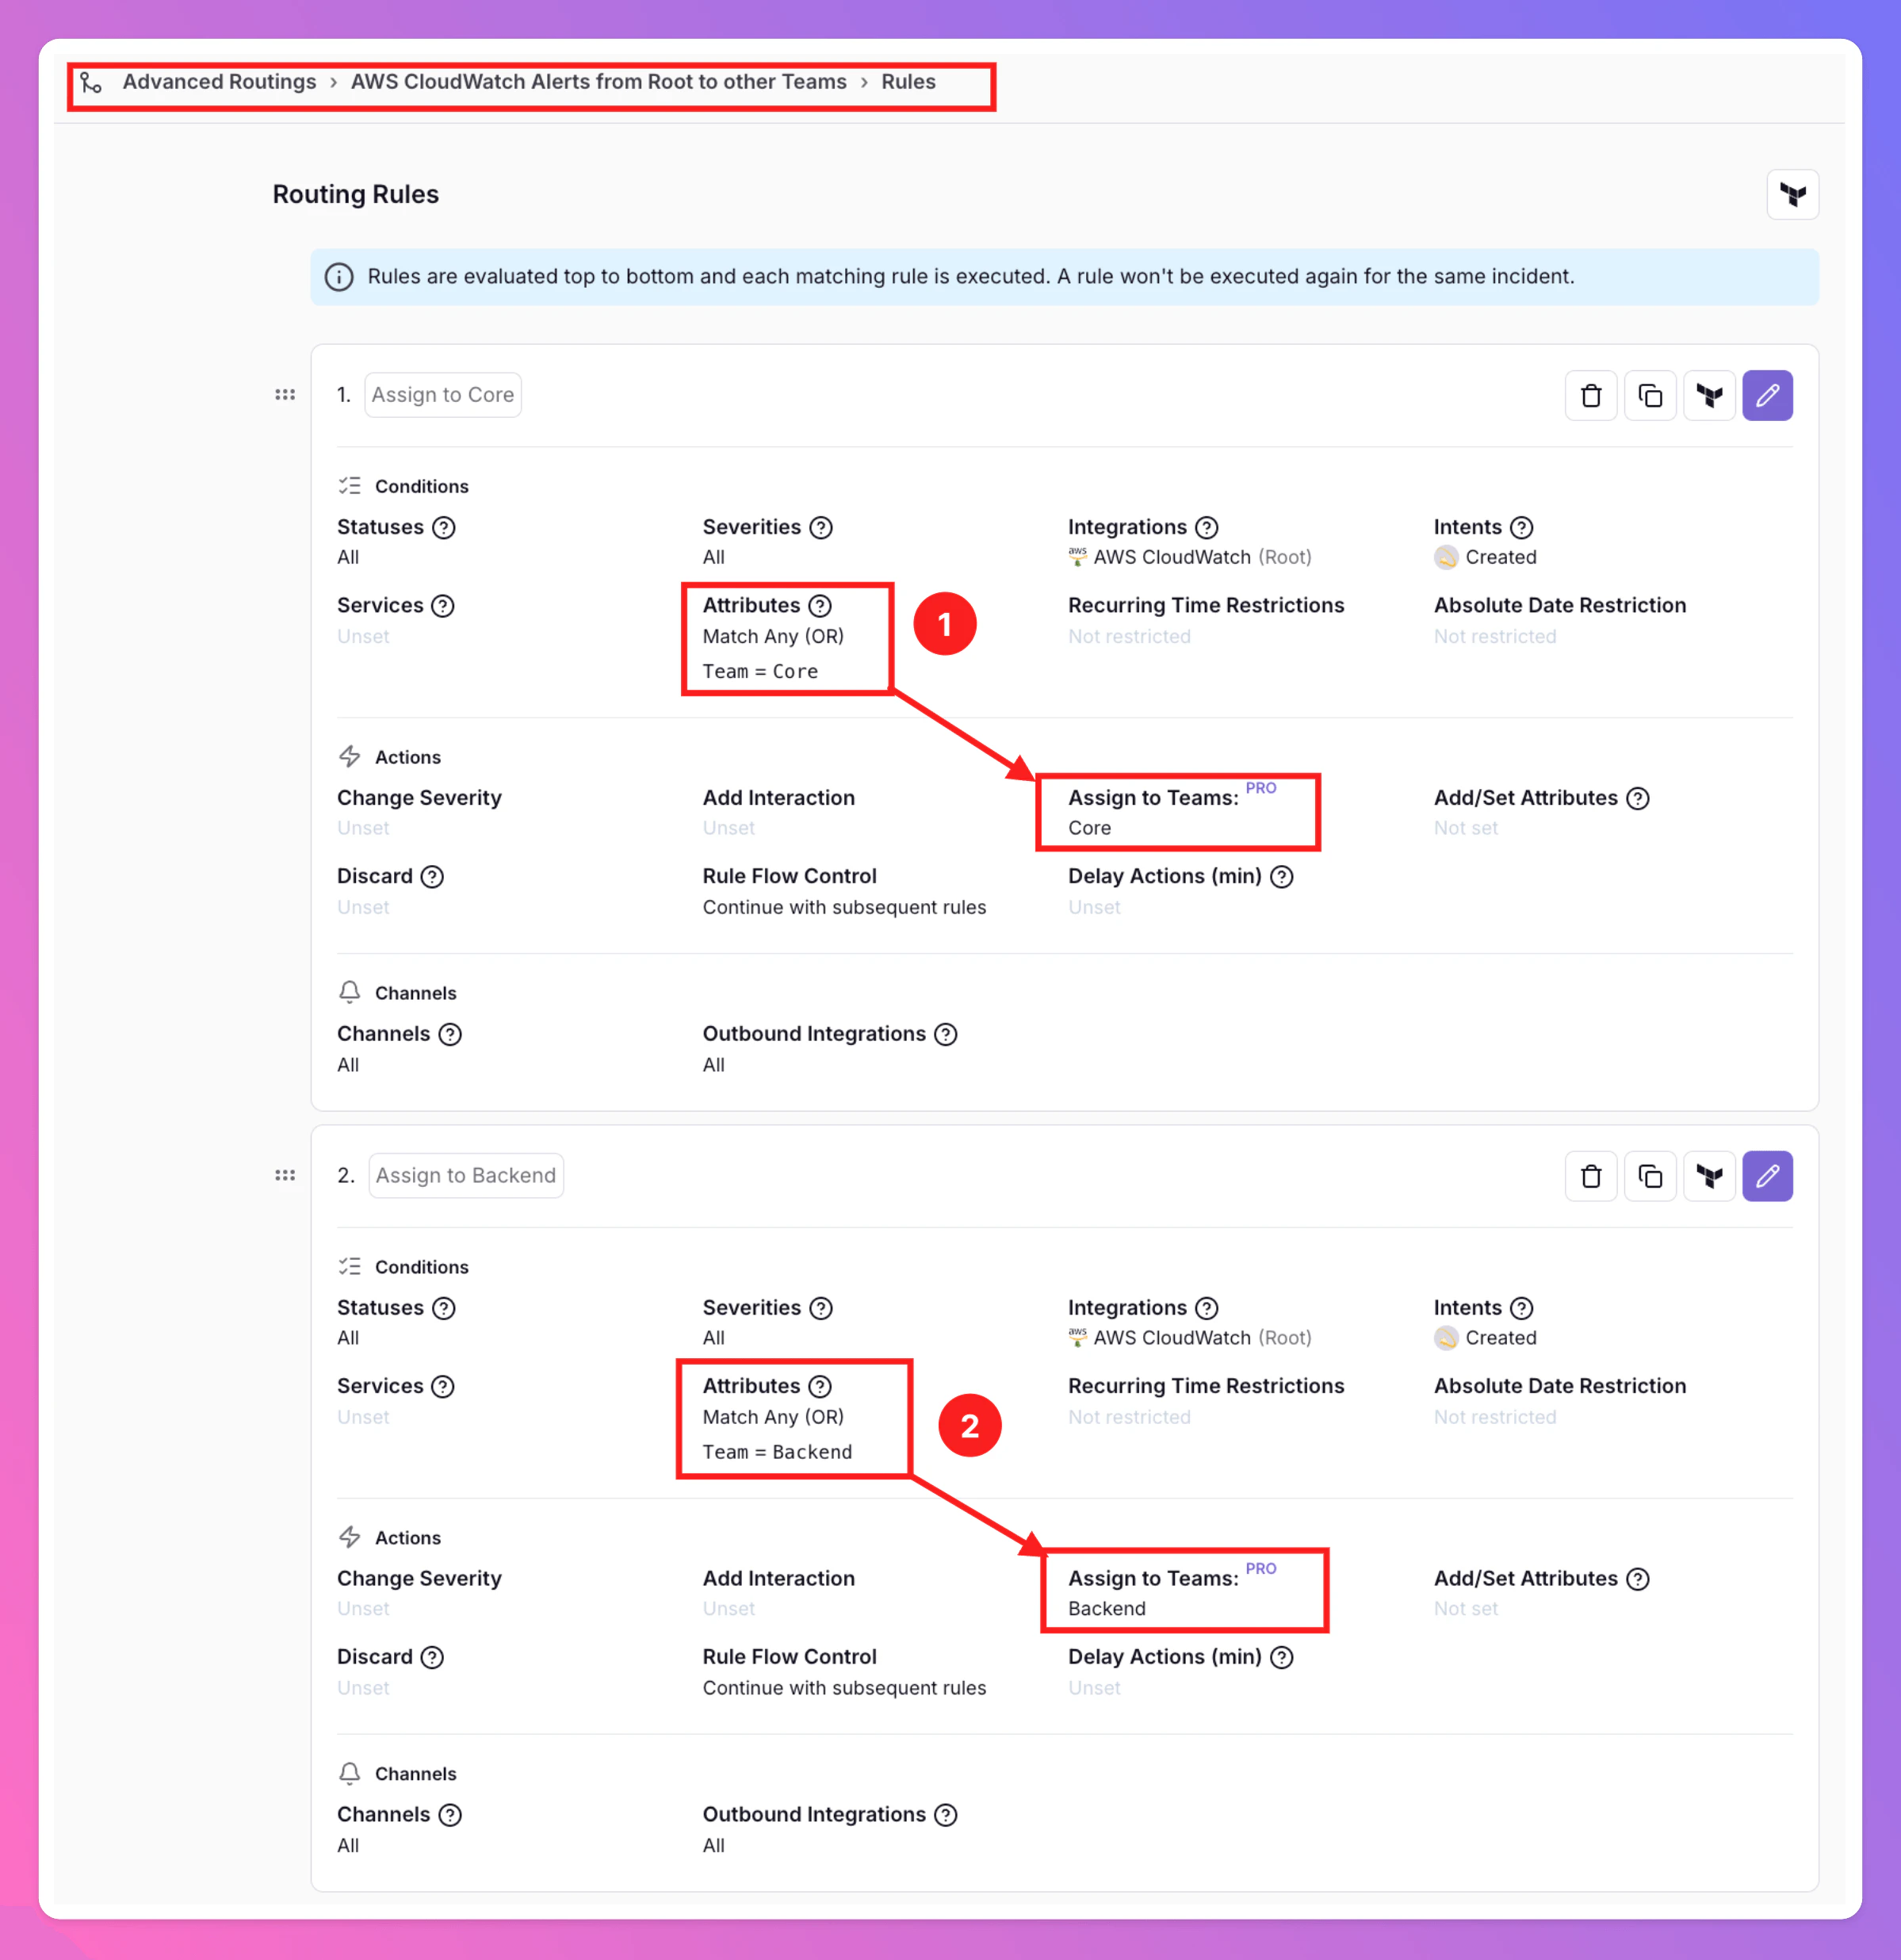
Below, you can find examples of different routings for incidents created via “Root” team’s AWS CloudWatch integration. In the payload mapping, we added the attribute “Team”. Based on the values of the attribute, we route incidents to different teams:
- Condition: Team = Core → Then Action: Assign to Team “Core” → Escalations in Team “Core” start
- Condition: Title = Backend → Then Action: Assign to Team “Backend” → Escalations in “Backend” start
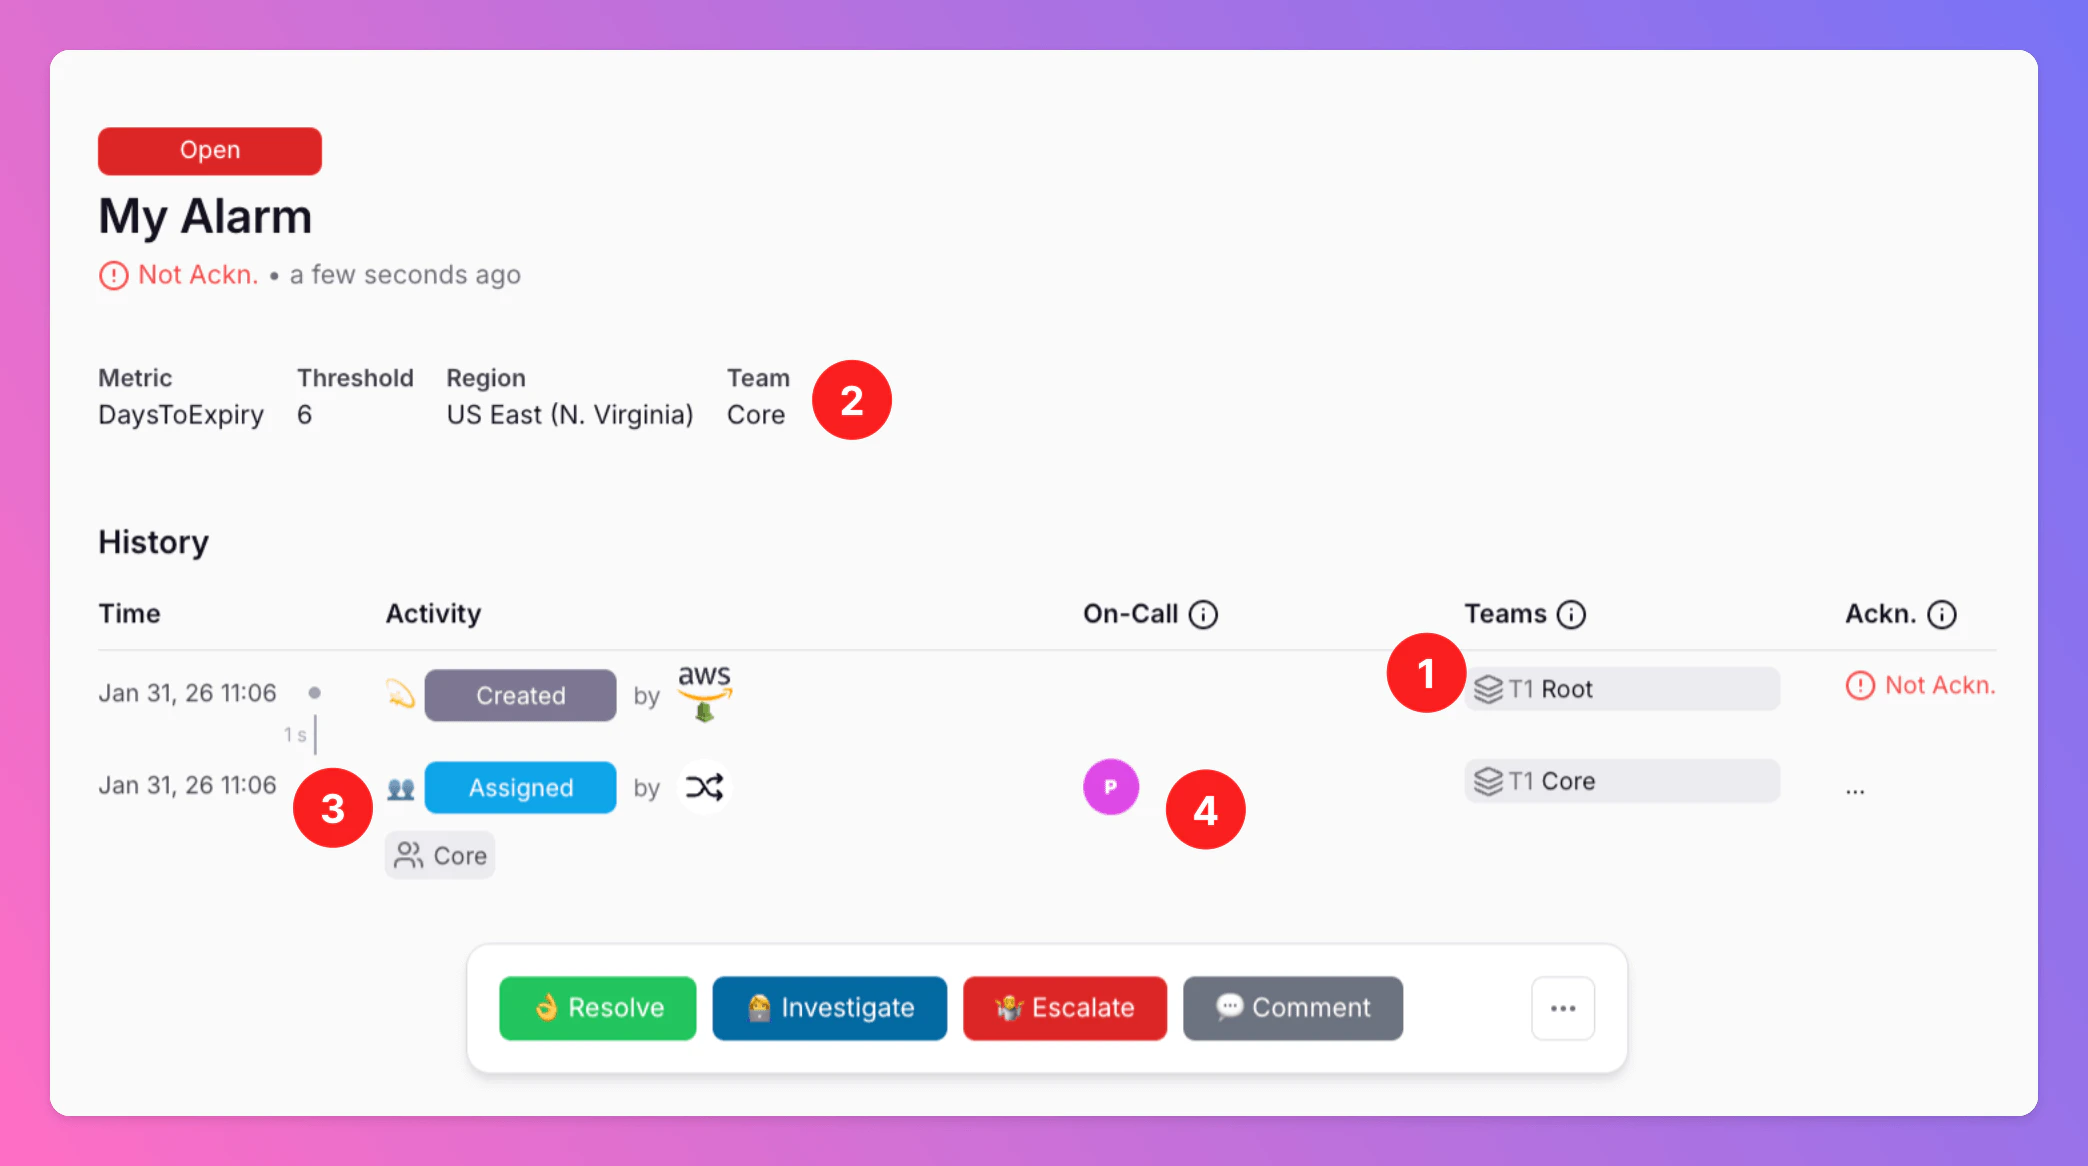
- Notice that the incident was created in the “Root” team, the team associated with the AWS CloudWatch integration.
- As the incident included the attribute “Team” with value “Core”…
- …the incidents was instantly assigned to “Core” team…
- …and Core’s Tier 1 members were notified.
Built-in Integrations
Receive alerts from your observability tools. We offer generic email and webhook as well as a growing number of pre-built integrations:AppDynamics
AppSignal
AWS Cloudwatch
Azure Monitor
Checkly
Coralogix
Cron Job Monitor
CrowdStrike
Dash0
Datadog
Dynatrace
Elastic Observability
Google Cloud Monitoring
GitHub
GitLab
Grafana
Heartbeat Monitor
Honeycomb
Jira
Linear
Mattermost
Microsoft Teams
Nagios
Netdata
New Relic
Observium
Ping Monitor
Pingdom
Prometheus
PRTG Network Monitor
Rollbar
Sentry
ServiceNow
SigNoz
Site24x7
Slack
Splunk
StatusCake
Twilio
UptimeRobot
Webhook
Website / HTTP Monitor
Zabbix
Zapier
Propose a new integration
Didn’t find your tool here? Reach out to support@allquiet.app and let us know your preferred integration. We’re always happy to grow our integrations list.API and Webhook Rate Limits
Our current rate limits for all integrations in order to protect the functionality of the platform for all customers
- API: 30 unique requests per URL within 20s
- Webhook Payloads: 20 requests per integration within 3s, 50 requests per integration within 20s, 180 requests per integration within 300s
- Incident Updates From Integration: Max 256 updates without user interaction in between are saved for a single incident; once limit is reached, newer updates will override older attribute information.
- Incident Creation via API: 4 incidents within 30s, 10 incidents within 2min, 20 incidents within 5min.
- Incident Updates via API: 4 updates per incident within 30s, 10 updates per incident within 2min, 20 updates per incident within 5min.