- Follow-the-sun
- Weekend shifts
- Night shifts
Follow-the-sun rotations enable global teams, especially those distributed worldwide, to leverage time zone differences for around-the-clock coverage. This ensures on-call duties are always managed during the local daytime hours of team members, enhancing responsiveness and minimizing overnight work.
- Setup: Depending on where your team is located, you can set up two (or more) schedules for the same escalation tier within All Quiet. Team members are then assigned to these schedules, with the option to add rotations. Ideally, this setup ensures every team member only works during their local daytime hours.
- Why: This method leverages time zone differences, minimizing response times to incidents during off-hours in any given region.
- Benefit: Teams experience less burnout and maintain a higher level of alertness and productivity, as members respond to incidents during their daytime hours.
Accessing Escalation Policies
To access the escalation management page, simply select theEscalations option for the respective team.
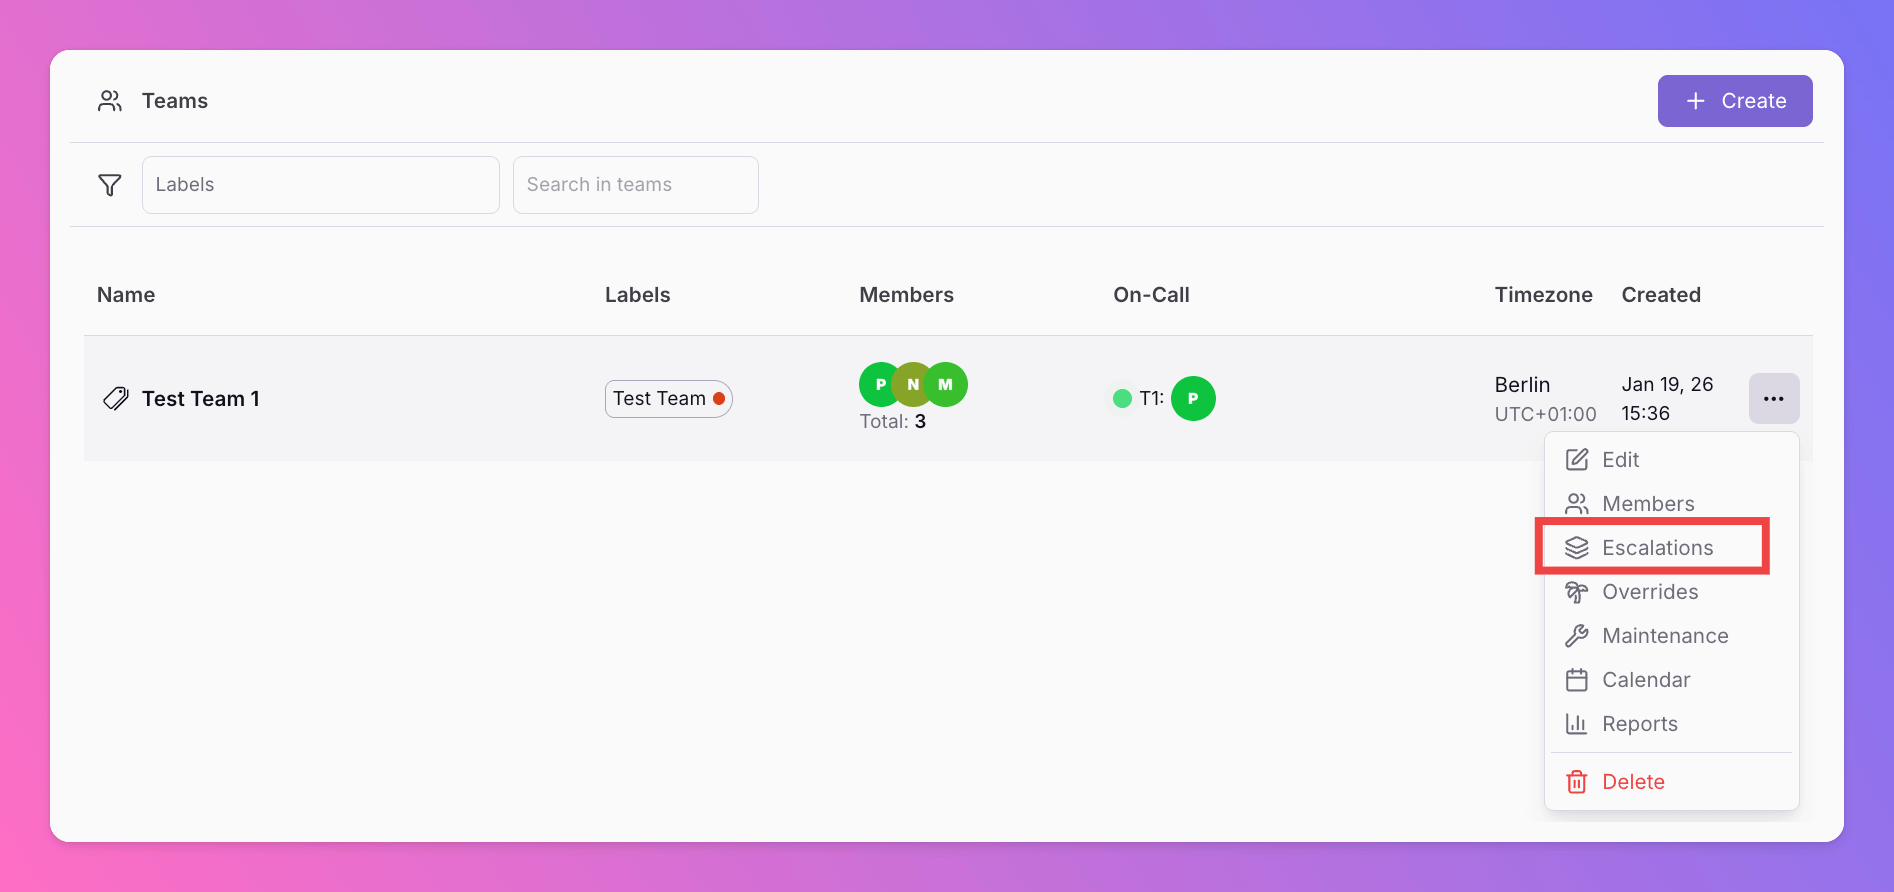
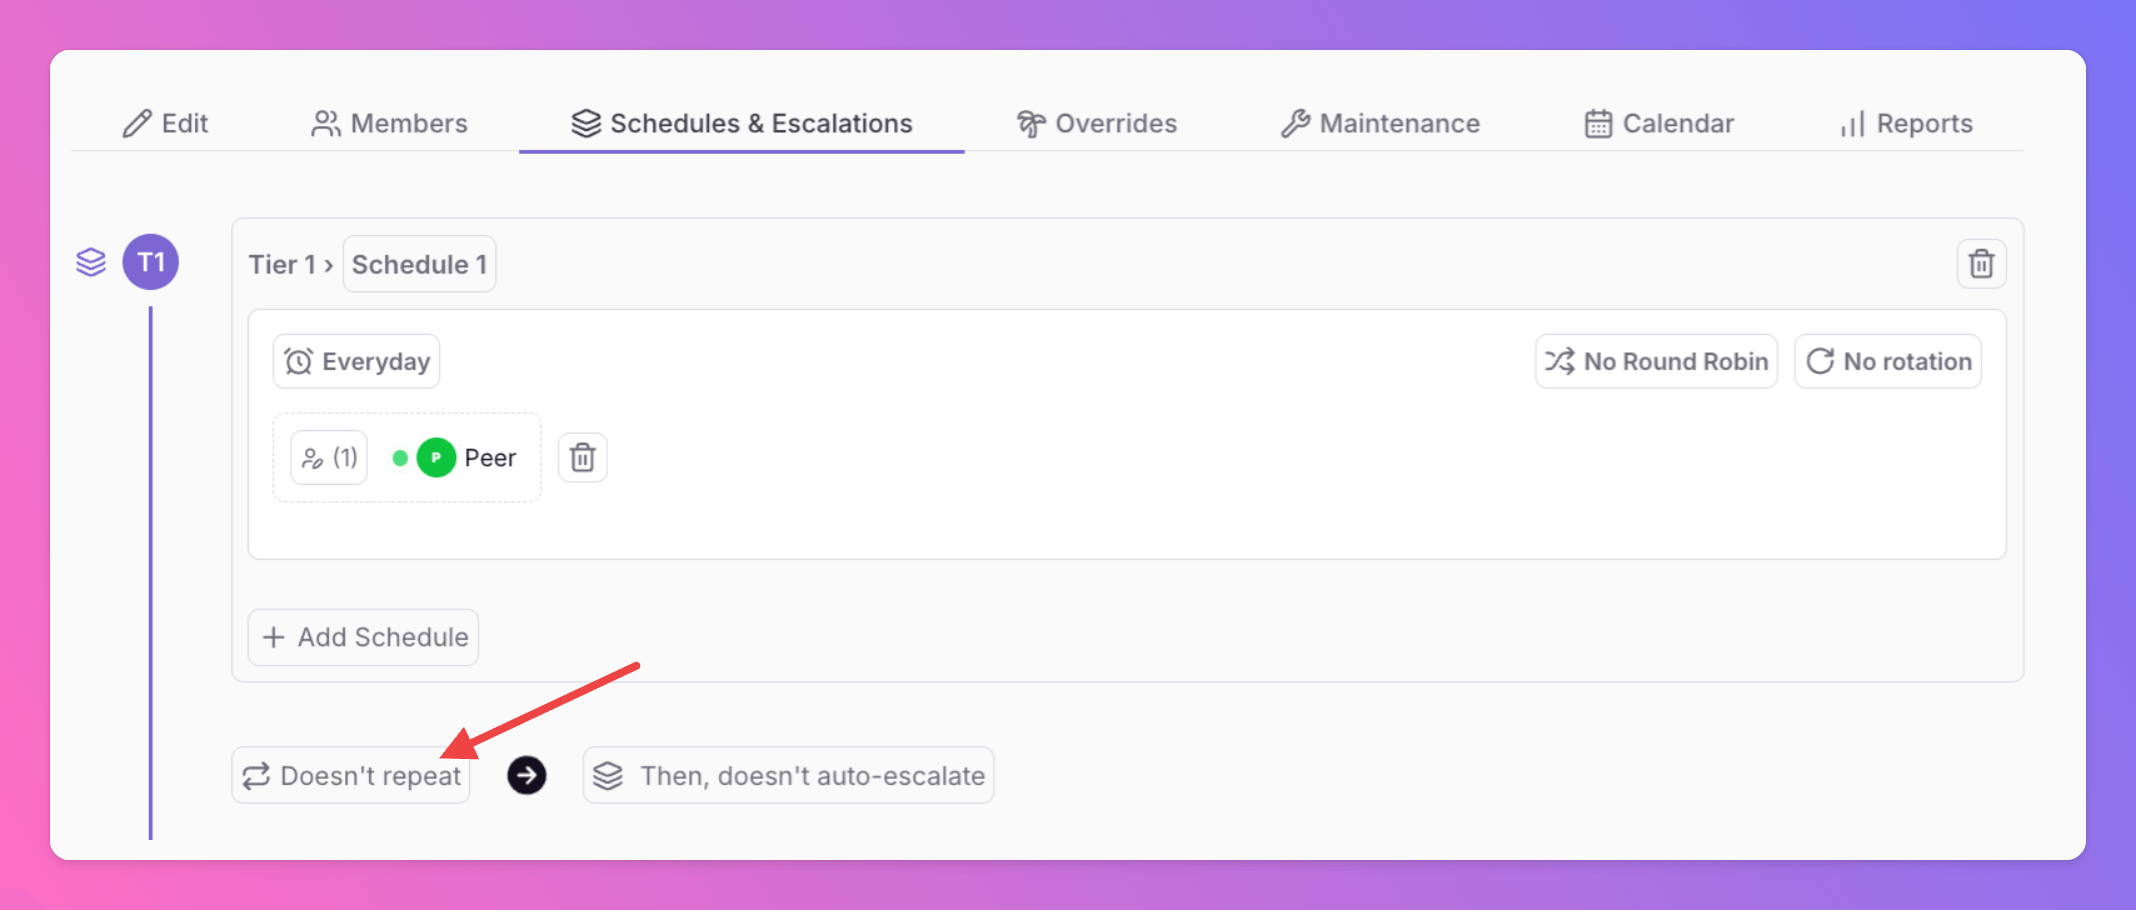
Escalation Tiers
Escalation tiers allow incidents to be escalated to the next level when they are not acknowledged / resolved by the members of the current tier or when a manual escalation is triggered. They also allow you to repeat escalations for users that got already alerted. Check out our example below for a hands-on use case of setting up various escalation tiers.Repeat Escalation Tier
If you want re-alert the on-call members of one tier in case they did not acknowledge / resolve an incident, you can use ourrepeat escalation tier function.
To add a repetition for a specific tier, simply click the label below the tier.
- To activate
Repeat current escalation tier, activate the toggle. - Decide when auto-repeat should stop, whether it’s after someone acknowledges the incident or whether auto-repeats should happen until someone
Resolvesthe incident. - Select how often you want to repeat the tier.
- Select how long you want to wait in between each repetition.
- Save your settings.
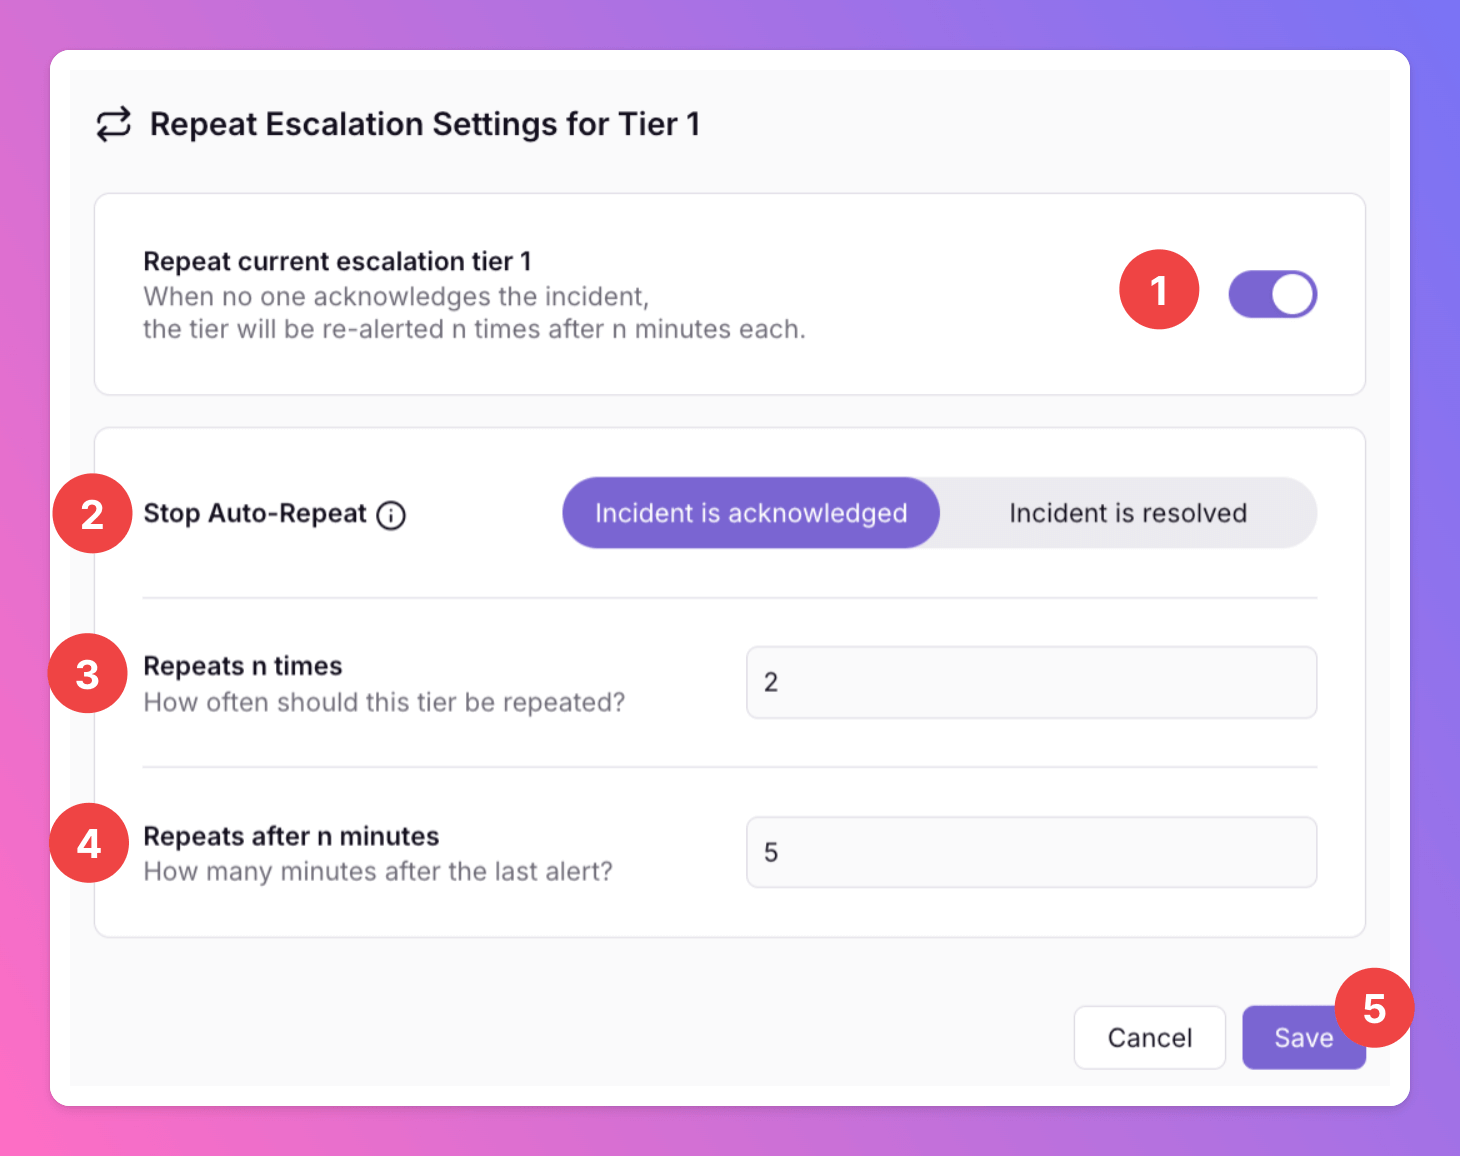
- Tier 1 alert at t=0 min
- First repetition at t=5 min (if no one acknowledged)
- Second repetition at t=10 min (if no one acknowledged)
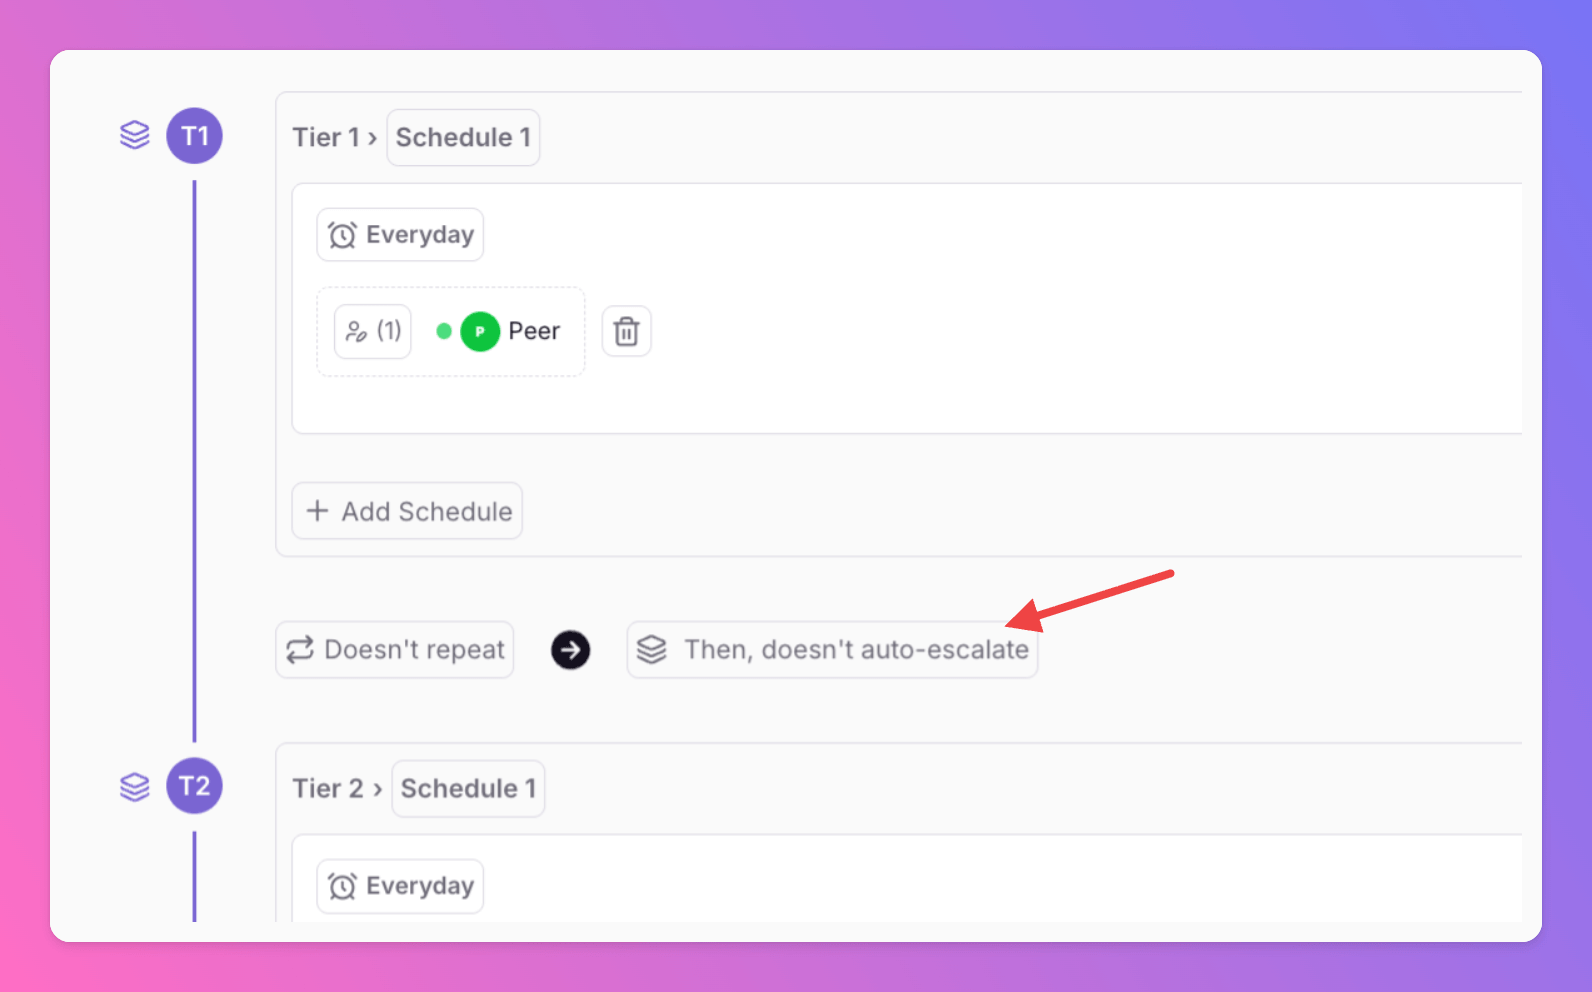
Automatic Escalation
To enable auto-escalations, you first need to add at least a second escalation tier. Without it, the incident will remain within Tier 1, and no further escalation will occur. Click+ Add Escalation Tier and select team members to create the second tier.
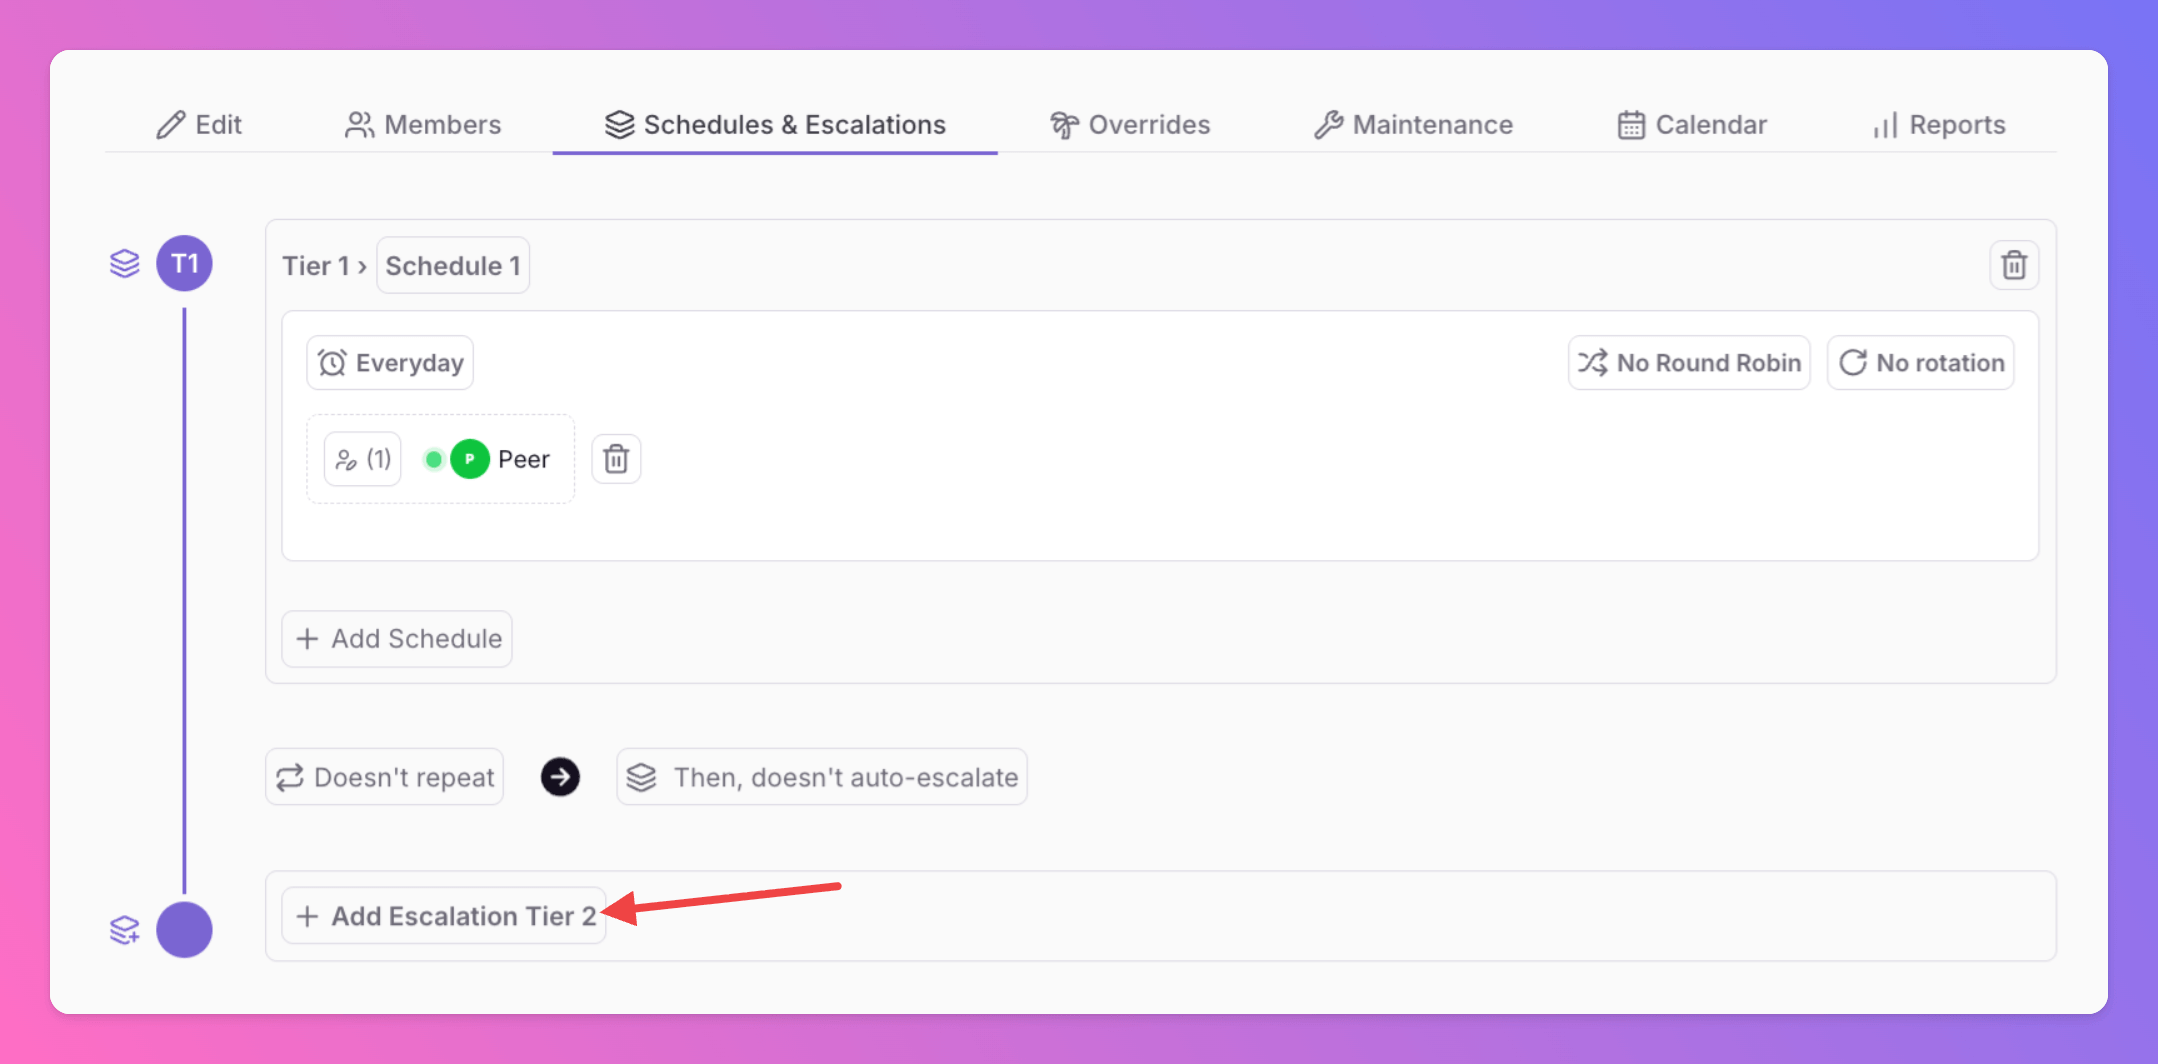
Then, doesn't auto-escalate by default.
The repeat and auto-escalate features can, of course, be combined. This allows you to notify Tier 1 multiple times before automatically escalating the incident if no one acknowledges / resolves it.
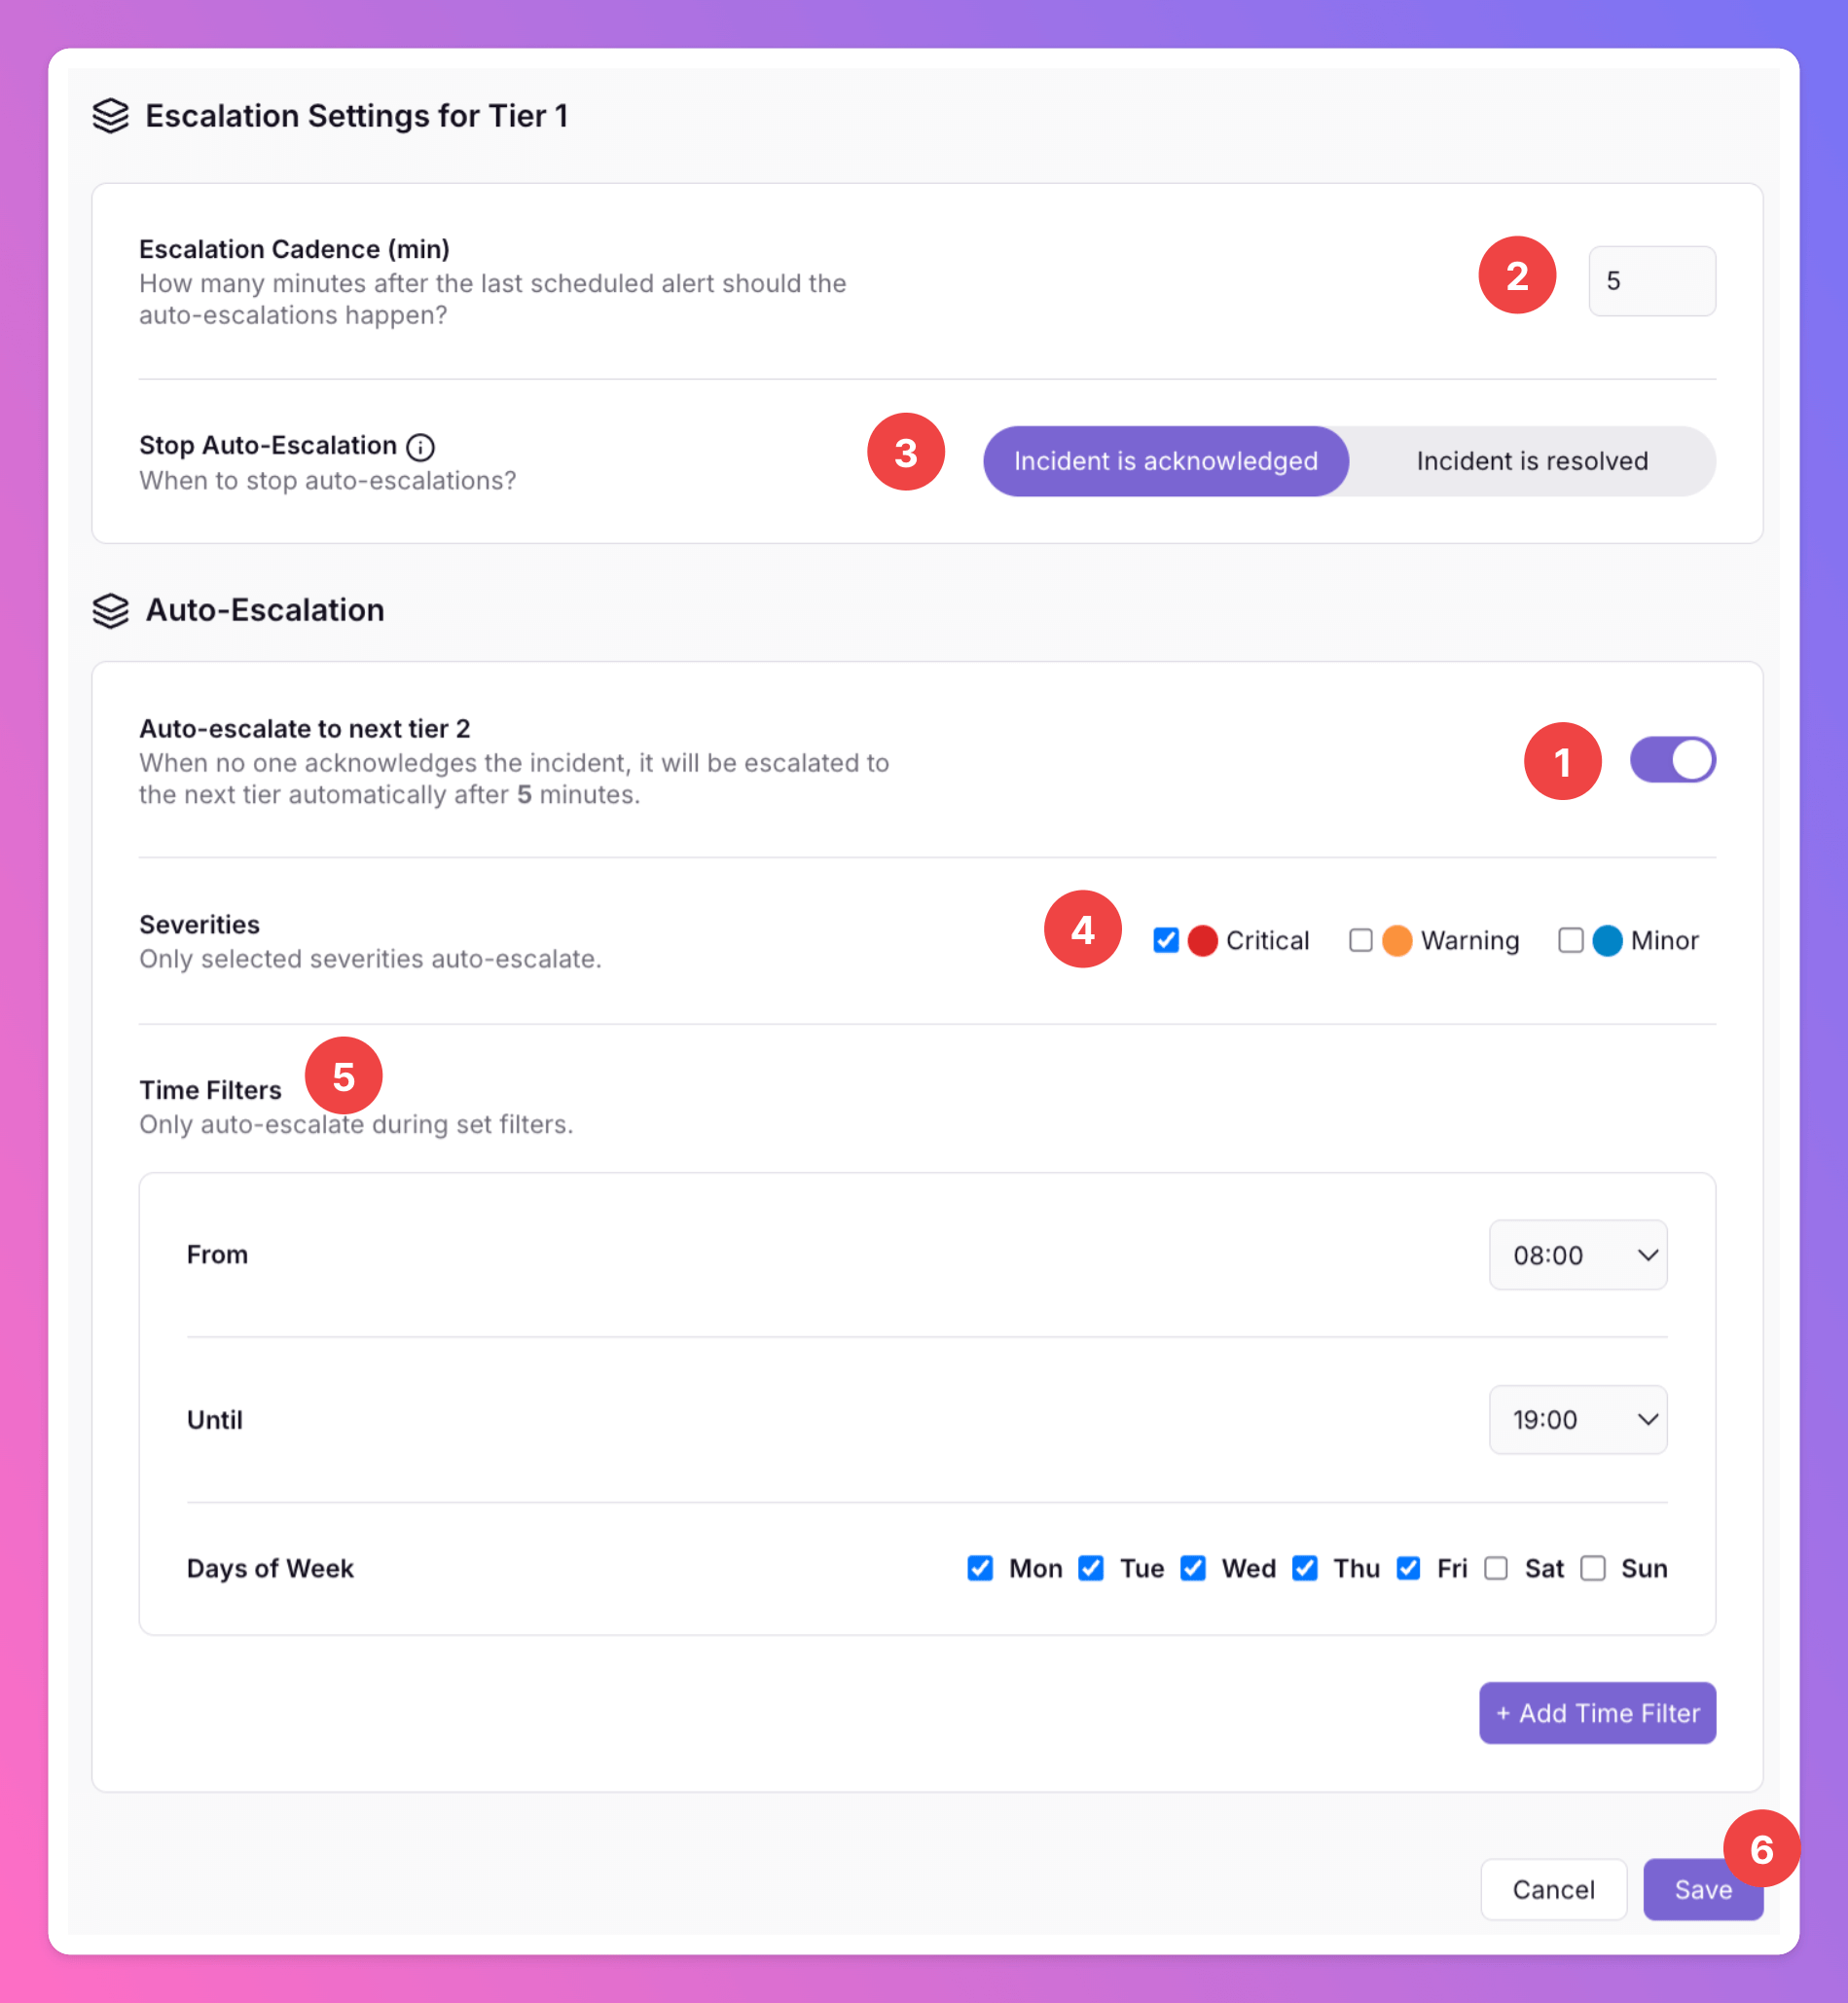
- To activate
Auto-escalate to next tier, activate the toggle. - Select how long you want to wait after the last scheduled alert in Tier 1 before you auto-escalate to Tier 2. “Last scheduled alert in Tier 1” hereby includes all scheduled repetitions of Tier 1, not only those that actually took place.
- Decide when auto-escalations should stop, whether it’s after someone acknowledges the incident or whether auto-escations should happen until someone
Resolvesthe incident. - Select which incident severities you want to auto-escalate. Here, we decided to only auto-escalate Critical incidents.
- You may add
Time Filters. If added, auto-escalation only take place in the selected times. In the example below, we opted for auto-escalations that happen only during weekdays from 8:00 AM to 7:00 PM. - Click
Saveto activate auto-escalations.
Auto-Escalations Across Several Teams
Auto-assign and manual incident reassignment are supported only within Organizations on Pro and Enterprise plans.
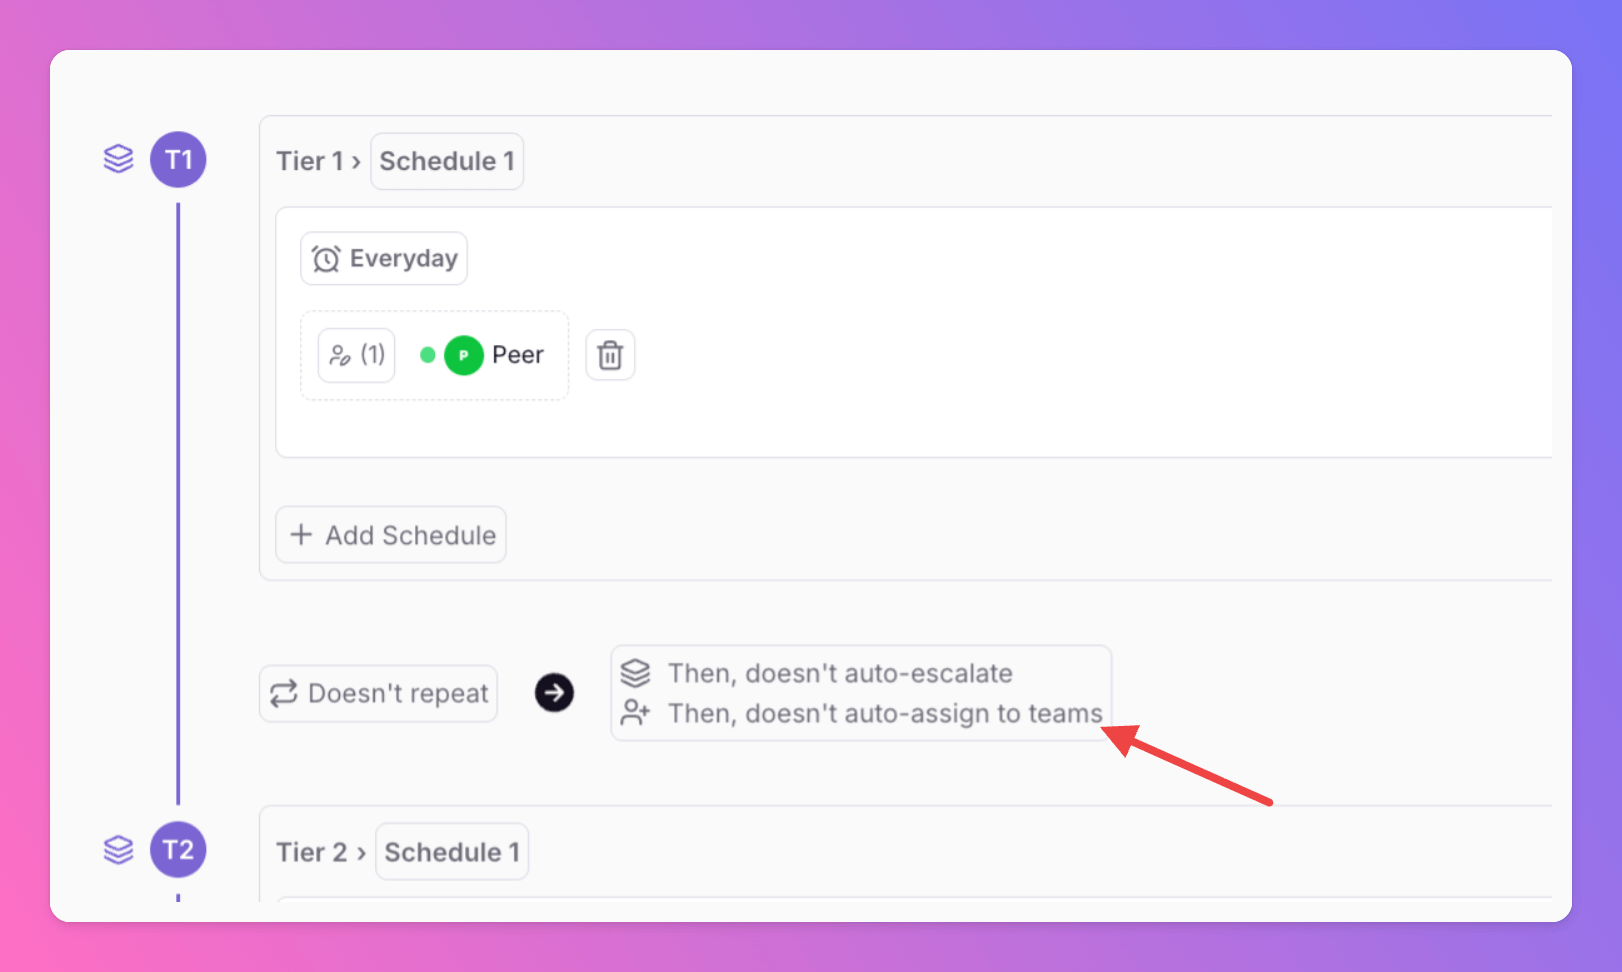
- As you can see, this is the same overlay you would use to activate auto-escalation.
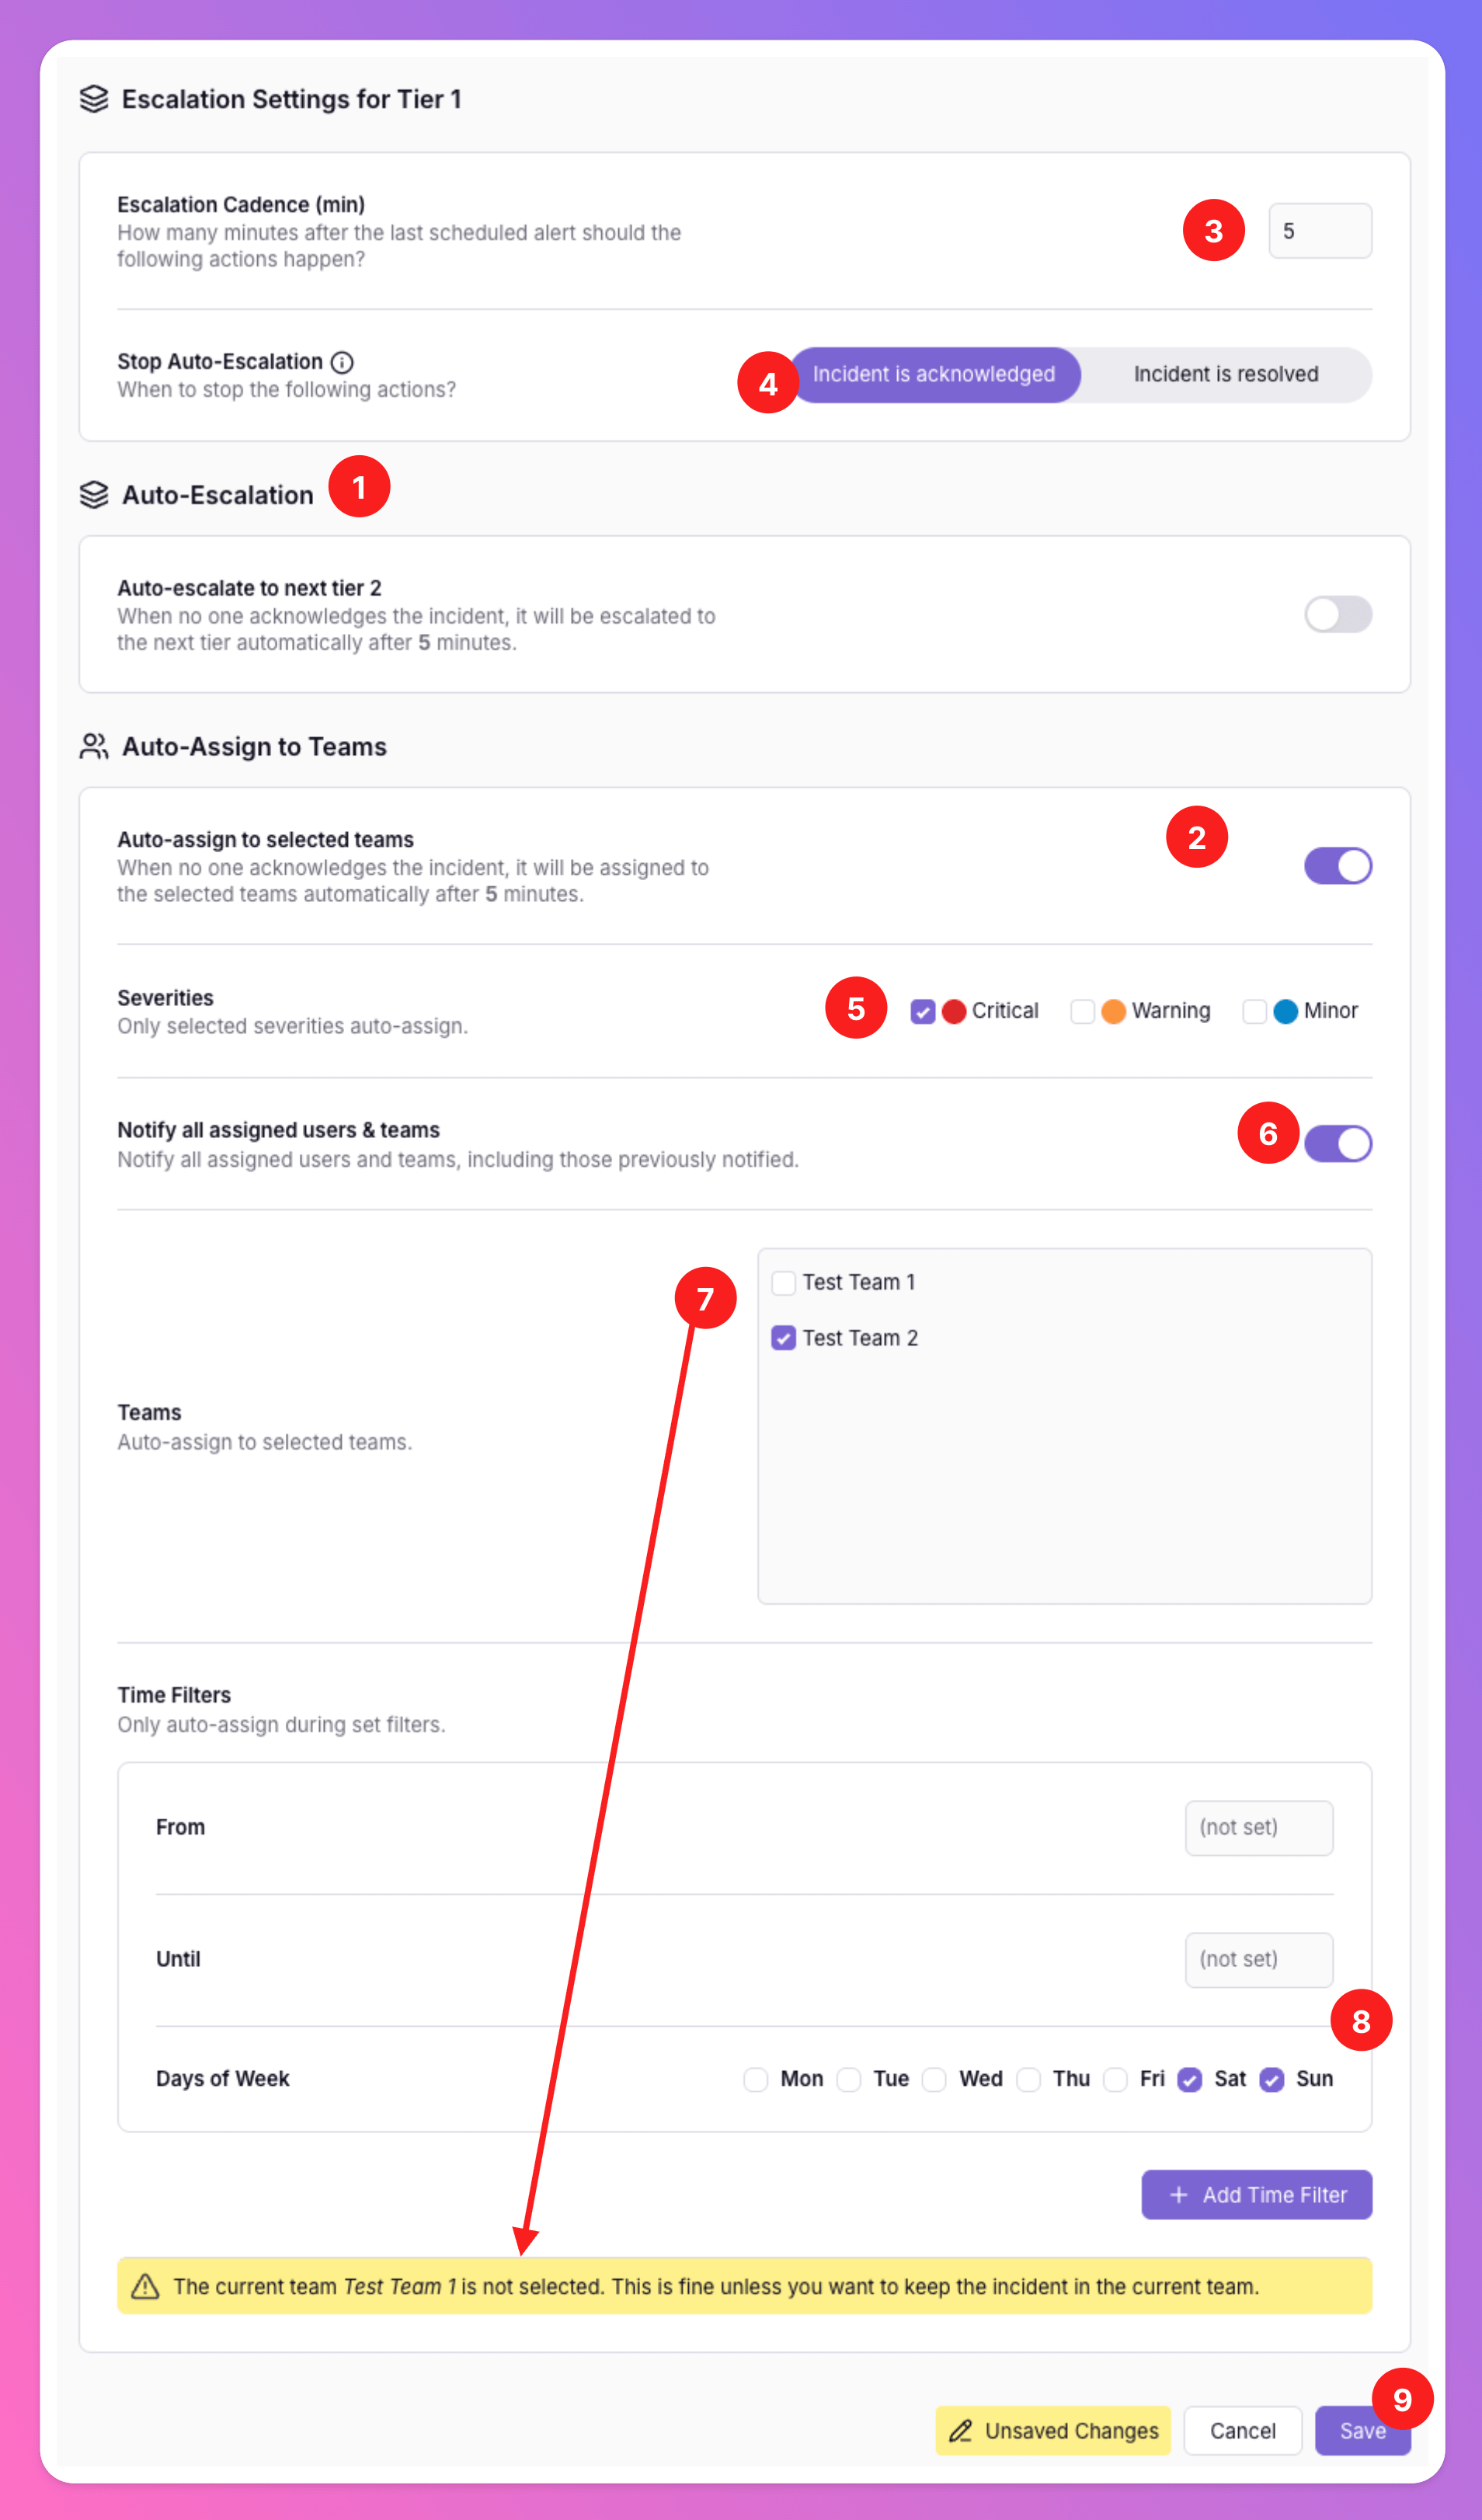
- To activate
Auto-assign to selected teams, activate the respective toggle. - Select how long you want to wait after the last scheduled alert in Tier 1 before you auto-assign to the selected teams. “Last scheduled alert in Tier 1” hereby all scheduled repetitions of Tier 1, not only those that actually took place. Note that the same cadence is used for auto-escalations, if activated.
- Decide when auto-assign should stop, whether it’s after someone acknowledges the incident or whether auto-assign should happen until someone
Resolvesthe incident. Note that the same rule is used for auto-escalations, if activated. - Select which incident severities you want to auto-assign. Here, we decided to only auto-assign Critical incidents.
- Select if you want to notify all assigned users and teams about the assign action or if you only want to notify users that are newly assigned.
- Select the teams you want to auto-assign to. In case you don’t select the current team (like in the example), we show a little warning.
- You may add
Time Filters. If added, auto-assign only take place in the selected times. In the example below, we opted for to only auto-assign on Saturdays and Sundays. - Click
Saveto activate auto-assign.
Need to involve more people? The “assign” action can also be used manually when collaborating on incident resolution. Learn more.
Impact on Auto-Escalations
As the incident is reassigned to a different team or the primary team asks additional people to help, the Assign action starts auto-escalations in the newly assigned team(s). If the incident is assigned to more than one team, auto-escalations are synchronized between those teams and only stop once an action that marks the incident as acknowleged follows after the Assign action / the incident is resolved. Here’s a breakdown of how reassigning an incident can impact escalations, with examples: Example 1 - Change Team of an Incident: Assign Incident from Team A to Team B- Team A: Auto-escalations stop as soon as the incident is not longer within the team.
- Team B: Tier 1 members are notified about the newly assigned incident. Auto-escalations begin, regardless of whether the incident was acknowledged by Team A before assigning it to Team B.
- Team B:
- Team B settings: Stop auto-escalations when “Incident is acknowledged”: Auto-Escalations as soon as anyone acknowledges the incident after it was assigned to Team B.
- Team B settings: Stop auto-escalations when “Incident is resolved”: Auto-escalations are only stopped if they come to an end or the incident is resolved.
- Team A Auto-Escalations: Tier 1 escalates to Tier 2 after 5 minutes
- Team B Auto-Escalations: Tier 1 escalates to Tier 2 after 2 minutes
- Team A: Incident is created, and Team A’s auto-escalations start (t=0 min)
- Team A: The incident is assigned to Team A & B. (t=2 min)
- Team A & B: At this point, Team B Tier 1 members and all already escalated tiers in Team A are notified about the newly assigned incident (t=2 min). Team B’s auto-escalations begin.
- Team B: Auto-escalates to Tier 2, 2 minutes after Tier 1 was notified (t=4min)
- Team A: Contrary to Team A’s original auto-escalation plan, auto-escalations now align with the updated escalation timeline. Auto-escalation for Team A also takes place at t=4 min. When multiple teams handle one incident and have different auto-escalation timelines, the system uses the first auto-escalation policy to align all teams. Team A is escalated regardless of whether Team A’ settings stopped auto-escalations before the incident was assigned it to Team B. Adding a new team is treated as if the new Team B represents a new escalation tier, notifying all tiers below in Team A & B.
- Team A & B:
- Both teams stop auto-escalations when “Incident is acknowledged”: Auto-escalations stop as soon as anyone acknowledges the incident after it was assigned to Team A & B.
- At least one team only stops auto-escalations when “Incident is resolved”: Auto-Escalations in Team A & B are only stopped if they come to an end or the incident is resolved.
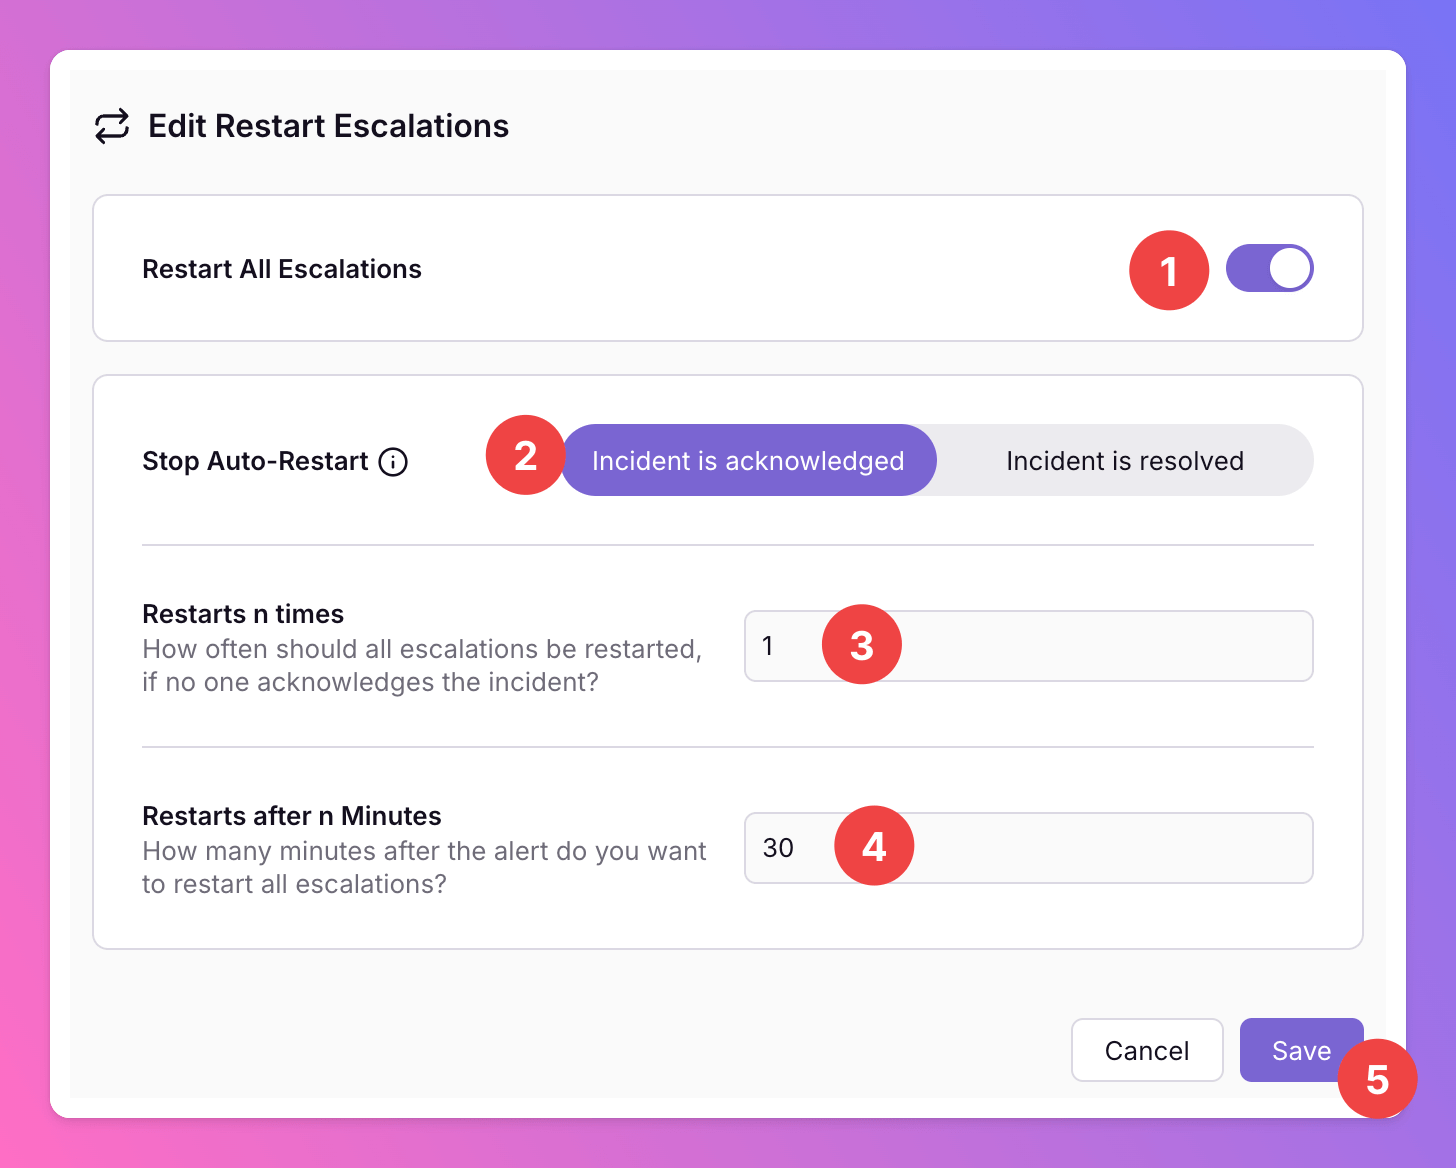
Repeat Escalations
You might want to repeat the escalation tiers to re-alert the on-call members. At the bottom of the page, you will find an element that you can activate by clicking on the label.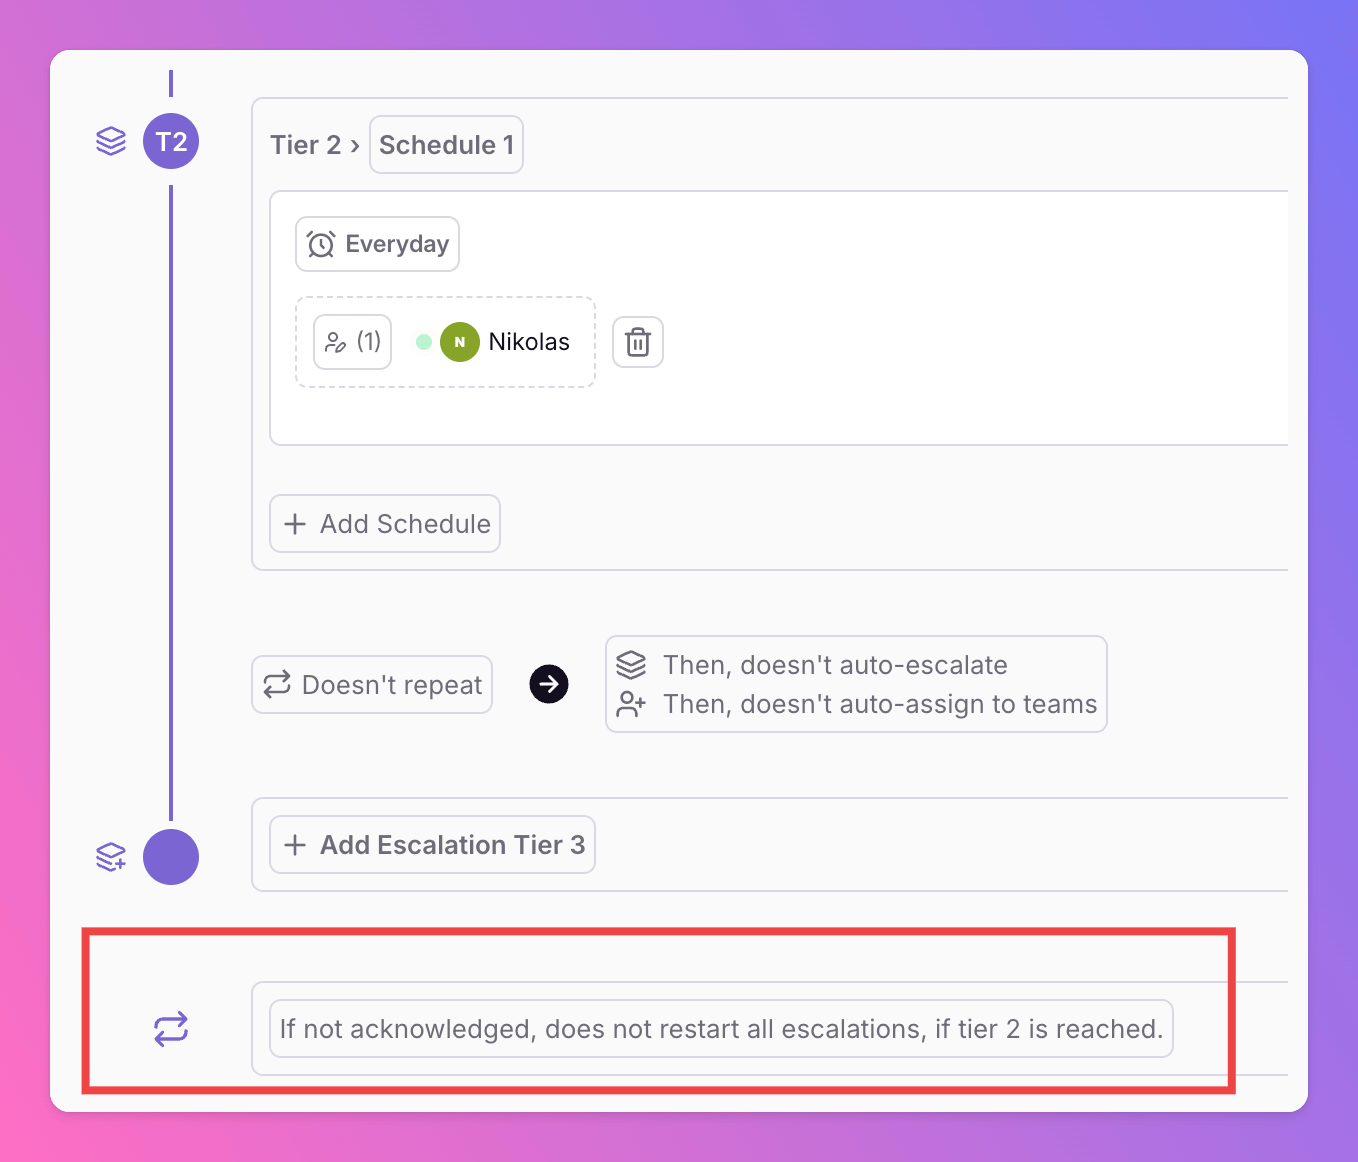
- Enabling the toggle activates repetition of all escalation tiers. Of course, tiers are only repeated if and after all escalations tiers have been reached.
- Decide when auto-repeat should stop, whether it’s when the incident is acknowledged or whether auto-repeat should happen until someone
Resolvesthe incident. - You can select how often you’d like to repeat the escalations.
- You can select how long you want to wait after the last escalation tier before repeating the escalations. We will use this grace period before restarting the escalations and re-alerting.
- Save your settings.

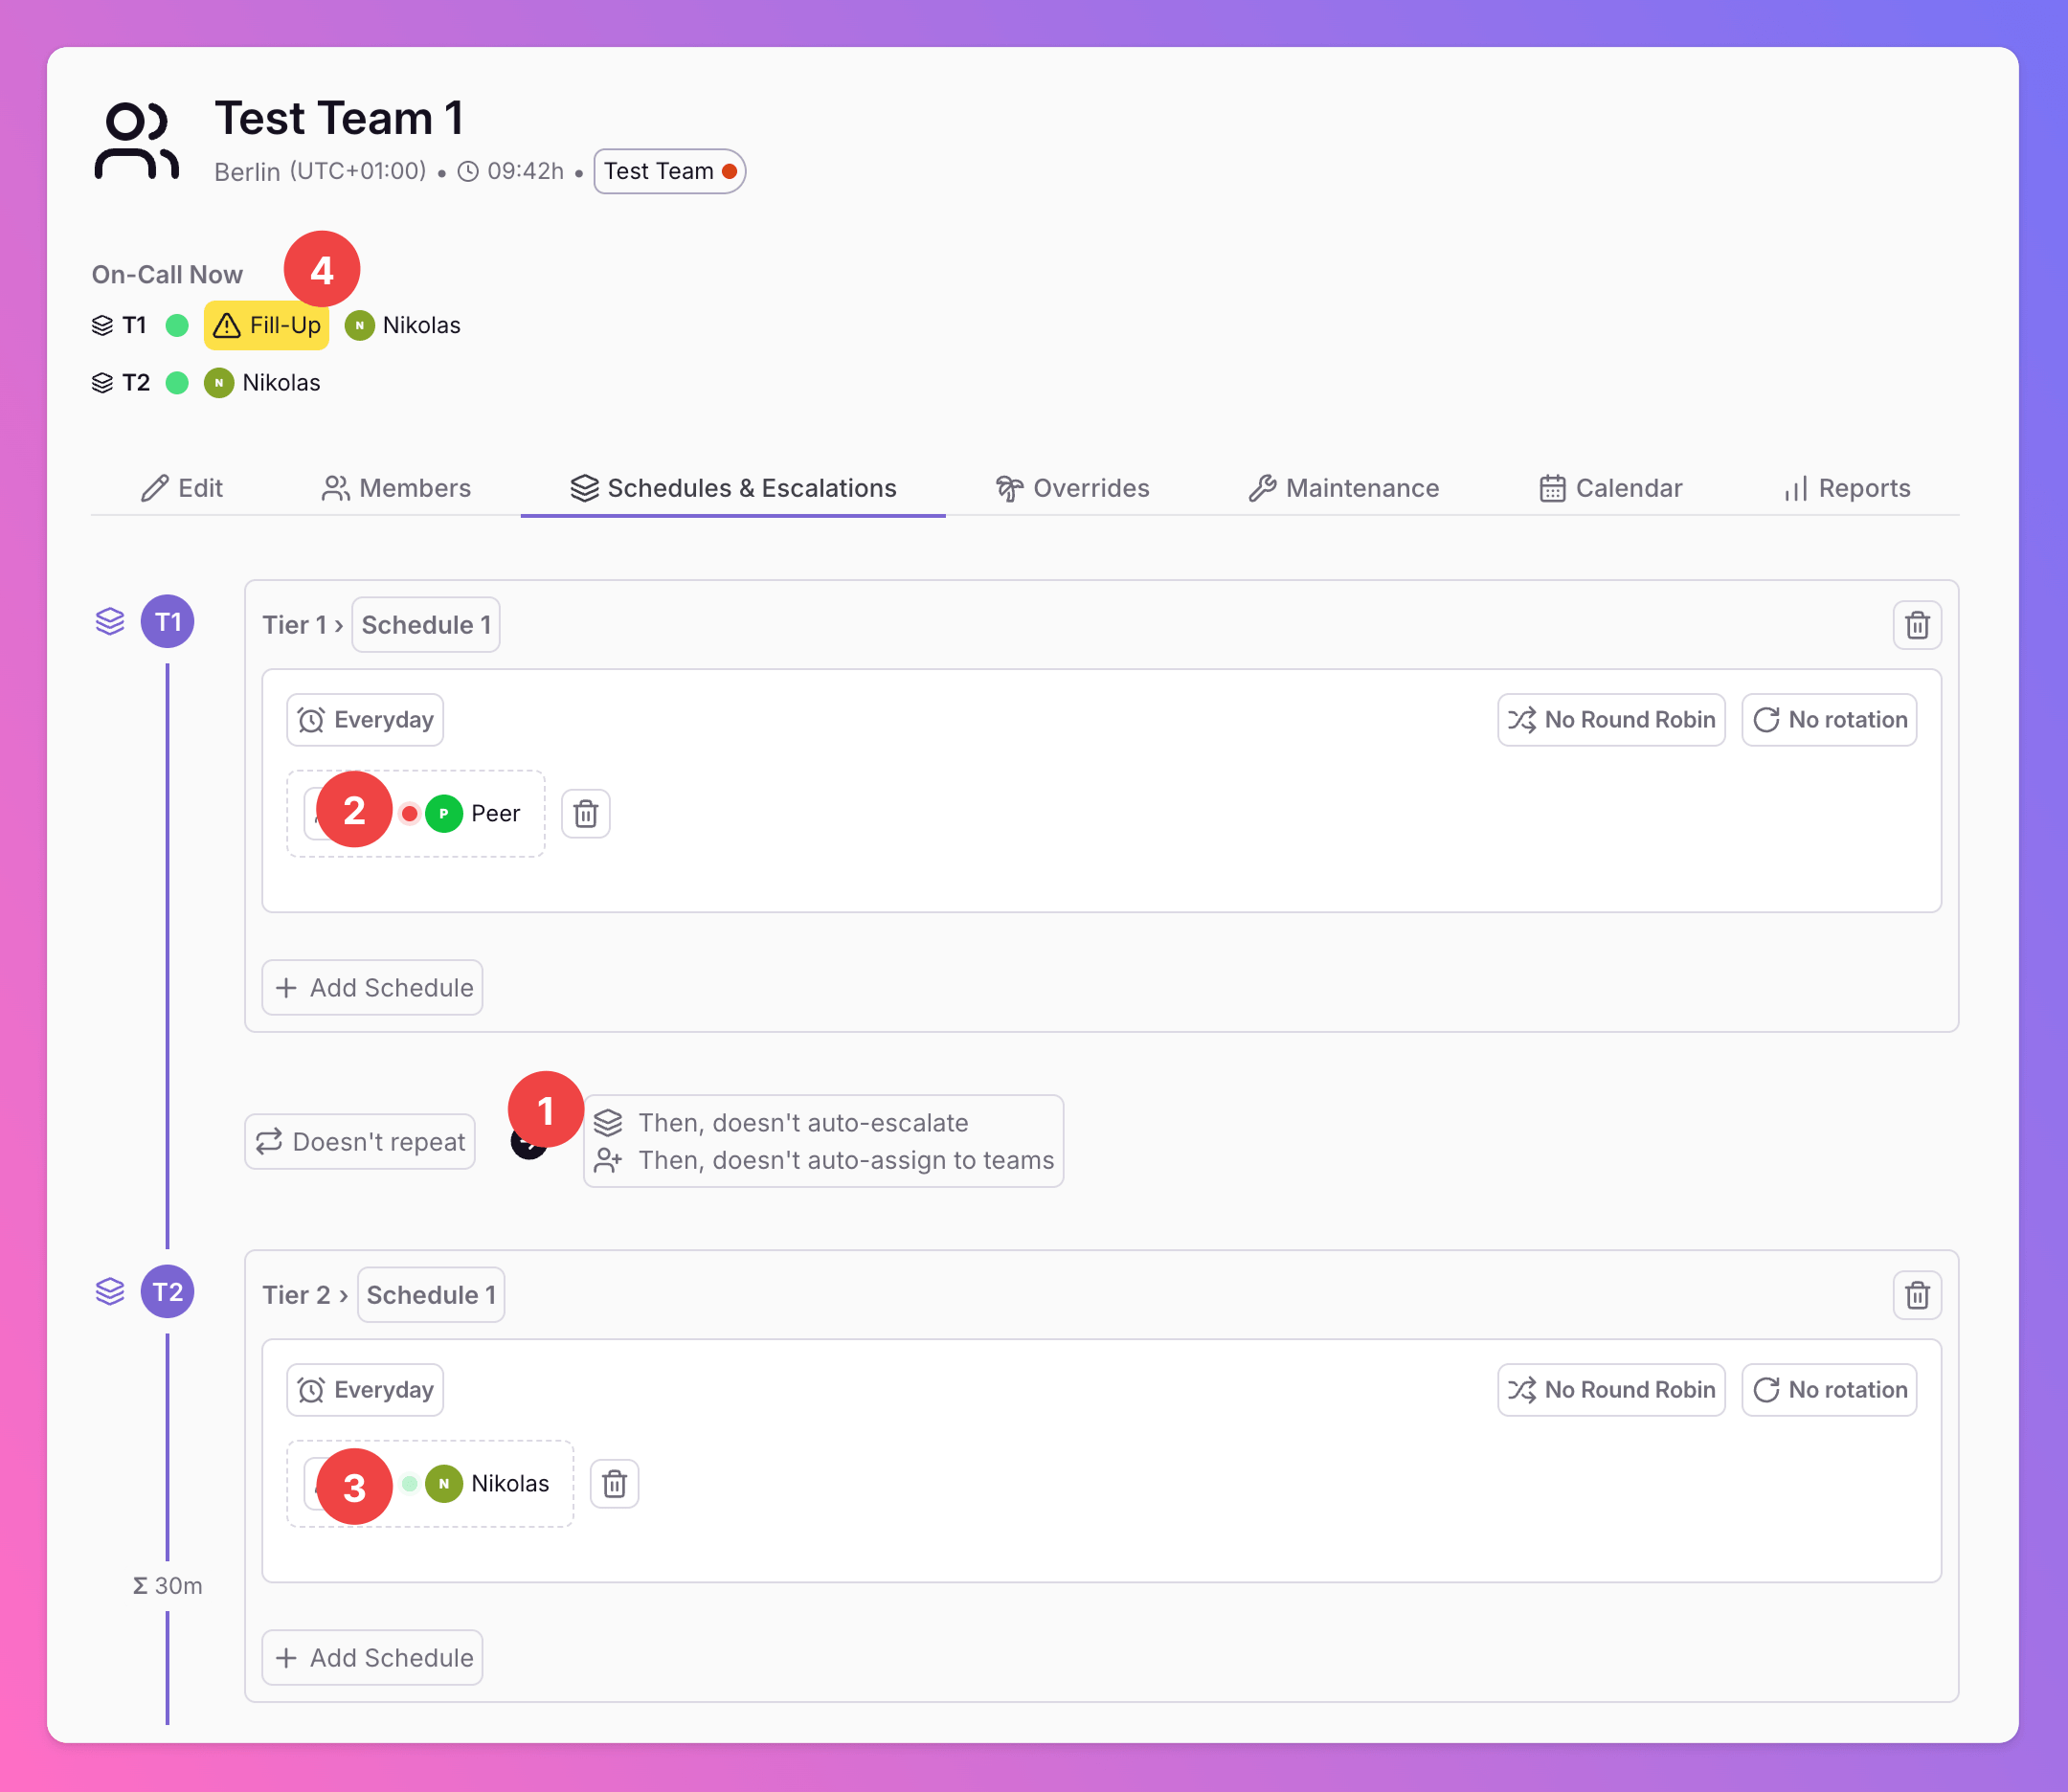
Auto Fill-up From Higher Escalation Tiers
We understand that it’s critical to avoid any gaps in your team’s weekly on-call shifts. Therefore, we added an auto fill-up feature that adds on-call team members from higher escalation tiers to lower escalation tiers if there is a gap in one of the lower-tier rotations. Here’s an example of how it works:- For simplicity, we are looking at a team with two on-call members in two tiers. Here, Tier 2 does not automatically come into play as there’s no automatic escalation activated.
- In Tier 1, Peer is usually on-call 24/7. However, due to a personal override, he’s not on-call for the day.
- Tier 2 is our “safety net”, with Nikolas on-call 24/7. Since there’s no auto-escalation to Tier 2, he’s usually not informed about incidents automatically.
- This is where the auto fill-up feature comes into play. Nikolas (Tier 2) fills Peer’s (Tier 1) vacant spot during his absence. As a temporary Tier 1 member, he is the first to be automatically informed about any incidents. As soon as Peer is back on-call, he’ll resume his place in Tier 1.
Schedules
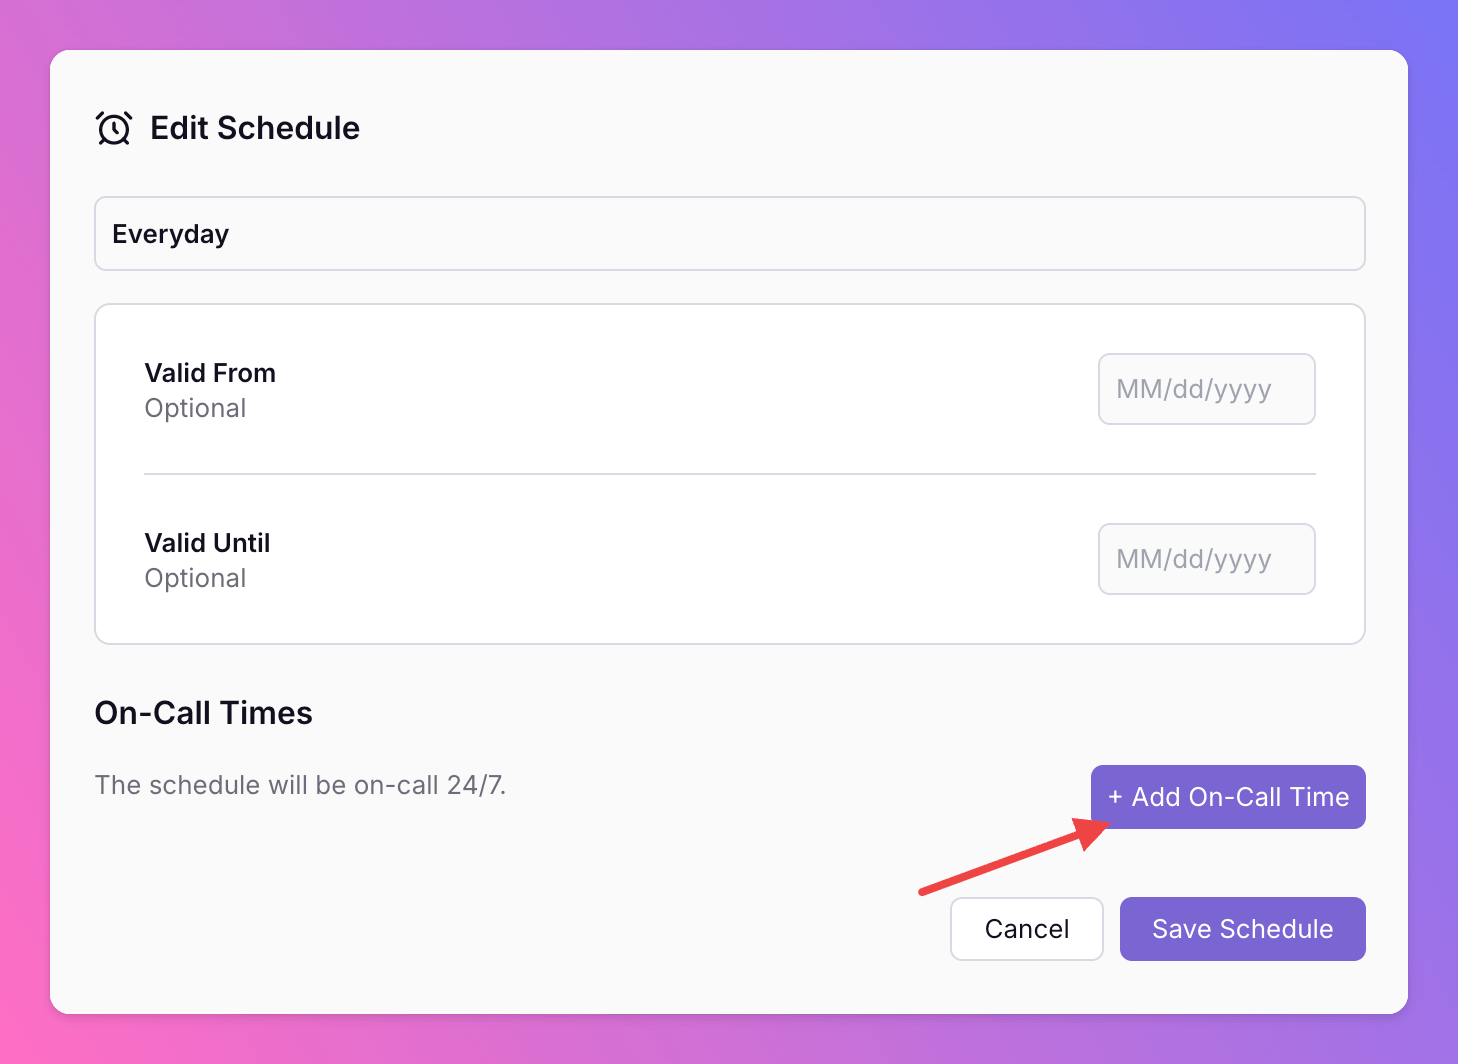
Within the management of escalations, All Quiet allows you to define schedules for each escalation tier. These schedules determine the on-call periods for team members. With schedule customization, you can specify the time of day, such as 8:00 AM to 4:00 PM, and designate specific weekdays, such as Monday through Friday, for the schedule to be active. This flexibility enables precise control over when team members are available and responsible for incident response within each escalation tier. To edit the on-call periods of a schedule, simply click on the label located at the top left of the schedule. By clicking on the label, you can access the edit dialogue where you can modify the schedule’s settings. The label will display the current settings, which are set to “everyday” by default, indicating that no specific settings have been defined yet.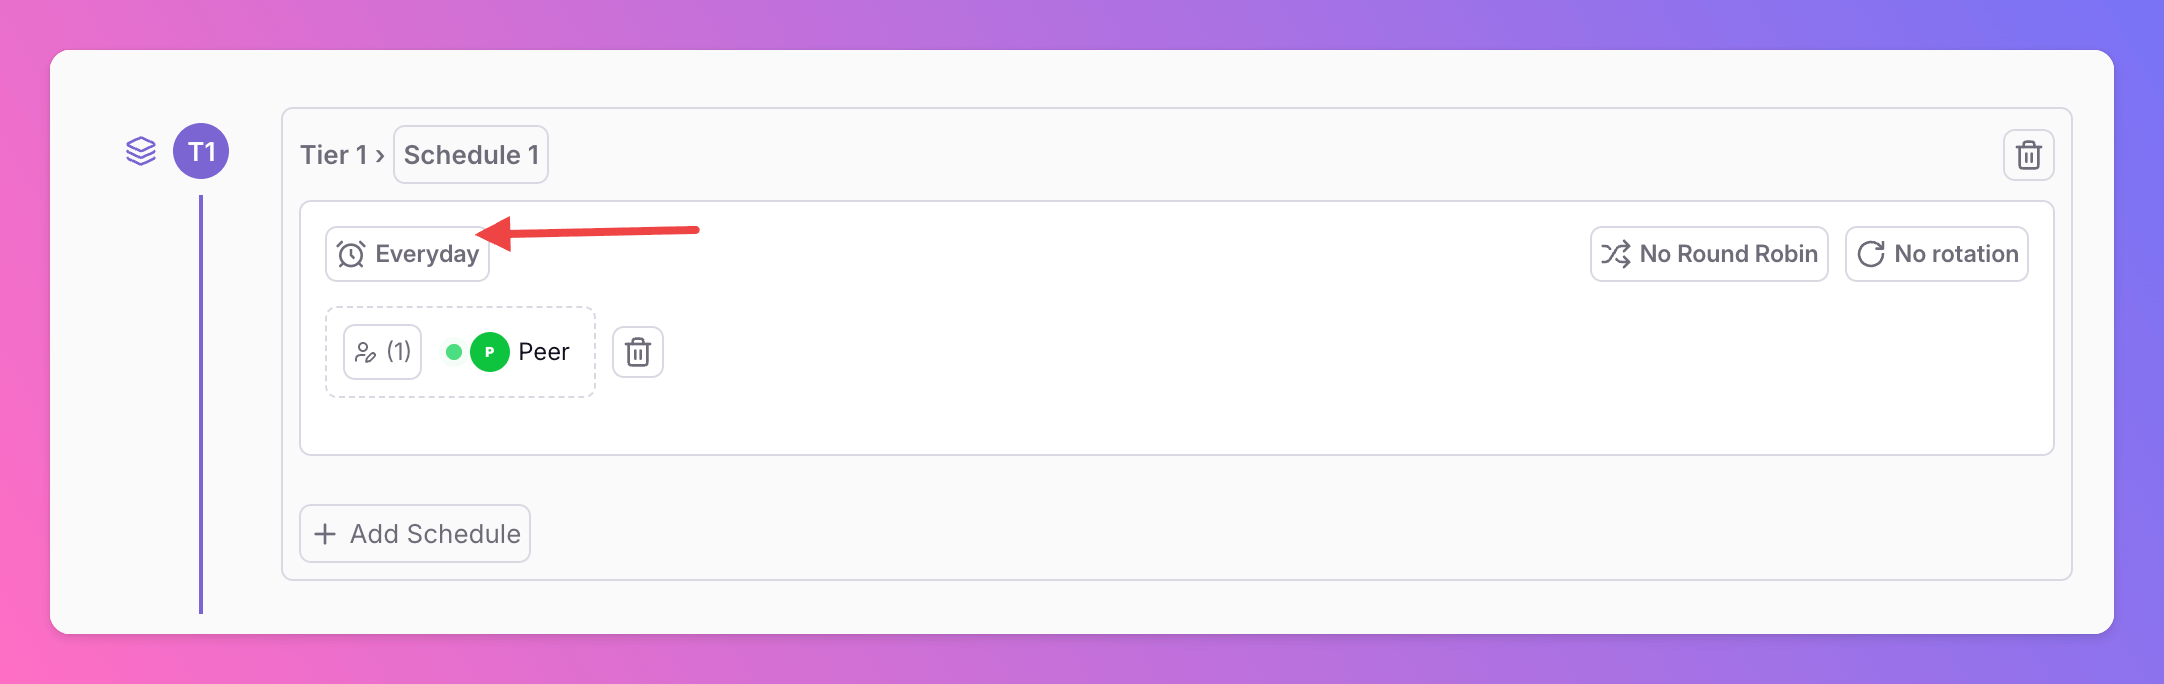
On-Call Times.
For now, we will focus on the On-Call Times. You can add as many on-call times as you like for one specific schedule. To start, click + Add On-Call Time. A schedules default on-call time is 24/7.
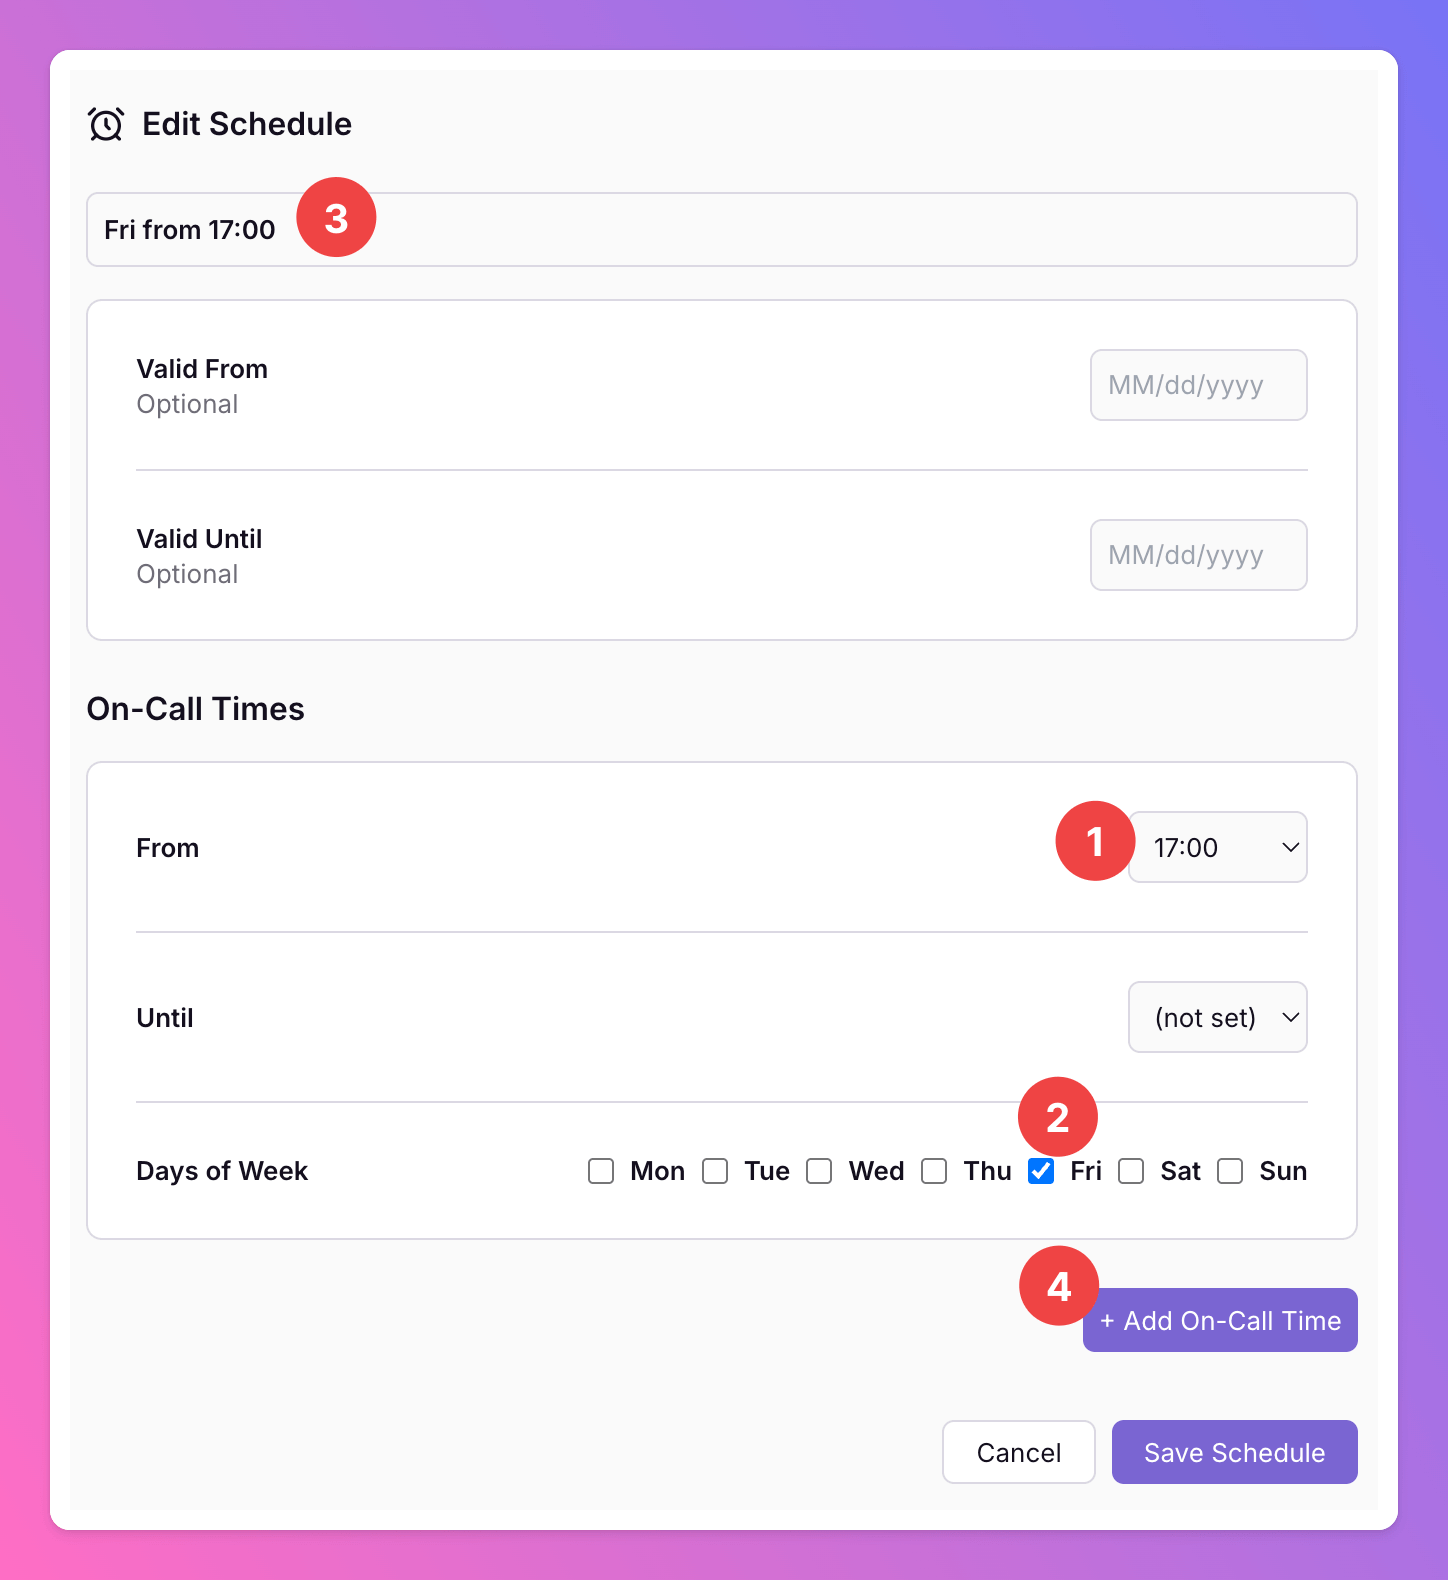
- As a start time, we set 17:00. Leaving the “until” field empty will be interpreted as “until end of the day”, just like leaving the “From” field empty would be interpreted as “from the start of the day”.
Select an end time smaller than or equal to the start time to create an overnight schedule that ends the next day.
- Additionally, we select the weekdays when the members of the schedule should be on-call from 17:00 - end of the day by checking the corresponding checkbox for Friday.
Checking no box would mean that the schedule would be active every weekday starting from 17:00
- We can see that the schedule is set to be active on Fridays after 17:00. The label updates as you adjust the settings, showing your current setup.
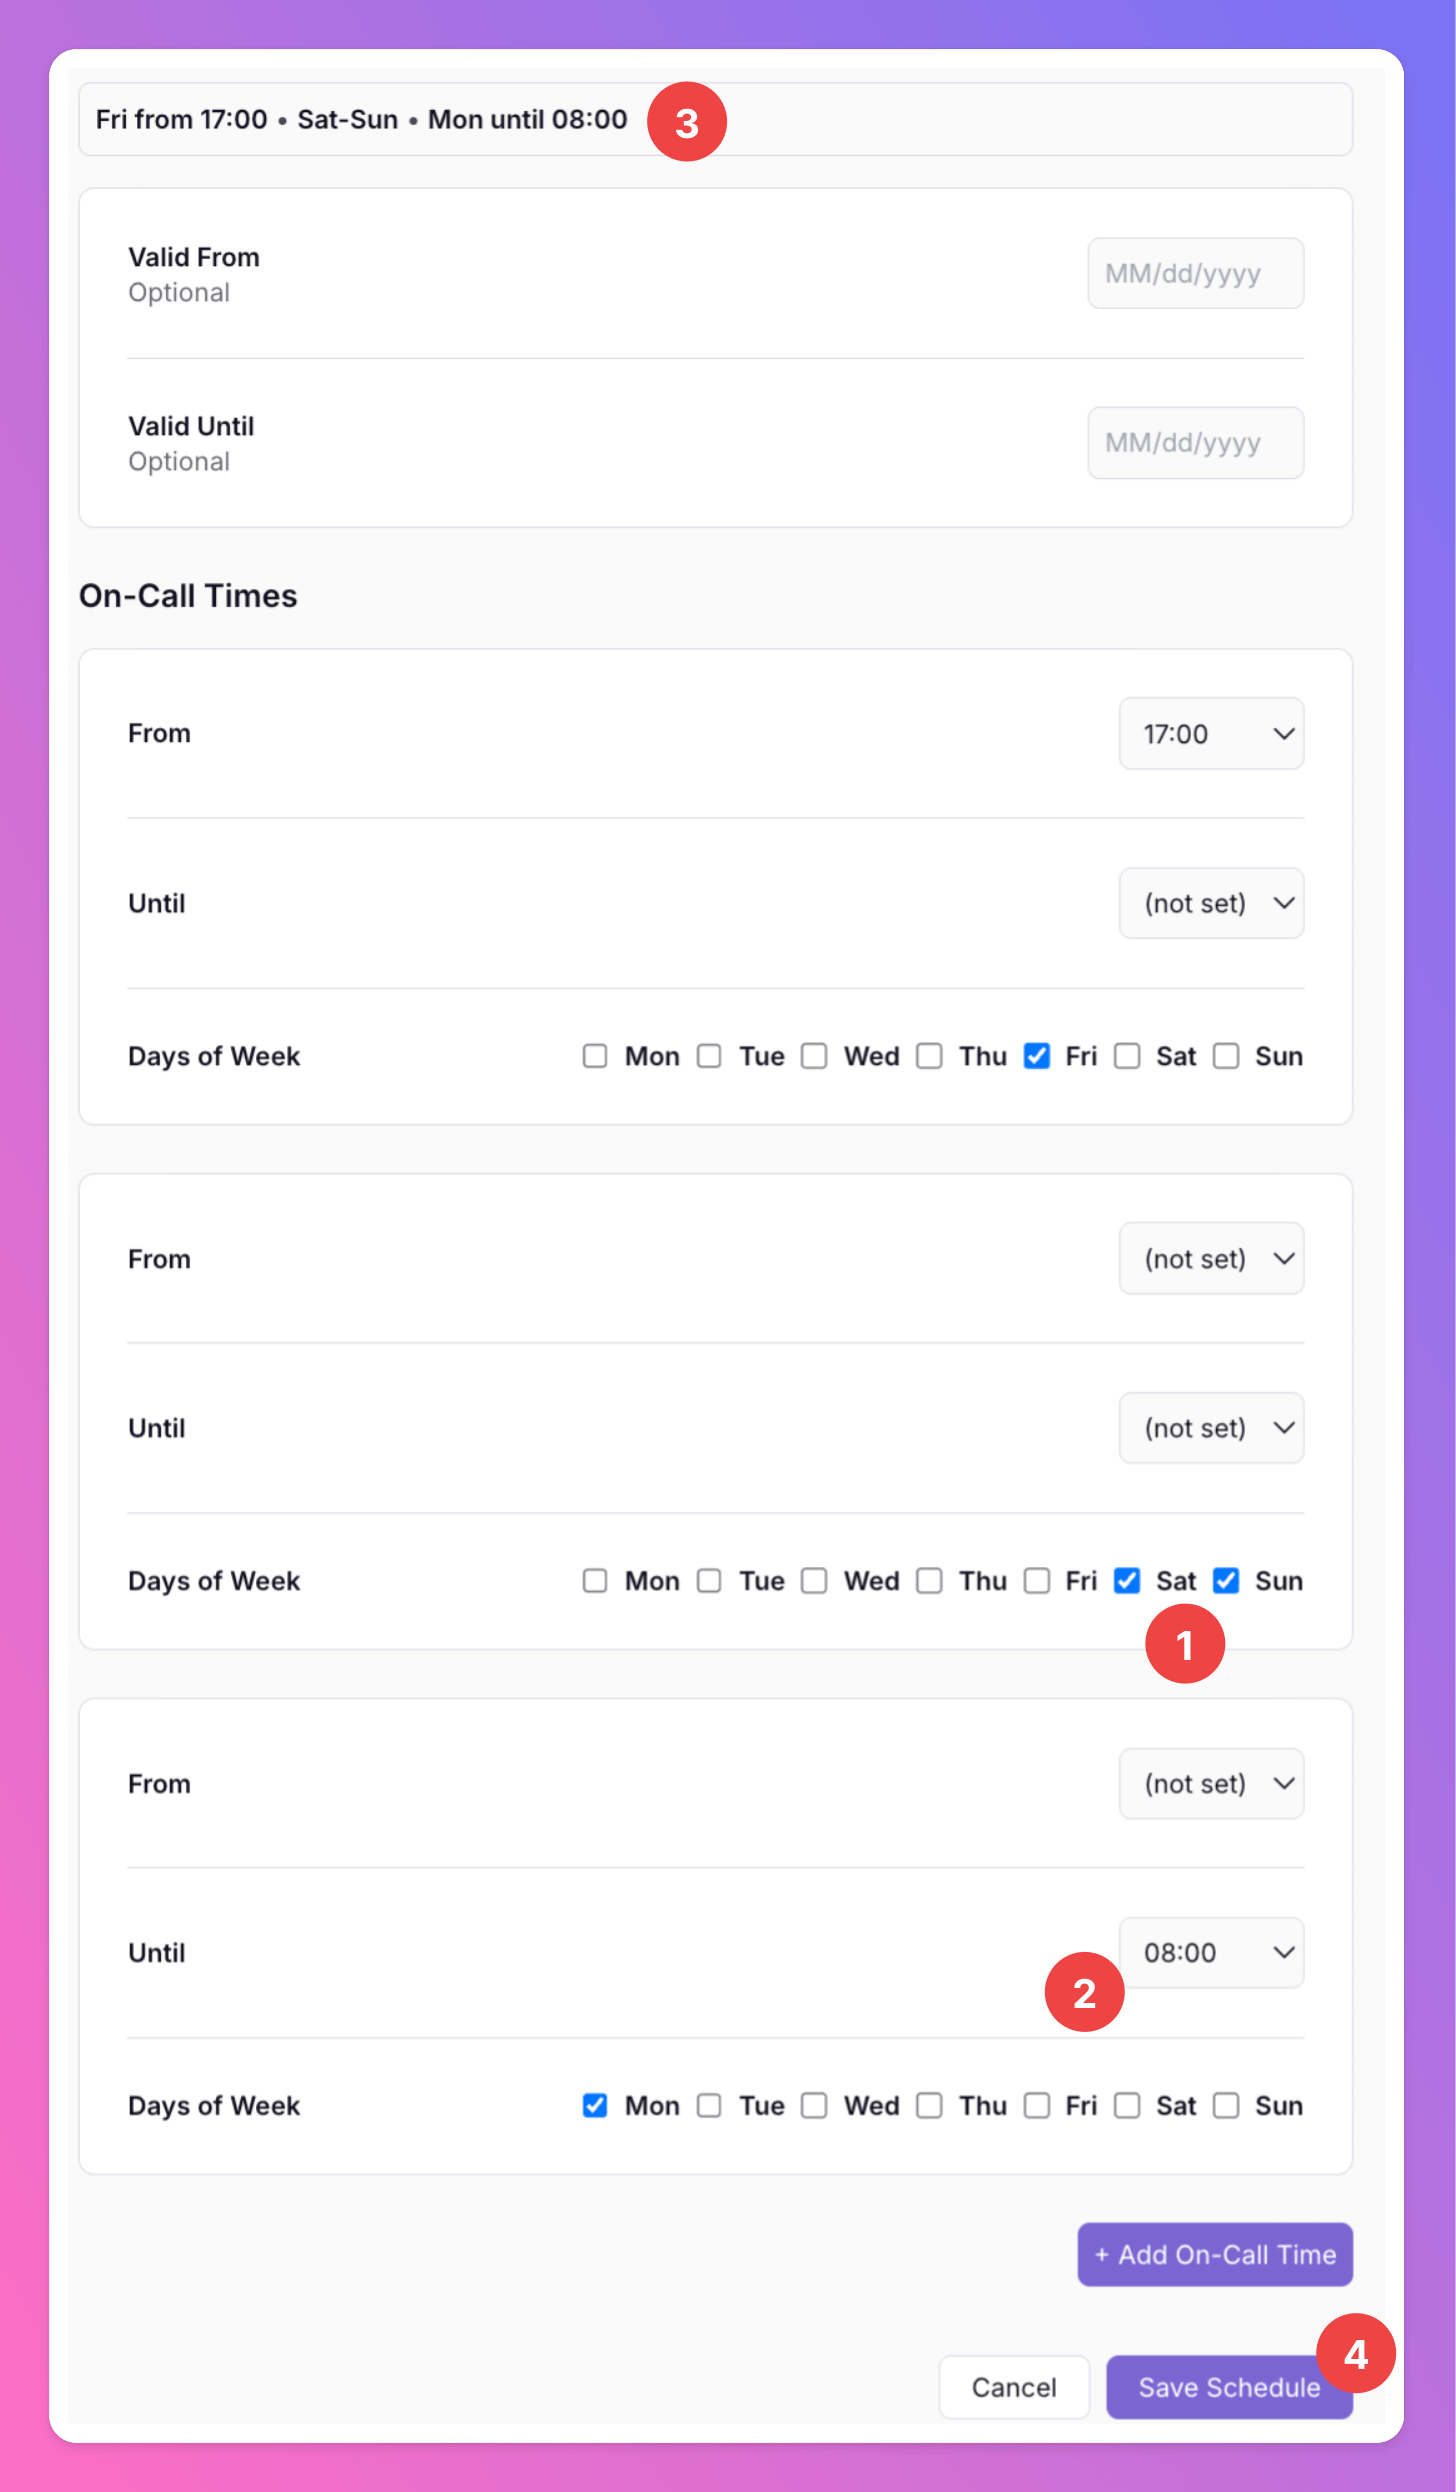
- We still need to add the on-call times for Saturday-Monday.
- Saturday and Sunday, we want the schedule to be active all day, so we just select the checkboxes for the days and don’t enter any “From” or “Until” values.
- Monday, we want the schedule to be active untill 08:00, so we only enter an “Until” time.
- The label updates accordingly.
- Clicking
Save Scheduleactivates the new schedule settings.
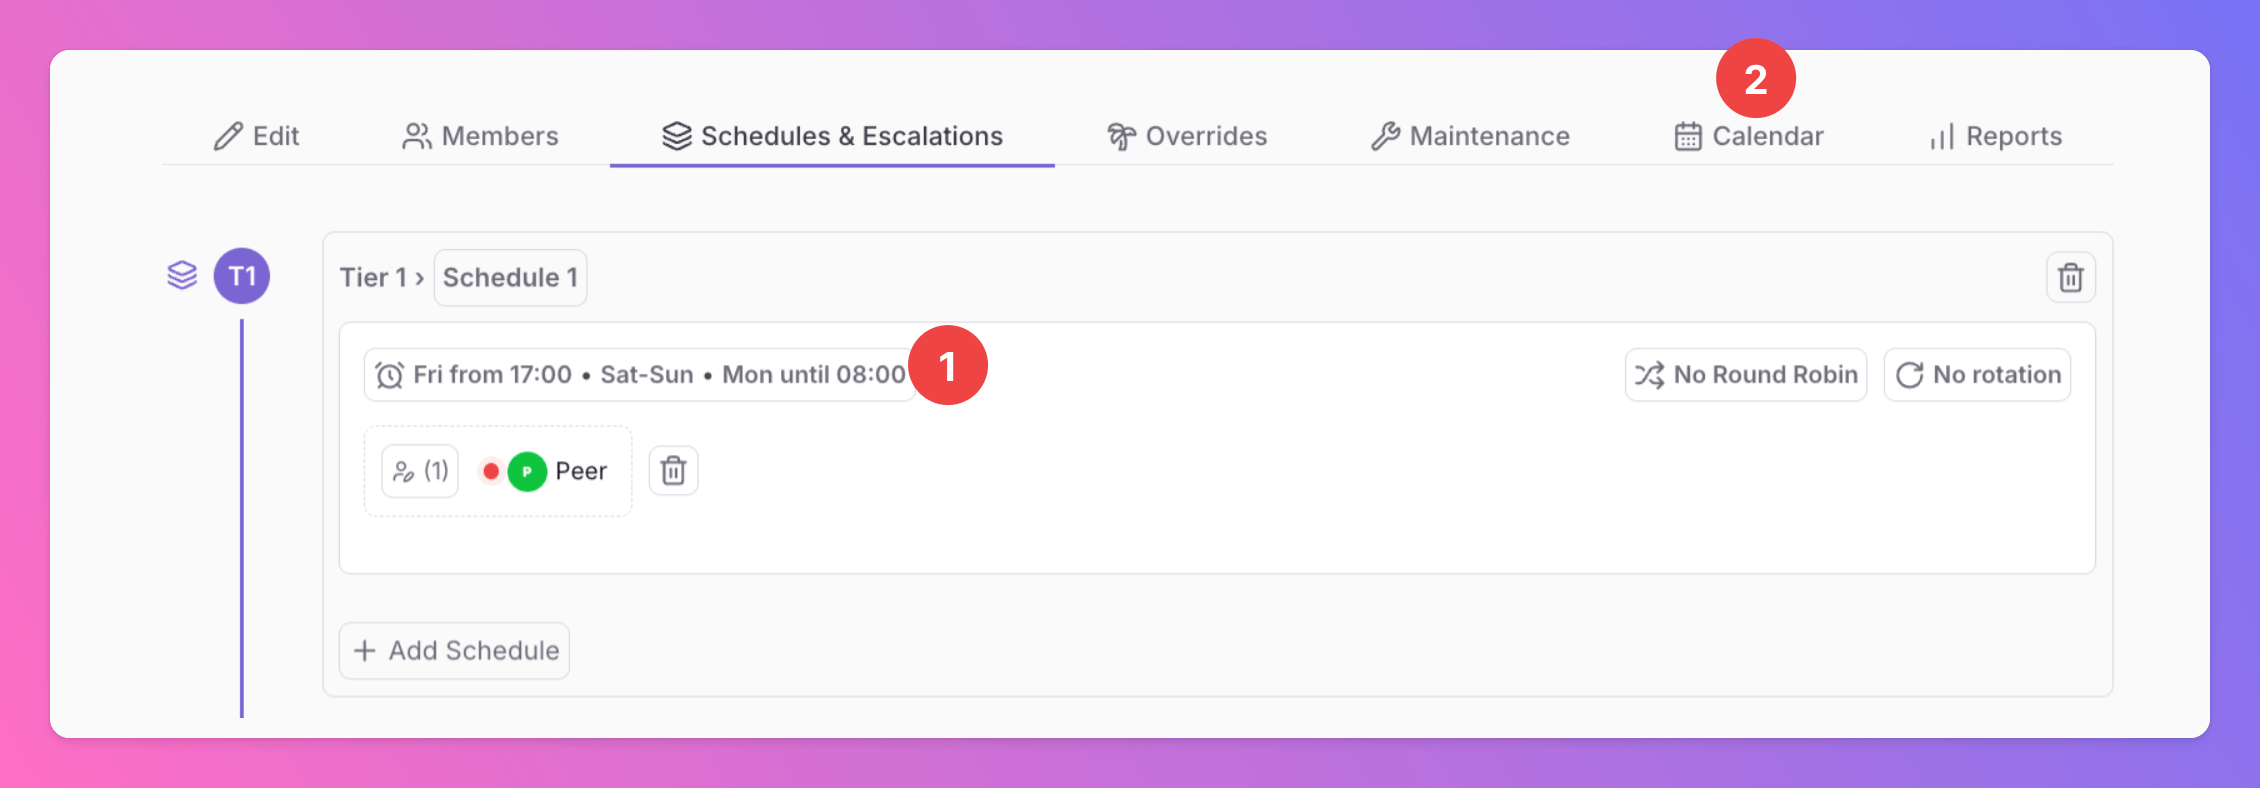
- After saving, you will immediately see the current schedule’s settings displayed in the top left corner. This provides a clear and easily understandable representation of the saved schedule settings, ensuring visibility and quick reference to the configured on-call periods and weekdays.
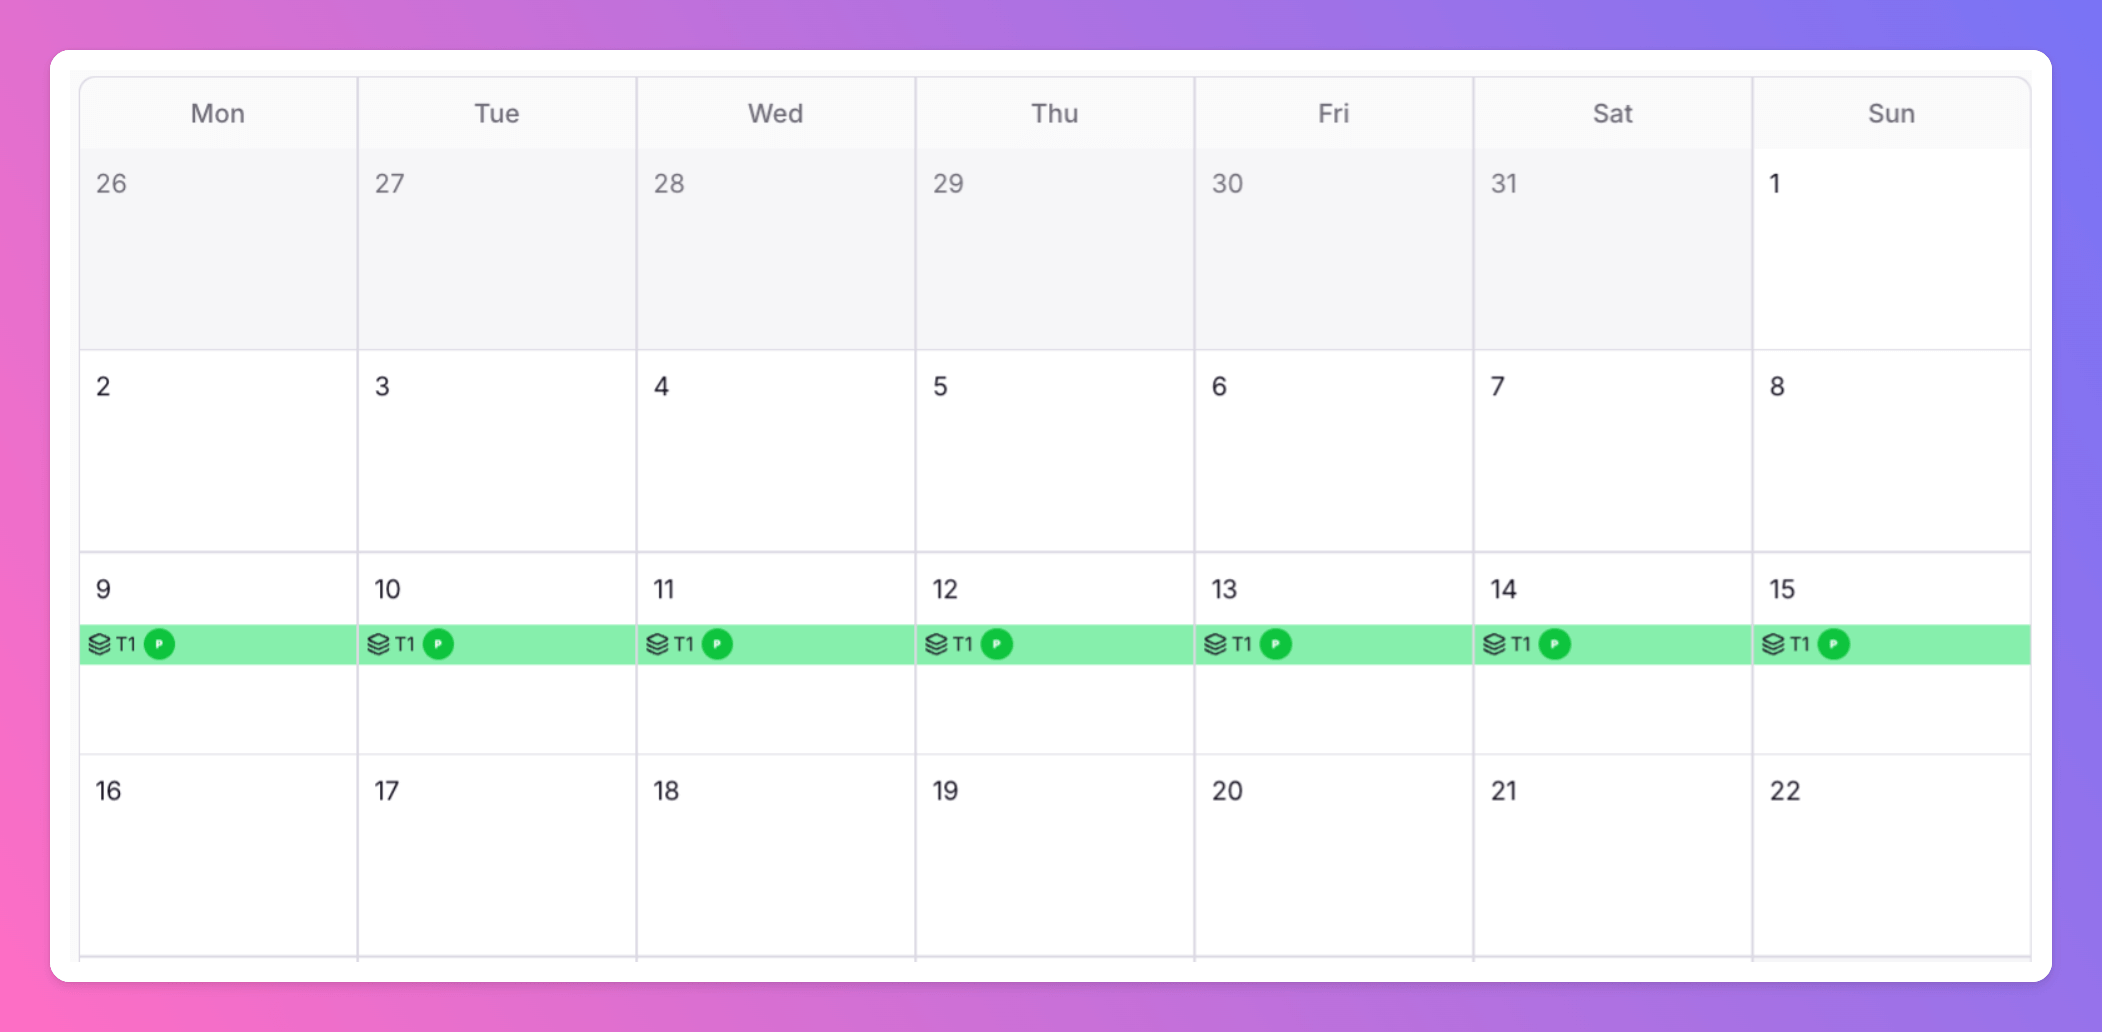
- Also, if you open your team’s calendar, you will see how the schedule and it’s rotations will take effect.
Round Robin Alerting
Round Robin ensures fair and structured incident distribution, preventing any single person from being overwhelmed. While our Rotations feature automatically cycles on-call responsibilities over time (e.g., week over week for fair coverage), Round Robin steps in when multiple people are on-call simultaneously - assigning incidents in a rotating order. This guarantees:- ✅ No one gets overloaded with back-to-back incidents.
- ✅ Every on-call member stays informed and engaged.
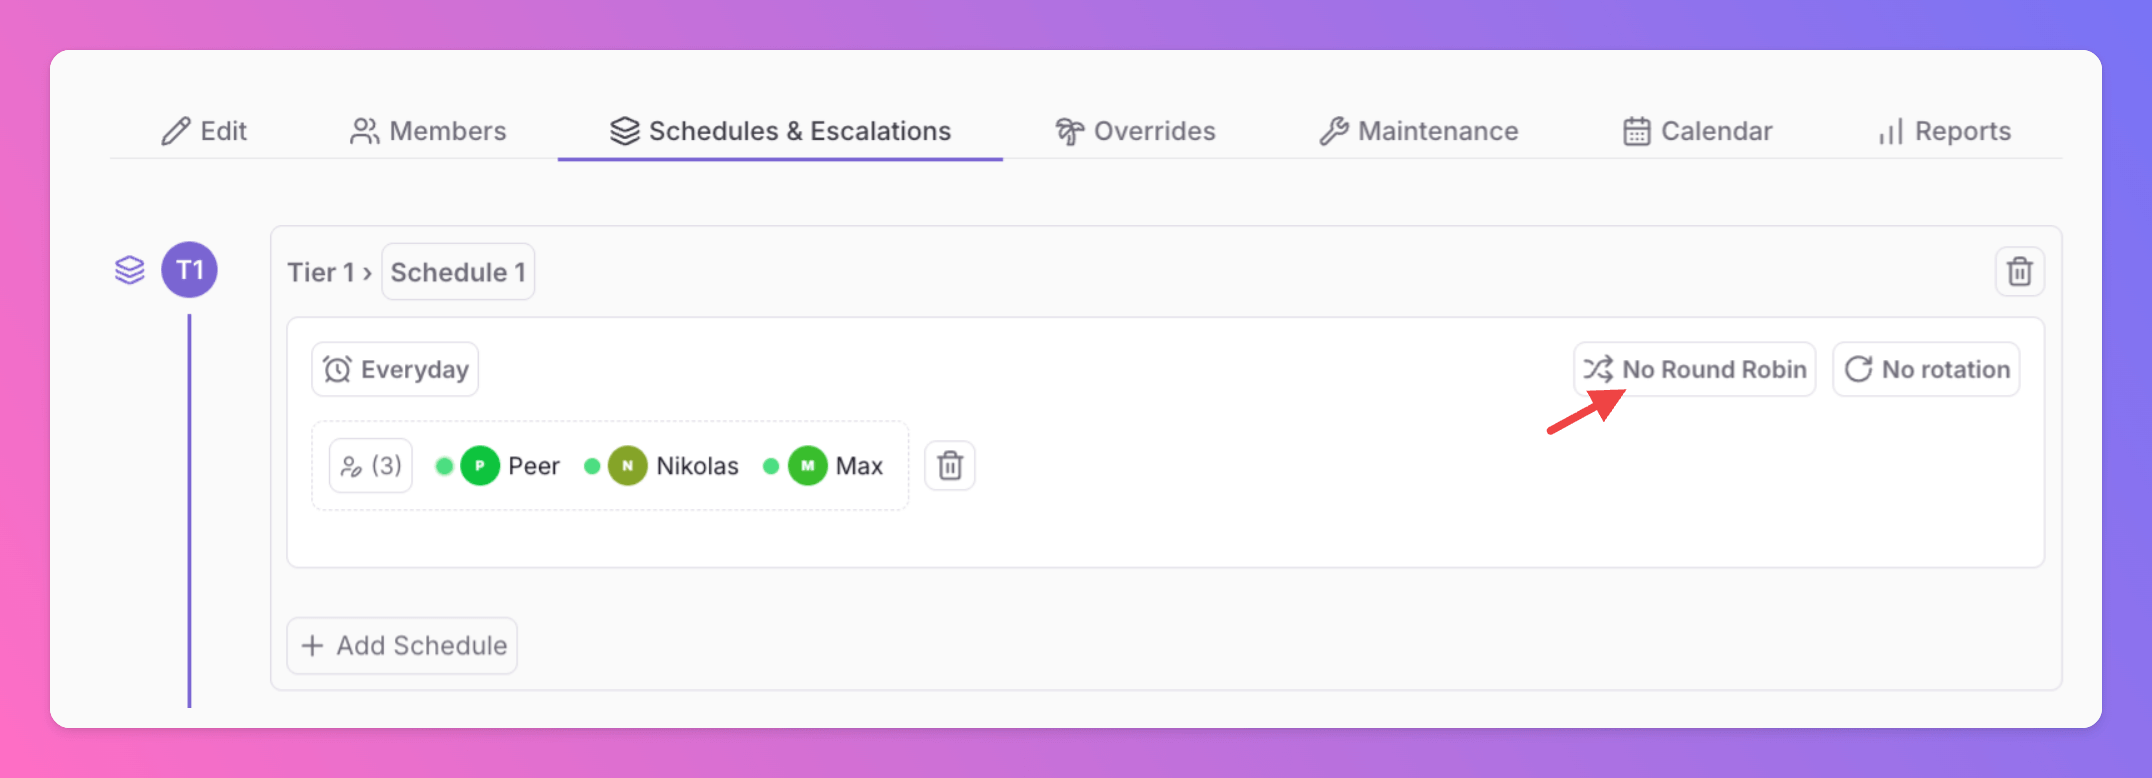
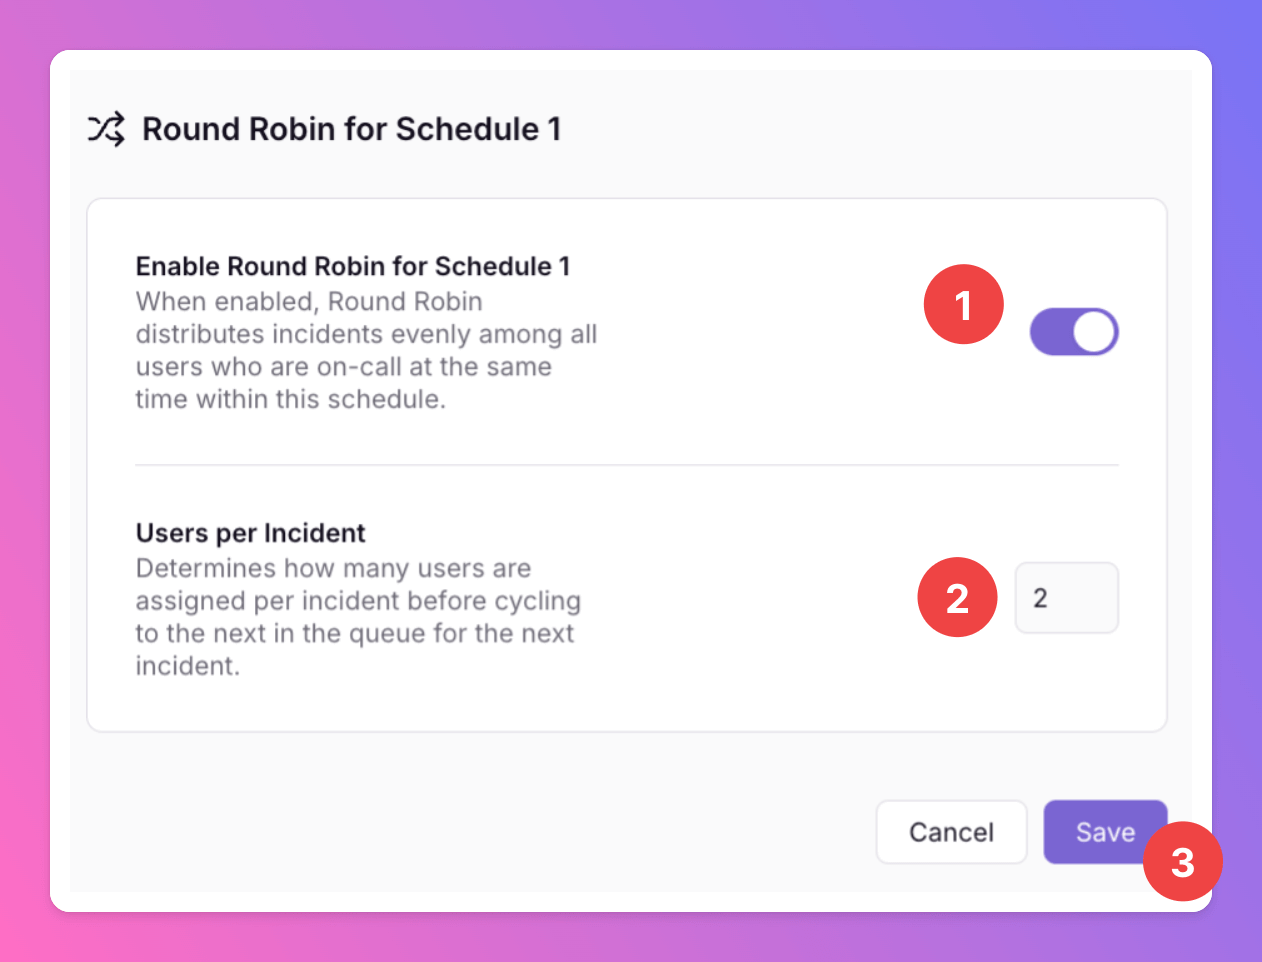
- Enable Round Robin
- Define the number of users per incident. This determines how many users are assigned per incident before cycling to the next in the queue for the next incident.
- Save your settings.
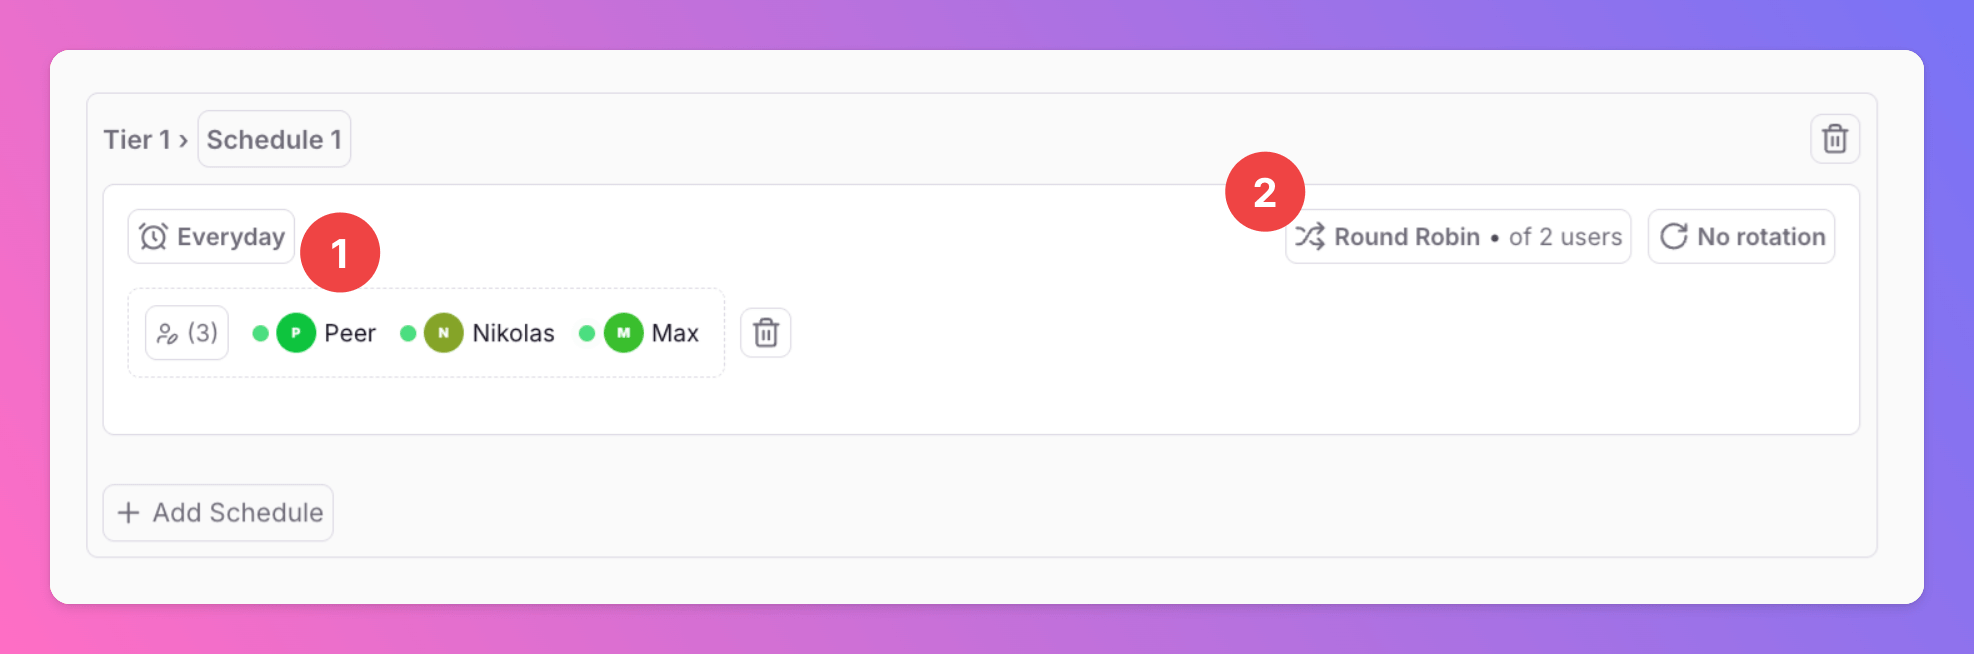
- In my schedule, there are 3 users (Peer, Nikolas, Max) on-call at the same time.
- I’ve enabled Round Robin with a size of 2. For each incident, instead of alerting all three on-call colleagues, we will notify only two, rotating the selection for each incident.
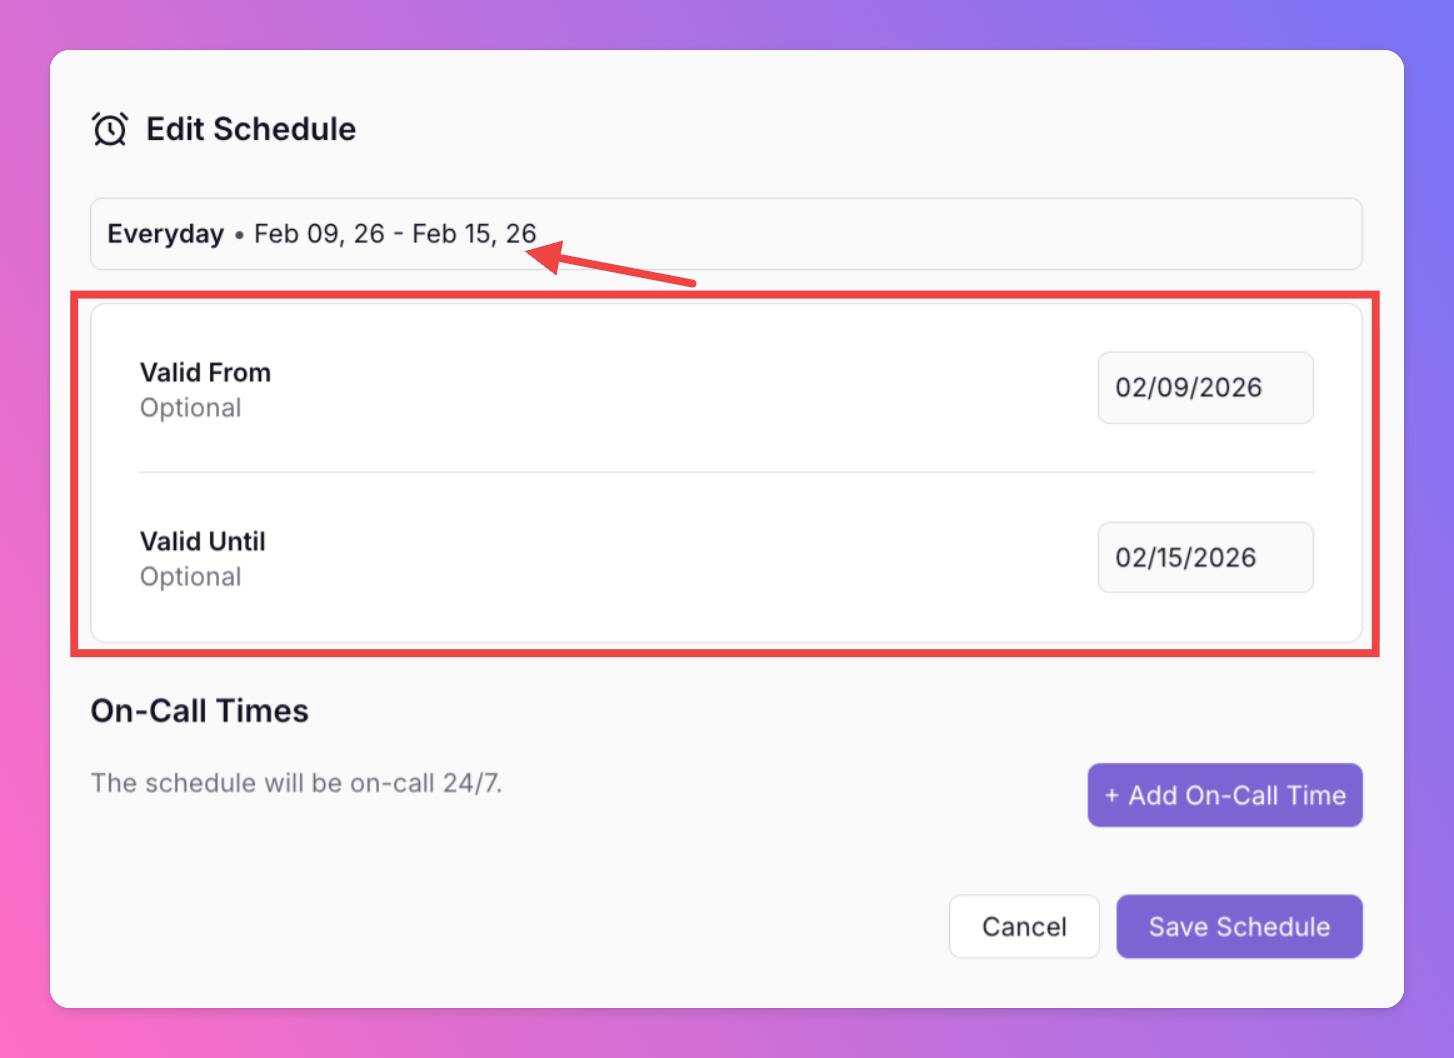
Start and End Date
For each schedule, you can optionally define a start and an end date.”Valid From” replaces the deprecated “Effective From” field in the rotation settings. “Valid From” specifies from which date onwards this schedule should be used. If you want to start the schedule right away, you don’t need to use this field.
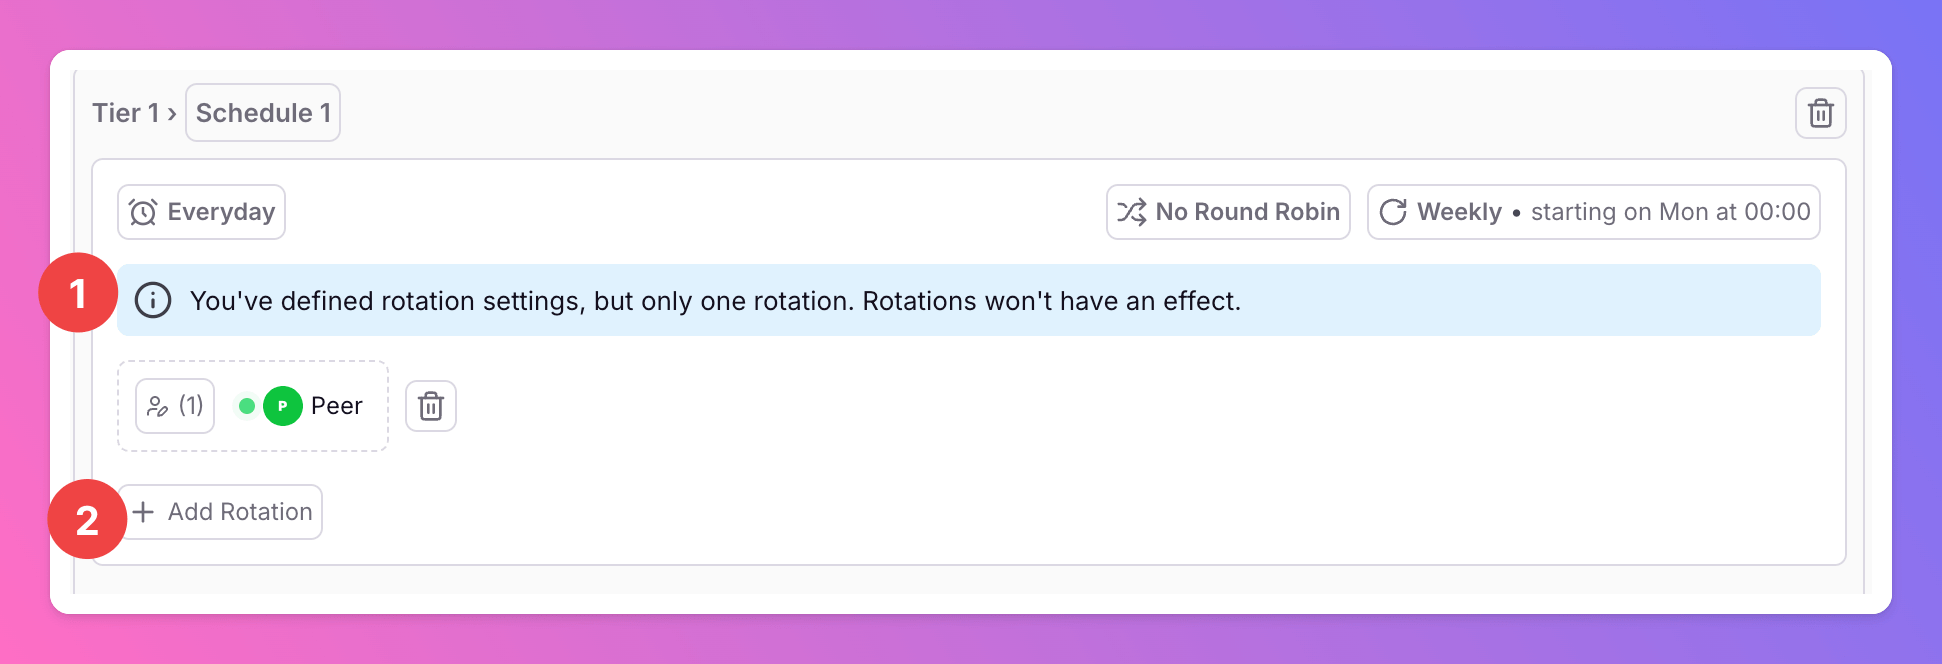
Rotations
At All Quiet,Rotations can be added on Schedule level. Rotations ensure fair distribution of on-call responsibilities among team members.
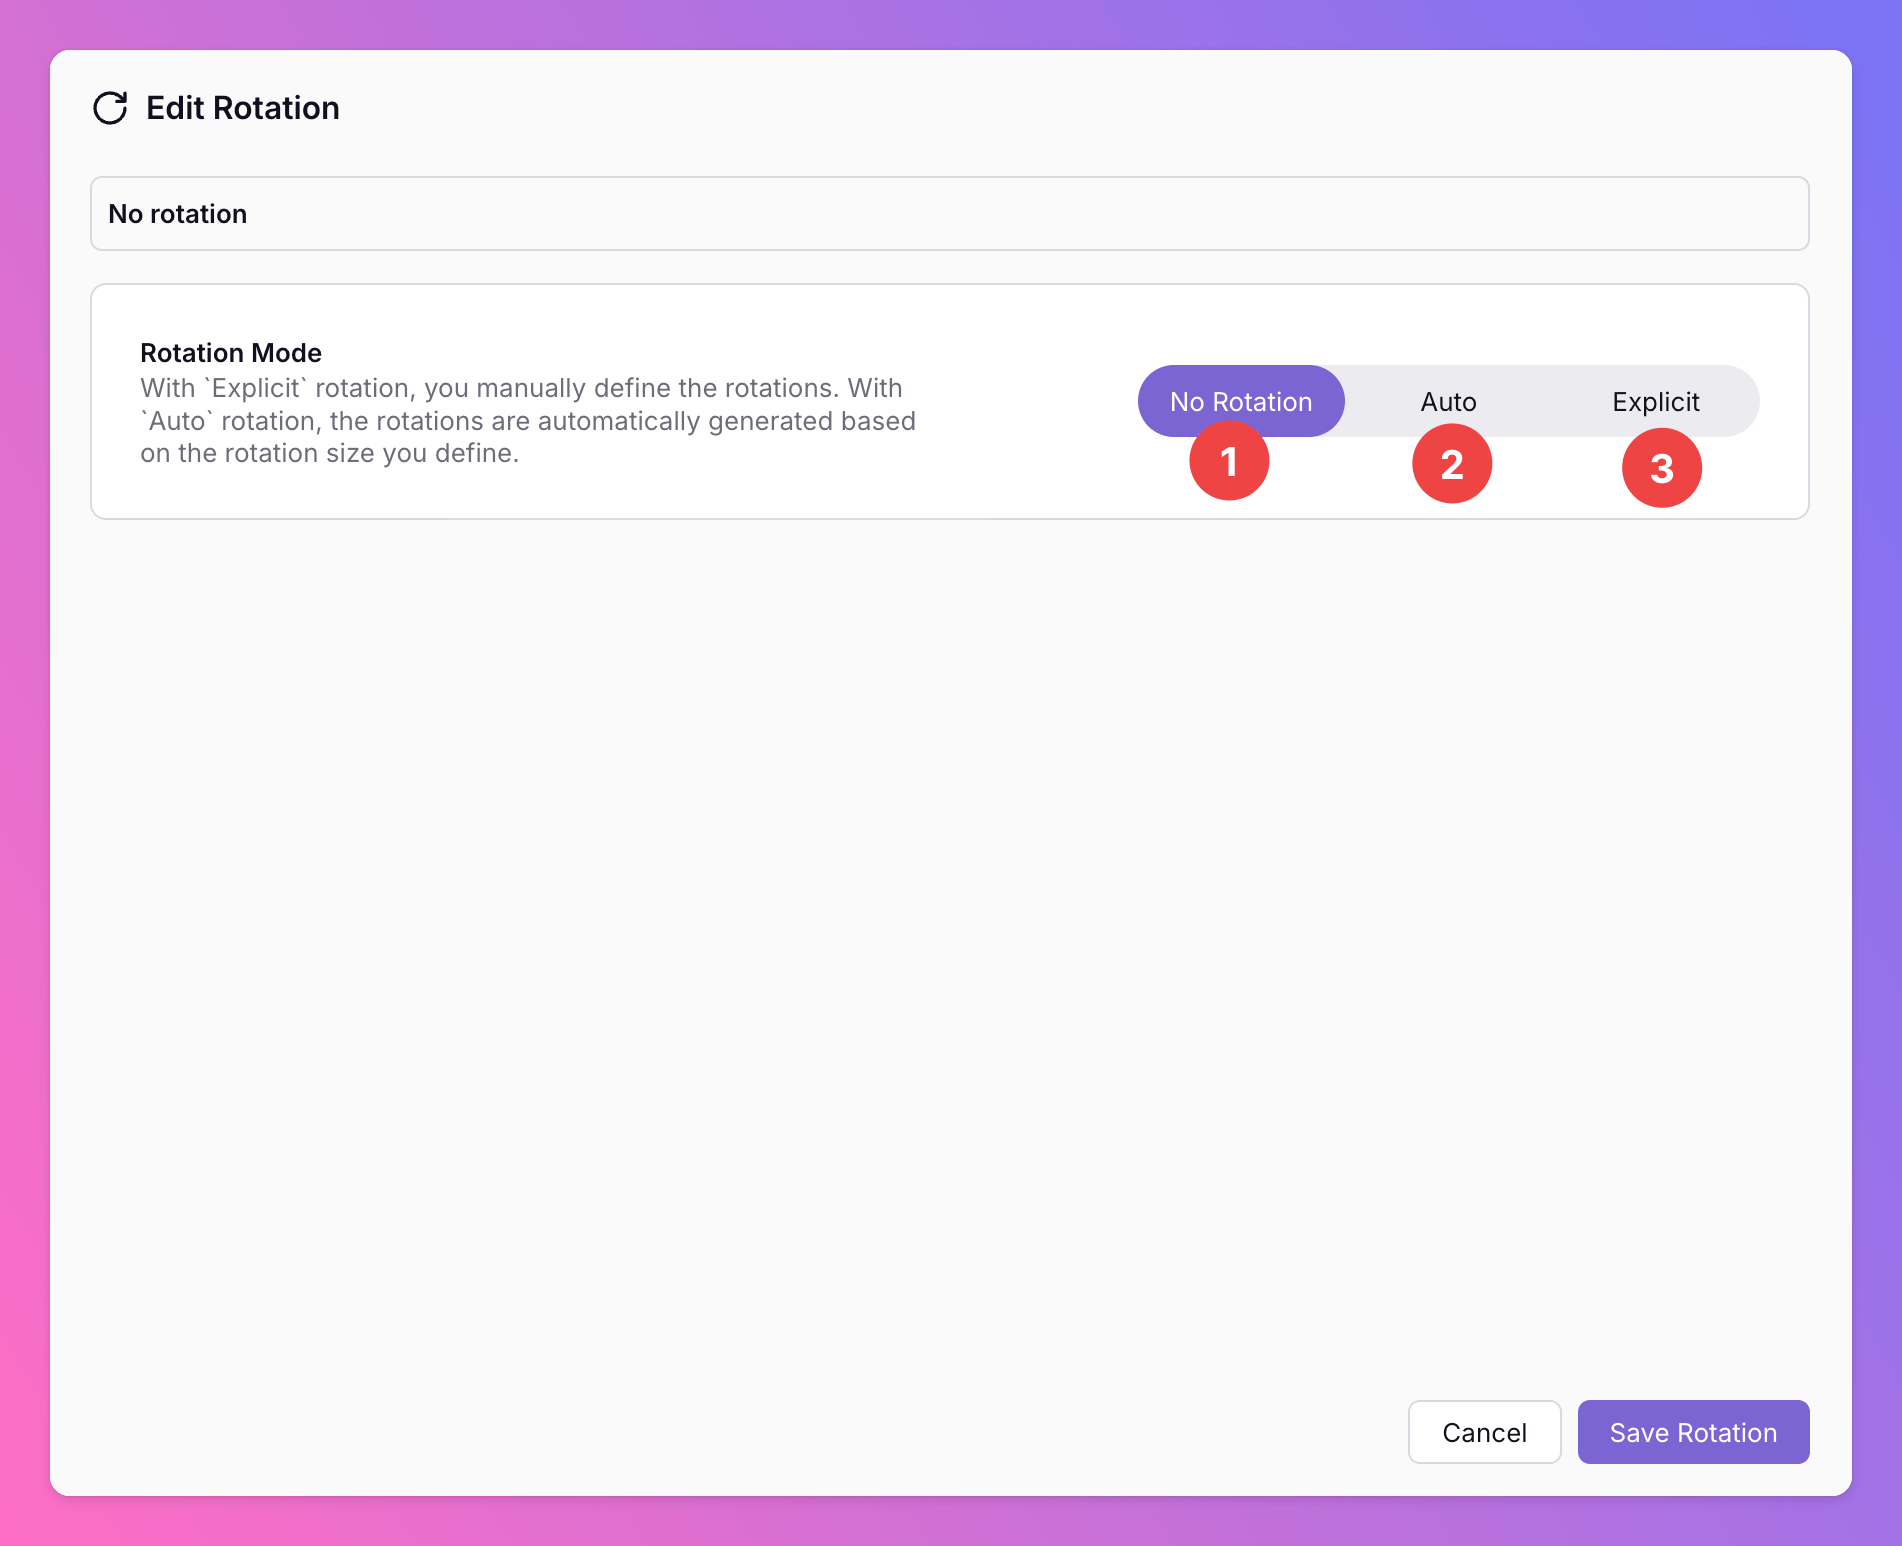
To add rotations to a schedule, simply click on the label located at the top right of the schedule. It always shows the current rotation settings of the schedule, which are set to No rotation by default.
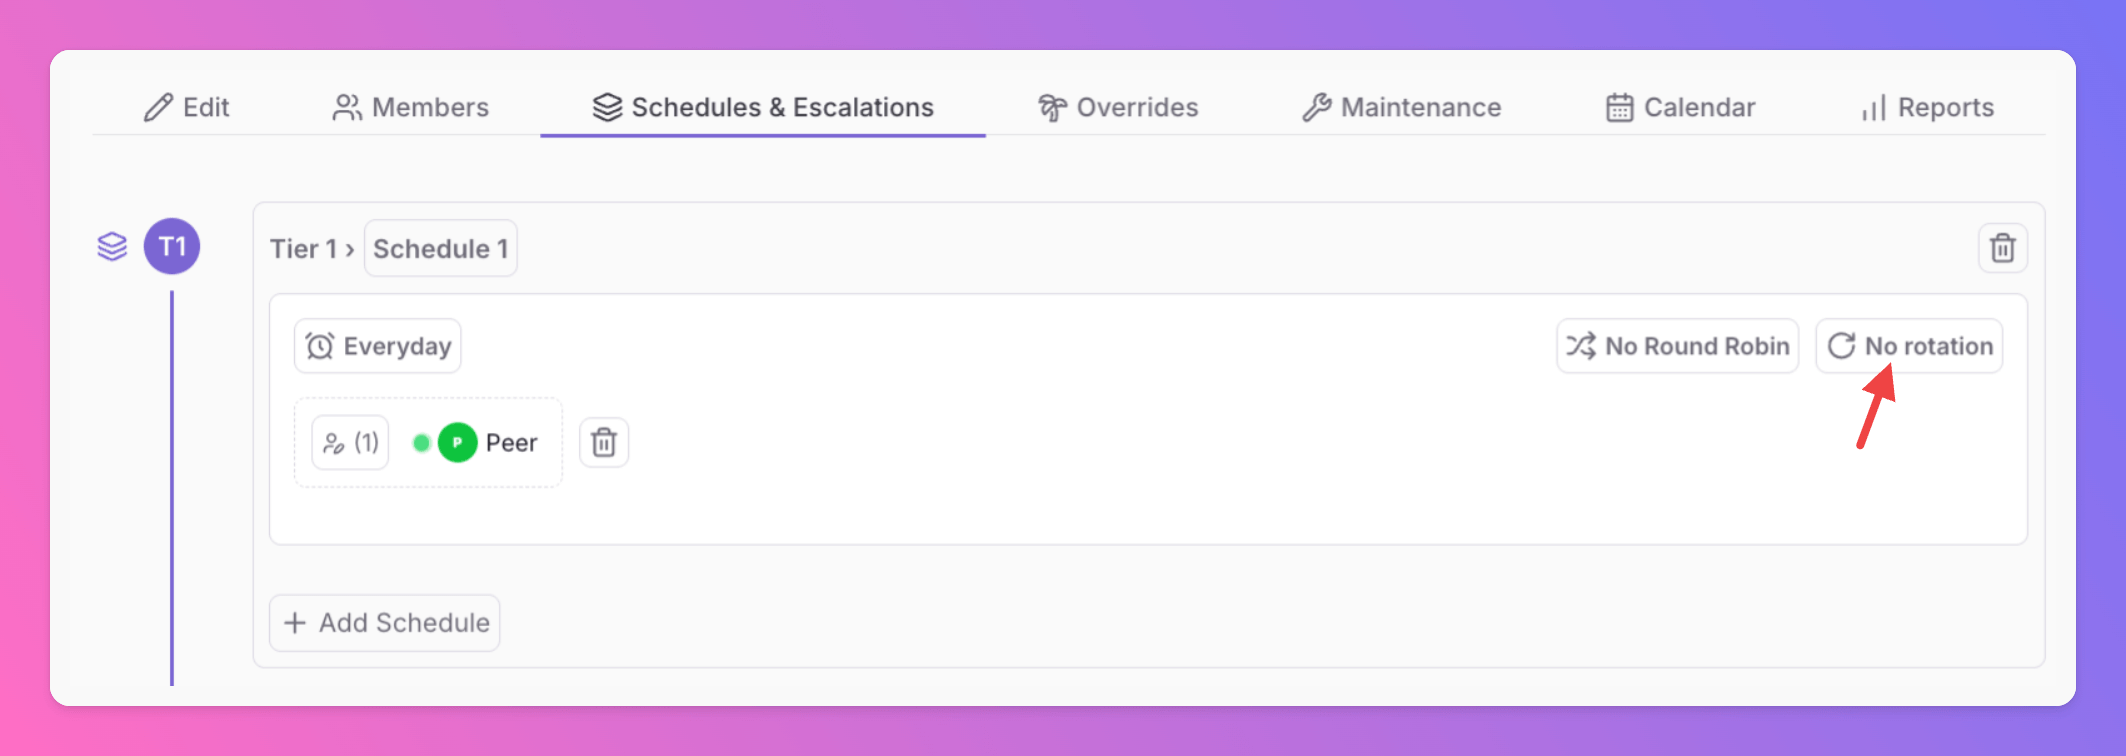
Rotation Mode.
Below, we’ll explain how both auto and explicit rotations work.
Auto Rotations
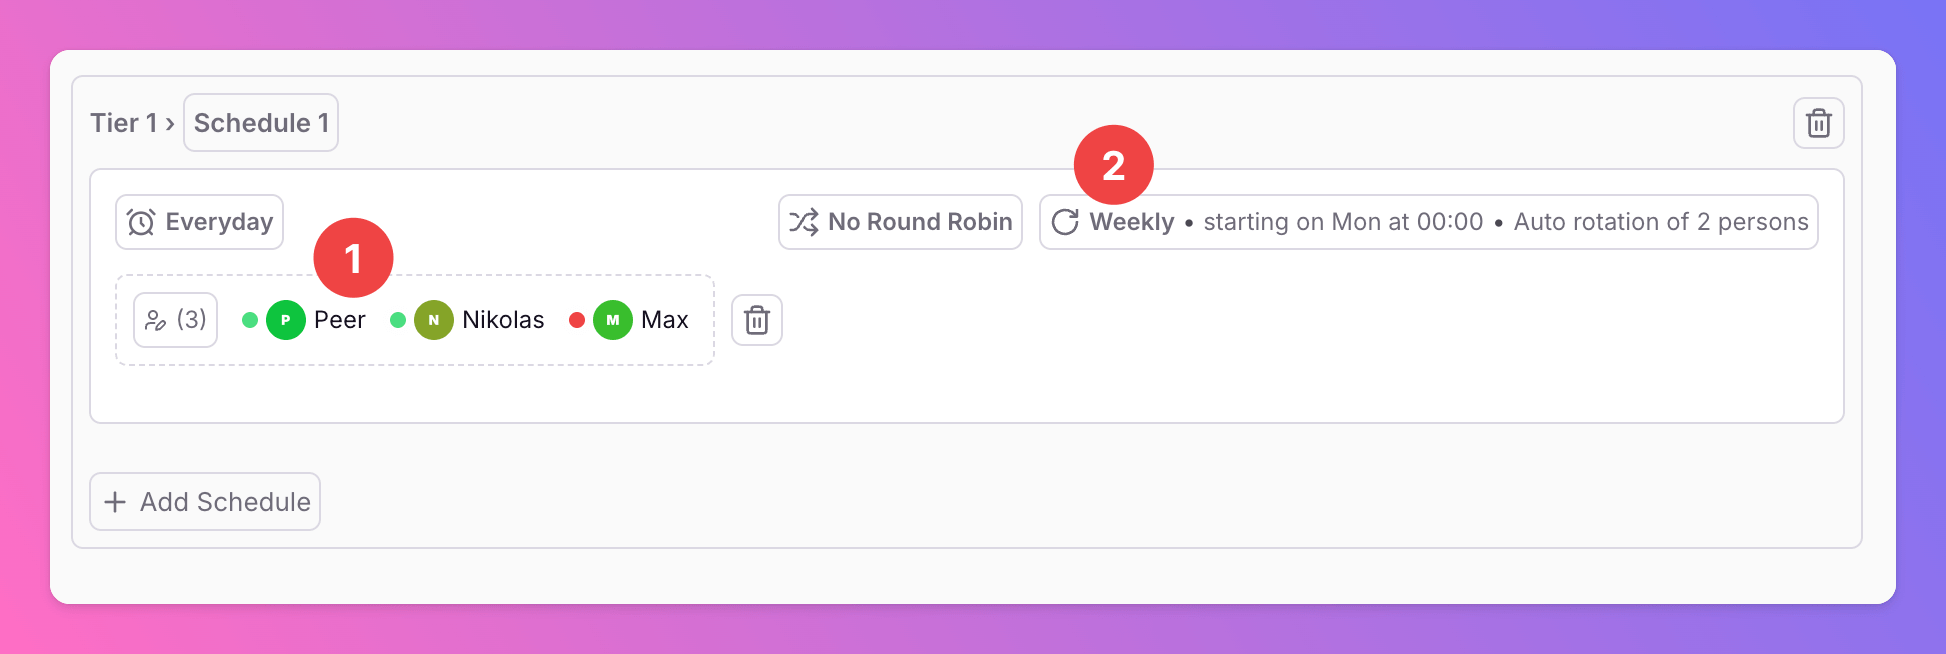
Auto-rotations create rotations for all members of a schedule without having to add rotations groups manually. All users can be added to one single group. In the example below, we have 3 members in the Tier 1, Schedule 1.- Currently, all Members are on-call.
- To add an auto-rotation, click the
No rotationbutton.
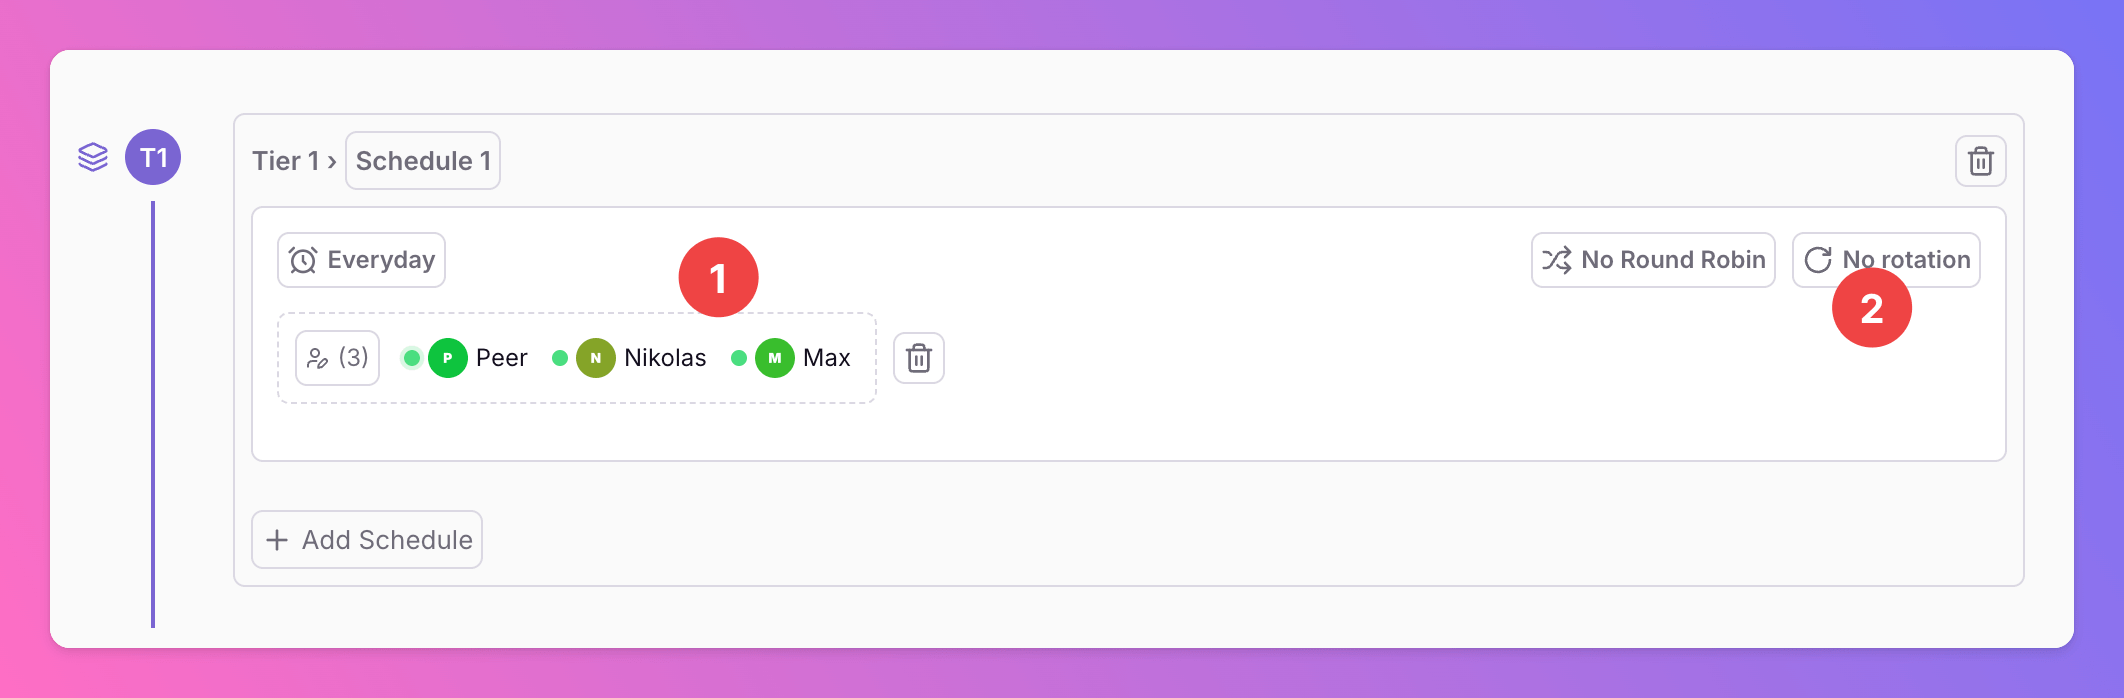
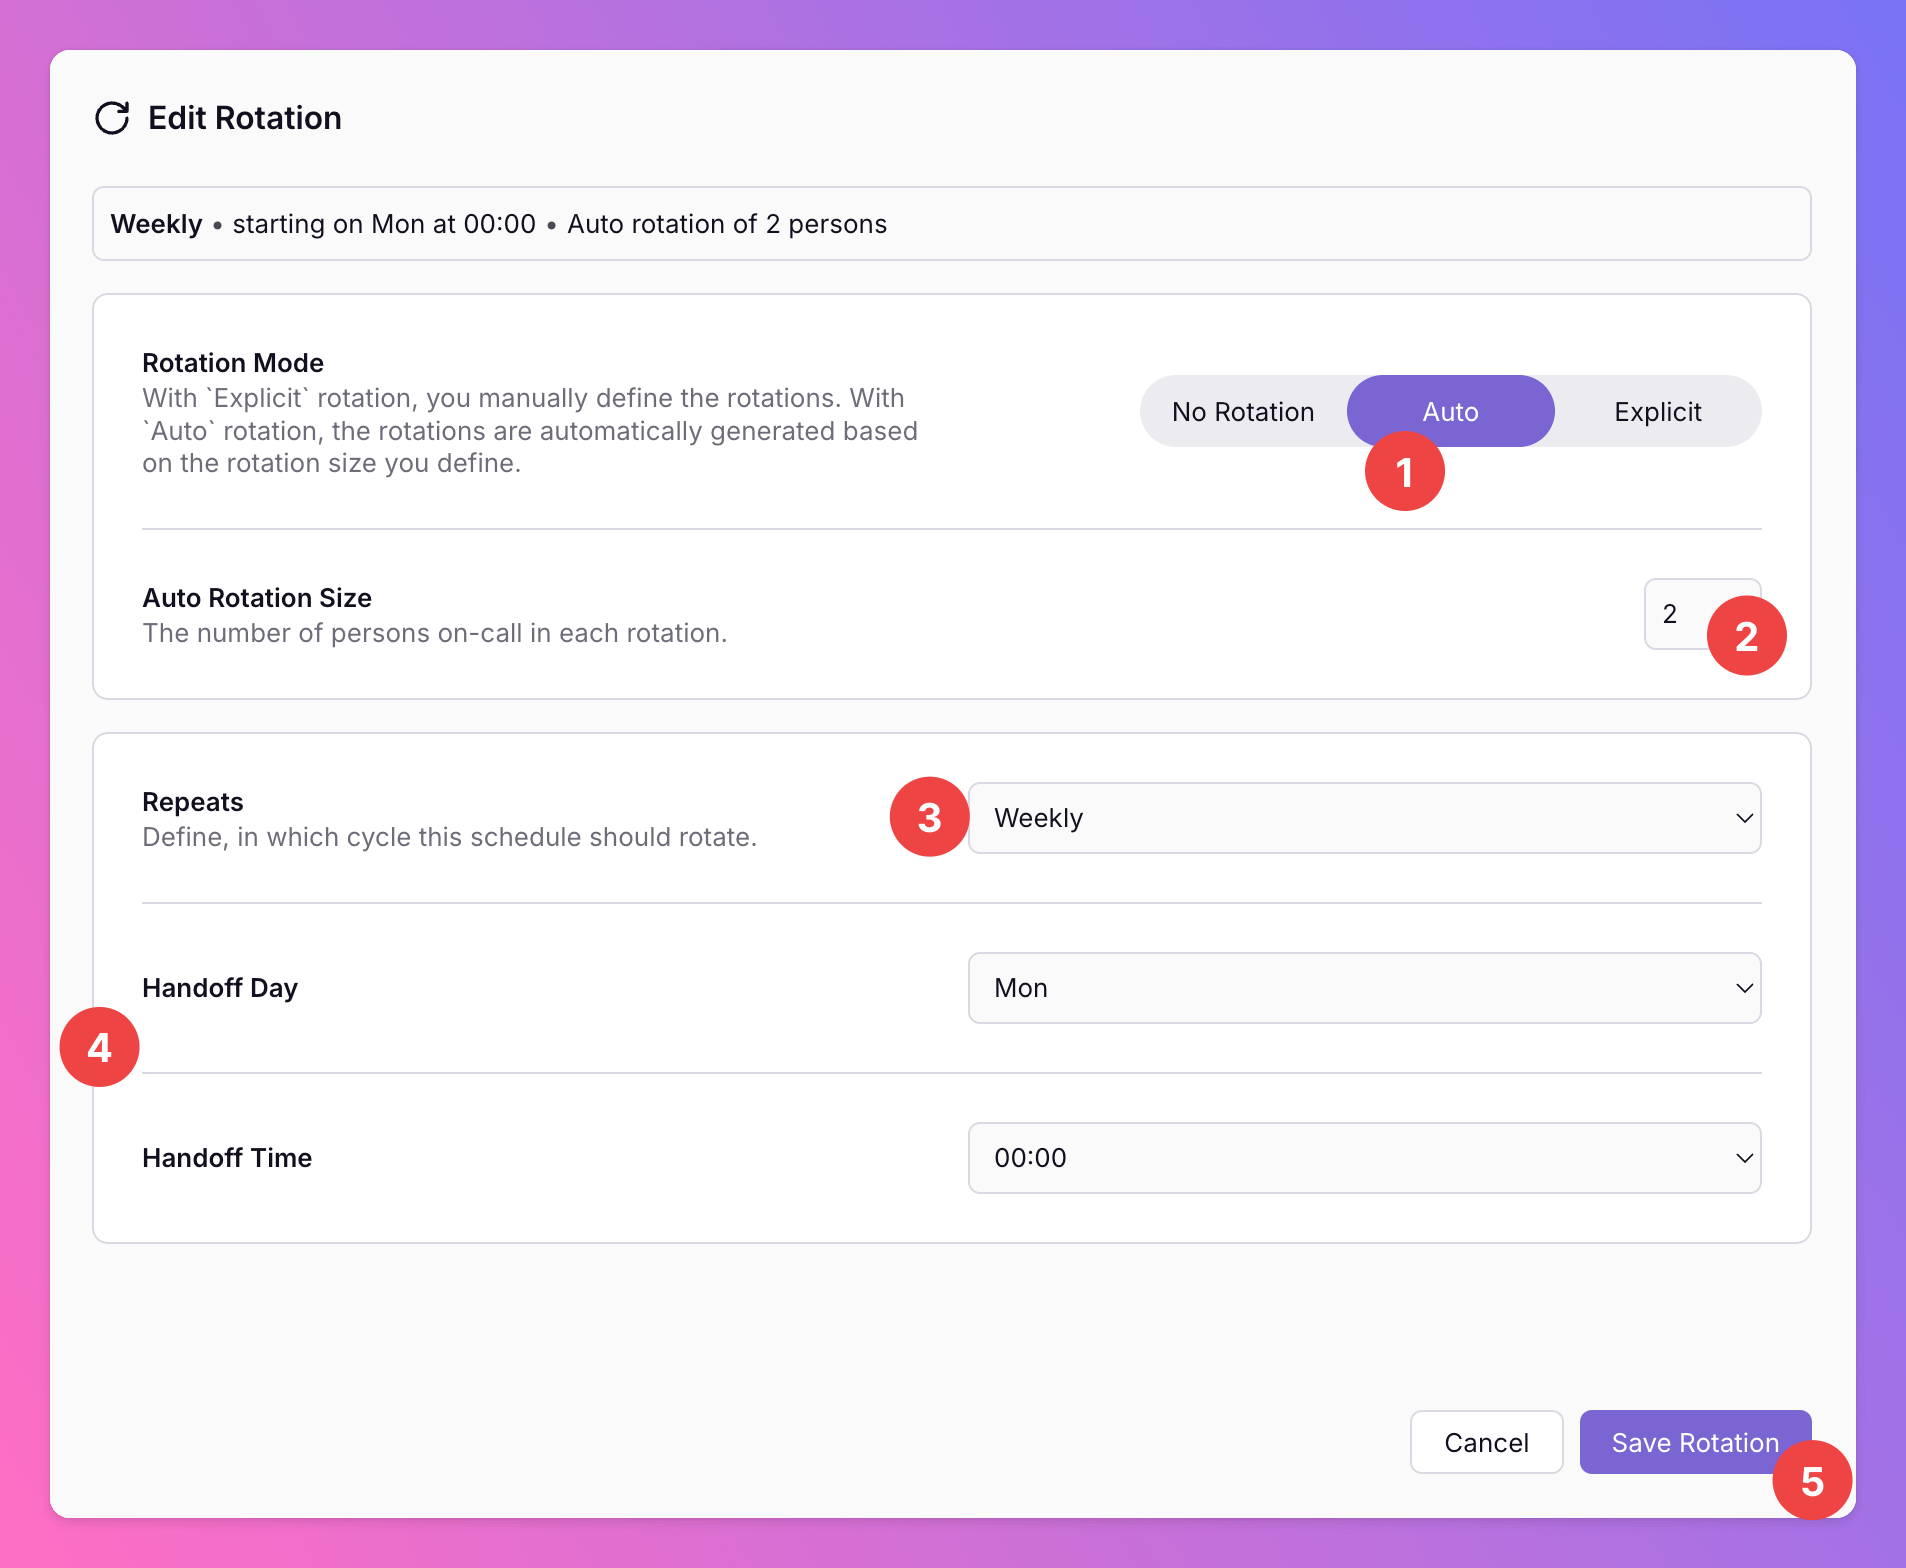
- Next, we opt for
Autoas rotation mode. This mode will automatically rotate the group of users in the schedule. - Define the
Auto Rotation Size. This is the number of persons on-call in each rotation group. - Select how oftern on-call duties should rotate. You can choose between
- Daily
- Weekly
- Biweekly
- Monthly
- Custom
- With rotation period weekly, you can also set a
Handoff Day. When your schedule uses 24-hour shifts and no specific on-call times, you can set aHandoff Timefor the on-call duty, too. If noHandoff Timeis available, the handoff happens automatically after the first shift ending that day (for overnight schedules) or before the first shift starting that day. - Click
Save Rotationto activate your changes.
The “Effective From” option got deprecated. Instead, you can now set a “Valid From” date on schedule level.
- As you can see, only 2 members of the group are on-call (green dots), the other has time off (red dot). By editing the members, you can change the rotation order per drag-and-drop.
- Next Monday at 00:00, the next 2 members will automatically rotate in for on-call duty. One week after, the next 2…
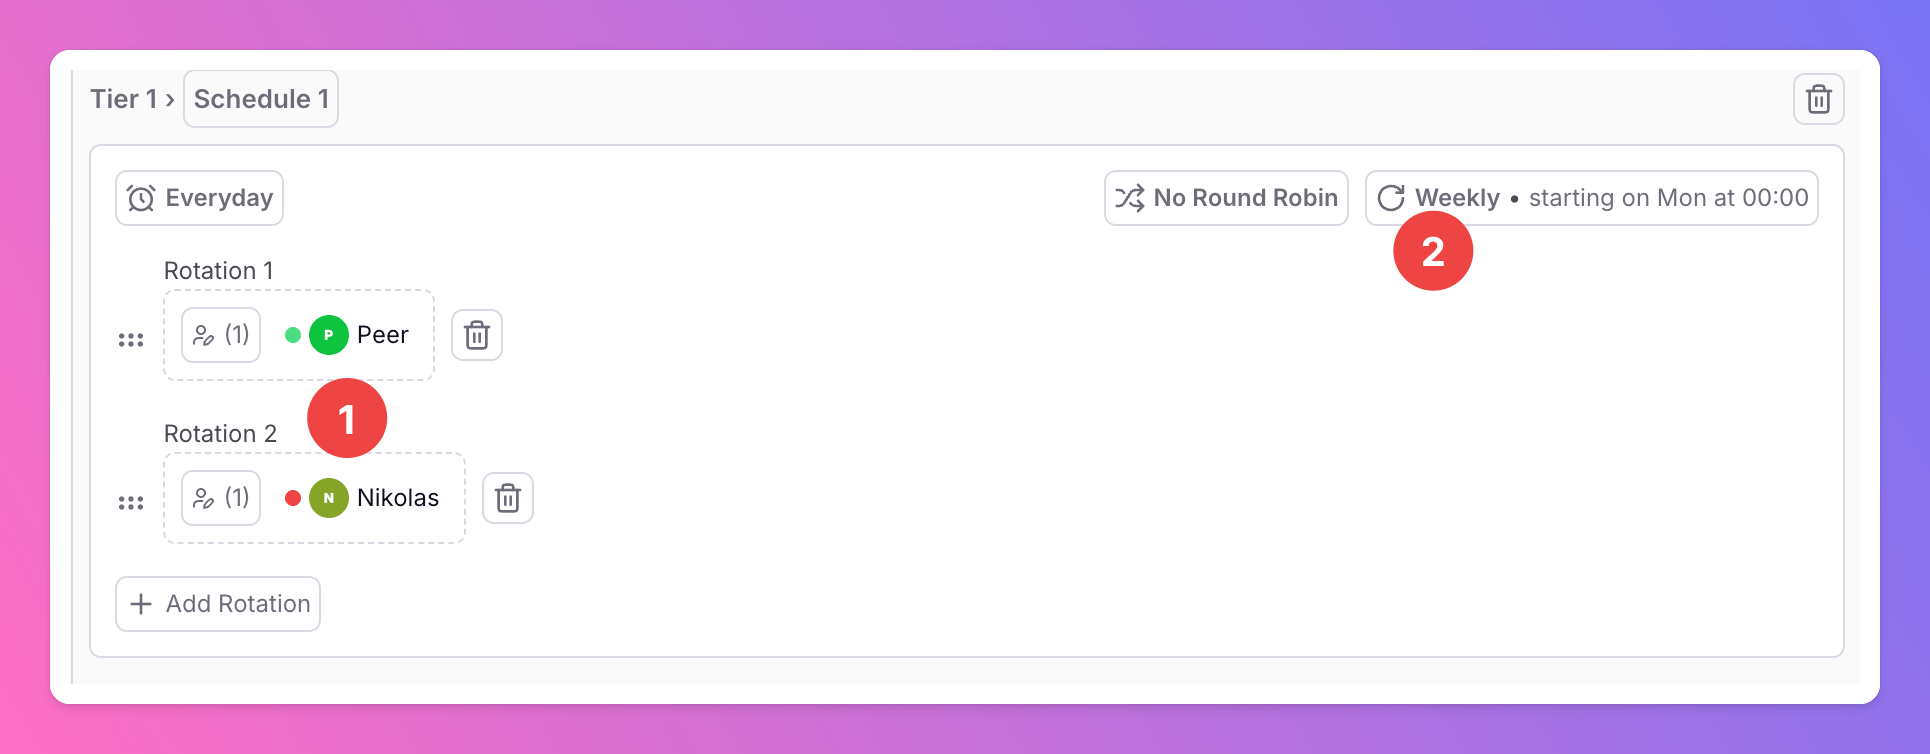
Explicit Rotations
- With
Explicitrotation mode, you manually define the members of each rotation group in the next step. - With rotation period weekly, you can also set a
Handoff Day. When your schedule uses 24-hour shifts and no specific on-call times, you can set aHandoff Timefor the on-call duty. If noHandoff Timeis available, the handoff happens automatically after the first shift ending that day (for overnight schedules) or before the first shift starting that day. - Select how oftern on-call duties should rotate. You can choose between
- Daily
- Weekly
- Biweekly
- Monthly
- Custom
- Click
Save Rotationto activate your changes.
The “Effective From” option got deprecated. Instead, you can now set a “Valid From” date on schedule level.
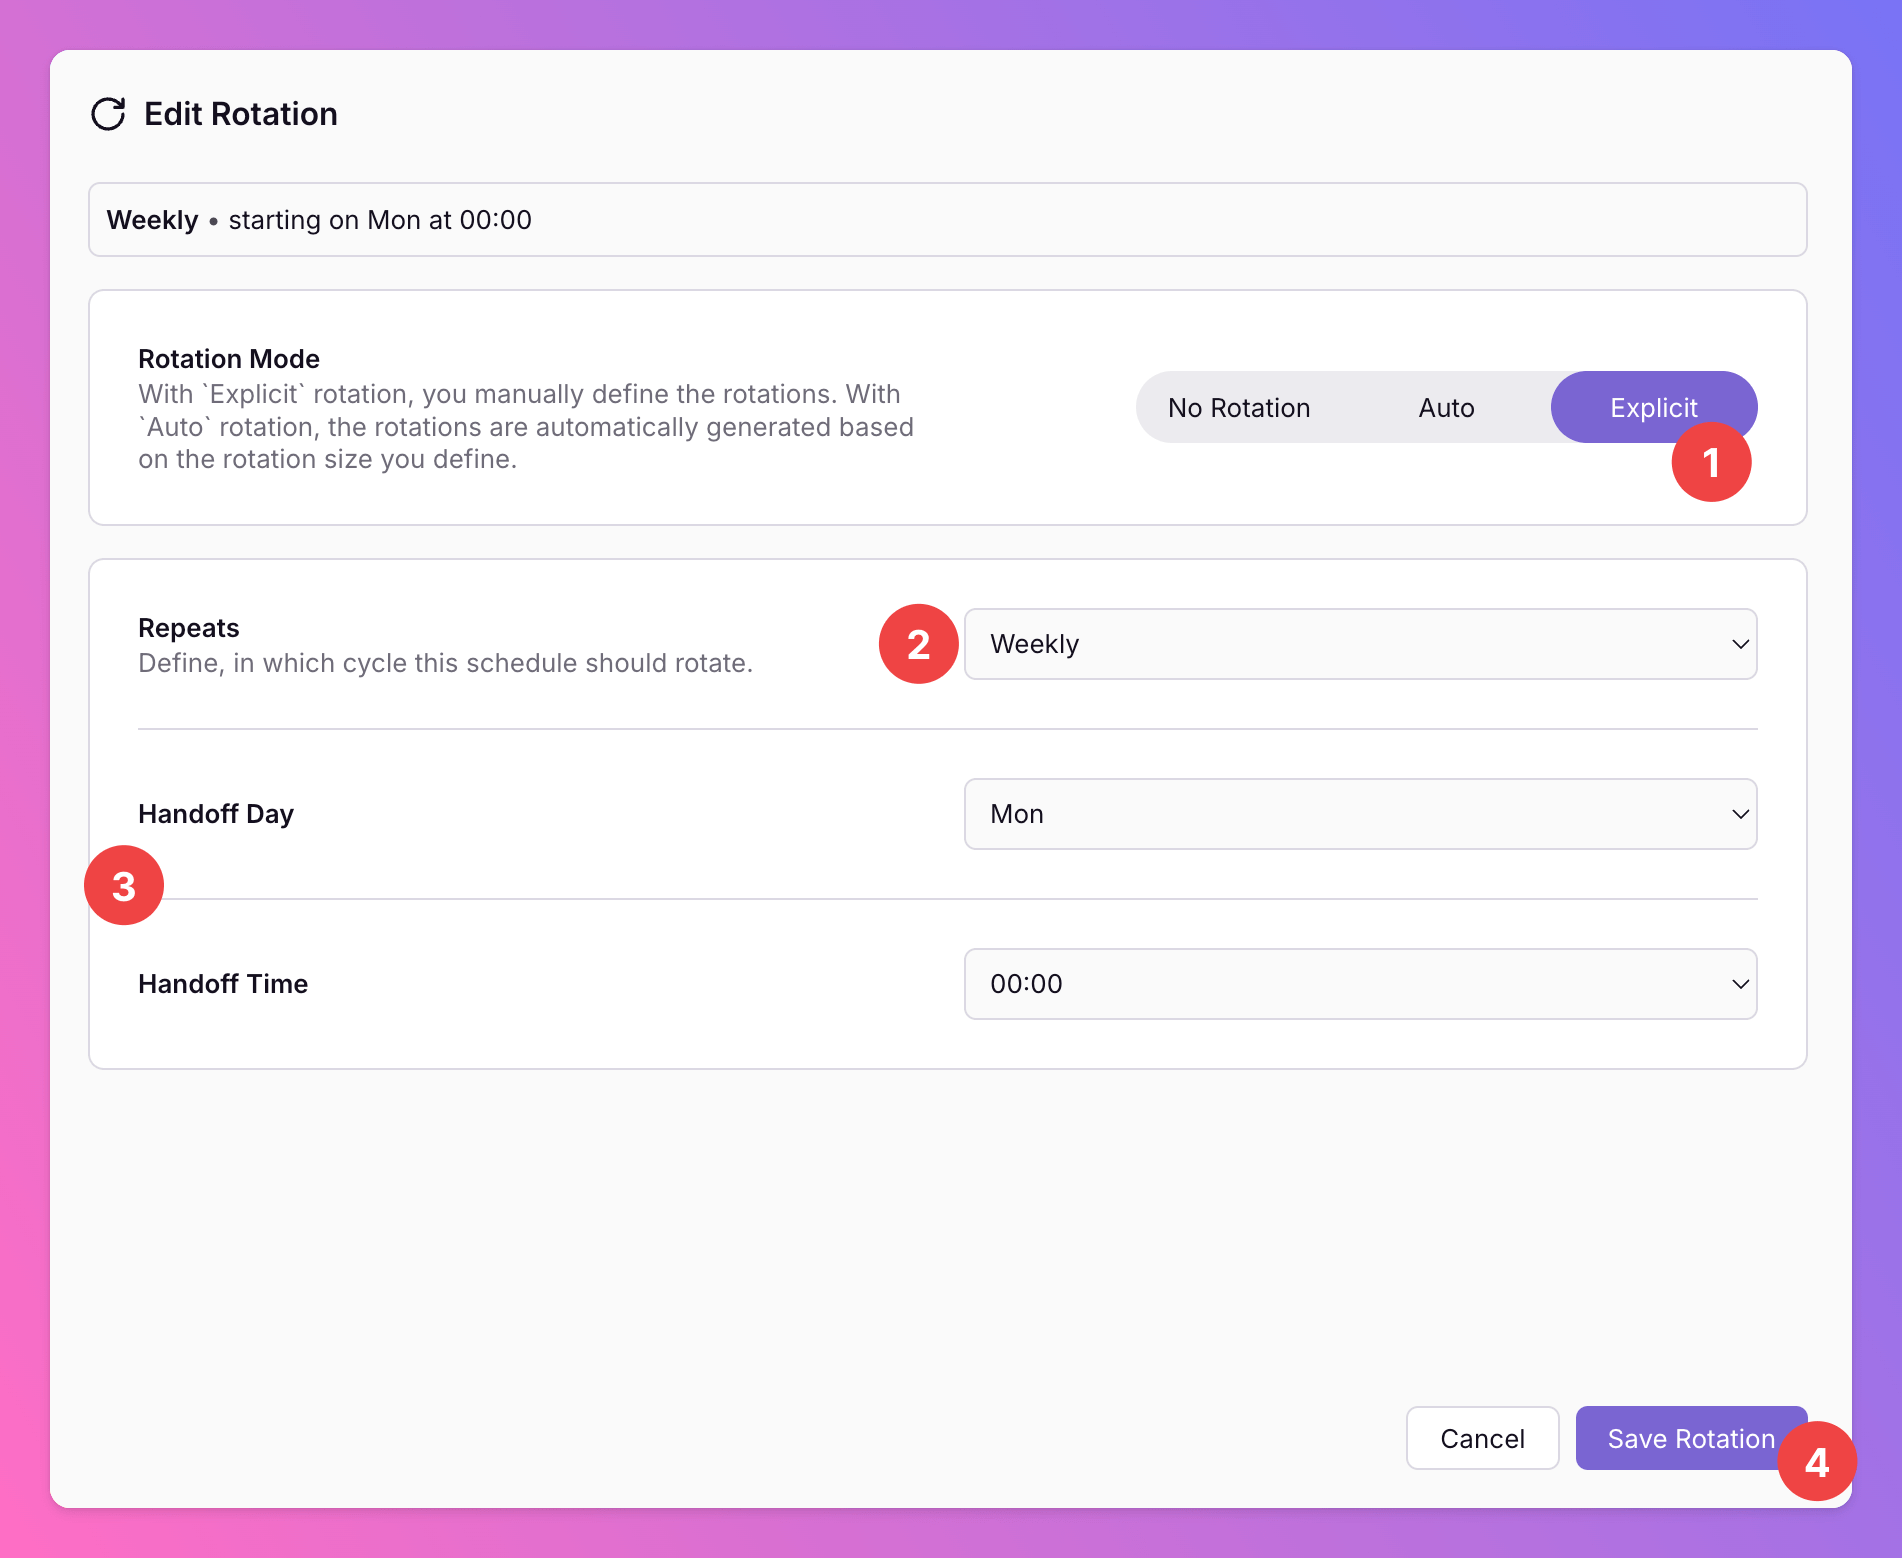
- We’ve opted for
Explicitrotations, so we need to add at least a 2ndRotation. - Click
+ Add Rotationto create a new rotation and add members to it.
- we can see that one rotation is on-call (green dot) and the other has time off (red dot) until on-call duties rotate. You can change the rotation order per drag-and-drop.
- Here, we can see our rotation rule and edit it.
Adding / Removing Rotations
When you add or remove rotations, we make sure the current on-call rotation remains active and the order stays unchanged. When the first rotation begins after the “Valid From” date in a cycle, that rotation marks the start of the plan. For example, in a weekly cycle where the “Valid From” date falls on a Tuesday:- If the rotation start day is Monday or Tuesday, the on-call period begins on Tuesday (the “Valid From” date).
- If the rotation’s designated handover day is Thursday, then the on-call period begins on the first Thursday after the “Valid From” date - two days later.
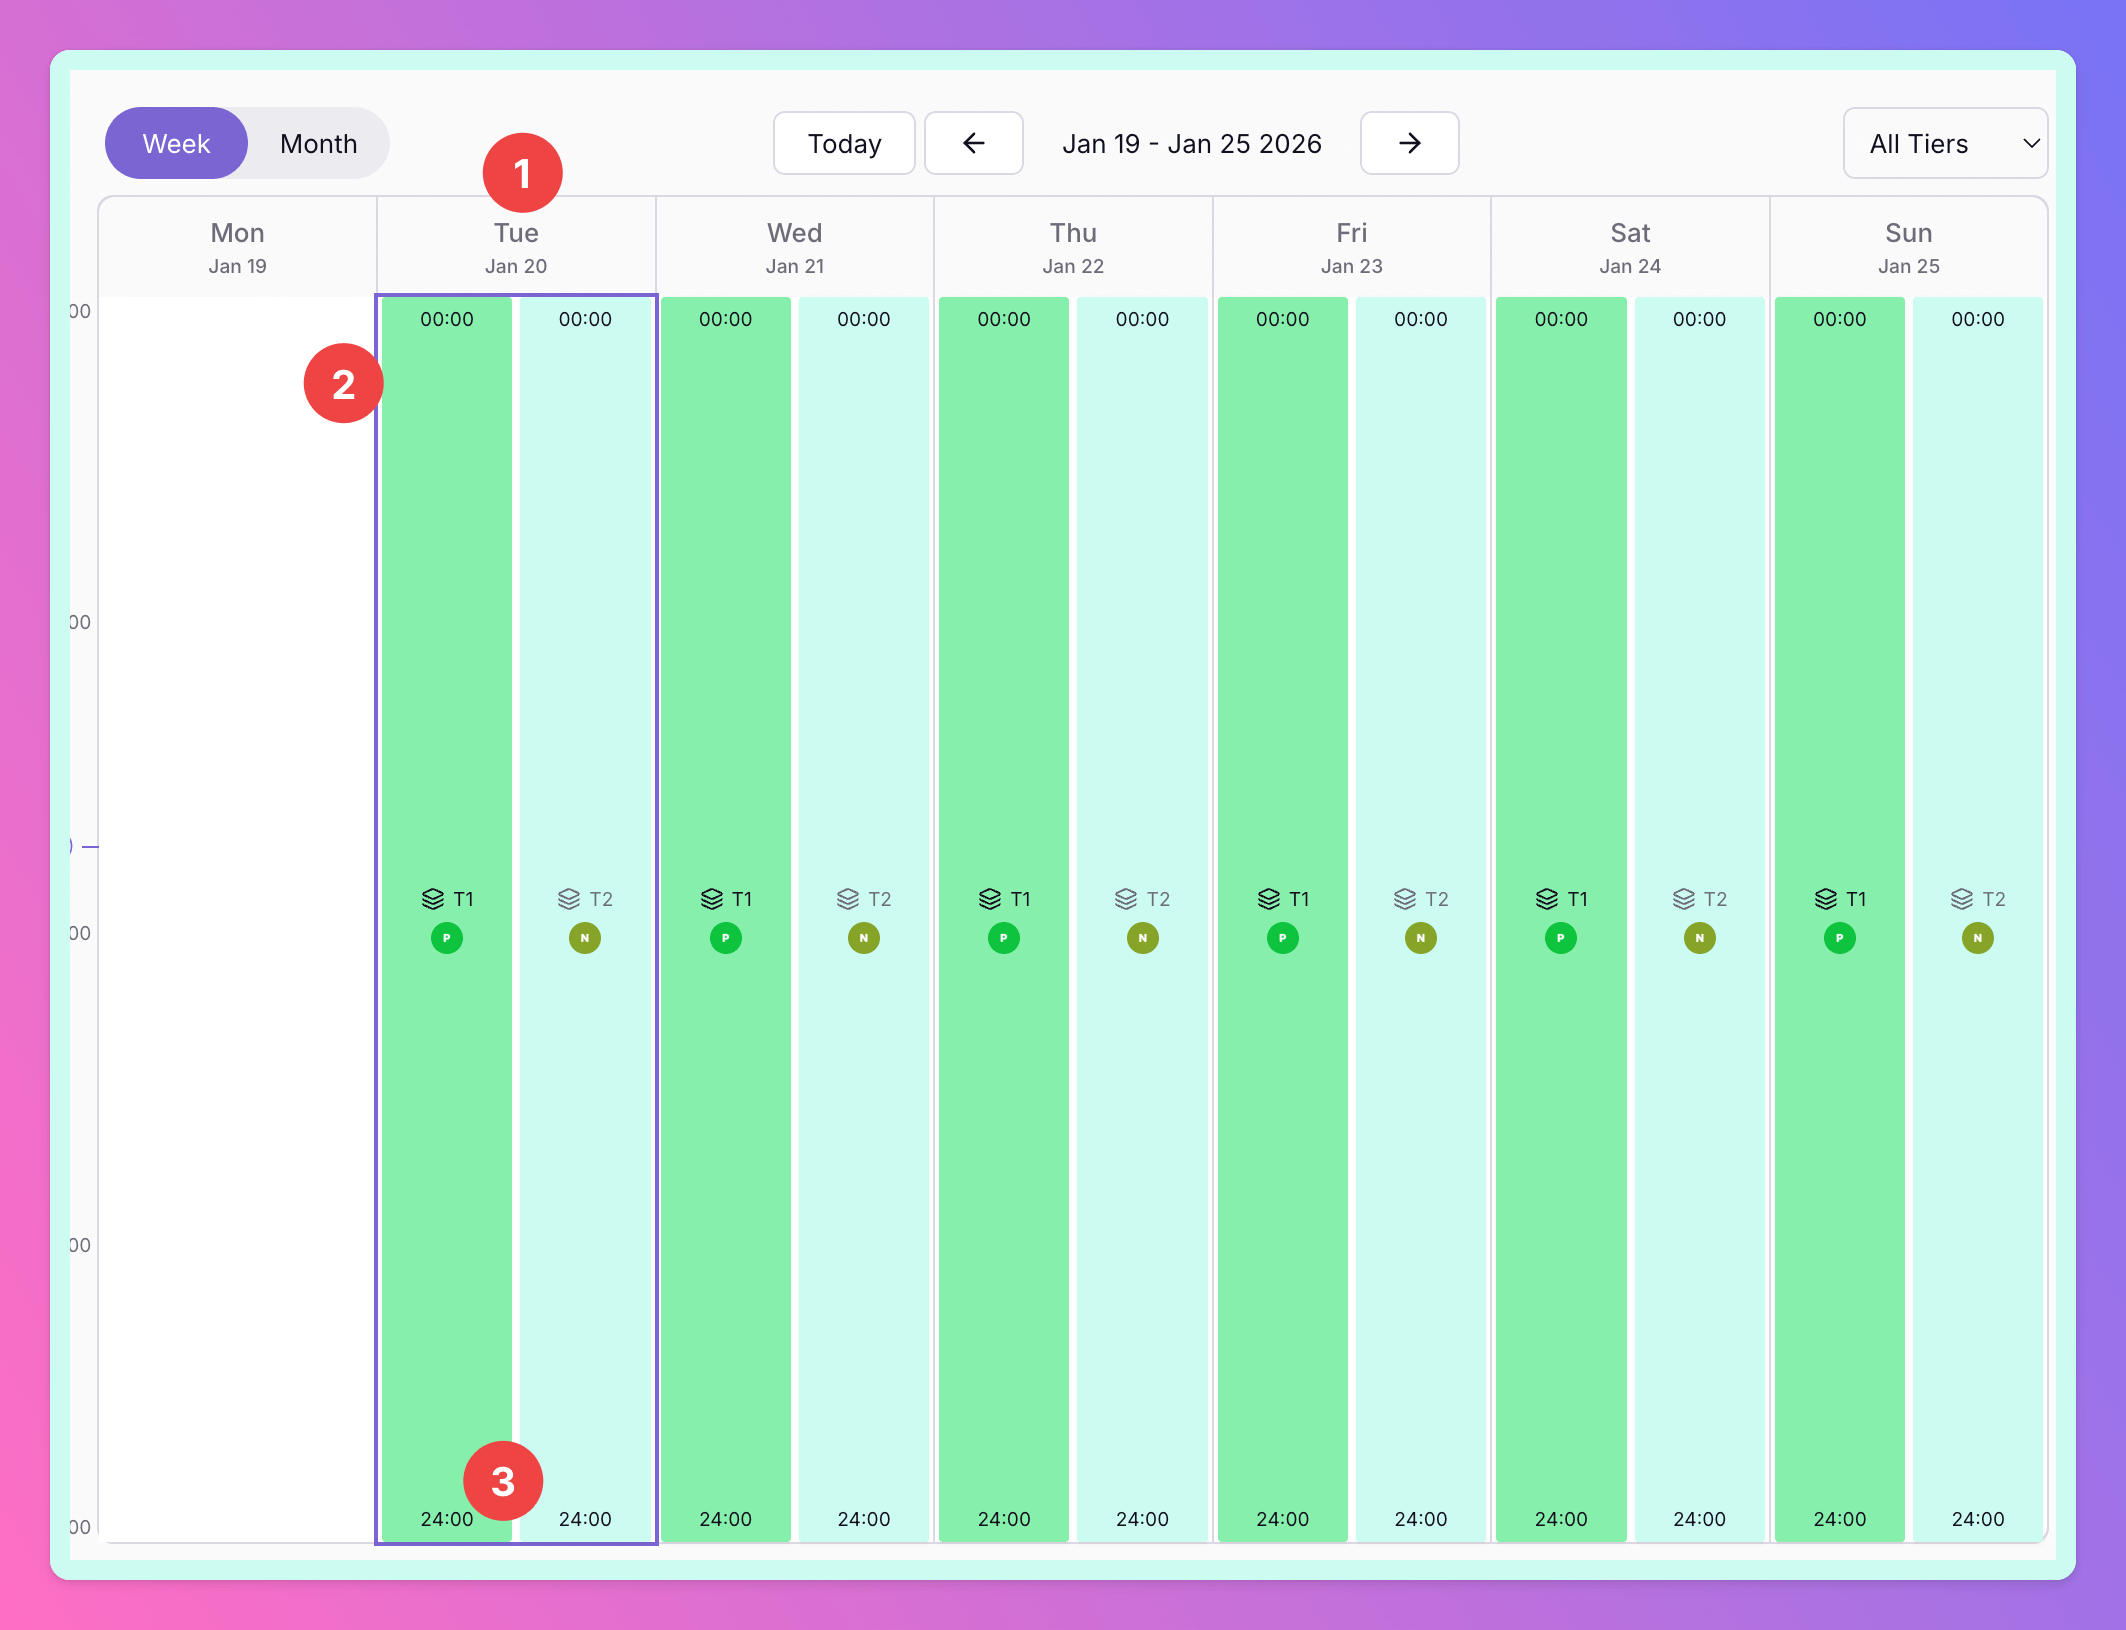
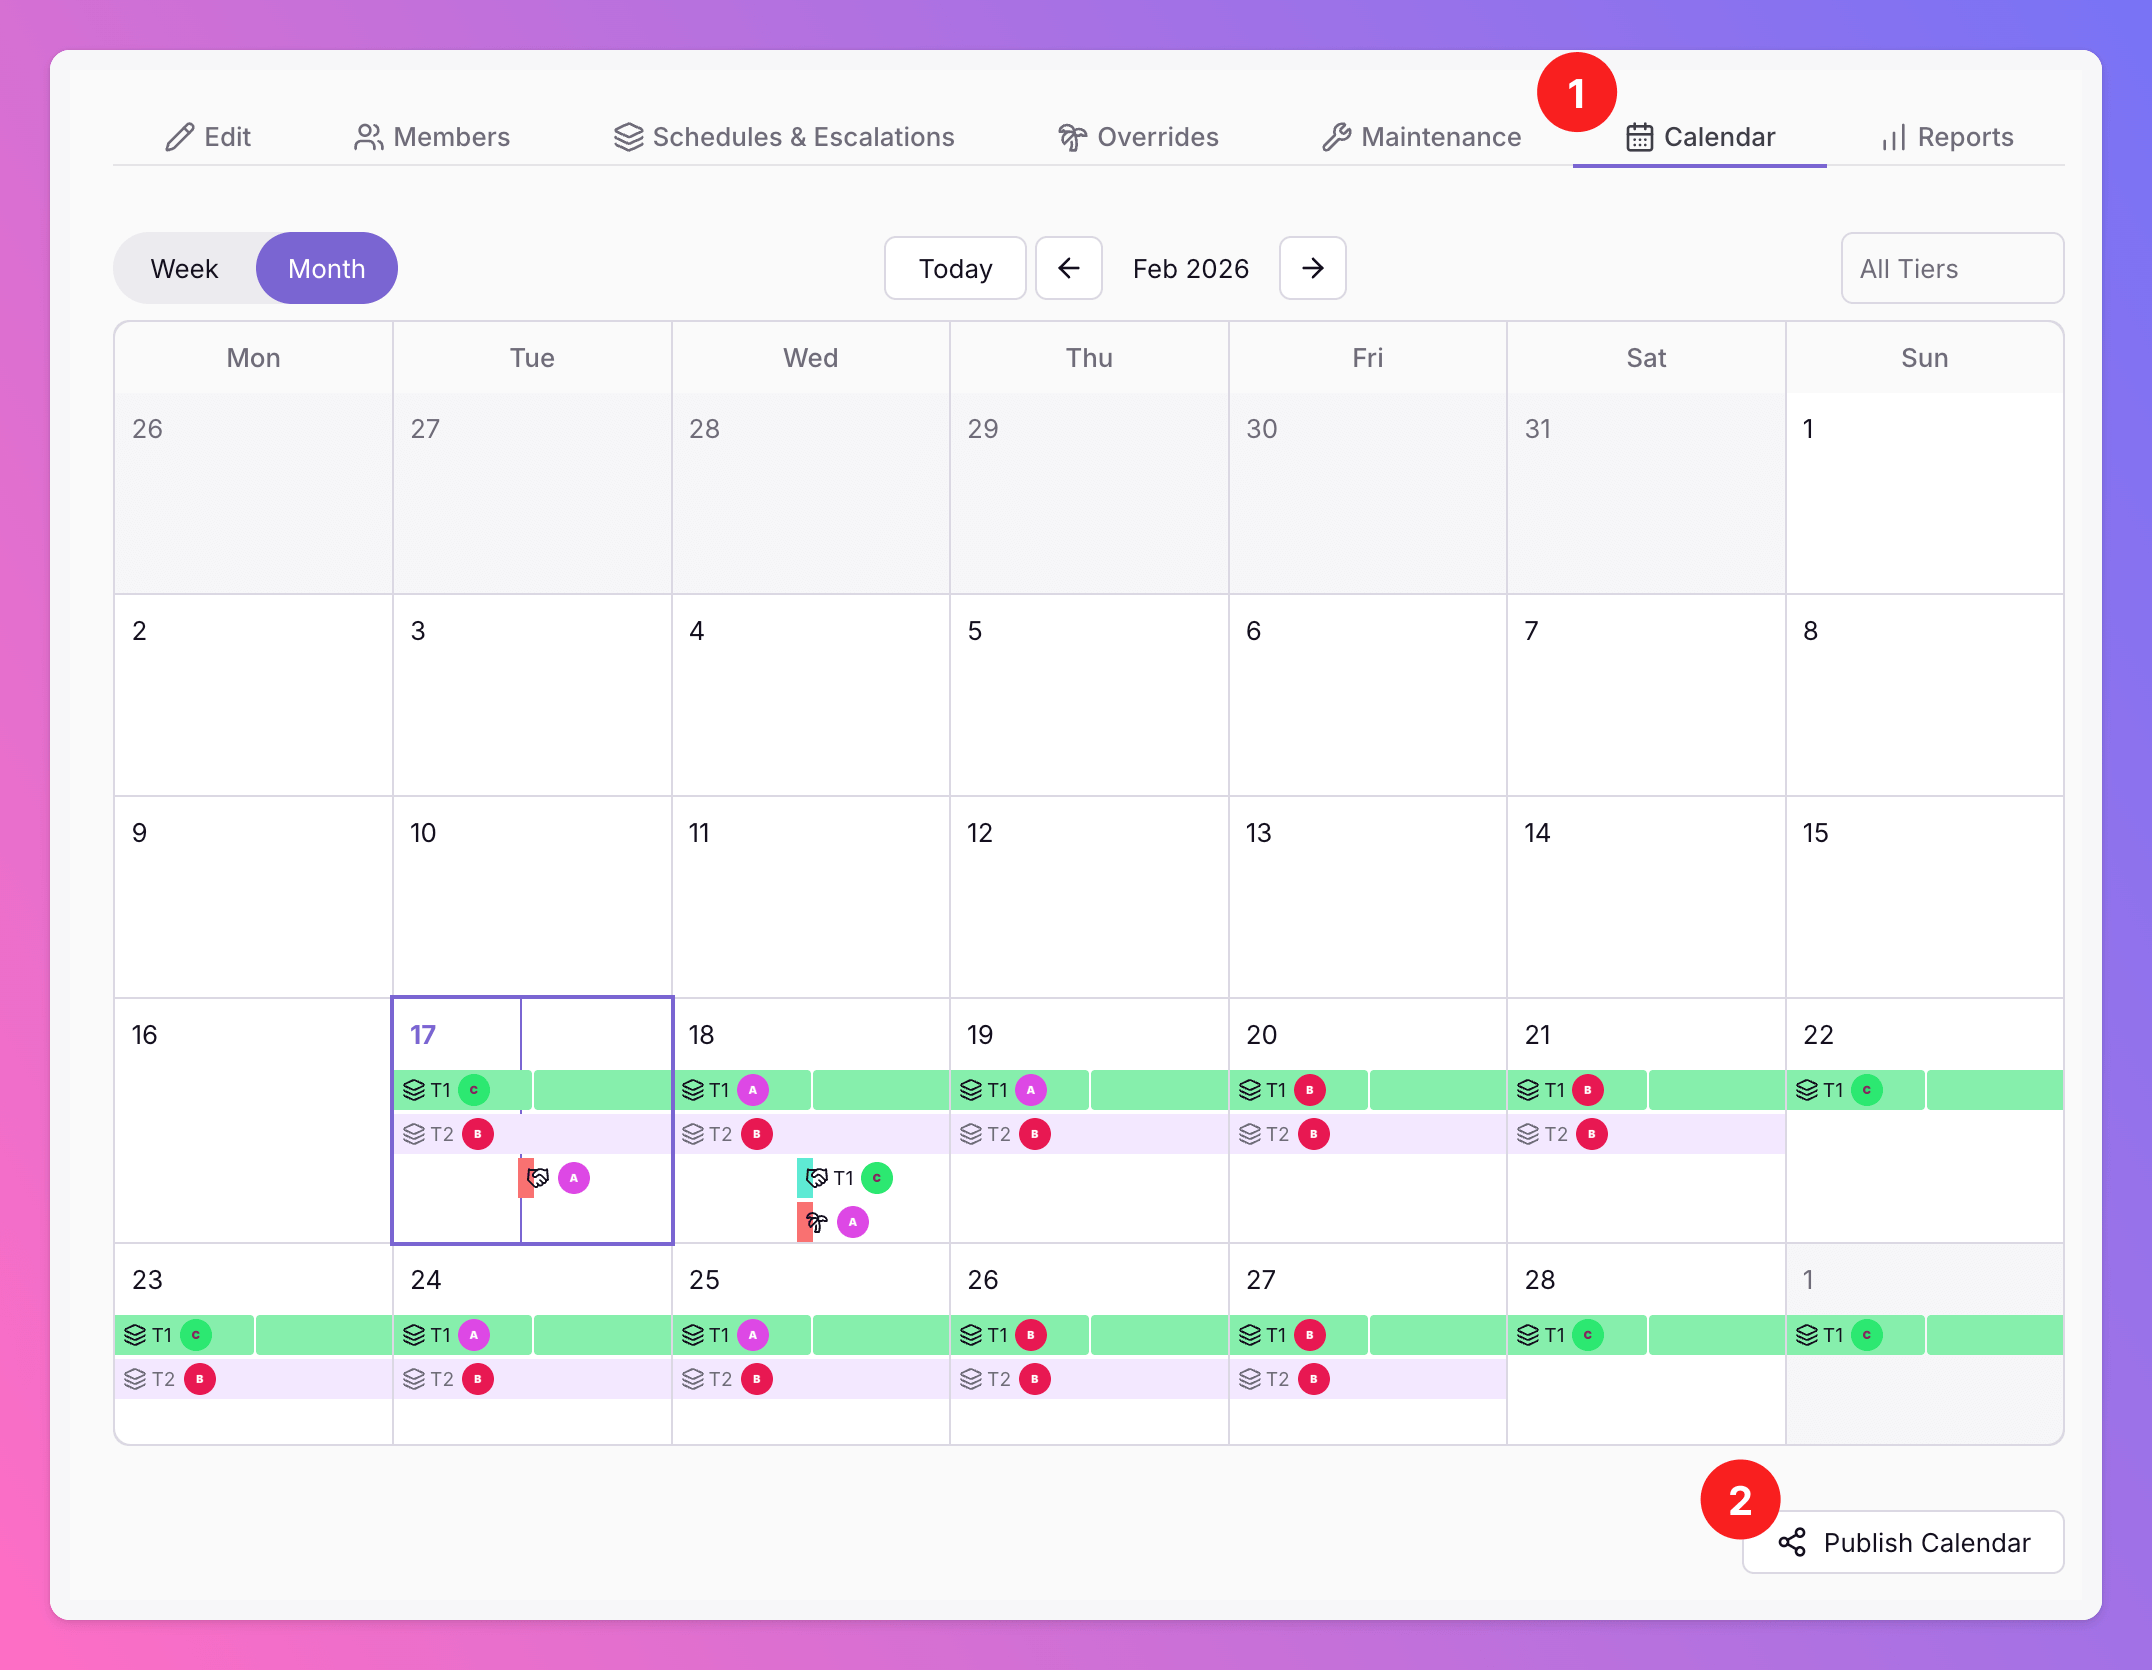
Team Calendar
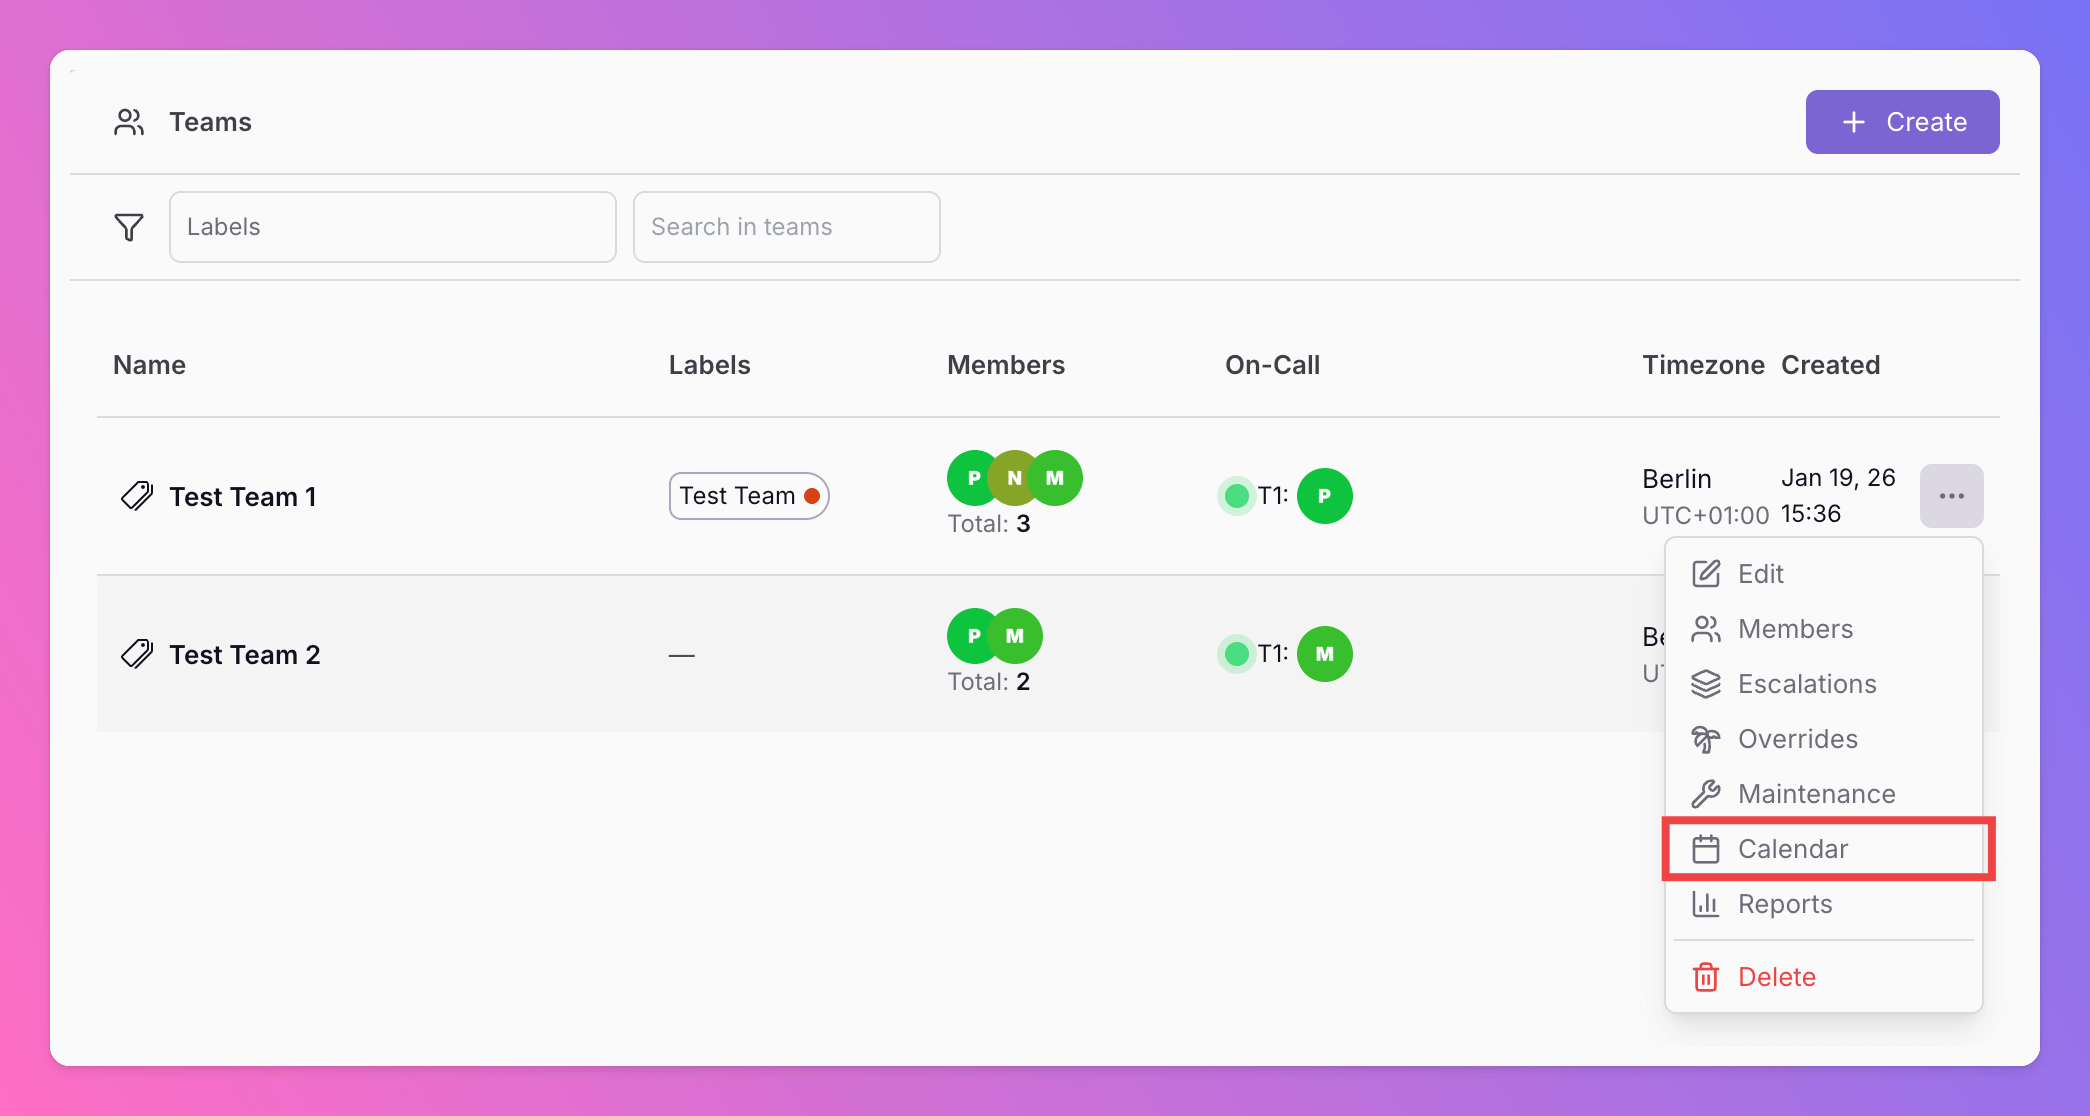
To view the calendar of a team and gain an overview of team members’ on-call and off-call periods within each escalation tier, follow this step:Access Team Calendar Page
Access the team calendar page: Navigate to the team management section or select the specific team from the menu. Look for the option labeledCalendar.
View Team’s Calendar and Schedules
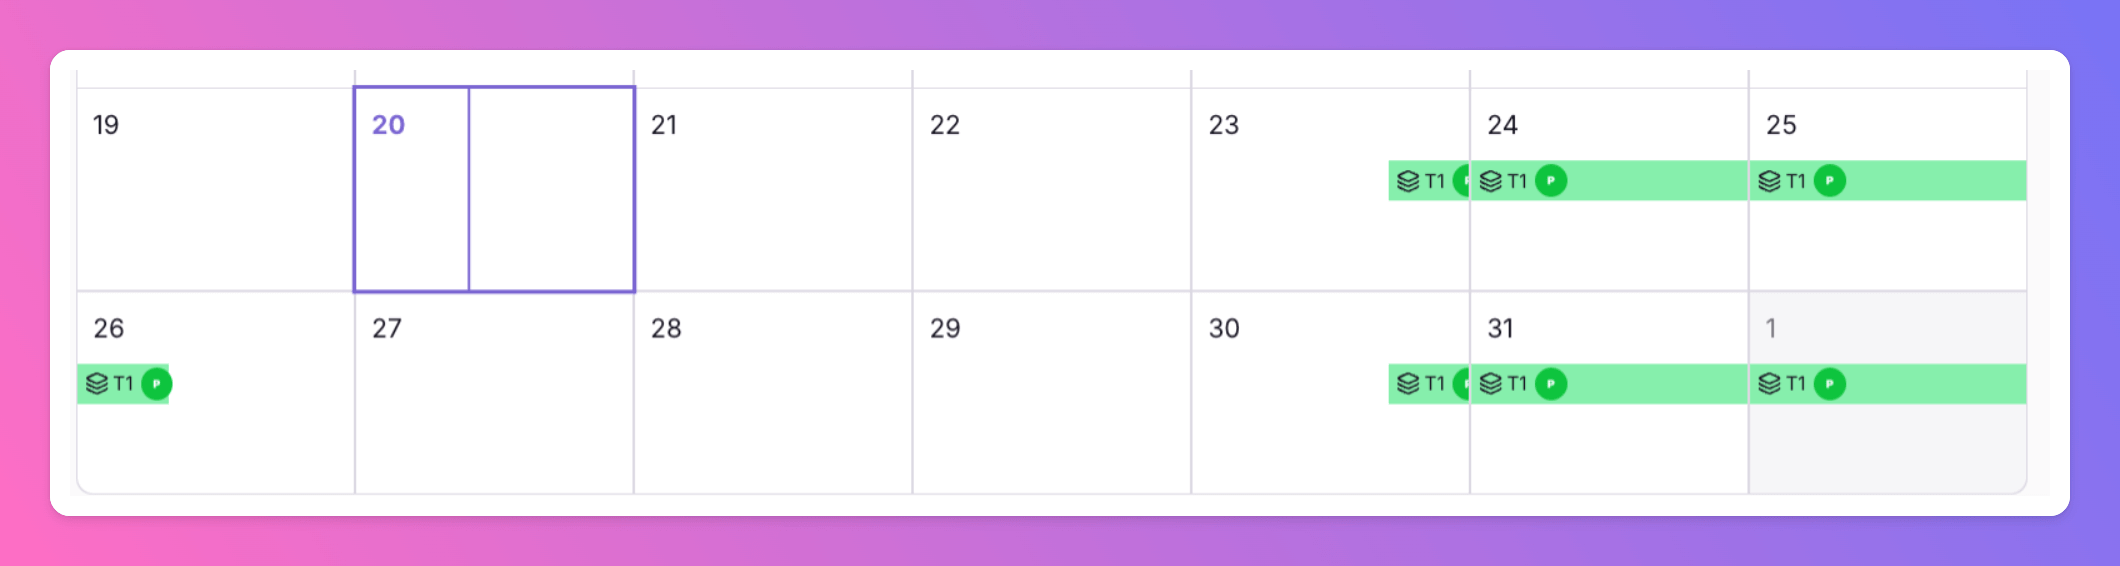
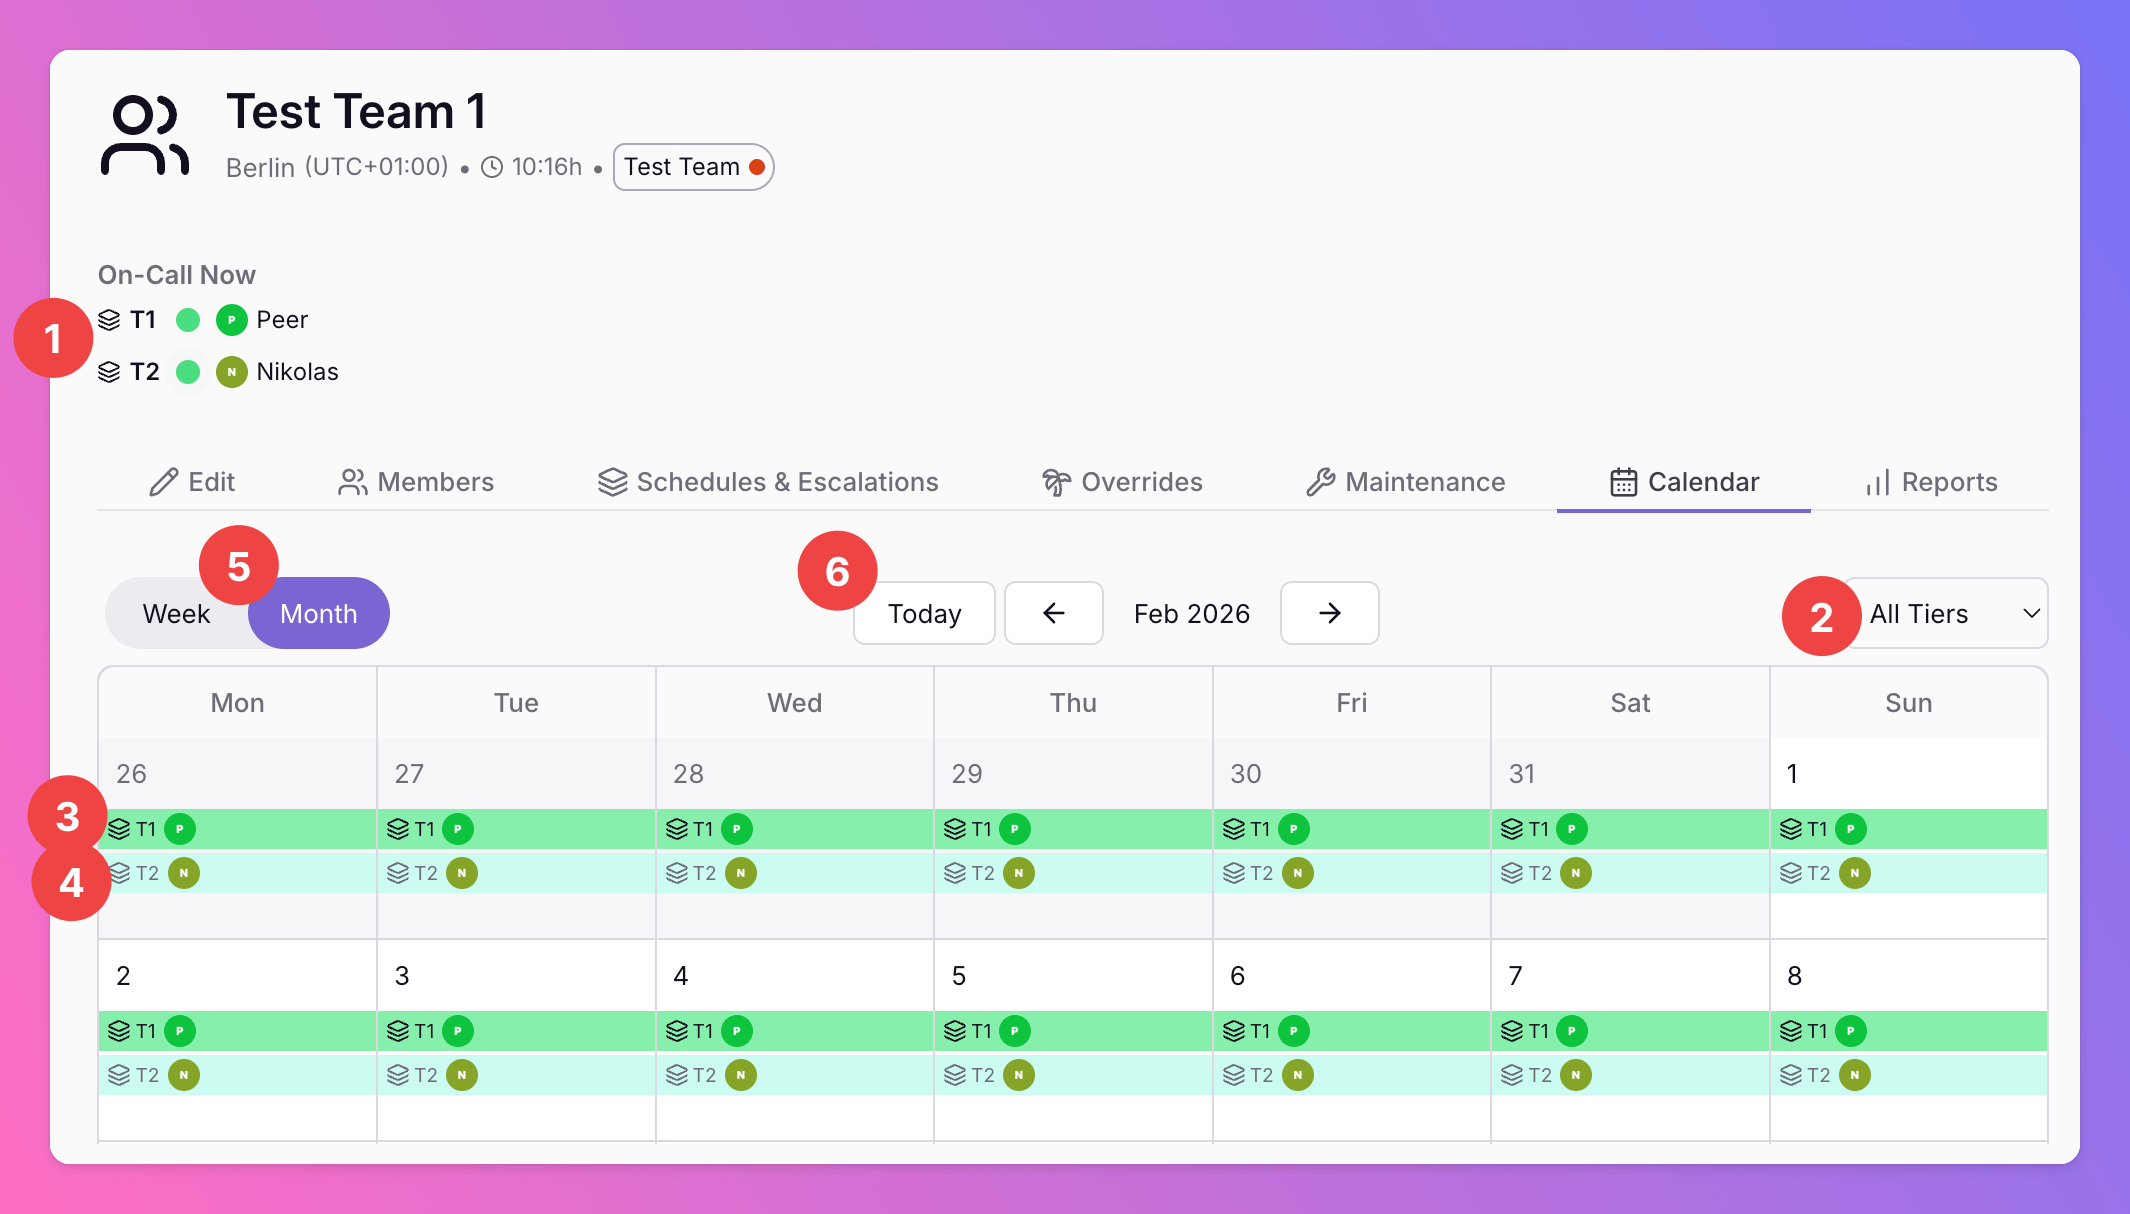
The All Quiet calendar provides a visual representation of the on-call schedules for your teams, ensuring that everyone knows their responsibilities at a glance. Below is a breakdown of the key elements of the calendar interface:Monthly Calendar
- On-Call Now Indicators: These indicators provide a quick view of which team members are currently on-call. The indicators are color-coded and numbered to correspond with the tier of on-call duty.
- Tiers Filter: Use the
Tiersdropdown to filter the calendar view by on-call tiers. This allows you to focus on specific response levels within your team’s on-call schedule. - Individual Schedule Entries: These entries display the scheduled on-call shifts for each team member. The entries show the profile image of the on-call individual and the corresponding time period of their shift. Click on the shift for details.
- Tier Labeling: Each schedule entry is labeled with a ‘T’ followed by a number to indicate the on-call tier. ‘T1’ corresponds to Tier 1, and ‘T2’ to Tier 2, providing a clear distinction of responsibility levels.
- Time Navigation: This section allows you to navigate through different time frames within the calendar—‘Week’ and ‘Month’ views are available. Use the arrows to move backward or forward through the calendar.
- Click
Todayto return to the current date.
Weekly Calendar
The weekly view in the All Quiet calendar provides a detailed look at the team’s on-call schedule, with each day of the week displayed as a separate column. This view contrasts with the monthly perspective by offering a granular, day-by-day breakdown of on-call shifts.- Daily Details: Unlike the monthly view which summarizes the shifts, the weekly view displays individual shifts for each day, showing precise start and end times.
- Current Day Highlight: The current day is accentuated with a distinct color, making it stand out for easy identification.
- Hourly Breakdown: Each column represents a single day broken down by hour, which is more detailed than the monthly calendar.
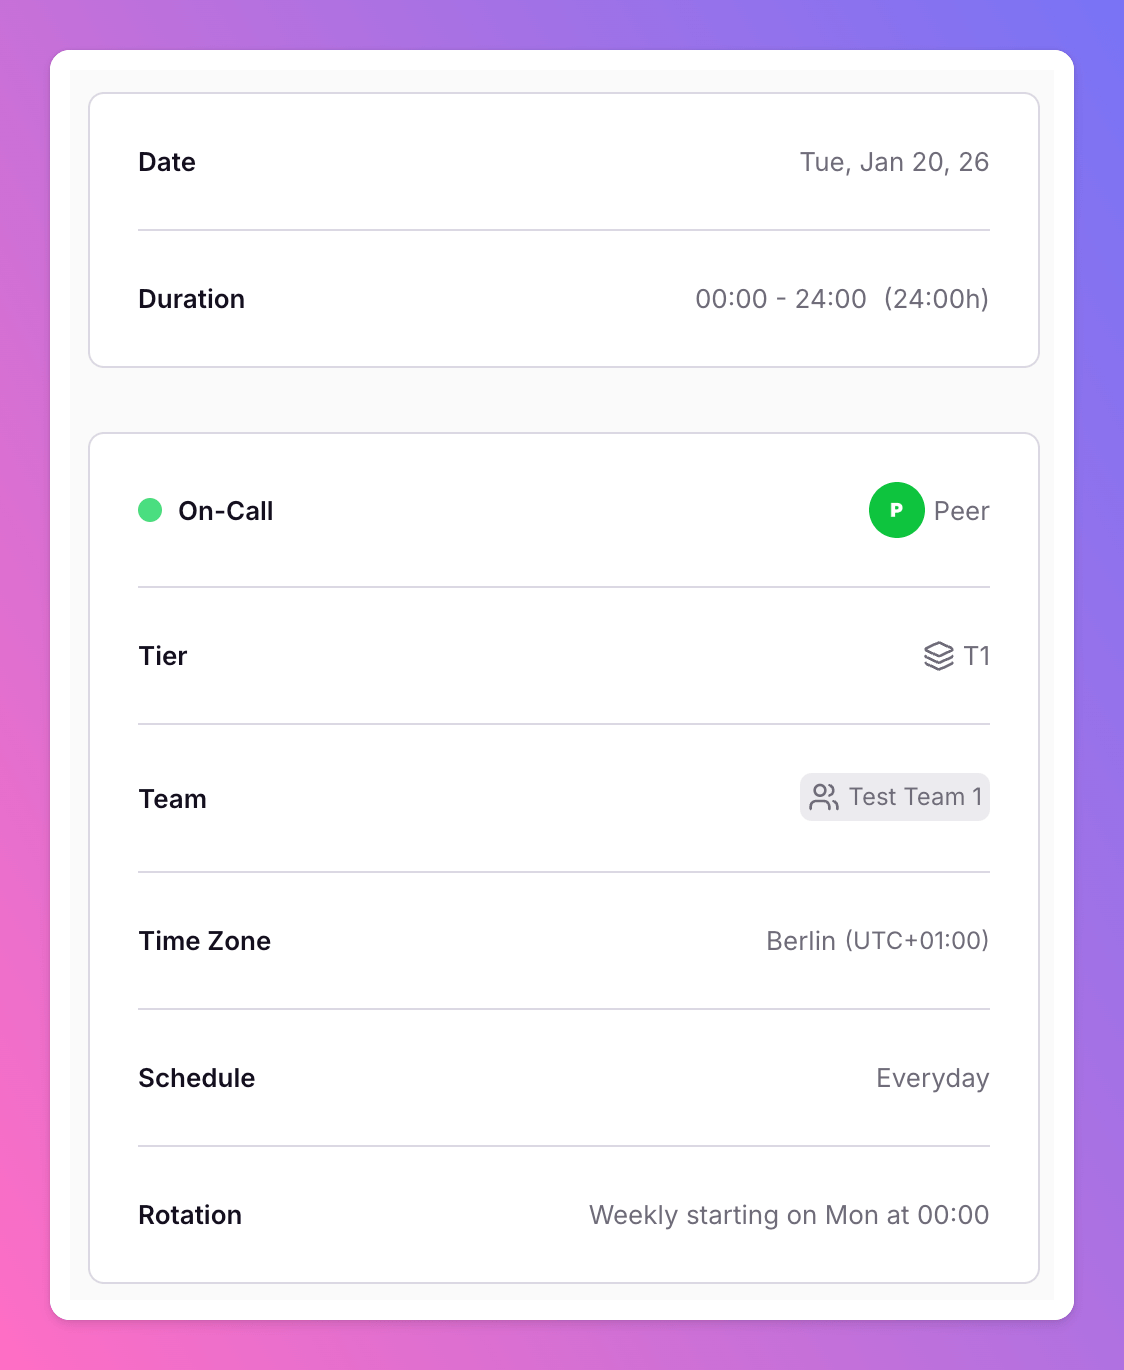
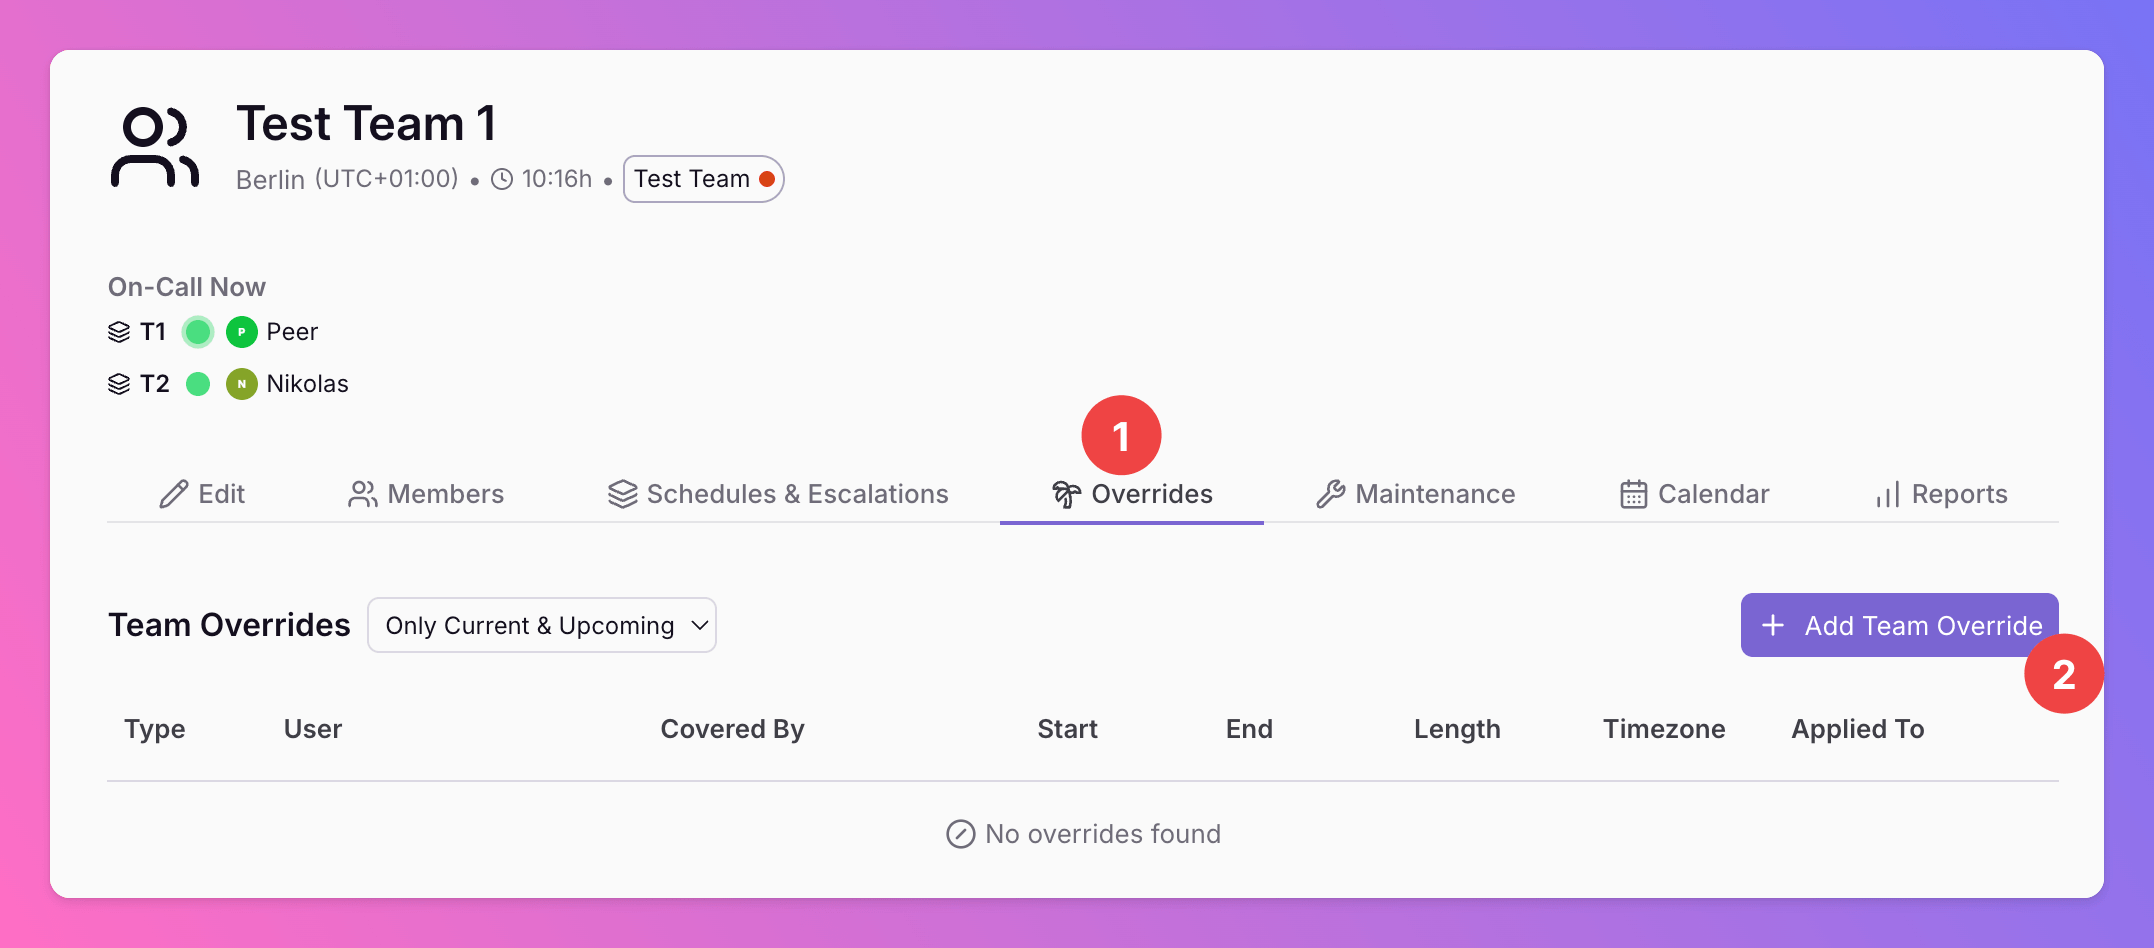
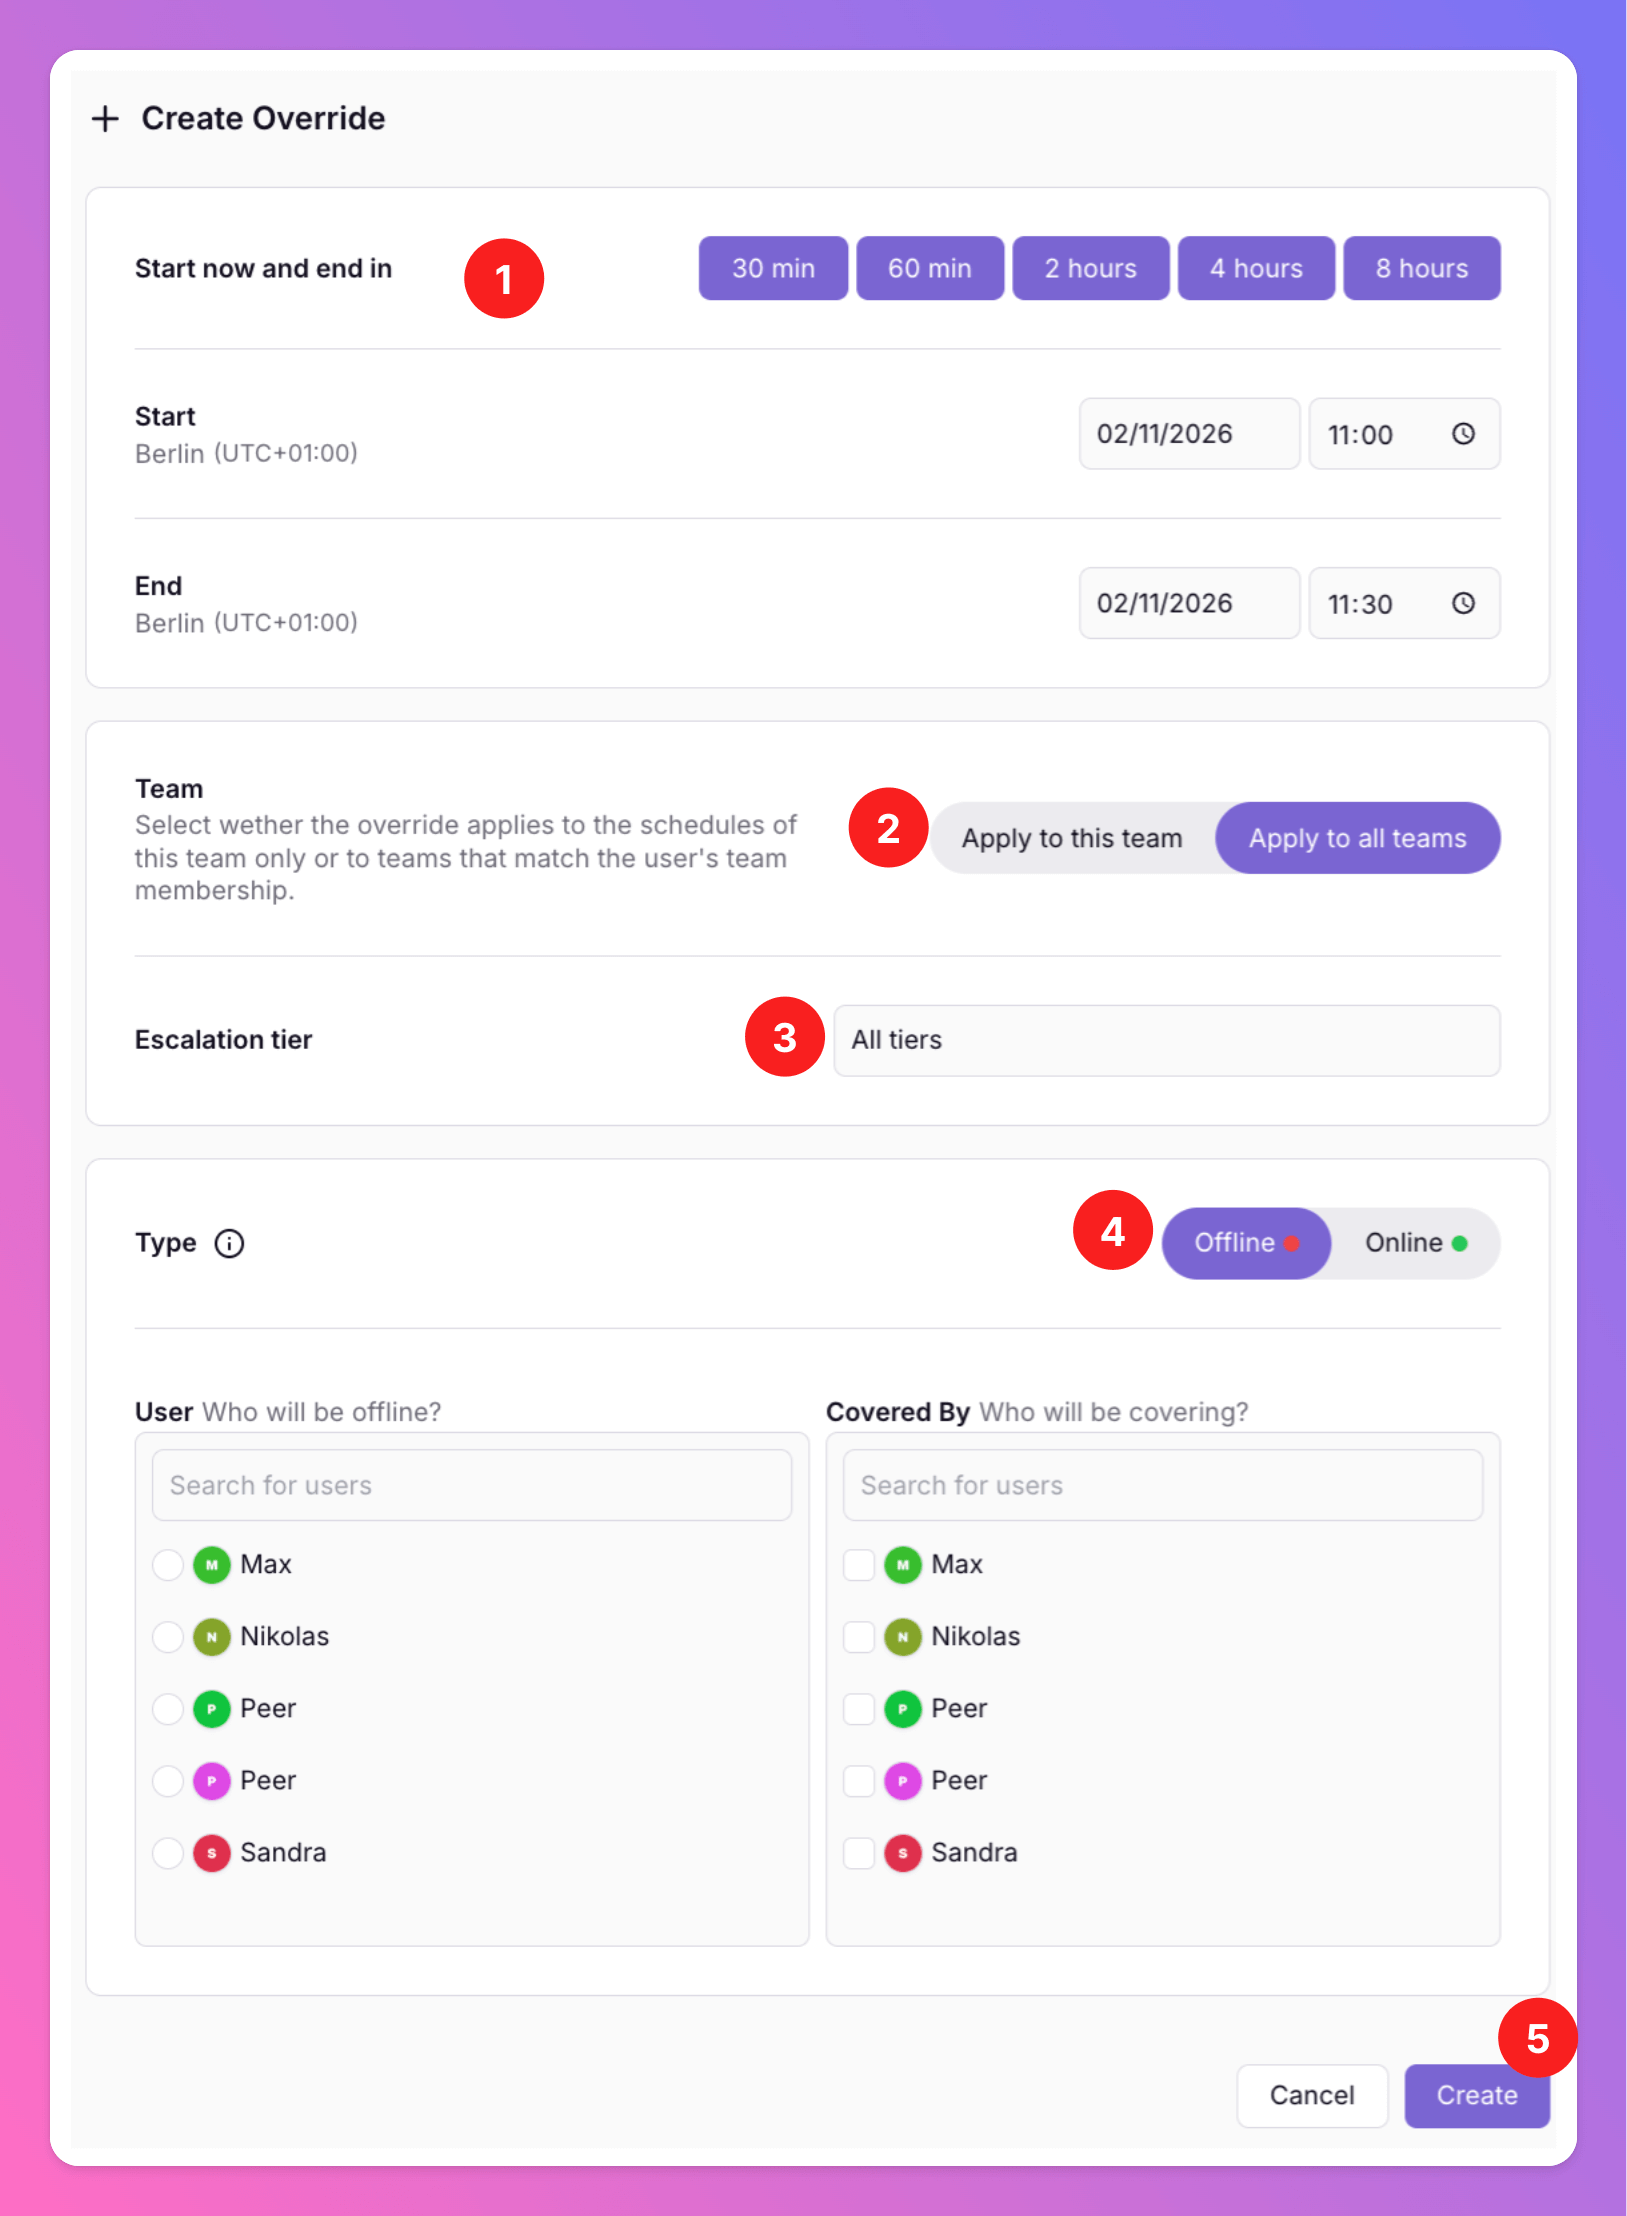
Team Member Overrides
Team Administrators can enter theTeam > Overrides section to add overrides for all team members.
In order to do so, select the team you want to add an overrride to.
- Next, select
Overrides - Click
Add Team Override
- Select the duration of the override.
- Specify whether the override should
apply to all teamsof the selected user or whether it should onlyapply to this team. - Specify whether the override should be appplied to all tiers or only specific tiers.
- Specify the type (“Offline” or “Online”), the user for whom you want to create the override, and - if the user will be “Offline” - optionally the covering user who will replace the offline user in his shift.
- Save the override. It will be visible in your team’s calendar and show up in the related users’ personal availabilites.
Publish and Export Team Calendar
The Team Calendar can only be published by Team Administrators, Organization Administrators and Organization Owners. Users with respectible rights can share the .ics link with others.
- Open the Calendar tab
- Click on
Publish Calendarbelow the calendar view.
- Choose whether to sync all tiers or just Tier 1. If you’re using Google Calendar, remember to rotate your public calendar URL after changing your sync settings and embed the new URL.
- After clicking
Publish Team Calendar URLs, you will see your team’s specific URLs that you can use to subcribe to the All Quiet On-Call calendar from your private calendar. Simply click on the URLs to copy them. - If you click “Rotate Team Calendar URL”, a new calendar link will be generated. Any subscriptions using the old link will stop updating, so you’ll need to resubscribe with the new URL.
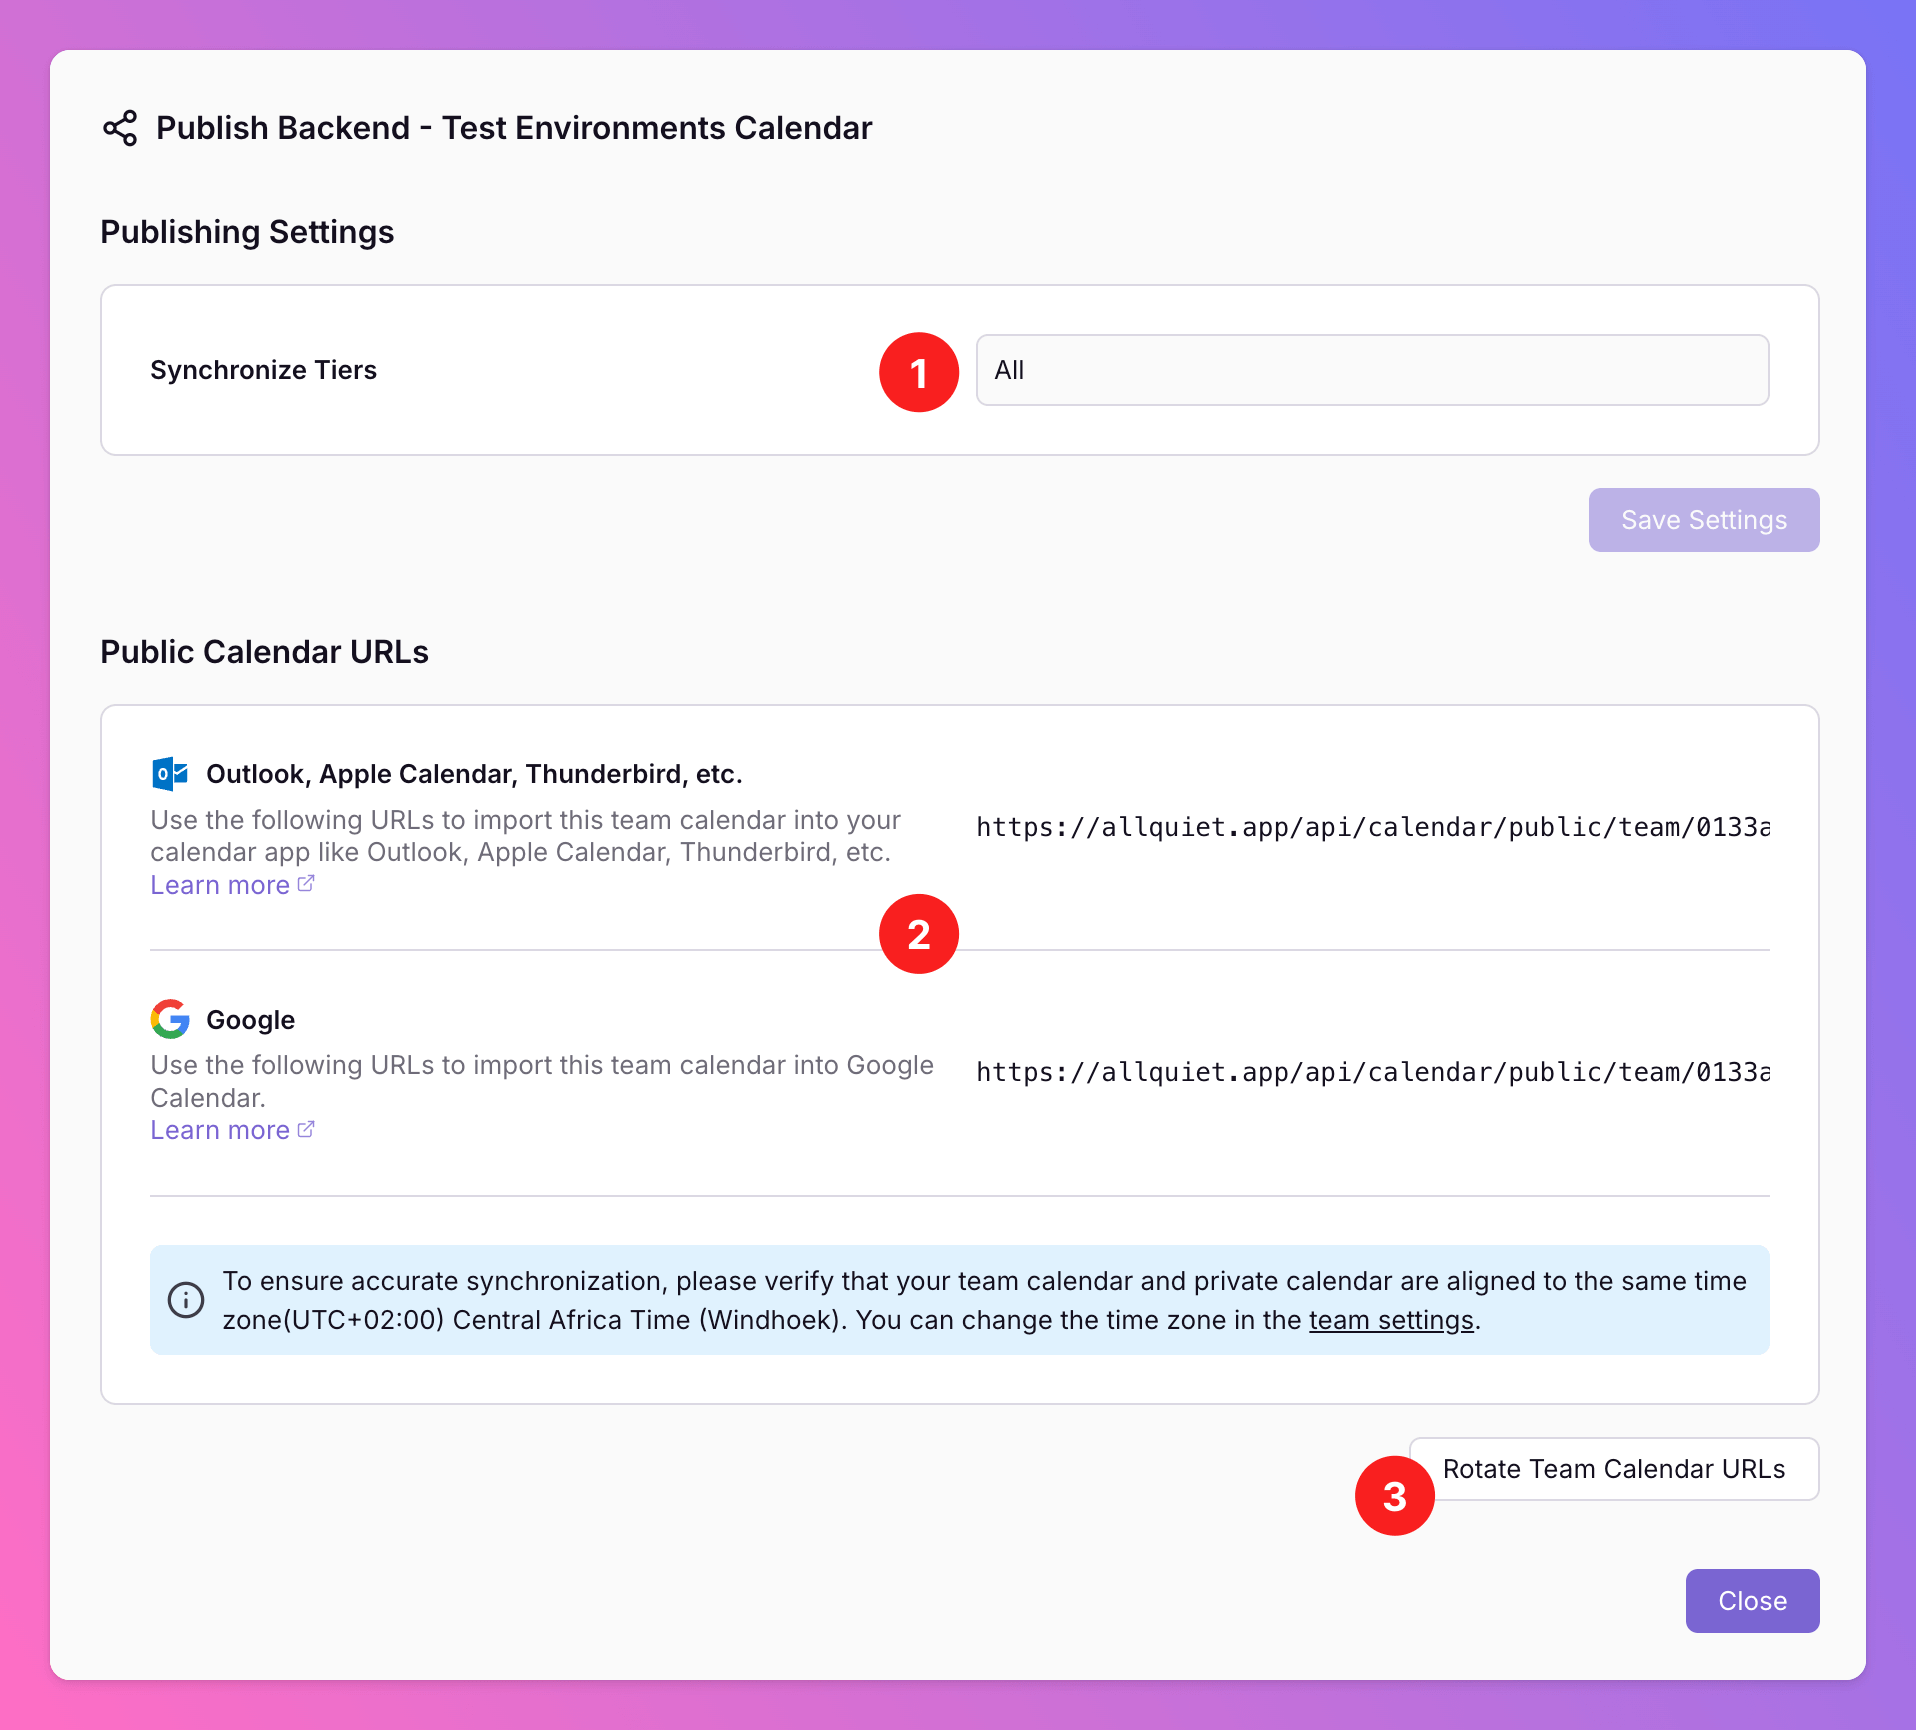
To ensure accurate synchronization to your private calendar, please verify that your Team’s All Quiet calendar and private calendar are aligned to the same time zone.
Personal Availability
This section in All Quiet’s documentation focuses on the crucial aspect of managing personal availability, ultimately contributing to a calm and efficient working environment, ensuring smooth coordination and coverage for on-call responsibilities.Your Availability
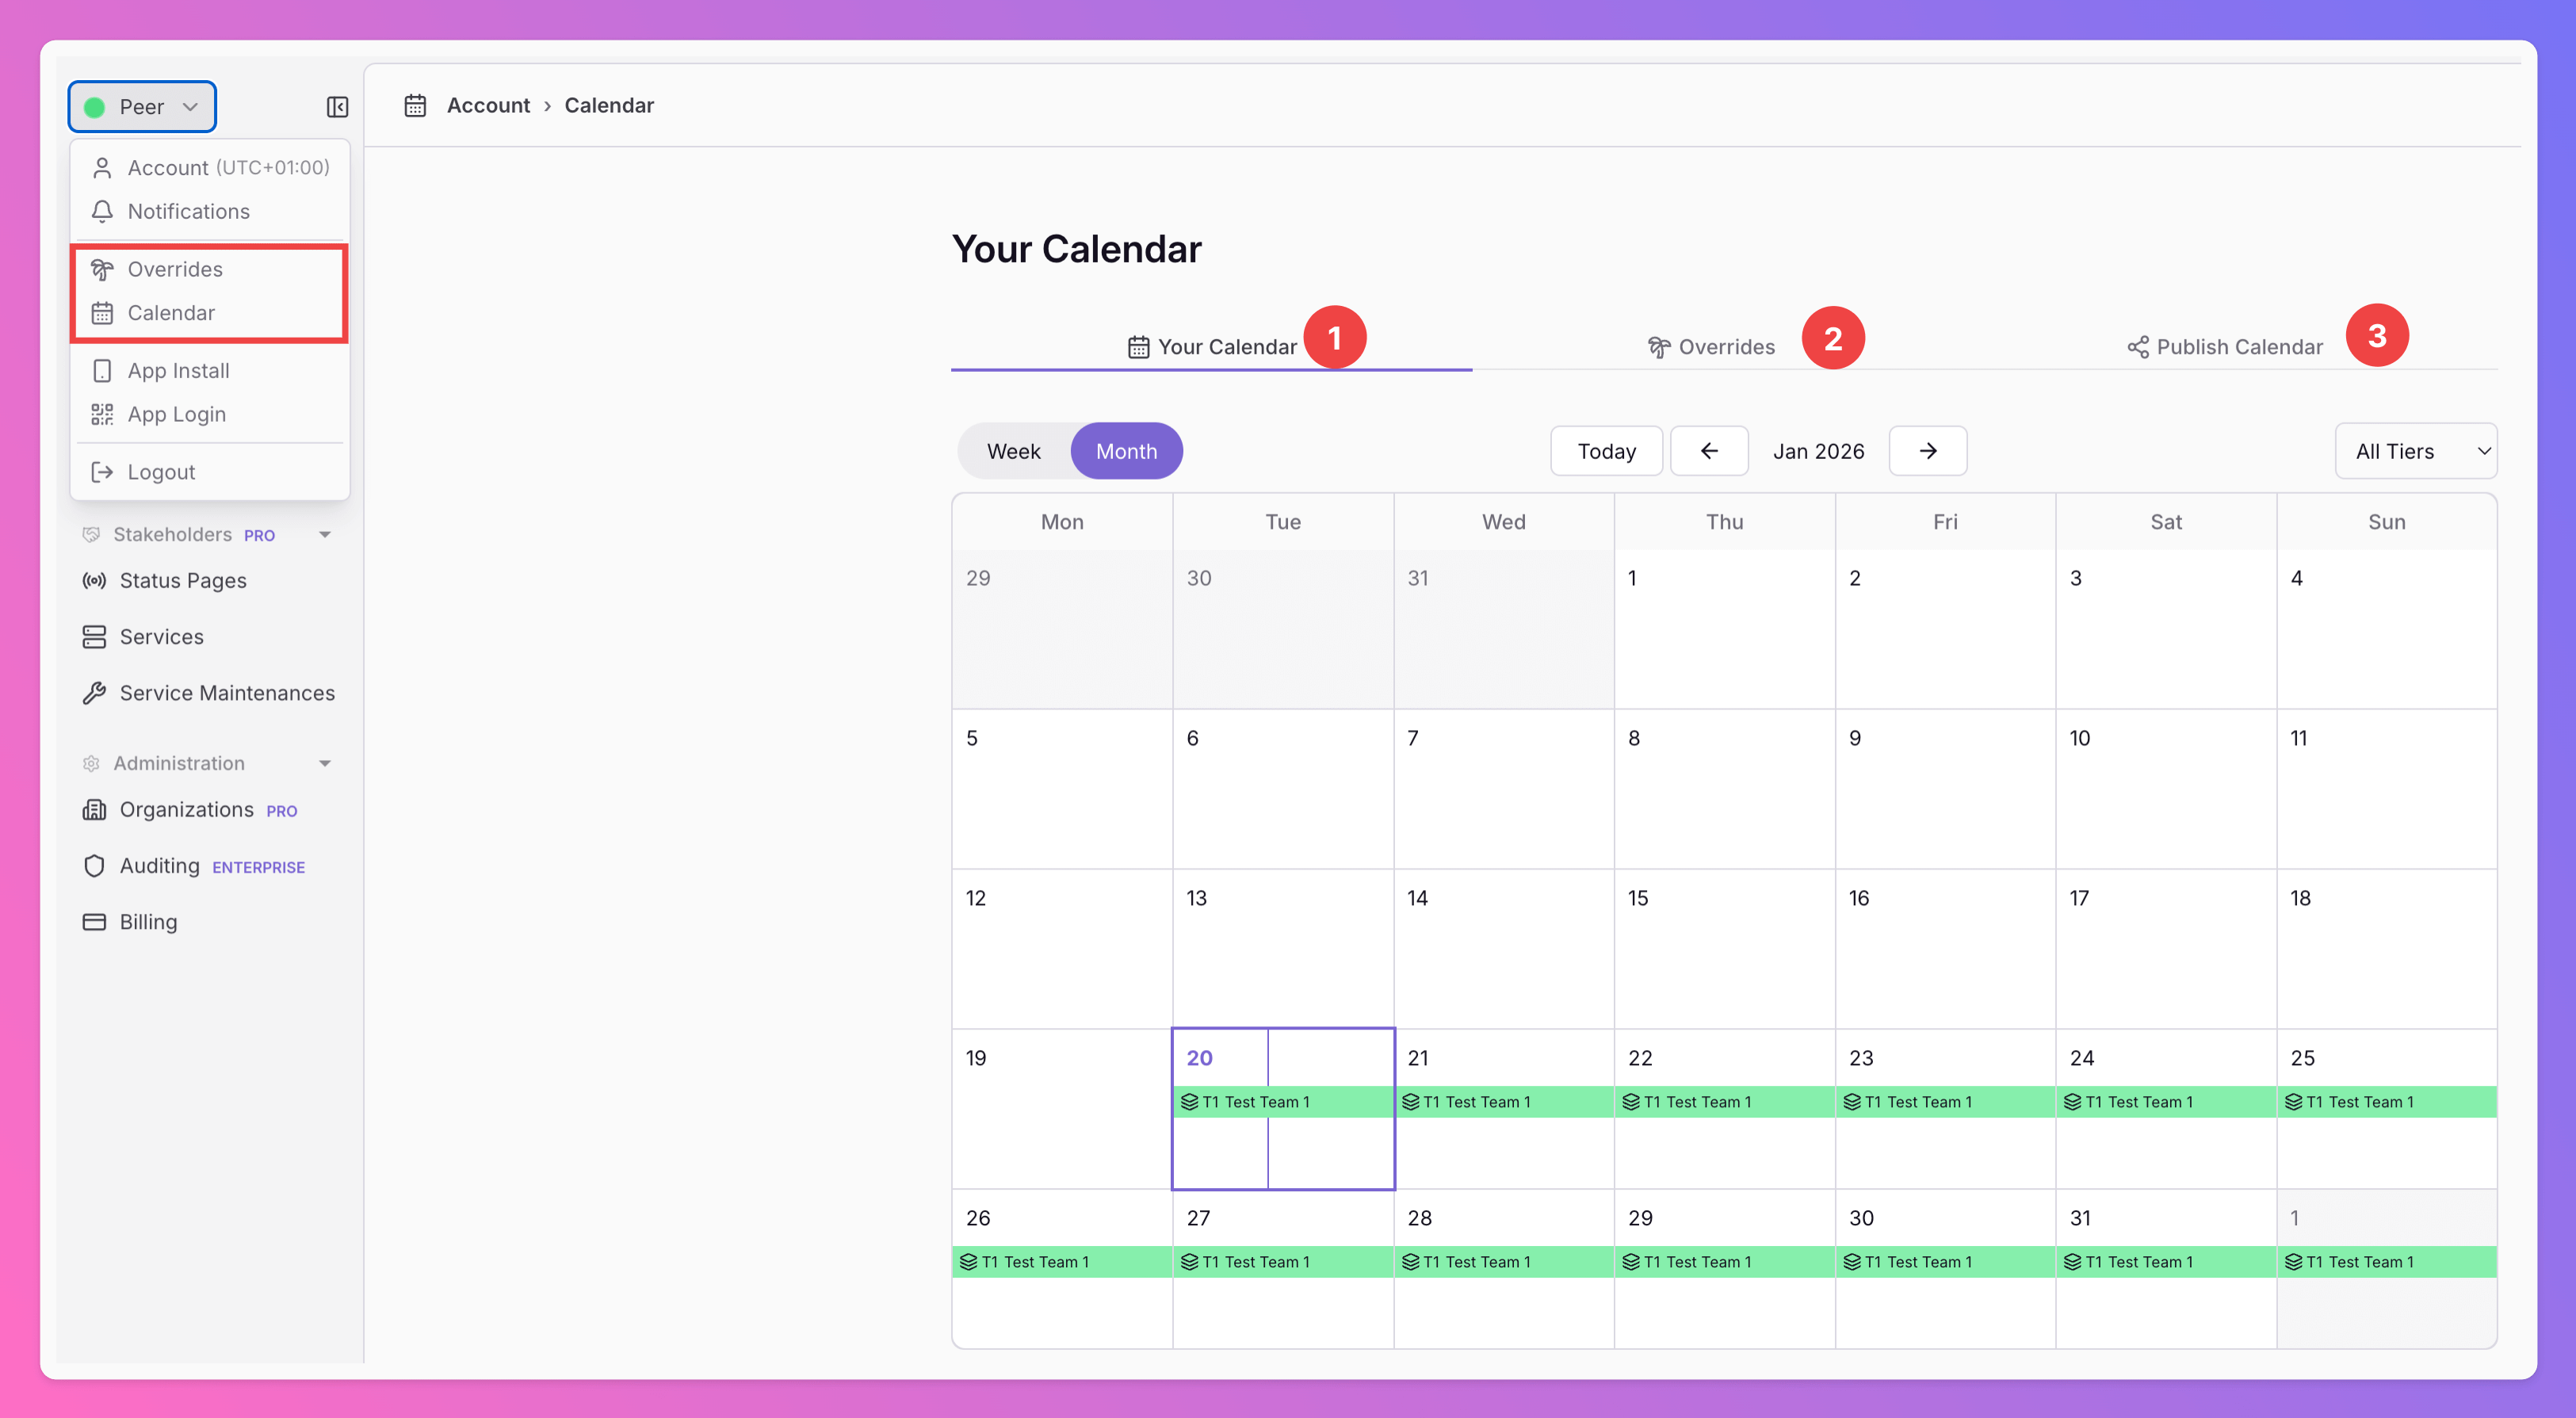
I the top left corner of the Web App, next to your Username, you can find a dot which dynamically indicates your current on-call status by displaying a blinking red or green indicator. Clicking on your Username opens a drop down in which you will find links to your personalOverrides and your personal Calendar. Clicking on of these links will navigate you to the “Calendar” section, which consists out of three tabs.
Your Calendarwhere you can conveniently view all your upcoming on-call duties across various teams.- An overview of your personal Overrides.
- A page where you can generate a public calendar URL to export your personal on-call times and import them to your favorite calendar app.
Personal Overrides
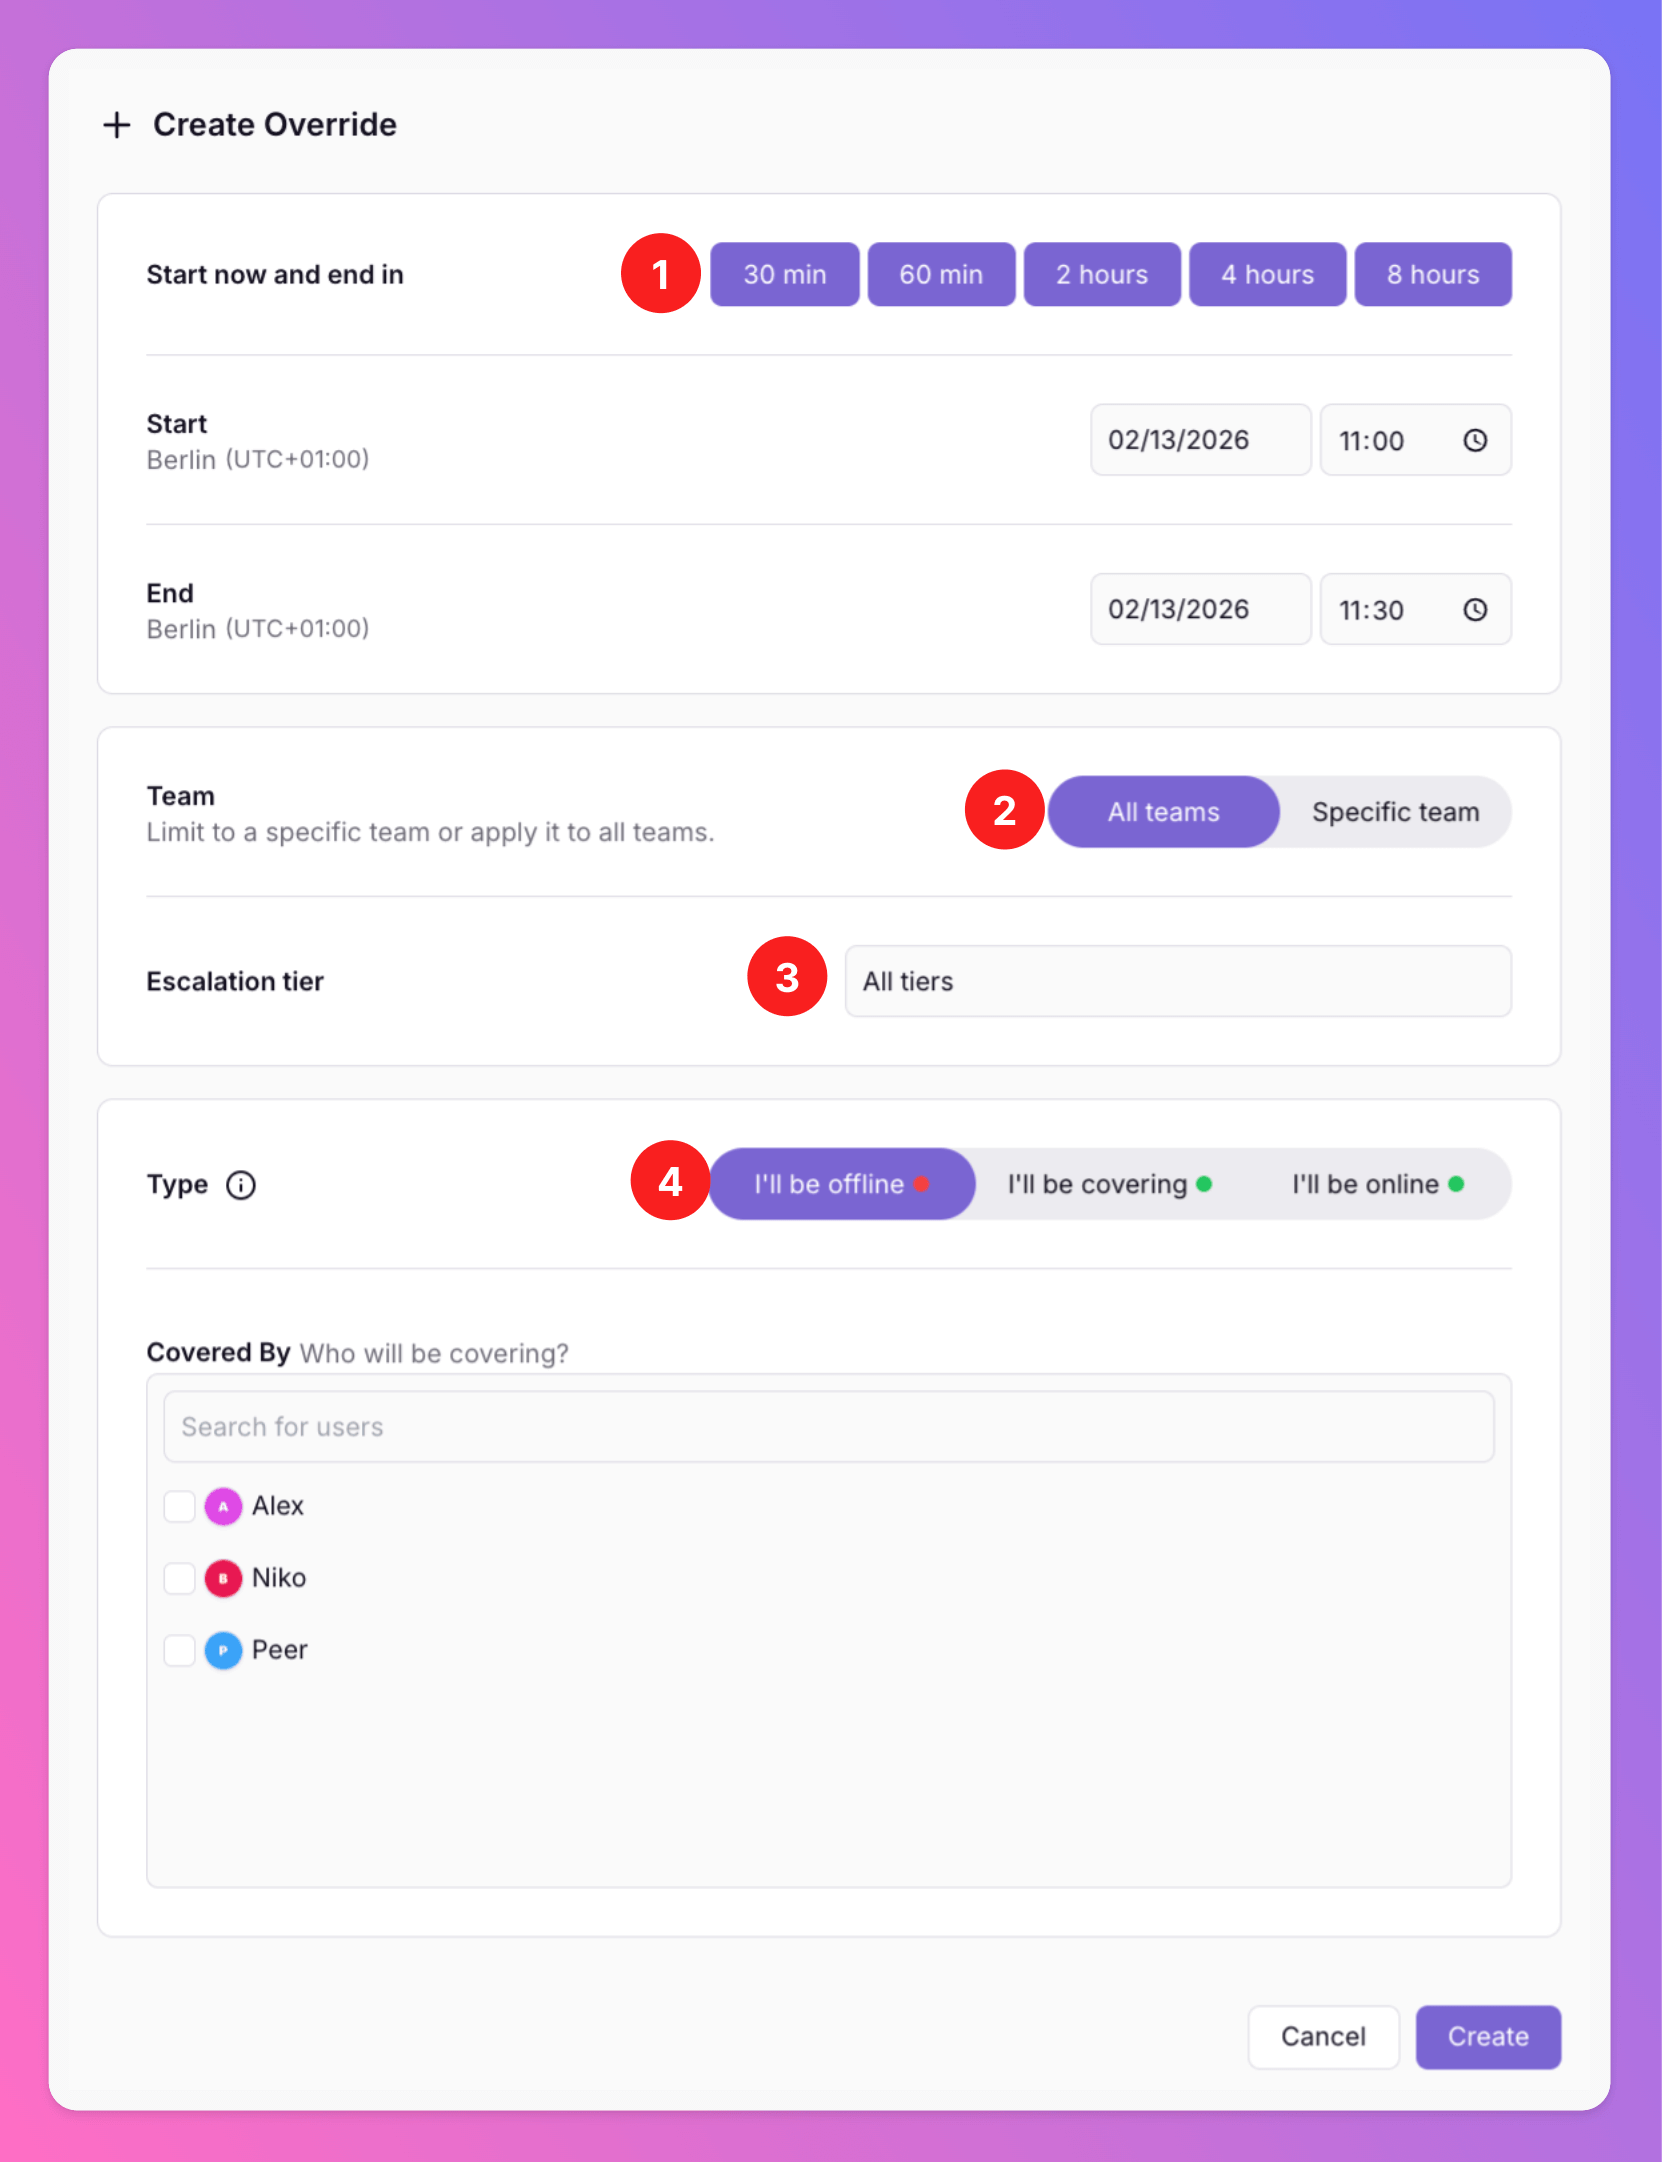
You can create overrides, such as a “fill-in” for a colleague on vacation or for your own vacation, with specified start and end dates. Simply click theAdd personal override (2) button on the Overrides (1) tab.
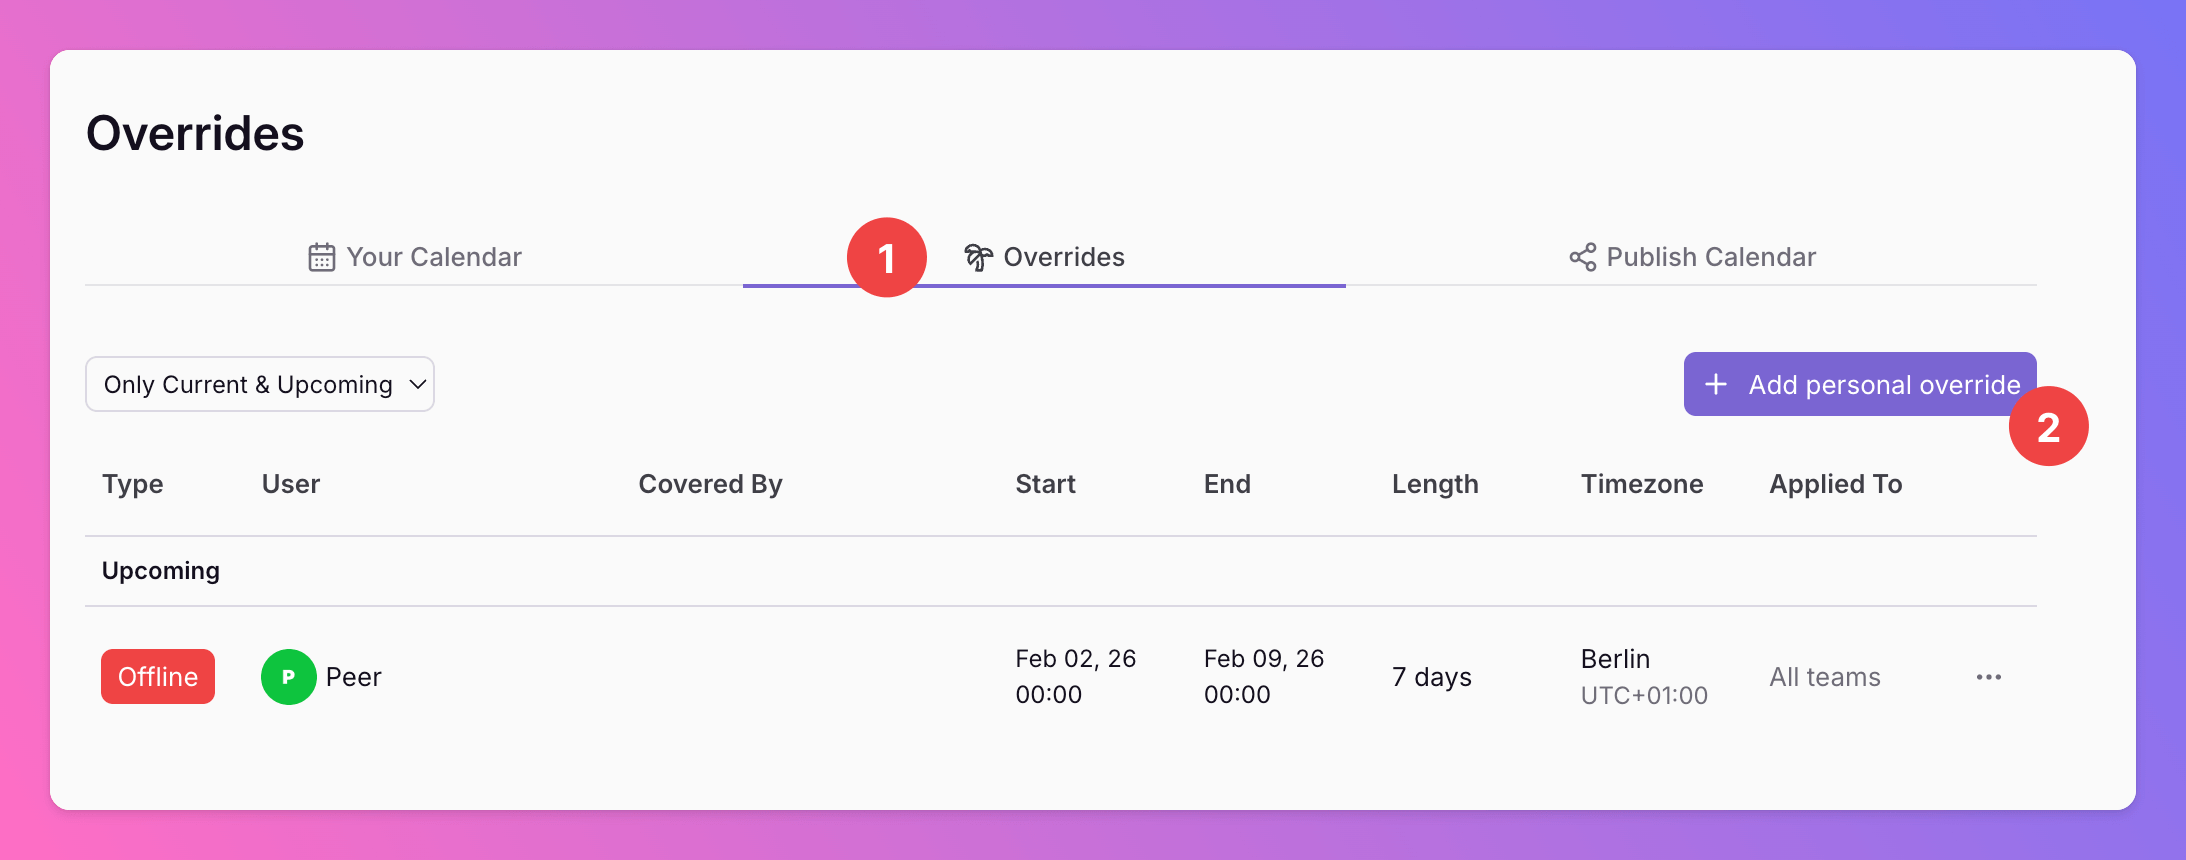
- A calendar will appear, allowing you to select the start date and end date.
- Specify whether the override should apply to
All teamsyou’re a member in or whether it should only apply to aSpecific team. - Specify whether the override should be appplied to all tiers or only specific tiers.
- Select the type of override
I`ll be offline: You’re offline for the selected time (e.g because you’re sick or on vacation). Optionally, add colleagues who will cover your on-call shifts in your shared team(s).I`ll be covering: You’ll be on-call and take care of the on-call shifts of the respective offline colleague in your mutual team(s).I`ll be online: You’ll be on-call in Tier 1 in all teams in which you have an explicit membership.
Export Personal On-Call Calendar
After you click “Generate Public Calendar URL”, we’ll create an .ics link that lets you sync your All Quiet on-call schedule with your personal calendar. You can also open the .ics URL directly to download a one-time snapshot of your current shifts.- If you click “Rotate Public Calendar URL”, a new calendar link will be generated. Any subscriptions using the old link will stop updating, so you’ll need to resubscribe with the new URL.
-
Choose whether to sync all tiers or just Tier 1. If you’re using Google Calendar, remember to rotate your public calendar URL after changing your sync settings and embed the new URL.
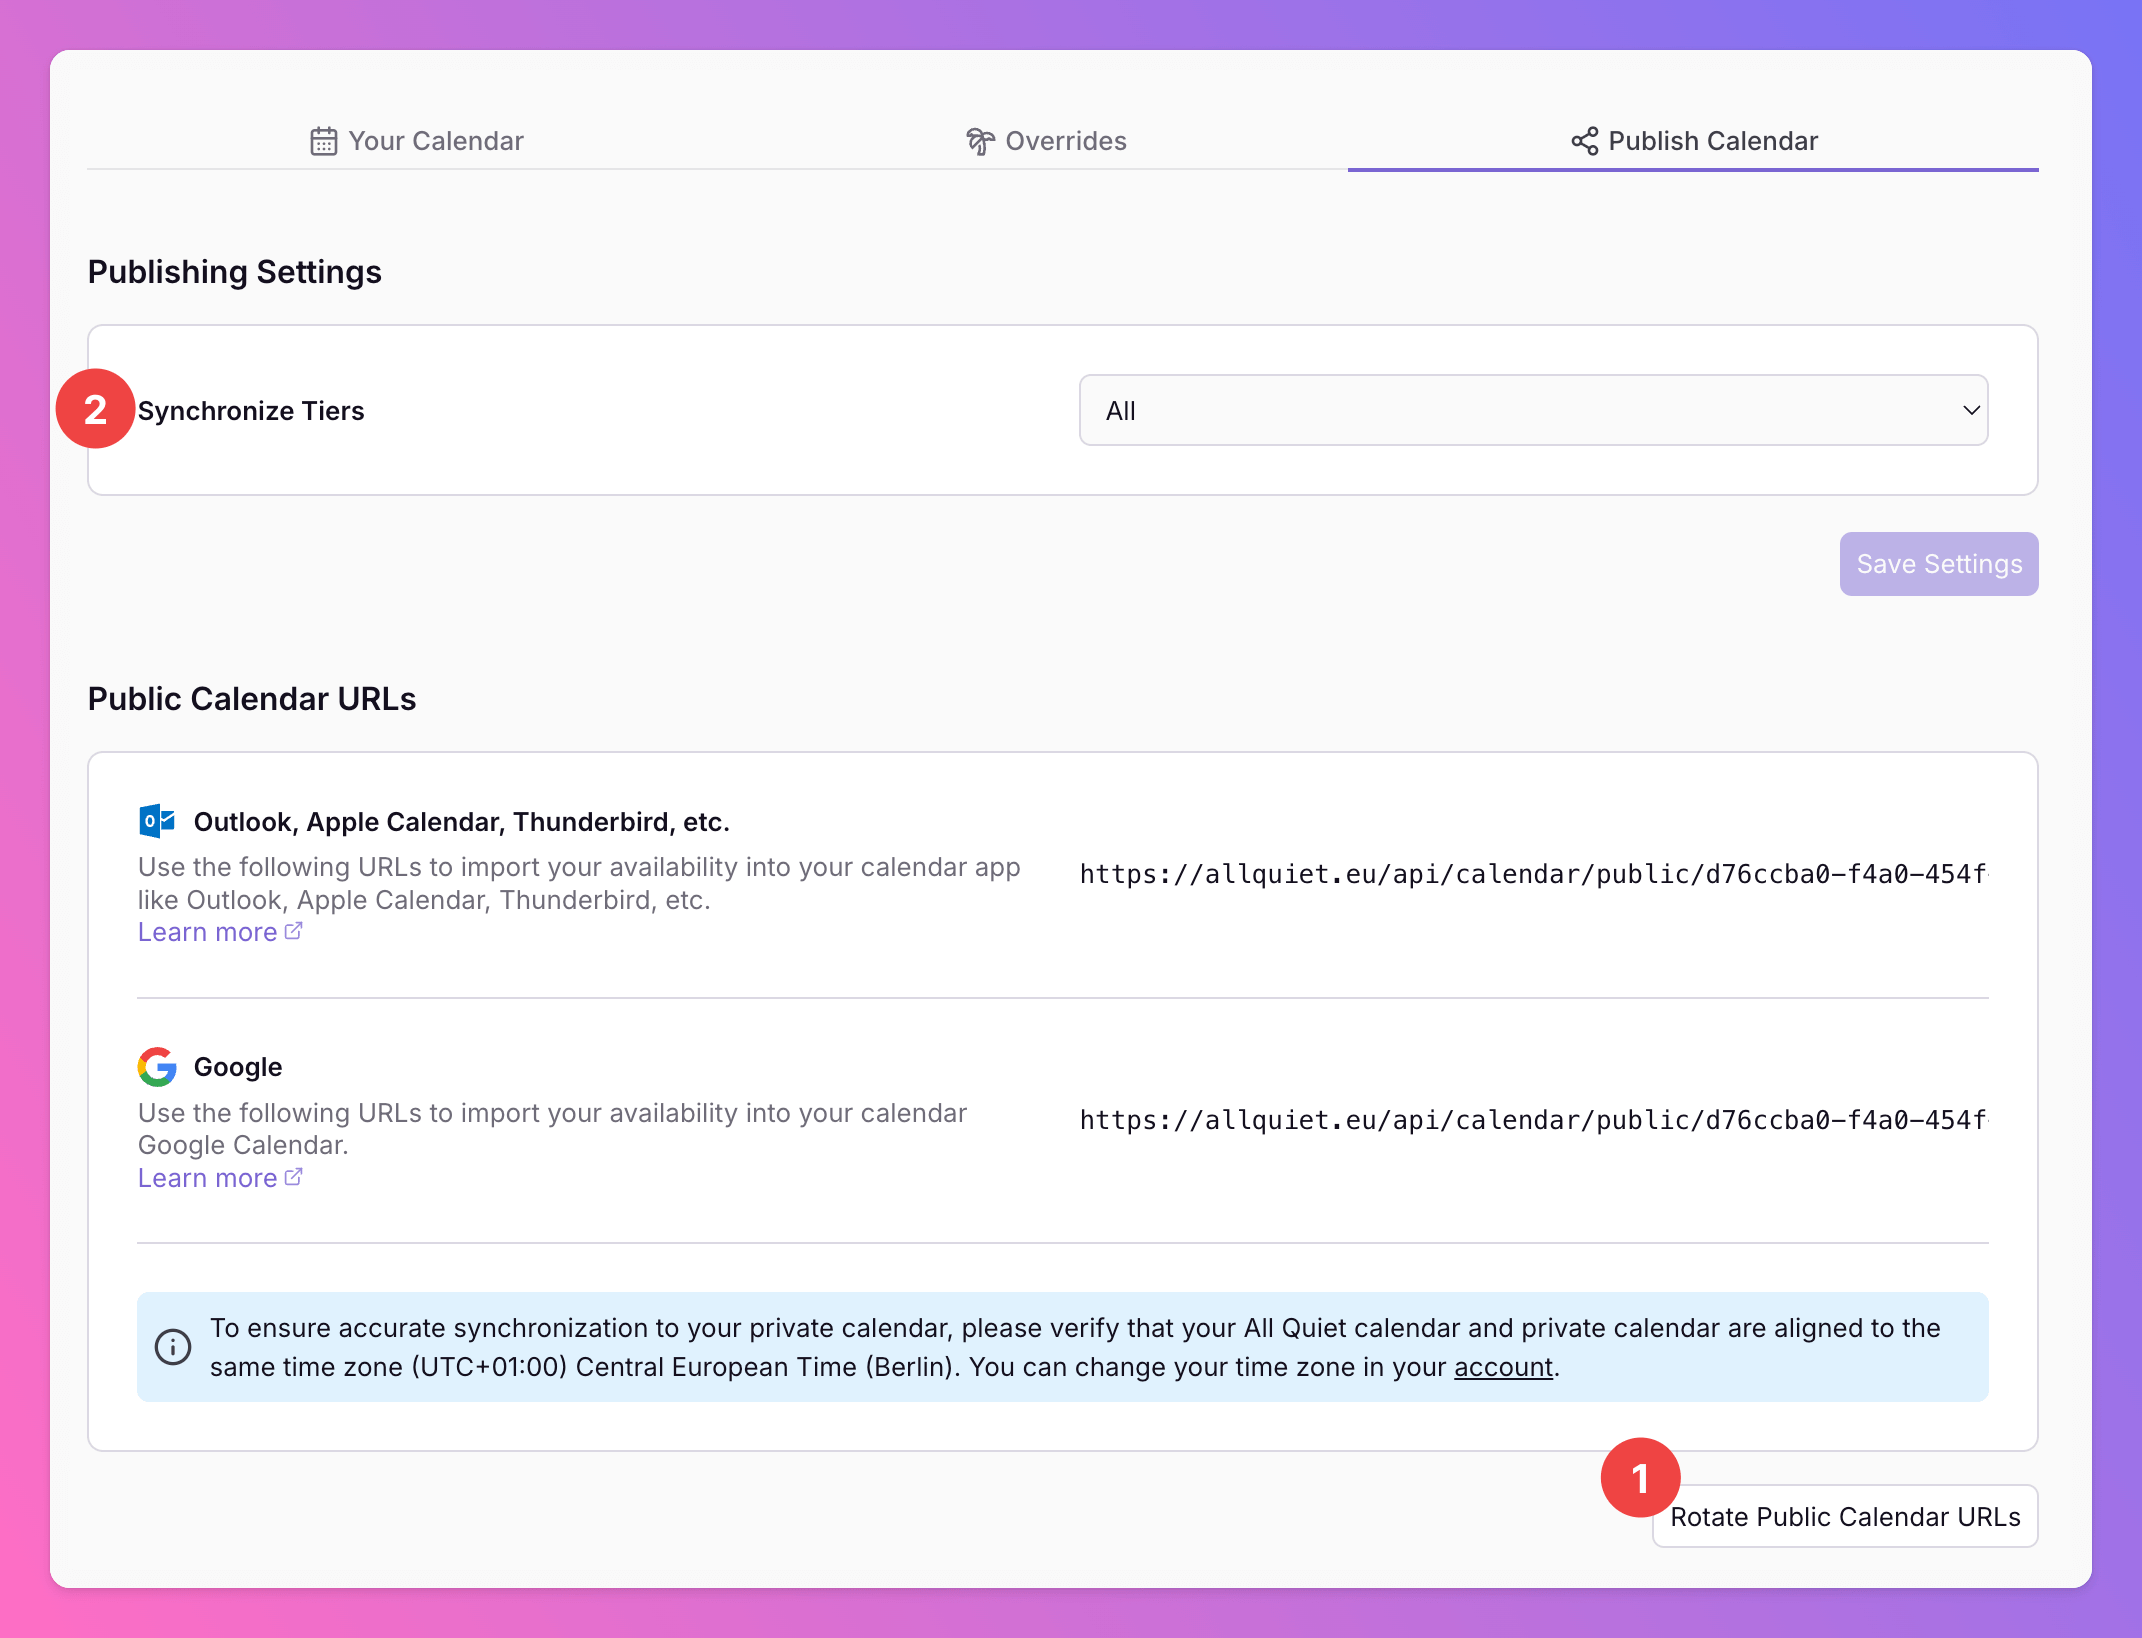
To ensure accurate synchronization to your private calendar, please verify that your personal All Quiet calendar and private calendar are aligned to the same time zone.
Vacation Schedule
The screenshot demonstrates an example of an individual vacation schedule (marked as “offline”) spanning a full week. However, it is worth noting that if the user should have been on call during this period, we would have still indicated this with green schedules on the same days. To modify or remove an existing override, simply click open the personal Overrides tab and edit the respective override.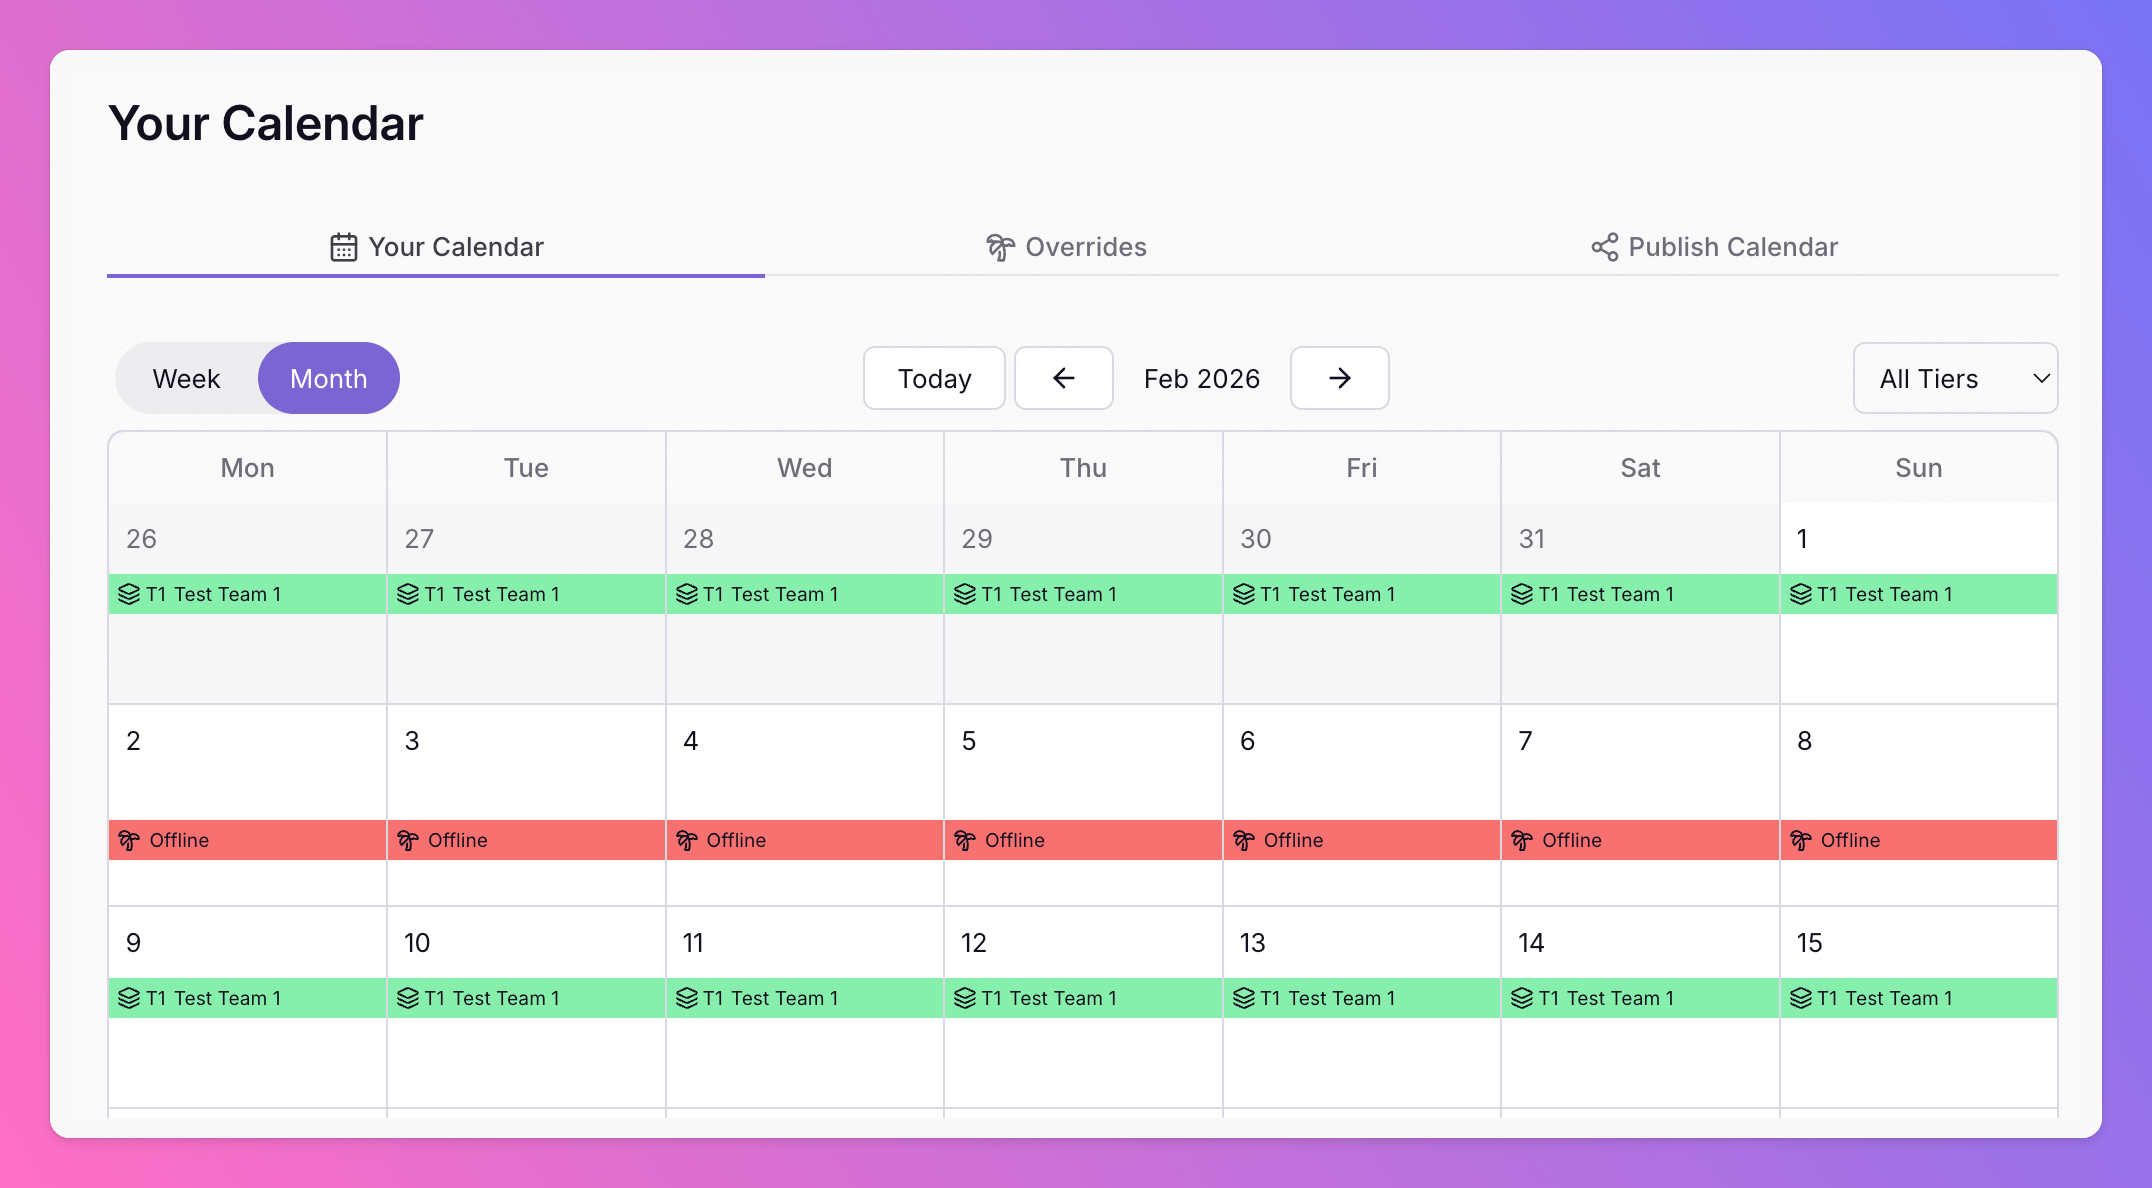
On-Call Reminder
Stay informed with our automatic on-call reminders. By default, you’ll get an email one day prior to your shift to help you prepare. Prefer not to be reminded? No problem. Just deselect the reminder in your account settings.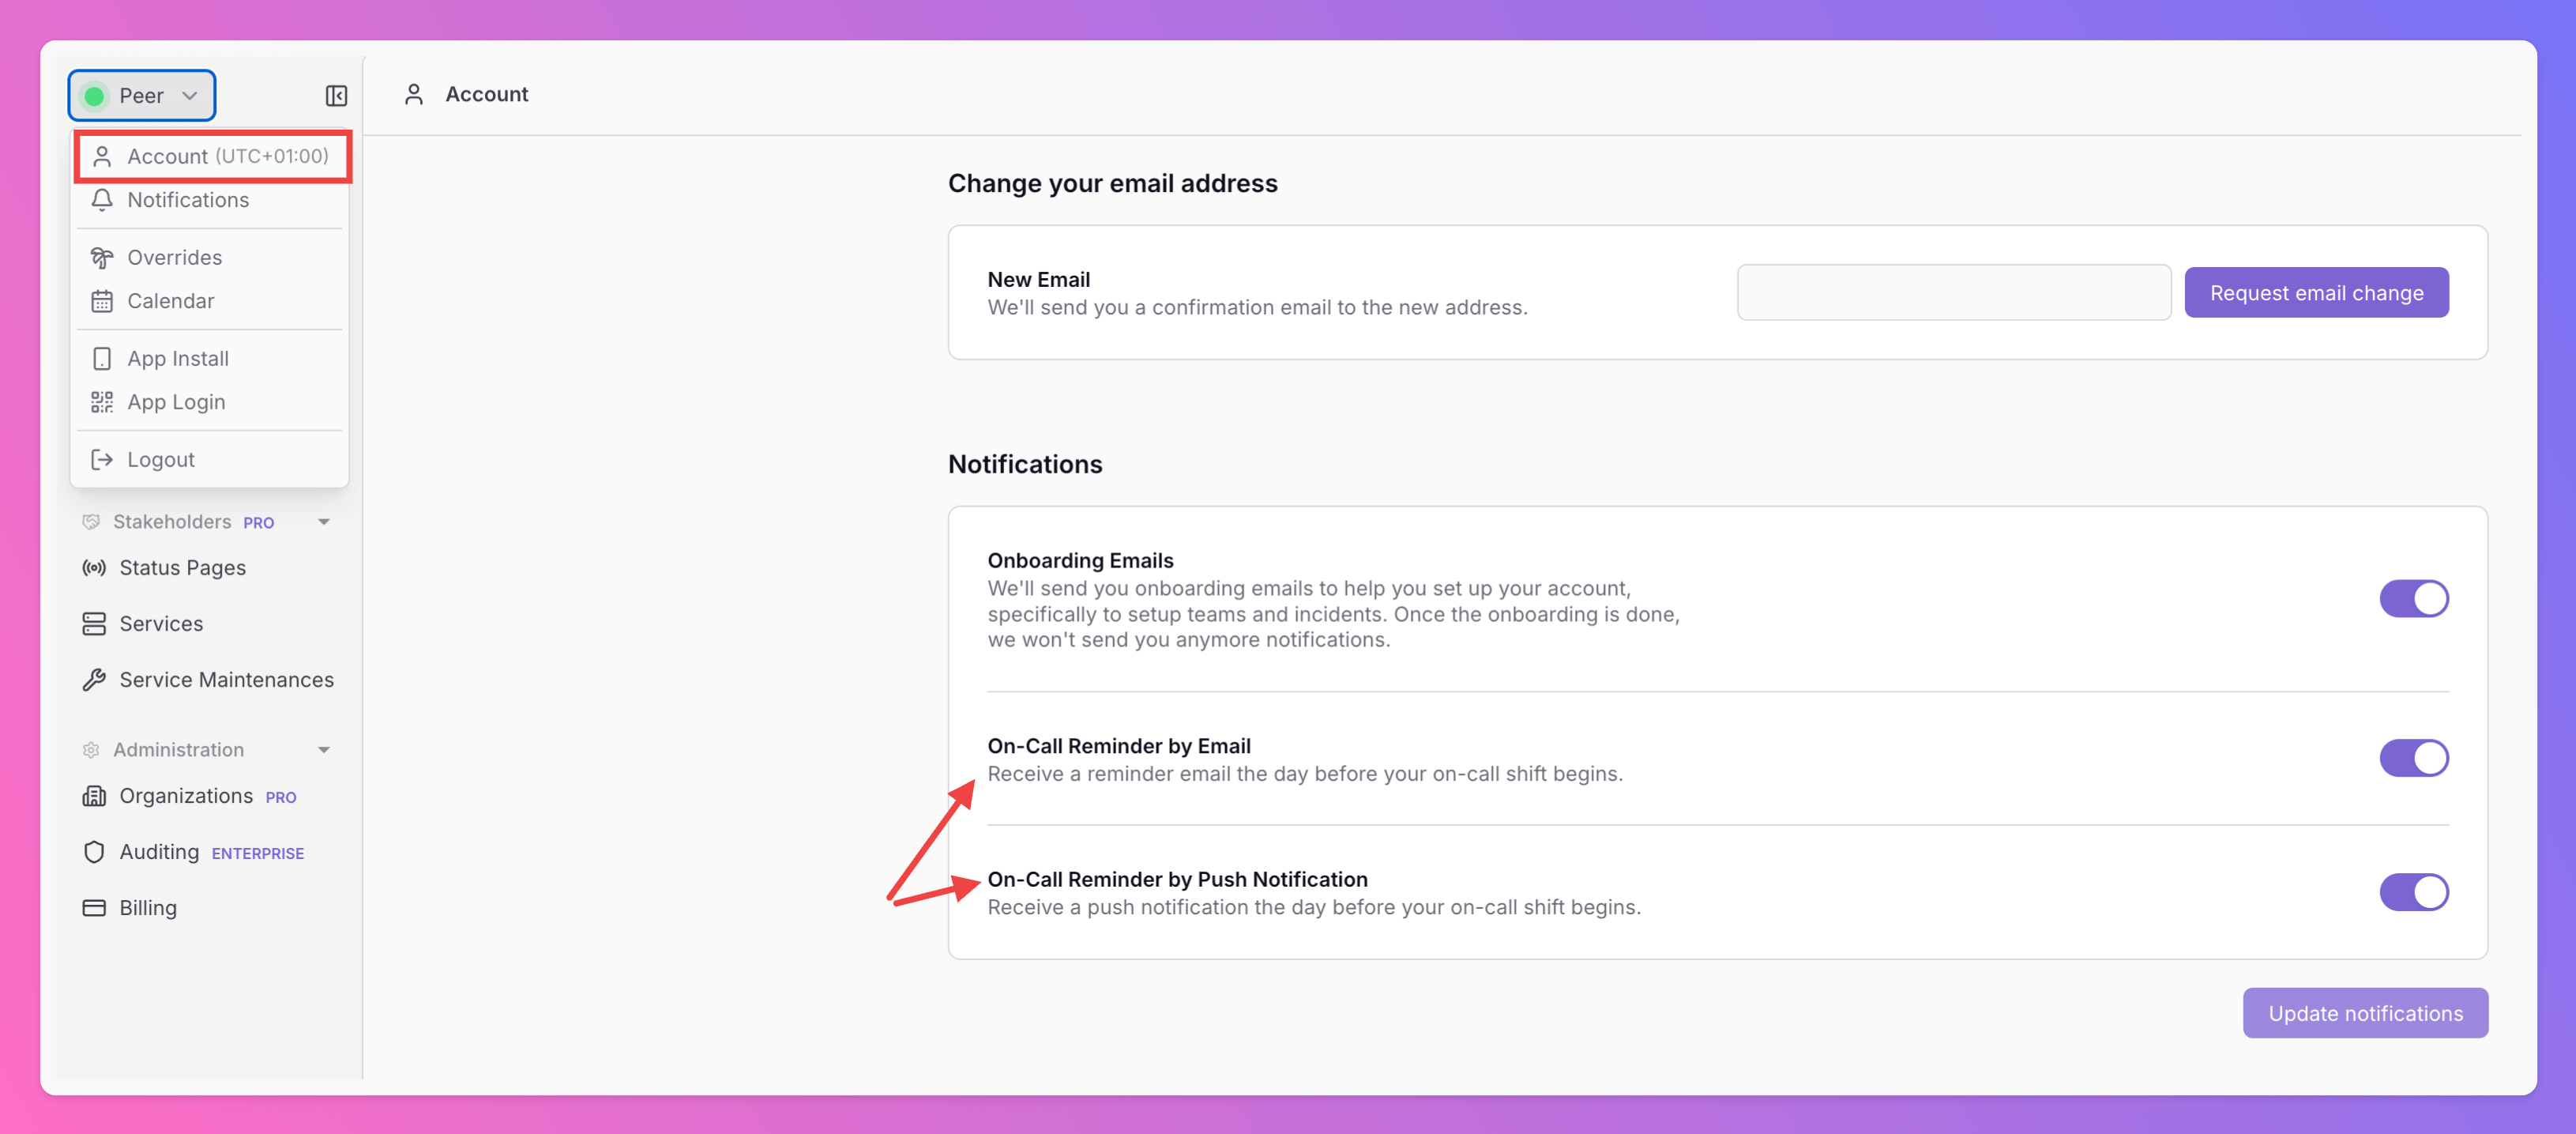
Timezones
Managing time zones in All Quiet is straightforward, ensuring your team’s schedules and rotations are always synced. Here’s how it works:- Time Zone Setting: The team’s default time zone is initially set to the creator’s time zone but can be easily adjusted to fit your team’s geographical distribution.
- Unified Scheduling: Regardless of individual locations, all schedules align with the team’s chosen time zone, making coordination seamless.
- Flexibility:
Team Administratorscan update the team’s time zone at any time via the Edit tab to reflect changes in team’s composition or operational needs, keeping everyone in sync effortlessly. This setup ensures seamless team operation across locations, streamlining time zone management and collaboration.
Example: Setting up an on-call rotation
In this setup, we aim to ensure round-the-clock incident coverage with a focused approach:- A team of four splits into two engineers on-call weekly (24/7) and two engineering managers on half-day shifts.
- Engineers rotate each week for continuous Tier 1 coverage.
- Engineering managers cover Tier 2 in two 12-hour shifts: 0-12 and 12-24.
- Auto-escalation: Escalate from Tier 1 to Tier 2 after 10 minutes if nobody acknowledges.
- If both Tier 1 and 2 miss an incident, the escalation is repeated once after 20 minutes
1
Add first schedule
In your team, go to 
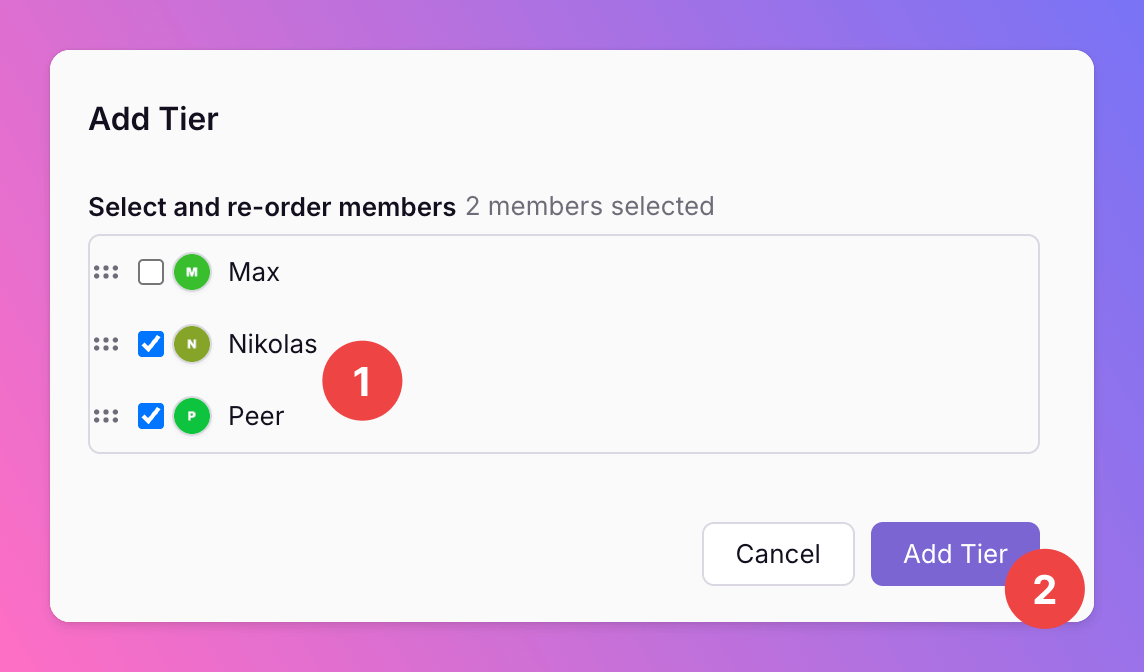
Schedule & Escalations, click on + Add Escalation Tier 1 & add both engineers to it.2
Create an auto-rotation for your schedule
We want to add auto-rotations to the first schedule, so we click on the 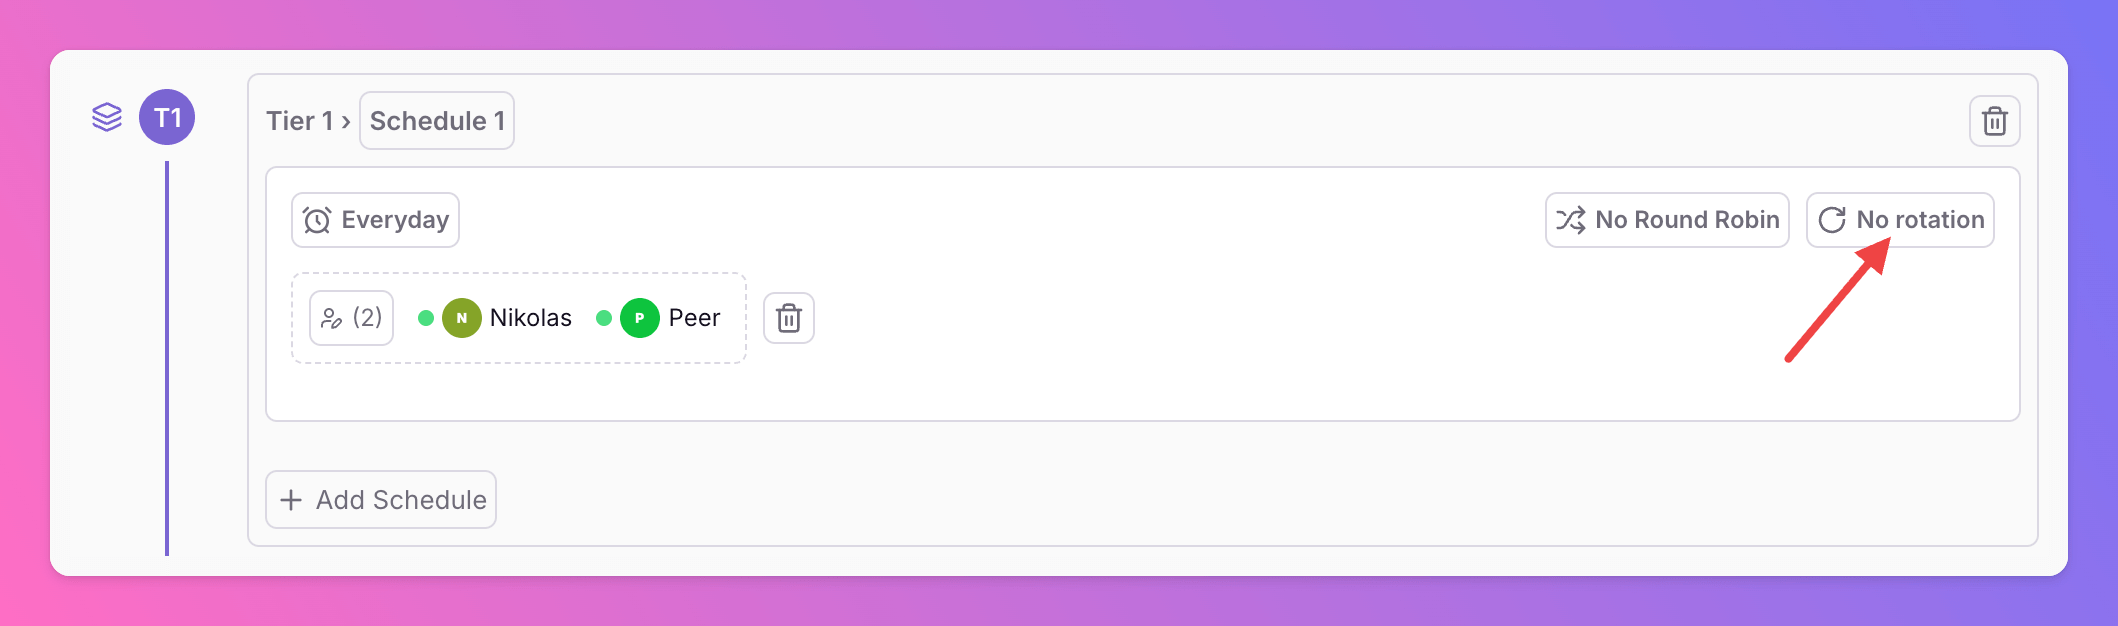
No rotation label.3
Edit Rotation
- Duty should rotate automatically.
- For each rotation, we want 1 on-call person.
- You want on-call duty to rotate
weekly. - We want to rotate on-call duty on Mondays at midnight.
- Click
Save Rotationto activate the auto-rotation.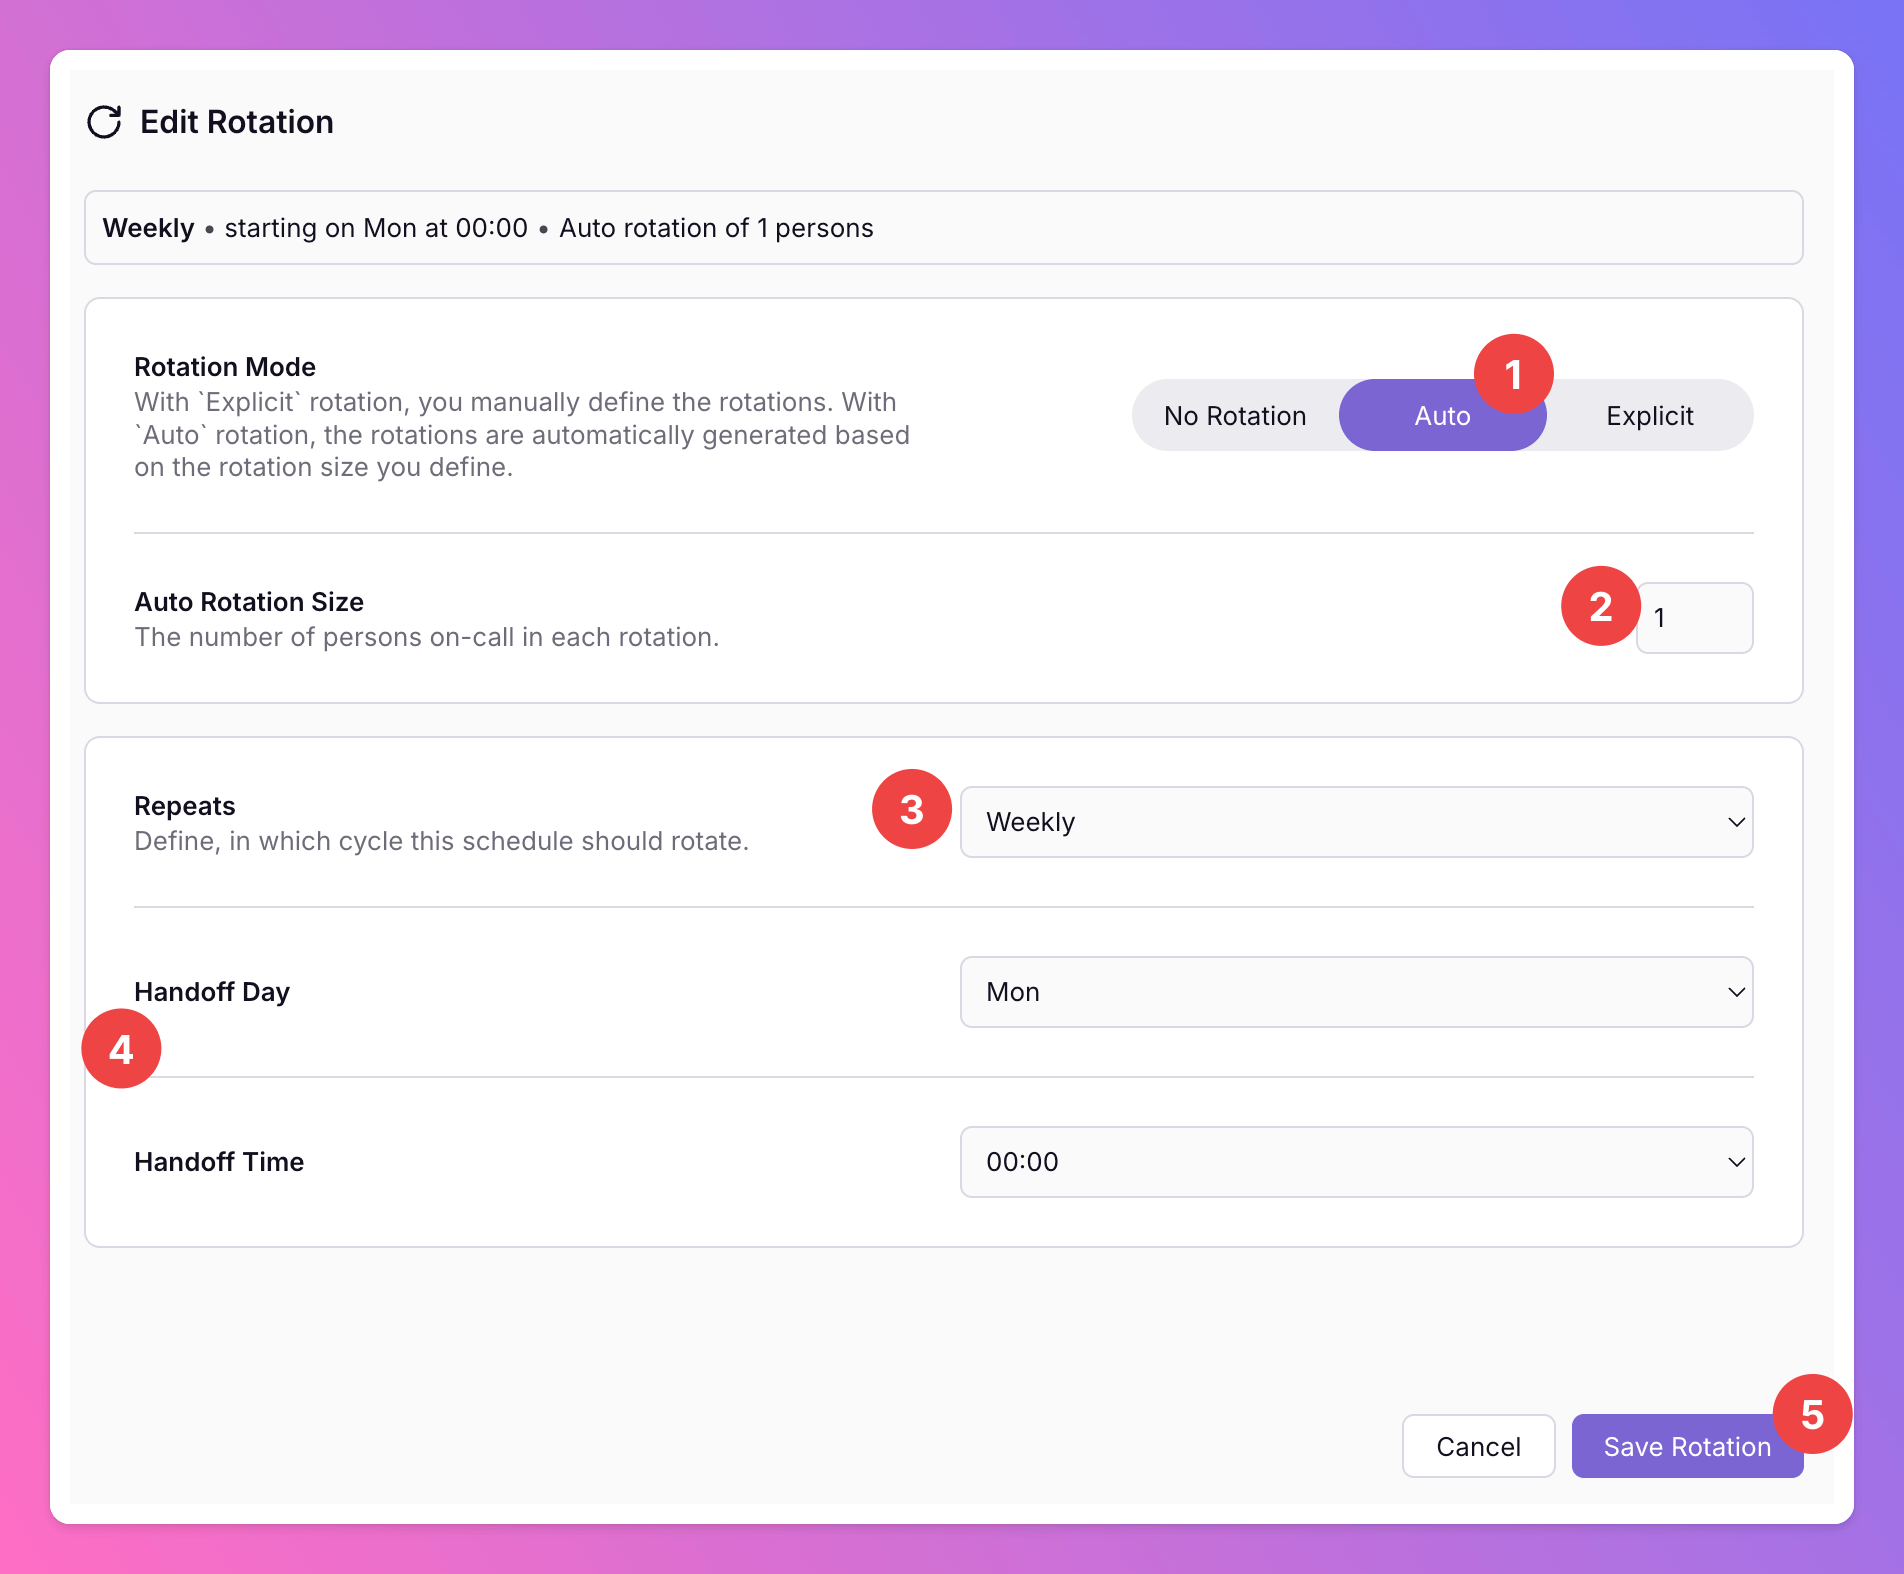
4
Create a New Tier
You’re done with Escalation Tier 1 and can set up subsequent Escalation Tiers to ensure no incident goes unnoticed.
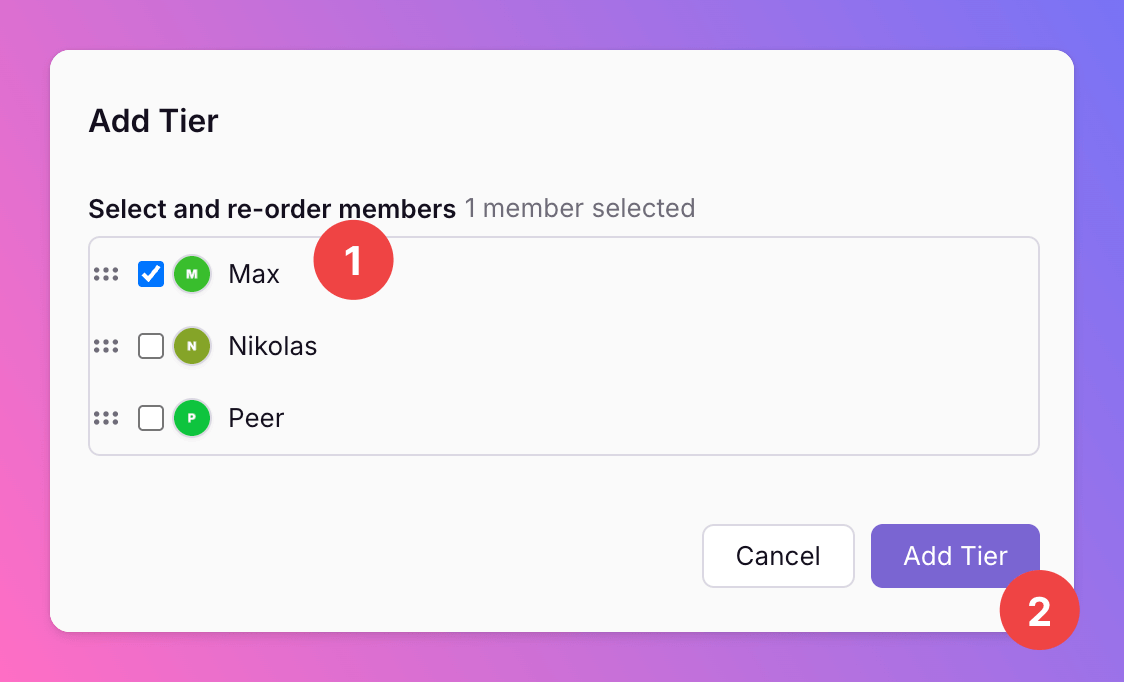
- Under the subsequent Escalation Tier, click on
+ Add Escalation Tier 2 - Choose the members that you want to add to Escalation Tier 2’s first schedule. Remember, in this escalation tier we’ll want to define two schedules since our team members are located in different time zones which ensures they only receive incidents during daytime (i.e., follow-the-sun rotation). So we only add only one member to the first schedule.
- Next, we ensure auto-escalation is set up between Tier 1 and 2. Click on the label between the two tiers.
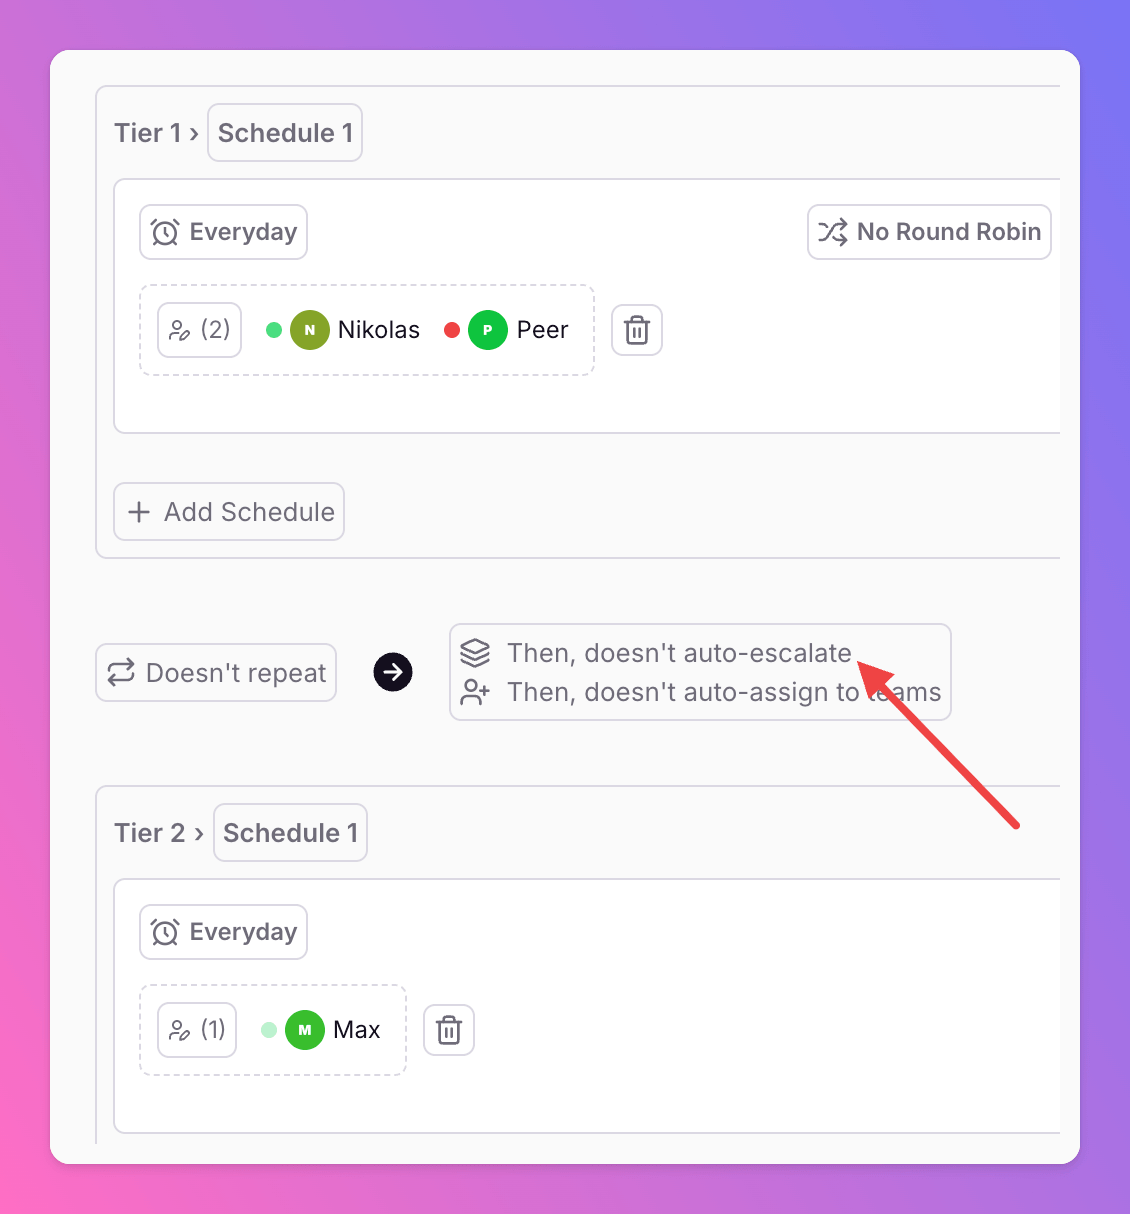
- We want to auto-escalate to Tier 2 (1) after 10 minutes (2) if not acknowledged (3) for all severities (4) and at all times of the week (5). Save the Tier 1 escalation settings (6).

5
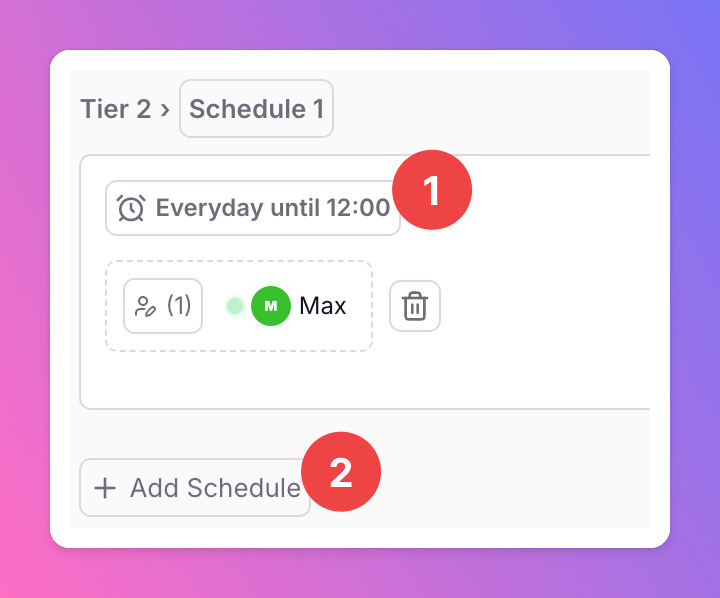
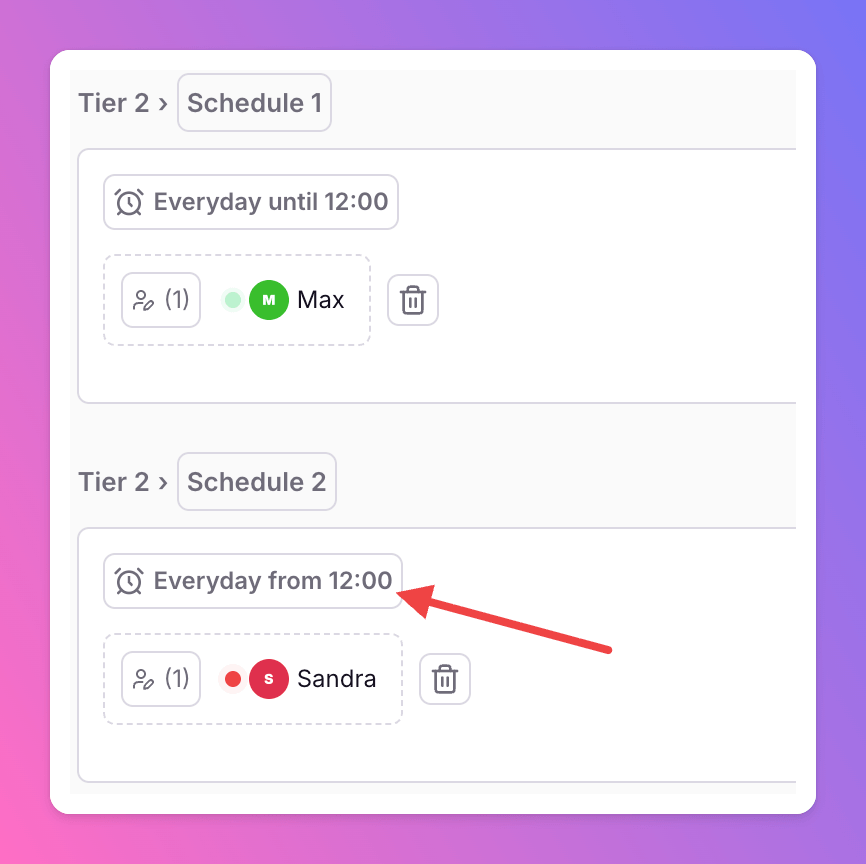
Customize Schedules
Now, we need to customize the schedule of the engineering manager to account for their half-day shift.
- Click on
everydayto edit the schedule & adjust the daily hours to 00:00-12:00. - Add a second schedule for the other engineering manager…
6
Repeat escalations if no one reacts
If no one acknowledged an incident 20 minutes after escalation to Tier 2, we want to repeat the escalations once.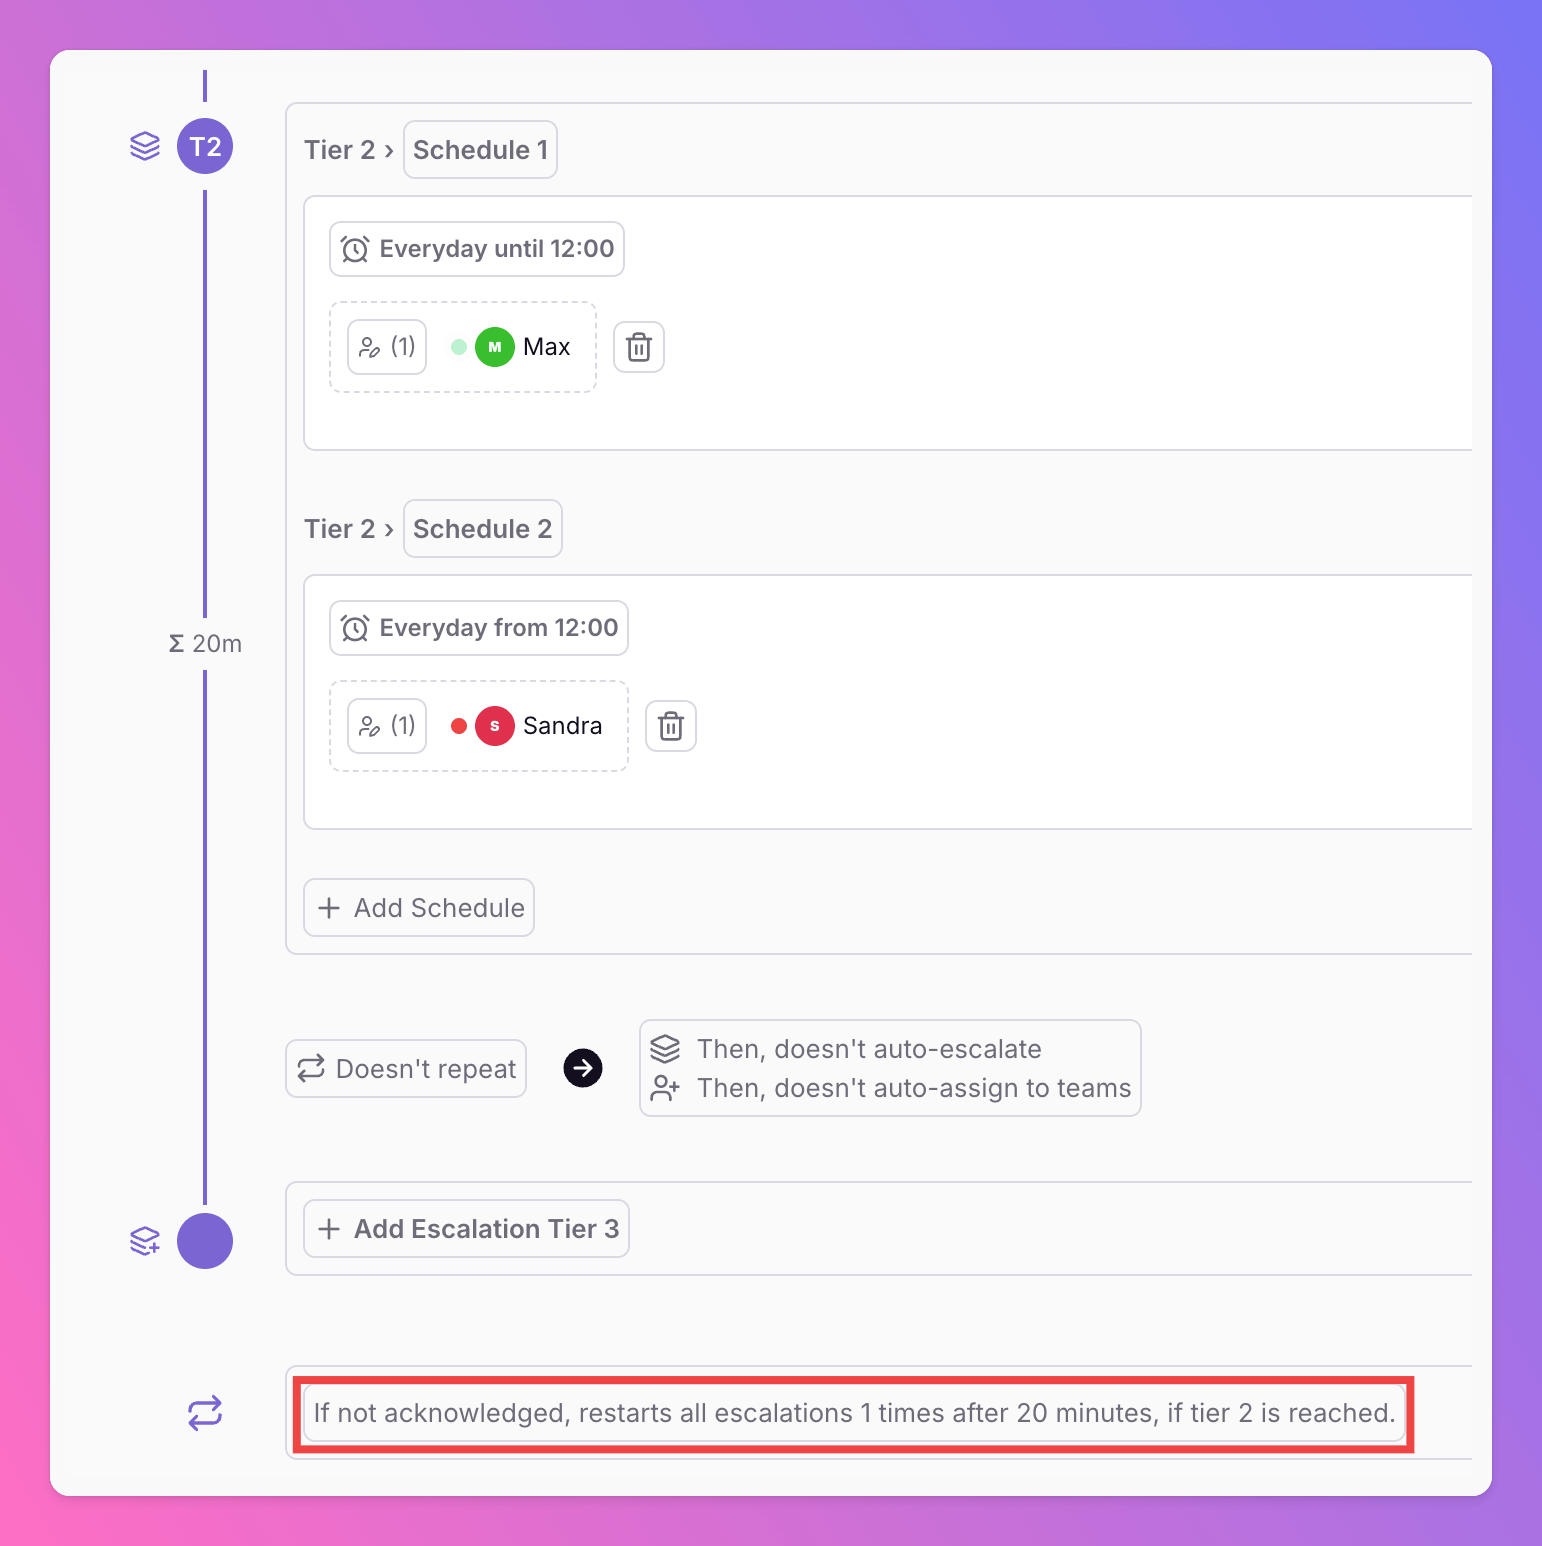
7
Check your Calendar
We’re done now and can check our on-call rotation directly under 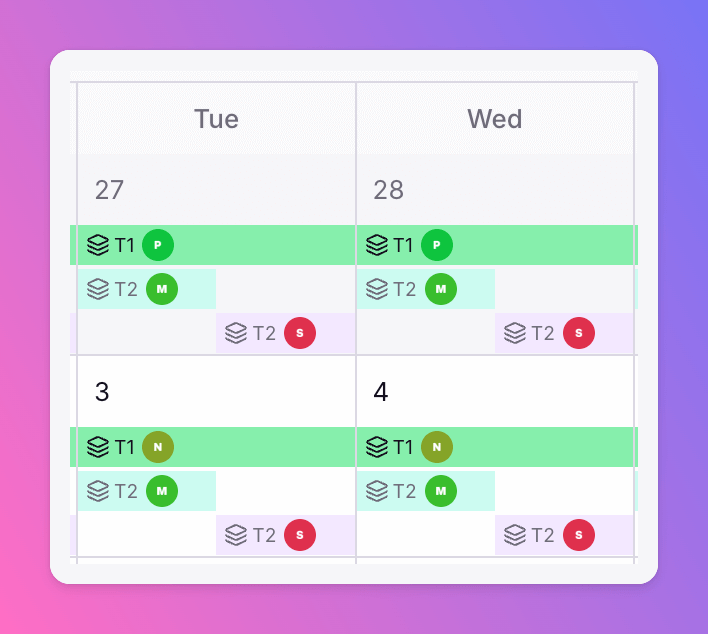
Calendar. Also, you’ll always see who is currently on-call in your relevant tiers.Common setups and troubleshooting
Weekend on-call through Monday morning
Goal: The same person stays on-call from Friday evening through Monday morning (for example Friday 17:00 → Monday 09:00), and the weekly rotation should change after that weekend duty ends—not at Monday 00:00 while someone still needs to cover Monday morning. Handoff time only applies to 24-hour coverage: As described under Auto Rotations, you can set aHandoff Time only when the schedule uses 24-hour shifts and no specific on-call times. For weekend windows made of shorter blocks, that option is not available—the handoff is derived from your handoff day and how the on-call times fall on that day.
How Monday as handoff day behaves without Handoff Time: Again per Auto Rotations, the handoff happens automatically after the first shift ending that day (for overnight-style coverage) or before the first shift starting that day. That is why a seemingly “simple” weekend pattern can rotate at the wrong moment.
Pattern to avoid: Friday 17:00–end of day, Saturday and Sunday full day, plus a separate Monday-only window 00:00–09:00. On Monday, the first on-call segment starts at 00:00, so the rotation is tied to that shift—you do not get a handoff at 09:00 when weekend coverage ends.
Recommended pattern: Keep the same overall coverage, but end the weekend with one on-call time that runs Sunday 09:00 → Monday 09:00 (use an end time not later than the start time so the block ends Monday morning, as in the schedule editor). Together with Friday 17:00 → Saturday 09:00 and Saturday 09:00 → Sunday 09:00, the Monday rotation lines up after that Sunday–Monday block ends—i.e. when you intend weekday coverage to take over.
At a glance — on-call times in the weekend schedule
- Friday: 17:00–09:00 (next day)
- Saturday and Sunday: each 09:00–09:00 (next day)
- Rotation: Weekly, handoff day Monday (no
Handoff Timeon this schedule—see above)