

Stay Informed, Always
All Quiet ensures you’re always in the loop with a variety of alerting channels, keeping your team alert and ready to respond:- Emails
- Push Notifications
- SMS
- Voice Calls
Voice Calls on this page are an alerting channel: All Quiet calls your phone when an incident is opened, assigned, or escalated. Add and confirm your number below — no Twilio account or Live Call Routing setup is required.If you instead need a hotline number that callers can dial so All Quiet can connect them to on-call responders, that is Live Call Routing and requires the Twilio integration.
Prioritize with Severity Levels
All Quiet categorizes incidents into three severity levels, helping you prioritize your response effectively:Critical: Immediate action required. Major impact with urgent attention needed.Warning: Potential for escalation. Address promptly to prevent negative effects.Minor: Non-urgent & low impact. Schedule resolution at your convenience.
Customizable Notification Preferences
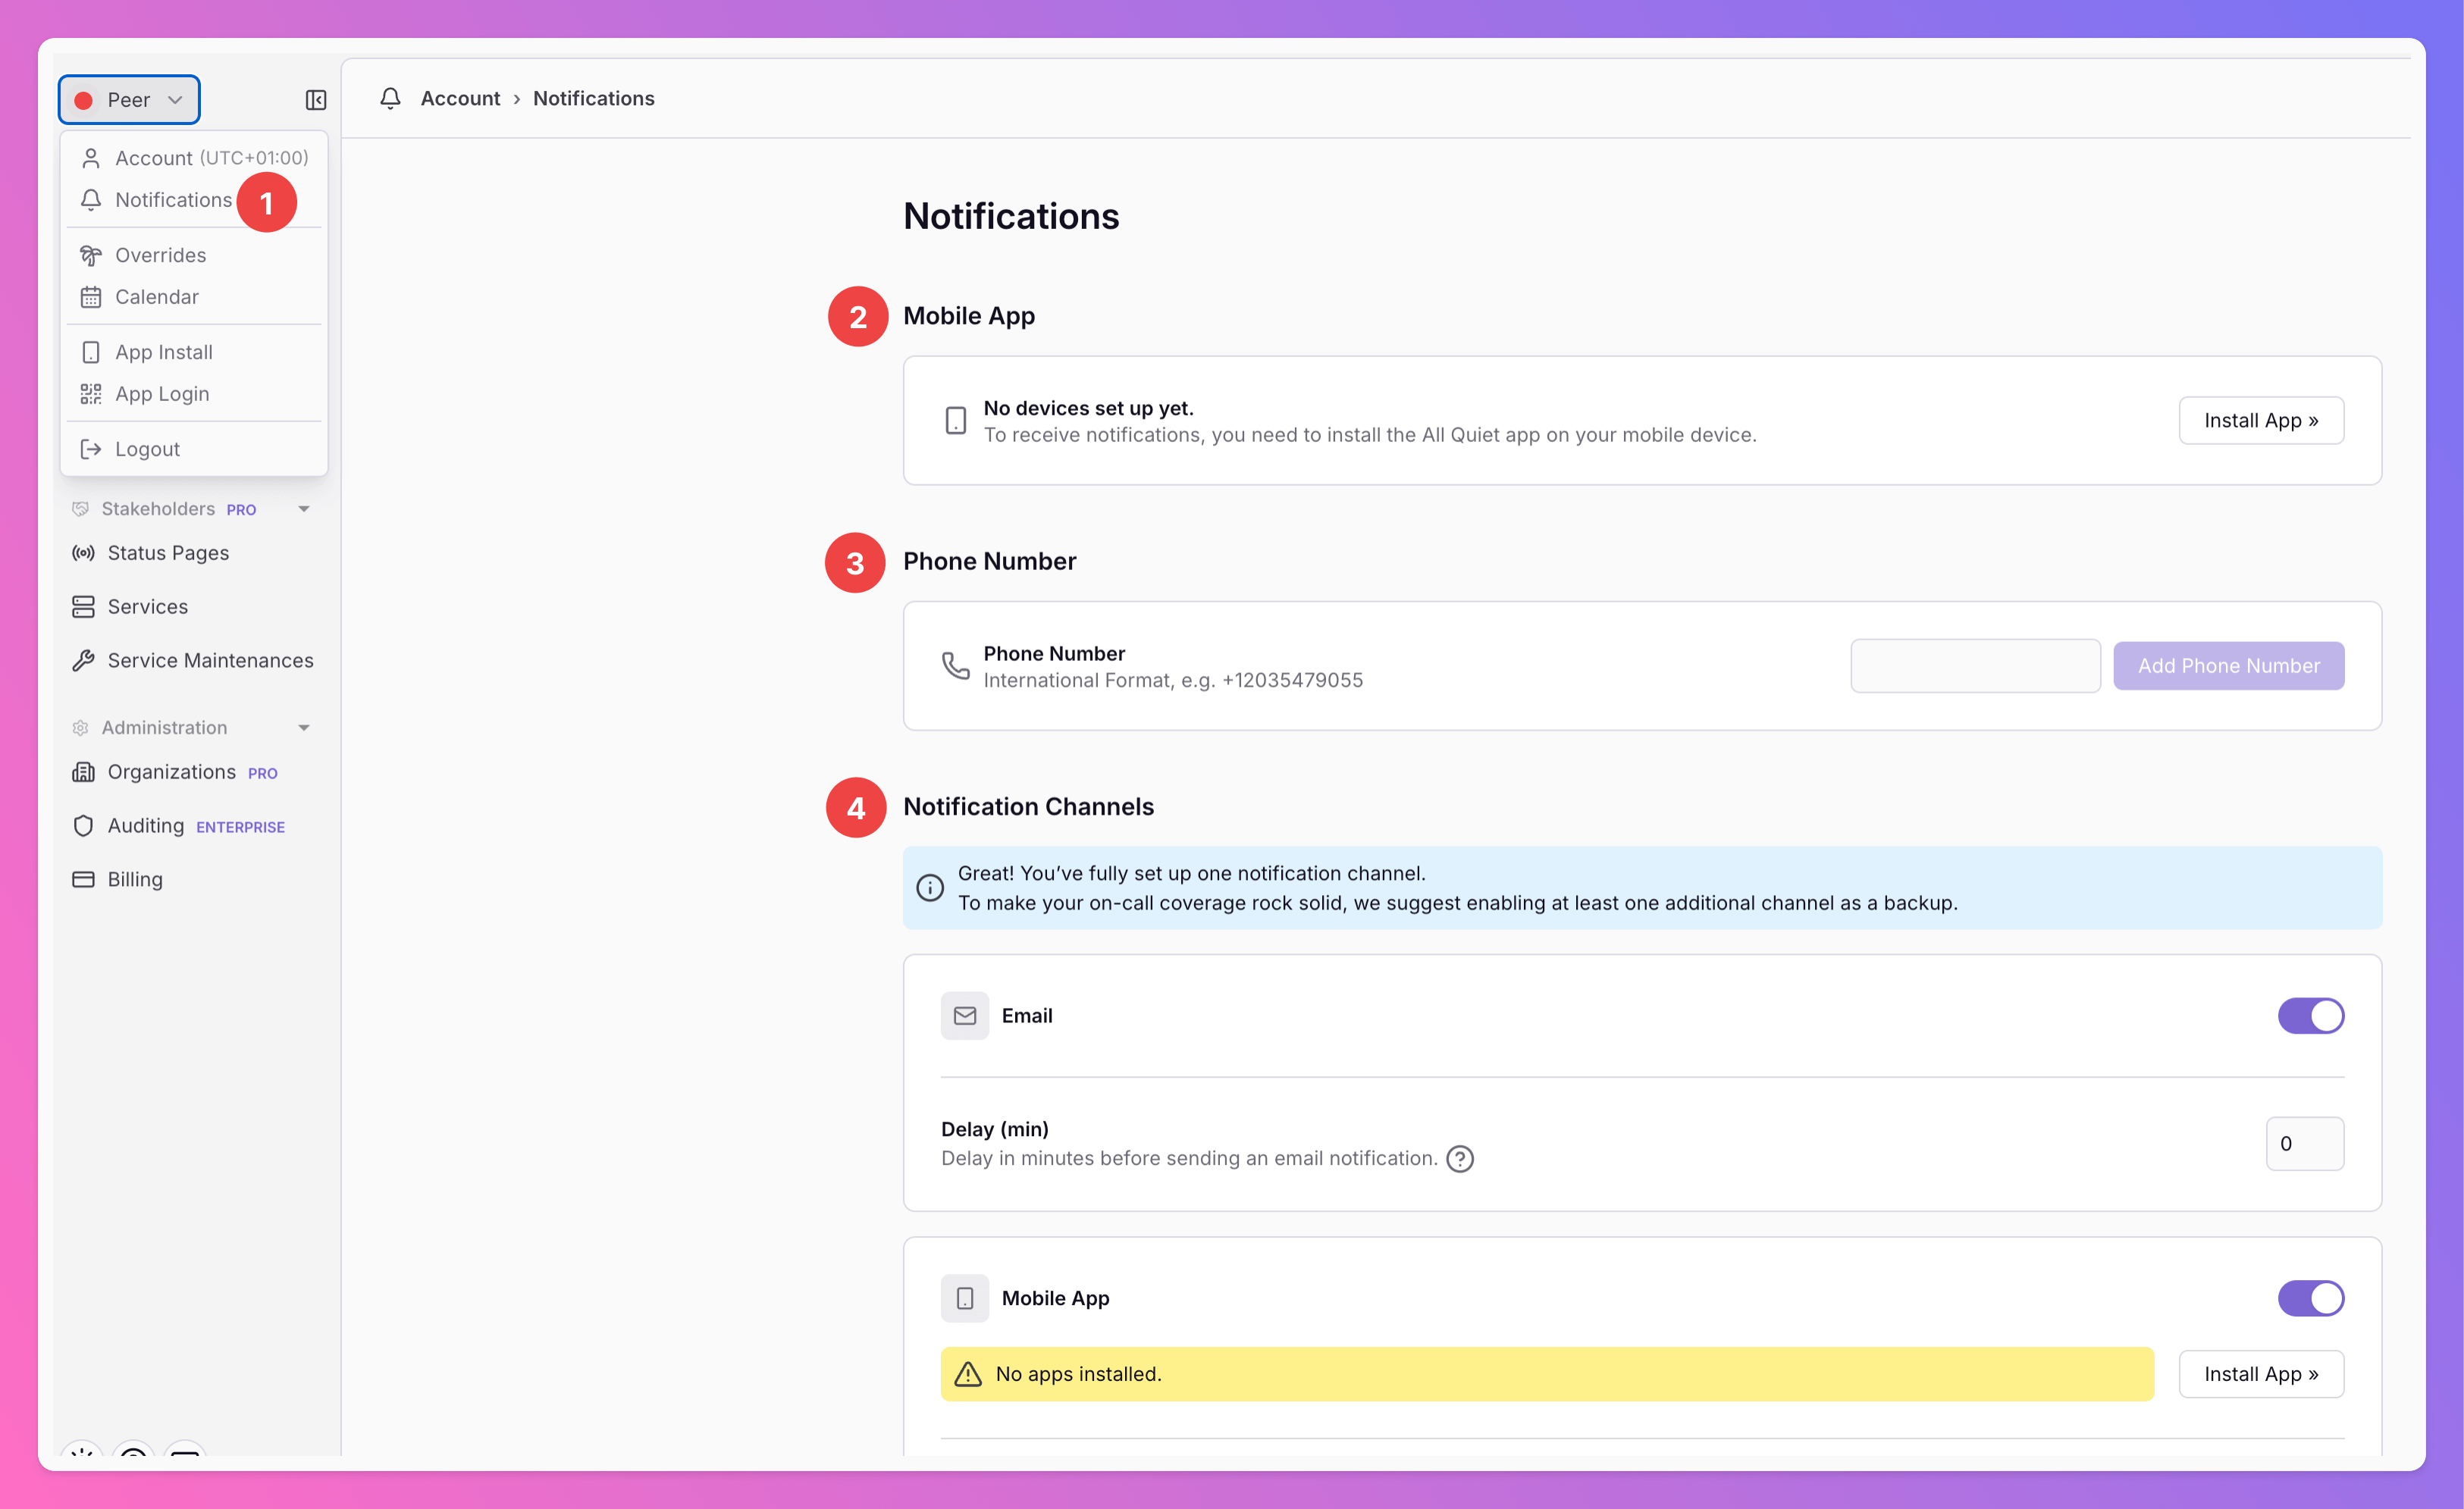
To tailor our alerting to your needs, you can customize your settings underYour Account > Notifications (1).
Here, you can
- download the native All Quiet App to receive push notifications (2)
- add your phone number to activate voice & SMS notifications (3)
- and manage settings for the different notifications channels (4).
Channels
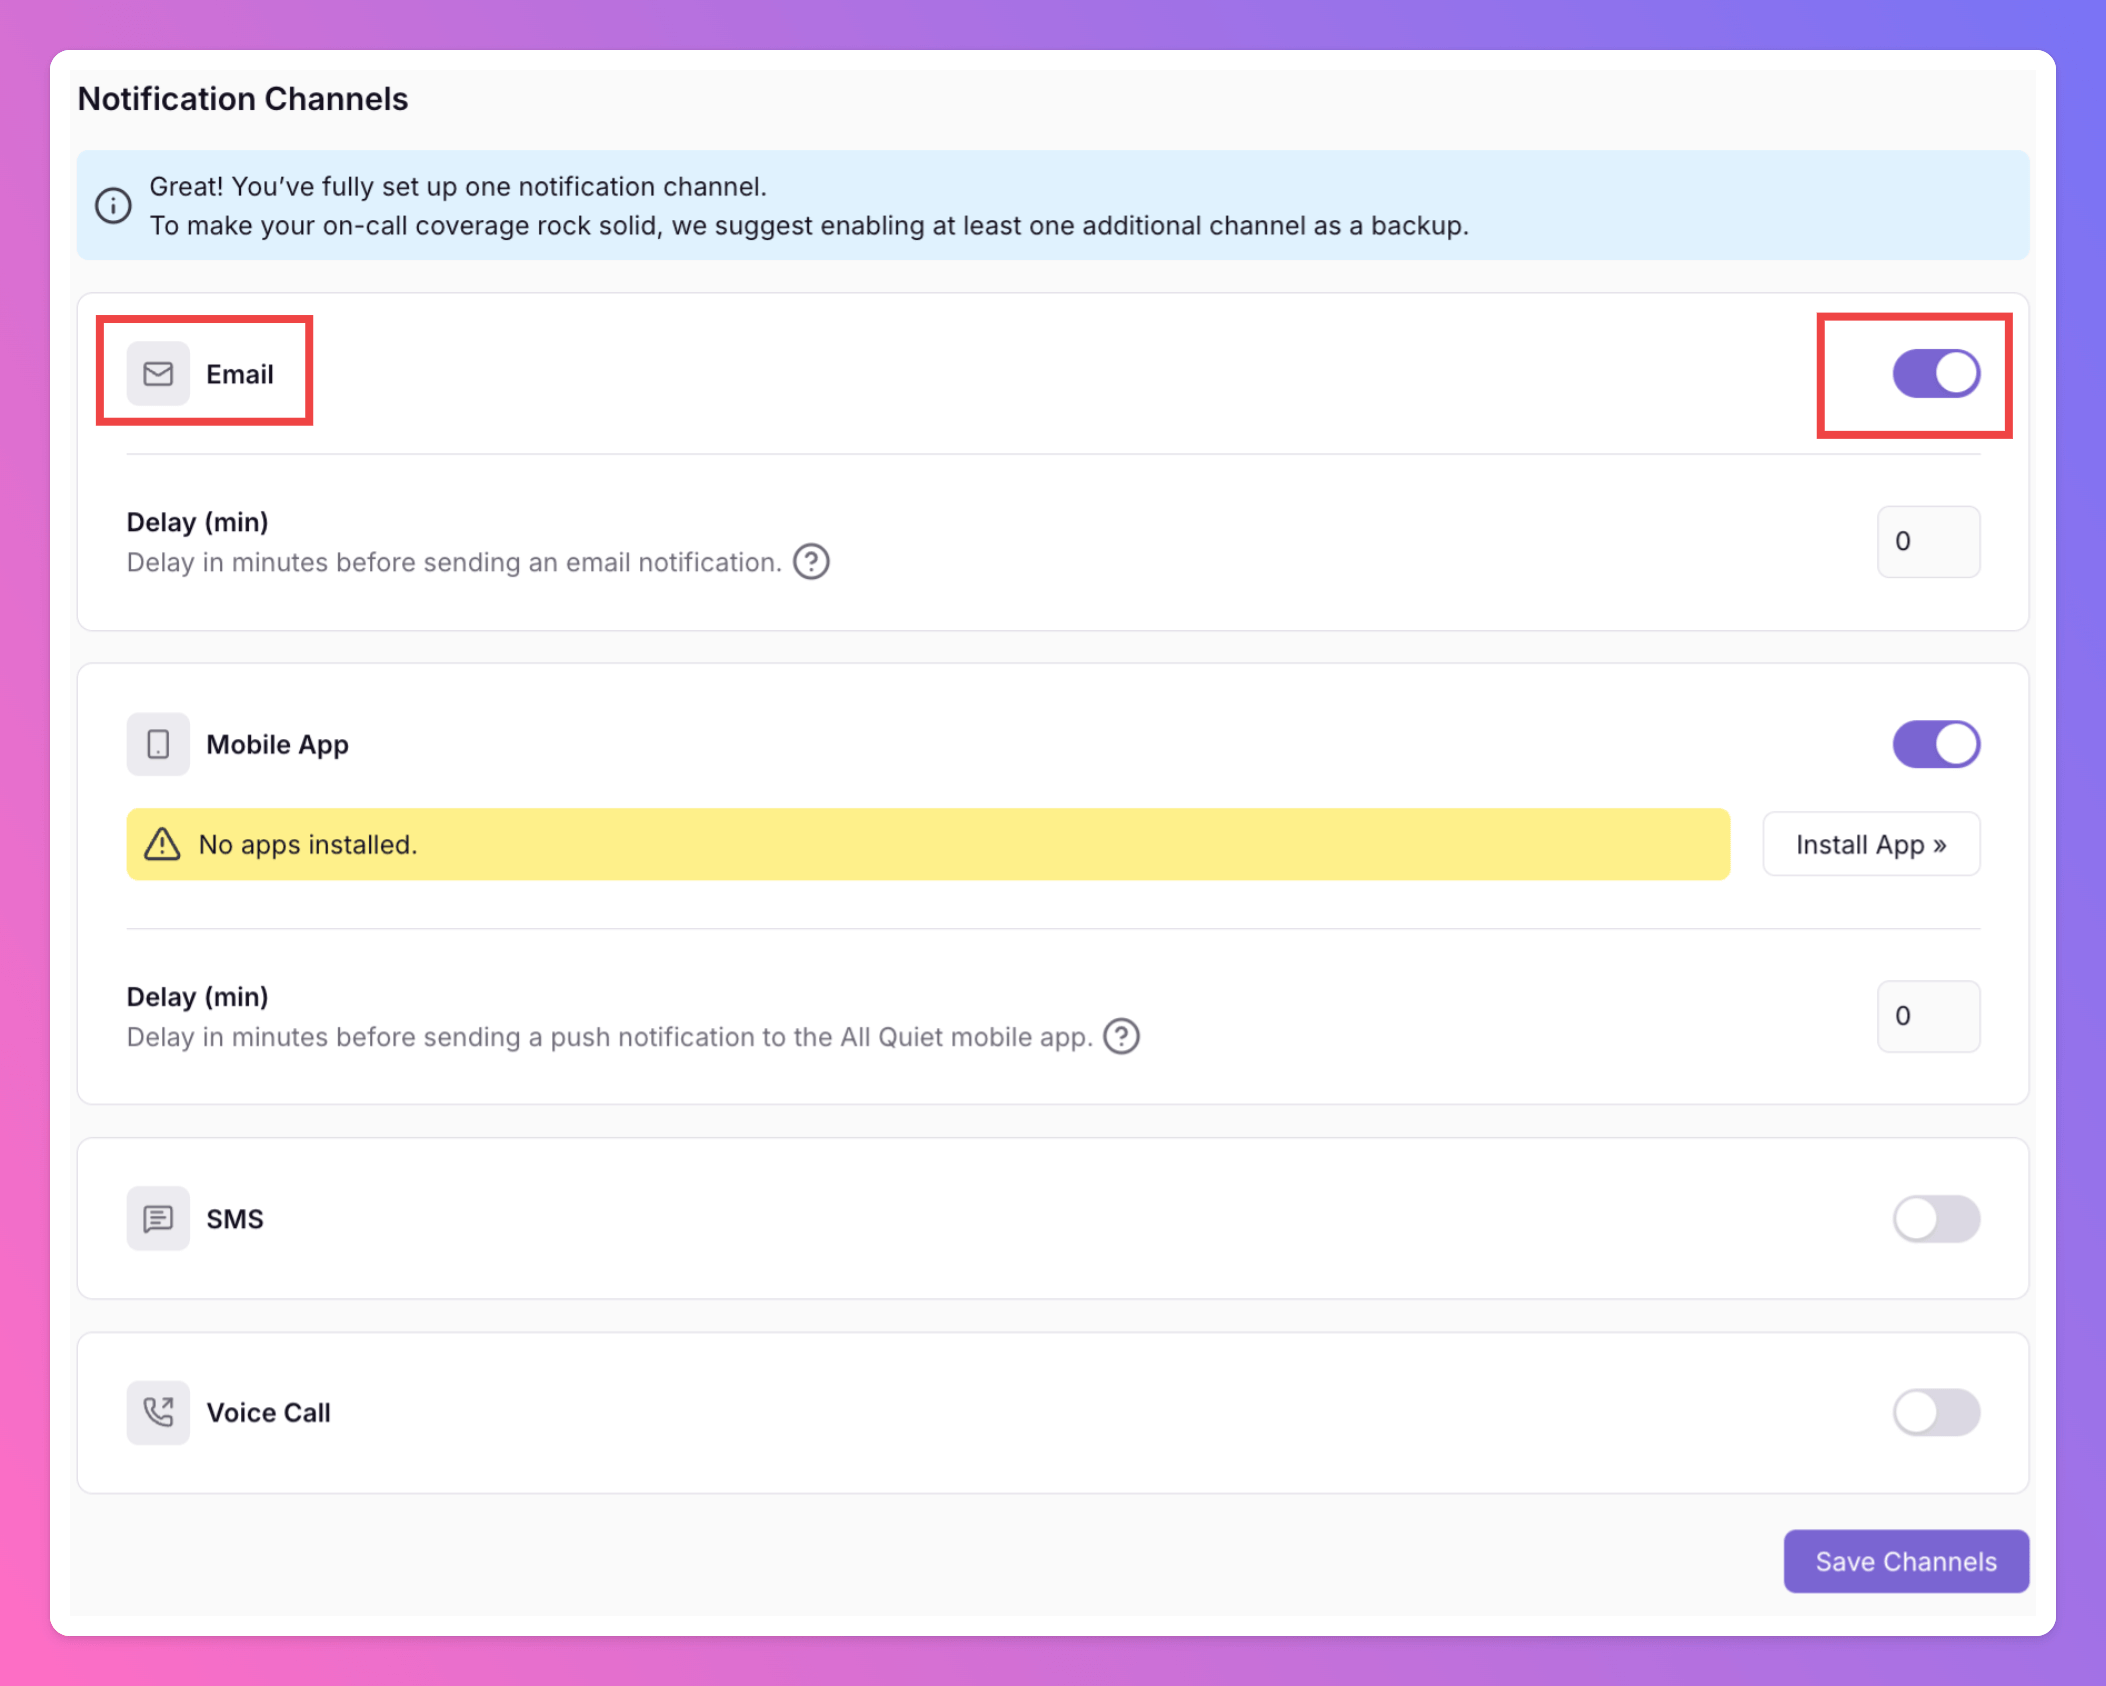
Select between and combine the following personal notification channels.- Emails (to activate, first confirm your email address)
- Push Notifications (to activate, first download the App and login)
- SMS (follow instructions below to activate)
- Voice Calls (follow instructions below to activate)
Notification Channels.
Smart Notification Delays
In the same section you can also enable smart notification delays for each channel.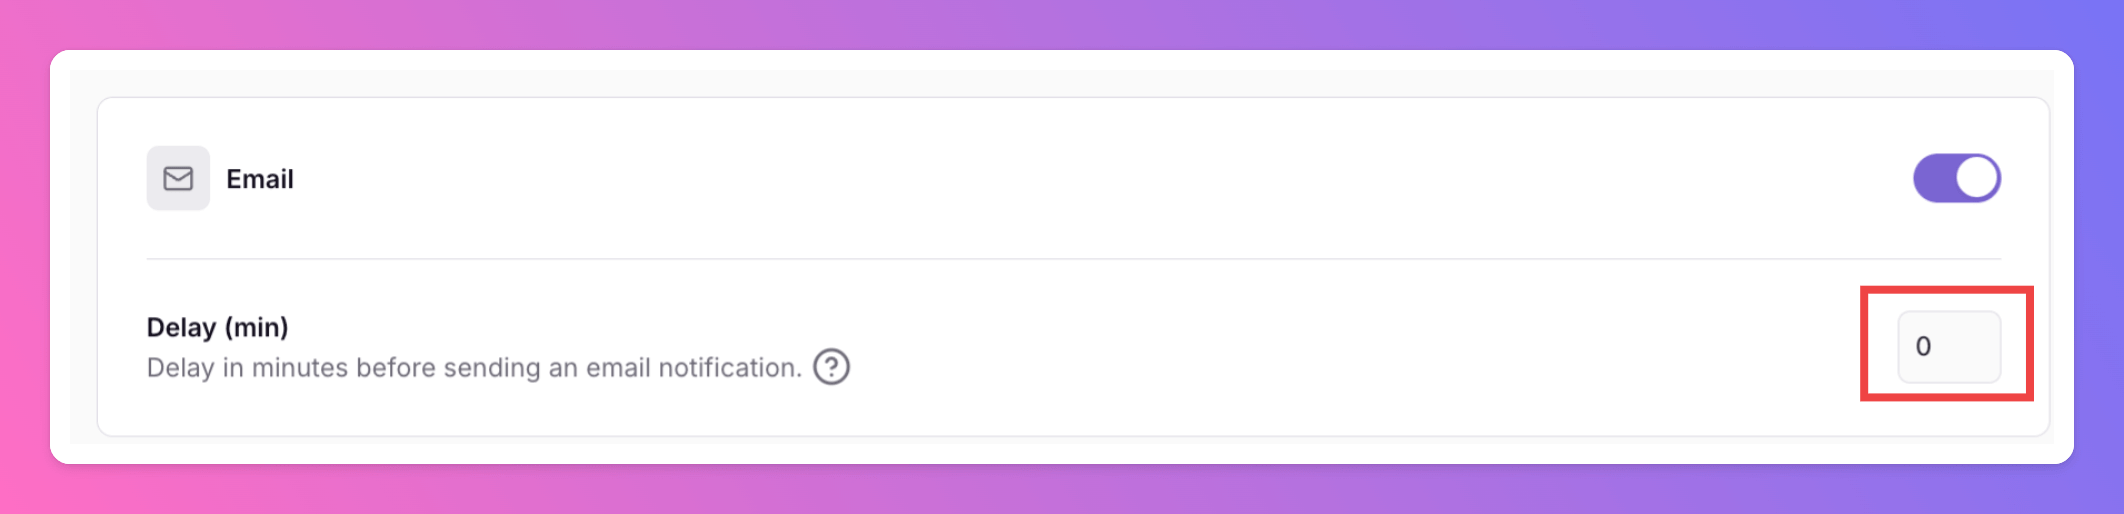
Alert Severities
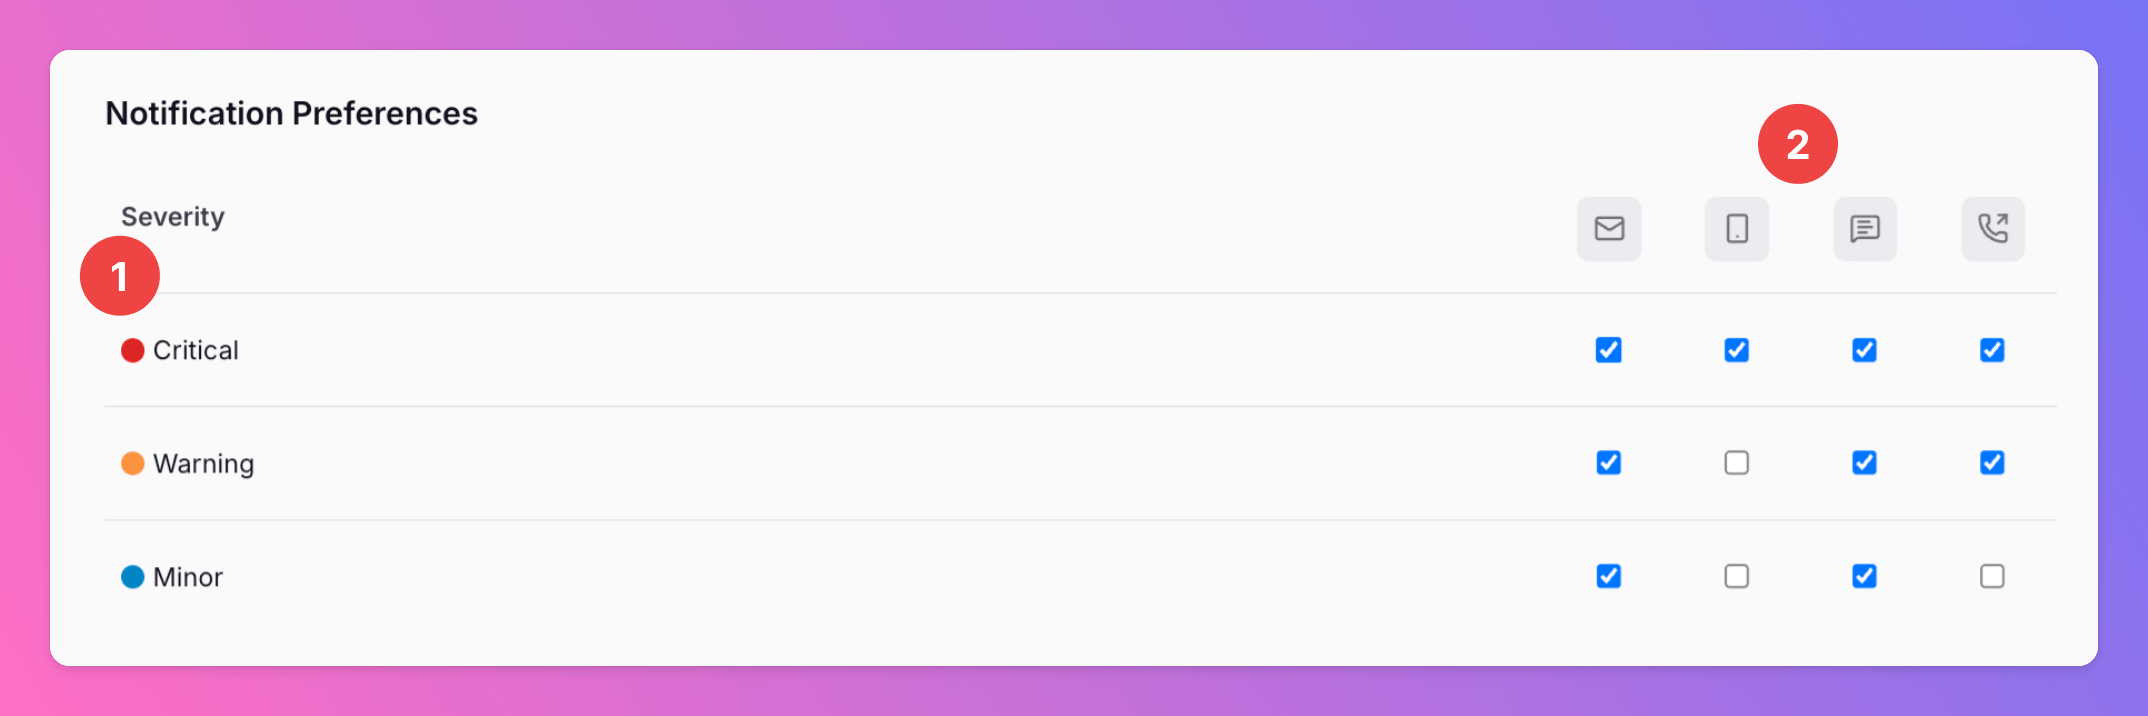
Alerts are tailored by default based on incident severity to ensure efficient notification:- Critical Incidents: all channels - Emails, Push Notifications, SMS, and Phone Calls.
- Warning Incidents: Emails, Push Notifications, and SMS.
- Minor Incidents: via Emails and Push Notifications only.
Notification Preferences section, you can customize these settings for each severity (1) and notification channel (2) anytime.
Notifications per Action
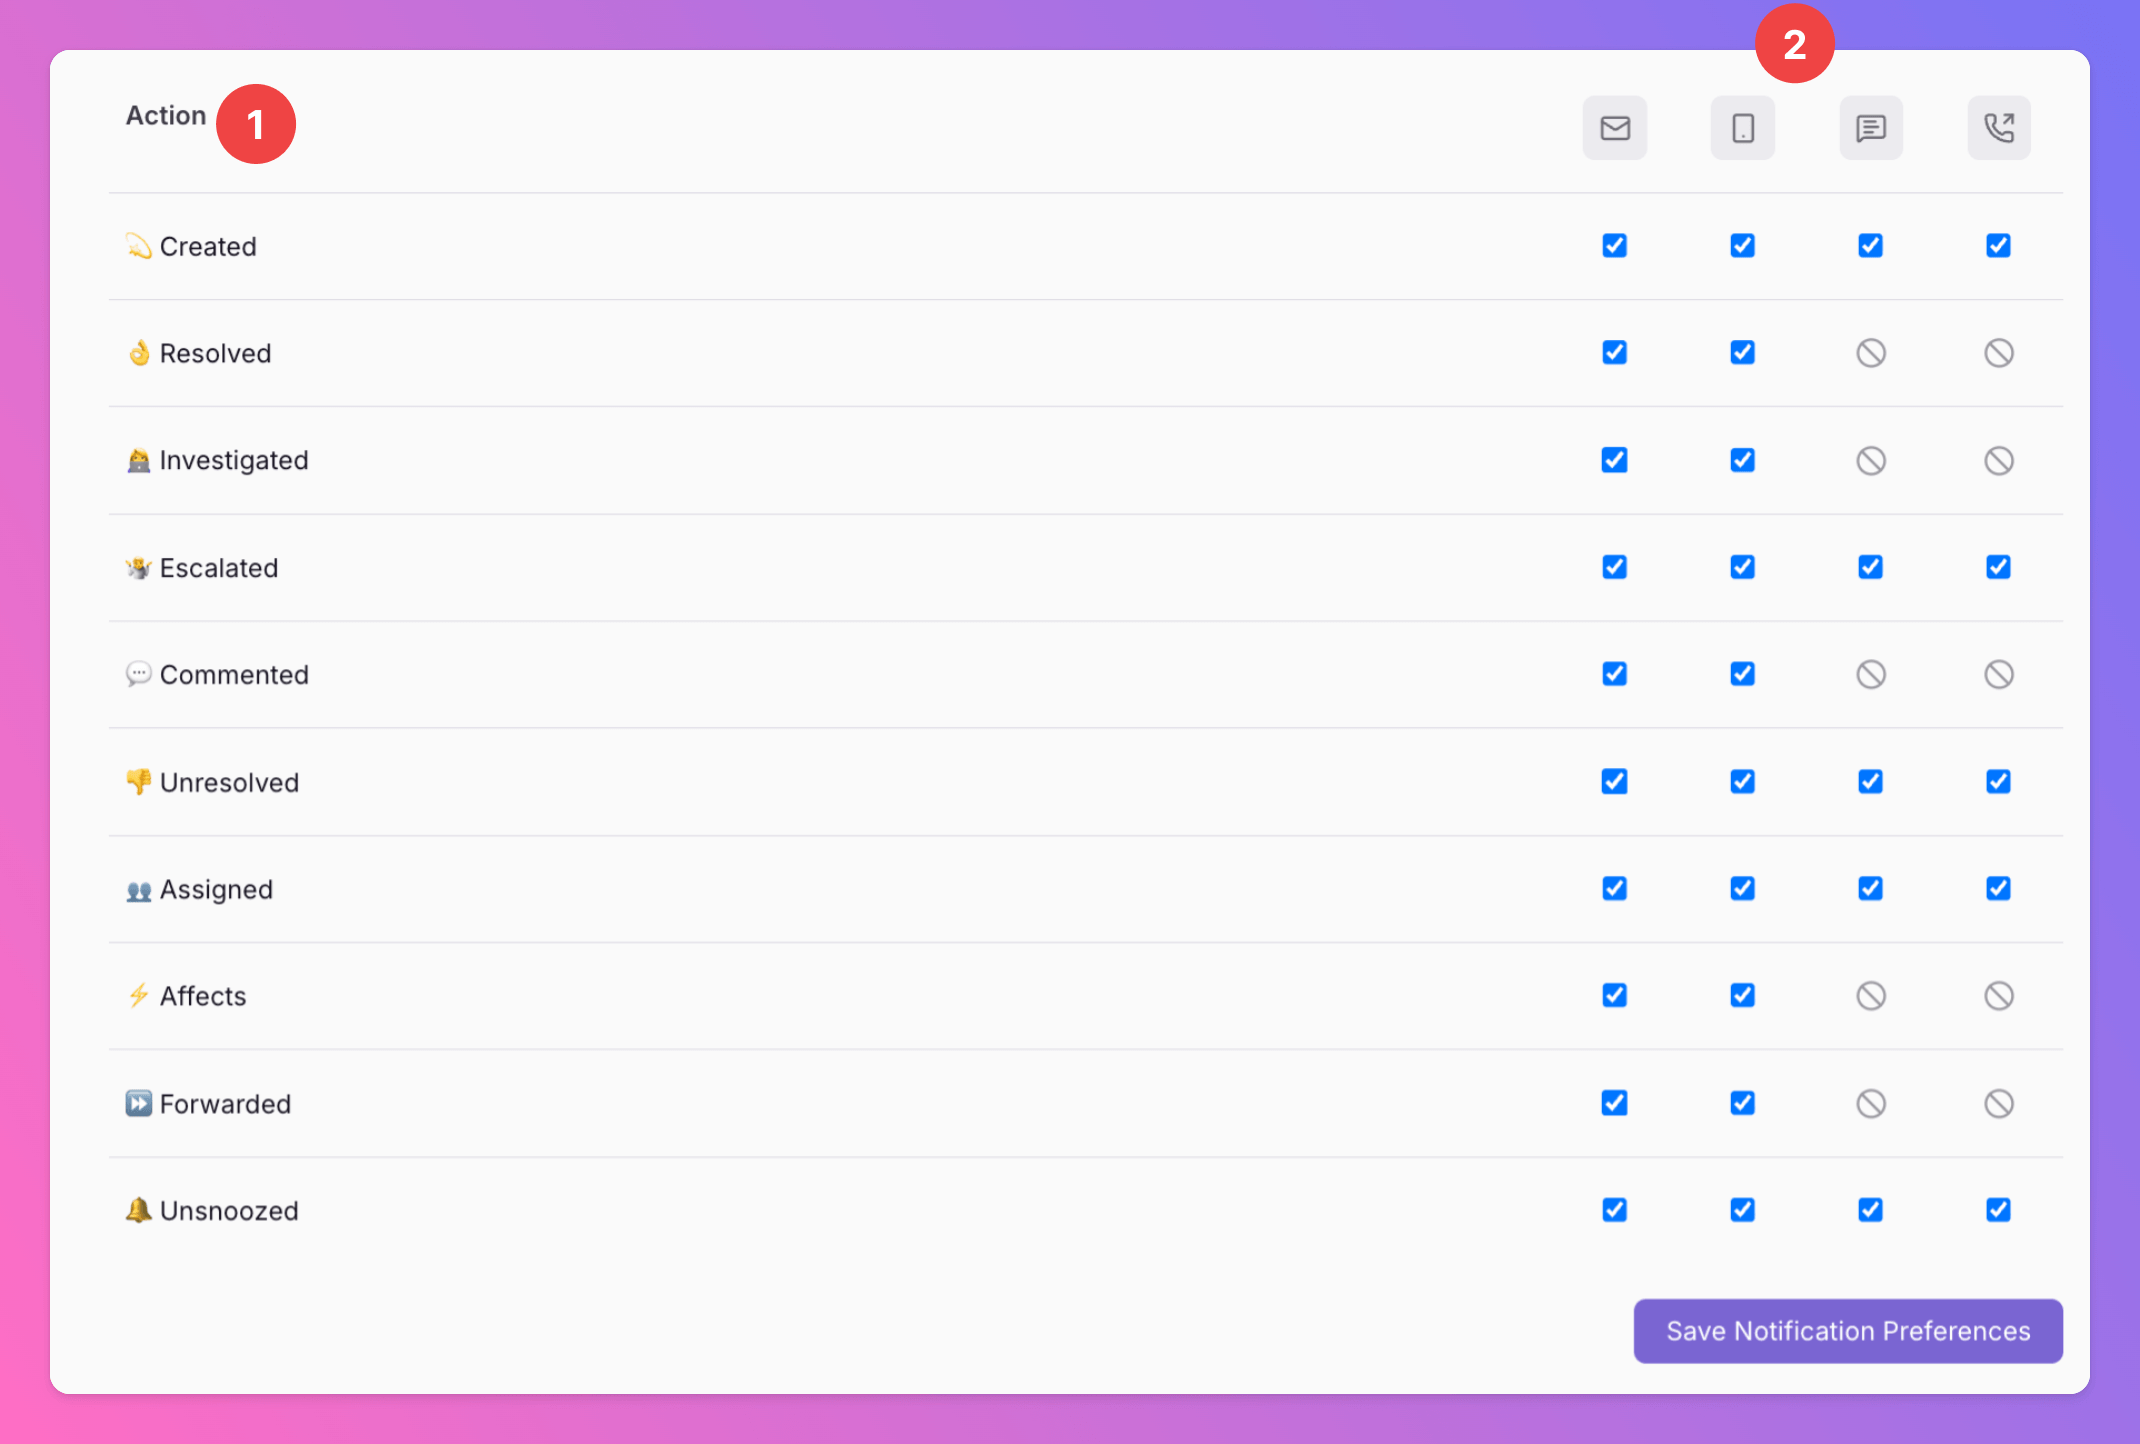
You can active and deactivate each notification channel for certain incident actions, e.g. you can decide to receive an email for the “Forwarded” action but deactivate push notifications for this kind of action. In theNotification Preferences section, you can customize these settings for each action (1) and notification channel (2) anytime.
SMS and Phone Calls
SMS and voice notifications are outbound alerts from All Quiet to you. They are not inbound hotline calls. To receive them, confirm your phone number in the steps below — you do not need Twilio or Live Call Routing.
Enable SMS and Voice Messages
1
Step 1: Navigating to 'Notifications' under Your Profile
Start by accessing your personal notification settings. From the main dashboard, click on your Username in the top left corner. In the drop down, select
Notifications.2
Step 2: Entering Your Phone Number
Note, that you can only confirm your phone number after confirming your email addreess.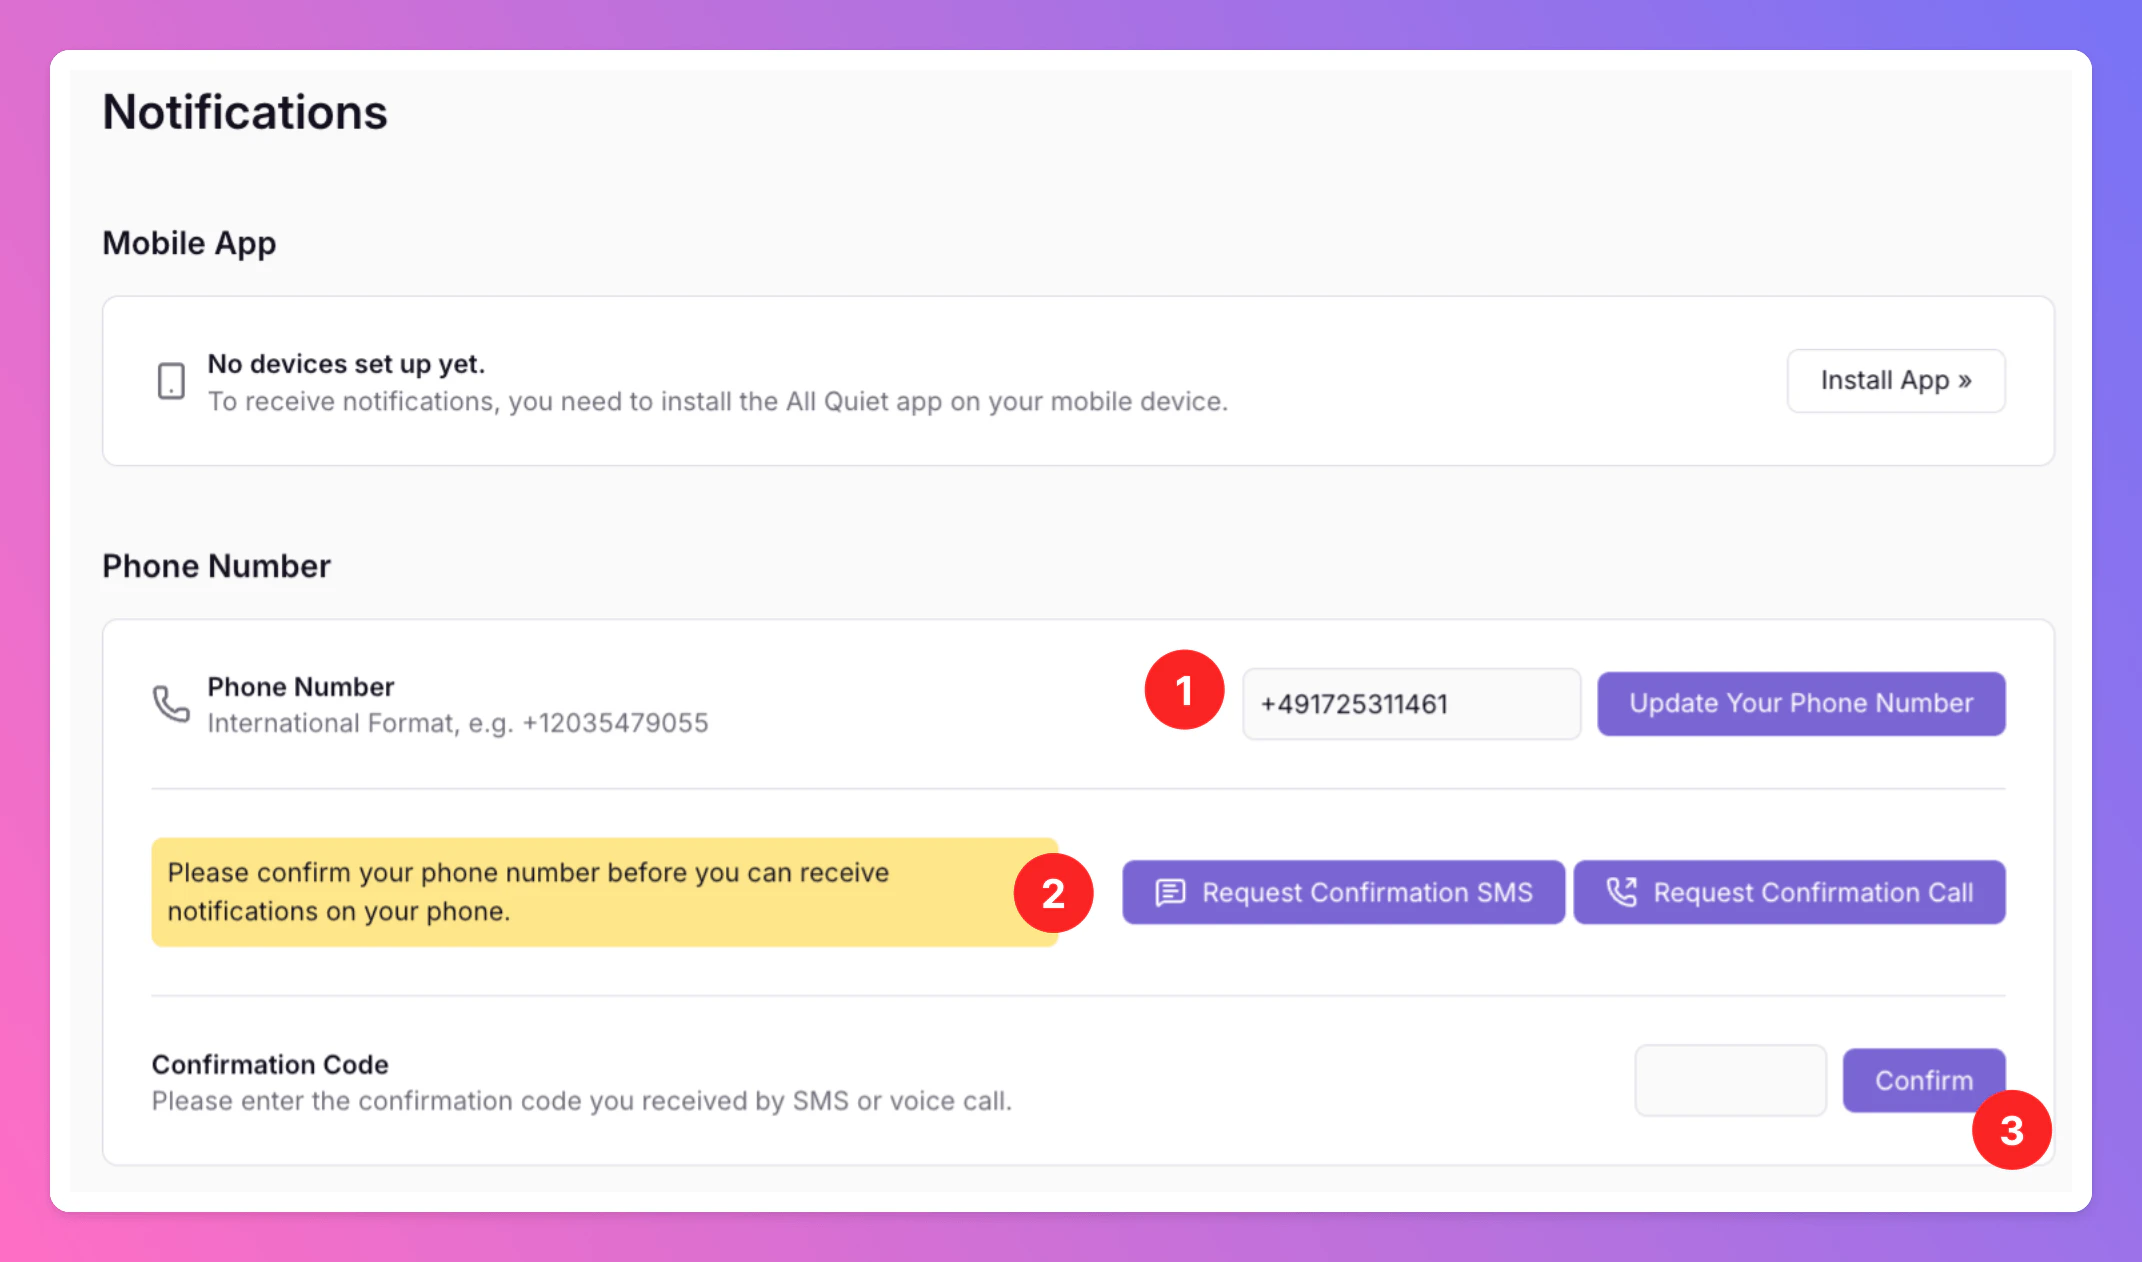
- In the ‘Phone Number’ field, input your number using the international format. For instance, you might enter: +491735311461.
- After entering, you will be asked to request a confirmation code. You can request the Code via SMS or Voice Call.
- After receiving the confirmation code. enter the code and “confirm” your phone number
3
Step 3: Activating SMS & Voice channels
Navigate to the
Notifications Channels section on the same page.- For SMS Notifications: Make sure the toggle for
SMSis enabled if you wish to receive SMS updates on incidents. - For Phone Calls: Make sure the toggle for
Voice Callis enabled if you wish to receive SMS updates on incidents. - For both, Voice Calls and SMS: You may want to add smart notification delays to adjust the notifications to your way of working.
4
Step 4: Select Severities and Actions for SMS & Voice Call Updates
In the
Notification Preferences section, you can select the severities and incident actions for which you’d like to receive anytime.Our Phone Numbers
Phone calls are triggered only once, at the moment an incident is opened, assigned or escalated.
Per default,Calls are reserved for incidents marked with the severity level of “Critical”. You can adjust these setting.
Enterprise customers may have other, additional phone numbers. Reach out to your admin or support@allquiet.app to learn more.
Receive calls during Do Not Disturb
Voice calls follow your phone’s Do Not Disturb and Focus settings. After you save the All Quiet contact, allowlist it so incident calls still ring while Do Not Disturb is on. Critical push alerts are configured in the All Quiet app. Phone calls and SMS are configured on the device, in the steps below.Allowlist every number on the contact card. All Quiet calls from these fixed numbers,. If your organization uses additional numbers include those as well.
iOS
On iPhone, add All Quiet to Favorites, then allow calls from Favorites in each Focus you use.1
Add All Quiet to Favorites
- Open the Contacts app.
- Open the All Quiet contact. Save it first from the contact card or the QR code if it is not in your address book yet.
- Tap Add to Favorites, then choose Call and the phone number.
- Repeat for every number on the contact. Only favorited numbers match Allow Calls From → Favorites.
2
Allow Favorites to call during Do Not Disturb
- Open Settings → Focus → Do Not Disturb.
- Tap People.
- Under Phone Calls, set Allow Calls From to Favorites.
- Open each other Focus you use, such as Sleep, Work, Personal, or a custom Focus, and set Allow Calls From to Favorites there as well. Each Focus keeps its own list of allowed callers.
Android
On Android, star the All Quiet contact, then allow calls from starred contacts while Do Not Disturb is on.1
Star the All Quiet contact
- Open the Contacts app. On some phones, open the Phone app and then Contacts.
- Open the All Quiet contact. Save it first from the contact card or the QR code if it is not in your address book yet.
- Tap the star so the contact is a favorite. Some phones label this Add to favorites. Starring the contact covers every number on the card.
2
Allow starred contacts to call during Do Not Disturb
- Open Settings.
- Open Modes, then Do Not Disturb. On other phones the path is Sound & vibration or Notifications, then Do Not Disturb.
- Tap People. Some phones call this Calls, messages, and conversations.
- Under Calls, choose Starred contacts. Some phones say Favorite contacts.
- To also receive SMS during Do Not Disturb, set Messages to Starred contacts (or Favorite contacts).
Menu names differ by manufacturer and Android version. Bedtime, Sleep, Driving, and custom modes have their own filters. Set Calls to starred or favorite contacts for each mode you use. If a menu is unclear, check your device manual or the manufacturer’s support site.
SMS and Voice Rate Limits
Our current rate limits to protect the functionality of the platform for all customers.
- SMS: 1 SMS per unique phone number, 8 SMS per unique phone number within 1 minute
- Phone Calls / Voice Messages: 1 Call per unique phone number within 1 second, 8 Calls per unique phone number within 1 minute
To prevent abuse, we may apply country specific rate limits. To learn more about our rate limits or if your organization needs specific rate limits reach out to support@allquiet.app
Native App Push Notifications
Push notifications in All Quiet are designed to keep you informed about incidents, whether they’re minor updates or urgent emergencies. Of course, notifications will only be sent once you have granted the necessary permissions on your device. Here’s how notifications work on both iOS and Android:iOS
From version 2.0.0
By default, All Quiet sends push notifications for all incident updates. These notifications respect your device’s sound and focus settings - if your phone is on silent or in a Focus mode, you may not hear a sound, but you’ll still see the notification banner.
Normal notifications use your iPhone’s system notification volume.
Critical Alerts
For incidents marked as “Critical,” you can enable “Critical Alerts” in the app. When enabled, these notifications will break through silent and focus modes, ensuring you never miss an urgent alert. You can control this permission in your iOS settings.Critical Alerts will only be triggered when the incident’s severity is
When enabled, critical alerts use the volume you set in the All Quiet app’s settings screen, not the system volume.
Critical. This feature allows All Quiet notifications to break through silent and “Do Not Disturb” modes. When enabled, critical alerts use the volume you set in the All Quiet app’s settings screen, not the system volume.
1
Granting Push Notification Permissions
After logging in for the first time, users are encouraged to authorize push notifications. Users also have the option to activate “Critical Alerts”. Upon selecting this checkbox, the iOS system will prompt for the necessary permissions, as depicted in the subsequent screen.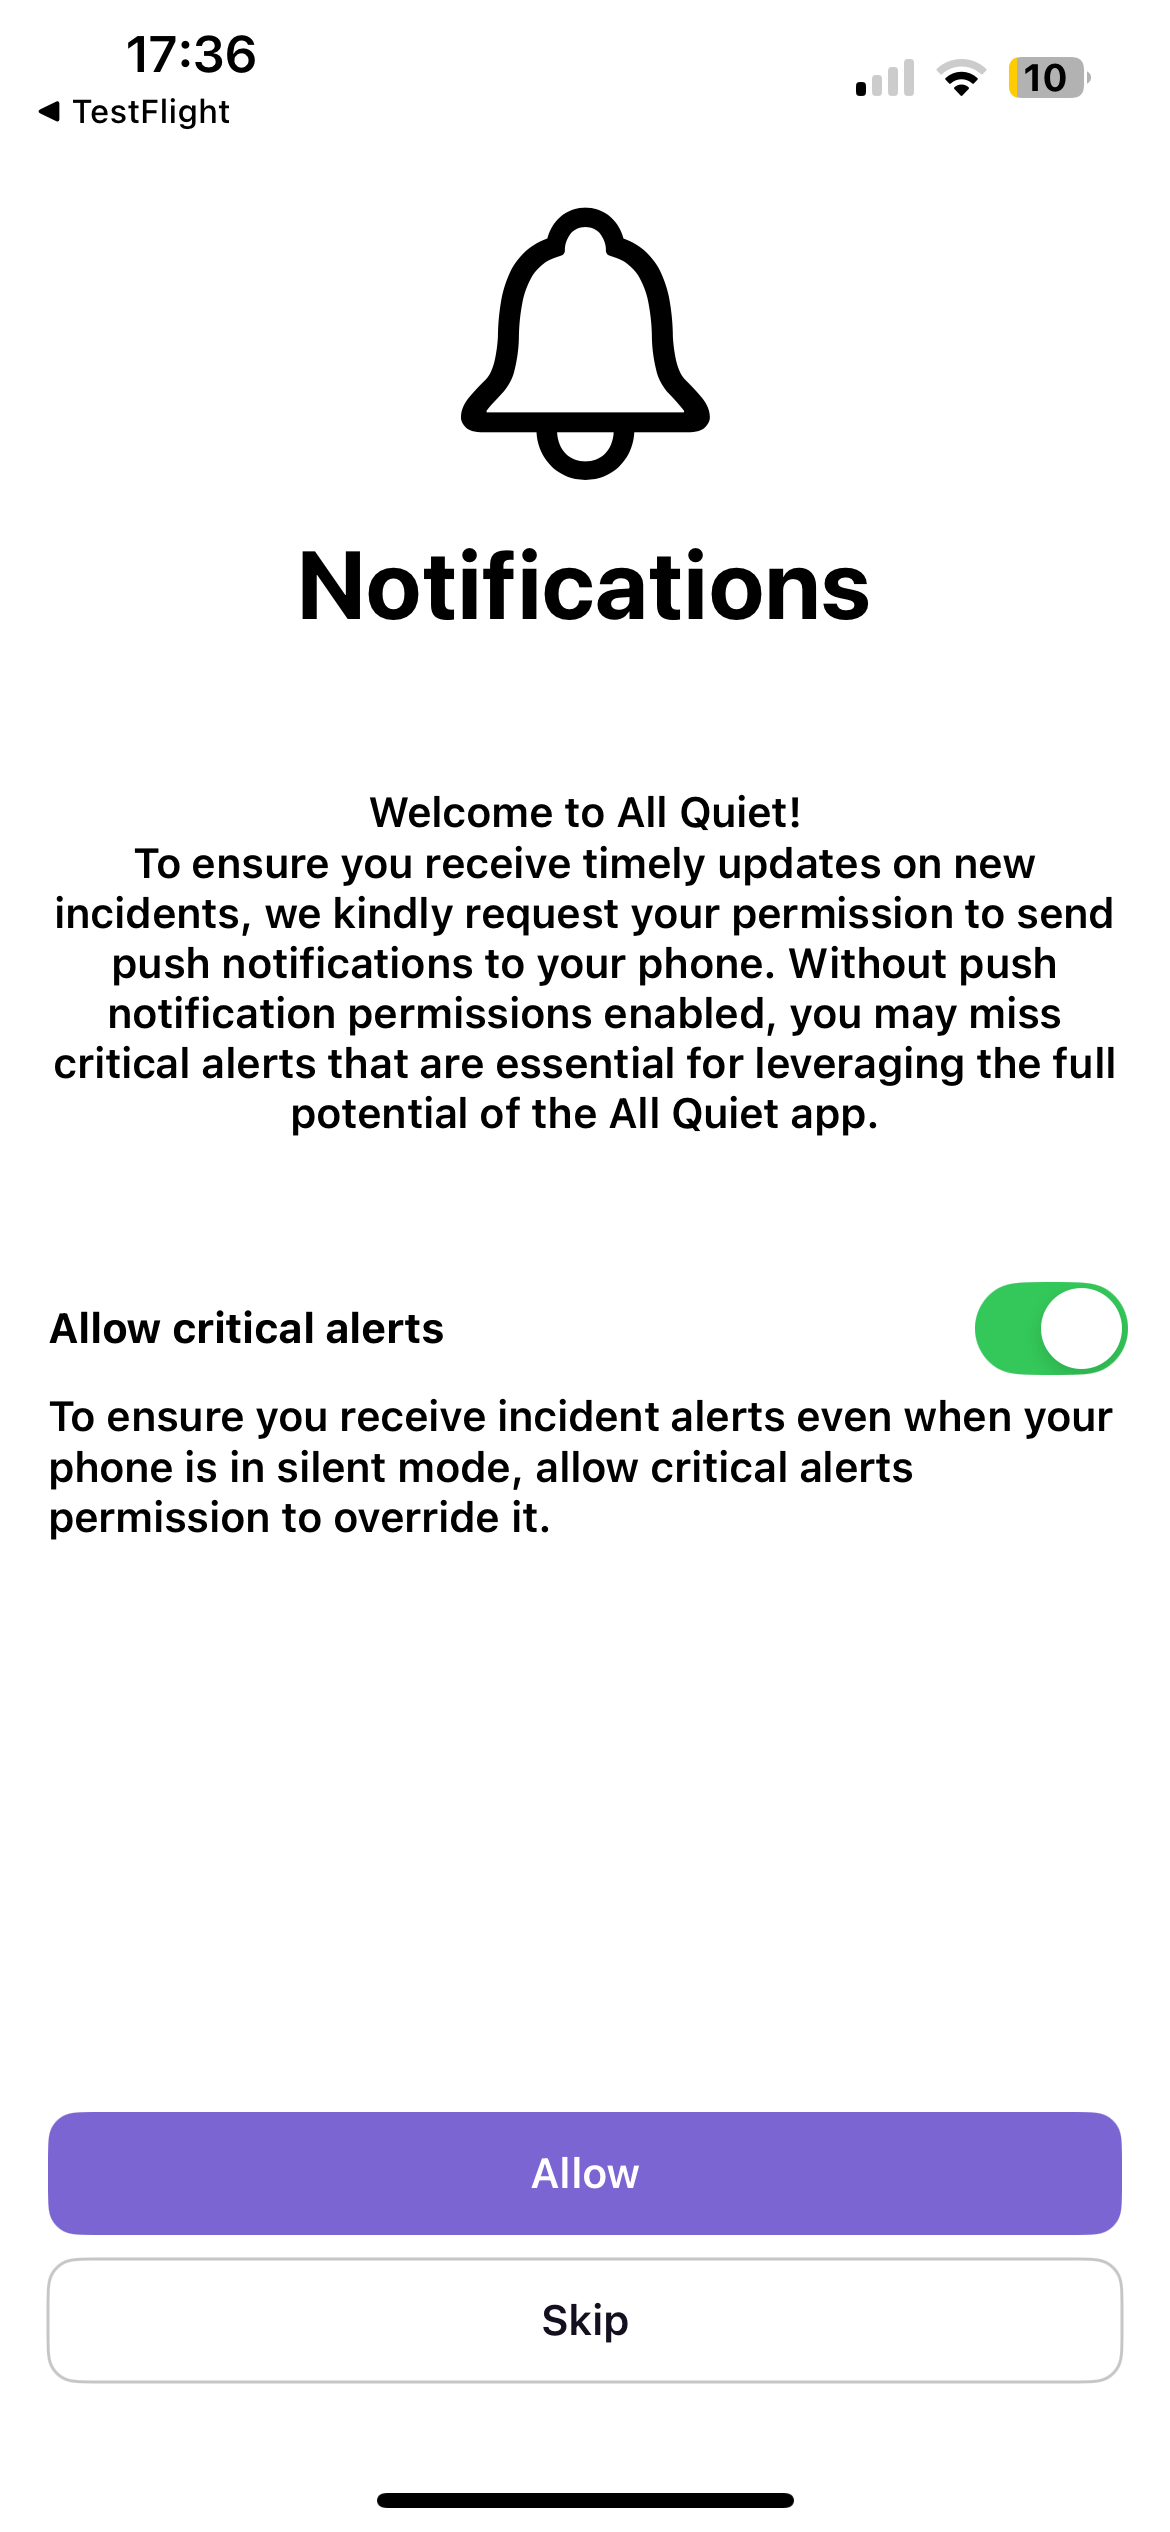
2
Allowing 'Critical Alerts'
The screenshot depicts the operating system’s request for permission to enable critical alerts.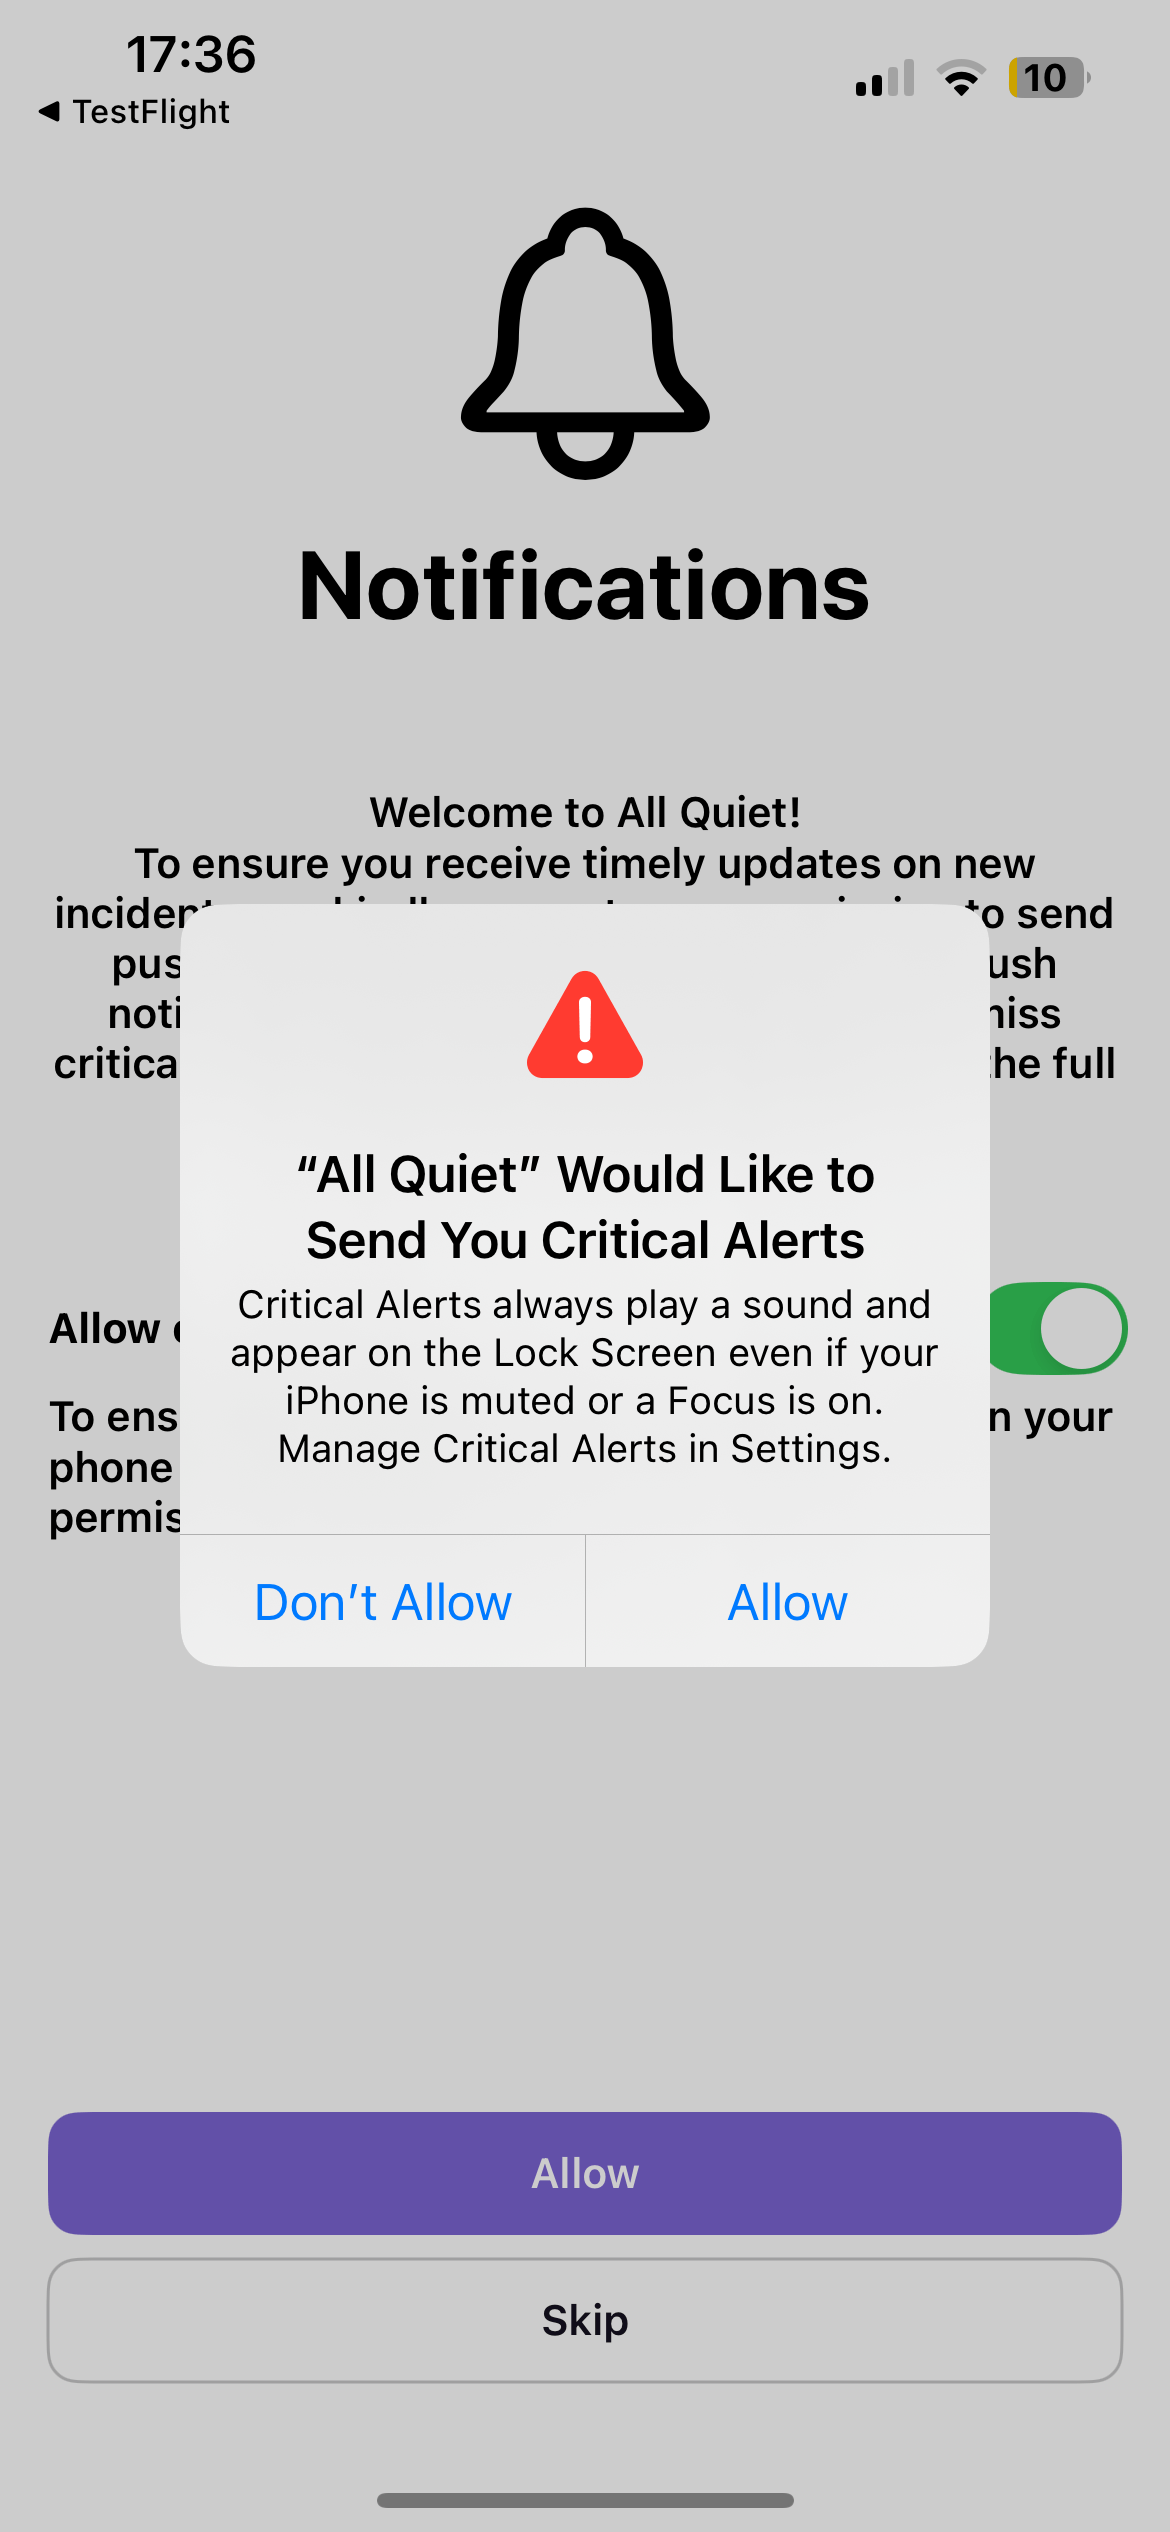
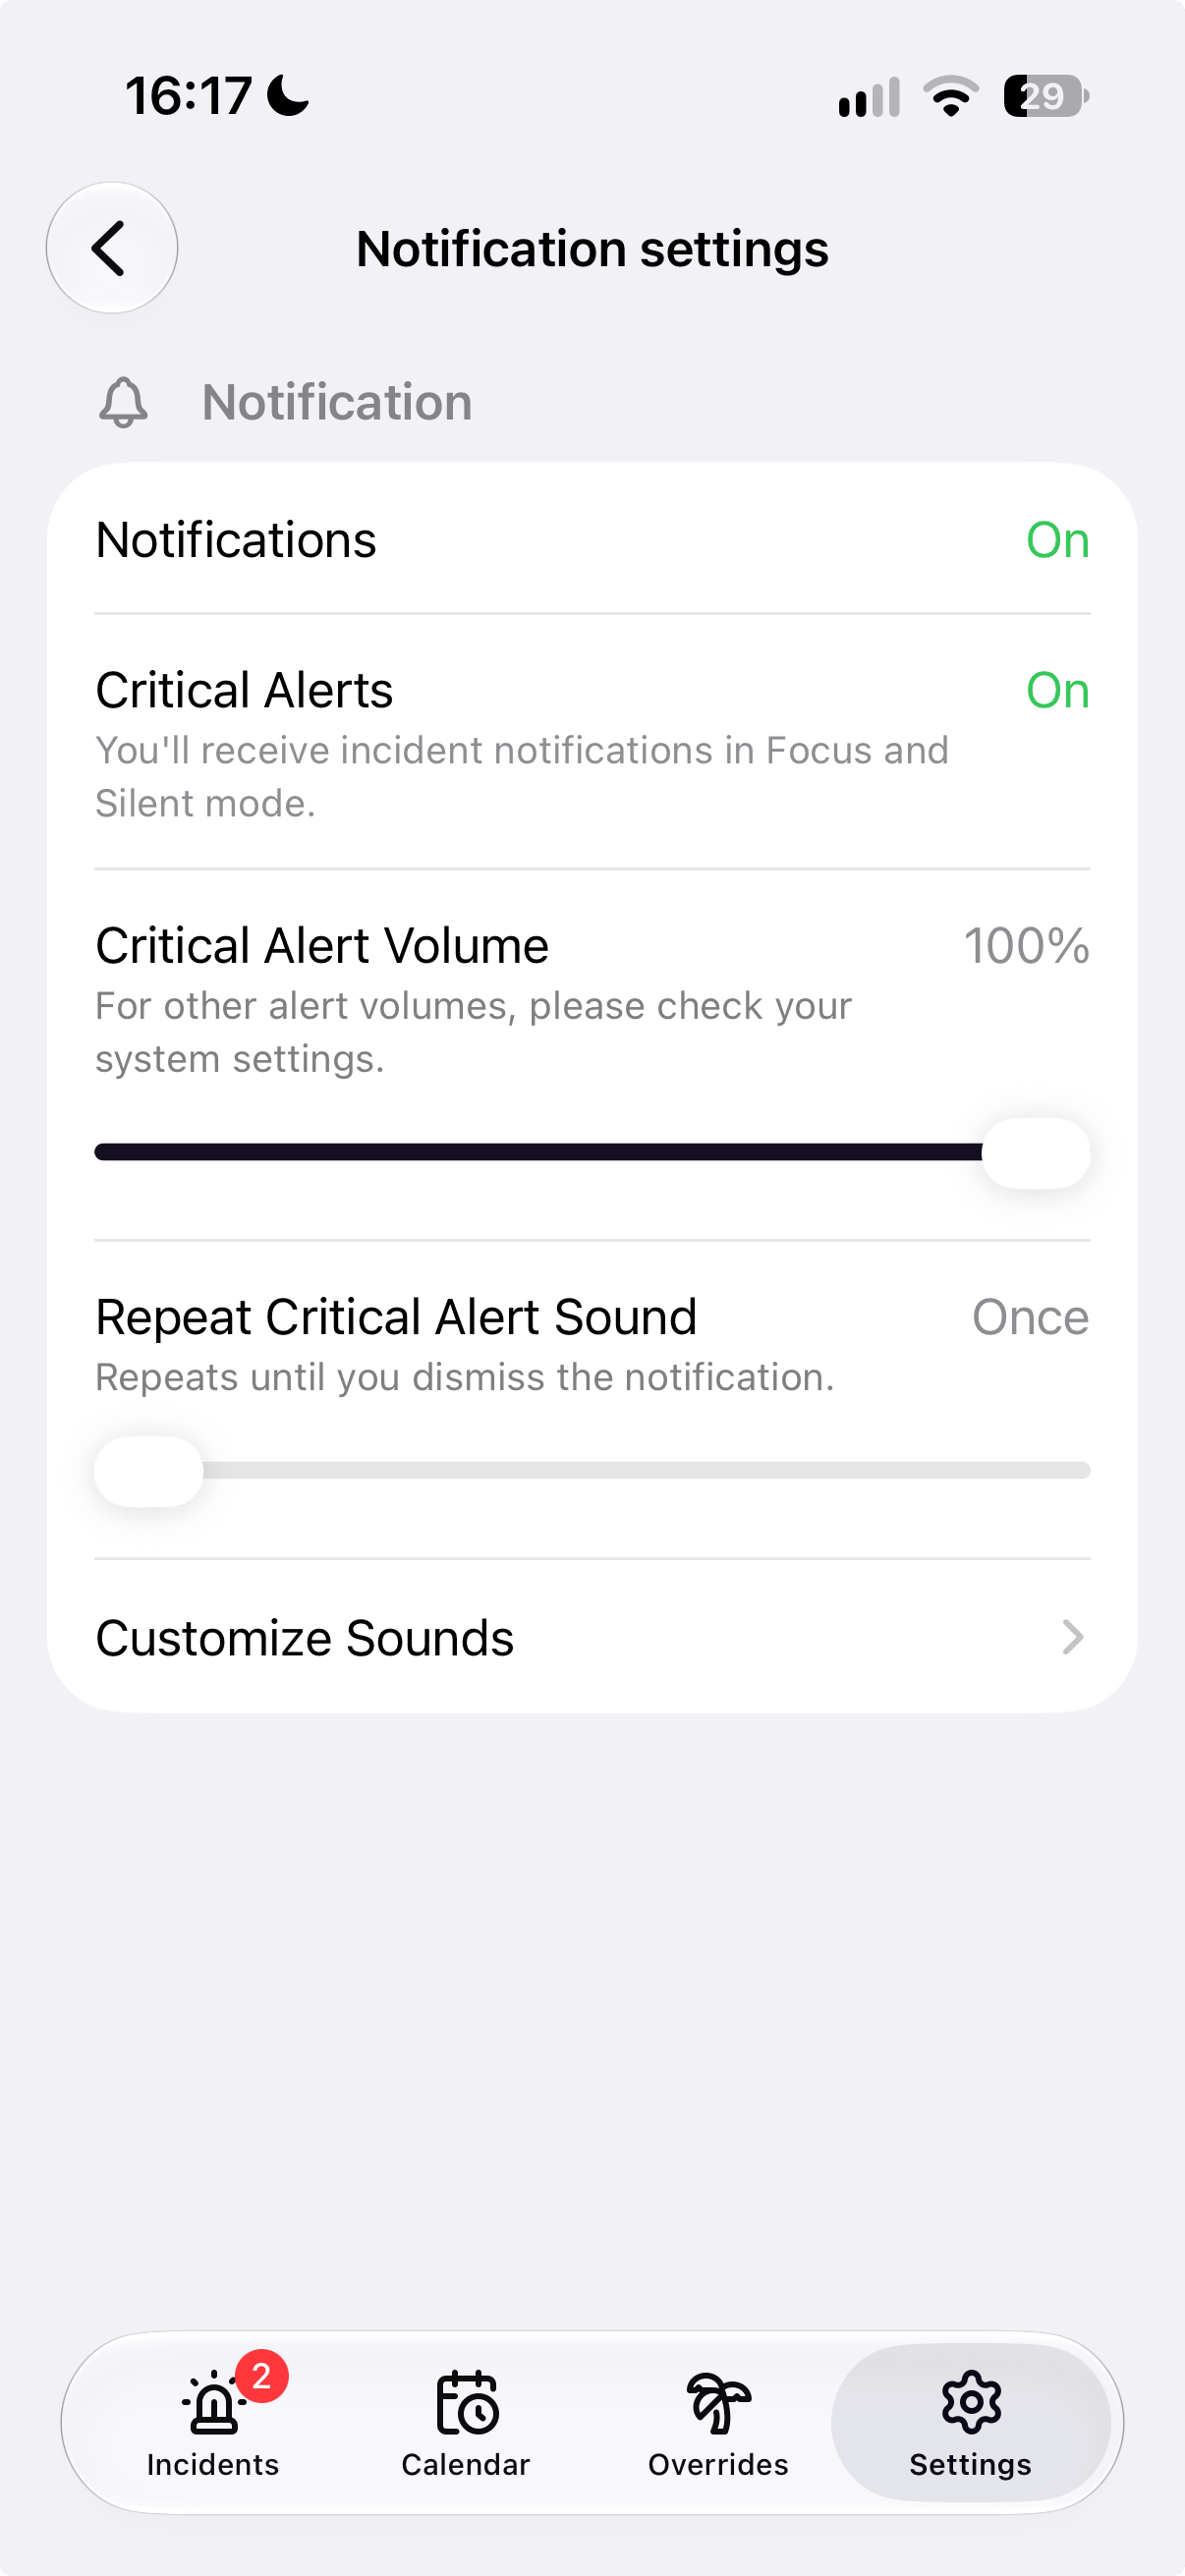
Repeat Critical Alert Sound
By default, the sound you set for critical alerts plays once. In Settings → Notification settings, raise Repeat Critical Alert Sound above Once to keep that sound playing unntil you miss the notification. iOS does not allow a notification sound to play longer than 30 seconds.A longer repeat helps when you need a critical incident to wake you at night. The phone keeps sounding until you open the app, similar to receiving a call in the All Quiet app, without placing a voice call.
Do Not Disturb (DnD) & Other Focus Modes
Normal notifications will not make a sound if DnD or Focus is enabled, but critical alerts (if allowed) will always get through with sound and vibration, even if your phone is muted.When DnD or Focus is enabled, only critical alerts (if allowed) will play a sound, using the app’s critical alert volume setting.
Android
From version 2.0.0
All Quiet sends push notifications for all incident updates. These notifications follow your device’s standard notification settings—if your phone is on silent or DnD, you may not hear a sound, but you’ll still receive the notification. You can fine tune your notification preferences in the “Notification Channel Settings” for the All Quiet Incident Channel, under “Settings”.
Normal notifications use your Android device’s system notification volume. When receiving a notification while playing media or in a call, we adapt the volume to the media / the voice call volume.
Critical Alerts
All Quiet for Android gives you fine-grained control over how critical alerts behave, even when your phone is muted or in Do Not Disturb (DnD) mode.-
There are two separate toggles in the app’s notification settings:
- Override System Volume (When DnD is off): When notifications are allowed, enabled by default. When this is on, critical alerts will play a sound even if your phone is in silent mode (but not in DnD). You can set a custom volume for these alerts in your notification settings. When receiving a notification while playing media or in a call, we adapt this volume to the media / the voice call volume.
- Override Do Not Disturb (DnD): Must be opted-in. When enabled, critical alerts will play a sound even if your phone is in DnD mode. This also has its own volume setting (see DnD section below for more details). When receiving a notification while playing media or in a call, we adapt this volume to the media / the voice call volume, too.
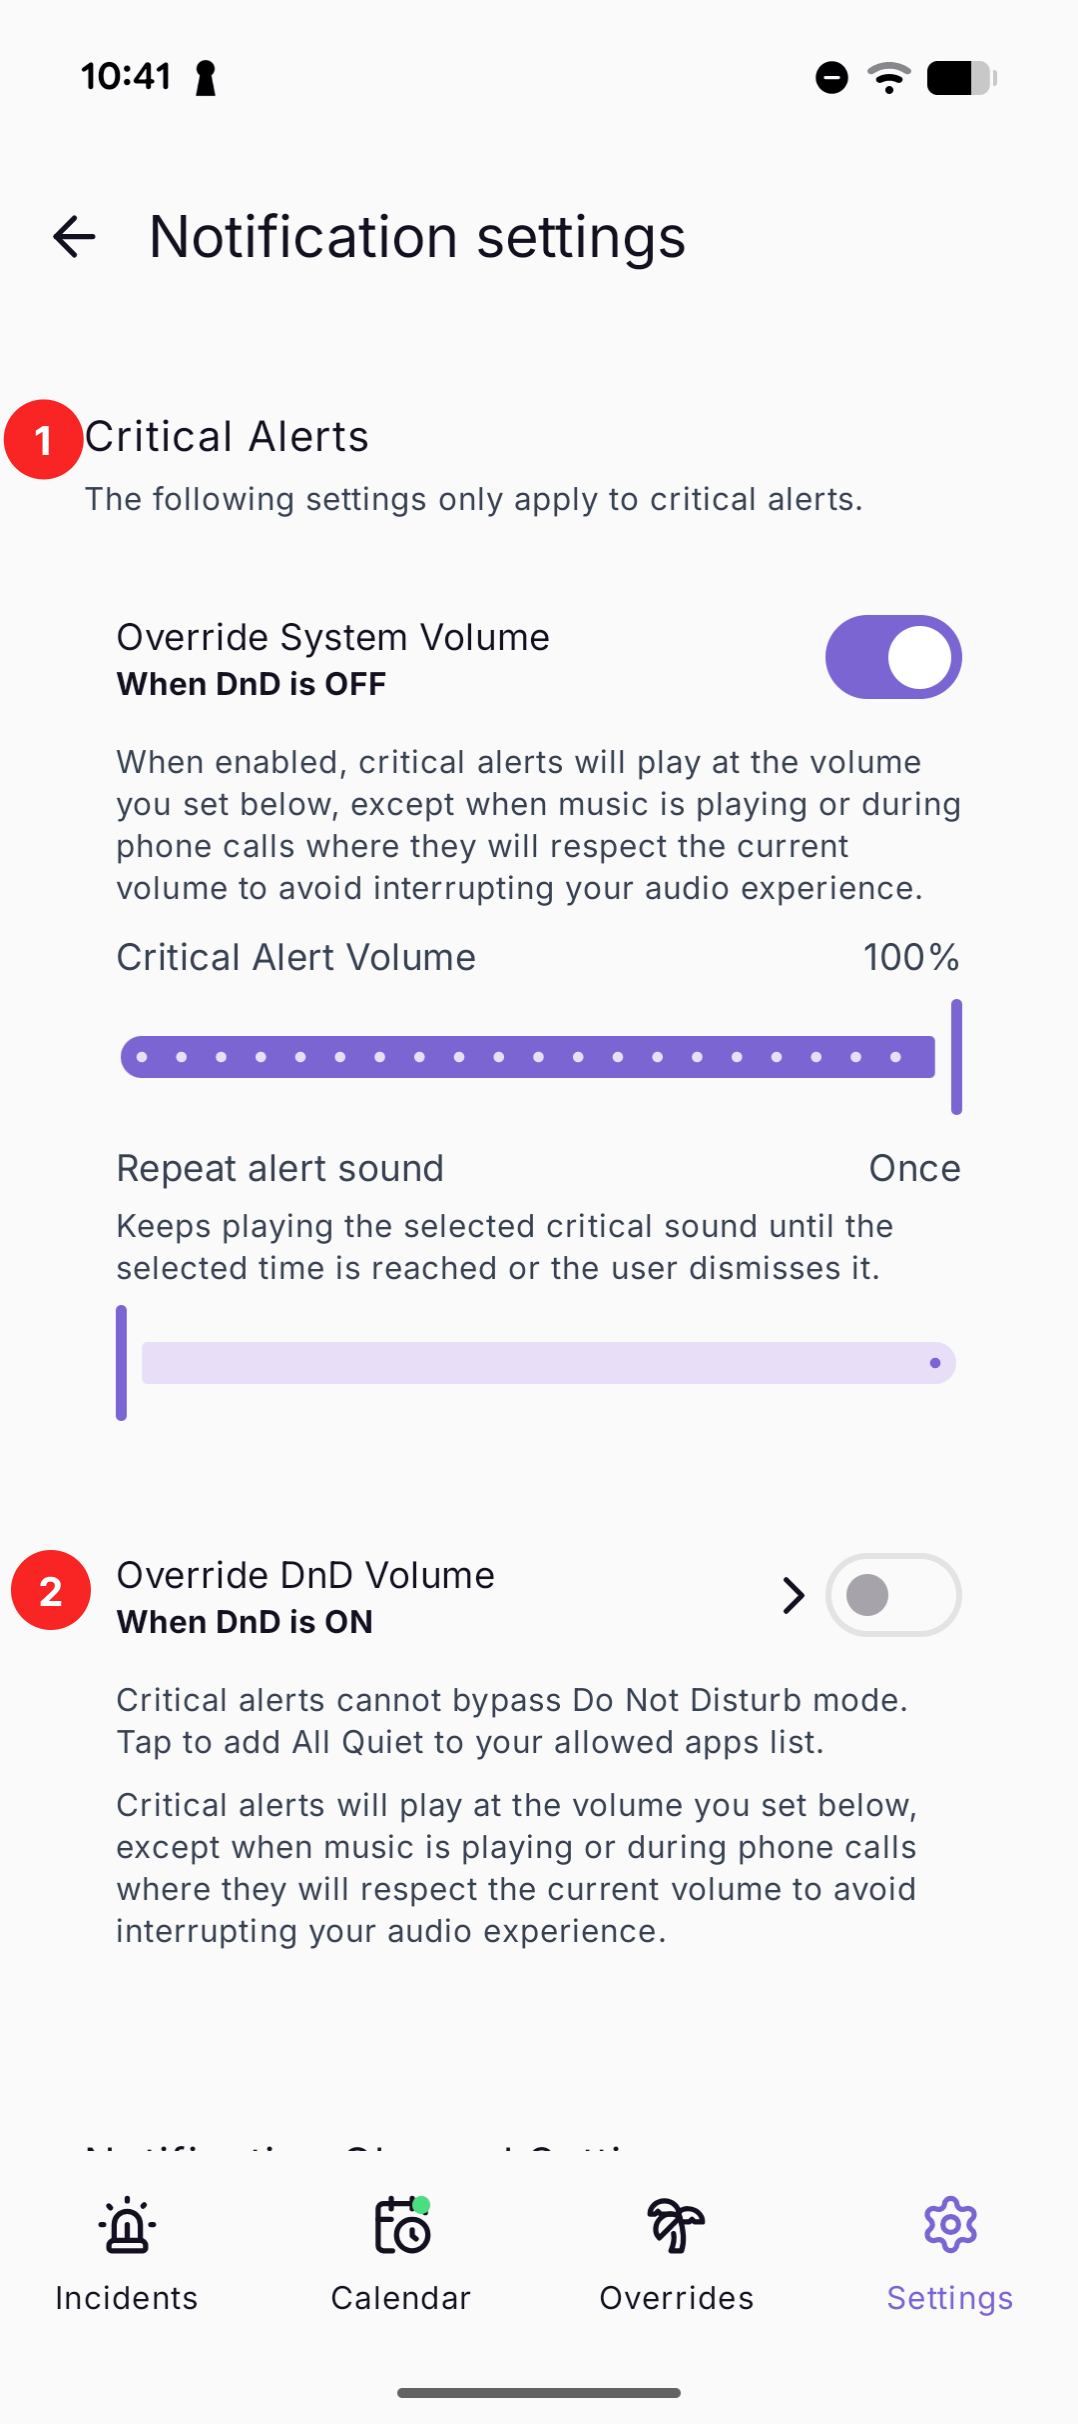
- Both toggles allow you to set the alert volume independently from your device’s system volume.
- Each toggle has its own Repeat alert sound control. See Repeat alert sound below.
- You can always adjust these settings in the All Quiet app under notification preferences.
Critical alerts will only break through silent or DnD modes if the corresponding toggle is enabled. The sound volume for each scenario is determined by the app’s settings, not your device’s system volume.
Repeat alert sound
By default, the sound you set for critical alerts plays once. You can change that separately for both cases:- Override System Volume (When DnD is off)
- Override DnD Volume (When DnD is on)
A longer repeat helps when you need a critical incident to wake you at night. The phone keeps sounding until the time runs out or you dismiss the alert, similar to receiving a call in the All Quiet app, without placing a voice call.
Do Not Disturb (DnD)
Normal notifications will be silenced by DND, but critical notifications (if DND override is enabled) will break through and alert you with sound and vibration.When DND is enabled, only critical alerts (if allowed) will play a sound, using the app’s DnD override alert volume setting. When receiving a notification while playing media or in a call, we adapt the volume to the media / the voice call volume.
1
Do Not Disturb (DnD) Volume Override for Critical Alerts
The first screenshot shows our notification settings after enabling normal notifications. Users are introduced to the option of overriding the “Do not disturb” (DnD) mode. To override the DnD mode, you need to grant the app permission to override system DnD settings. The system settings can be opened by clicking the chevron next to “Override DnD Volume”.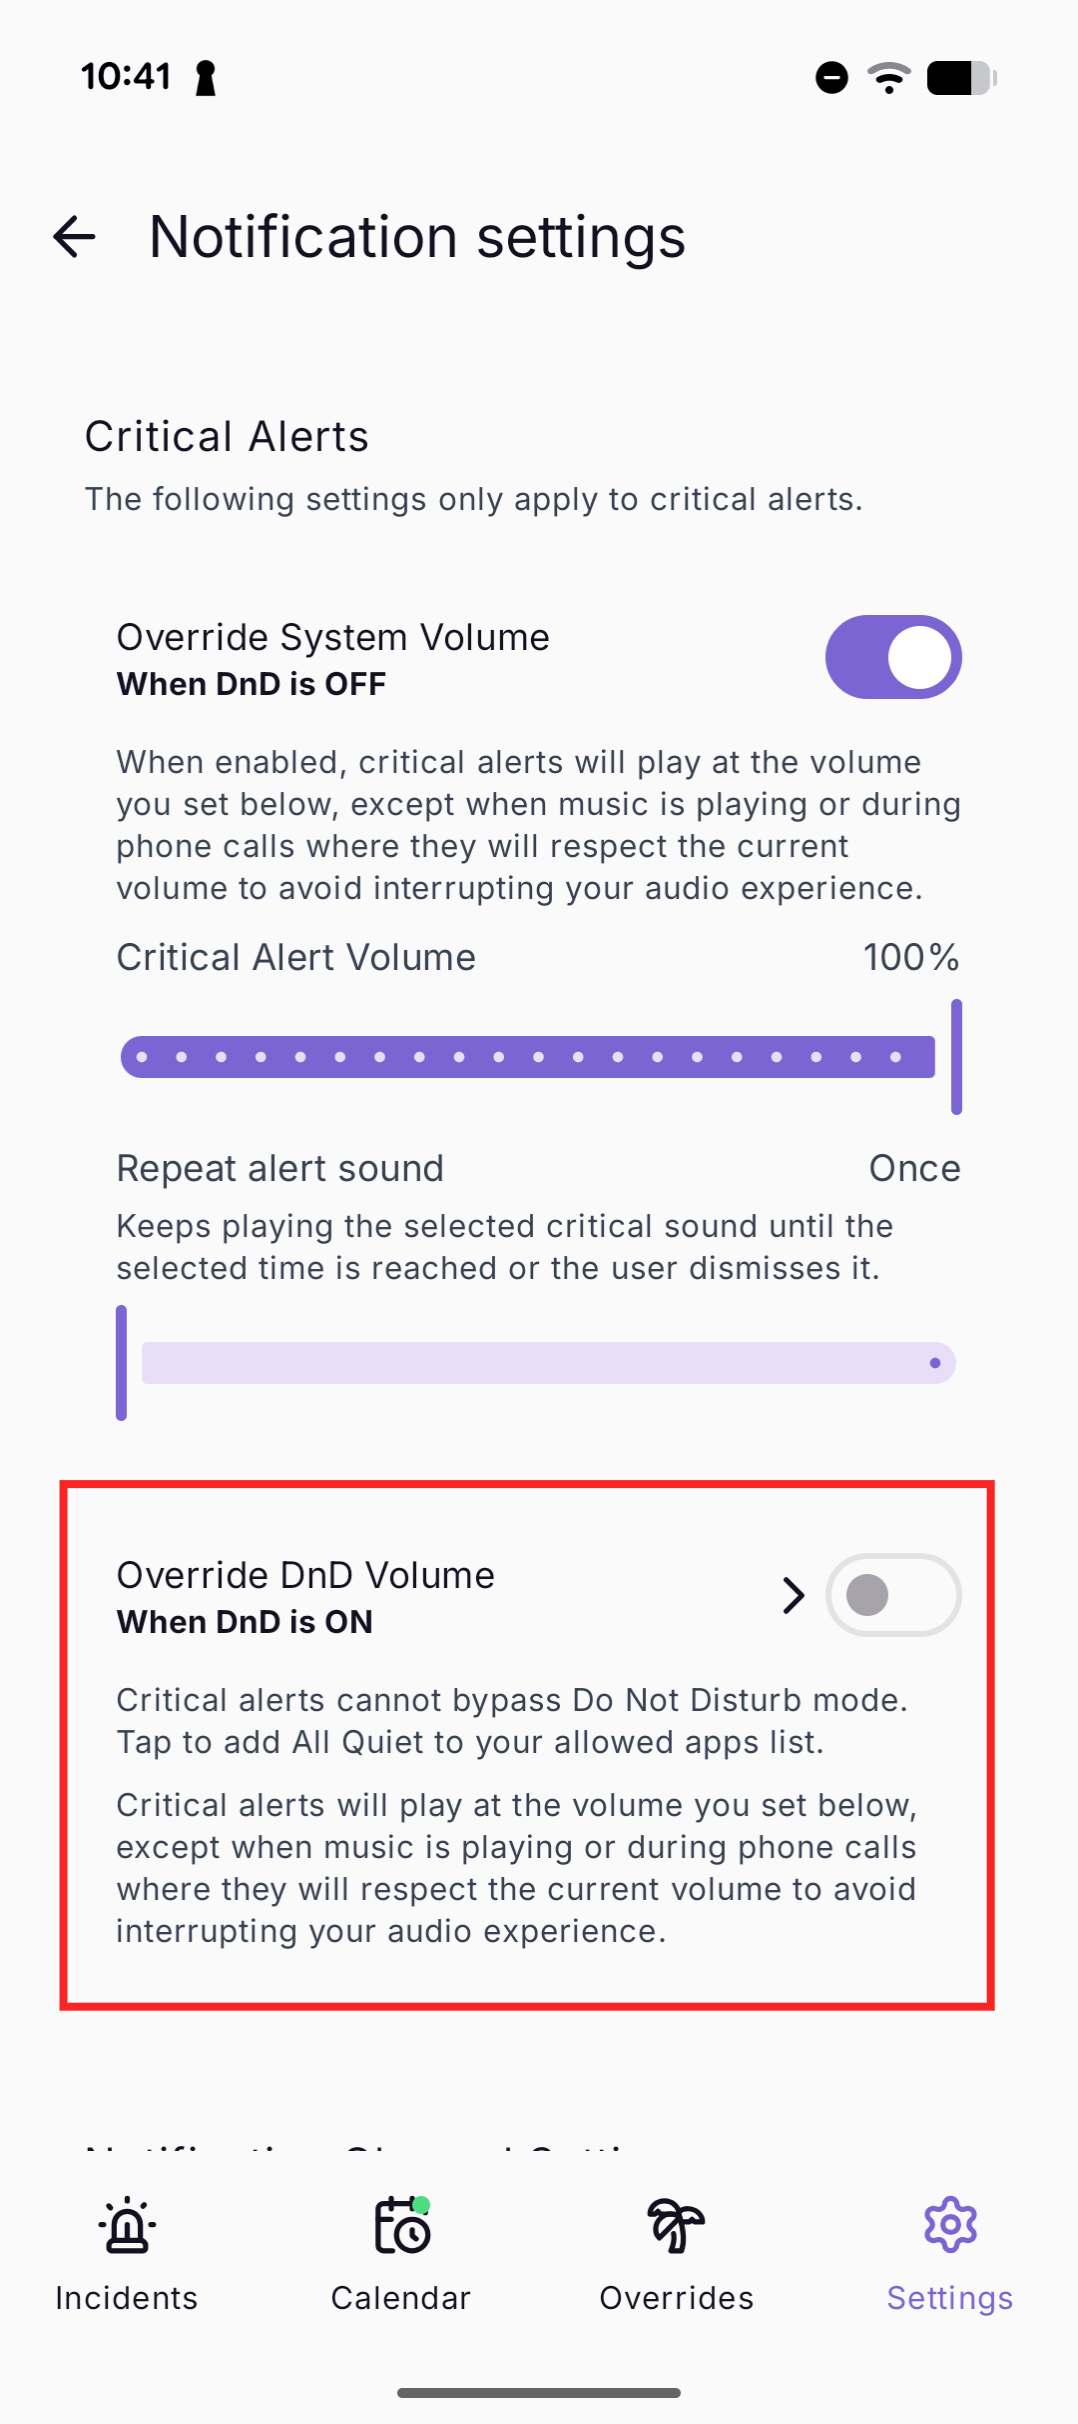
2
Overriding 'Do Not Disturb' Mode in System Settings
You’re forwarded to the Android system settings for Do not Disturb. Make sure to allow “App notifications” for All Quiet.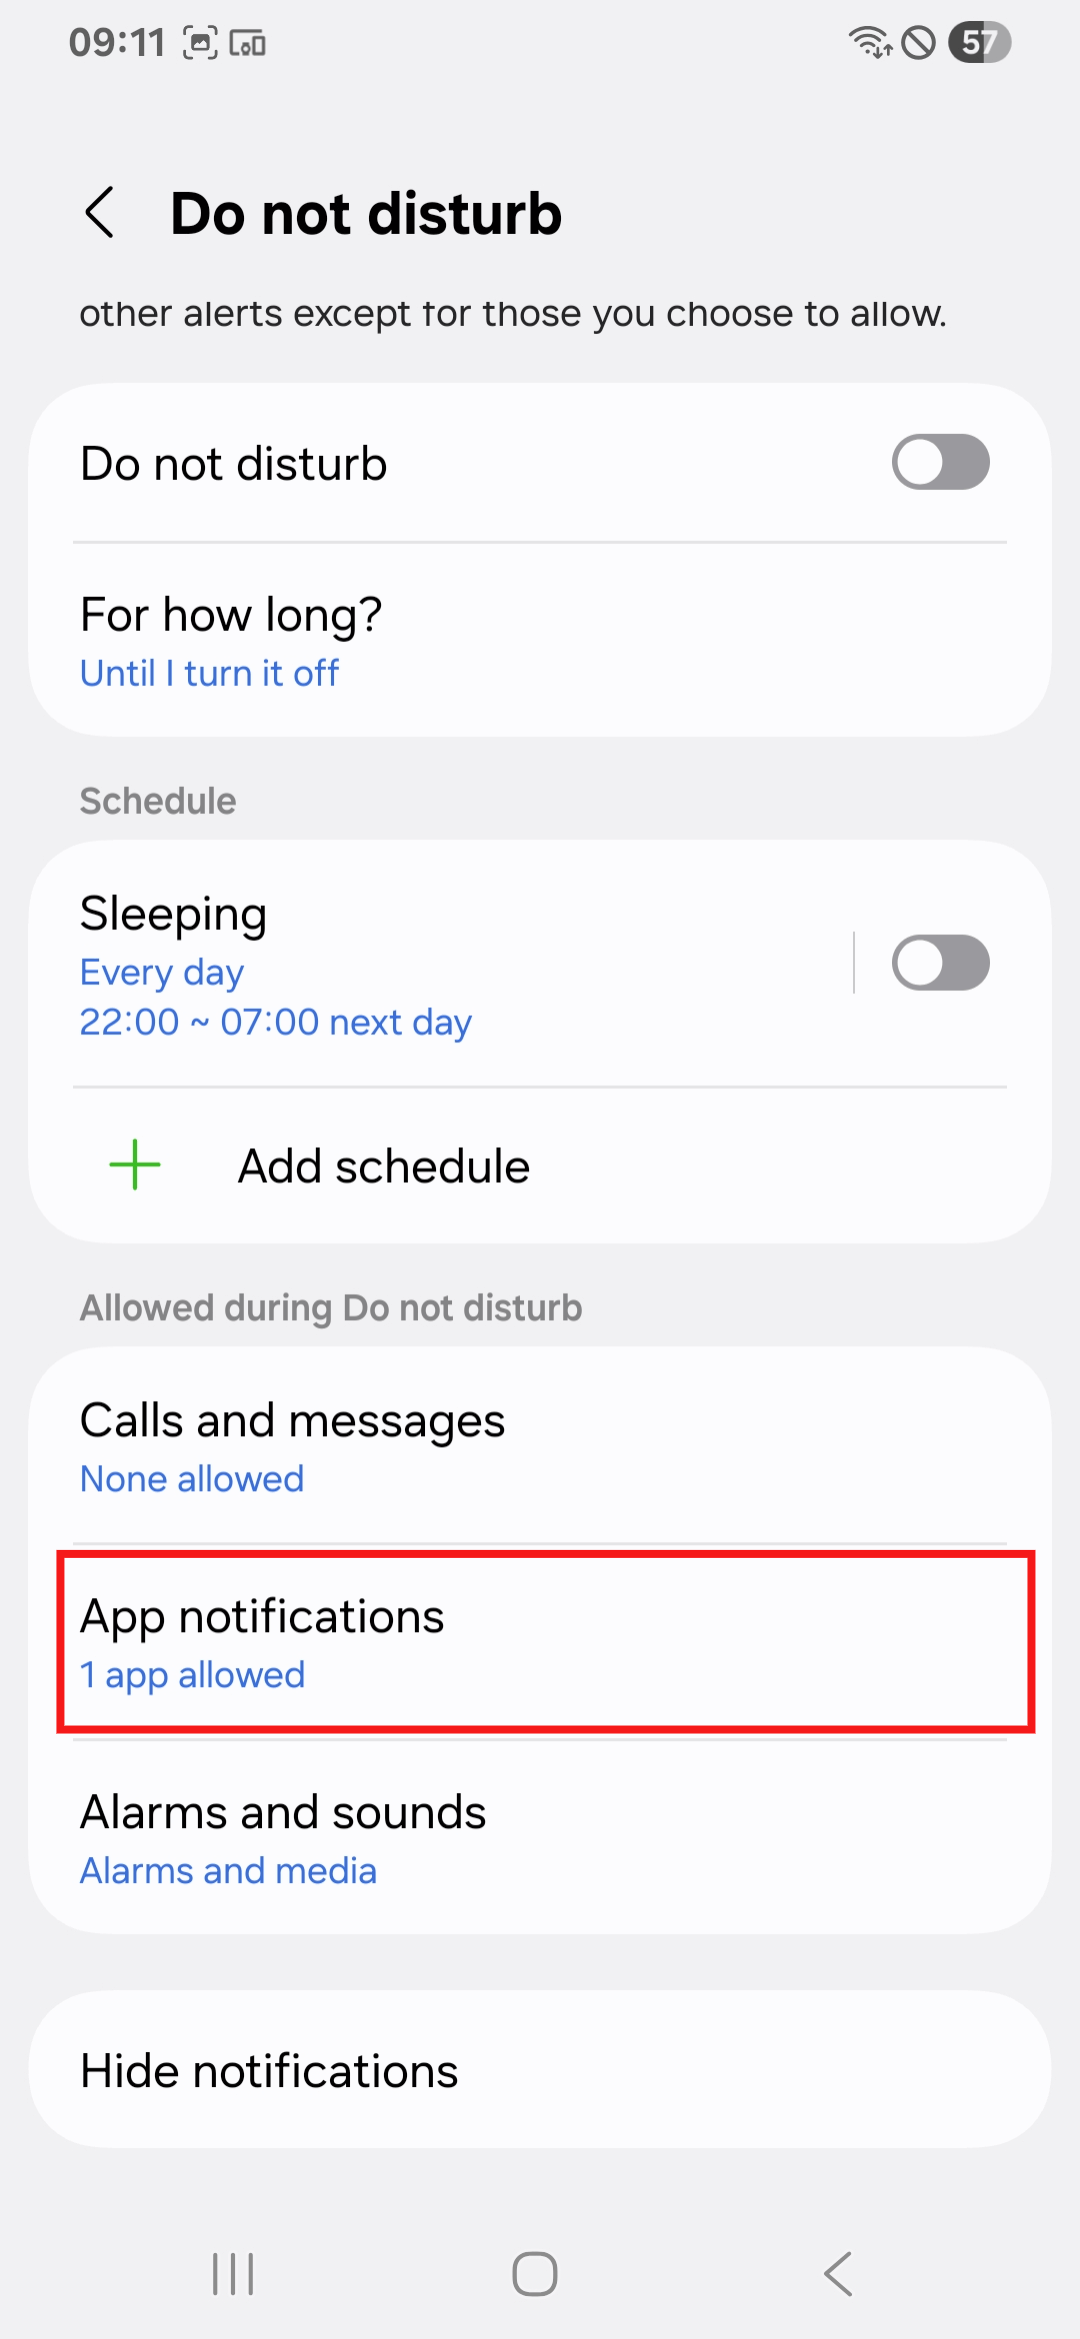
3
DnD Override Successfully Activated
Returning to the Notification settings screen, you can see that the DnD override is now activated. You can adapt the volume to your preference and set Repeat alert sound for when DnD is on. If needed, you can also disable the DnD override from here.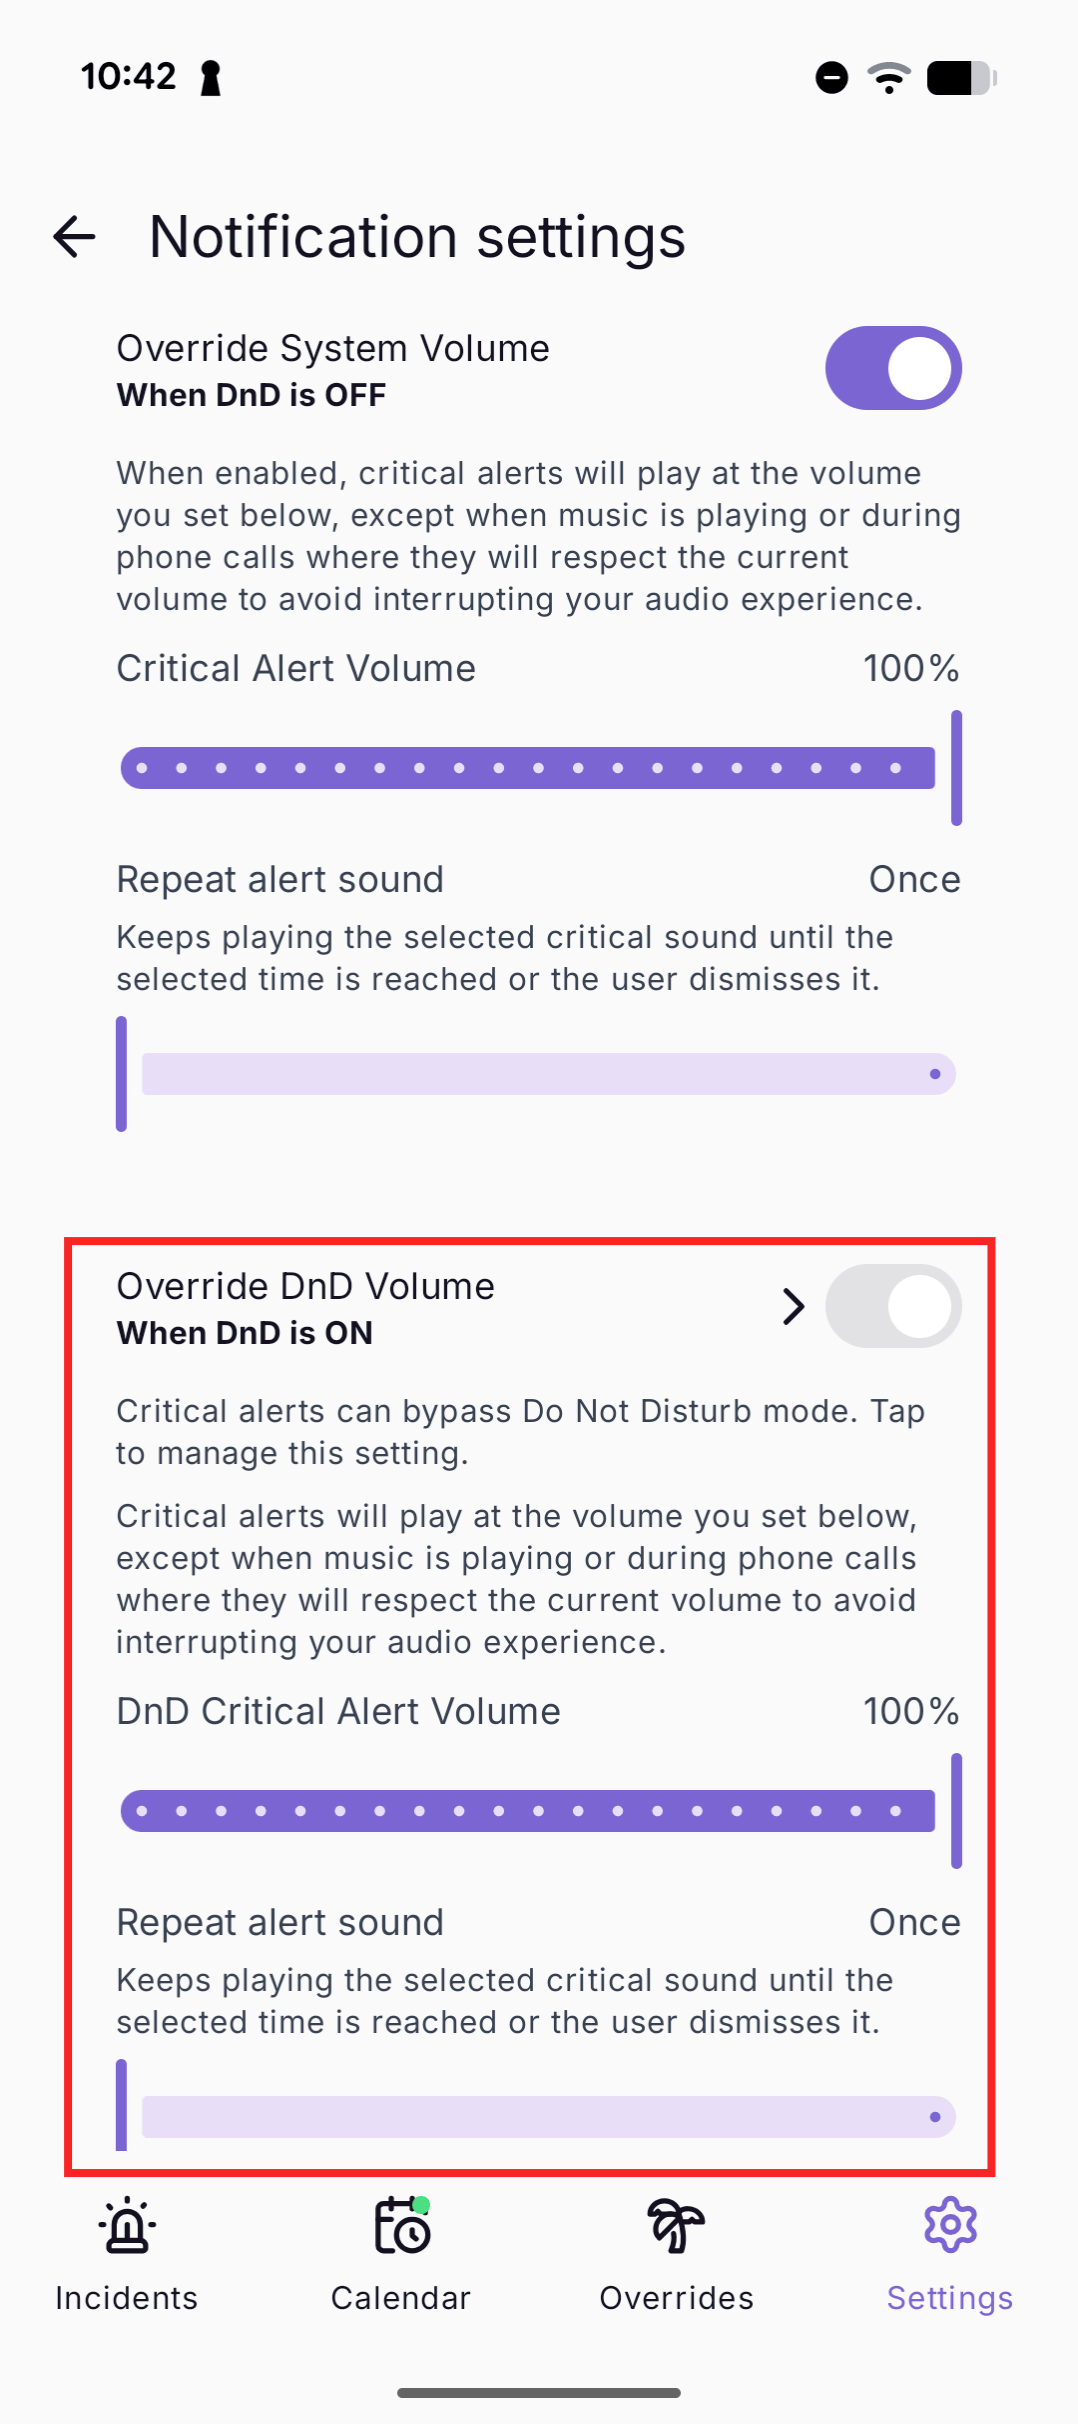
Personal Notification Logs
Personal Notification Logs let each user see a history of notifications sent to them (email, SMS, voice calls, push), including the delivery outcome and relevant context (sender/provider, incident link, and errors when applicable). In the web app, open the Account dropdown.- Open Notifications
- Open Notification Logs tab (
/app/account/notifications/history).

What’s Shown per Log Entry
Each row includes:- Time of the entry (with a tooltip showing when the log entry expires)
- Channel icon (Email / SMS / Voice Call / Push)
- Recipient (e.g. masked email address / masked phone number; or
—if unavailable) - Result (see glossary below; errors are shown inline when present)
- From (our customer-facing sender label, when available)
- Action (the incident action that triggered the notification)
- Action Time (the timestamp of the action that triggered the notification)
- Incident (a link to the incident if the notification was incident-related)
Retention & Availability
- Retention: notification logs are retained for 30 days (as displayed in UI).
On Enterprise plans, retention may differ if your organization agreed on a custom period — contact support@allquiet.app.
Notification Result Glossary
The UI maps internal result codes to user-facing labels. These are the outcomes users will see:- Sent (
Succeeded): Our system successfully sent the notification to the recipient. If the recipient still did not receive the notification, it is likely due to carrier, internet or provider issues. - Delayed (
Delayed): The notification is intentionally postponed. If known, the UI shows the delay (e.g. “Delayed (5 min)”). - Discarded (
Discarded): A previously scheduled notification was not sent because it no longer applied. This happens if there’s a newer action on the incident that no longer requires a notification for the action that initially triggered the notification. - Rate limited (
RateLimited): Sending was throttled by a provider or system rate limit. - Invalid recipient (
RecipientInvalid): Recipient address/number is invalid. - Blocked recipient (
RecipientBlocked): Recipient is blocked (policy/provider/user-level). - Recipient not supported (
RecipientNotSupported): The recipient can’t be used with that channel/provider. - Failed (
Failed): A send attempt failed (details may be shown as error text).
Troubleshooting: no personal channel alerts (email, SMS, push, voice)
If an incident exists but you get no email, push, SMS, or voice on your personal channels, start by checking whether All Quiet attempted to notify you.1) Check your Personal Notification Logs
Open Account → Notifications → Notification Logs (/app/account/notifications/history) and look for an entry around the incident action time.
- If there is a log entry: use the Result to understand what happened (for example Delayed, Discarded, Rate limited, Invalid recipient, Failed). Errors (when available) are shown inline in the log entry. See the result glossary.
- If there is no log entry: the system likely never attempted to notify you for that action (for example because routing muted the channel, you are not part of the notified audience for that incident/team, or your personal notification preferences disabled that channel/action).
2) Check routing & personal preferences
If the logs show no attempt, or the attempt was discarded/muted, advanced routing may be muting those paths for incidents that match the rule:- Find rules whose conditions match the incident, then open Choose Channels and look for Mute all Channels or a subset of channels only (for example SMS or voice excluded).
- Open Configure Actions and check
Discard, snooze, and other actions that affect alerting.