In All Quiet, Live Call Routing is only available for the Pro and Enterprise plan. Organization Administrators and Organization Owners can create Call Routing Numbers. Team Administrators can edit existing numbers whose Root Team is a team they administer — but cannot create new ones.
Live Call Routing in All Quiet is Bring Your Own Number (BYON): you keep (or provision) your phone number with Twilio, and All Quiet routes incoming calls to the right responders.
To set up Live Call Routing, start with ordering a phone number from Twilio and connecting it with your All Quiet account. You can find the instructions in our step-by-step guide for Twilio.
After that, you can set up Live Call Routing in All Quiet by following the steps in this documentation page.
To set up Live Call Routing, start with ordering a phone number from Twilio and connecting it with your All Quiet account. You can find the instructions in our step-by-step guide for Twilio.
After that, you can set up Live Call Routing in All Quiet by following the steps in this documentation page.
Overview
This guide picks up where the Twilio integration setup leaves off. That guide walks you through buying a number, creating a Call Routing Number in All Quiet, and connecting your Twilio credentials. Once the connection shows a green checkmark, you are ready to configure how incoming calls are handled — caller allow & block lists, welcome messages, routing modes, dial chains, voicemail, and fallbacks. Here you will learn:- How a call flows from the welcome message through the on-call chain to a connected responder or voicemail. It also explains when and how incidents are created for incoming calls.
- What each setting on the Call Routing tab does, and how to tune them for your team.
- What snoozing, maintenance, and mute do — and what they don’t affect for live calls.
- How to block or allow callers in the Call Routing tab — and what to watch for if you also filter at your provider (Twilio).
Open your Call Routing Number in All Quiet and switch to the Call Routing tab when you configure settings. All options described under Call routing tab live there.
Prerequisites
Before configuring Live Call Routing, make sure:- Twilio is connected — you completed the steps in the Twilio integration guide and the integration shows a valid connection.
- Your team has on-call schedules and escalation tiers — call routing uses the same on-call chain as incident escalations, not a separate call-specific policy.
- On-call members have confirmed phone numbers on their All Quiet profiles — only members who are online and have a phone number configured can be dialed.
- You have permission to configure the number — creating a Call Routing Number requires Organization Administrator or Organization Owner rights. Team Administrators can edit call routing, Twilio settings, and operational tabs for numbers whose Root Team they administer.
Quick mental model
Call routing is always live. When someone dials your number, All Quiet routes the call according to your Call Routing settings. Integration snooze, maintenance windows, and mute mostly affect incidents and alert notifications — they do not stop the phone from ringing. See What snoozing, maintenance, and mute do for details.How a call flows
Before you tune individual settings, it helps to understand the end-to-end path of an inbound call. The diagram below shows every step; the numbered list underneath explains how All Quiet builds the on-call dial chain and how incidents are created.- Caller allow & block lists — When the call reaches All Quiet, the caller’s number is checked against your allowlist and blocklist. Blocked callers, or callers not on the allowlist when one is set, are rejected before routing begins.
- Welcome message — The caller hears your configured welcome message (text-to-speech or uploaded audio). In keypad menu mode, this message must explain the menu options.
- Route selection — In single-route mode, All Quiet uses the default route. In keypad menu mode, the caller picks a route by pressing 1–9; invalid keys and timeouts follow your menu settings.
- Direct voicemail shortcut — Once a route is selected, All Quiet checks Send caller directly to voicemail. If enabled, the on-call dial chain is skipped: the caller records a voicemail and All Quiet creates a new open incident from that recording.
- On-call chain & dialing — If direct voicemail is off, All Quiet resolves who to call from the route’s Team to route to, using that team’s on-call schedule and escalation tiers — the same chain used for incident escalations, not a separate call policy.
- Differences between Live Call Routing Escalations and Incident Escalations:
- Only online members with a confirmed phone number on their profile are candidates to receive a call.
- First, Tier 2 members are tried. One person is tried at a time, there is no parallel ring group. We randomly shuffle the order of the members in each tier for each call.
- Round Robin is ignored.
- If no one in Tier 1 answers the call, Tier 2 members are tried. We ignore if auto-escalations are enabled and we ignore the timeouts between tiers. We simply try the next person that is online in the team’s on-call schedule.
- If auto-assign is enabled in your team’s escalations, it is ignored.
- Repeat tiers and repeat escalations are ignored.
- Differences between Live Call Routing Escalations and Incident Escalations:
- Accept call — The on-call member hears a prompt and must press 1 before the call is bridged to the caller. This prevents mailboxes and accidental pickups from connecting the caller.
- Escalation between people — If someone doesn’t answer within Dial timeout per user, the next person is tried immediately — there is no wait between tiers. Max users to call caps how many people are tried before fallback.
- Fallback — When the dial chain is exhausted, the caller hears your voicemail or a closing message. What happens next — incident or call log only — depends on your fallback settings. See Incidents vs. call logs below.
Incidents vs. call logs
Every inbound call appears in Call Logs, no matter how it ends. An incident is only created when the caller leaves a voicemail or when an on-call member accepts the call (presses 1 and is bridged to the caller). Other outcomes — such as a Missed call where no one accepts and voicemail is disabled — are logged as calls only.Use Call Logs to review every inbound attempt — who was dialed, menu choices, voicemail vs. missed, and call duration. Use the Incidents tab when you need actionable records that enter your on-call workflow (voicemails and taken calls).
Concurrent inbound calls
When several callers ring at the same time, each call runs through the flow above independently — but they draw from the same on-call members for a team. If an on-call member is already connected to another live call for that team, their phone number is excluded from the dial chain for any other inbound call. All Quiet will not ring the same number twice at once. When every reachable member is already busy, a second caller’s dial chain can be exhausted quickly — the same outcome as when no one answers. If Send to voicemail if no one responds is enabled, that caller is sent to voicemail. This is expected behavior, not a misconfiguration. For high-volume hotlines, keep voicemail fallback enabled so concurrent callers can still leave a message. The sections below walk through each setting on the Call Routing tab and how it maps to this flow.Call routing tab
Now that you know how a call moves through All Quiet, open the Call Routing tab on your Call Routing Number to configure each step. The tab is divided into four sections:- General settings: Configure the general settings for the call routing number.
- Routing modes: Configure the routing modes for the call routing number. Choose between single route and keypad menu mode.
- Per-route settings: Configure the per-route settings for the call routing number. Choose the team to route to, the incident severity, and the caller fallback.
- Caller allow & block lists: Allow or block callers by phone number or country prefix before routing begins.
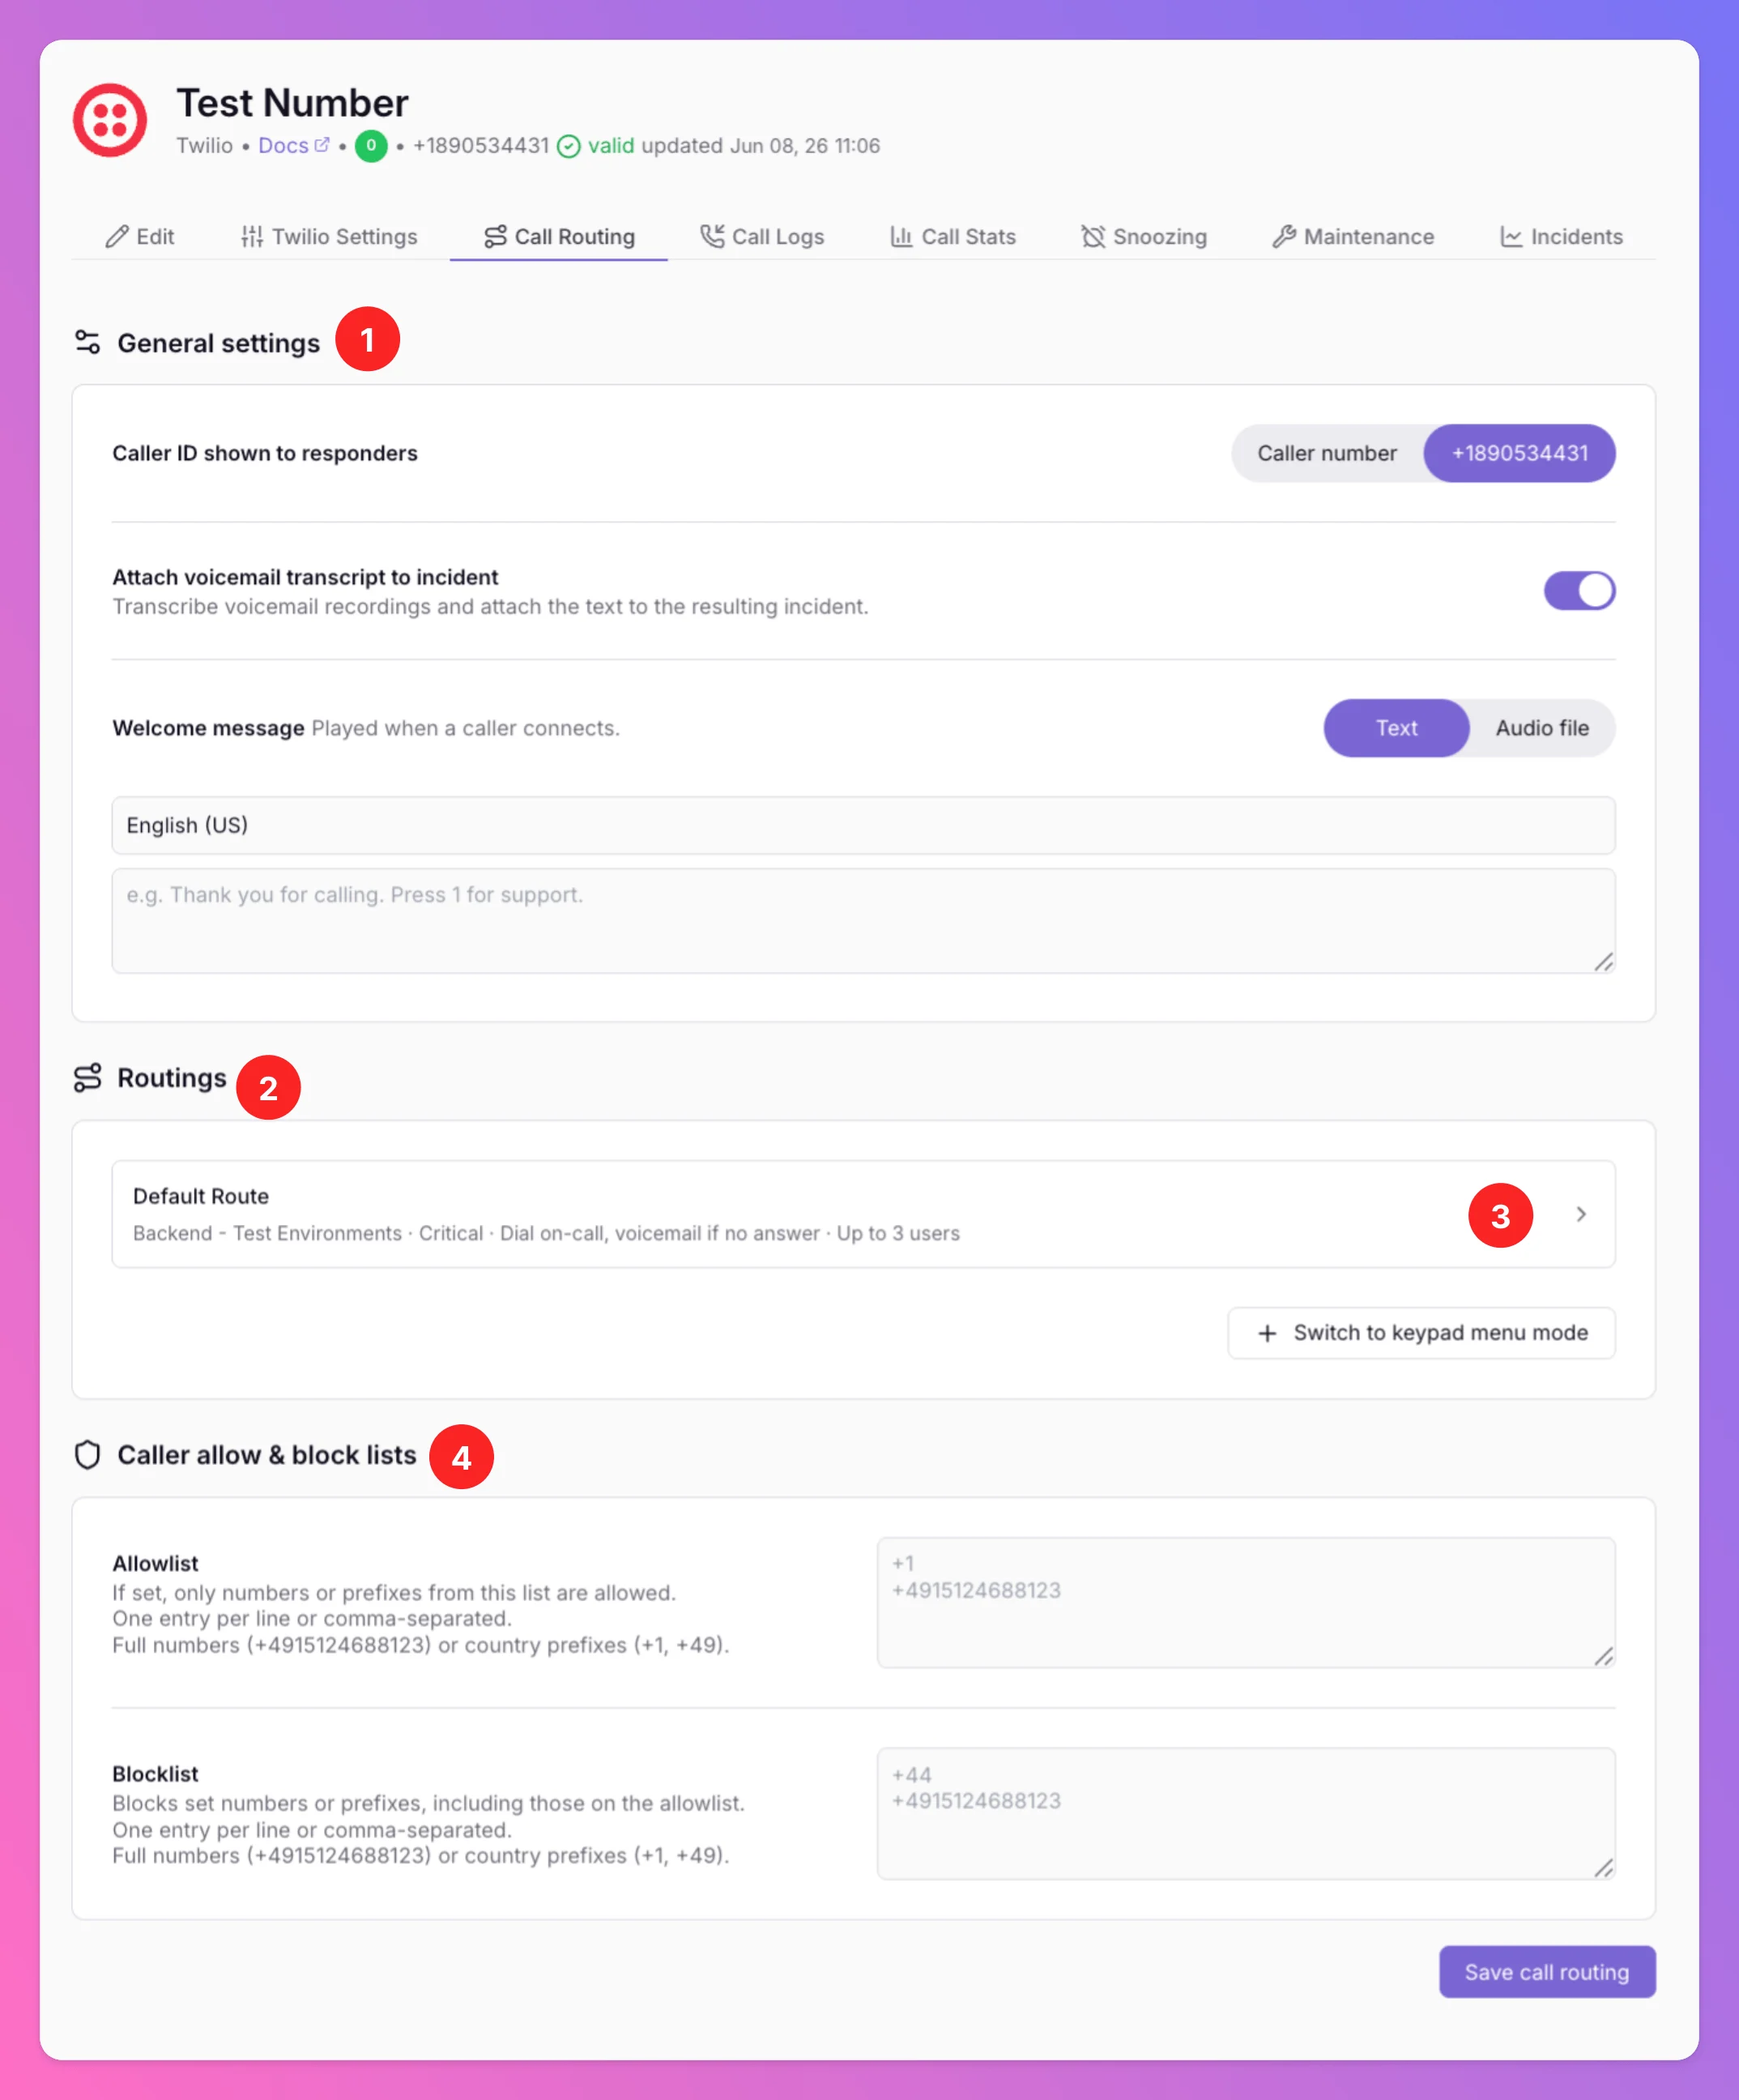
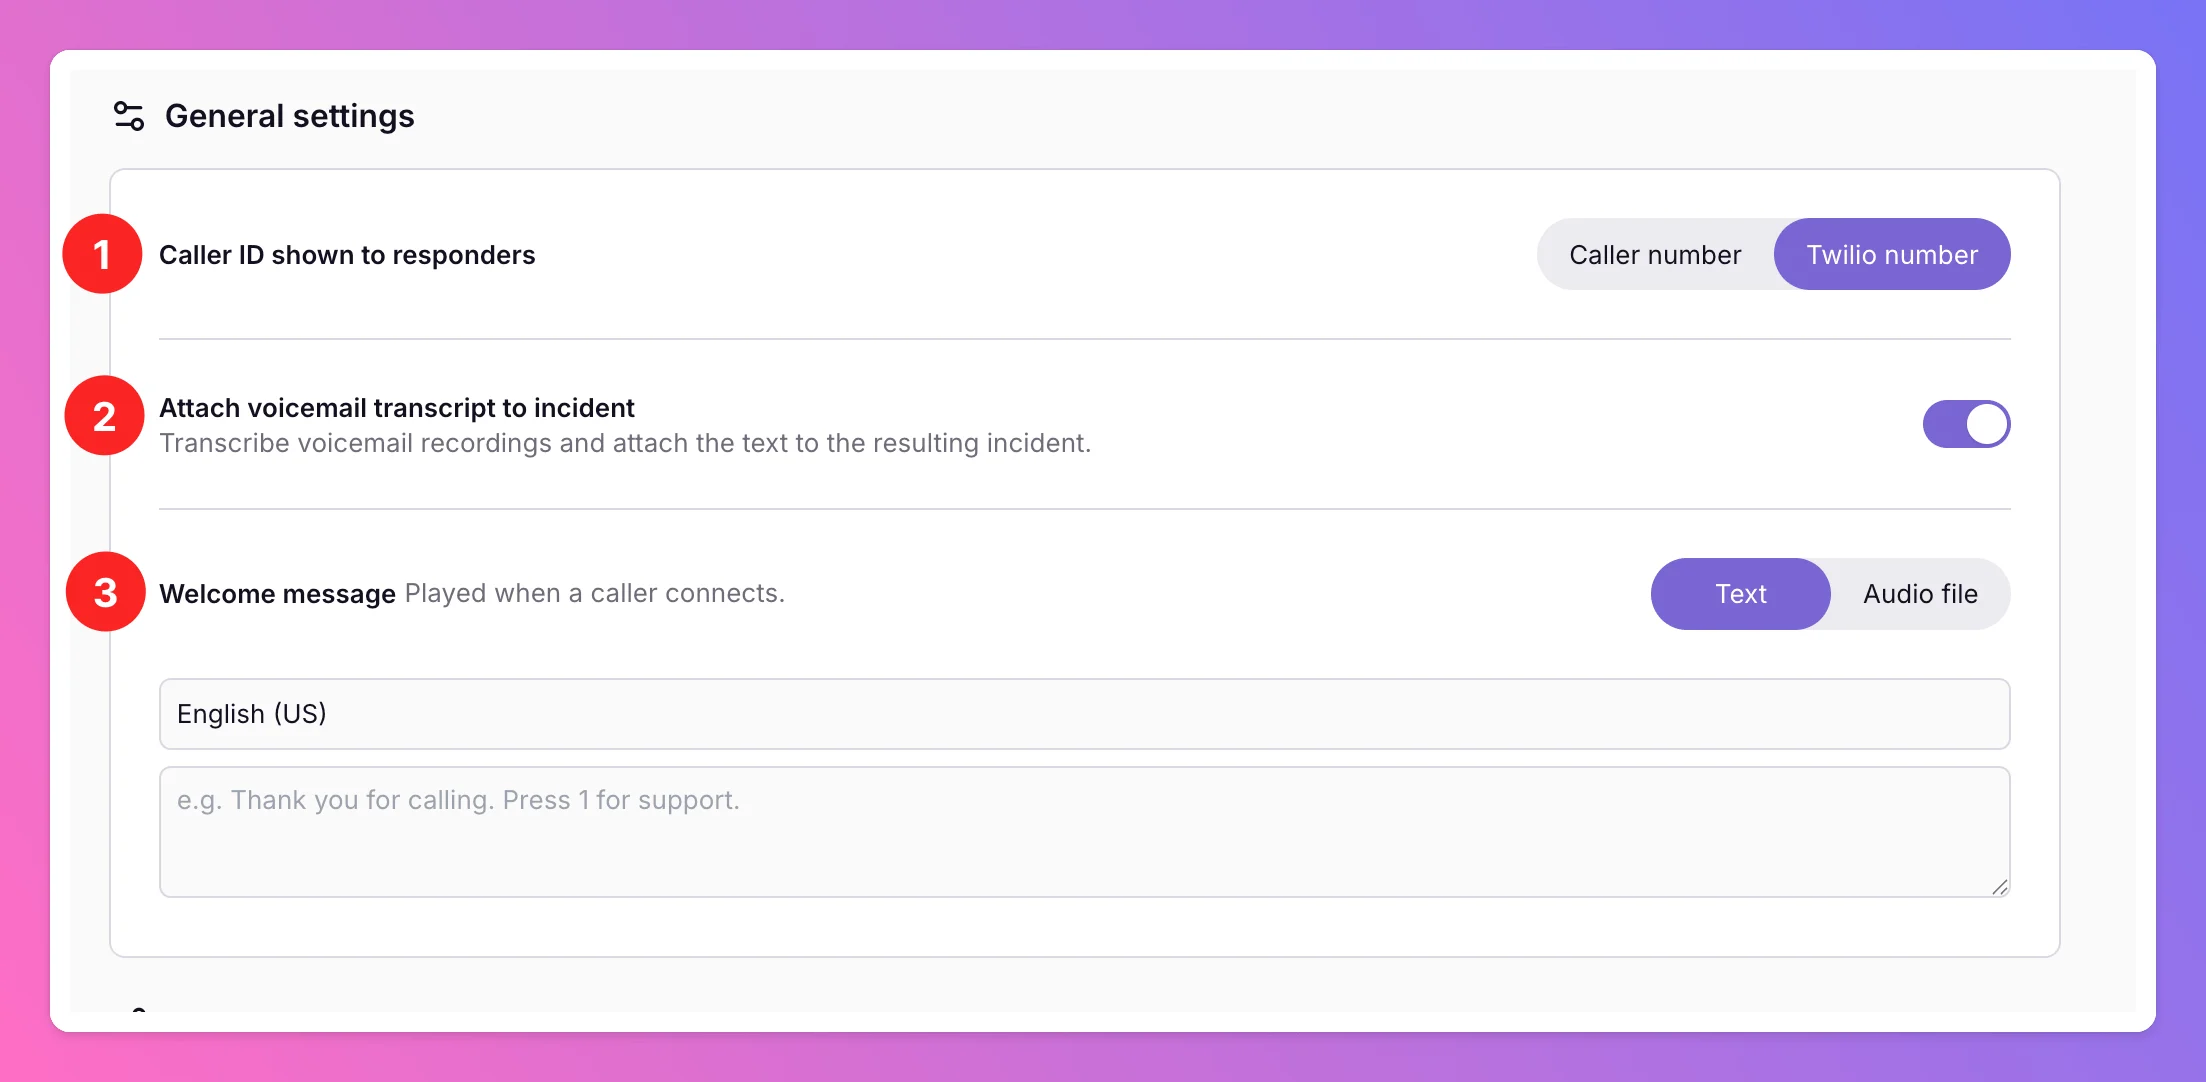
General settings
The general settings for your call routing number are:- Caller ID shown to responders: Show caller number vs. your inbound Twilio number. Helps responders recognize repeat callers vs. hotline number.
- Attach voicemail transcript to incident: When enabled, voicemails are transcribed and attached to the resulting incidents.
Currently, Call transcripts are generated in English only — if callers use another language, consider disabling this option. The incident is created as soon as the voicemail is recorded; the transcript is added afterward and can take a few moments to appear on the incident via an update.
- Welcome message: The message that is played to the caller before they are routed to the on-call chain. This can be a text-to-speech in your preferred language or uploaded audio file.
Routing modes
Per default, incoming calls are sent to a single route in you integration’s root team. You can configure this in the Routing modes section.Single route (default)
One team, one route. Good for a single hotline. Click on the route to edit it. The route editor modal will open.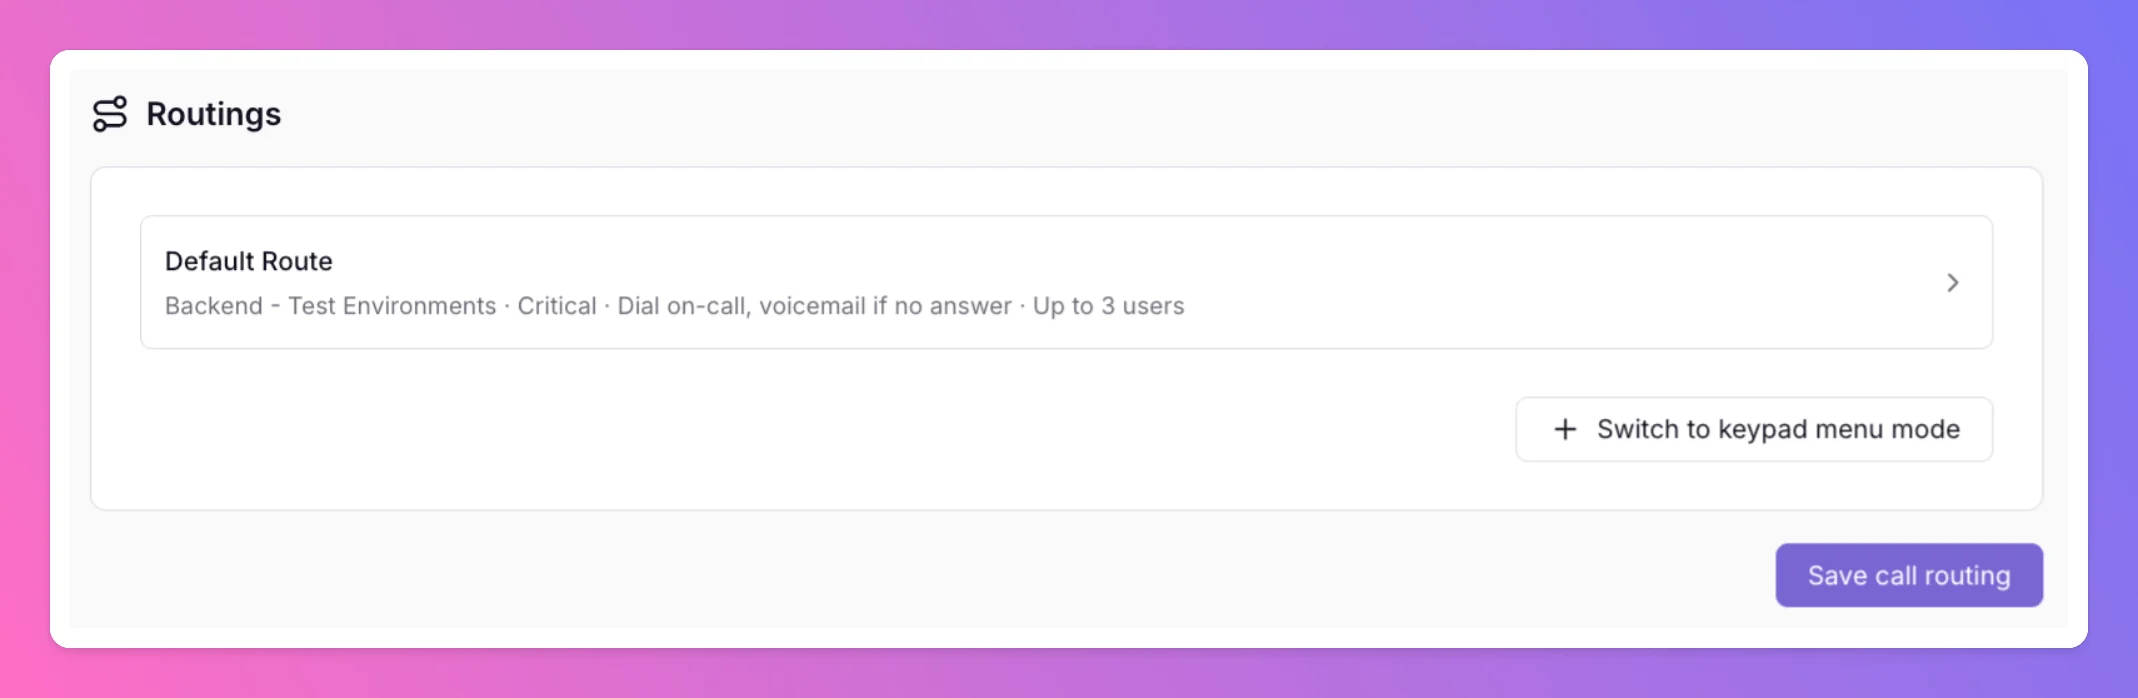
Keypad menu mode
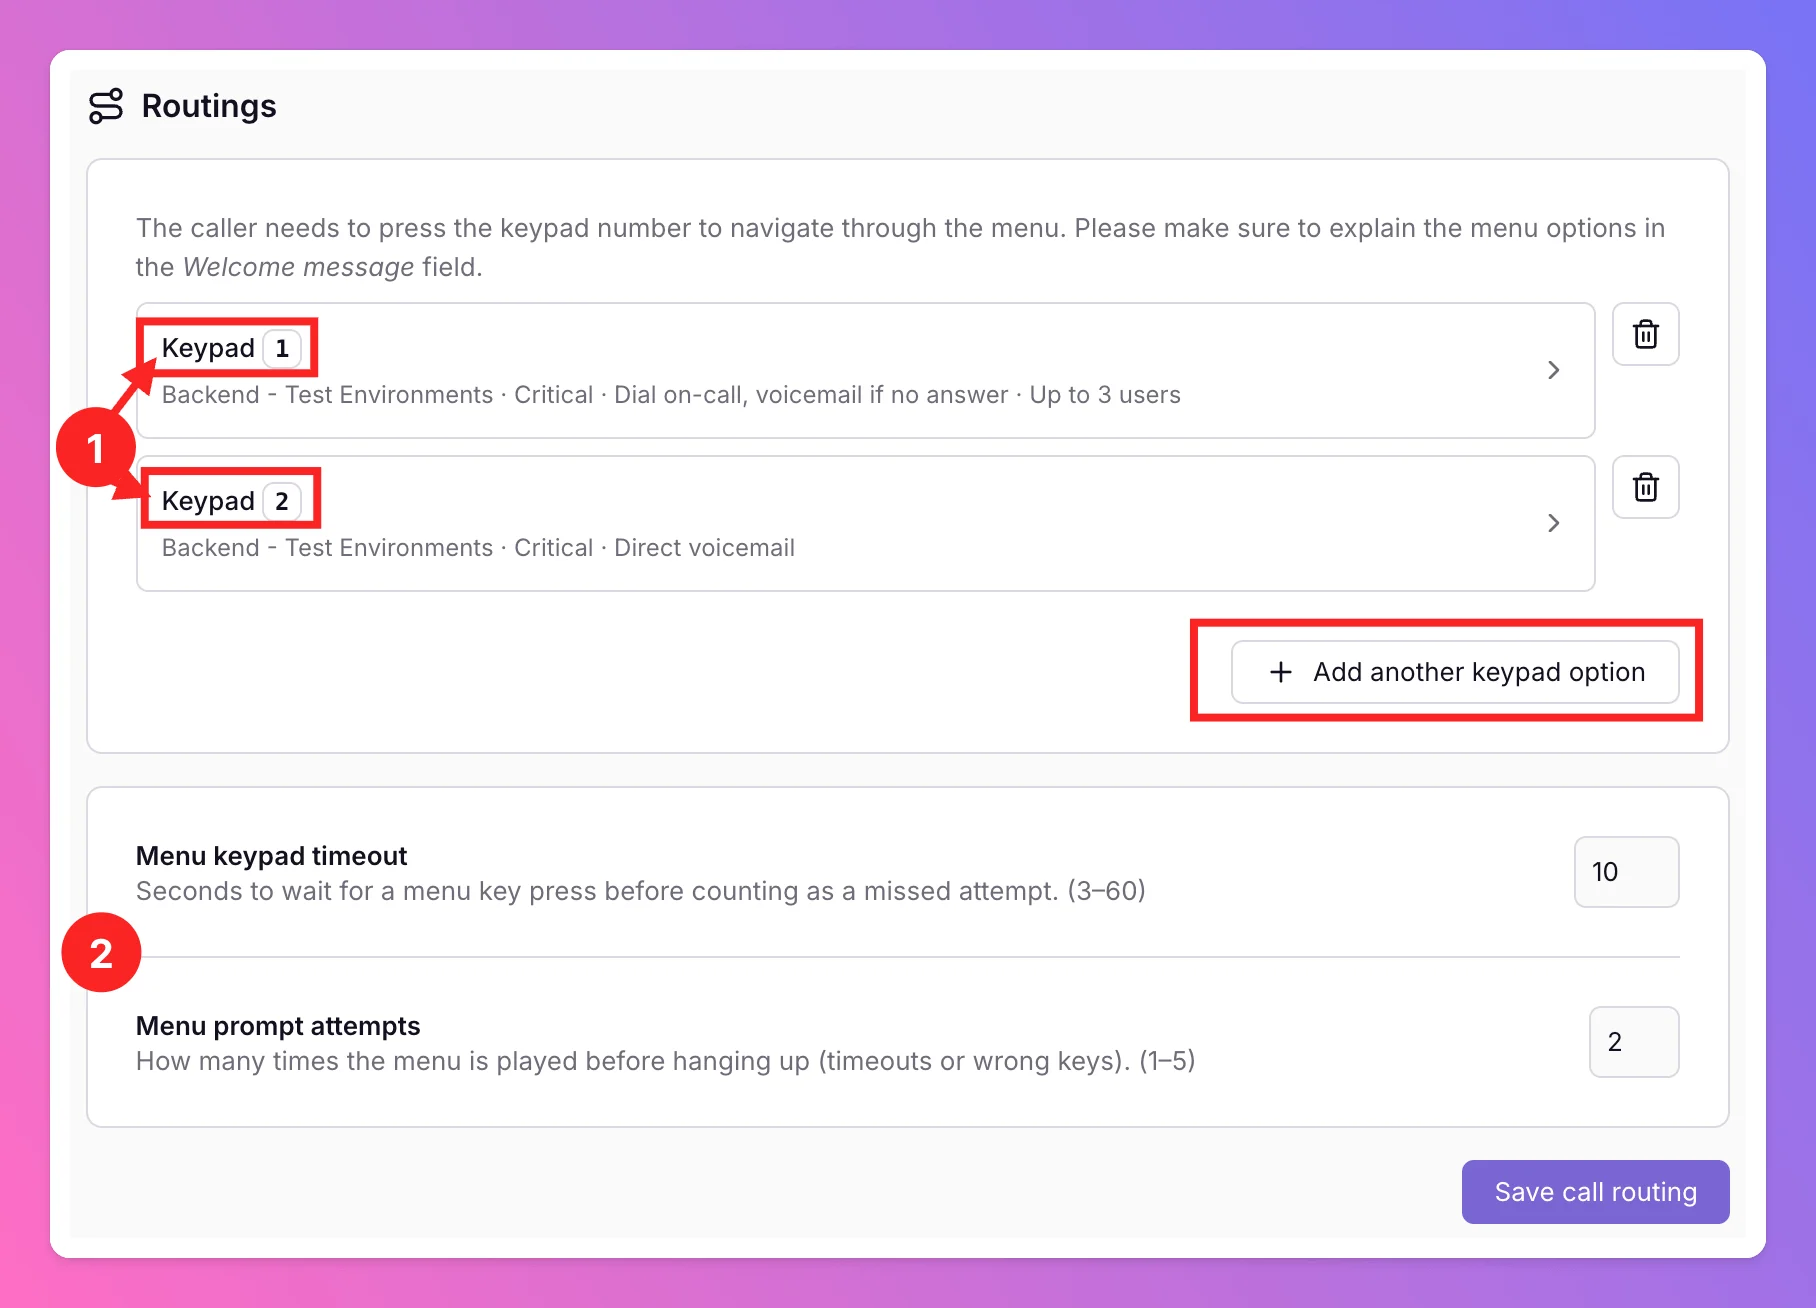
The keypad menu mode allows the caller to pick a route by pressing a number between 1 and 9. it is activated by clicking on+ Add another keypad option while in single route mode.
- You can see your routes and there current settings. Caller presses 1–9 to pick a route (e.g. “Press 1 for production, 2 for billing”).
- Define timeouts and tries for the caller in the keypad menu
- Menu keypad timeout: Seconds to wait for input before re-prompting.
- Menu prompt attempts: How many times the menu is played before hanging up (including timeouts or wrong keys).
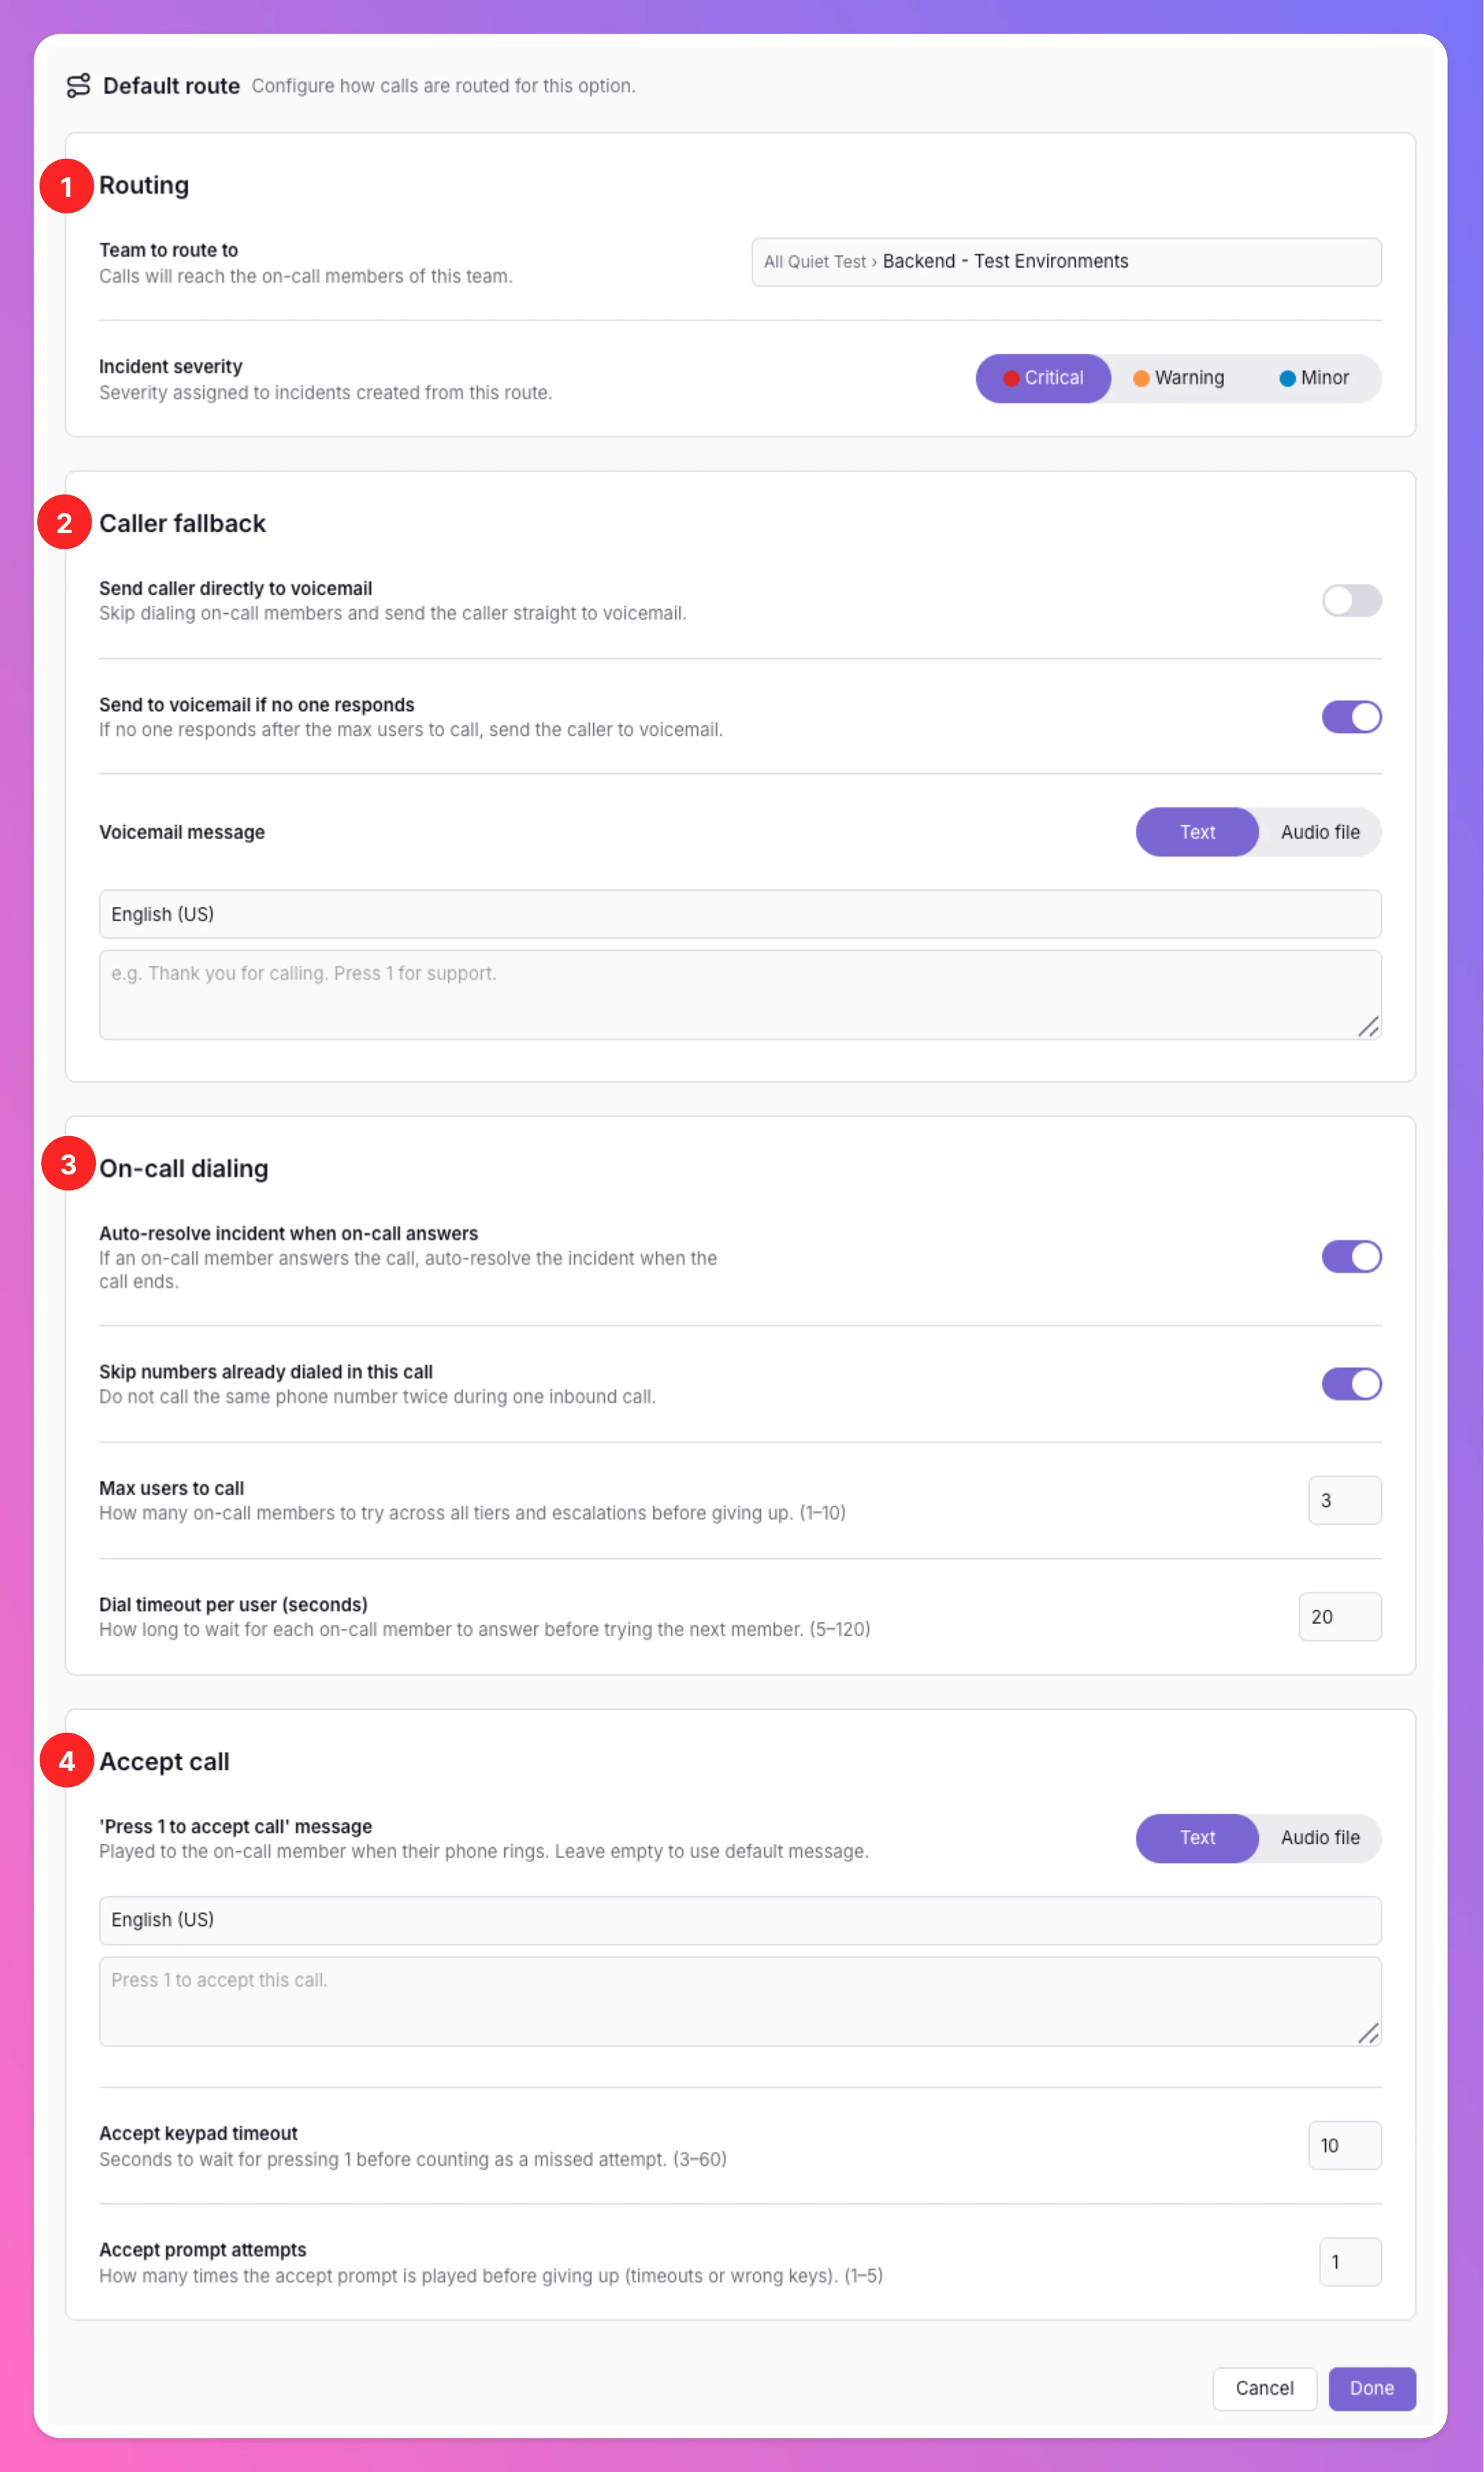
Per-route settings (route editor modal)
When clicking on a route, the route editor modal will open. It is divided into four sections:- Routing: Configure the team and severity for the route.
- Caller fallback: Configure what should happen if no one answers the call for the route. Or, send the caller directly to voicemail.
- On-call dialing: Configure the on-call dialing for the route. How many users are tried, how long to wait for each user to answer, and what happens if someone answers the call.
- Accept call: Configure how on-call members are required to accept the call for the route. To prevent mailboxes from answering calls, on-call members are always required to press 1 before the call is bridged to the caller.
Routing
These settings define which team handles the call and how the resulting incident is classified.- Team to route to — Select the team whose on-call members should be dialed when this route is used. You can choose between your integration’s root team and other teams within the root team’s organization — which teams appear in the list depends on your role. Team Administrators can select teams they administer; Organization Administrators and Organization Owners can select from all teams in the organization. All Quiet builds the dial chain from that team’s on-call schedule and escalation tiers — the same chain used for incident escalations. In keypad menu mode, each menu option can route to a different team.
- Incident severity — Set the severity for incidents created from this route (answered calls and voicemails). Use this to distinguish a production hotline from a lower-priority line, or to align call-based incidents with your existing severity workflow.
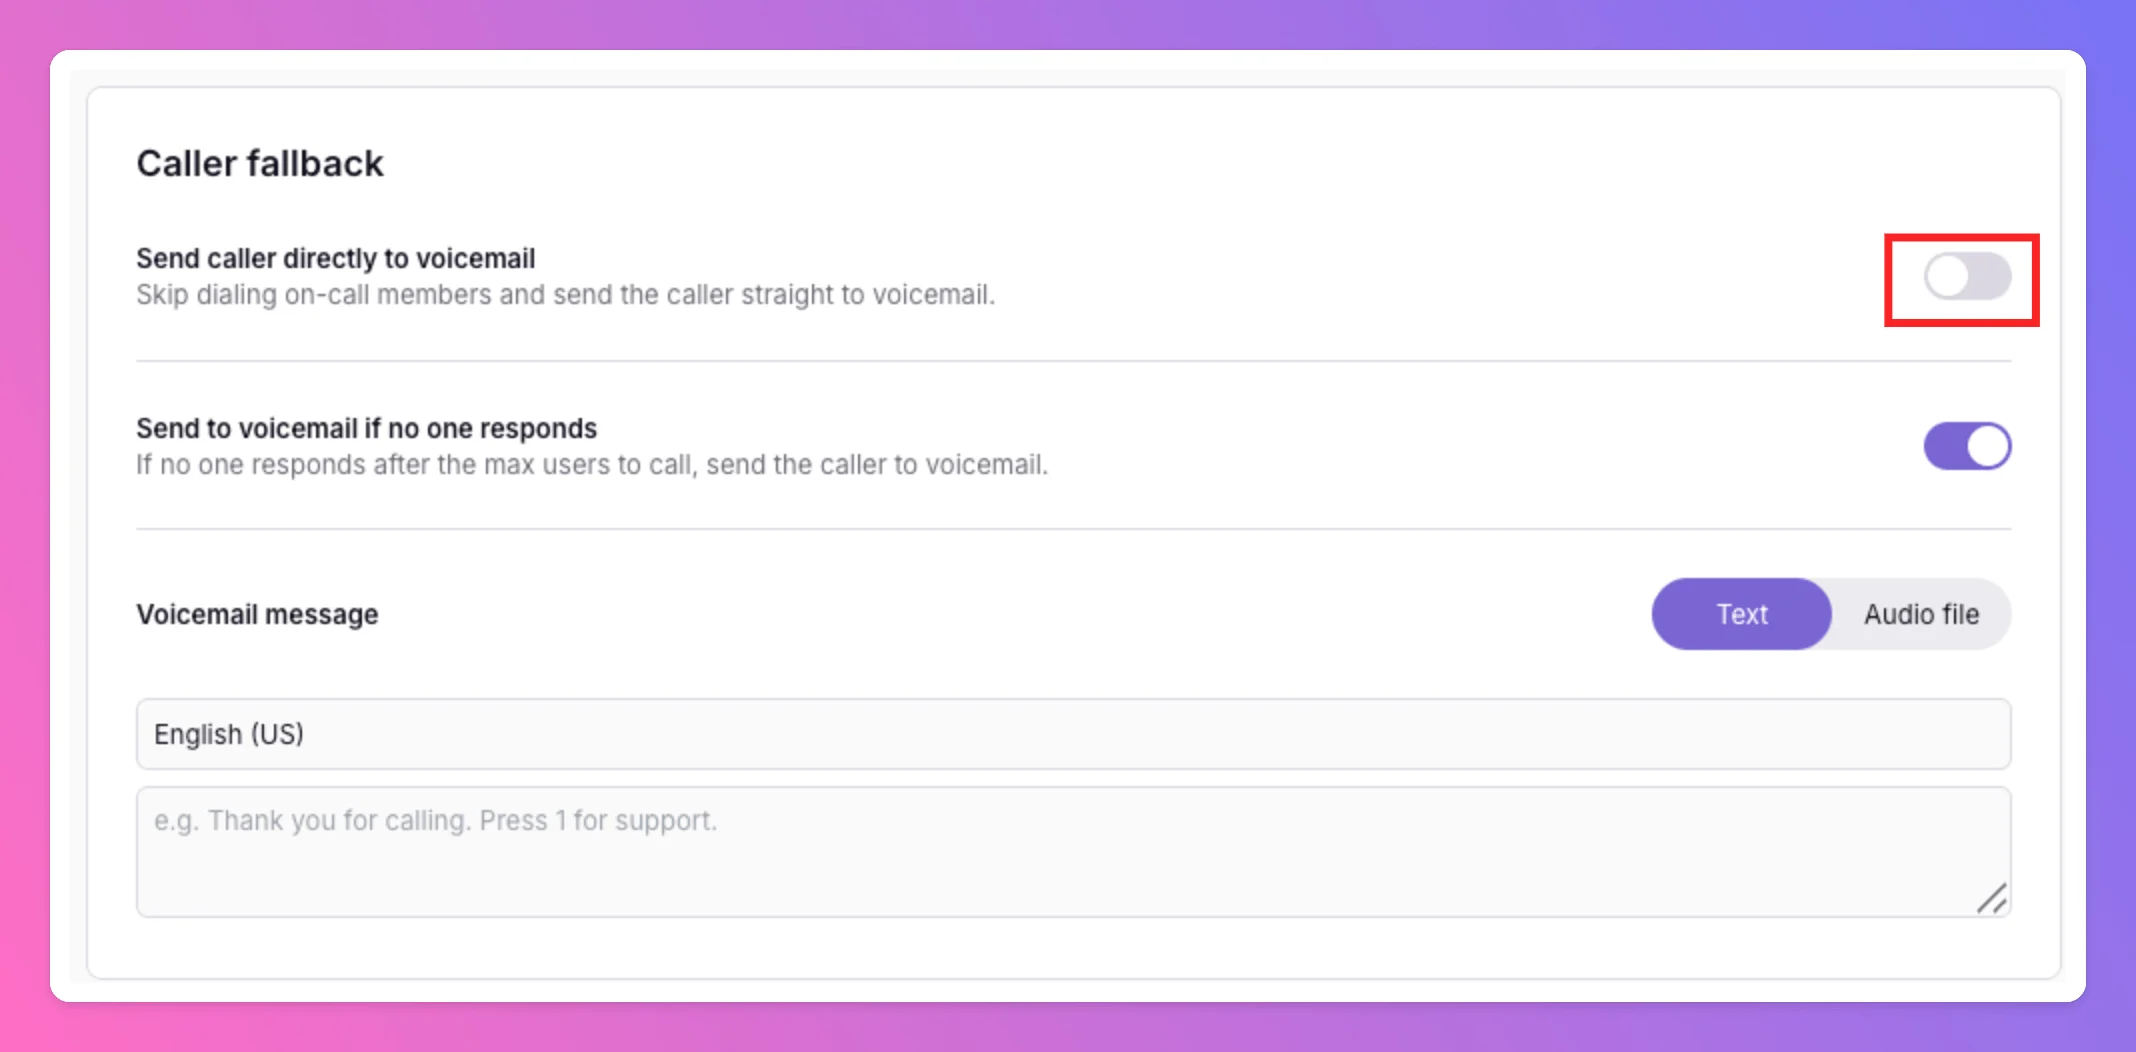
Caller fallback
These settings control what happens when no one answers, or when you want callers to reach voicemail without dialing anyone. Send caller directly to voicemail — When enabled, All Quiet skips the on-call dial chain entirely and sends the caller straight to voicemail. Useful for after-hours lines, overflow numbers, or routes where you only want to collect messages. You can add a custom voicemail message here that is played after the welcome message. Choose between text-to-speech in your preferred language or uploaded audio. Max length for the voicemail message is 2 minutes.
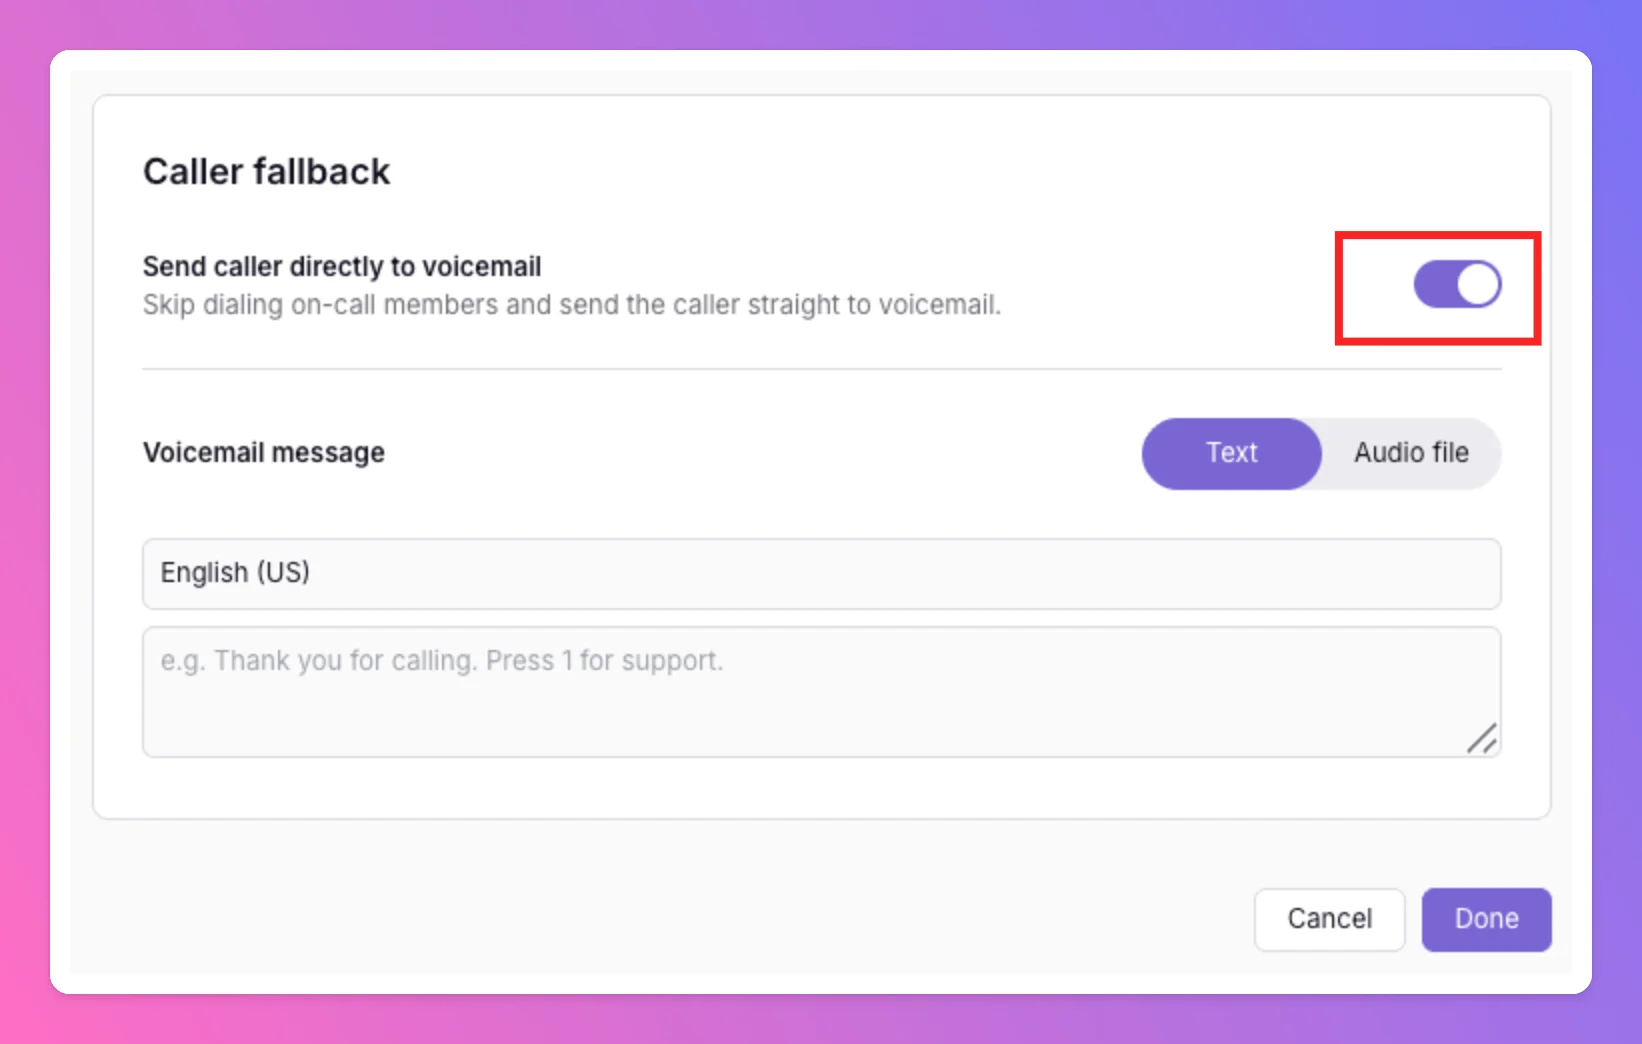
Max length for the voicemail message is 2 minutes.
On-call dialing
These settings fine-tune how All Quiet walks through the on-call chain and what happens when someone picks up. Auto-resolve incident when on-call answers — Enabled by default. When an on-call member accepts and the call is bridged, All Quiet creates an incident that is automatically resolved when the call ends. Turn this off if you want answered calls to leave an open incident that enters your team’s normal escalation workflow. See Incidents vs. call logs for a full breakdown. Skip numbers already dialed in this call — When enabled, All Quiet will not ring the same phone number twice during a single inbound call session. Helps avoid calling the same person again if they appear in multiple escalation tiers. Max users to call (1–10, default 3) — Caps how many on-call members are tried across all escalation tiers before fallback (voicemail or closing message). Increase this for larger teams or longer chains; keep it lower if you want callers to reach voicemail quickly when the first few people are unavailable. Dial timeout per user (5–120 seconds, default 20) — How long All Quiet waits for each person to answer before moving to the next person in the chain. There is no additional delay between tiers — the next person is dialed immediately after the timeout. Shorter timeouts reach voicemail faster; longer timeouts give responders more time to pick up (e.g. when they need to find a quiet place).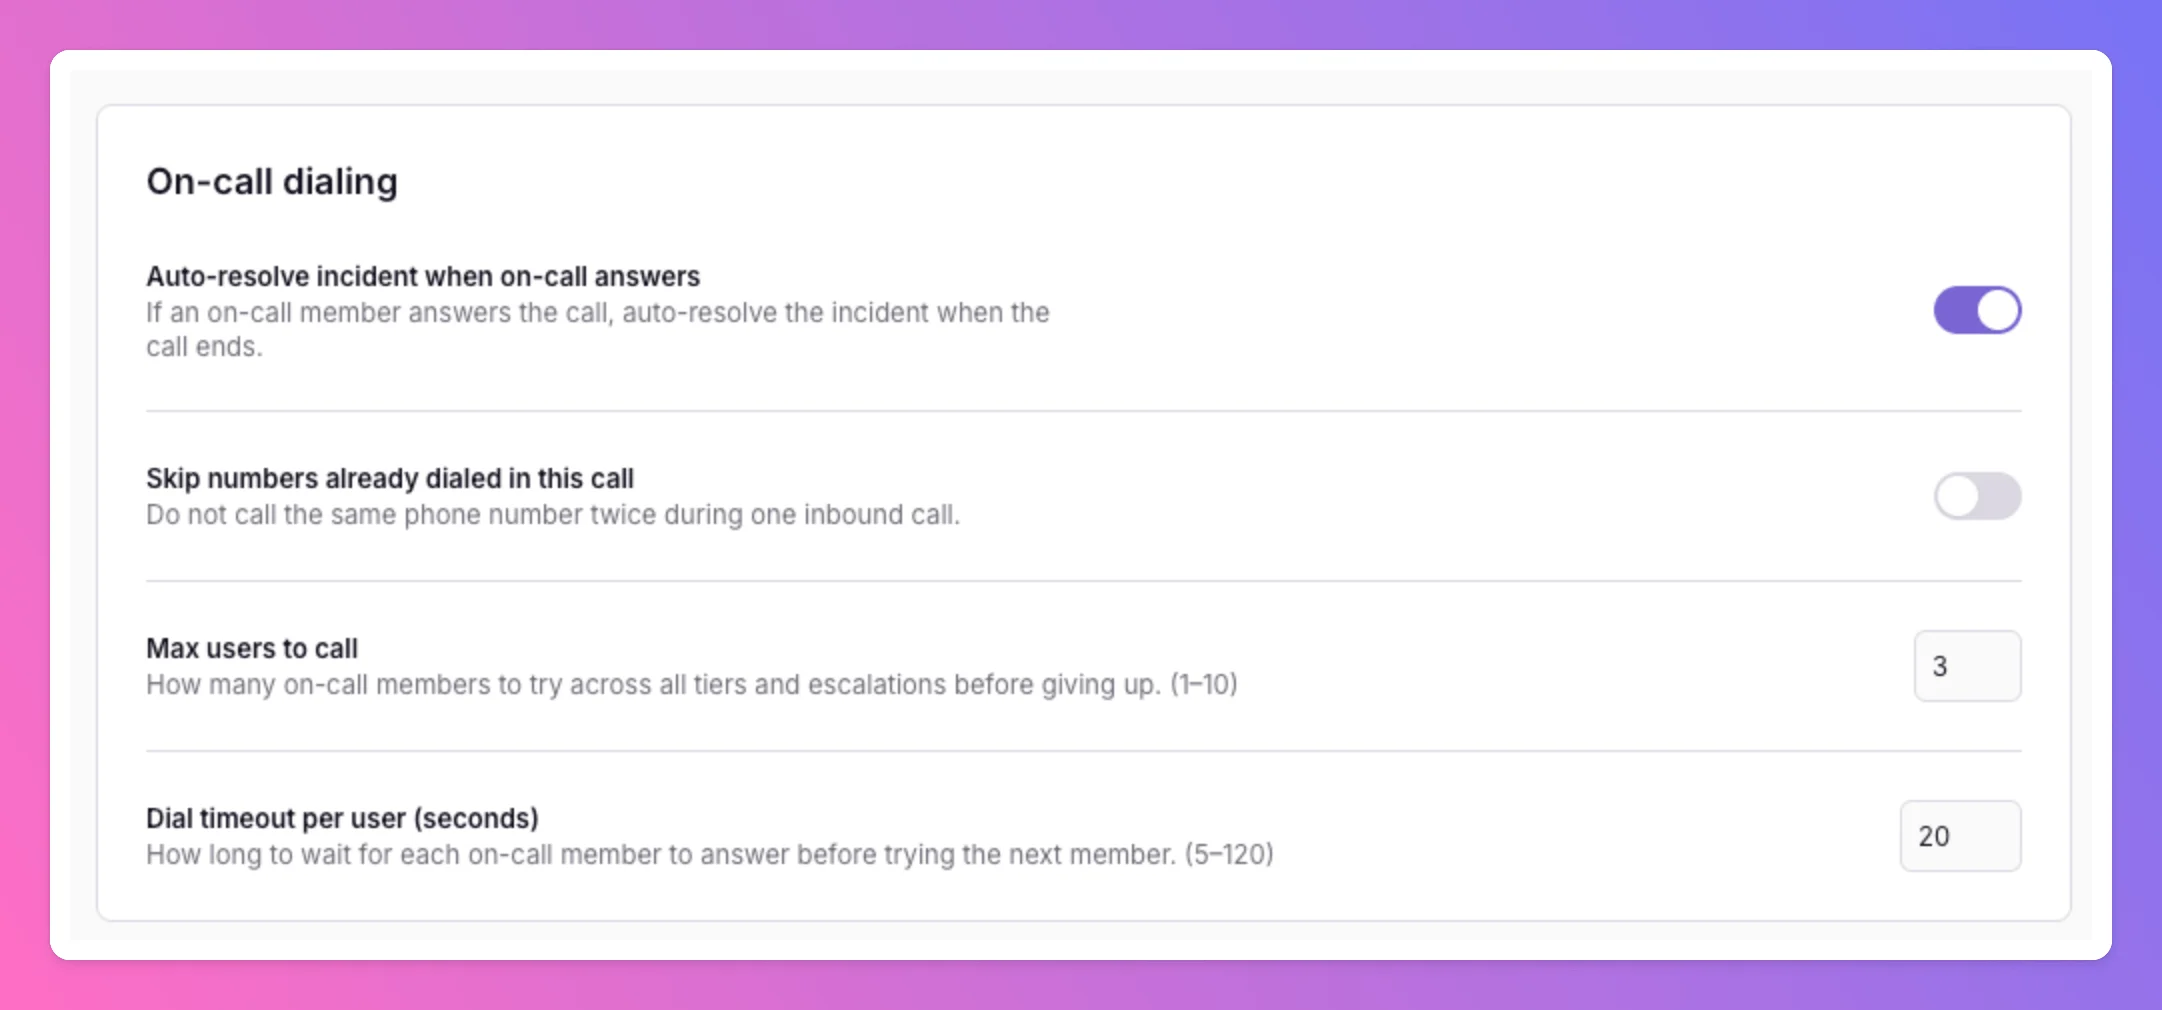
Accept call
Before bridging the caller to an on-call member, All Quiet requires the responder to confirm they are ready to take the call. “Press 1 to accept call” message — The prompt played to the on-call member when their phone rings (text-to-speech or uploaded audio). They must press 1 on their keypad to accept; only then is the caller connected. Reduces accidental pickups and wrong-number answers on shared devices. Also, this prevents mailboxes from answering calls. Accept call keypad timeout — How long the on-call member has to press 1 after hearing the prompt before All Quiet treats the attempt as unanswered and moves to the next person in the chain. Prompt attempts — How many times the accept prompt is repeated before giving up on that person and dialing the next candidate.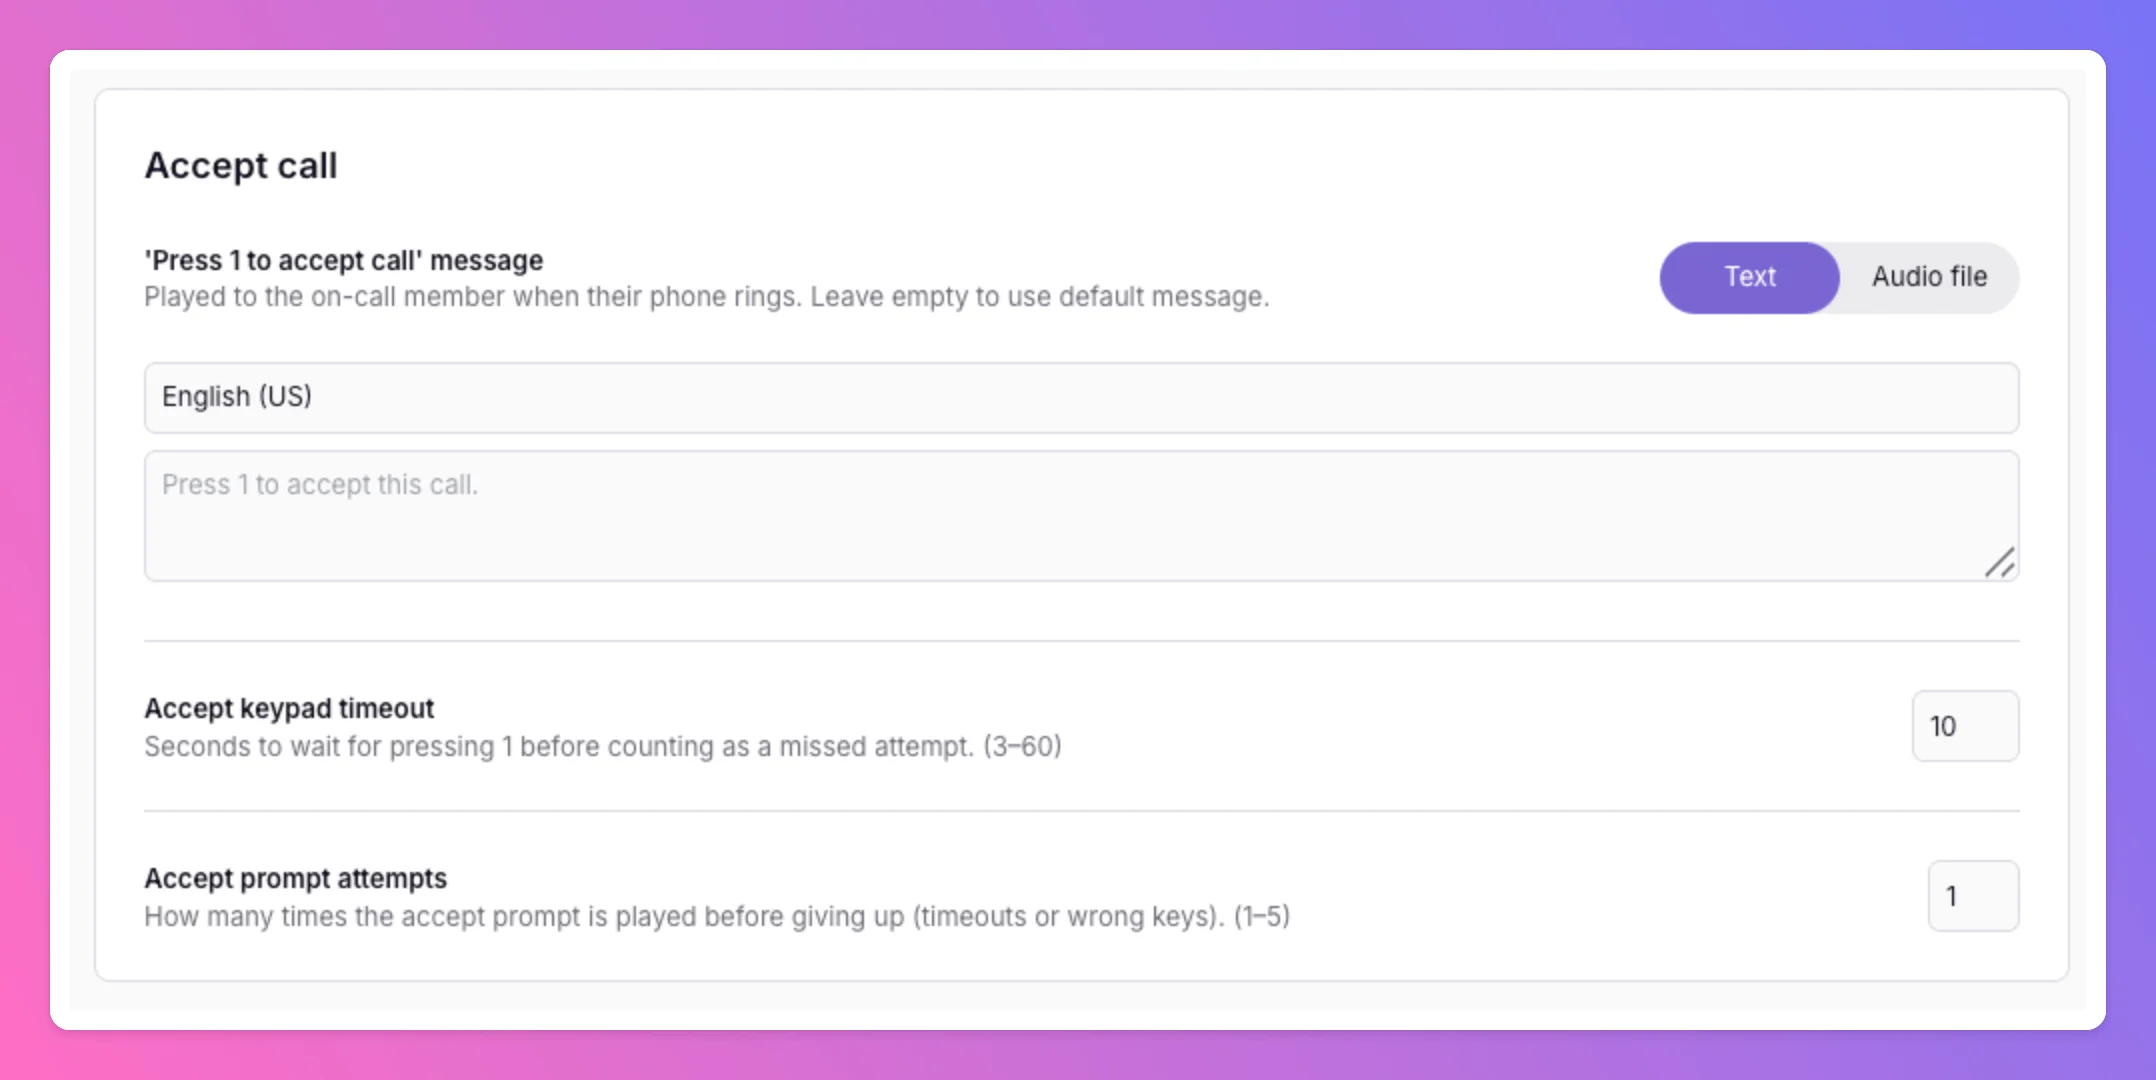
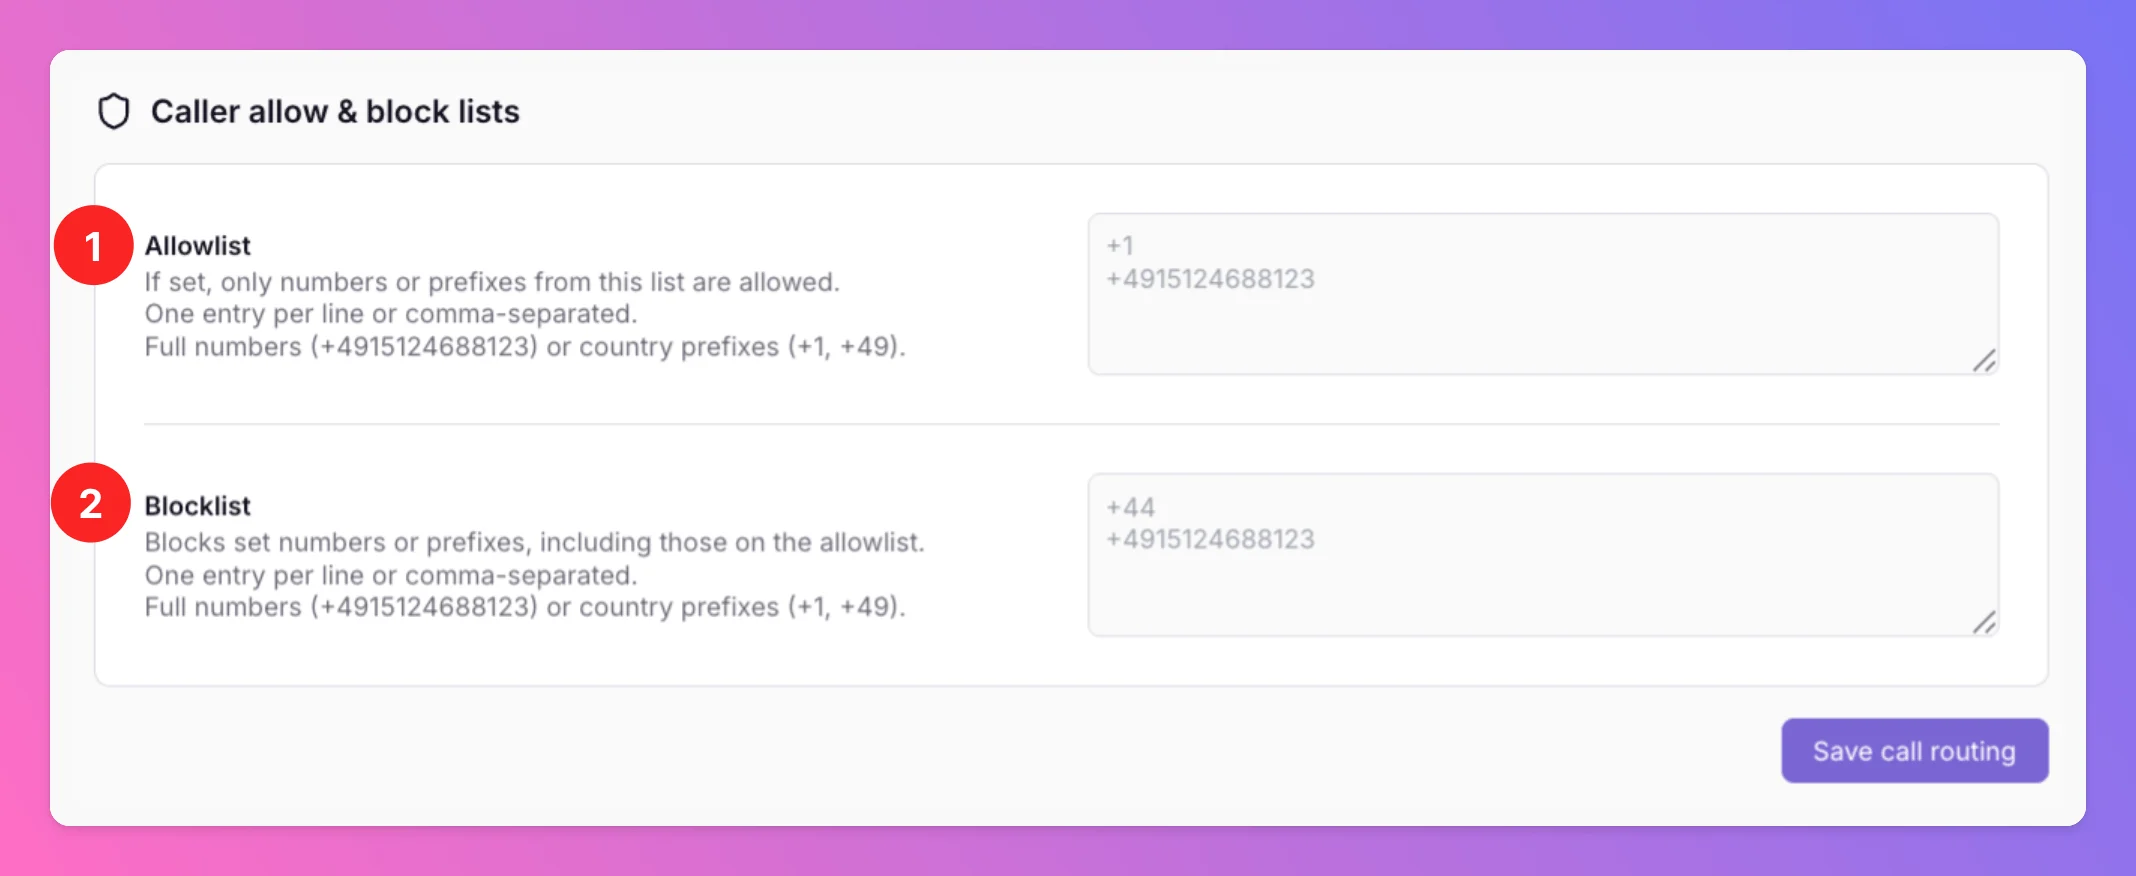
Caller allow & block lists
The fourth section on the Call Routing tab lets you filter callers by phone number or country prefix before routing begins. Filtering runs when the call has already reached All Quiet — after your provider (e.g. Twilio) forwards it to us. Both Allowlist and Blocklist use the same entry format:- One entry per line or comma-separated
- Full numbers in E.164 format (for example
+4915124688123) or country prefixes (for example+1,+49)
- Allowlist (Whitelist) — If set, only callers whose number matches an entry on the allowlist (full number or prefix) are allowed through. If the allowlist is empty, all callers are allowed unless blocked by the blocklist.
- Blocklist — Blocks matching numbers or prefixes. The blocklist takes precedence over the allowlist — a number that appears on both lists is blocked.
You’ve successfully set up Live Call Routing in All Quiet. You’re now able to receive inbound calls and route them to the right responders.
Operational tabs
After configuring call routing, use these tabs on your Call Routing Number to review what happened on your hotline. They complement each other: Call Logs capture every attempt; Incidents capture only what enters your on-call workflow. See Incidents vs. call logs for when each applies.Call Logs
Call logging in All Quiet works on two levels:- Call session — one row per inbound call (the Call Logs list).
- Log entries — a step-by-step timeline inside that session (View logs).
Call session list
The list shows a summary for each call. You can filter by caller number (prefix match) and outcome.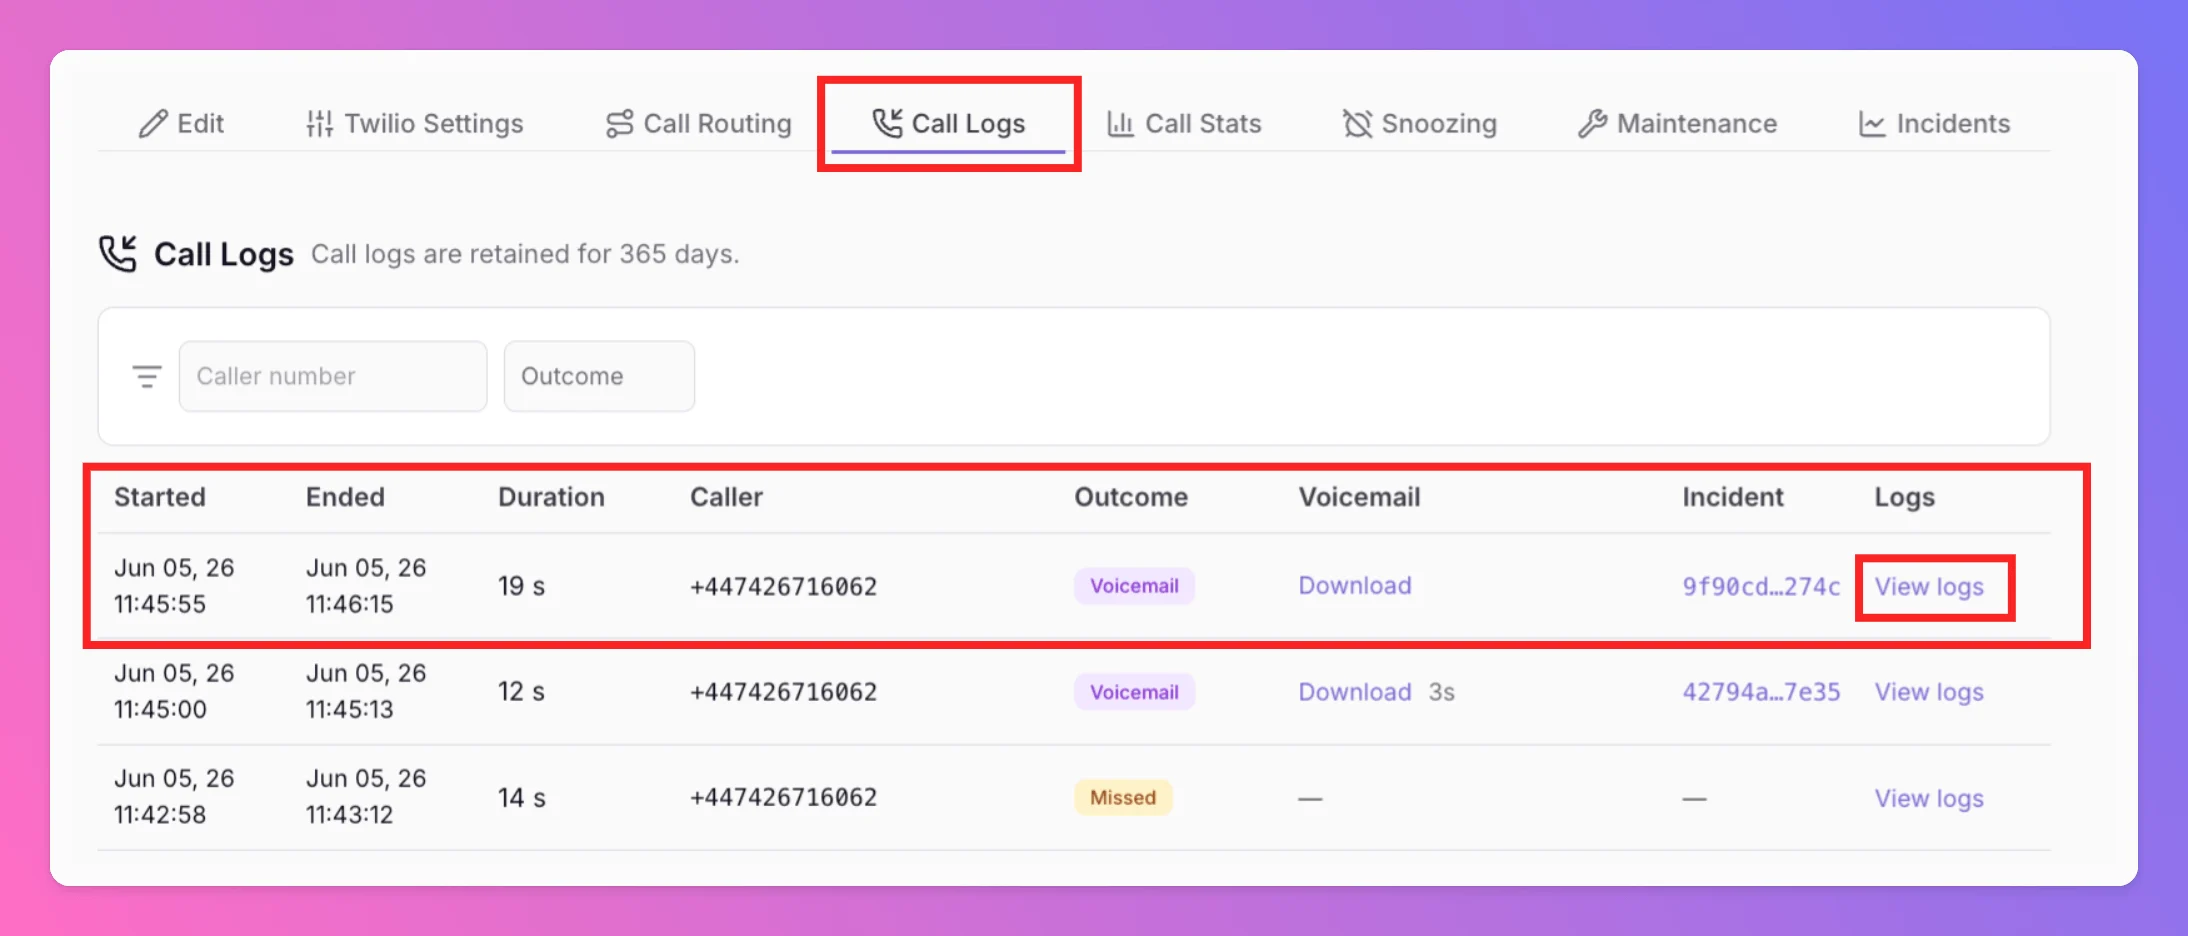
Session outcomes
These badges answer “What happened to this call?”View logs (session detail)
Click View logs on a session to open:- Session summary — caller, outcome, timestamps, provider call ID, voicemail download (if any).
- Chronological log table — one row per processing step: webhook received, dial chain built, dial attempt, voice command sent, and so on.
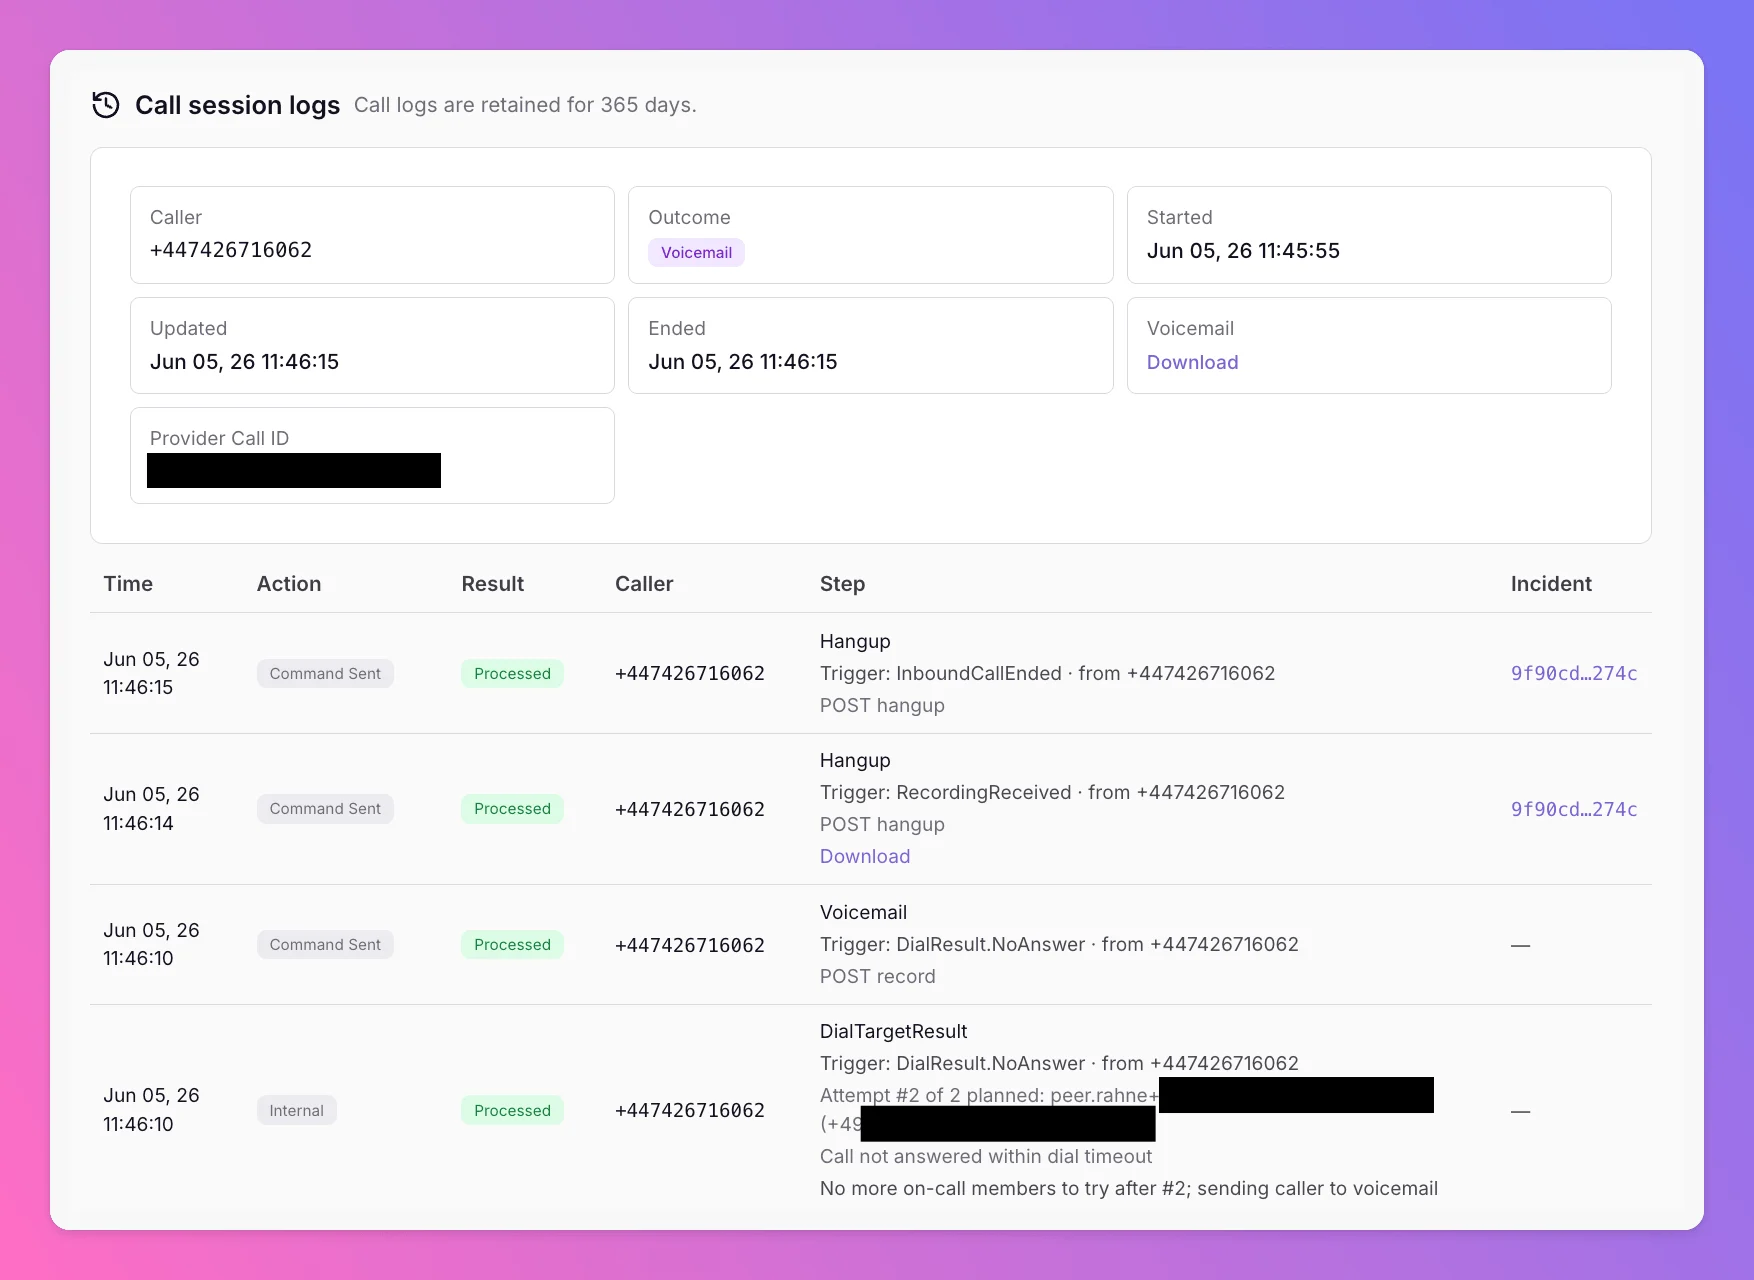
Reading the log timeline
Each log row has a Step (where the call was in the flow), an Action, and a Result. The most useful steps when reading a call:
Actions on each row:
Results: Processed (step handled), Failed (something went wrong — see error details in the row), or Ignored (webhook received but no action taken).
A log row with Result = Failed is not the same as session outcome Failed. A single failed processing step can still end with the call marked Missed or Voicemail.
Retention
Call Stats
Call Stats aggregates call sessions on this number over time — volume, duration, and breakdown by outcome (Accepted, Voicemail, Missed, Blocklisted, Ongoing, and Failed). Use it to spot trends: Are most callers reaching a responder? How often does voicemail kick in? Is missed-call volume rising after a schedule change? How many callers are being rejected by your allow/block lists? The same outcome badges from the Call Logs list drive these statistics, so numbers in Call Stats match what you see per call in Call Logs. Call logs are retained for 2 years.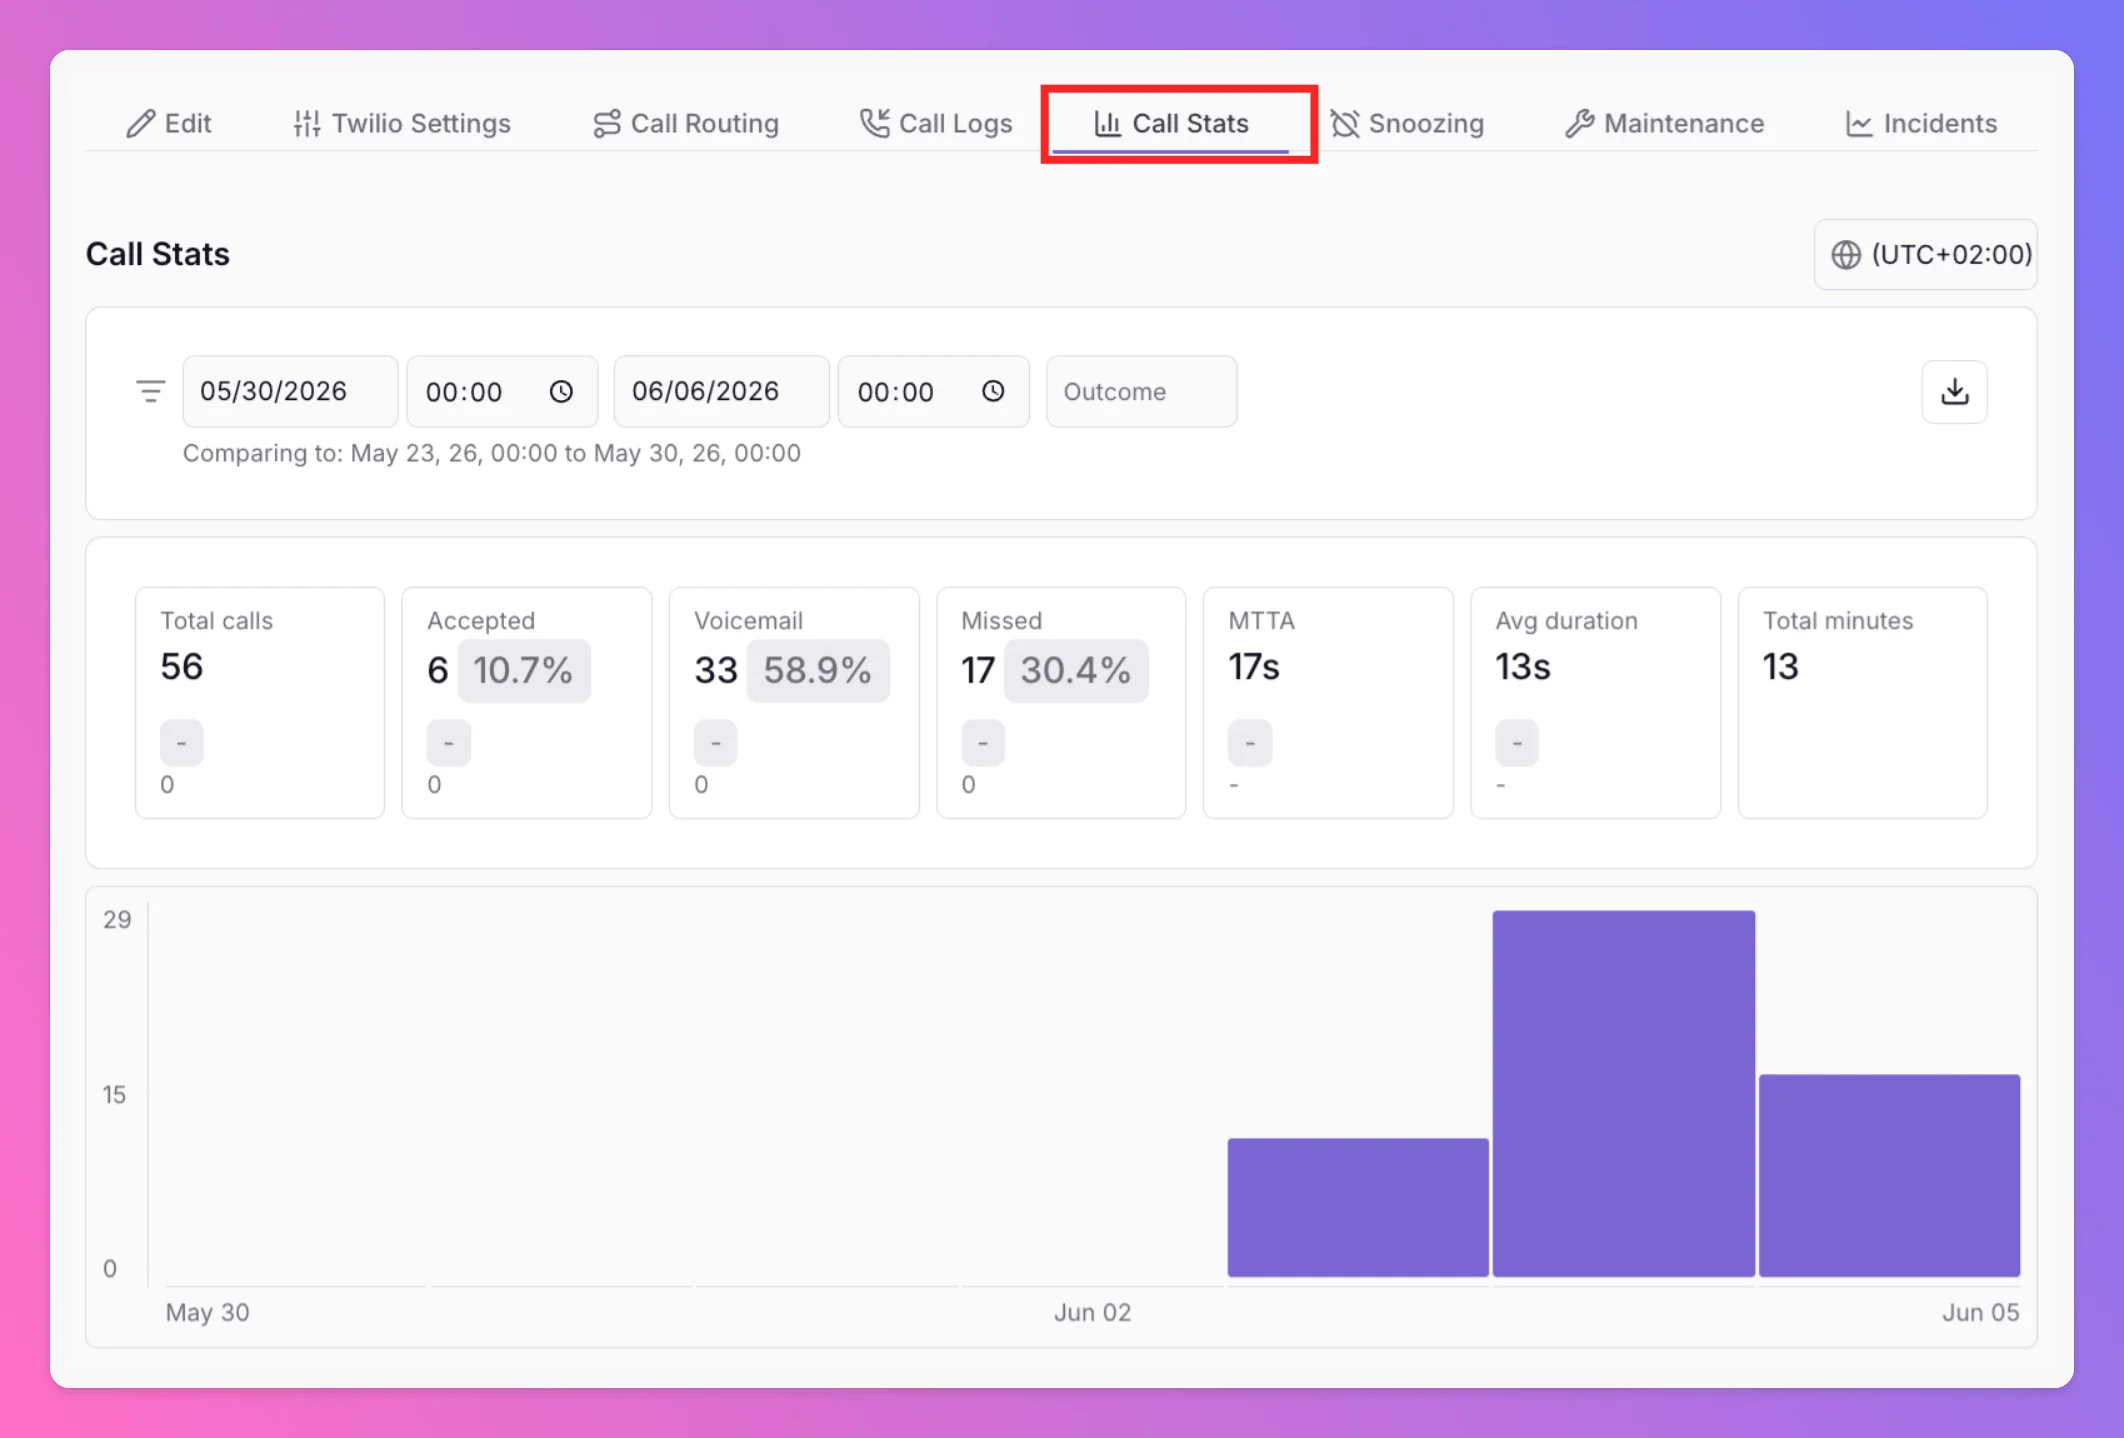
Incident Report
The Integration-level Incident Report shows incidents created from this number — not every call. Only voicemails and successfully accepted calls produce incidents; Missed outcomes appear in Call Logs only.What snoozing, maintenance, and mute do (and don’t do)
This section clarifies a common misconception: these controls only affect incindents resulting from Calls, but not the call routing itself.Pausing or disabling the number in Twilio
All Quiet has no “pause this number” toggle for Call Routing Numbers (unlike Ping Monitor or HTTP Monitoring). To temporarily stop callers from reaching All Quiet, adjust the webhook in Twilio Console: Temporarily pause inbound calls (keep the number)- Open Twilio Console → Phone Numbers → Manage → Active numbers and select your Live Call Routing number.
- Under Voice configuration, find A call comes in (also labeled Incoming Voice Call).
- Replace the All Quiet webhook with one of the following:
- A TwiML Bin or TwiML App that plays a short “this line is unavailable” message and hangs up.
- A Twilio Function that rejects the call (
<Reject/>). - Clear or change the webhook so traffic no longer reaches All Quiet.
Recommended defaults & tuning guide
A practical “start here” table:Troubleshooting
Can I buy a phone number through All Quiet?
Not currently. Live Call Routing uses Bring Your Own Number (BYON): you purchase and own the number with a provider such as Twilio, then connect it to All Quiet. We do this so you are not charged twice — once by the carrier for the number and again by All Quiet on top. You pay your provider directly for the number and usage; All Quiet handles routing and on-call dialing on top.Can All Quiet create incidents for missed calls?
No. All Quiet only creates incidents for voicemails and accepted calls (on-call member pressed 1 and the call was bridged). Missed calls — where no one accepts and the caller does not leave voicemail — appear in Call Logs only, not in Incidents. If you want a record that enters your escalations when no one answers, enable Send to voicemail if no one responds or Send caller directly to voicemail on your route. Voicemail recordings create open incidents. See Incidents vs. call logs.Call connects but no incident was created
The call was routed and appears in Call Logs, but no incident was created. Check whether a maintenance window was active — calls still route, but incident creation is suppressed. See Incidents vs. call logs.Nobody gets rung when someone calls the hotline
Verify that on-call members are online, have a confirmed phone number on their profile, and that the route’s Team to route to is correct. Call routing only dials members in that team’s on-call schedule. See Prerequisites and On-call chain & dialing.The same person always seems to be rung first
Within a tier, dial order is shuffled randomly per call — there is no fixed “first responder.” The same person may be tried first several times in a row by chance; across many calls the order varies.A second simultaneous caller always gets voicemail
Expected when all reachable numbers are busy. On-call members already on a live call for that team are excluded from other dial chains. Enable Send to voicemail if no one responds so concurrent callers can leave a message.The number still receives calls after “pausing” in All Quiet
All Quiet has no pause toggle for Call Routing Numbers. Pause or disable inbound calls in Twilio — see Pausing or disabling the number in Twilio.Related docs
- Connect Twilio with All Quiet — number setup and credentials
- On-call schedules & escalation tiers
- Troubleshooting & FAQs — Live Call Routing