> ## Documentation Index
> Fetch the complete documentation index at: https://docs.allquiet.app/llms.txt
> Use this file to discover all available pages before exploring further.
# SSO - OpenID Connect & SCIM
> Integrate SSO using OpenID Connect (OIDC) and SCIM 2.0 for All Quiet
OpenID Connect (OIDC) and SCIM are available on Pro & Enterprise plan only.
All Quiet provides a secure and efficient way to integrate Single Sign-On (SSO) using OpenID Connect and SCIM, offering a seamless authentication experience for your users.
## OpenID Connect (OIDC)
This integration allows your organization to utilize its existing identity provider (IdP) services to manage user access to All Quiet.
### Step-by-Step-Guide
For this process, you need access SSO tab of your organization, only accessible to users with *Organization Owner* role.
To use OIDC, you first need to create an [Organization](/advanced/organizations) in All Quiet. If you also want to use [SCIM](/miscellaneous/sso#scim-2-0) to provision your users, please note that the user ("root user") who creates the Organization cannot be provisioned through SCIM. We recommend to create the Organization with a "root user" that is not bound to a specific employee, like [devops@yourcompany.com](mailto:devops@yourcompany.com).
In your identity provider’s management console, you will need to register All Quiet as a new application and give your users access to it.
Make sure to create an application that uses OIDC, not SAML, as the authentication type. Also, if you want to add [SCIM provisioning](/miscellaneous/sso#scim-2-0), make sure the application supports SCIM provisioning as well.
When adding an OIDC tenant for **existing** All Quiet accounts, All Quiet maps users by **email address**. The email address on the All Quiet account must match the user’s **primary email address** in your Identity Provider (IdP). If they don’t match, the account cannot be mapped and the user won’t be able to sign in to the existing account in All Quiet via OIDC. Make sure to update the All Quiet email addresses accordingly (users can update their email in the Web app under `/app/account`) before adding the OIDC tenant.
In your IdP's application, you will need to configure the following:
Configure the **Redirect URI** in your IdP:
* `https://allquiet.app/signin-oidc` (US Hosted) or
* `https://allquiet.eu/signin-oidc`(EU Hosted).
In case that a **Login URL** is expected as well, set it to
* `https://allquiet.app/login` (US Hosted) or
* `https://allquiet.eu/login`(EU Hosted).
The application will provide you with a **Client ID** and **Client Secret** that you will need in the next step to set up the application on All Quiet. Make sure to safe the information securely. Additionally, you will need to provide the **Authority URL** from your IdP's application to set up the OIDC tenant in All Quiet Web App. The Authority URL is usually the client-specific domain derived from the discovery document URL. These details are essential for establishing a secure and reliable connection between your IdP and All Quiet.
#### OIDC with Microsoft Entra ID
In your OIDC tenant's `API Permissions` settings, add `email`, `offline_access`, `openid` and `profile` permissions.
Mark all these permissions as type `Delegated` and without requiring Admin consent.
Also, in the `Token Configuration`, add `email` claims.
**Authority URL (important):** Microsoft Entra has two OIDC endpoint versions. The Authority URL determines which discovery document and token endpoint are used.
* **Recommended (v2.0 / Microsoft Identity Platform):** `https://login.microsoftonline.com/{tenant-id}/v2.0`\
Use this for modern OIDC setups and scope-based permissions (like `openid`, `profile`, `email`, `offline_access`).
* **Legacy (v1.0):** `https://login.microsoftonline.com/{tenant-id}`\
Only use this if you have a legacy setup that explicitly requires v1.0 tokens.
If you’re unsure, start with the **v2.0** Authority URL. A mismatched Authority URL can cause discovery or token validation errors.
#### OIDC with Jumpcloud
In your OIDC tenant's `OIDC Single Sign-On Configuration`
* Select "Client Secret POST" as `Client Authentication Type`
* Select Standard Scopes "Email" and "Profile". No need to further adjust the mapping of single attributes.
* The **Authority URL** can be found [here](https://jumpcloud.com/support/sso-with-oidc).
#### OIDC with Google Workspace
You'll need to additionally configure the **Redirect URI**:
* `https://allquiet.app/signin-oidc` (US Hosted) or
* `https://allquiet.eu/signin-oidc`(EU Hosted).
The **Authority URL** for Google is `https://accounts.google.com`.
#### OIDC with Okta
The **Authority URL** for Okta is `https://{tenant}.okta.com`
#### OIDC with Auth0
The **Authority URL** for Auth0 is `https://{tenant}.auth0.com`.
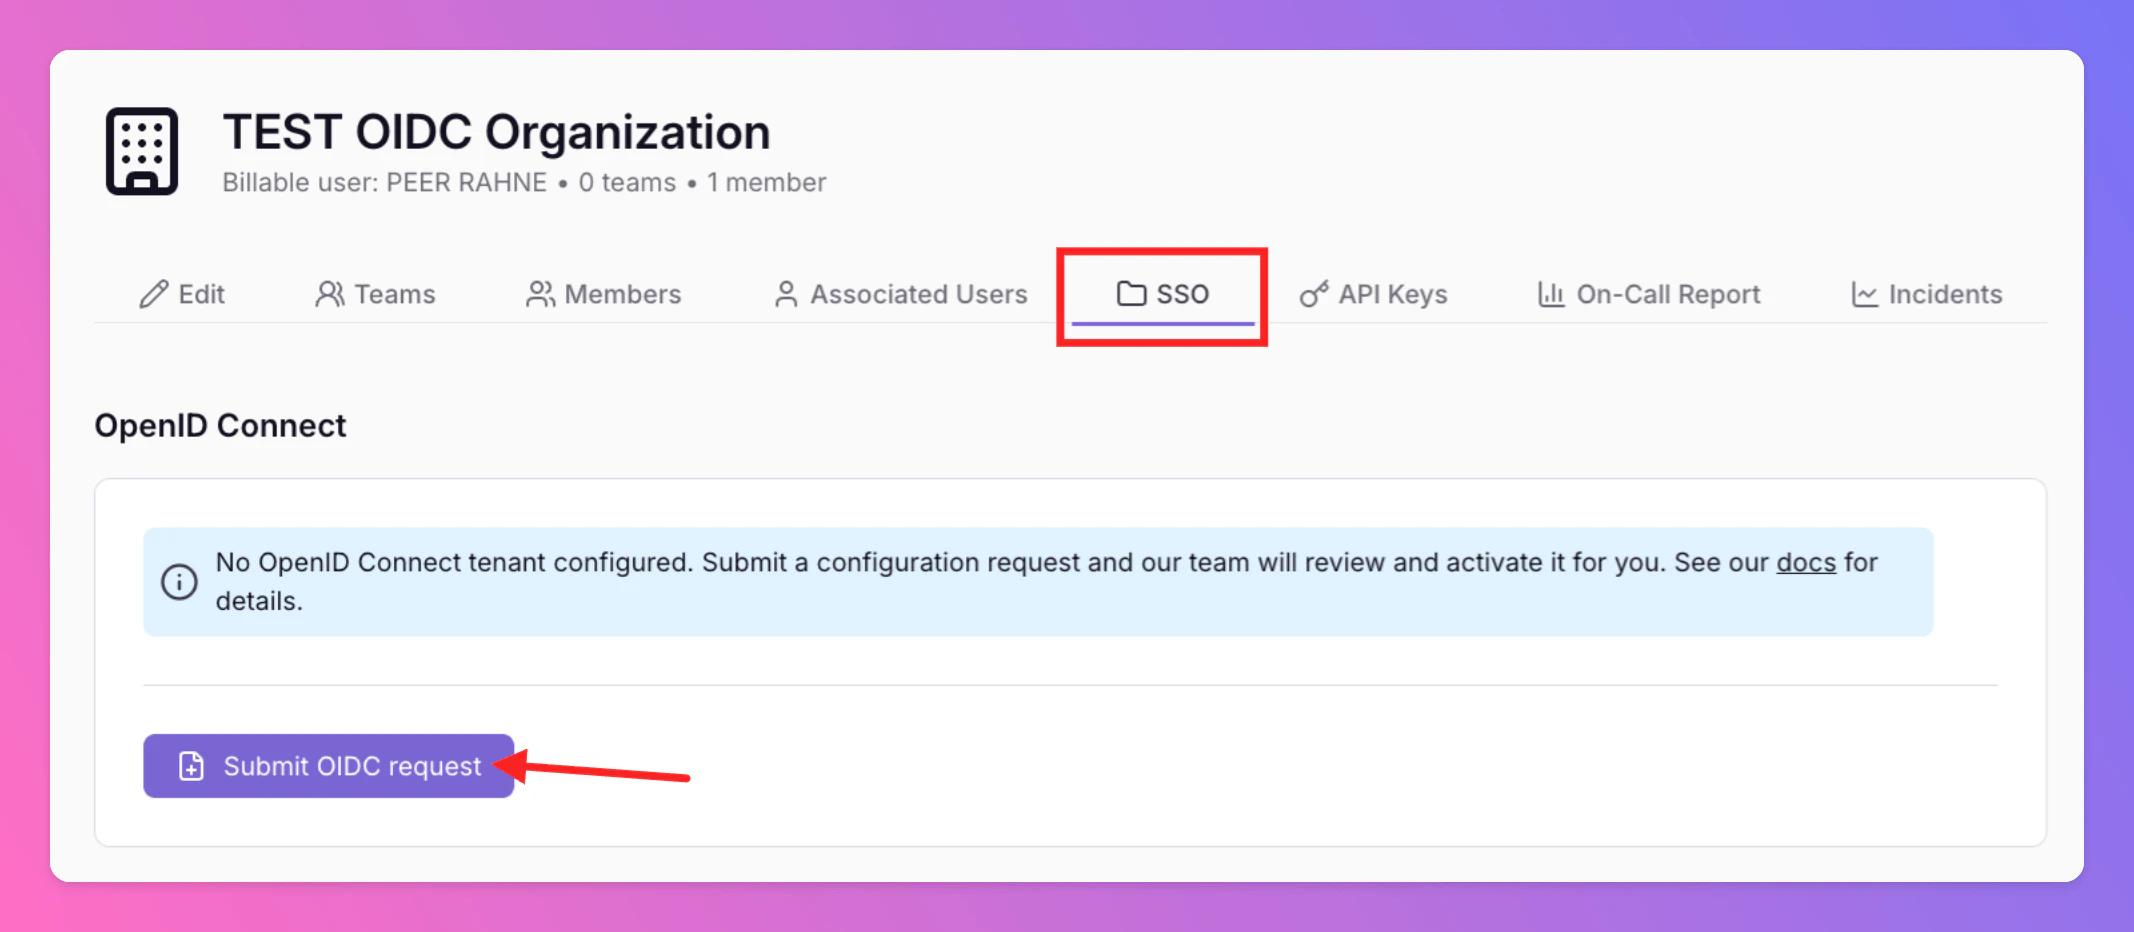
After setting up the application in your IdP, you need to set up the OIDC tenant in All Quiet Web App.
* Go to `Organizations`
* Select your organization
* Click on `SSO` tab
* Click on `Submit OIDC request` button.
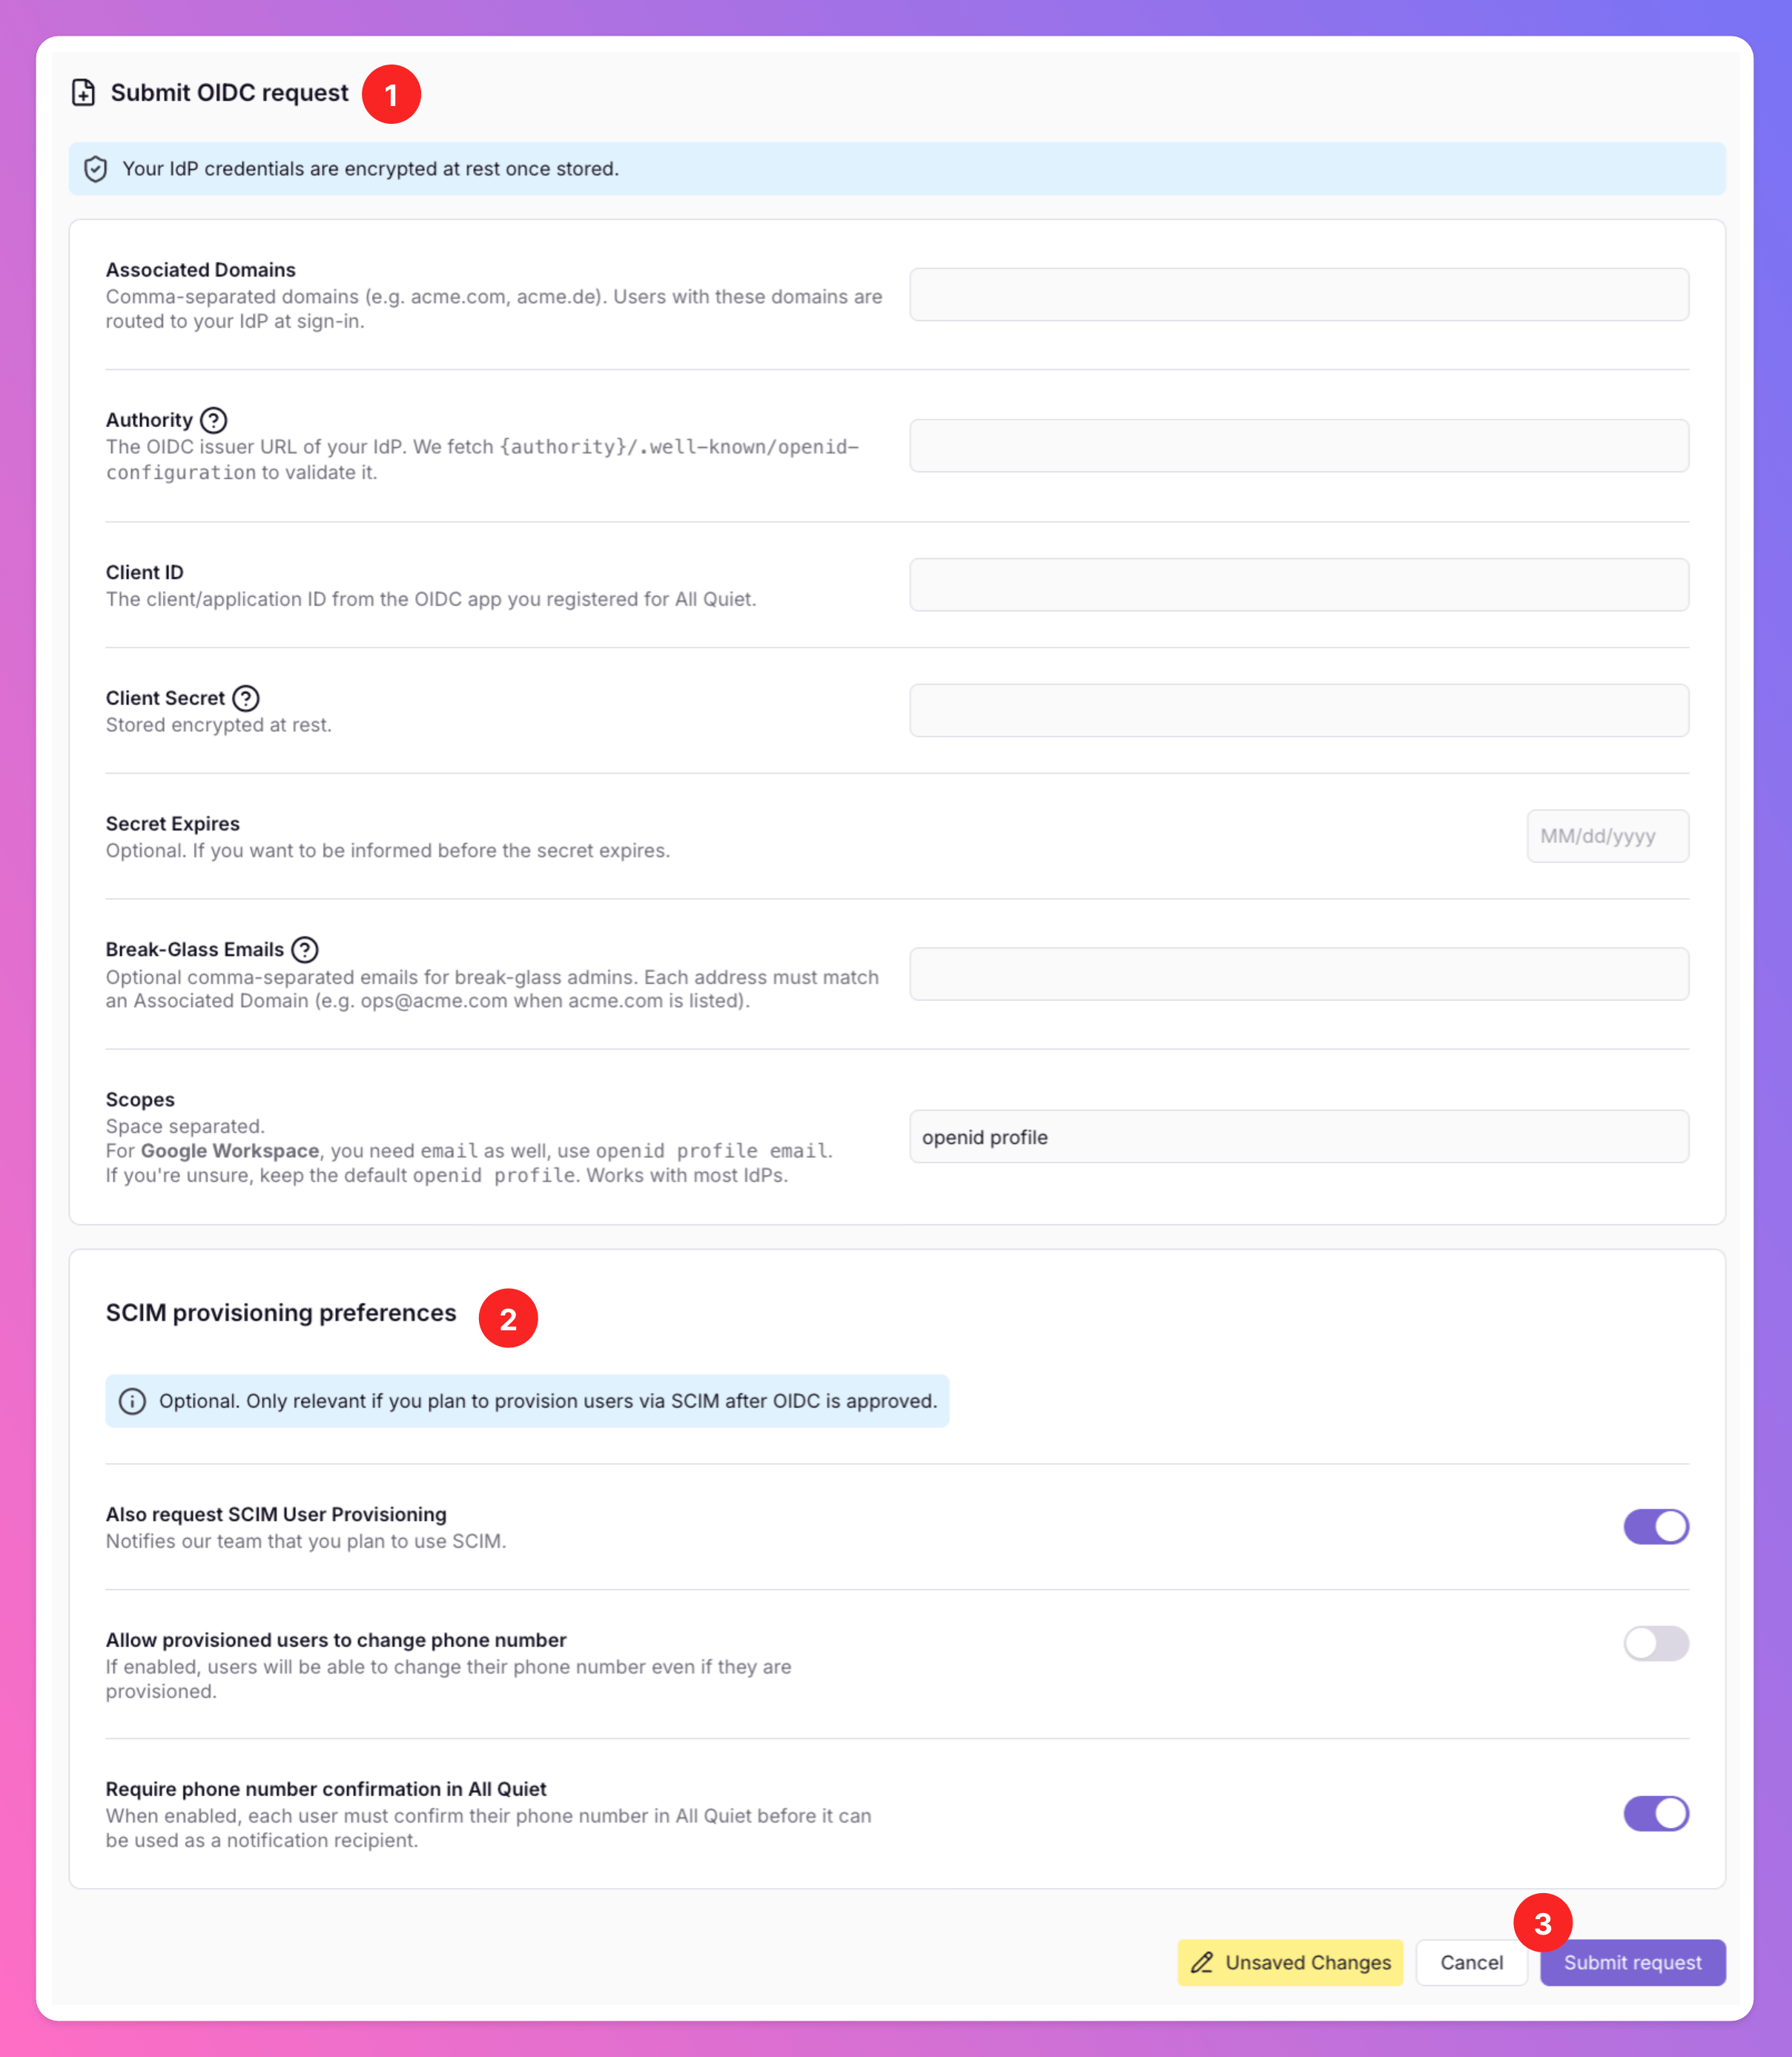
 Fill out the following information in the overlay window:
1. Submit OIDC request:
* **Associated Domains**: Enter the domains you want to associate with the OIDC tenant. Only add domains you control. You can add multiple domains by separating them with a comma. We will validate the domains you add after you submit the request.
* Authority URL: Enter the **Authority URL** from your IdP's application that you've received in the previous step. We fetch `{authority}/.well-known/openid-configuration` to validate it.
* Client ID: Enter the **Client ID** from your IdP's application that you've received in the previous step.
* Client Secret: Enter the **Client Secret** from your IdP's application that you've received in the previous step. **Do not share this secret with anyone.** All Quiet will store your IdP credentials securely in our database.
* **Secret Expires** (optional): Enter the date and time when the client secret will expire. We will remind you 2 weeks before the secret expires.
* **Break-Glass Emails** (optional): Break-Glass Emails can be used to bypass OIDC sign-in and typically are not tight to a individual person, but rather a service account e.g. [admin@acme.com](mailto:admin@acme.com). Each email domain must match an Associated Domain you listed above (subdomains are allowed). Add multiple emails by separating them with a comma.
* **Scopes**: Space-separated OIDC scopes. The default is `openid profile`, which works with most IdPs. For **Google Workspace**, include `email` as well — use `openid profile email`. If you're unsure, keep the default `openid profile`.
2. Optional: Set SCIM provisioning preferences:
If you want to set up [SCIM provisioning](/miscellaneous/sso#scim-2-0), too, let us know your preferences during this step.
* Define if SCIM provisioned users should be allowed to **change their phone number** via the Web app.
* Define if SCIM provisioned users need to **confirm their phone number** via the Web app. We recommend this to be enabled to ensure the phone number is valid and users can receive notifications.
Have you already created users manually and now wish to convert them to SCIM-provisioned users? Let us know the exact users you want to convert after submitting the request by contacting [support@allquiet.app](mailto:support@allquiet.app).
3.Click on `Submit request` button.
Fill out the following information in the overlay window:
1. Submit OIDC request:
* **Associated Domains**: Enter the domains you want to associate with the OIDC tenant. Only add domains you control. You can add multiple domains by separating them with a comma. We will validate the domains you add after you submit the request.
* Authority URL: Enter the **Authority URL** from your IdP's application that you've received in the previous step. We fetch `{authority}/.well-known/openid-configuration` to validate it.
* Client ID: Enter the **Client ID** from your IdP's application that you've received in the previous step.
* Client Secret: Enter the **Client Secret** from your IdP's application that you've received in the previous step. **Do not share this secret with anyone.** All Quiet will store your IdP credentials securely in our database.
* **Secret Expires** (optional): Enter the date and time when the client secret will expire. We will remind you 2 weeks before the secret expires.
* **Break-Glass Emails** (optional): Break-Glass Emails can be used to bypass OIDC sign-in and typically are not tight to a individual person, but rather a service account e.g. [admin@acme.com](mailto:admin@acme.com). Each email domain must match an Associated Domain you listed above (subdomains are allowed). Add multiple emails by separating them with a comma.
* **Scopes**: Space-separated OIDC scopes. The default is `openid profile`, which works with most IdPs. For **Google Workspace**, include `email` as well — use `openid profile email`. If you're unsure, keep the default `openid profile`.
2. Optional: Set SCIM provisioning preferences:
If you want to set up [SCIM provisioning](/miscellaneous/sso#scim-2-0), too, let us know your preferences during this step.
* Define if SCIM provisioned users should be allowed to **change their phone number** via the Web app.
* Define if SCIM provisioned users need to **confirm their phone number** via the Web app. We recommend this to be enabled to ensure the phone number is valid and users can receive notifications.
Have you already created users manually and now wish to convert them to SCIM-provisioned users? Let us know the exact users you want to convert after submitting the request by contacting [support@allquiet.app](mailto:support@allquiet.app).
3.Click on `Submit request` button.
 After submitting the request, our team will review your request and get back to you if additional information is needed.
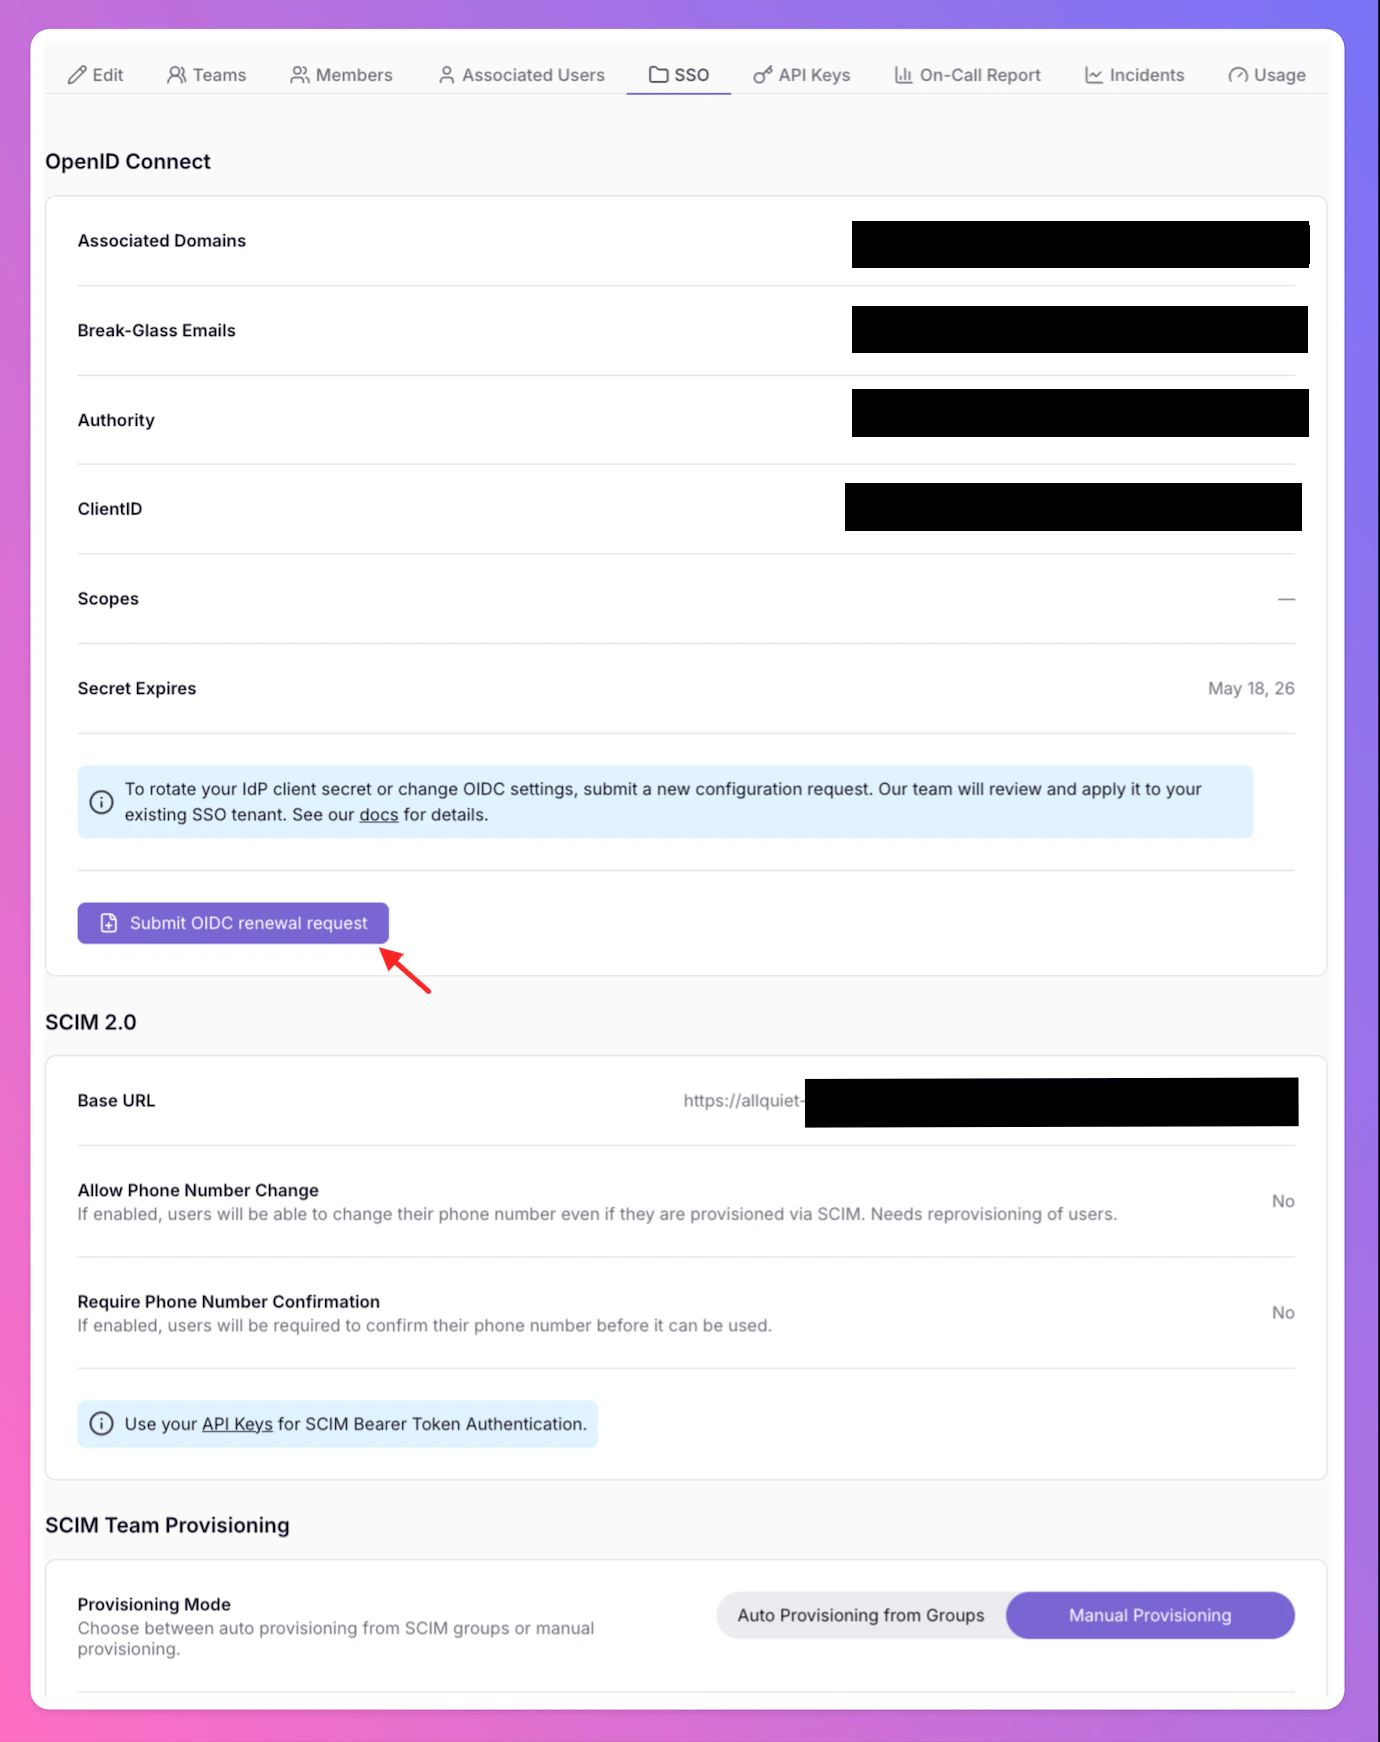
After successful verification, the integration is considered complete. You will now find your OIDC tenant (and SCIM provisioning preferences if you've set them up) in the `SSO` tab of your organization.
After submitting the request, our team will review your request and get back to you if additional information is needed.
After successful verification, the integration is considered complete. You will now find your OIDC tenant (and SCIM provisioning preferences if you've set them up) in the `SSO` tab of your organization.
 ### Renewing OIDC credentials
Once your tenant is active, you can use **Submit an OIDC renewal request** on the `SSO` tab when you need to rotate your client secret. If your secret is about to expire, we will notify you by email. In the renewal form, provide the new **Client Secret** and, if applicable, the updated **Secret Expires** date.
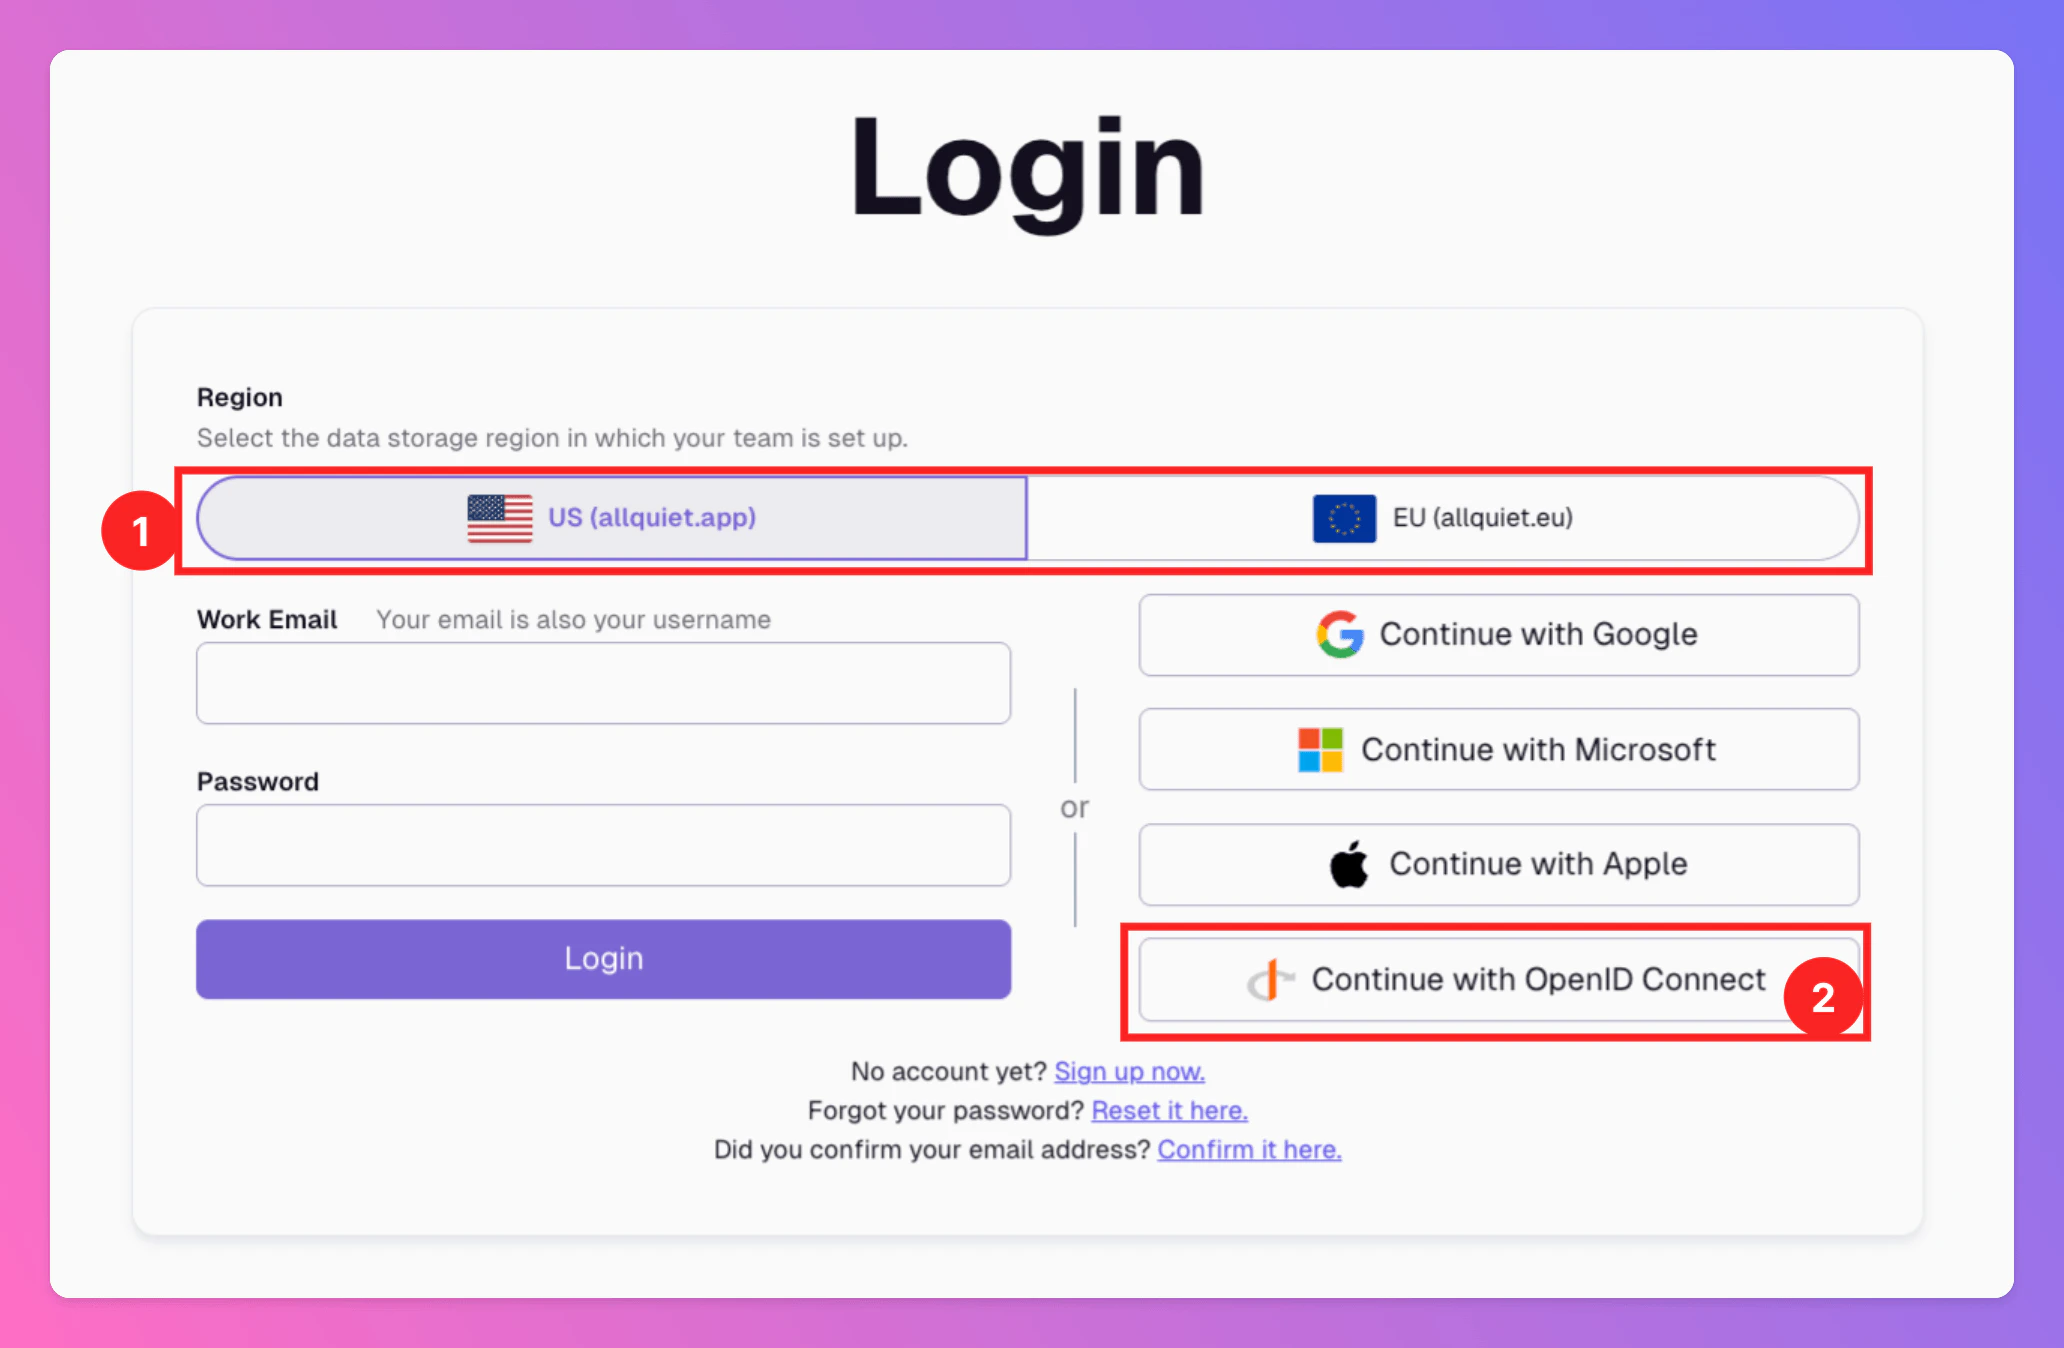
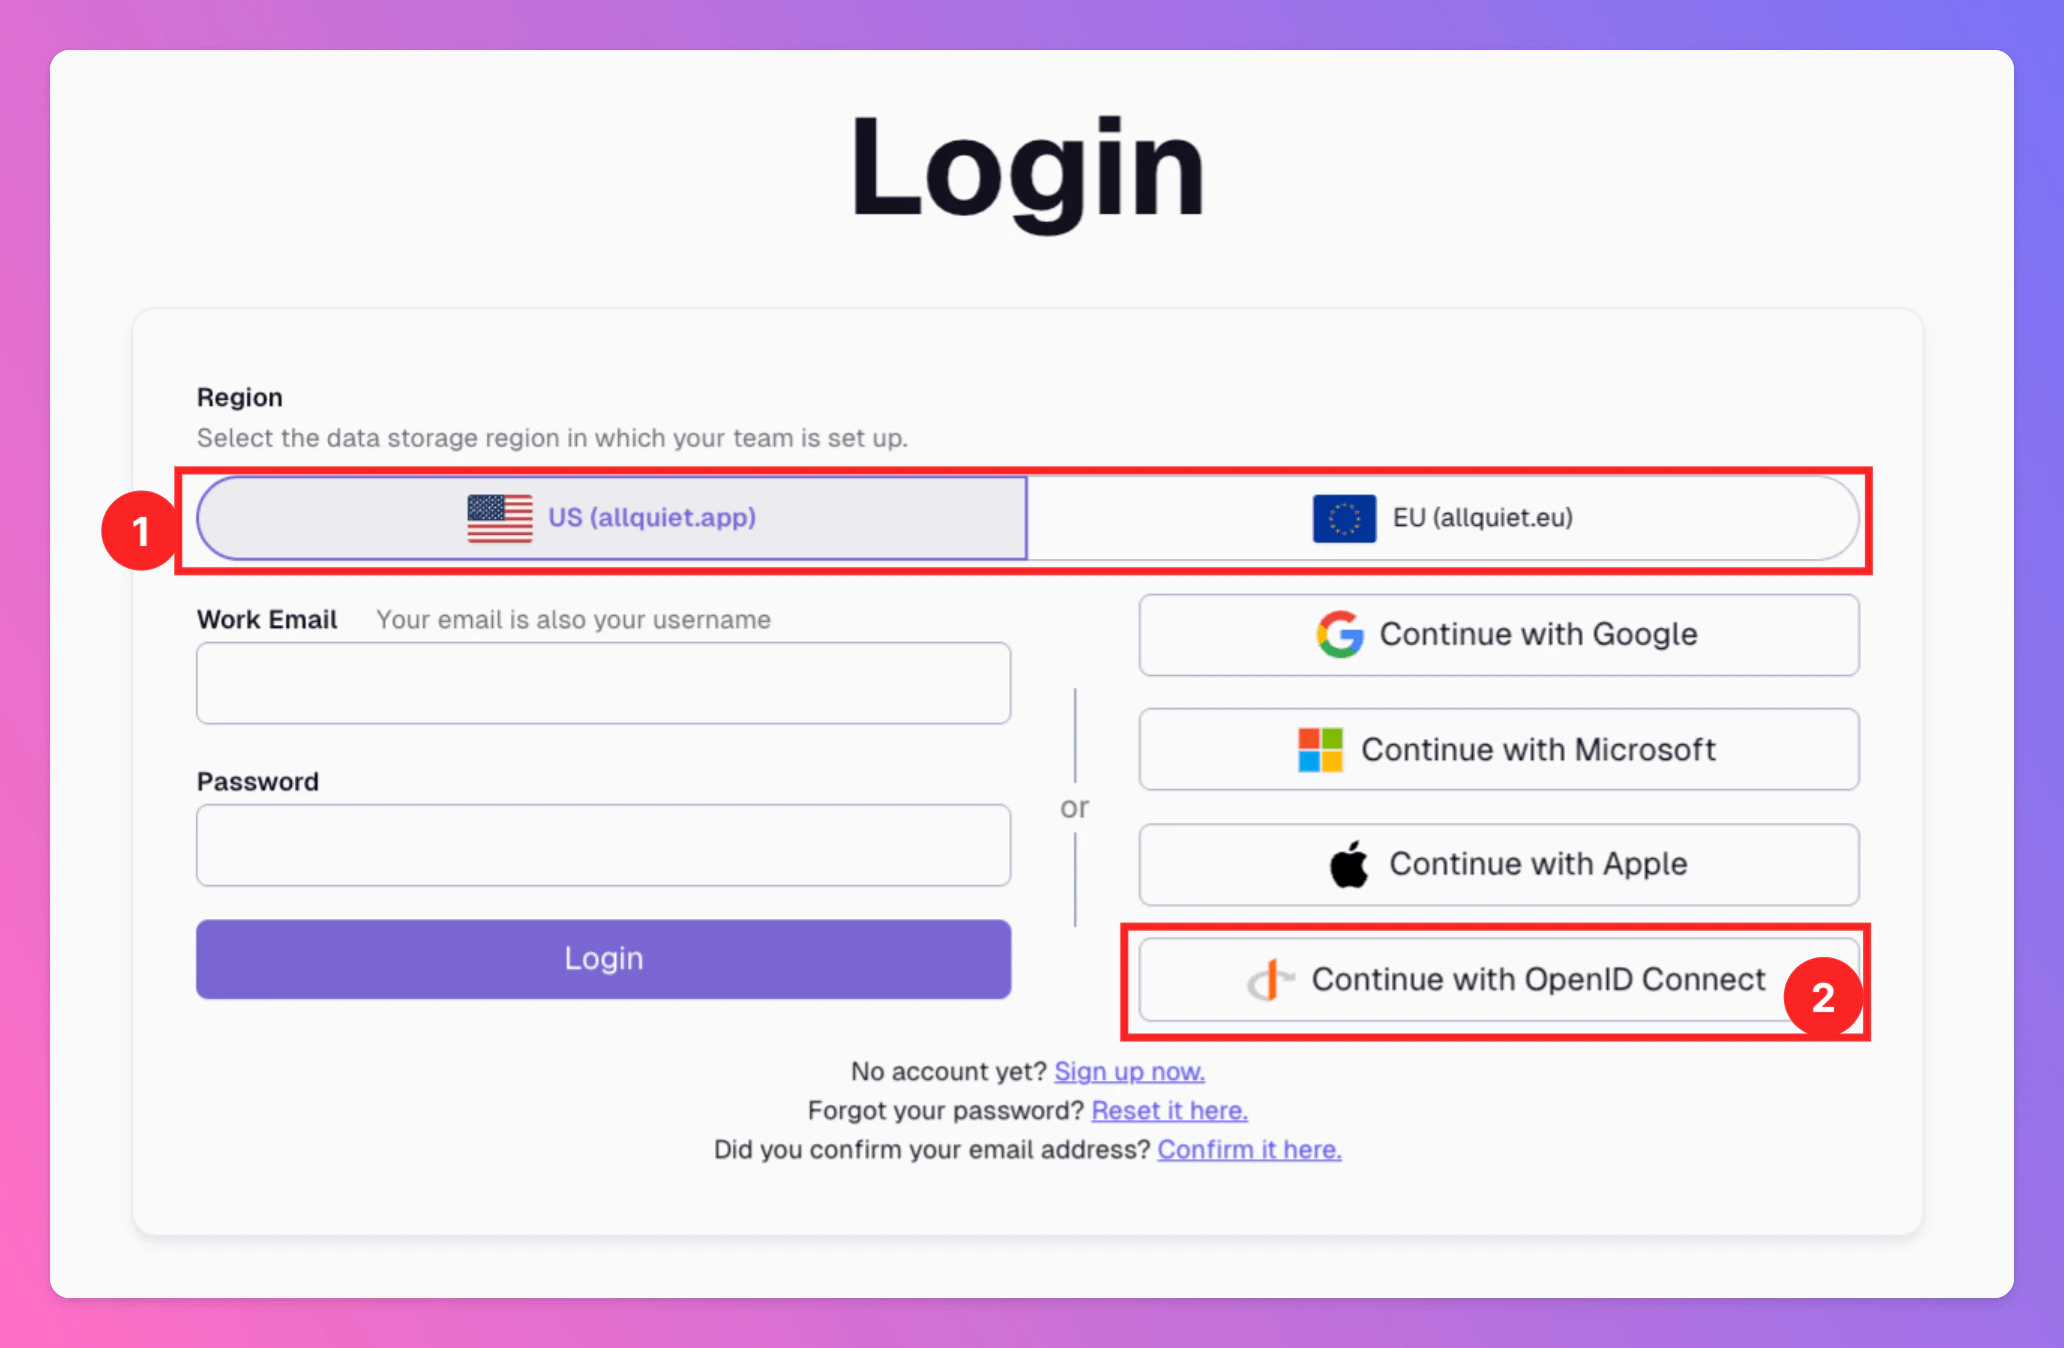
To log in via the All Quiet Website, your users need to
1. Select the correct hosting region
2. Click on `Continue with OpenID Connect`
### Renewing OIDC credentials
Once your tenant is active, you can use **Submit an OIDC renewal request** on the `SSO` tab when you need to rotate your client secret. If your secret is about to expire, we will notify you by email. In the renewal form, provide the new **Client Secret** and, if applicable, the updated **Secret Expires** date.
To log in via the All Quiet Website, your users need to
1. Select the correct hosting region
2. Click on `Continue with OpenID Connect`
 ### Conclusion
Integrating your organization's SSO using OpenID Connect with All Quiet enhances your platform's security and user experience. With this setup, you ensure a consistent and secure access management system, aligned with your organizational policies and requirements.
## SCIM 2.0
### Step-by-Step-Guide
For this process, you need access to the API Keys and SSO tab of your organization, only accessible to users with *Organization Owner* role.
This integration allows your organization to leverage tools like Microsoft Entra for smoother user management in All Quiet.
To use SCIM, you first need to create an [Organization](/advanced/organizations) in All Quiet. Please note: The user who creates the Organization cannot be provisioned via SCIM. Therefore, we recommend to create the Organization with a "root user" that is not bound to a specific employee, e.g. [devops@yourcompany.com](mailto:devops@yourcompany.com). This way, you ensure all “real” on-call users and employee accounts can be provisioned. If you already set up the Org with your personal account, you can change your account’s email address via the Web app on /app/account to a root user email and later provision your personal email and account via SCIM.
OpenID Connect SSO first is a prerequisite for SCIM user provisioning. Follow the OIDC setup guide [here](/miscellaneous/sso#openid-connect-oidc) and make sure to opt-in for SCIM provisioning.
Have you already created users manually and now wish to convert them to SCIM-provisioned users? Let us know the exact users you want to convert after submitting the request by contacting [support@allquiet.app](mailto:support@allquiet.app).
If your organizations already has an active OIDC tenant and you want to use it for SCIM provisioning, please contact [support@allquiet.app](mailto:support@allquiet.app). Please inform us whether SCIM provisioned users should be able to change their phone number and / or confirm their phone number via the Web app.
In your SCIM provider’s console, you will need to register All Quiet as a new SSO application.
For the integration, you will need to provide the **Base URL** and **API Key** of your All Quiet Organization.
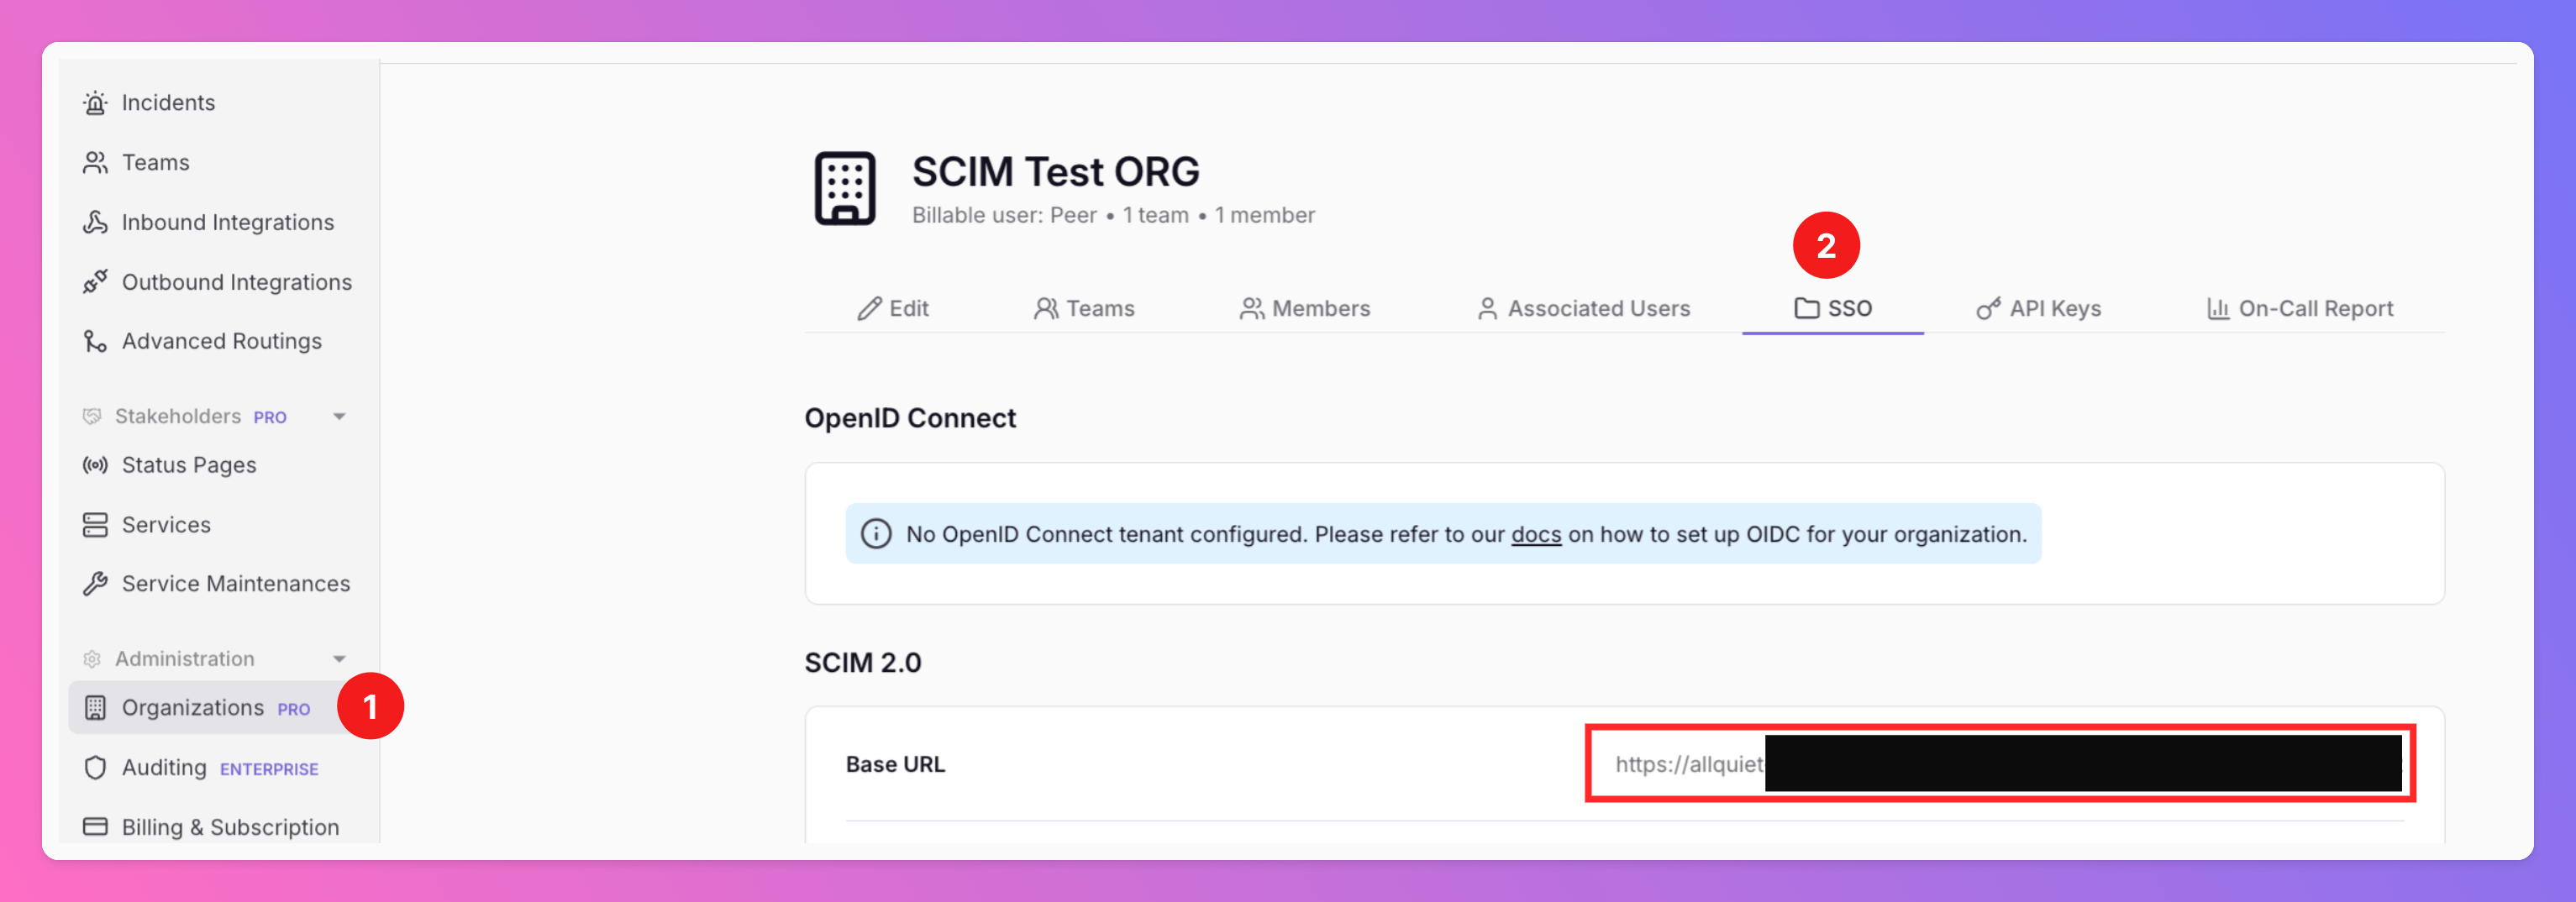
After approving your OIDC tenant and SCIM provisioning request, our team will create your Organization's **Base URL**. It will be visible under
1. `Organizations`.
2. Select your Organization and the tab `SSO`.
### Conclusion
Integrating your organization's SSO using OpenID Connect with All Quiet enhances your platform's security and user experience. With this setup, you ensure a consistent and secure access management system, aligned with your organizational policies and requirements.
## SCIM 2.0
### Step-by-Step-Guide
For this process, you need access to the API Keys and SSO tab of your organization, only accessible to users with *Organization Owner* role.
This integration allows your organization to leverage tools like Microsoft Entra for smoother user management in All Quiet.
To use SCIM, you first need to create an [Organization](/advanced/organizations) in All Quiet. Please note: The user who creates the Organization cannot be provisioned via SCIM. Therefore, we recommend to create the Organization with a "root user" that is not bound to a specific employee, e.g. [devops@yourcompany.com](mailto:devops@yourcompany.com). This way, you ensure all “real” on-call users and employee accounts can be provisioned. If you already set up the Org with your personal account, you can change your account’s email address via the Web app on /app/account to a root user email and later provision your personal email and account via SCIM.
OpenID Connect SSO first is a prerequisite for SCIM user provisioning. Follow the OIDC setup guide [here](/miscellaneous/sso#openid-connect-oidc) and make sure to opt-in for SCIM provisioning.
Have you already created users manually and now wish to convert them to SCIM-provisioned users? Let us know the exact users you want to convert after submitting the request by contacting [support@allquiet.app](mailto:support@allquiet.app).
If your organizations already has an active OIDC tenant and you want to use it for SCIM provisioning, please contact [support@allquiet.app](mailto:support@allquiet.app). Please inform us whether SCIM provisioned users should be able to change their phone number and / or confirm their phone number via the Web app.
In your SCIM provider’s console, you will need to register All Quiet as a new SSO application.
For the integration, you will need to provide the **Base URL** and **API Key** of your All Quiet Organization.
After approving your OIDC tenant and SCIM provisioning request, our team will create your Organization's **Base URL**. It will be visible under
1. `Organizations`.
2. Select your Organization and the tab `SSO`.
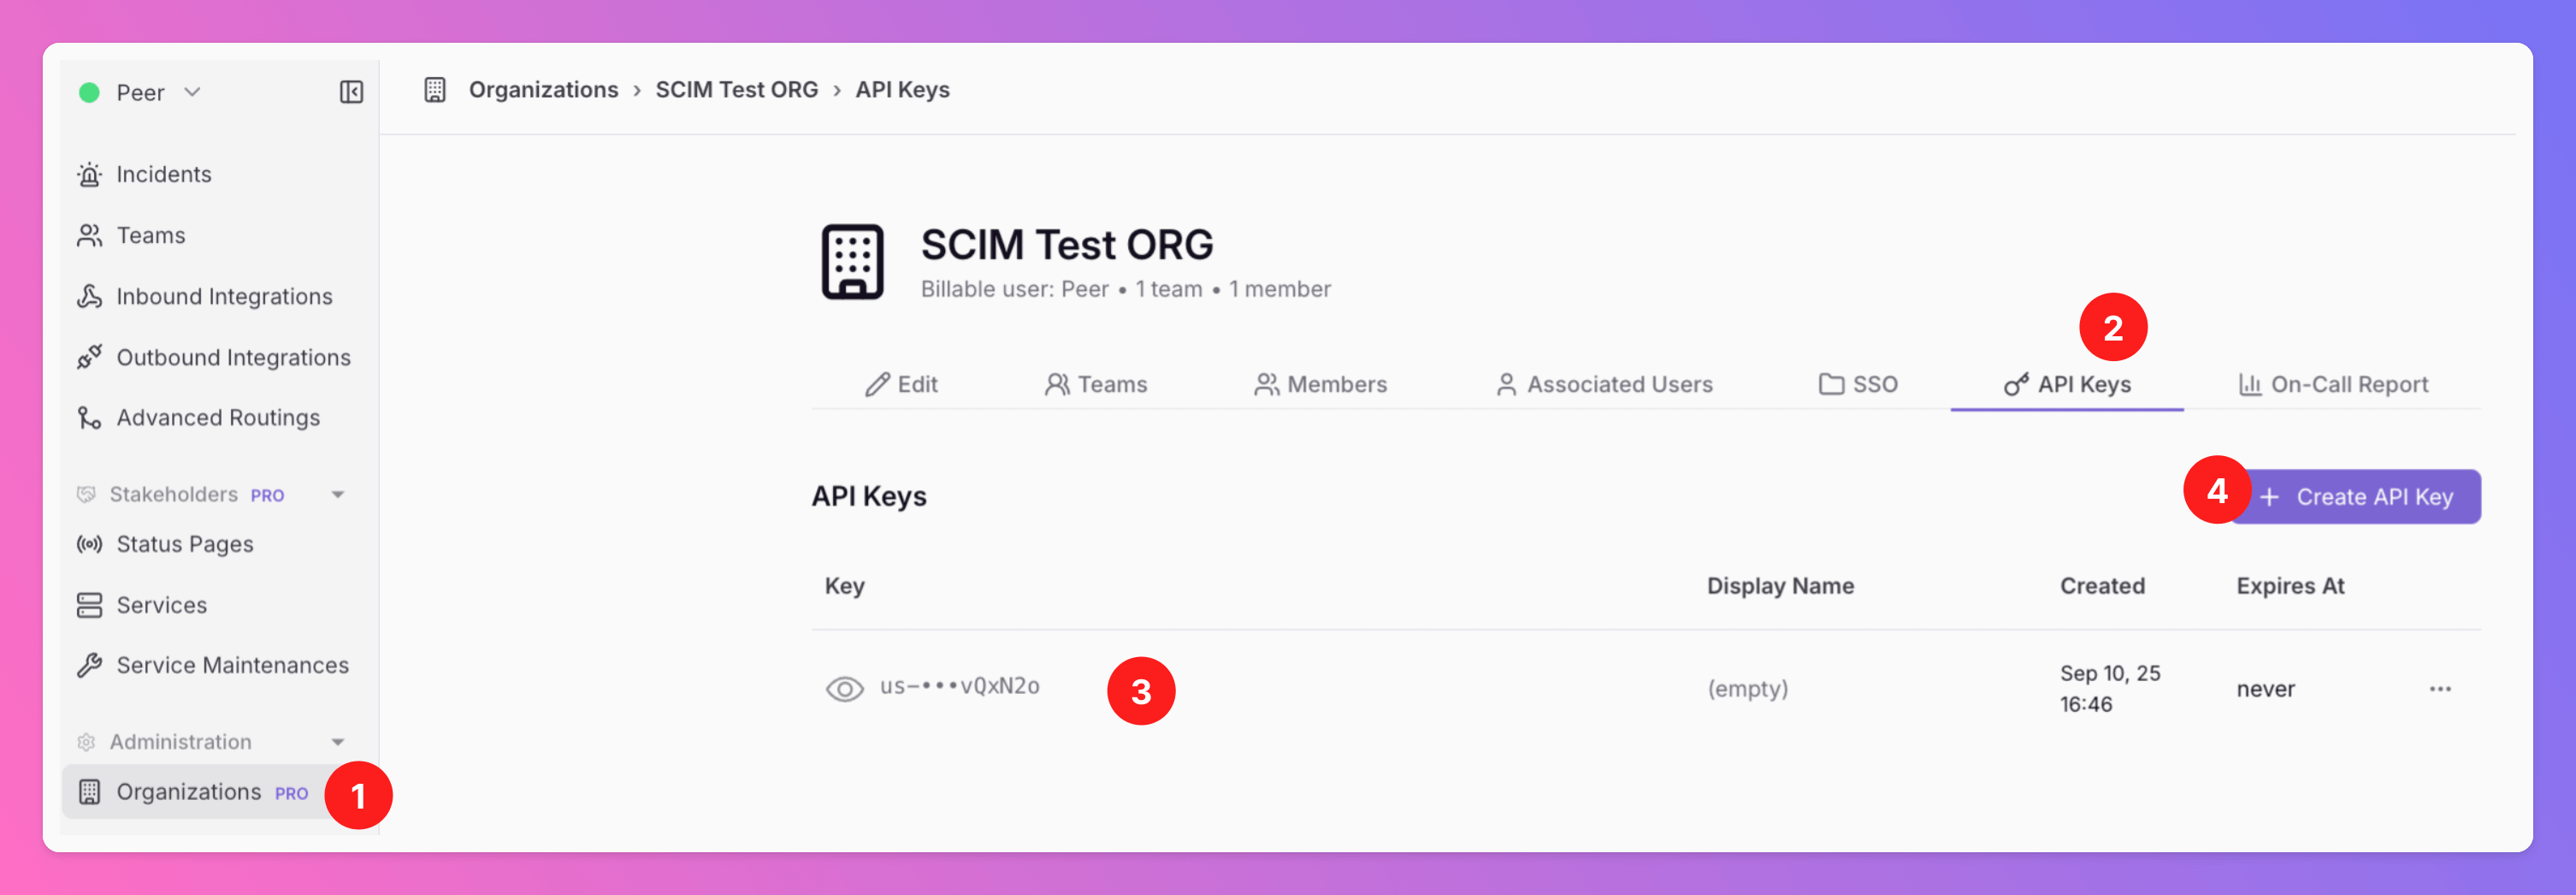
 Additionally, you'll need an **API Key**. To find or create your Organization's API Key, open
1. `Organizations`.
2. Select your Organization and the tab `API Keys`.
3. Retrieve your `API Key`.
4. Alternatively, click `+ Create API Key` if you haven’t created one yet.
Additionally, you'll need an **API Key**. To find or create your Organization's API Key, open
1. `Organizations`.
2. Select your Organization and the tab `API Keys`.
3. Retrieve your `API Key`.
4. Alternatively, click `+ Create API Key` if you haven’t created one yet.
 Both, **Base URL** and **API Key** will be necessary to activate All Quiet as a new SSO application of your SCIM provider and to establish a secure and reliable connection.
All Quiet stores all secrets strongly encrypted in our database to ensure the safety of your credentials.
Make sure to select the Users and User Groups you want to share with All Quiet in your SCIM provider's interface and activate the SCIM provisioning.
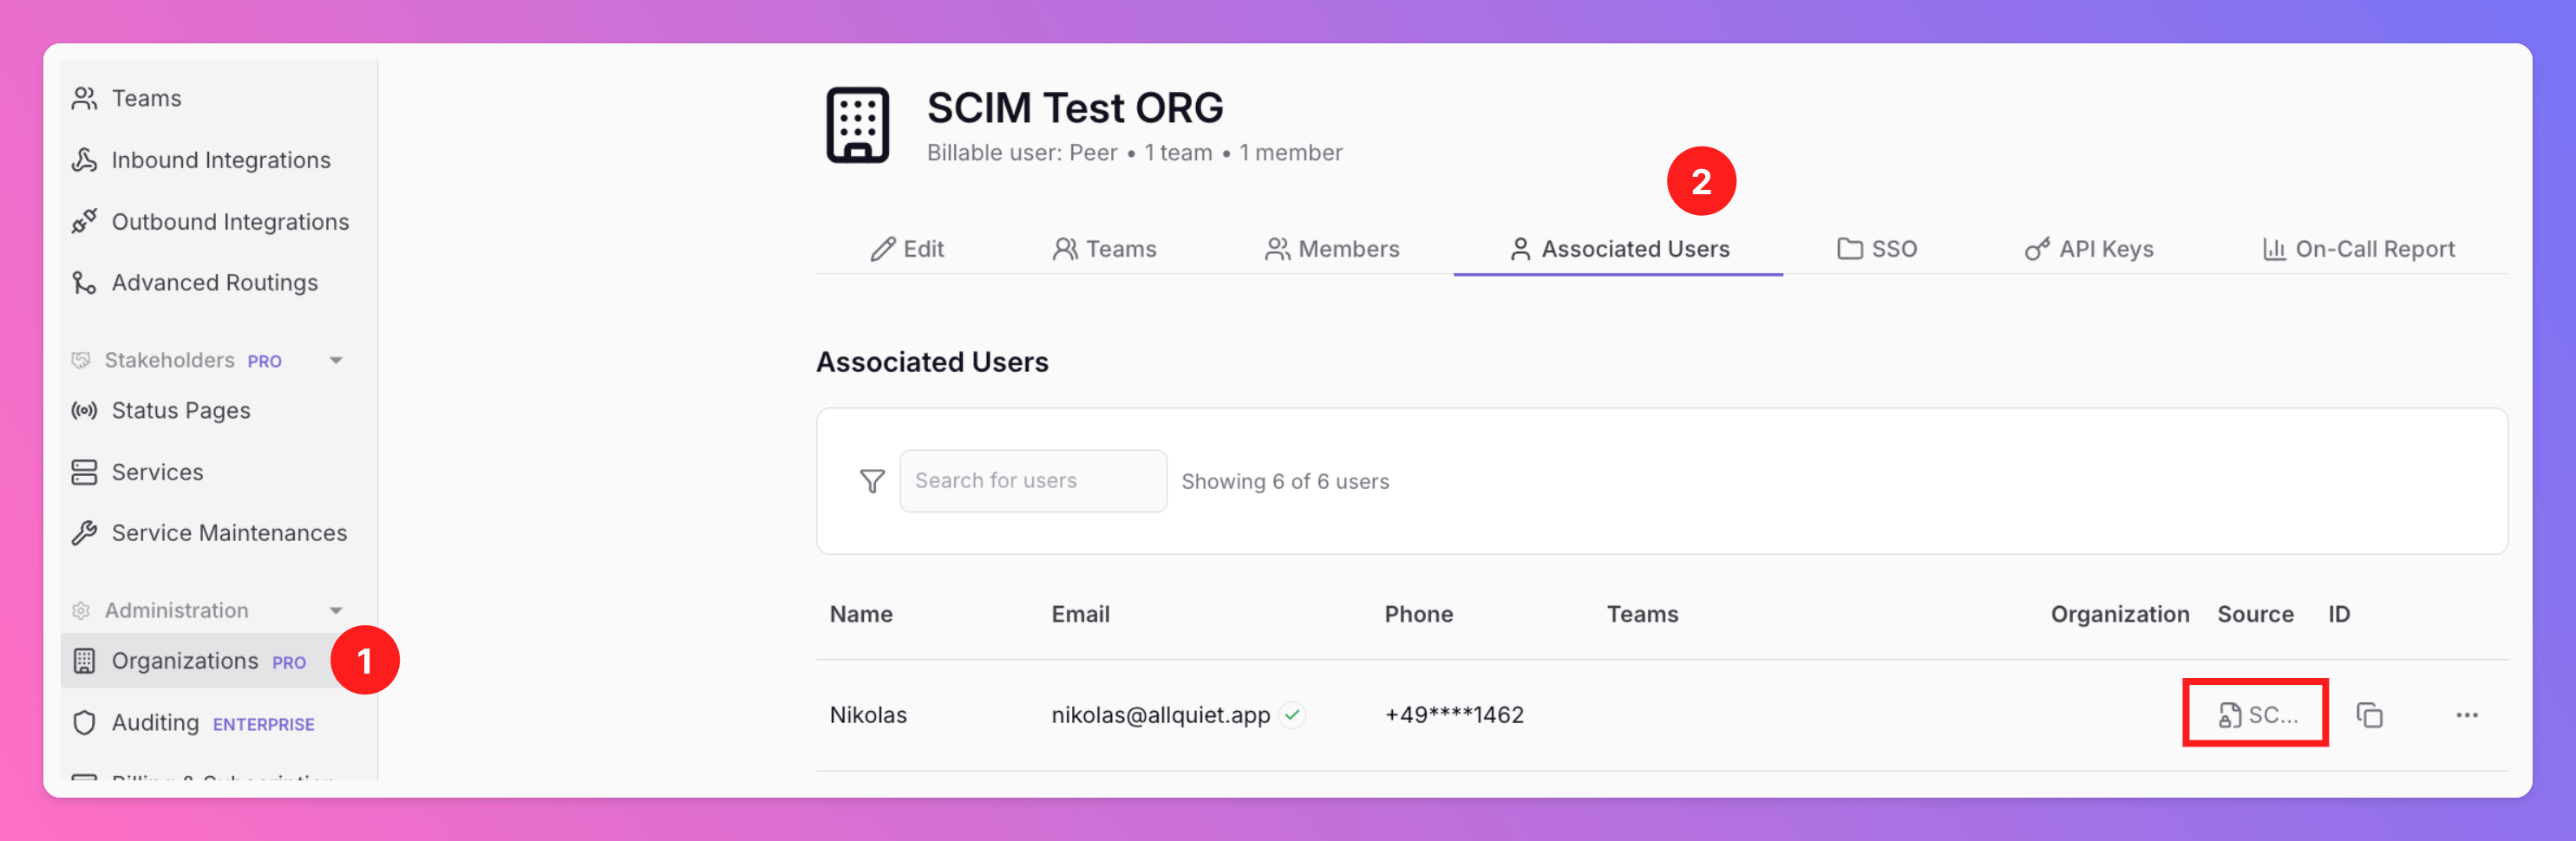
Once the setup is completed, you will find the users provisioned via SCIM under
1. Organizations
2. Tab `Associated Users`. The `Source` column will show which users got provisioned via SCIM.
Both, **Base URL** and **API Key** will be necessary to activate All Quiet as a new SSO application of your SCIM provider and to establish a secure and reliable connection.
All Quiet stores all secrets strongly encrypted in our database to ensure the safety of your credentials.
Make sure to select the Users and User Groups you want to share with All Quiet in your SCIM provider's interface and activate the SCIM provisioning.
Once the setup is completed, you will find the users provisioned via SCIM under
1. Organizations
2. Tab `Associated Users`. The `Source` column will show which users got provisioned via SCIM.
 Your SCIM provisioned users can now log in via OIDC. They won't have a password, so they need to use the OIDC login button to log in.
To log in to All Quiet, your users need to
1. Select the correct hosting region
2. Click on `Continue with OpenID Connect`
Your SCIM provisioned users can now log in via OIDC. They won't have a password, so they need to use the OIDC login button to log in.
To log in to All Quiet, your users need to
1. Select the correct hosting region
2. Click on `Continue with OpenID Connect`
 You can use the User Groups from your SCIM provider for Team & Organization Management in All Quiet. This is a convenient and much leaner alternative to [manual team invites](/essentials/teams#inviting-members) for larger organizations.
Go to `Organizations > SSO.`
**Manual Provisioning Mode**
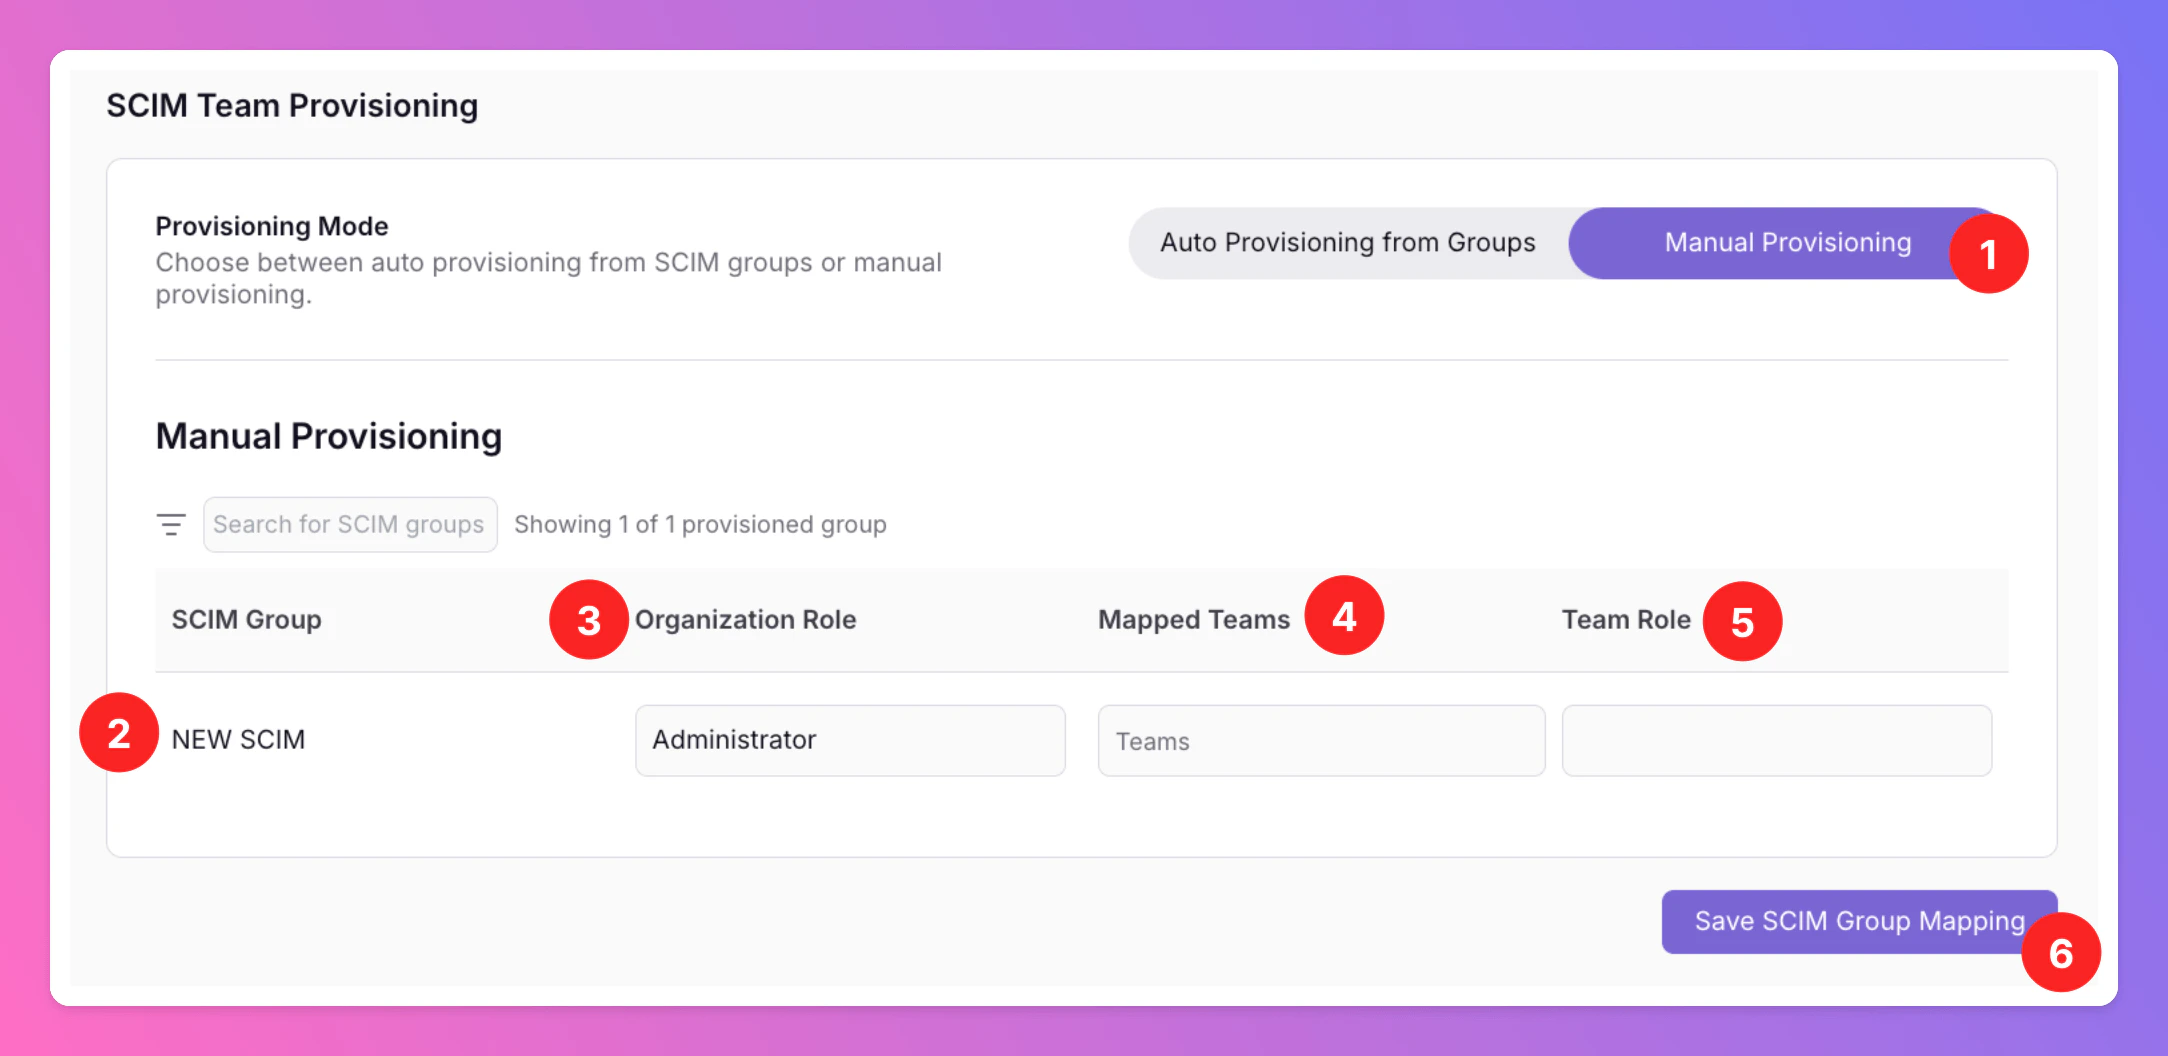
1. First, you need to select your `Provisioning Mode`. We recommend `Manual Provisioning` if you want to be flexible and want to be able to switch SCIM User Groups between All Quiet Teams.
Switching the **Provisioning Mode** between **Manual** and **Auto** will remove all previously provisioned users from their teams, as this action resets the existing mappings. To avoid disruptions, we recommend choosing a provisioning mode and sticking with it.
2. Find your SCIM User Groups below.
3. Optionally, you can assign *Organization Member*, *Organization Administrator* or *Organization Owner* roles to the provisioned users.
4. Map your SCIM User Groups to All Quiet Teams. For Manual Provisioning Mode, there have to be existing teams for you to be able to map them.
Changing an existing mapping will add Users to other All Quiet Teams and / or remove them from their old Teams, depending on your selection. If you use [the Teams section to invite Users](/essentials/teams#inviting-members) from your SCIM Groups to your All Quiet Teams, those users will remain in the Team, even if you later remove their SCIM Group from the Team.
5. Choose whether provisioned users should be assigned *Member* or *Administrator* roles within the teams. You can update these roles via the Teams section at any time for each User. Learn more about team roles [here](/essentials/teams#roles).
6. Save your settings. You will find the Users from your SCIM User Groups in your All Quiet Teams.
You can use the User Groups from your SCIM provider for Team & Organization Management in All Quiet. This is a convenient and much leaner alternative to [manual team invites](/essentials/teams#inviting-members) for larger organizations.
Go to `Organizations > SSO.`
**Manual Provisioning Mode**
1. First, you need to select your `Provisioning Mode`. We recommend `Manual Provisioning` if you want to be flexible and want to be able to switch SCIM User Groups between All Quiet Teams.
Switching the **Provisioning Mode** between **Manual** and **Auto** will remove all previously provisioned users from their teams, as this action resets the existing mappings. To avoid disruptions, we recommend choosing a provisioning mode and sticking with it.
2. Find your SCIM User Groups below.
3. Optionally, you can assign *Organization Member*, *Organization Administrator* or *Organization Owner* roles to the provisioned users.
4. Map your SCIM User Groups to All Quiet Teams. For Manual Provisioning Mode, there have to be existing teams for you to be able to map them.
Changing an existing mapping will add Users to other All Quiet Teams and / or remove them from their old Teams, depending on your selection. If you use [the Teams section to invite Users](/essentials/teams#inviting-members) from your SCIM Groups to your All Quiet Teams, those users will remain in the Team, even if you later remove their SCIM Group from the Team.
5. Choose whether provisioned users should be assigned *Member* or *Administrator* roles within the teams. You can update these roles via the Teams section at any time for each User. Learn more about team roles [here](/essentials/teams#roles).
6. Save your settings. You will find the Users from your SCIM User Groups in your All Quiet Teams.
 **Auto Provisioning from Groups**
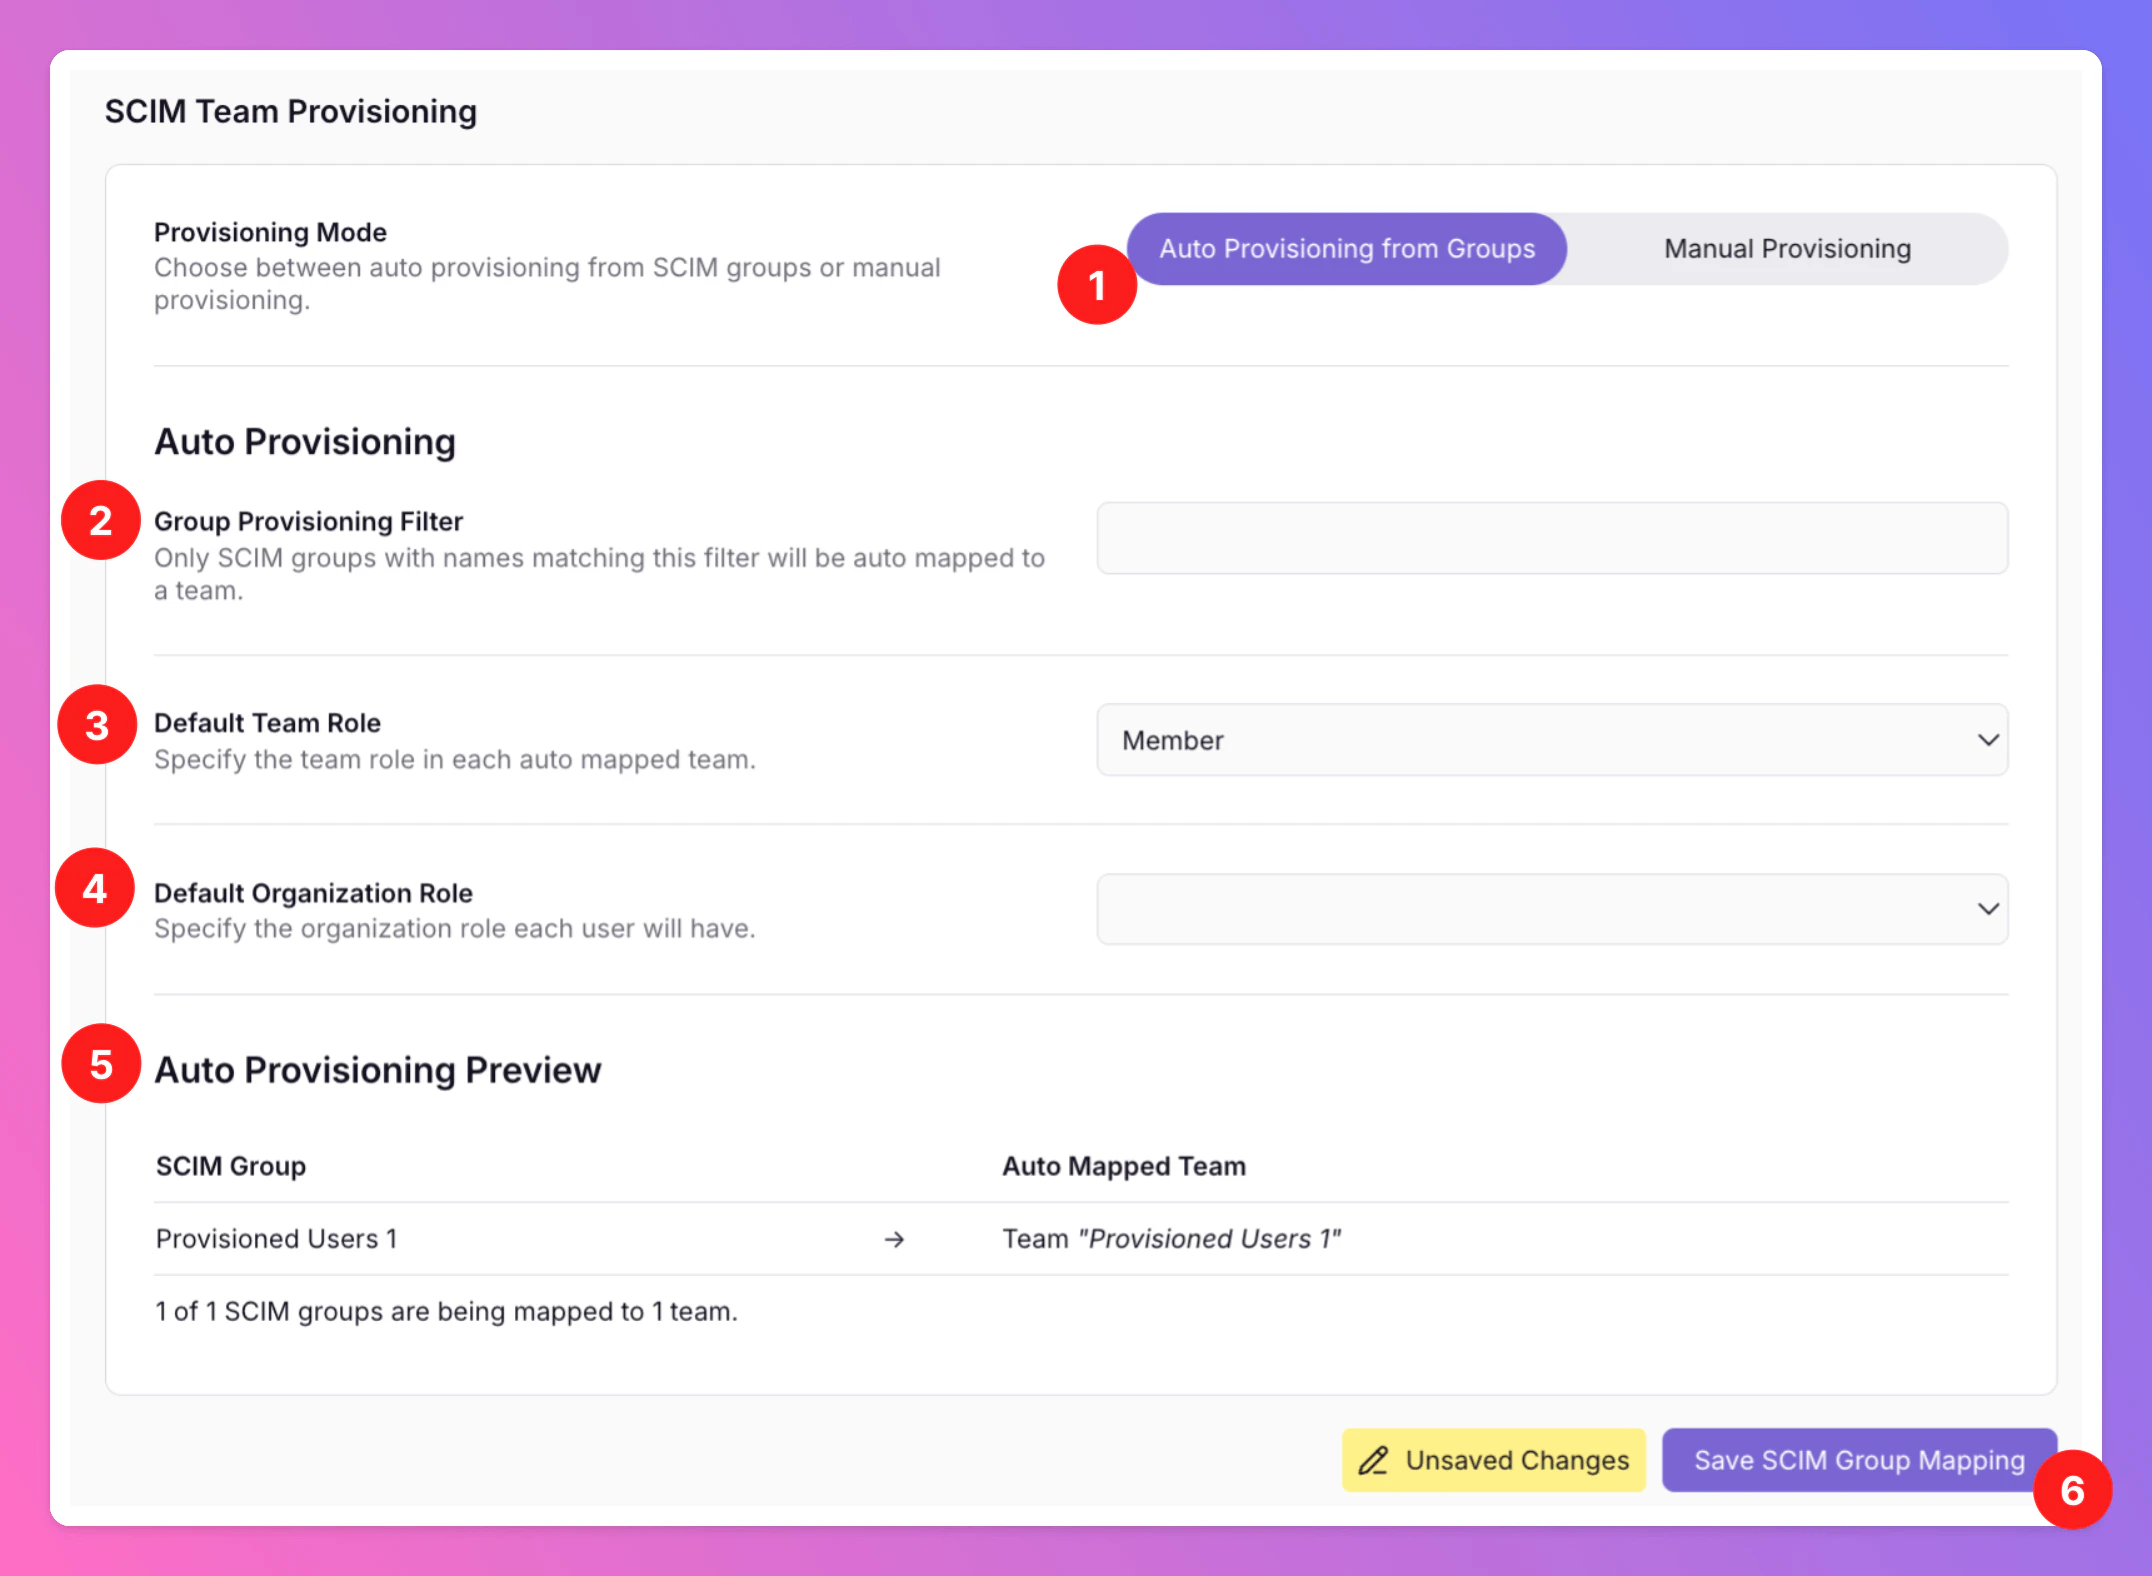
1. In this case, we've selected **Auto Provisioning from Groups** as provisioning mode. For this mode you don't have to create All Quiet teams in advance. However, it's also much stiffer.
2. Auto Provisioning options include a **Group Provisioning Filter**: You can use this field if you only want certain SCIM User Groups to be auto provisioned to All Quiet Teams.
3. **Default Team Role**: Choose whether provisioned users should be assigned *Member* or *Administrator* roles within the **Teams**.
4. **Default Organization Role**: You can additionally assign *Member*,*Administrator* or *Owner* roles within the **Organization**.
5. A preview showing which SCIM User Groups will create which All Quiet Teams.
6. Again, safe to create the teams and roles through auto provisioning mode.
**Auto Provisioning from Groups**
1. In this case, we've selected **Auto Provisioning from Groups** as provisioning mode. For this mode you don't have to create All Quiet teams in advance. However, it's also much stiffer.
2. Auto Provisioning options include a **Group Provisioning Filter**: You can use this field if you only want certain SCIM User Groups to be auto provisioned to All Quiet Teams.
3. **Default Team Role**: Choose whether provisioned users should be assigned *Member* or *Administrator* roles within the **Teams**.
4. **Default Organization Role**: You can additionally assign *Member*,*Administrator* or *Owner* roles within the **Organization**.
5. A preview showing which SCIM User Groups will create which All Quiet Teams.
6. Again, safe to create the teams and roles through auto provisioning mode.
 ### Provisioned Users Cannot Be Edited via Web App.
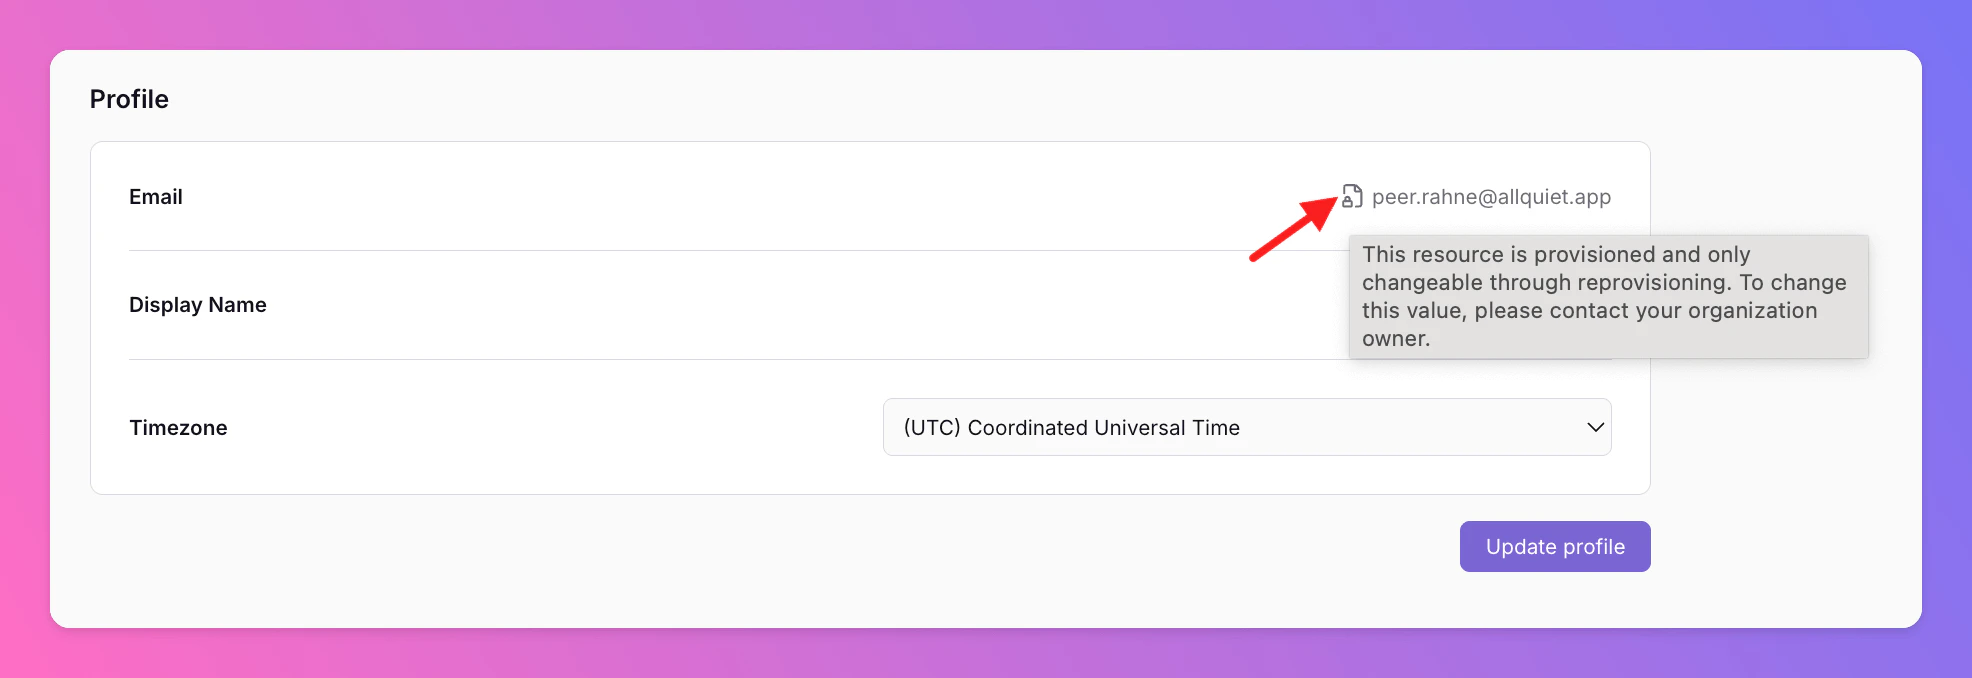
To ensure that the resources managed via your SCIM provider stay in sync with your setup, we lock provisioned resources within the Web App. This means these resources cannot be edited or deleted directly through the Web App's interface.
Provisioned resources are marked with an icon, and hovering over it will display a message explaining why the resource is locked and cannot be modified via the Web App.
### Provisioned Users Cannot Be Edited via Web App.
To ensure that the resources managed via your SCIM provider stay in sync with your setup, we lock provisioned resources within the Web App. This means these resources cannot be edited or deleted directly through the Web App's interface.
Provisioned resources are marked with an icon, and hovering over it will display a message explaining why the resource is locked and cannot be modified via the Web App.
 Exception: Depending on your organization's settings, SCIM provisioned users can still add / change their phone number via the Web App. They can also manage their [personal notification preferences](/essentials/channels#customizable-notification-preferences). When provisioning phone numbers from your Identity Provider (IdP), All Quiet imports the **primary** phone number by default and only falls back to the **secondary** phone number field if the primary field is empty.
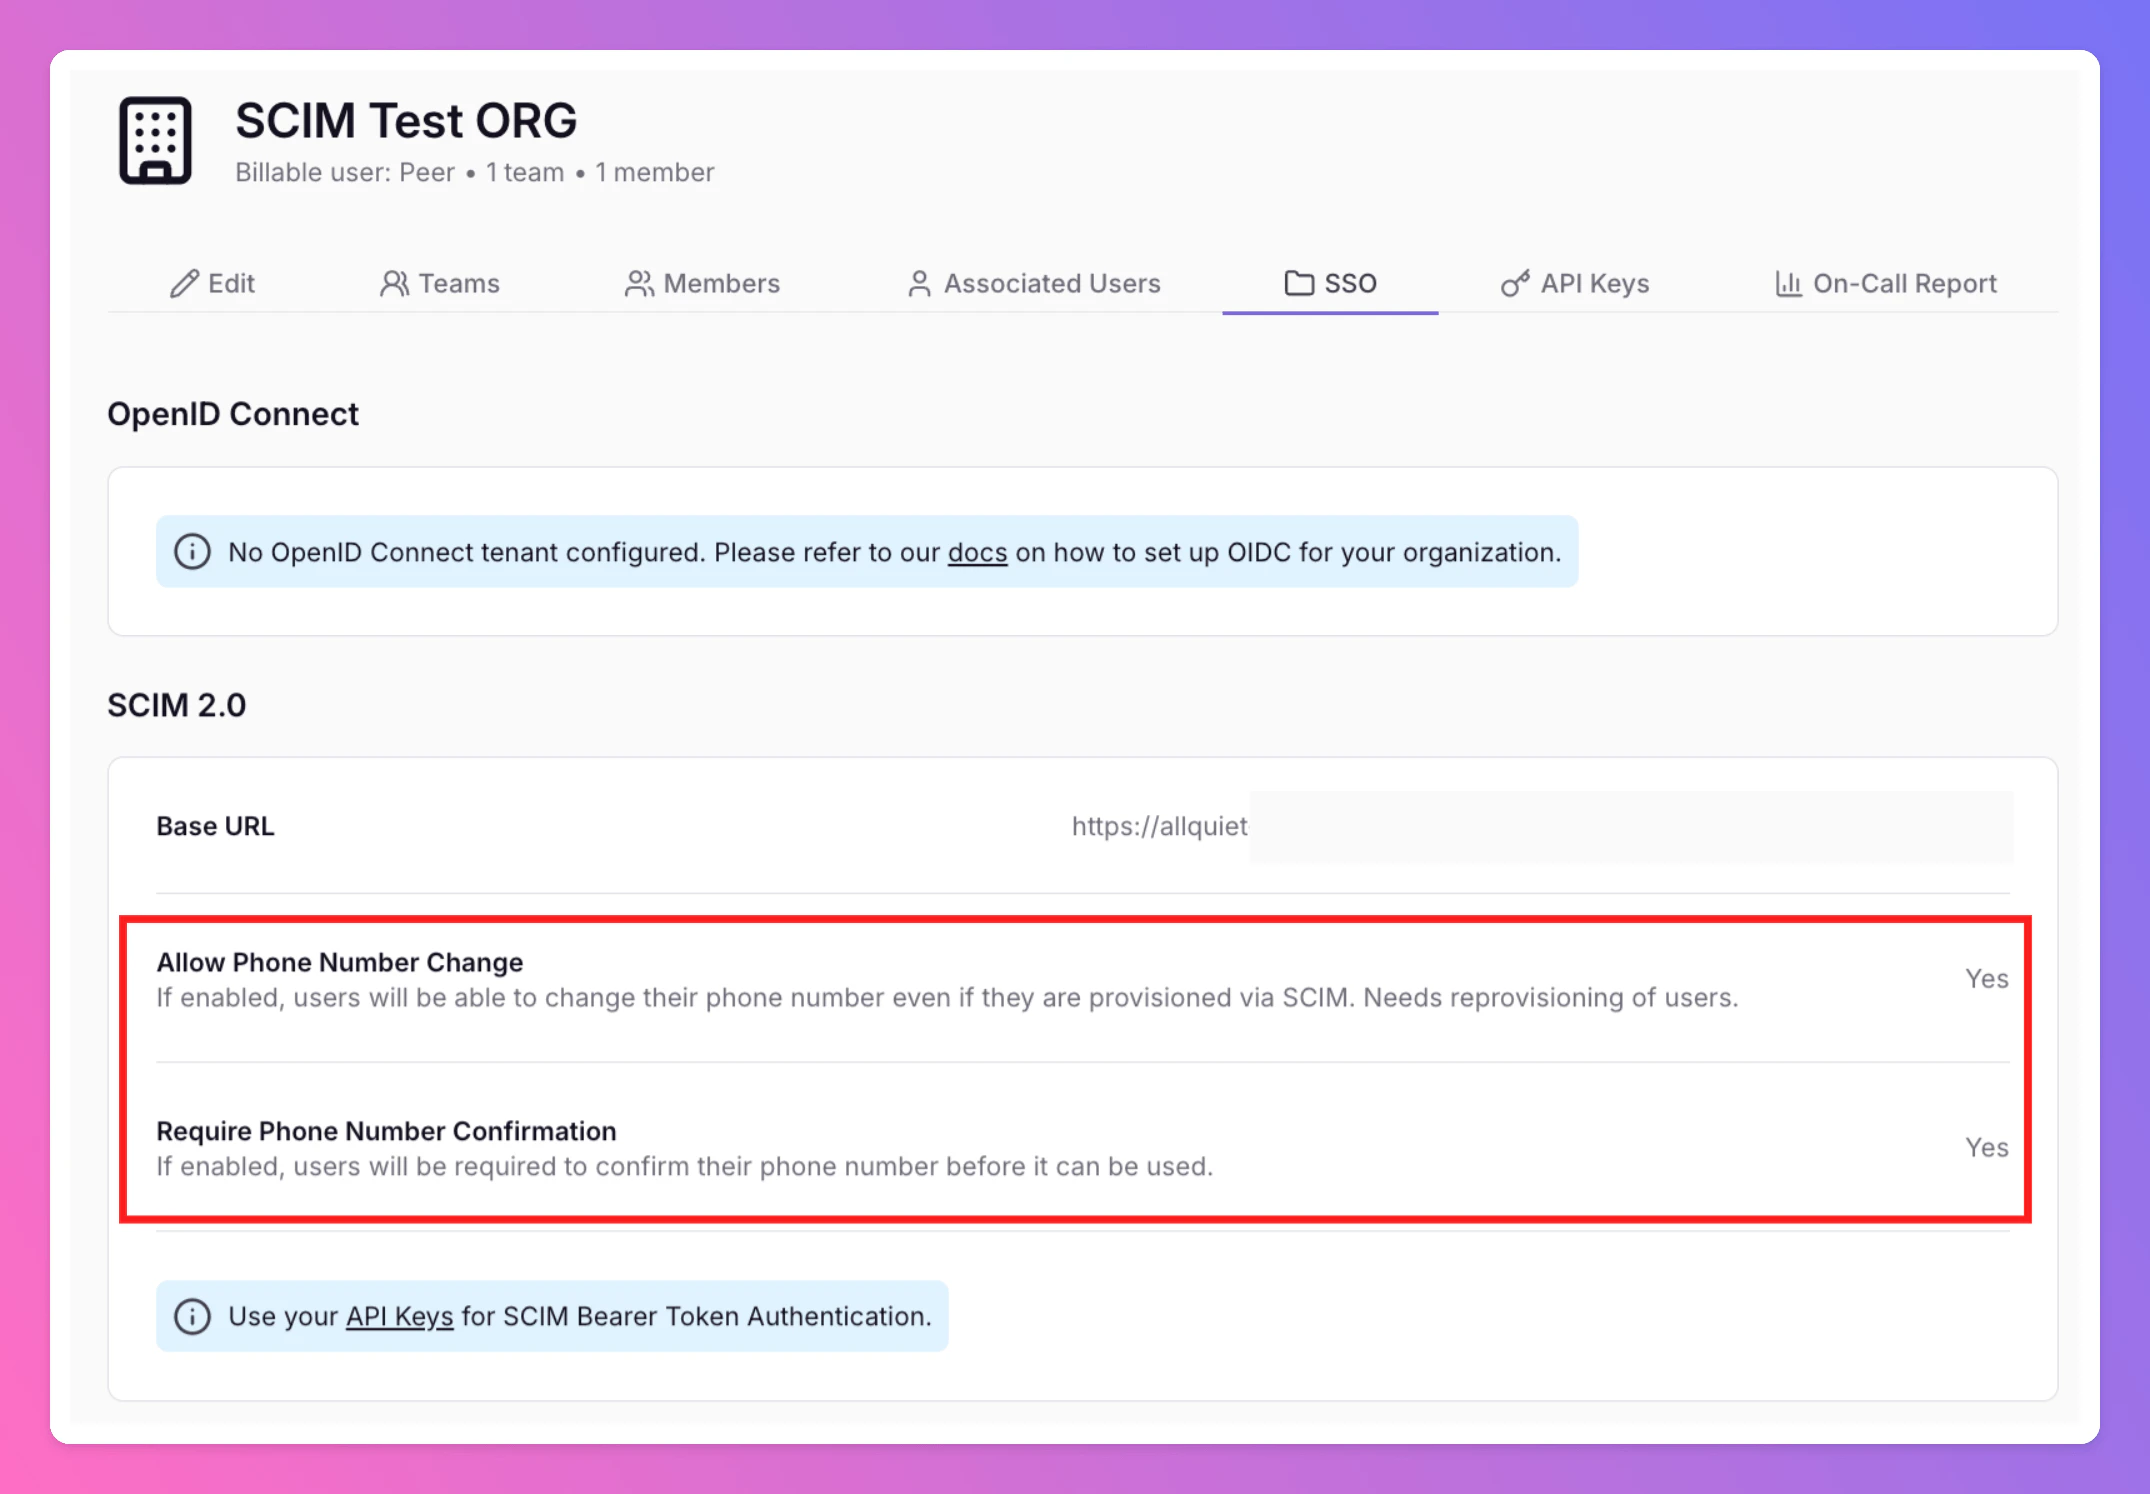
Your current settings can be found on the `SSO` page of your organization. If you want to change your settings, please contact [support@allquiet.app](mailto:support@allquiet.app).
Exception: Depending on your organization's settings, SCIM provisioned users can still add / change their phone number via the Web App. They can also manage their [personal notification preferences](/essentials/channels#customizable-notification-preferences). When provisioning phone numbers from your Identity Provider (IdP), All Quiet imports the **primary** phone number by default and only falls back to the **secondary** phone number field if the primary field is empty.
Your current settings can be found on the `SSO` page of your organization. If you want to change your settings, please contact [support@allquiet.app](mailto:support@allquiet.app).