> ## Documentation Index
> Fetch the complete documentation index at: https://docs.allquiet.app/llms.txt
> Use this file to discover all available pages before exploring further.
# Webhook
> Connect Any Third-Party Platform with All Quiet via `HTTP calls`
Setup time: 6 Min
Maximize your team's efficiency with All Quiet's outbound webhooks. Connect seamlessly with third-party platforms, enabling real-time alerts and maintaining operational awareness.
## Create Outbound Integration
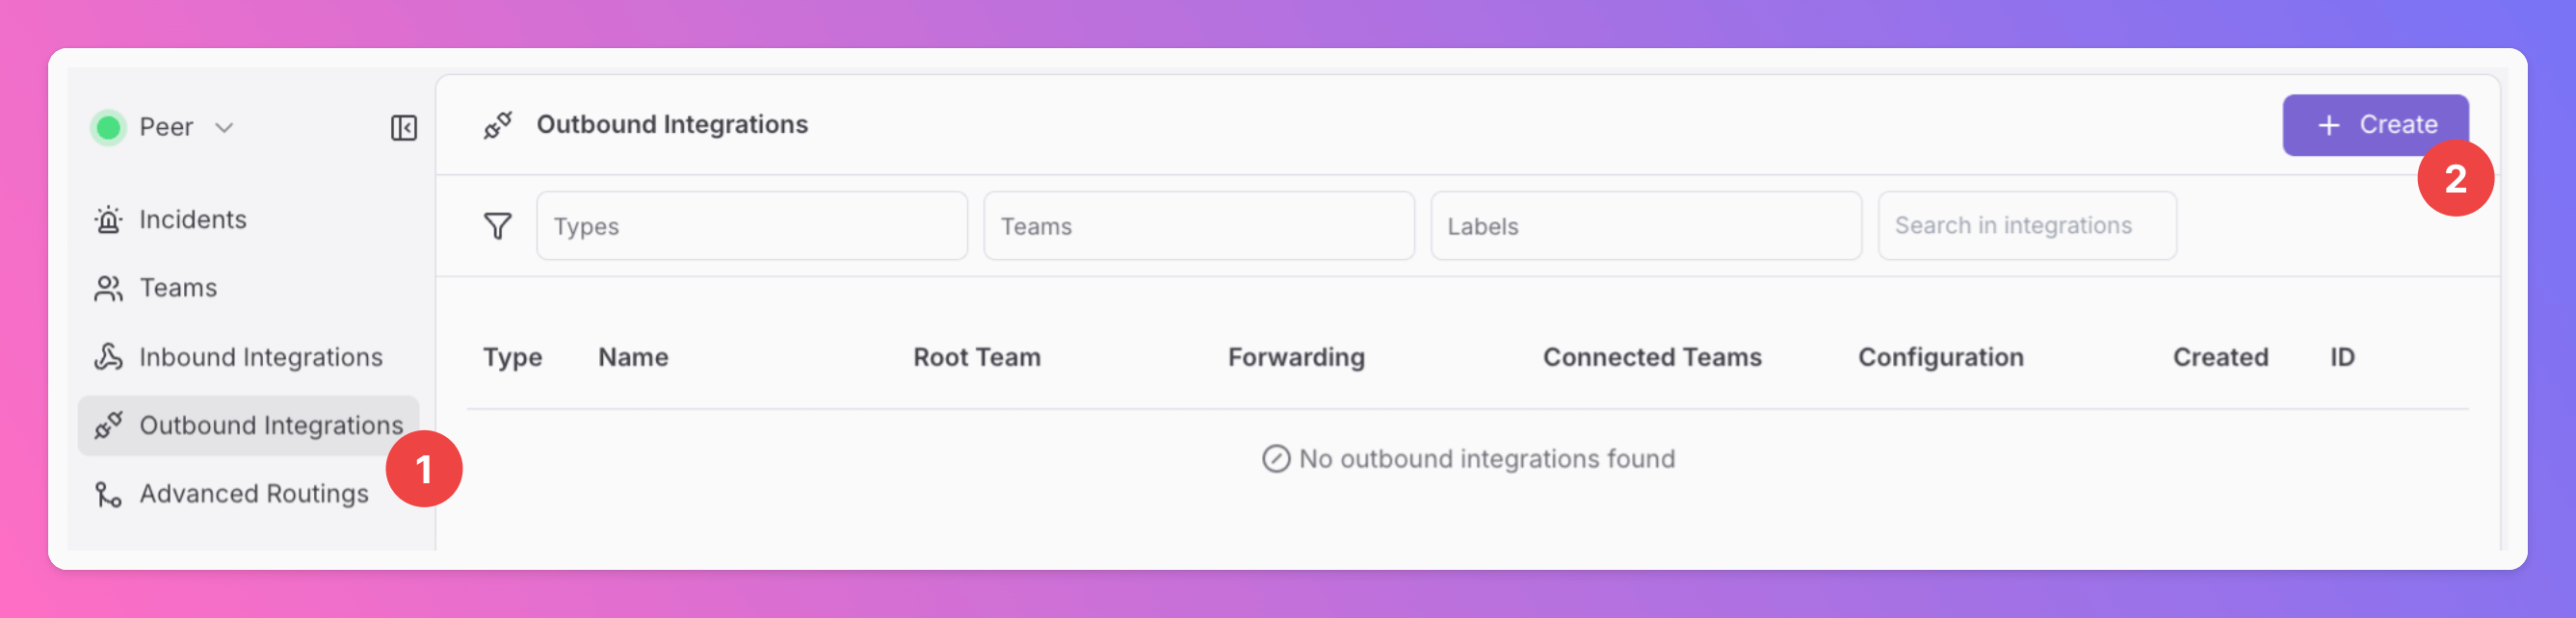
1. Click on the `Outbound Integrations` tab.
2. Click on `+ Create`.
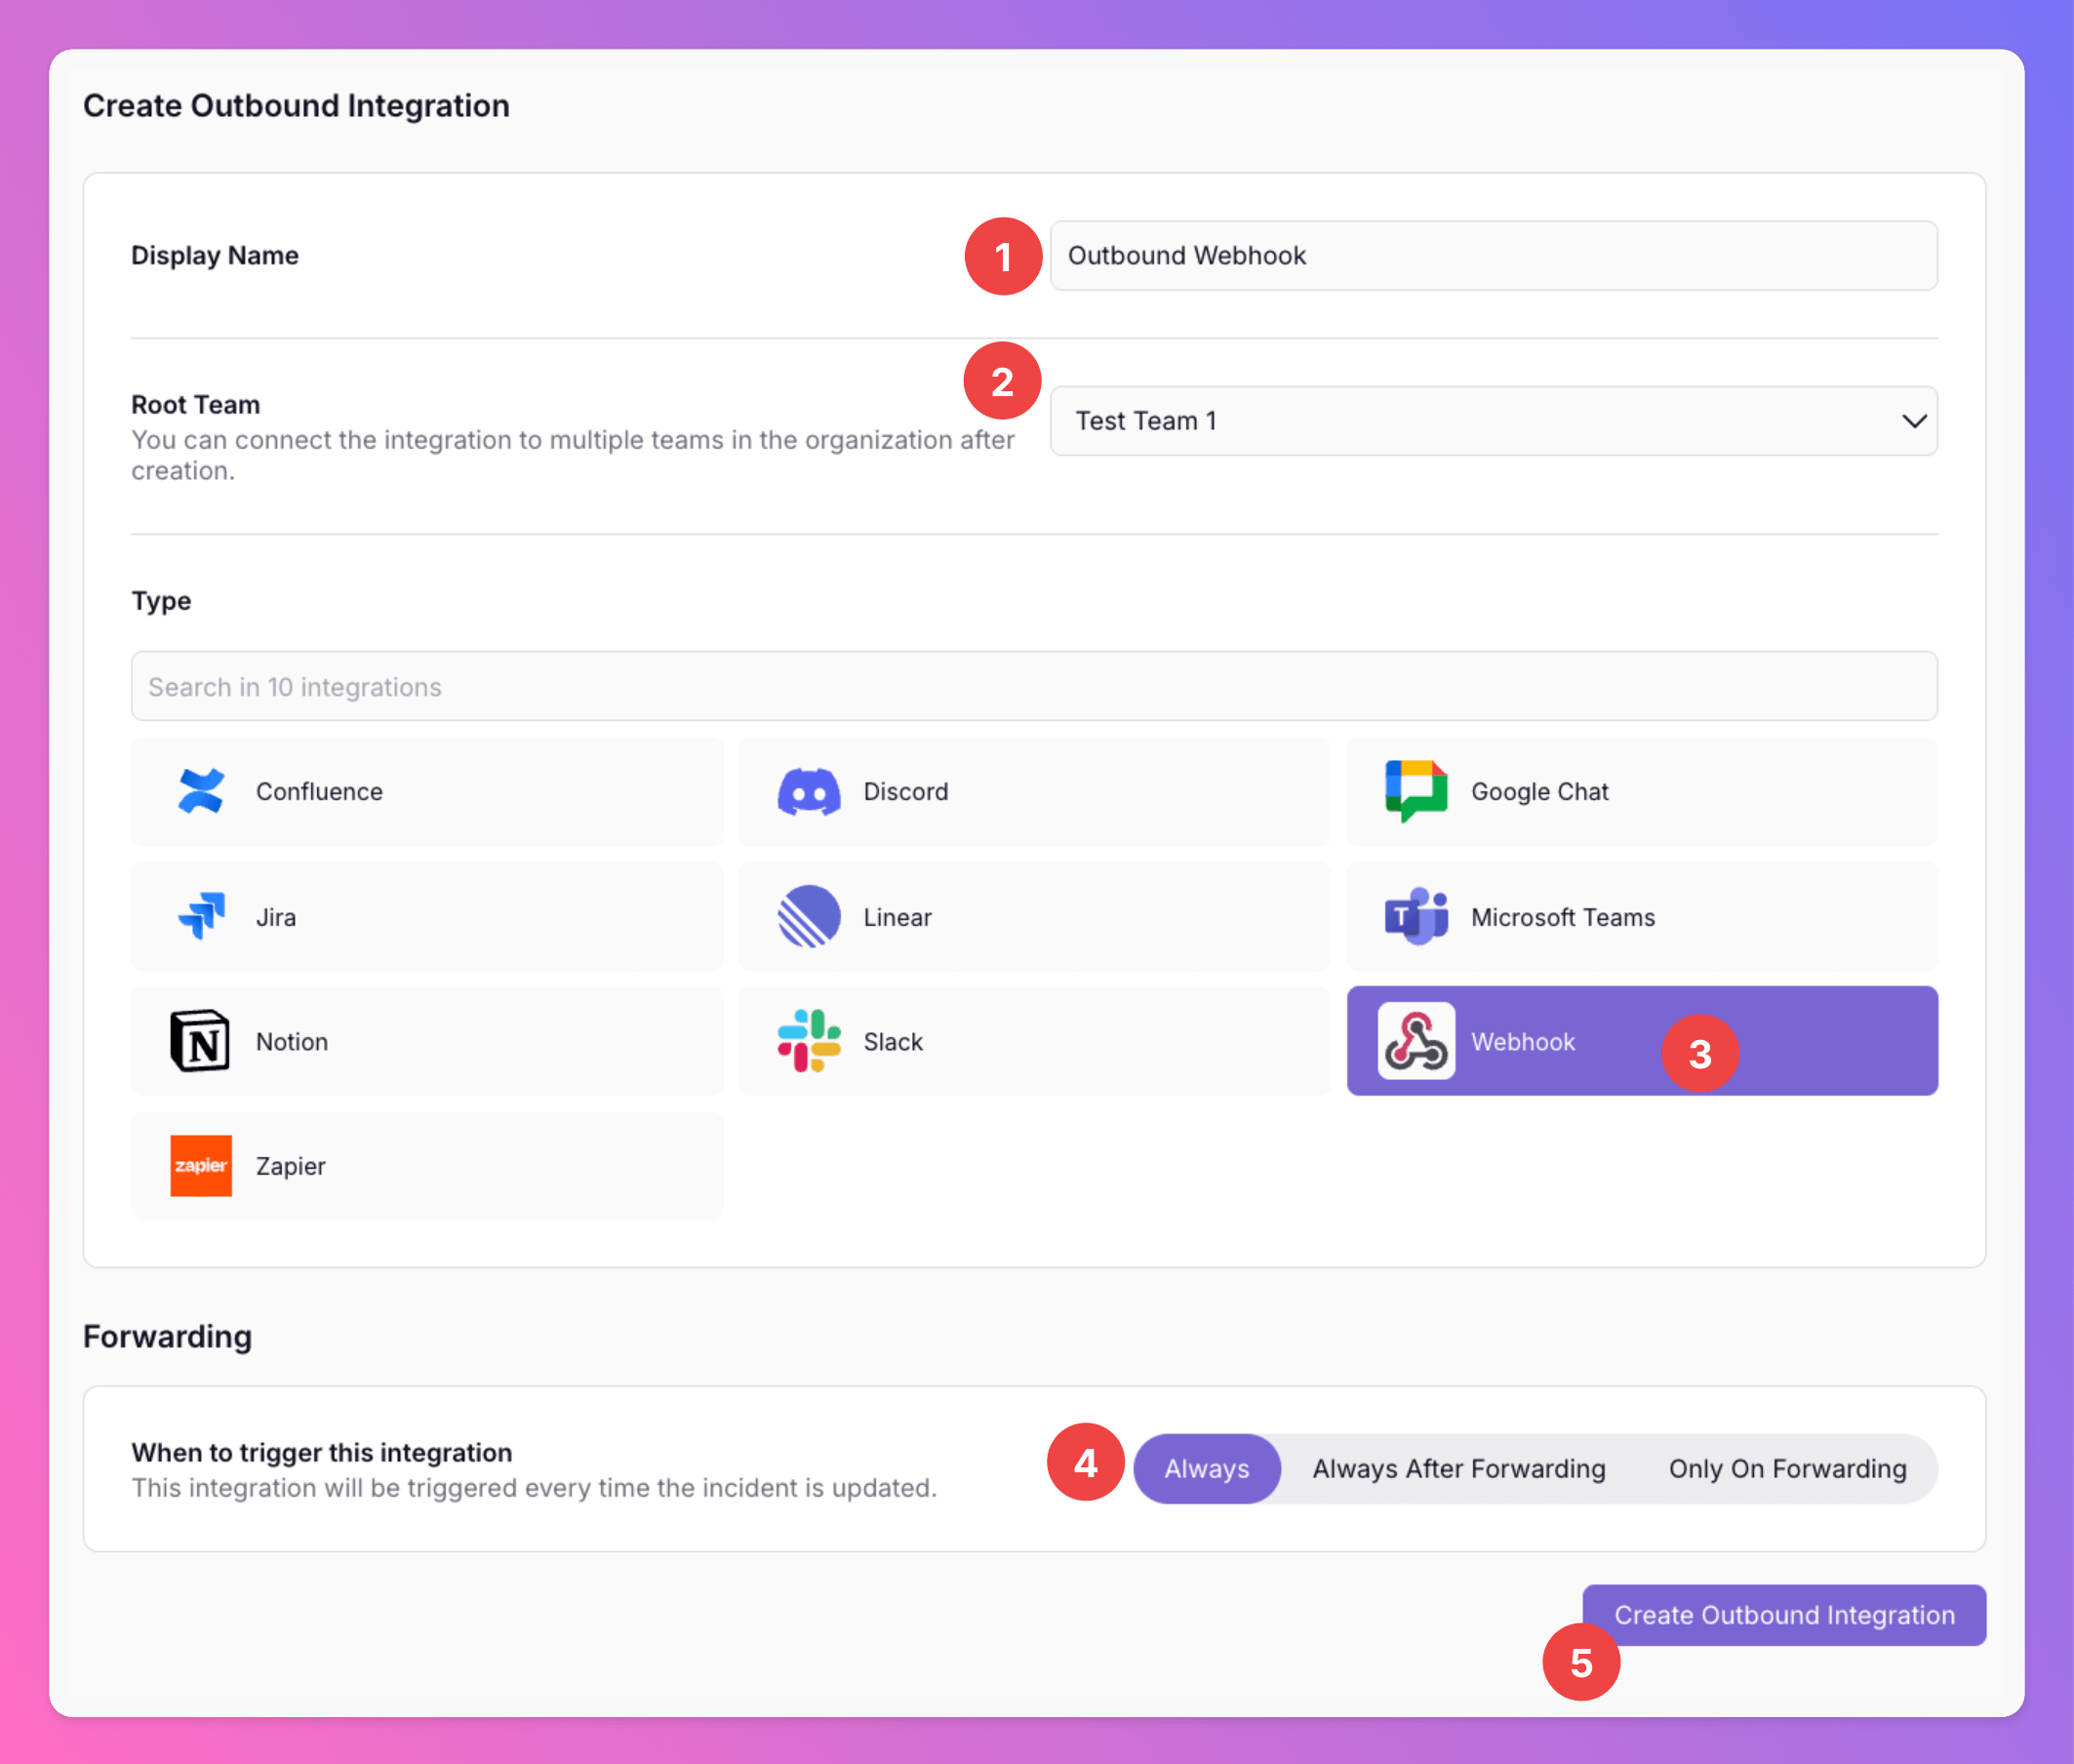
 1. Enter a `Display Name` for your integration, e.g. "Outbound Webhook".
2. Select a `Team`. For Organizations with Pro and Enterprise plan: This is going to be the root team of your integration. You will be able to add additional teams in the next step.
3. Select `Webhook` as the integration's type.
4. Forwarding settings:
1. **Default:** `Always` will automatically forward all incidents to your Webhook, unless excluded by [advanced routing rules](/advanced/routing).
2. **Alternative 1**: `Always After Forwarding` will only sent requests if users [manually forward specific incidents](/essentials/incident#forwarding) or if you set up [advanced routing rules](/advanced/routing) for your Webhook Outbound integration that automatically forward incidents in specific scenarios. **After Forwarding, all updates** of the incident **will also be pushed to the Outbound Webhook**.
3. **Alternative 2**: `Only On Forwarding` will only forward a snapshot of the current incident history to your Outbound Webhook in the moment users [manually forward specific incidents](/essentials/incident#forwarding) or if you set up [advanced routing rules](/advanced/routing) for your Webhook Outbound integration that automatically forwards incidents in specific scenarios. We will **not send** any incident **updates** to the Outbound Webhook **afterwards**.
You can change your selection anytime.
5. Click `Create Outbound Integration`.
1. Enter a `Display Name` for your integration, e.g. "Outbound Webhook".
2. Select a `Team`. For Organizations with Pro and Enterprise plan: This is going to be the root team of your integration. You will be able to add additional teams in the next step.
3. Select `Webhook` as the integration's type.
4. Forwarding settings:
1. **Default:** `Always` will automatically forward all incidents to your Webhook, unless excluded by [advanced routing rules](/advanced/routing).
2. **Alternative 1**: `Always After Forwarding` will only sent requests if users [manually forward specific incidents](/essentials/incident#forwarding) or if you set up [advanced routing rules](/advanced/routing) for your Webhook Outbound integration that automatically forward incidents in specific scenarios. **After Forwarding, all updates** of the incident **will also be pushed to the Outbound Webhook**.
3. **Alternative 2**: `Only On Forwarding` will only forward a snapshot of the current incident history to your Outbound Webhook in the moment users [manually forward specific incidents](/essentials/incident#forwarding) or if you set up [advanced routing rules](/advanced/routing) for your Webhook Outbound integration that automatically forwards incidents in specific scenarios. We will **not send** any incident **updates** to the Outbound Webhook **afterwards**.
You can change your selection anytime.
5. Click `Create Outbound Integration`.
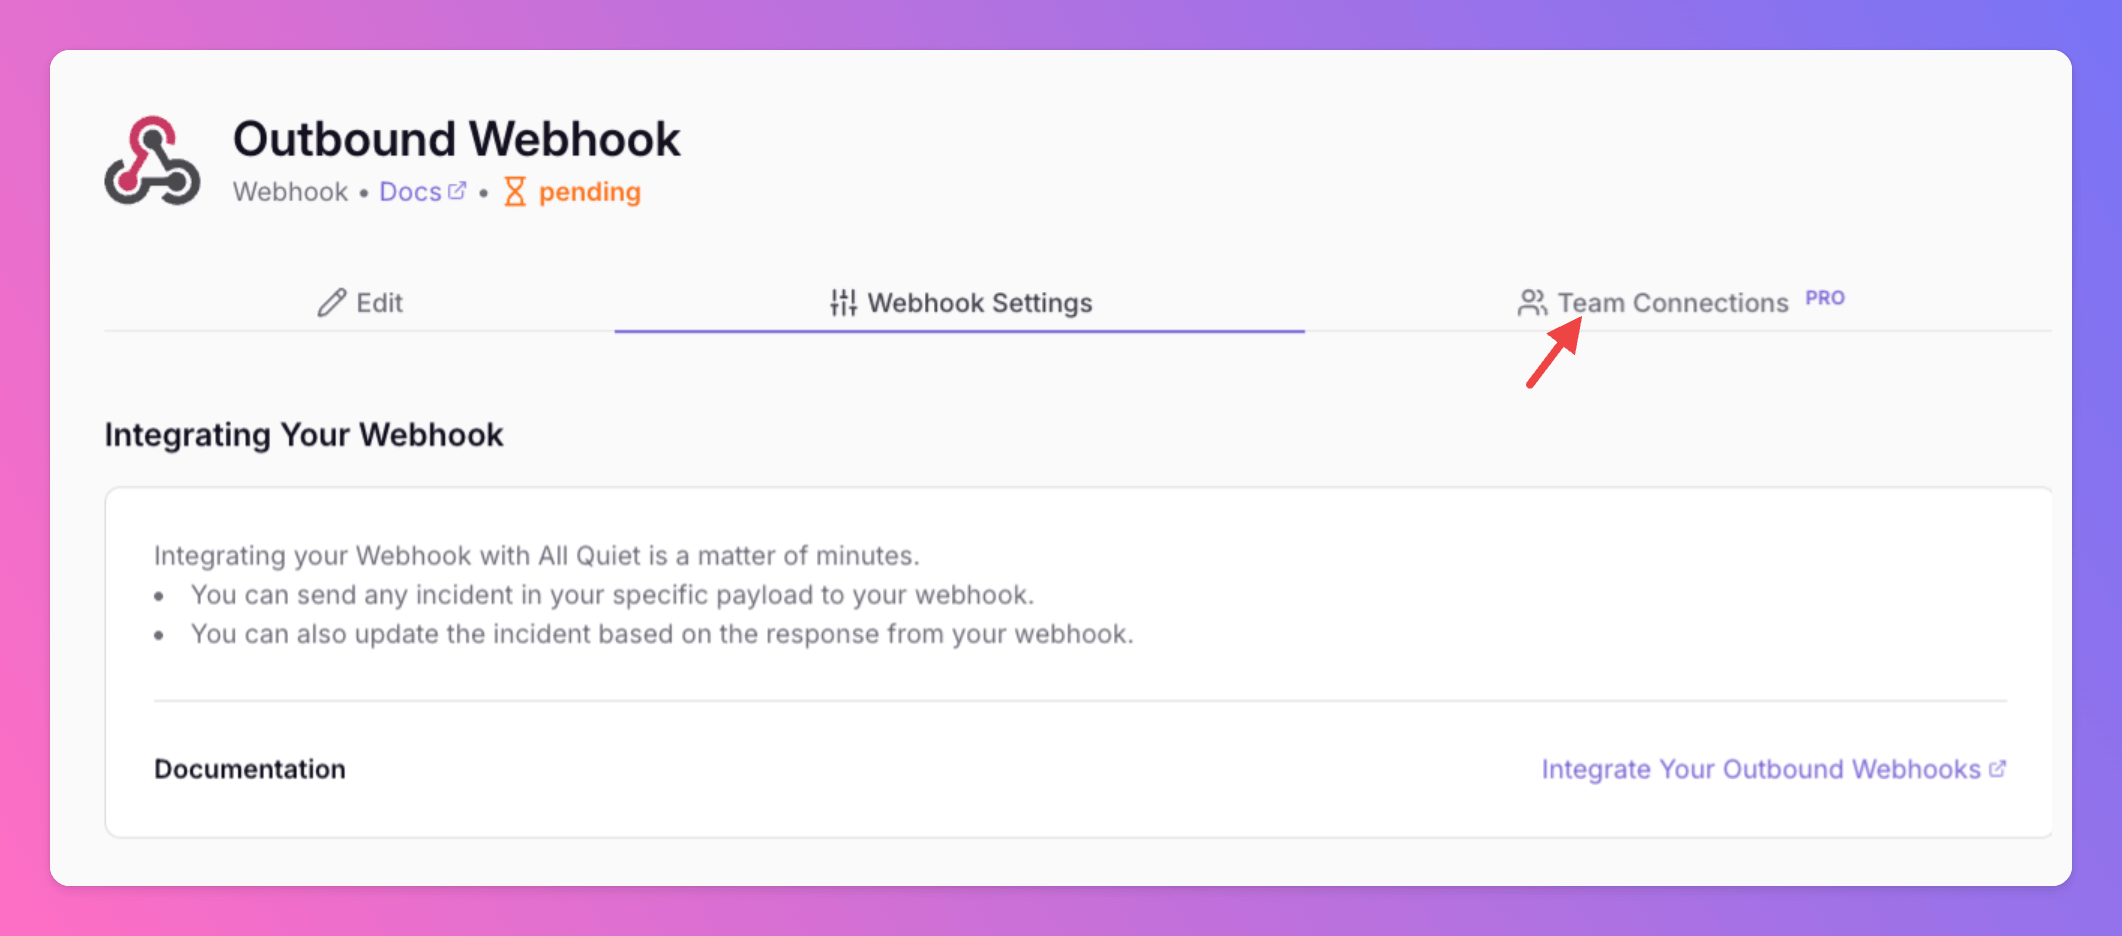
 After successfully creating your new outbound integration, you'll be redirected to the details page automatically.
**Only for Pro and Enterprise plan:** The root team is pre-selected, and you can add the integration to further teams within the root team's organization. *Team Administrators* can add / remove those teams they are an admin in, *Organization Administrators* & *Organization Owners* can manage the connections to all teams of the organization.
After successfully creating your new outbound integration, you'll be redirected to the details page automatically.
**Only for Pro and Enterprise plan:** The root team is pre-selected, and you can add the integration to further teams within the root team's organization. *Team Administrators* can add / remove those teams they are an admin in, *Organization Administrators* & *Organization Owners* can manage the connections to all teams of the organization.
 ## Configure Webhook Request
To configure webhook requests in the All Quiet incident management tool, you would typically follow these steps:
* **Load an Incident:** Choose an incident from your list to serve as a test case.
* **Write a Template:** Craft a Handlebars template that converts the incident data into a webhook request payload.
* **Review & Dispatch:** Examine the generated request for accuracy, then save and trigger a test request to confirm the integration works as expected.
### Load Incident Model for Testing
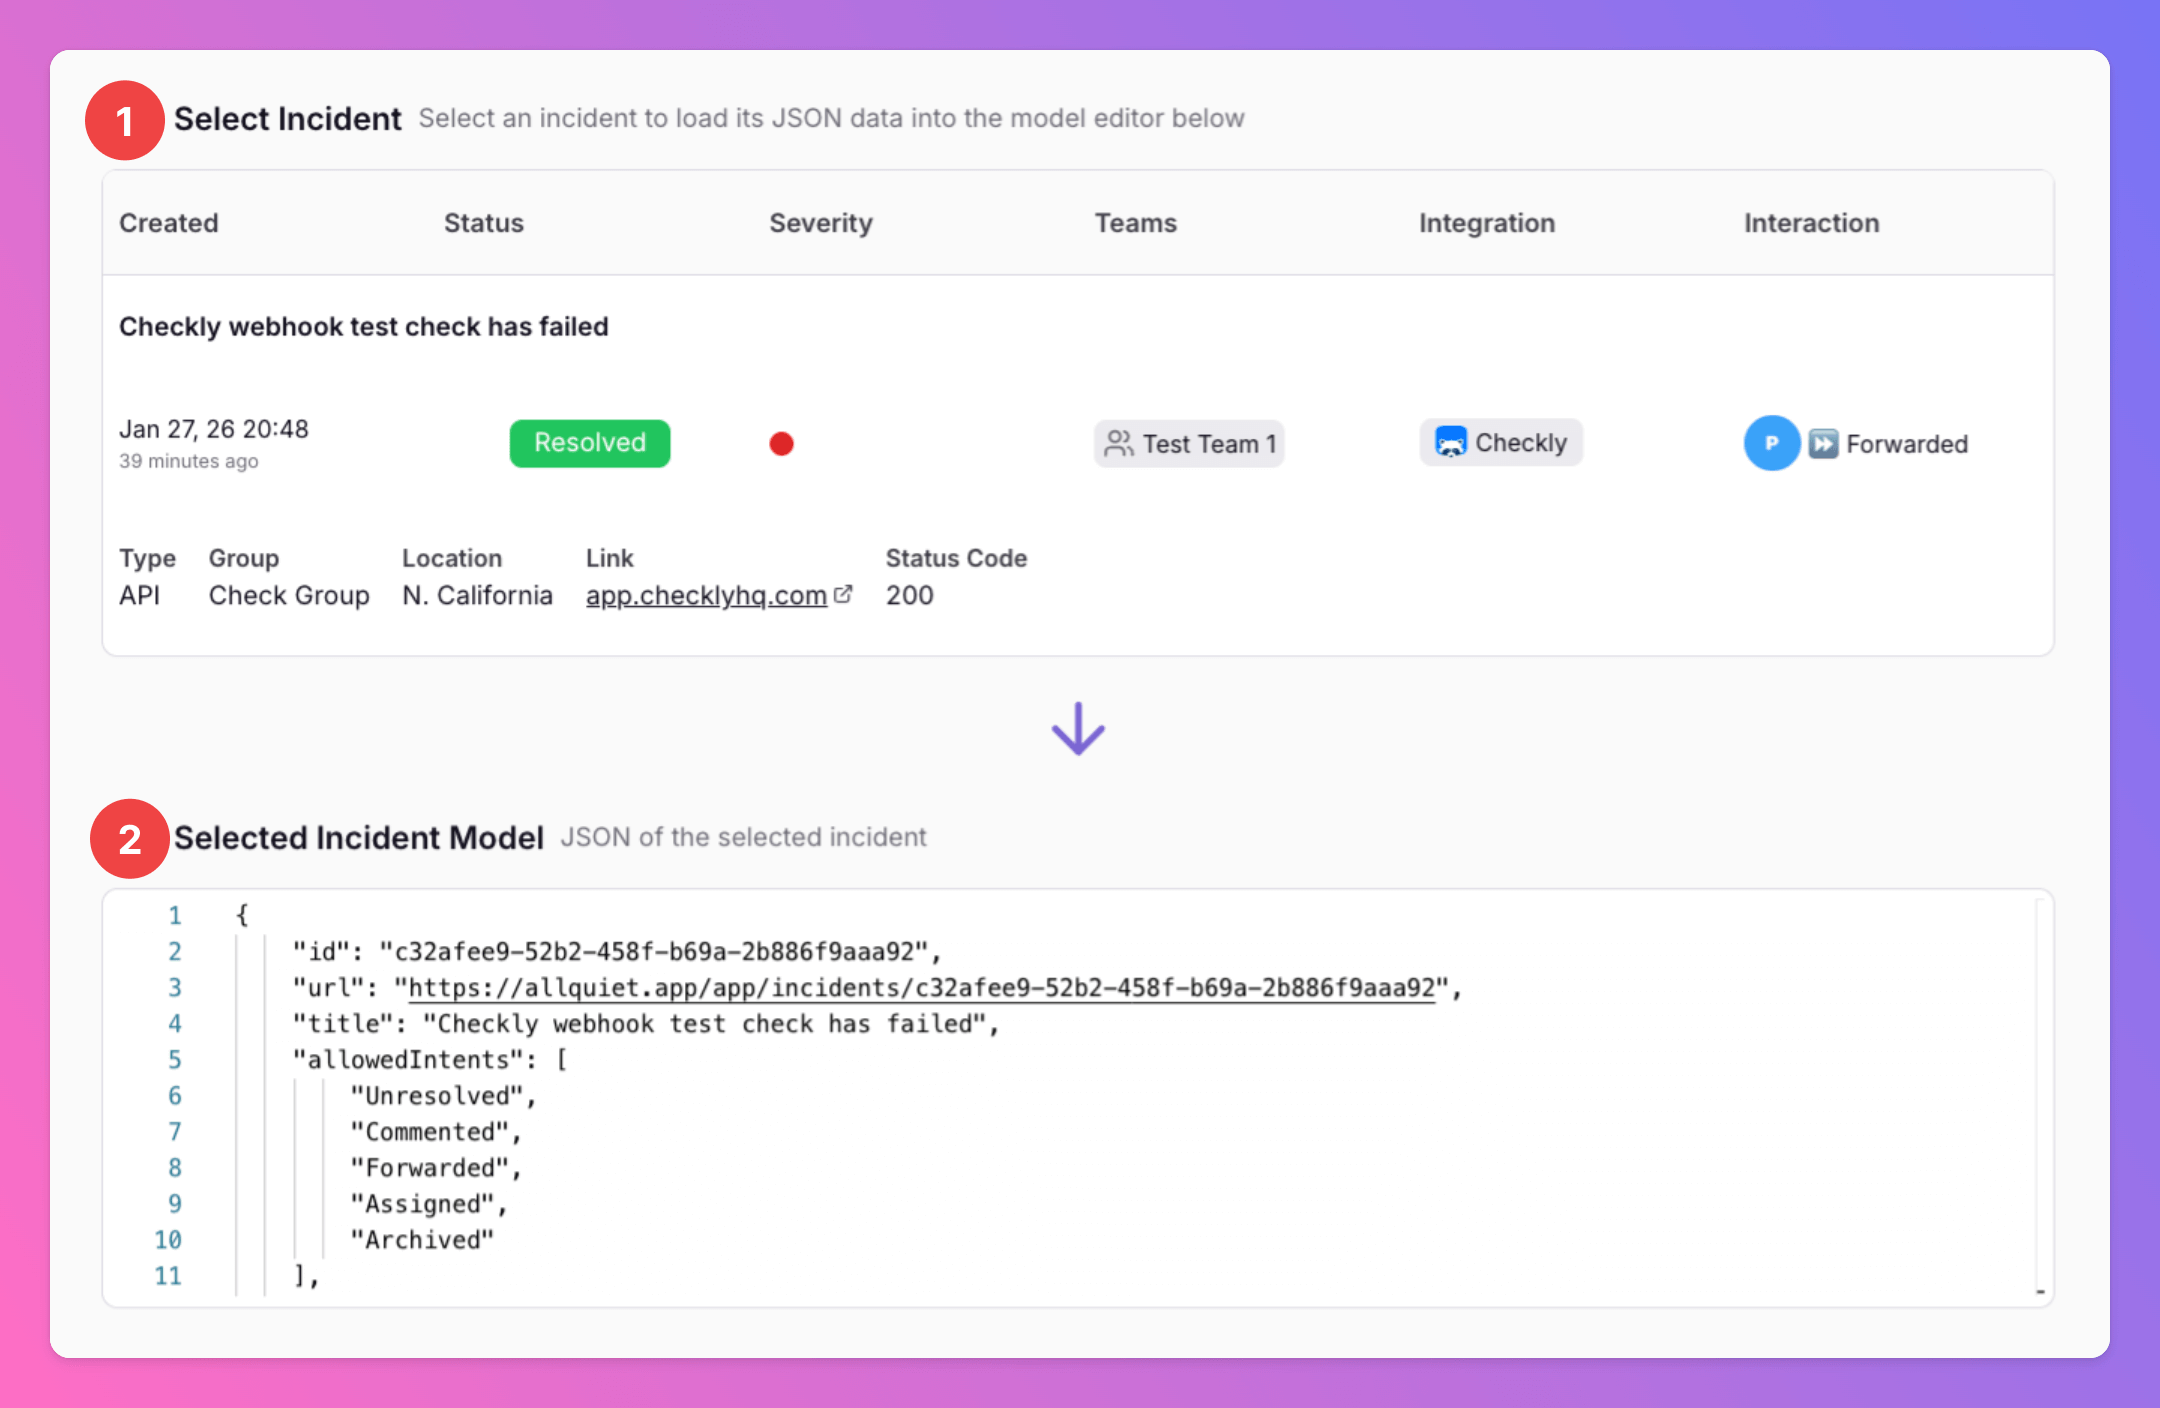
1. Select an incident. This incident acts as a sample to define how the webhook should behave.
2. Clicking on an incident will populate its JSON structure in the test area (2), allowing you to use real incident data to model the webhook request.
## Configure Webhook Request
To configure webhook requests in the All Quiet incident management tool, you would typically follow these steps:
* **Load an Incident:** Choose an incident from your list to serve as a test case.
* **Write a Template:** Craft a Handlebars template that converts the incident data into a webhook request payload.
* **Review & Dispatch:** Examine the generated request for accuracy, then save and trigger a test request to confirm the integration works as expected.
### Load Incident Model for Testing
1. Select an incident. This incident acts as a sample to define how the webhook should behave.
2. Clicking on an incident will populate its JSON structure in the test area (2), allowing you to use real incident data to model the webhook request.
 ### Write a Template
With the incident data loaded, navigate to the `Template` section. Here, use [Handlebars syntax](https://handlebarsjs.com/guide/) to map the incident data fields to the corresponding webhook JSON structure. This template determines how the incident data is transformed into the format required by the receiving endpoint. Here, you need to add the `URL` you want to sent the Outbound Webhook to.
### Write a Template
With the incident data loaded, navigate to the `Template` section. Here, use [Handlebars syntax](https://handlebarsjs.com/guide/) to map the incident data fields to the corresponding webhook JSON structure. This template determines how the incident data is transformed into the format required by the receiving endpoint. Here, you need to add the `URL` you want to sent the Outbound Webhook to.
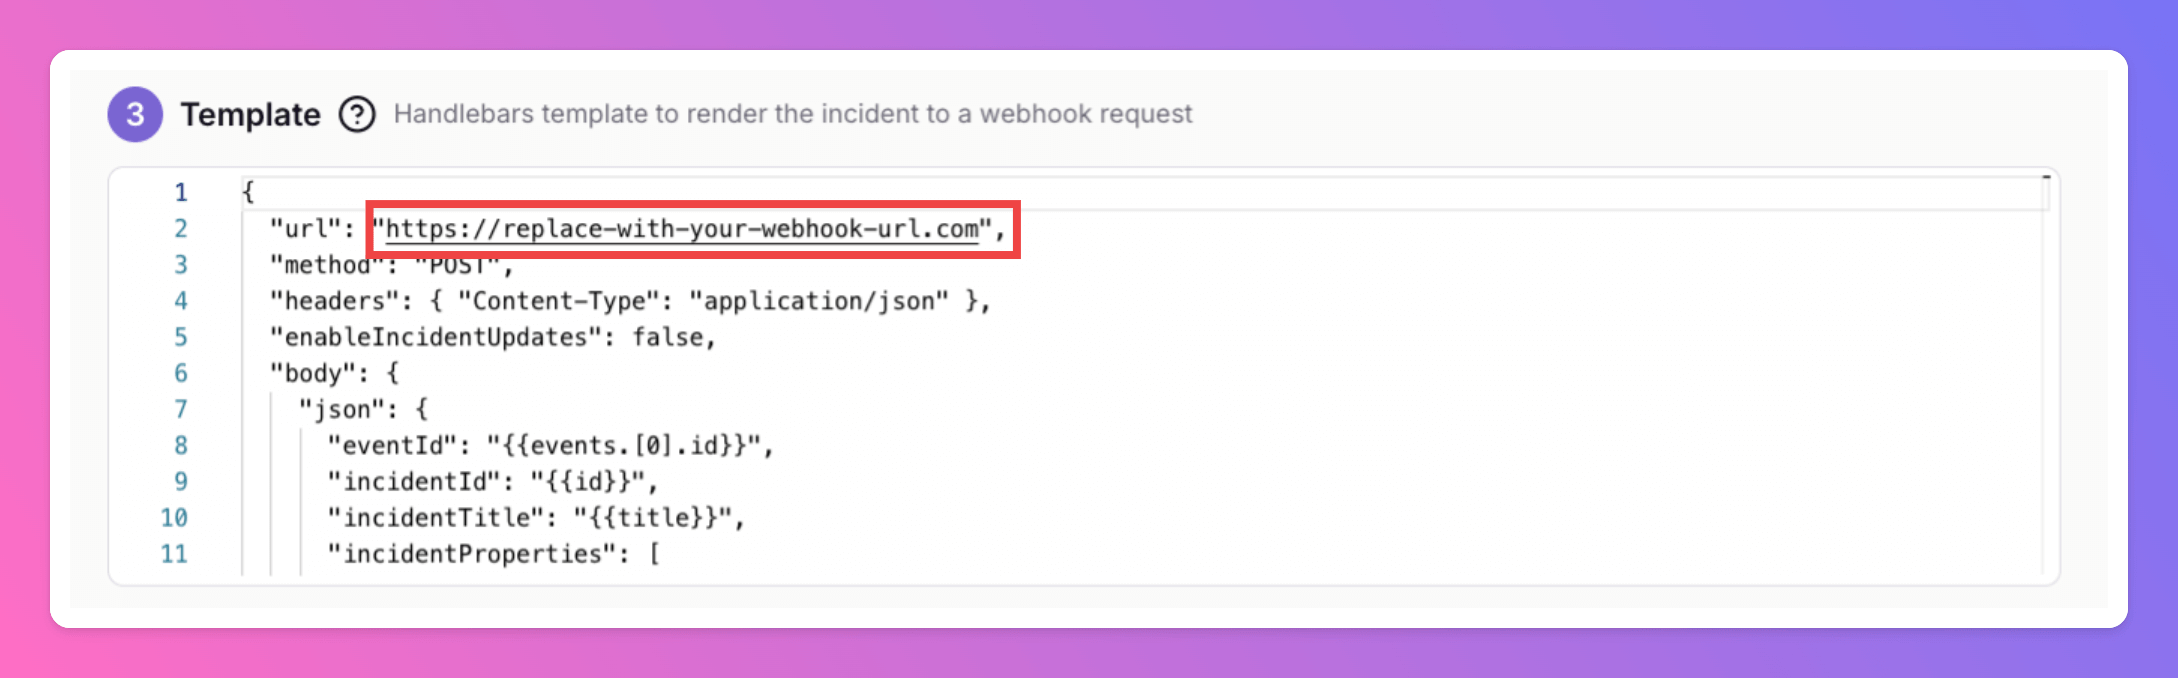 The following JSON structure provides a template for sending a webhook request. You can modify the `method`, `url`, `headers` values, and the `body` content to fit the specific requirements of your webhook integration.
For each new incident event, such as creation, resolution, or commenting, All Quiet will send an HTTP call with the specified method, headers, and body to the URL defined in the webhook request JSON.
```JSON theme={null}
{
"method": "POST",
"url": "https://your-url.com",
"headers": {
"Content-Type": "application/json; charset=utf-8",
"X-Your-Header": "abc"
},
"body": {
"text": "Your Text Content",
"formData": {
"key1": "a",
"key2": "b"
},
"json": {
"prop1": "a",
"prop2": {
"someArray": [{"k": "v"}]
}
}
}
}
```
Only one of `text`, `formData`, and `json` is used. If you specify more than one, the first one is used.
#### Look Up Incident Attributes by Name
Incident attributes from your [payload mapping](/essentials/inbound#mapping-payloads) are available in Handlebars templates through two properties on the incident model:
* **`attributes`** — an array of attribute objects. Use this when you want to iterate over all attributes (for example with `{{#each attributes}}`), but values are only addressable by position in the list.
* **`attributesByName`** — a map keyed by attribute name. Use this to read a specific attribute without knowing its index in `attributes`.
Each entry in `attributesByName` has the same shape as an item in `attributes` (`name`, `value`, `isImage`, `hideInPreviews`, and related fields). Reference the value of a named attribute with dot notation:
```JSON theme={null}
{
"method": "POST",
"url": "https://your-url.com",
"headers": {
"Content-Type": "application/json; charset=utf-8"
},
"body": {
"json": {
"title": "{{title}}",
"environment": "{{attributesByName.ENV.value}}",
"server": "{{attributesByName.Server.value}}"
}
}
}
```
When you load an incident for testing, its JSON in the test area includes `attributesByName` alongside `attributes`, so you can confirm attribute names and values before saving your template.
If an attribute name contains characters that are not valid in Handlebars dot paths (for example spaces or hyphens), use bracket notation: `{{attributesByName.[My Attribute].value}}`.
### Outbound IP Addresses
The outbound IP addresses used for webhook requests are dynamic and can be retrieved from the following endpoints:
* US Region: [https://allquiet.app/api/public/v1/metadata/ips](https://allquiet.app/api/public/v1/metadata/ips)
* EU Region: [https://allquiet.eu/api/public/v1/metadata/ips](https://allquiet.eu/api/public/v1/metadata/ips)
While these IP addresses are generally stable, we do not guarantee their persistence. It's recommended to regularly check these endpoints for any changes.
### Inspect and Send Webhook Request
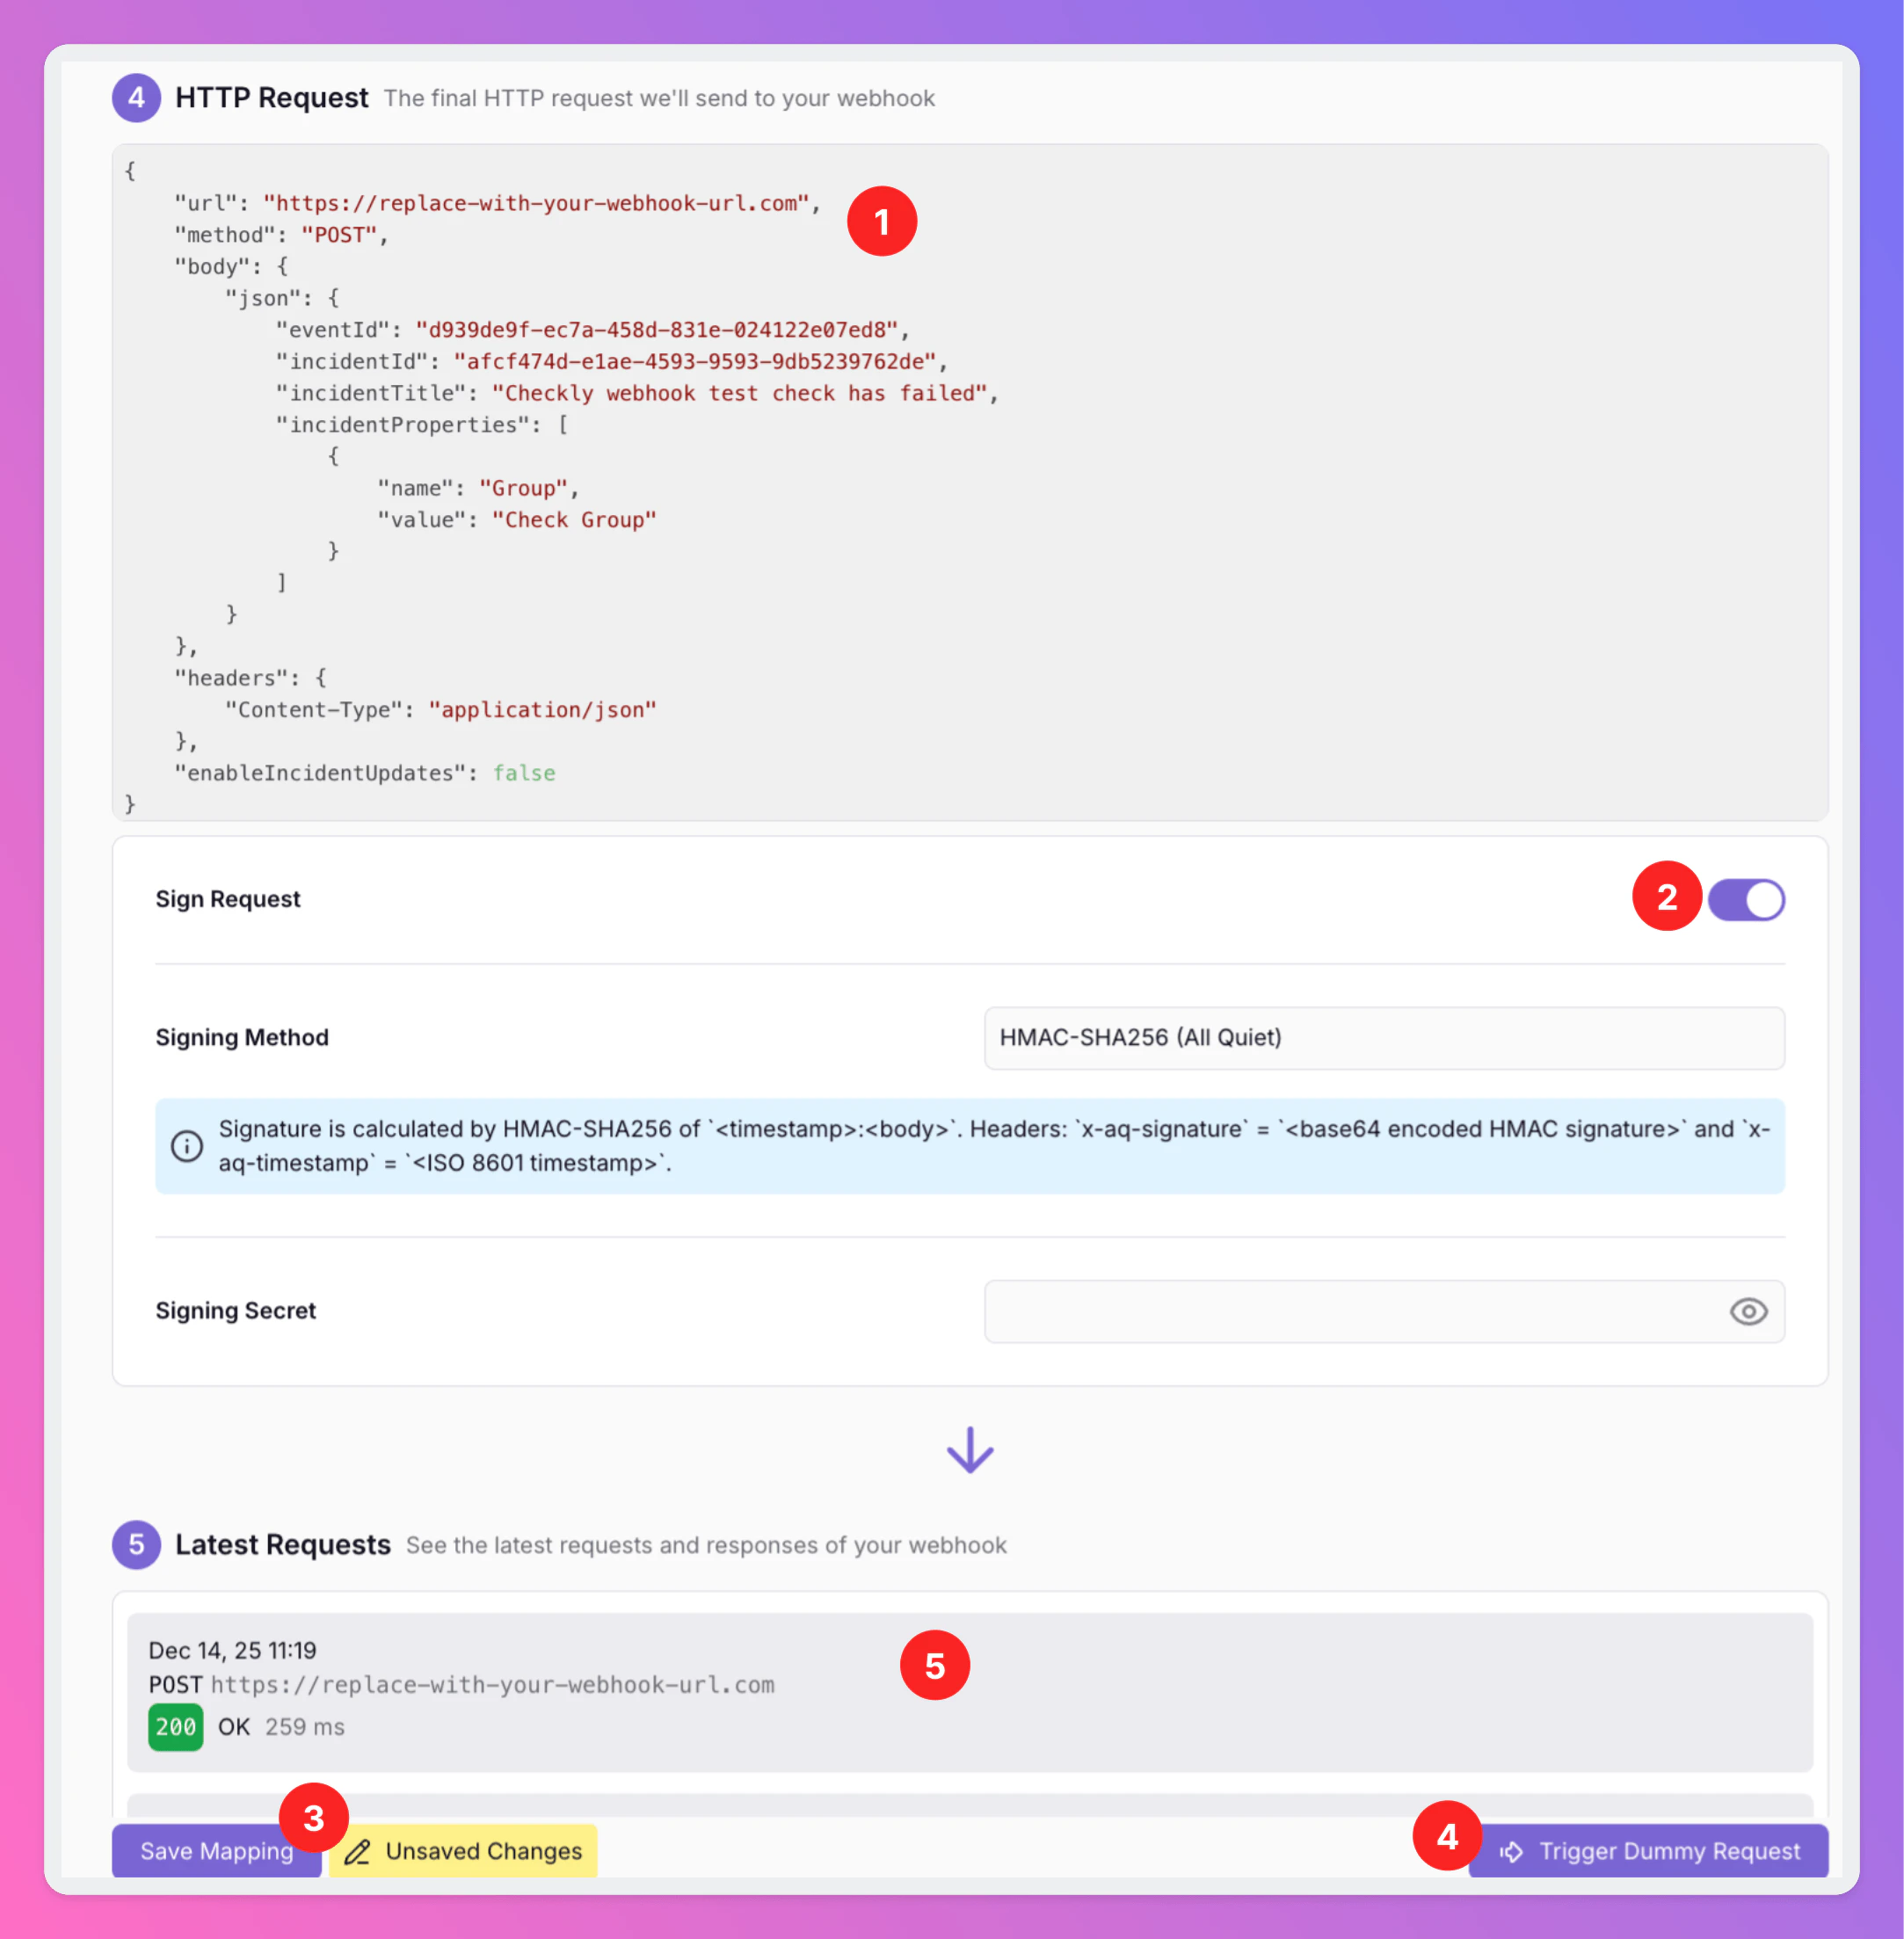
1. In the 'HTTP Request' section, review the final payload based on your template. This is where you ensure that all necessary data is correctly formatted and included.
2. Optionally, you can sign the request. As `Signing Method`, we currently support "HMAC-SHA256 (All Quiet)" or "HMAC-SHA256 (AWS DevOps Agent)". Don't forget to add your `Signing Secret` when adding a signature.
3. After confirming the request and selected signing method are accurate, save the mapping.
4. Use the `Trigger Dummy Request` button to test the webhook, validating the end-to-end process.
5. The recorded request and response will be visible in the right pane under "Latest Requests".
The following JSON structure provides a template for sending a webhook request. You can modify the `method`, `url`, `headers` values, and the `body` content to fit the specific requirements of your webhook integration.
For each new incident event, such as creation, resolution, or commenting, All Quiet will send an HTTP call with the specified method, headers, and body to the URL defined in the webhook request JSON.
```JSON theme={null}
{
"method": "POST",
"url": "https://your-url.com",
"headers": {
"Content-Type": "application/json; charset=utf-8",
"X-Your-Header": "abc"
},
"body": {
"text": "Your Text Content",
"formData": {
"key1": "a",
"key2": "b"
},
"json": {
"prop1": "a",
"prop2": {
"someArray": [{"k": "v"}]
}
}
}
}
```
Only one of `text`, `formData`, and `json` is used. If you specify more than one, the first one is used.
#### Look Up Incident Attributes by Name
Incident attributes from your [payload mapping](/essentials/inbound#mapping-payloads) are available in Handlebars templates through two properties on the incident model:
* **`attributes`** — an array of attribute objects. Use this when you want to iterate over all attributes (for example with `{{#each attributes}}`), but values are only addressable by position in the list.
* **`attributesByName`** — a map keyed by attribute name. Use this to read a specific attribute without knowing its index in `attributes`.
Each entry in `attributesByName` has the same shape as an item in `attributes` (`name`, `value`, `isImage`, `hideInPreviews`, and related fields). Reference the value of a named attribute with dot notation:
```JSON theme={null}
{
"method": "POST",
"url": "https://your-url.com",
"headers": {
"Content-Type": "application/json; charset=utf-8"
},
"body": {
"json": {
"title": "{{title}}",
"environment": "{{attributesByName.ENV.value}}",
"server": "{{attributesByName.Server.value}}"
}
}
}
```
When you load an incident for testing, its JSON in the test area includes `attributesByName` alongside `attributes`, so you can confirm attribute names and values before saving your template.
If an attribute name contains characters that are not valid in Handlebars dot paths (for example spaces or hyphens), use bracket notation: `{{attributesByName.[My Attribute].value}}`.
### Outbound IP Addresses
The outbound IP addresses used for webhook requests are dynamic and can be retrieved from the following endpoints:
* US Region: [https://allquiet.app/api/public/v1/metadata/ips](https://allquiet.app/api/public/v1/metadata/ips)
* EU Region: [https://allquiet.eu/api/public/v1/metadata/ips](https://allquiet.eu/api/public/v1/metadata/ips)
While these IP addresses are generally stable, we do not guarantee their persistence. It's recommended to regularly check these endpoints for any changes.
### Inspect and Send Webhook Request
1. In the 'HTTP Request' section, review the final payload based on your template. This is where you ensure that all necessary data is correctly formatted and included.
2. Optionally, you can sign the request. As `Signing Method`, we currently support "HMAC-SHA256 (All Quiet)" or "HMAC-SHA256 (AWS DevOps Agent)". Don't forget to add your `Signing Secret` when adding a signature.
3. After confirming the request and selected signing method are accurate, save the mapping.
4. Use the `Trigger Dummy Request` button to test the webhook, validating the end-to-end process.
5. The recorded request and response will be visible in the right pane under "Latest Requests".
 You now integrated outbound webhooks with All Quiet, simplifying incident management by consolidating notifications and actions in your place of choice.
### Update / Patch Incidents via Outbound Webhook
In addition to only sending an All Quiet incident to another tool via the Outbound Webhook, you can also use it **to patch (update) the incident** directly.
This can be valuable when you want to trigger a certain action or when you simply want to enrich the incident by sending it to your Outbound Webhook.
To allow incident patching via Outbound Webhook
1. Adjust your Outbound Webhook's [request template](/integrations/outbound/webhook#write-a-template) and add `"enableIncidentUpdates": true`.
You now integrated outbound webhooks with All Quiet, simplifying incident management by consolidating notifications and actions in your place of choice.
### Update / Patch Incidents via Outbound Webhook
In addition to only sending an All Quiet incident to another tool via the Outbound Webhook, you can also use it **to patch (update) the incident** directly.
This can be valuable when you want to trigger a certain action or when you simply want to enrich the incident by sending it to your Outbound Webhook.
To allow incident patching via Outbound Webhook
1. Adjust your Outbound Webhook's [request template](/integrations/outbound/webhook#write-a-template) and add `"enableIncidentUpdates": true`.
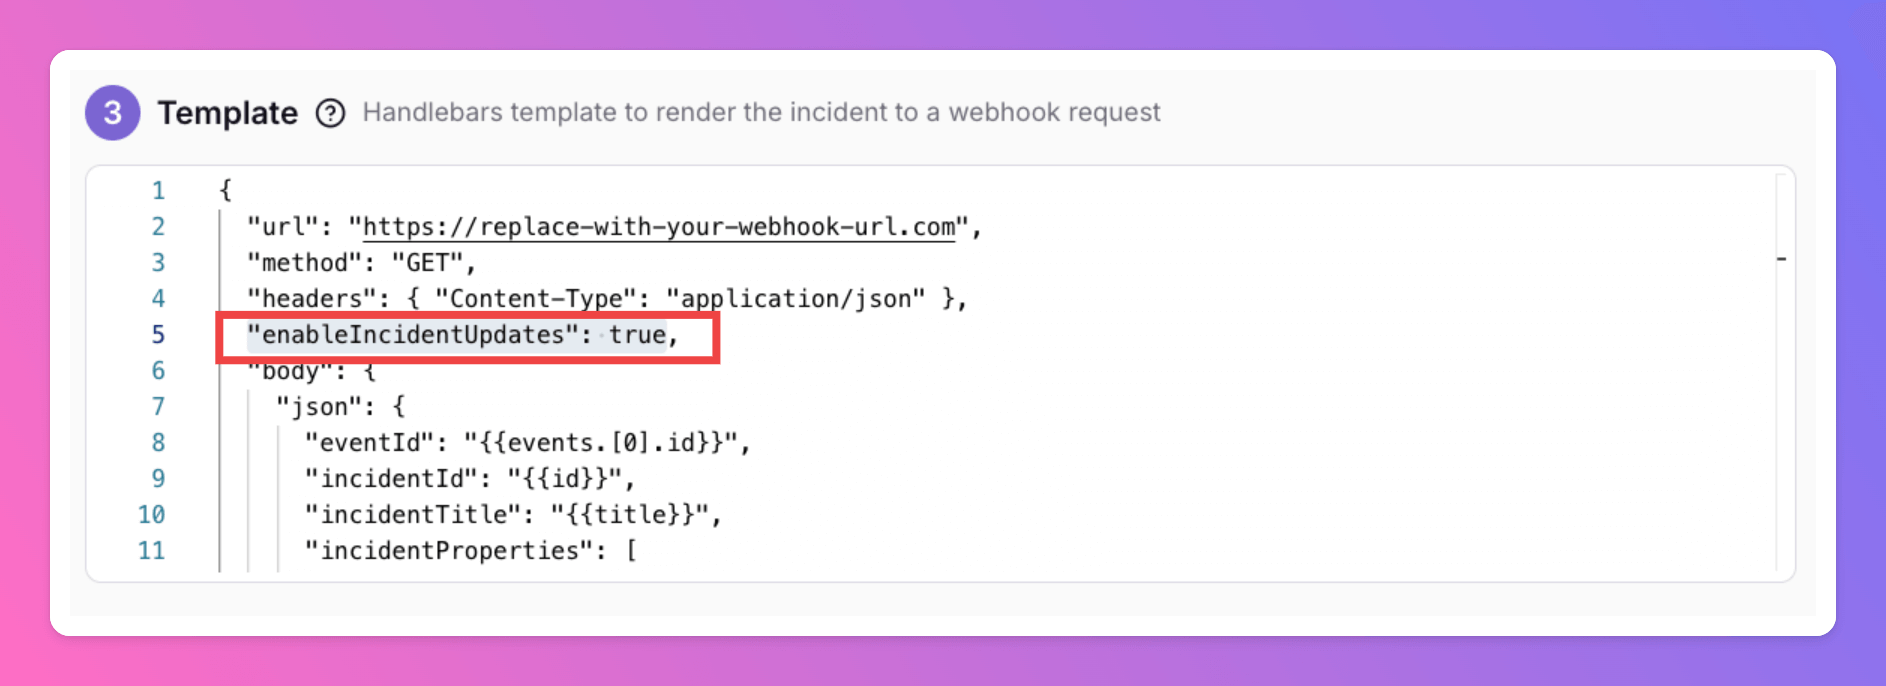 2. Prepare a patch response from the URL you're sending the incident to. Find a few examples for patches below. The whole list of patches we allow can be retrieved via our [Public API Documentation,"IncidentResource" Patch](https://allquiet.app/api/public/swagger-ui/index.html).
To resolve an incident as soon as it's send to the outbound webhook, send this patch as response to the Outbound Webhook.
```
{
"operations": {
"appendIntent": {
"intent": "Resolved"
}
}
}
```
The incident will be updated as `resolved` by your Outbound Webhook Integration.
In this example we want to add a new attribute to the incident, a URL to the tool which the incident was sent to by the Outbound Webhook.
```
{
"operations": {
"addAttributes": {
"attributes": [
{
"name": "ExampleToolURL",
"value": "https://exampleurl.com/ID",
"isImage": false,
"hideInPreviews": false
}
]
}
}
}
```
The incident will be updated a by your Outbound Webhook Integration, including the new attribute "OutboundID".
## Troubleshooting
**Team Administrators**, **Organization Administrators**, and **Organization Owners** can troubleshoot this integration using the **History** tab (**Outbound History**) on the integration details page. See **[Outbound History](/essentials/outbound#outbound-history)** for what is logged, who can access it, and how to read outcomes. For broader checks when outbound tools do not fire, see **[Outbound integrations — Troubleshooting](/essentials/outbound#outbound-troubleshooting-routing)** and **[advanced routing](/advanced/routing)**.
2. Prepare a patch response from the URL you're sending the incident to. Find a few examples for patches below. The whole list of patches we allow can be retrieved via our [Public API Documentation,"IncidentResource" Patch](https://allquiet.app/api/public/swagger-ui/index.html).
To resolve an incident as soon as it's send to the outbound webhook, send this patch as response to the Outbound Webhook.
```
{
"operations": {
"appendIntent": {
"intent": "Resolved"
}
}
}
```
The incident will be updated as `resolved` by your Outbound Webhook Integration.
In this example we want to add a new attribute to the incident, a URL to the tool which the incident was sent to by the Outbound Webhook.
```
{
"operations": {
"addAttributes": {
"attributes": [
{
"name": "ExampleToolURL",
"value": "https://exampleurl.com/ID",
"isImage": false,
"hideInPreviews": false
}
]
}
}
}
```
The incident will be updated a by your Outbound Webhook Integration, including the new attribute "OutboundID".
## Troubleshooting
**Team Administrators**, **Organization Administrators**, and **Organization Owners** can troubleshoot this integration using the **History** tab (**Outbound History**) on the integration details page. See **[Outbound History](/essentials/outbound#outbound-history)** for what is logged, who can access it, and how to read outcomes. For broader checks when outbound tools do not fire, see **[Outbound integrations — Troubleshooting](/essentials/outbound#outbound-troubleshooting-routing)** and **[advanced routing](/advanced/routing)**.