> ## Documentation Index
> Fetch the complete documentation index at: https://docs.allquiet.app/llms.txt
> Use this file to discover all available pages before exploring further.
# Slack
> Connect Your Slack Workspace with All Quiet to Manage Incidents from Slack
Setup time: 3 Min
Integrate your Slack Workspace with All Quiet for efficient incident management right within Slack.
The first part of this documentation focuses on creating the integration. The second explains how to send All Quiet incidents to your Slack channels (Outbound).
Want to create new incidents from your Slack channels (Inbound)? Follow the [third part](/integrations/outbound/slack#all-quiet-app-for-slack-commands) of this guideline.
## Create Outbound Integration
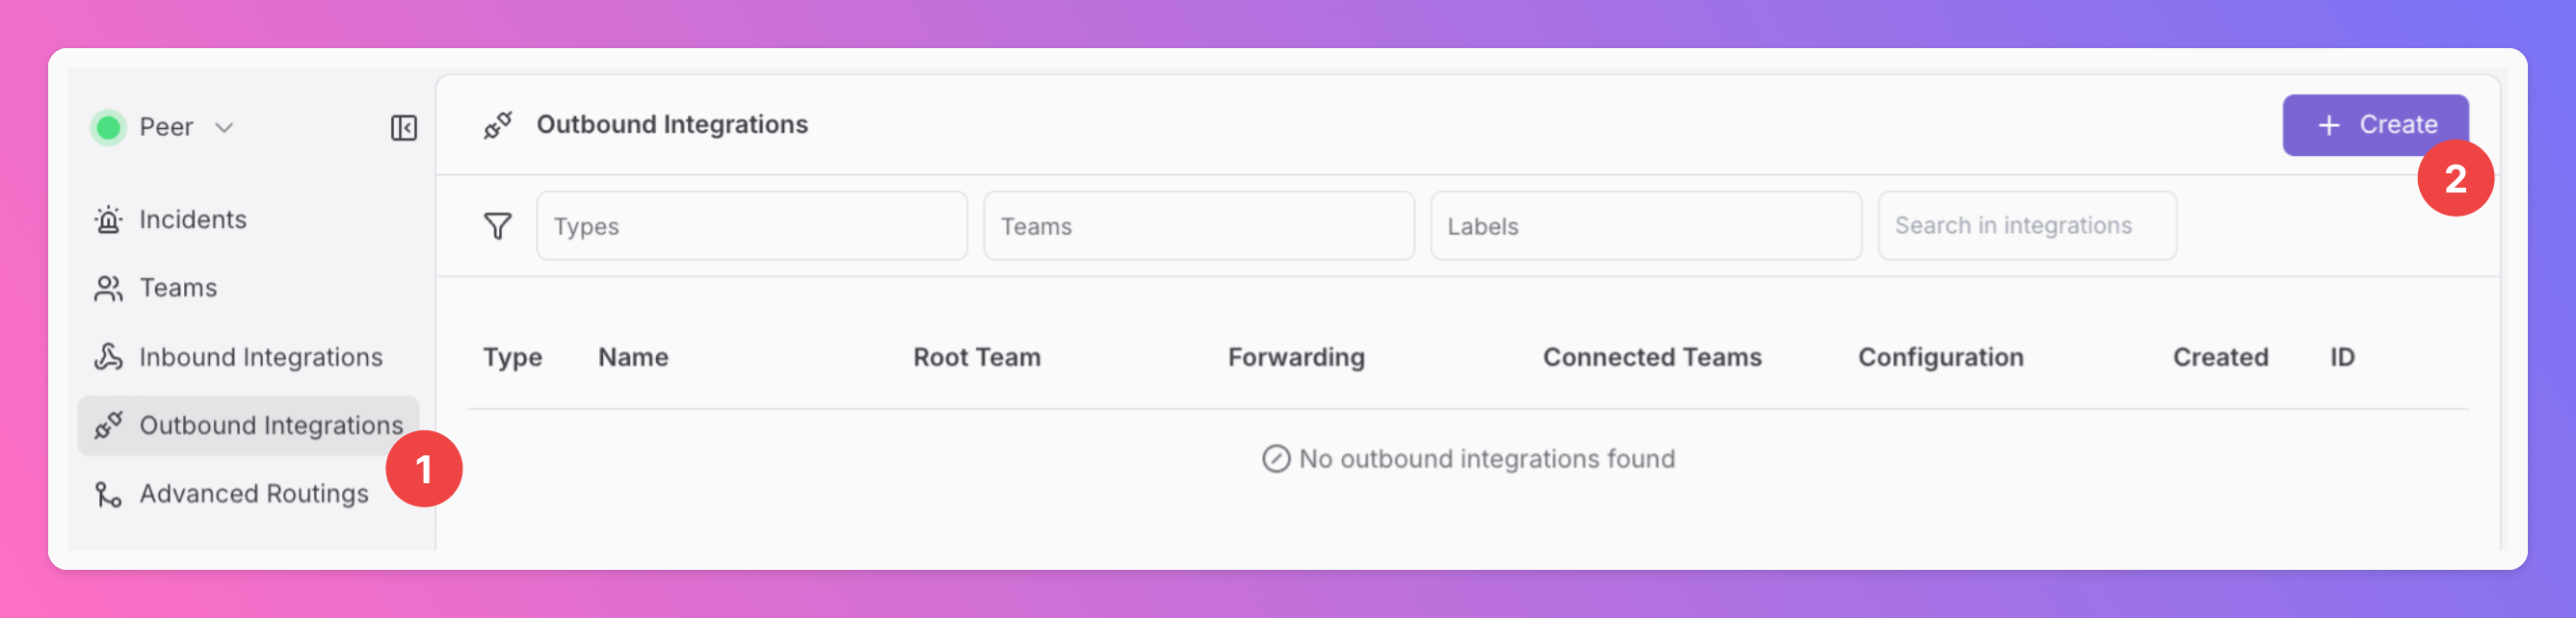
1. Click on the `Outbound Integrations` tab.
2. Click on `+ Create`.
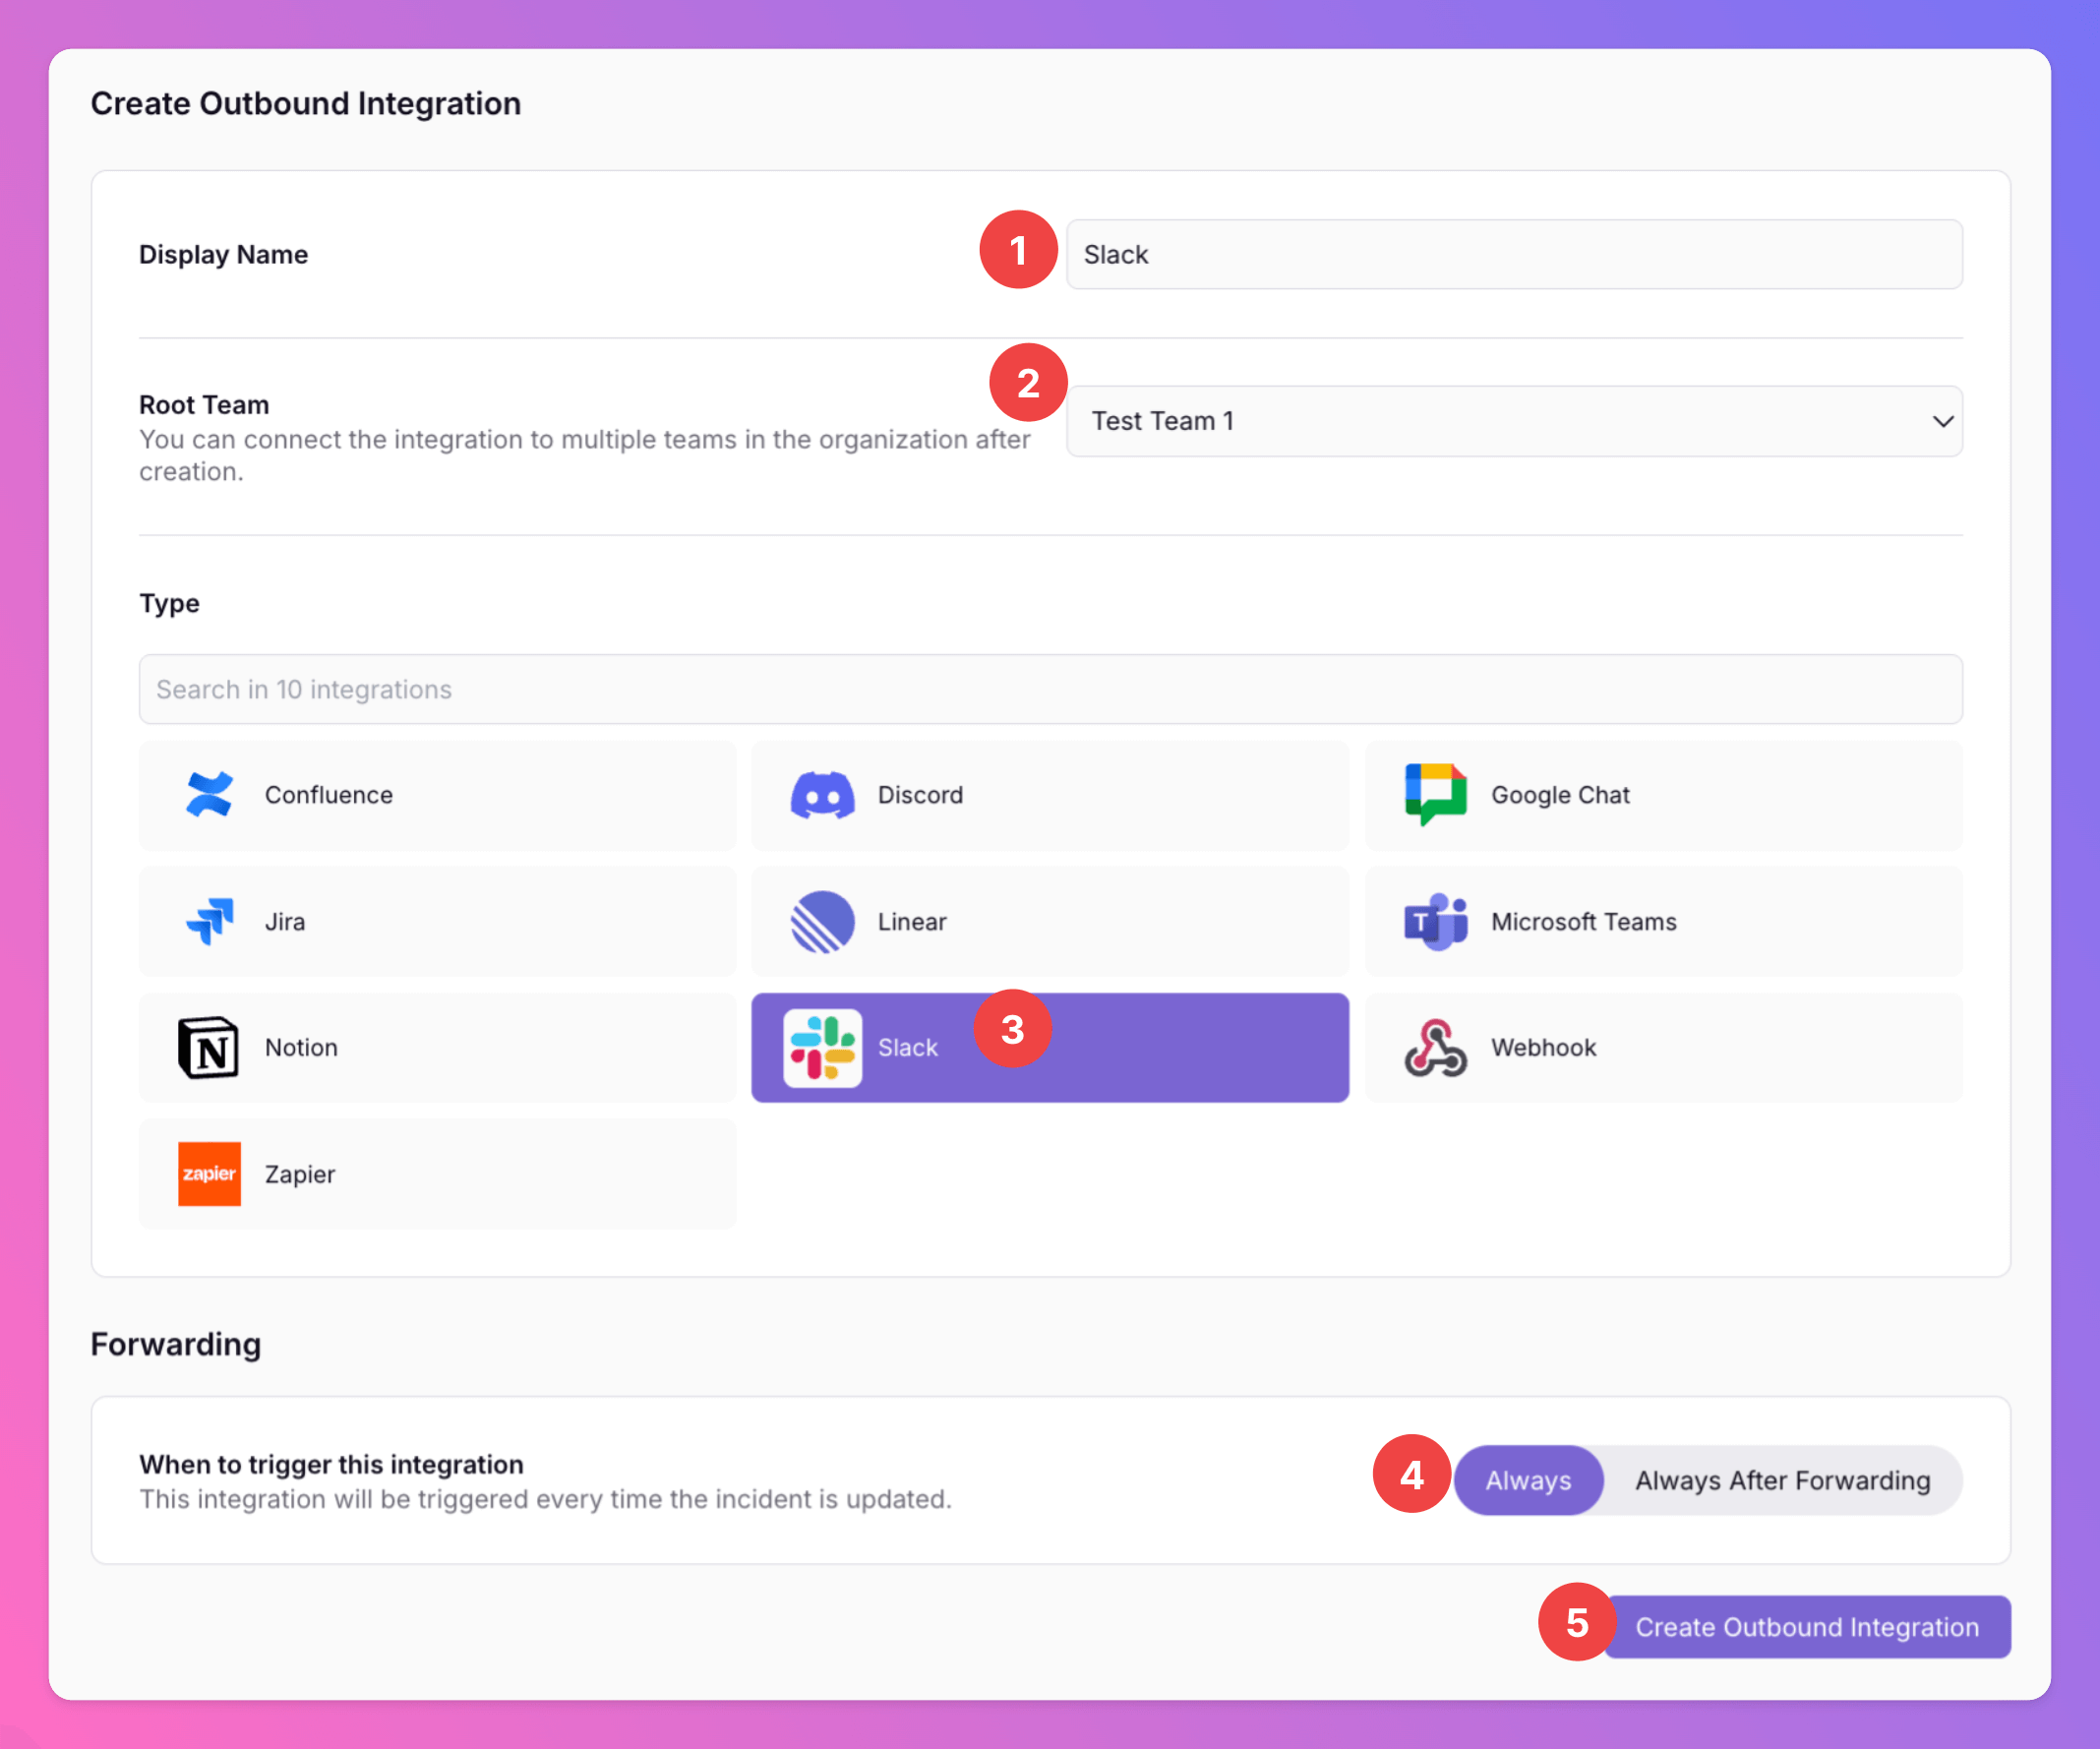
 1. Enter a `Display Name` for your integration, e.g. "Slack".
2. Select a `Team`. For Organizations with Pro and Enterprise plan: This is going to be the root team of your integration. You will be able to add additional teams in the next step.
3. Select `Slack` as the integration's type.
4. Forwarding settings:
1. **Default:** `Always` will automatically forward all incidents to your Slack Workspace, unless excluded by [advanced routing rules](/advanced/routing).
2. **Alternative**: `Always After Forwarding` - Messages will only be sent if users [manually forward specific incidents](/essentials/incident#forwarding) or if you set up [advanced routing rules](/advanced/routing) for your All Quiet app for Slack that automatically forward incidents in specific scenarios. After the initial Forwarding, all updates will automatically be sent.
You can change your selection anytime.
5. Click `Create Outbound Integration`.
1. Enter a `Display Name` for your integration, e.g. "Slack".
2. Select a `Team`. For Organizations with Pro and Enterprise plan: This is going to be the root team of your integration. You will be able to add additional teams in the next step.
3. Select `Slack` as the integration's type.
4. Forwarding settings:
1. **Default:** `Always` will automatically forward all incidents to your Slack Workspace, unless excluded by [advanced routing rules](/advanced/routing).
2. **Alternative**: `Always After Forwarding` - Messages will only be sent if users [manually forward specific incidents](/essentials/incident#forwarding) or if you set up [advanced routing rules](/advanced/routing) for your All Quiet app for Slack that automatically forward incidents in specific scenarios. After the initial Forwarding, all updates will automatically be sent.
You can change your selection anytime.
5. Click `Create Outbound Integration`.
 ## Add All Quiet App For Slack to Your Workspace
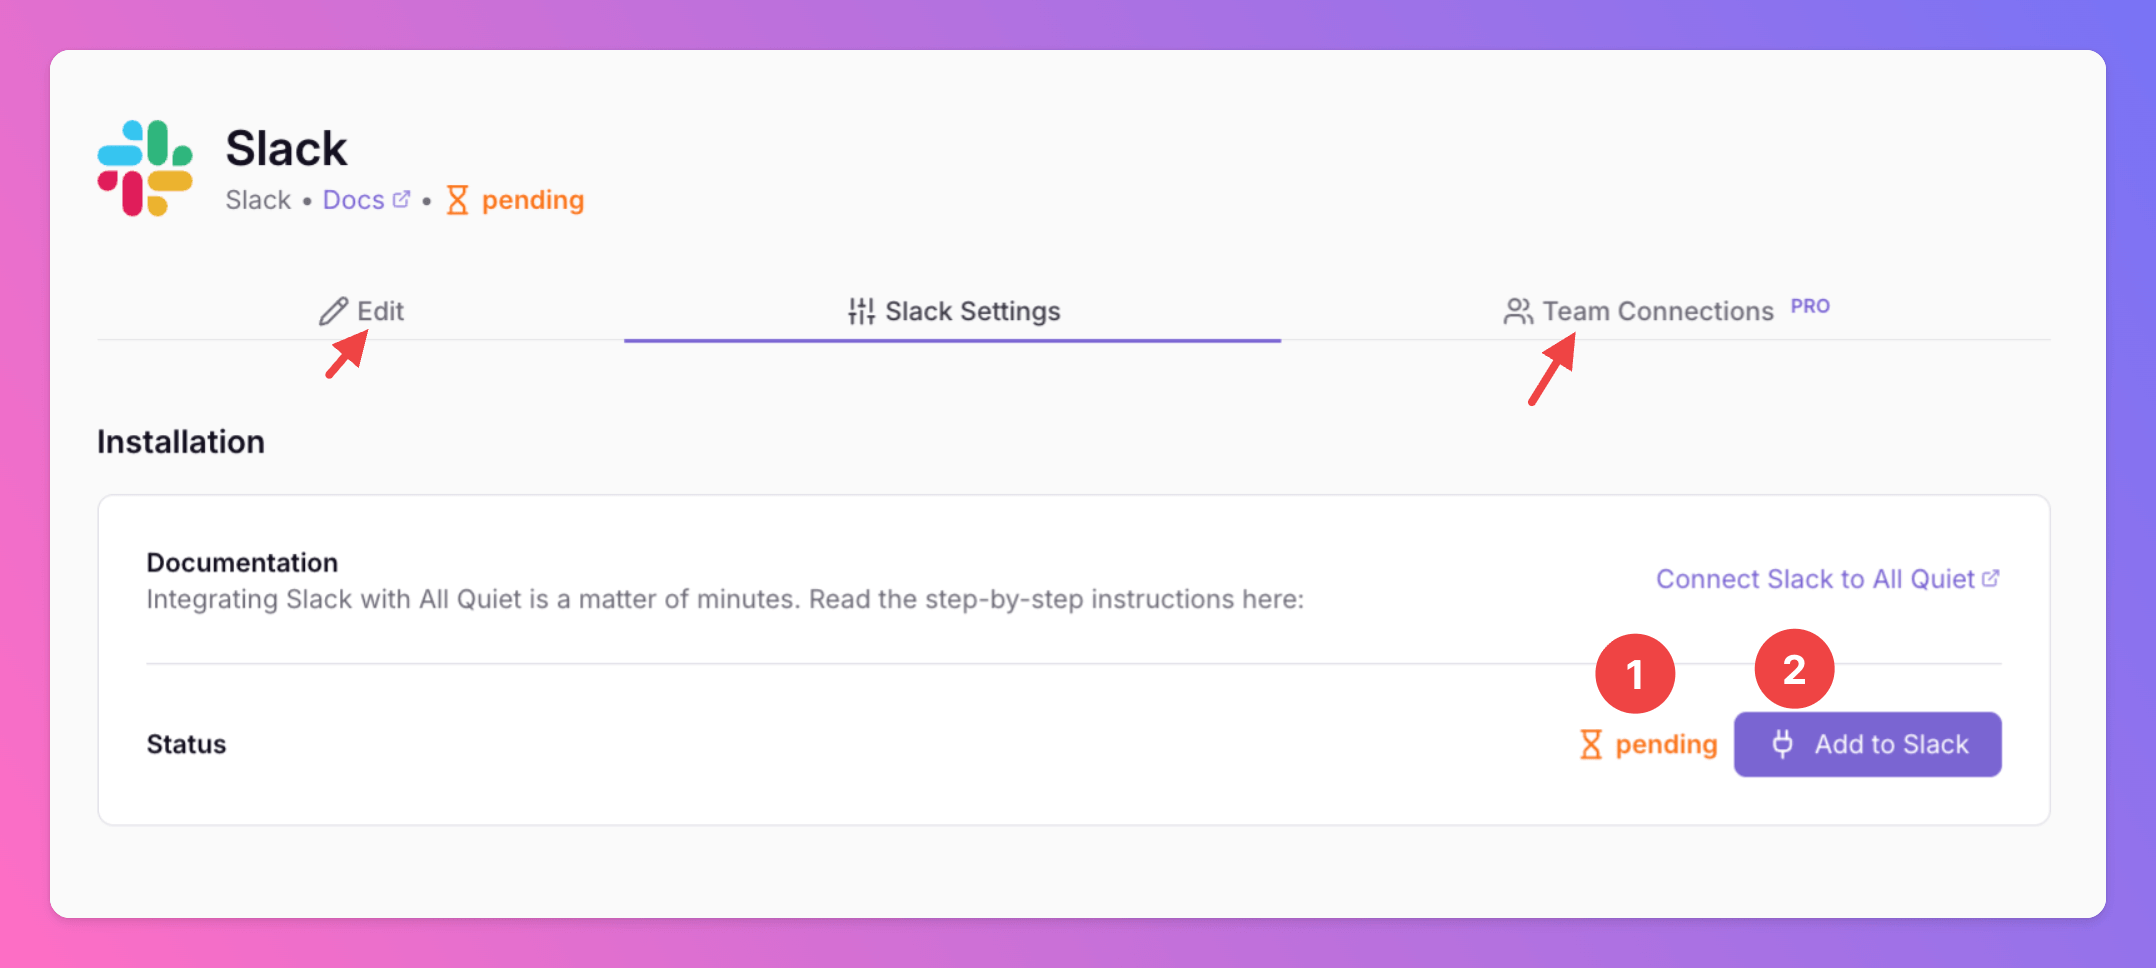
Once you've successfully created your new outbound integration, you'll automatically be redirected to its `Settings` page.
1. Observe that the installation status of the All Quiet app for Slack is still pending.
2. To complete the integration with your Slack Workspace, click `Add to Slack`.
In the `Edit` tab, you can change general settings like the integration's [Forwarding settings](/integrations/outbound/slack#create-outbound-integration).
**Only for Pro and Enterprise plan** - Manage your `Team Connections`: The root team is pre-selected, and you can add the integration to further teams within the root team's organization. *Team Administrators* can add / remove those teams they are an Administrator in, *Organization Administrators* & *Organization Owners* can manage the connections to all teams of the organization.
## Add All Quiet App For Slack to Your Workspace
Once you've successfully created your new outbound integration, you'll automatically be redirected to its `Settings` page.
1. Observe that the installation status of the All Quiet app for Slack is still pending.
2. To complete the integration with your Slack Workspace, click `Add to Slack`.
In the `Edit` tab, you can change general settings like the integration's [Forwarding settings](/integrations/outbound/slack#create-outbound-integration).
**Only for Pro and Enterprise plan** - Manage your `Team Connections`: The root team is pre-selected, and you can add the integration to further teams within the root team's organization. *Team Administrators* can add / remove those teams they are an Administrator in, *Organization Administrators* & *Organization Owners* can manage the connections to all teams of the organization.
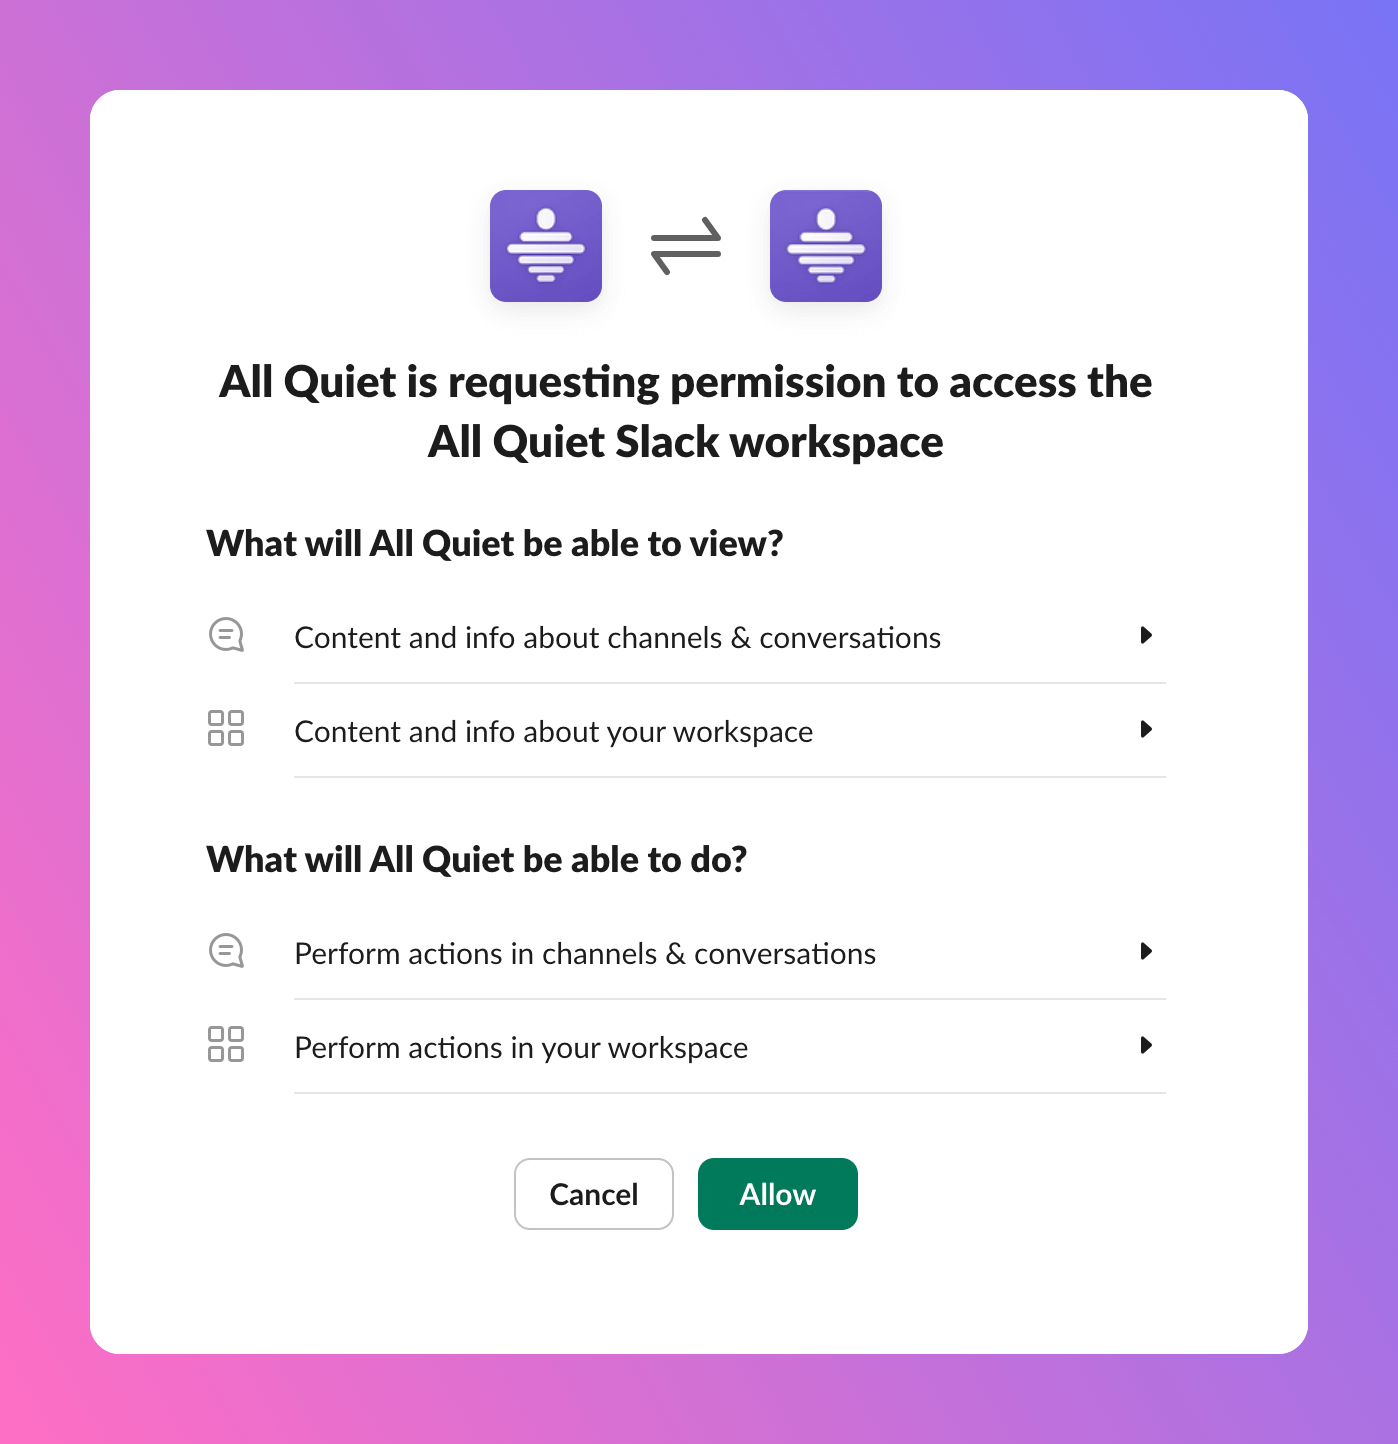
 You are redirected to Slack where you'll be asked to grant permissions for the `All Quiet` App for Slack (or, if you are a allquiet.eu user, the `All Quiet EU` App for Slack).
We request only those permissions that are strictly necessary for All Quiet to function properly. We access this data solely when you interact with the app and never use it for any other purpose.
Click on `Allow`. To learn more about the data we collect, check out our [privacy policy](https://allquiet.app/privacy).
You are redirected to Slack where you'll be asked to grant permissions for the `All Quiet` App for Slack (or, if you are a allquiet.eu user, the `All Quiet EU` App for Slack).
We request only those permissions that are strictly necessary for All Quiet to function properly. We access this data solely when you interact with the app and never use it for any other purpose.
Click on `Allow`. To learn more about the data we collect, check out our [privacy policy](https://allquiet.app/privacy).
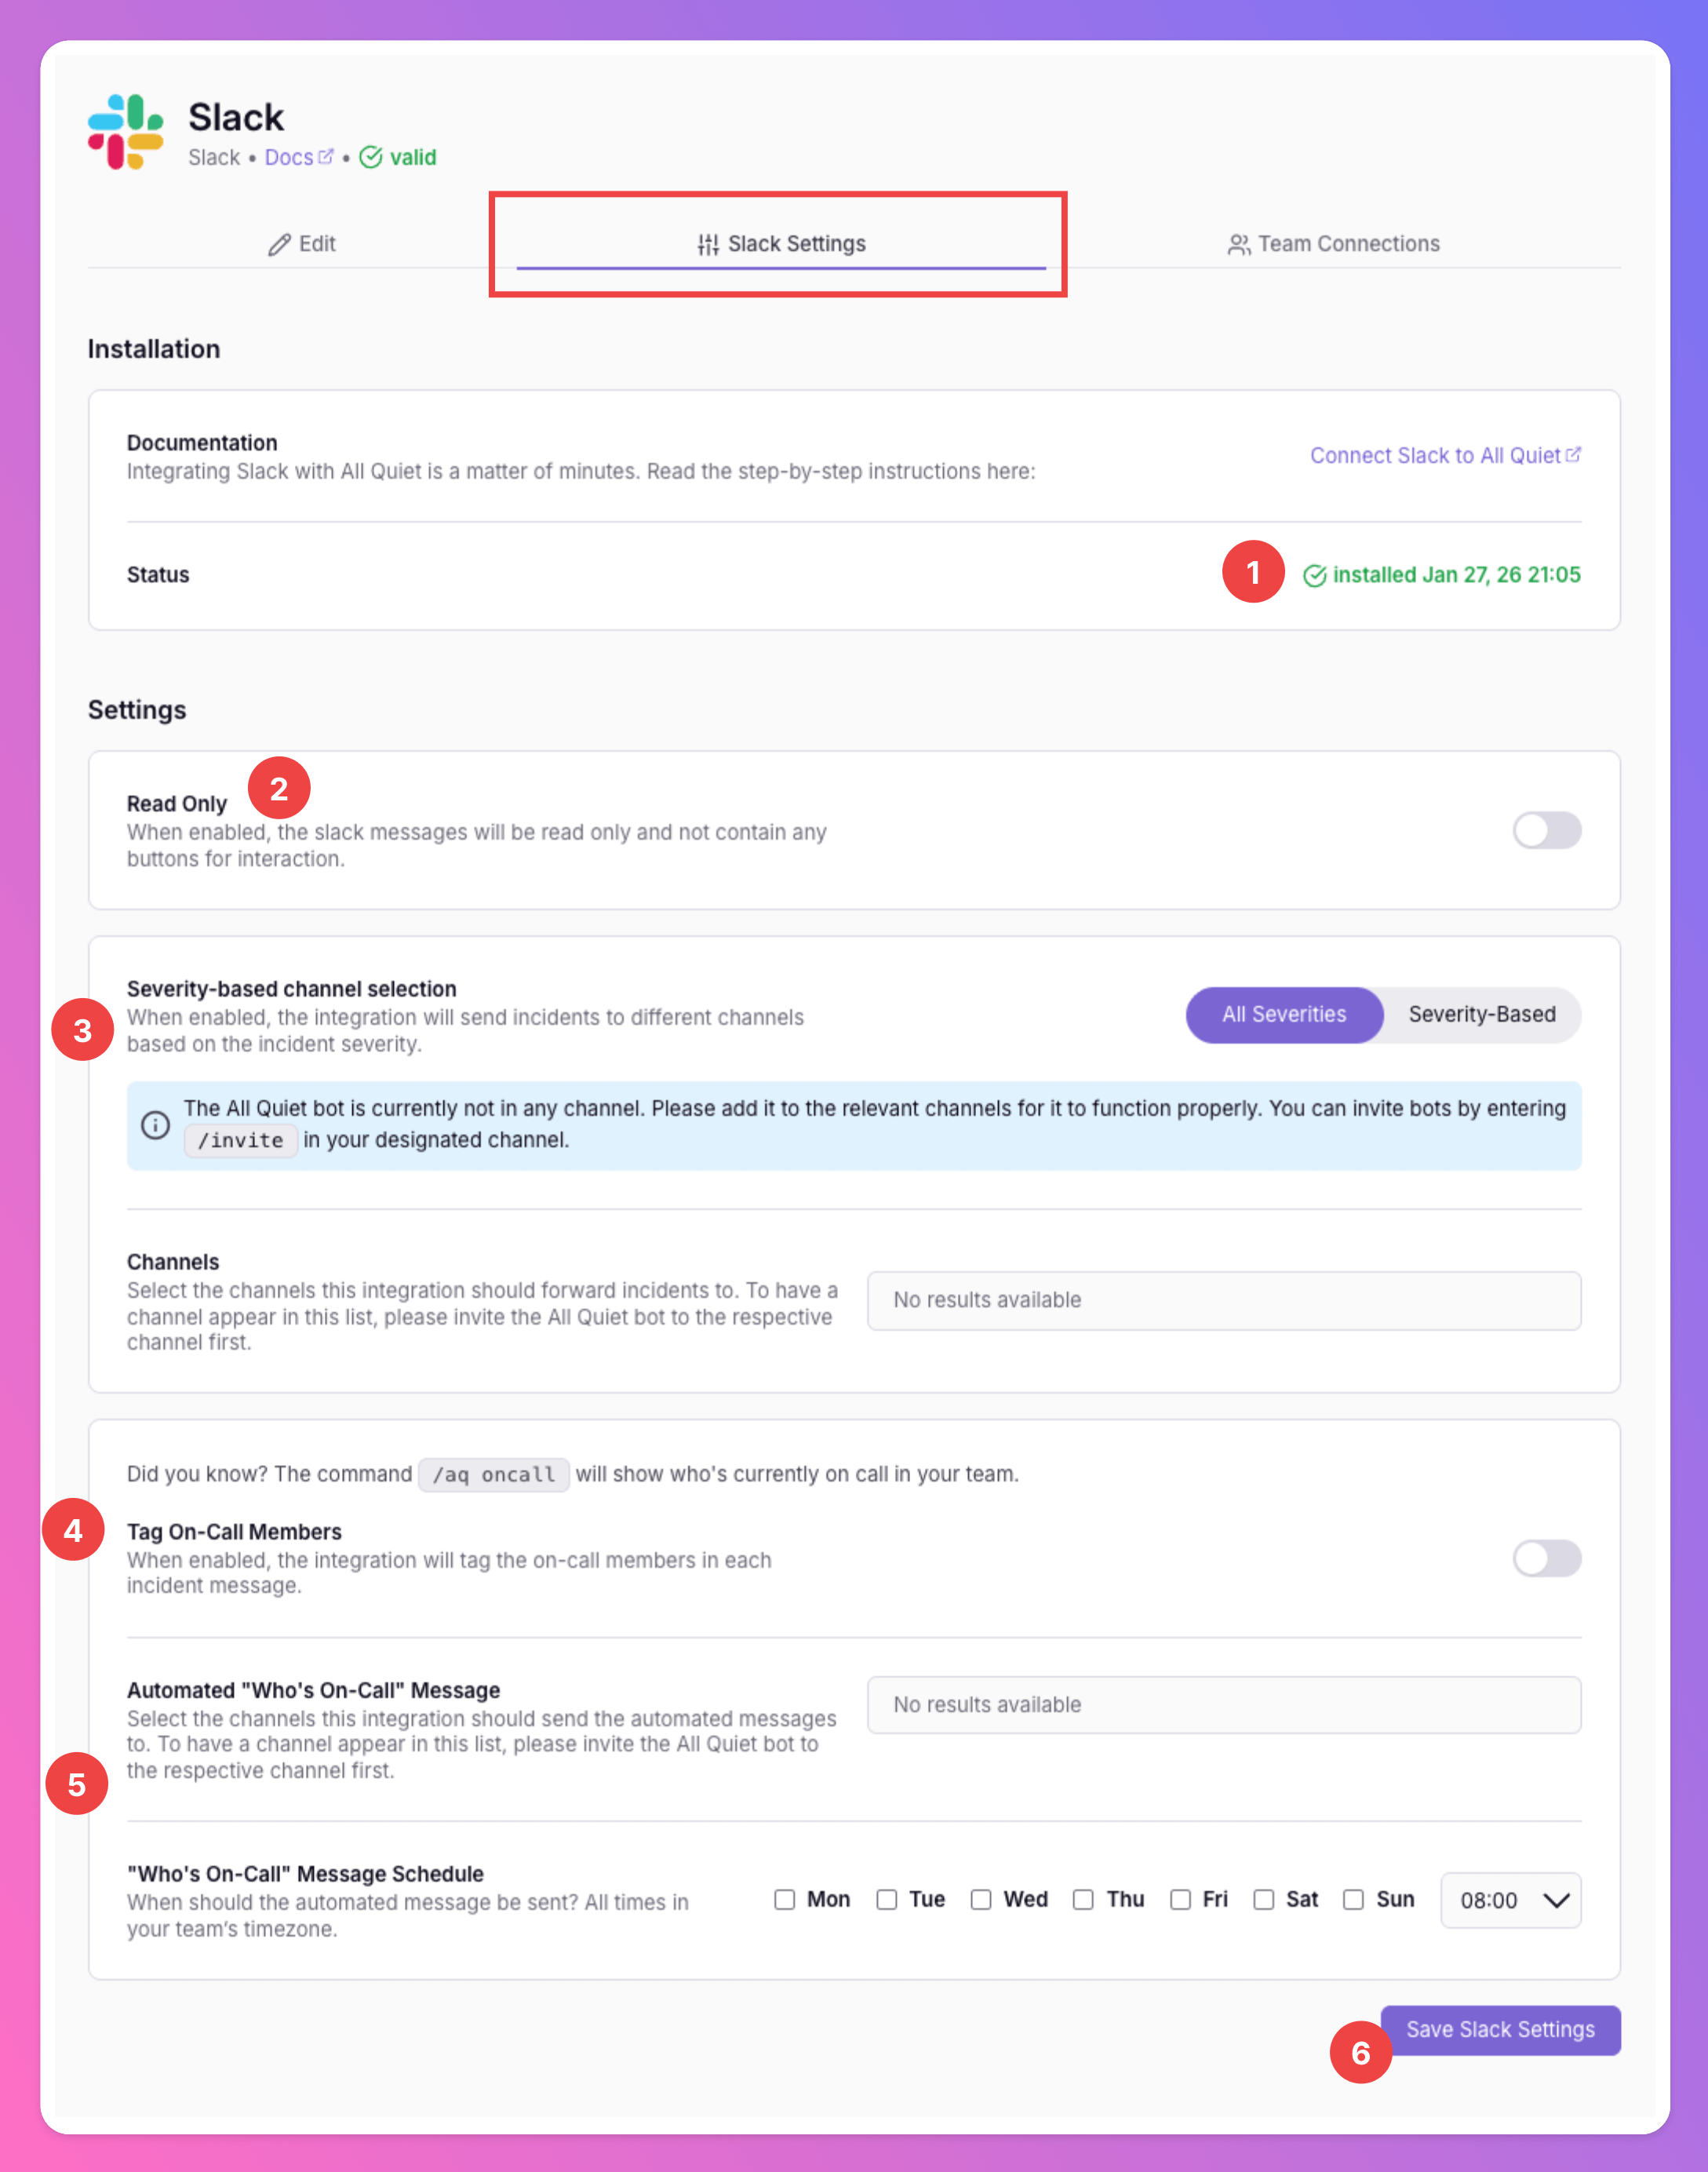
 After you've granted All Quiet access to Slack, you'll be redirected back to All Quiet. Open the `Slack Settings` tab.
1. Observe that the Installation Status now indicates "installed".
2. You can change your integration settings to “**Read Only**”. In this mode, we will not send any action buttons to Slack, meaning users cannot interact with the messages. This is ideal if you want to use the integration for internal stakeholder management.
3. For All Quiet to send incidents to your Slack workspace, you must invite All Quiet to at least one channel.
4. There's an option to tag you on-call members in the related Slack channels when an an incident is assigned to them.
5. As soon as you added All Quiet to at least one Slack channel, you can set up an automated message you can use to inform your Slack channels who's currently on-call in the All Quiet team(s) connected to the integration.
6. To save, click `Save Slack Settings`
After you've granted All Quiet access to Slack, you'll be redirected back to All Quiet. Open the `Slack Settings` tab.
1. Observe that the Installation Status now indicates "installed".
2. You can change your integration settings to “**Read Only**”. In this mode, we will not send any action buttons to Slack, meaning users cannot interact with the messages. This is ideal if you want to use the integration for internal stakeholder management.
3. For All Quiet to send incidents to your Slack workspace, you must invite All Quiet to at least one channel.
4. There's an option to tag you on-call members in the related Slack channels when an an incident is assigned to them.
5. As soon as you added All Quiet to at least one Slack channel, you can set up an automated message you can use to inform your Slack channels who's currently on-call in the All Quiet team(s) connected to the integration.
6. To save, click `Save Slack Settings`
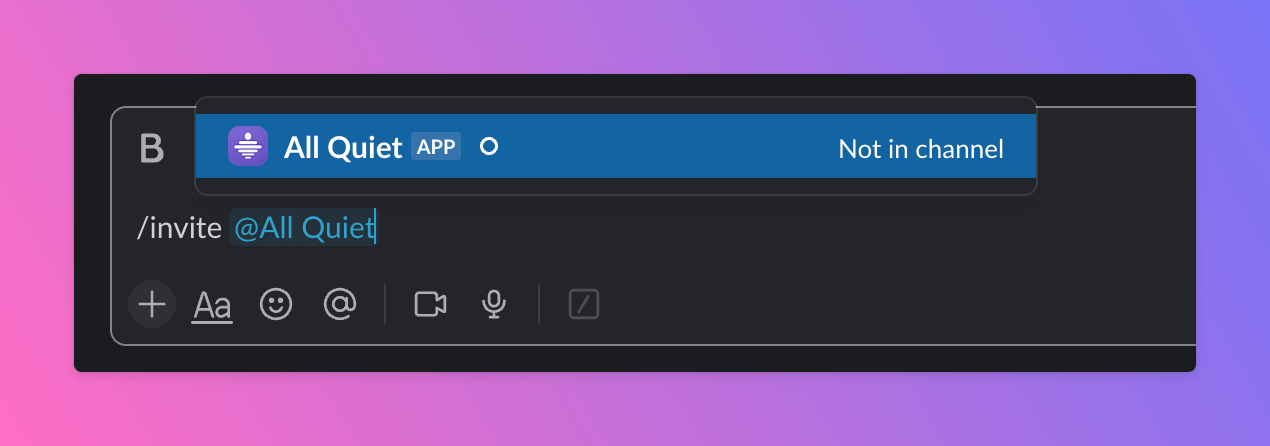
 Navigate to the desired channel in Slack where you want All Quiet to send incidents to.
1. Start by typing *`/invite @All Quiet`.* / *`/invite @All Quiet EU`.*
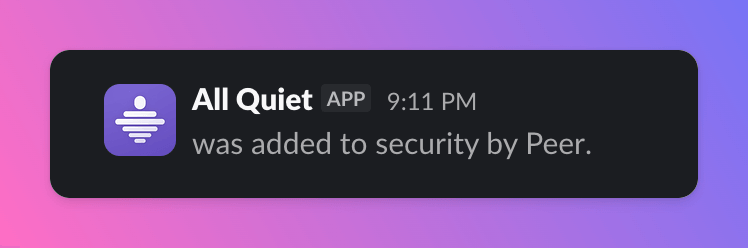
2. Select `All Quiet` (or, if you are a allquiet.eu user, the `All Quiet EU`) and then press `Enter` to add the app into your channel.
Navigate to the desired channel in Slack where you want All Quiet to send incidents to.
1. Start by typing *`/invite @All Quiet`.* / *`/invite @All Quiet EU`.*
2. Select `All Quiet` (or, if you are a allquiet.eu user, the `All Quiet EU`) and then press `Enter` to add the app into your channel.
 Back to your integration on All Quiet
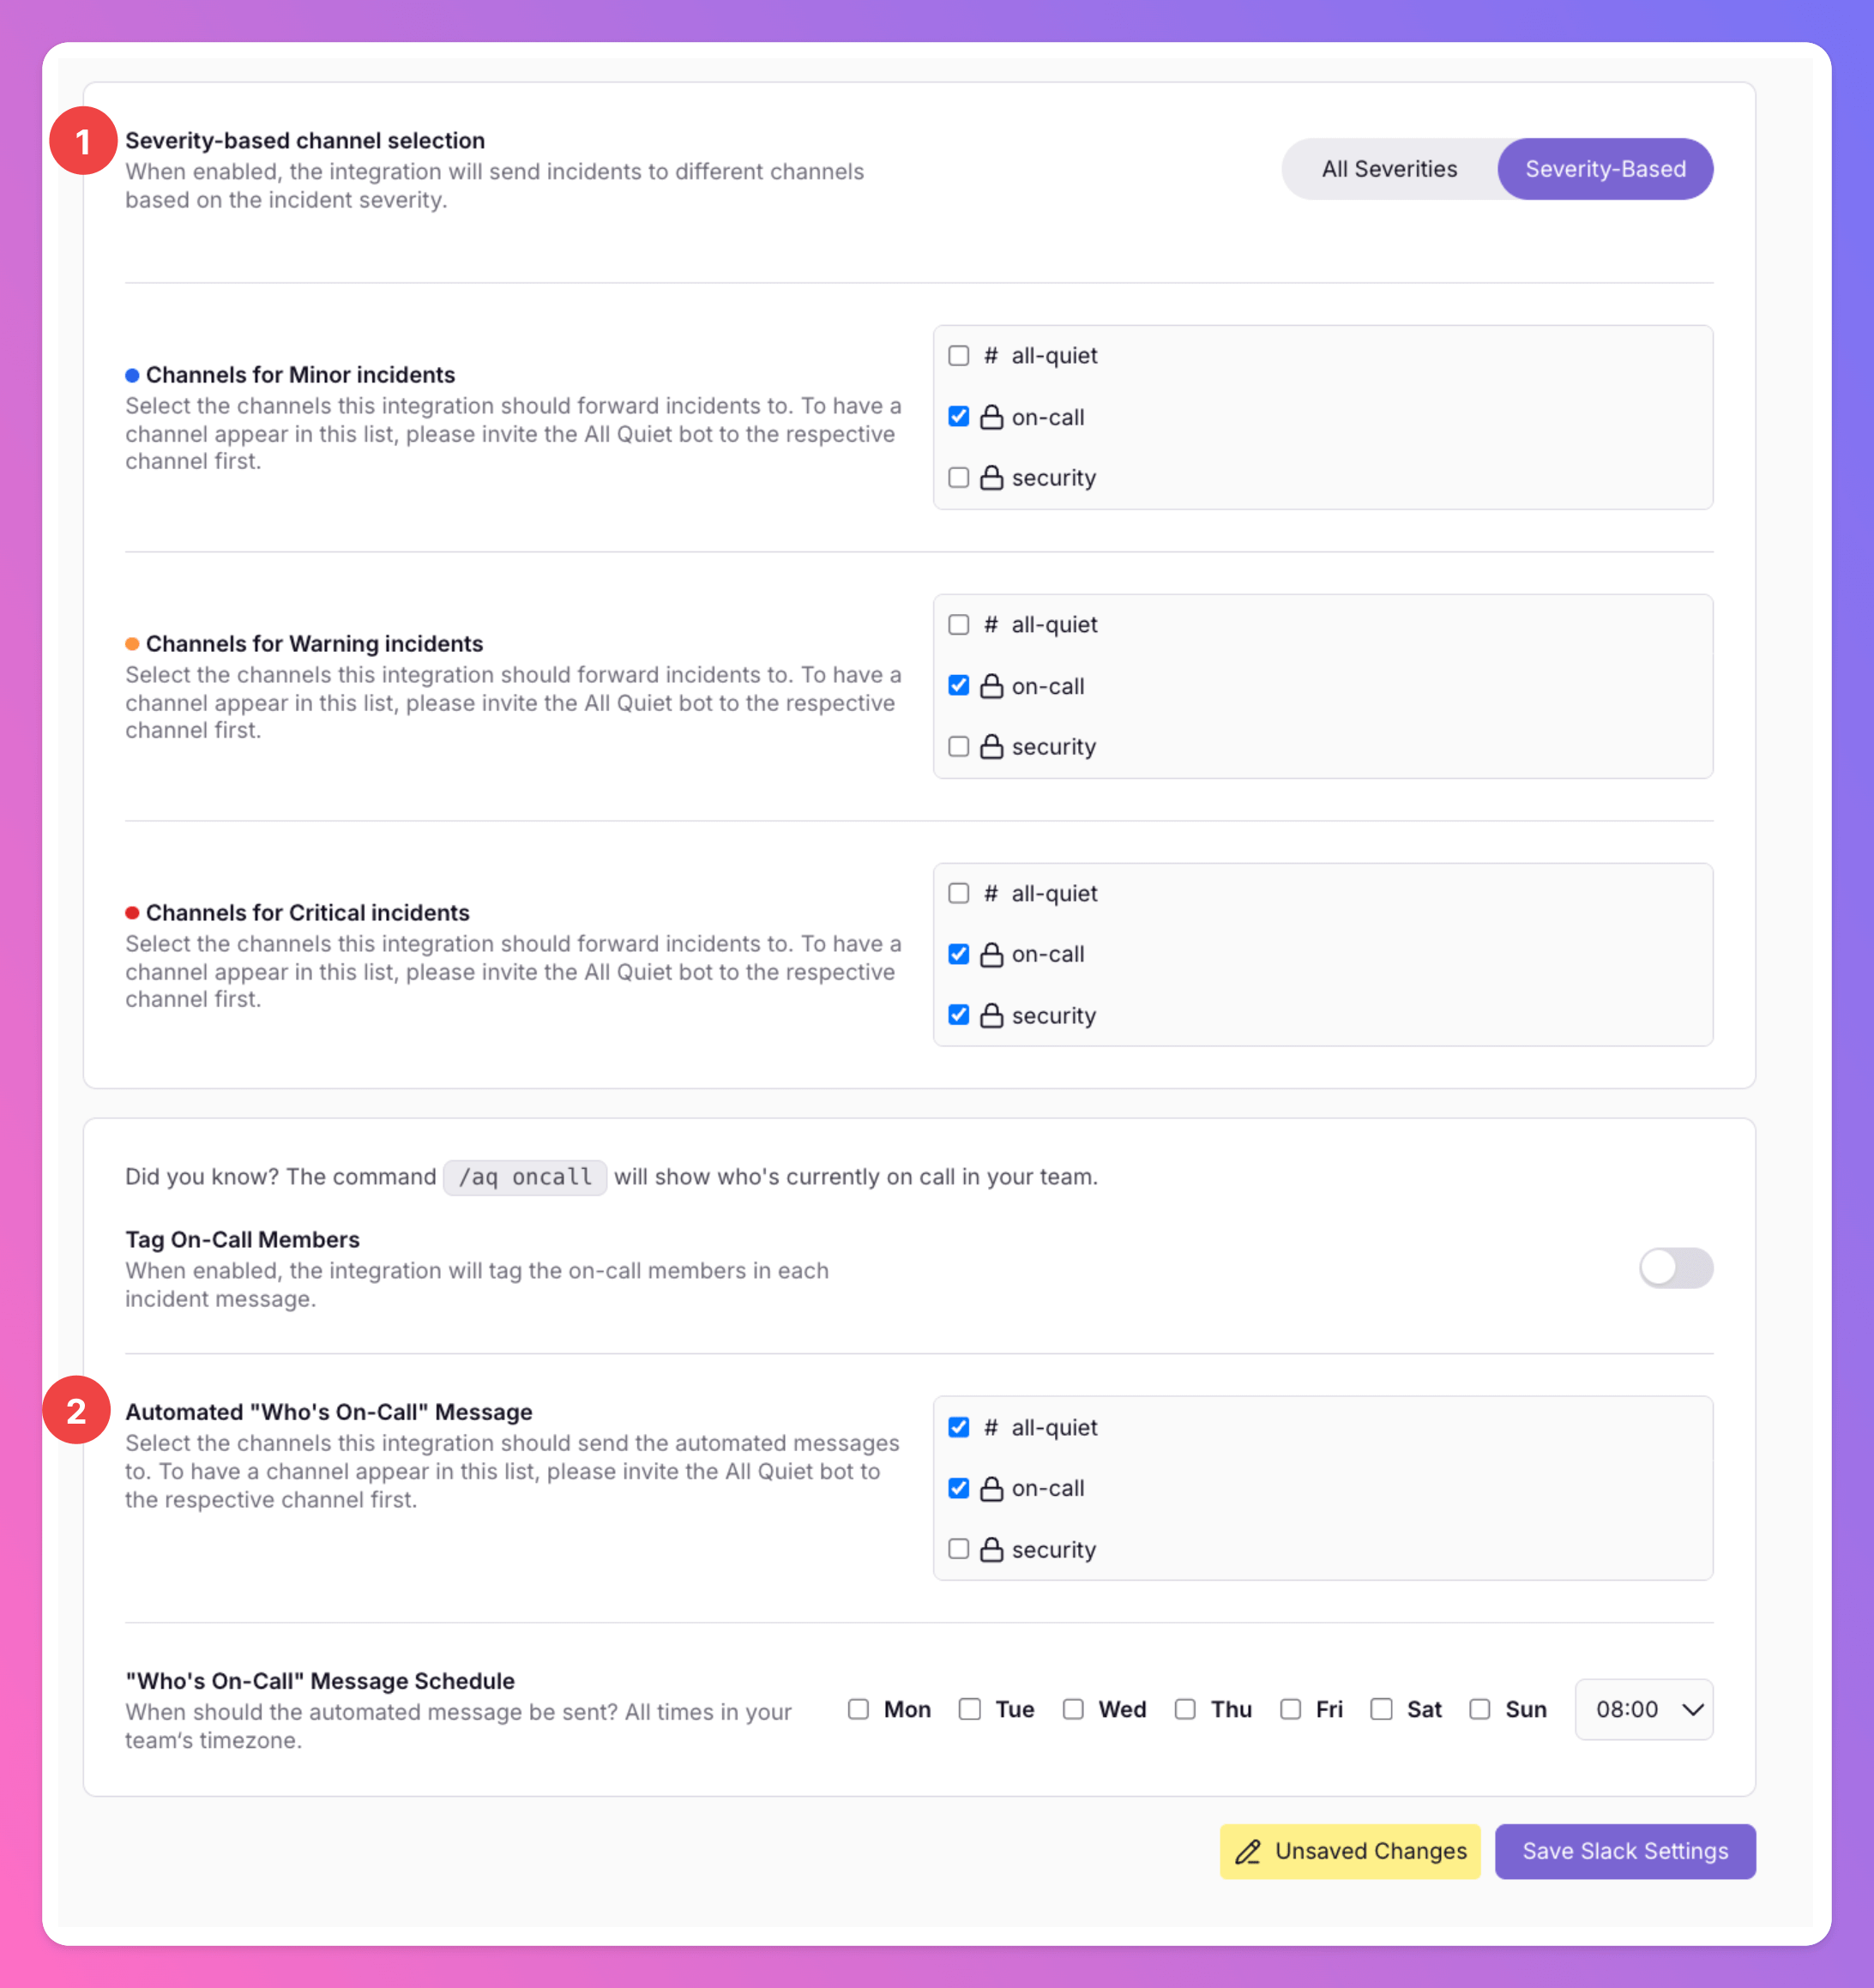
1. From the channels you added the bot to, select those you want to send incidents to. You can decide to either
* Send all incidents to the same channels.
* Select channels based on incident severity.
2. Also, you can now select the channels you want to sent the on-call message to.
Back to your integration on All Quiet
1. From the channels you added the bot to, select those you want to send incidents to. You can decide to either
* Send all incidents to the same channels.
* Select channels based on incident severity.
2. Also, you can now select the channels you want to sent the on-call message to.
 ### Engage with Incidents Directly in Slack
Each time you engage with incidents via All Quiet, our integration for Slack sends an interactive message to your designated channels. This allows you to manage incidents seamlessly, mirroring the experience on our iOS, Android, and Web Apps, all without leaving Slack.
If incident grouping is enabled, All Quiet will only include the grouping attributes in the Slack messages we send (the same fields used to group events into an incident). Learn more in our [Inbound Integrations docs](/essentials/inbound#optional-additional-attribute-keys).
For compliance reasons, only Users with rights in the All Quiet team(s) connected to the incident can interact with the Message. Additionally, if users create incidents manually they can alway interact with the specific incident no matter which team(s) are assigned.
### Engage with Incidents Directly in Slack
Each time you engage with incidents via All Quiet, our integration for Slack sends an interactive message to your designated channels. This allows you to manage incidents seamlessly, mirroring the experience on our iOS, Android, and Web Apps, all without leaving Slack.
If incident grouping is enabled, All Quiet will only include the grouping attributes in the Slack messages we send (the same fields used to group events into an incident). Learn more in our [Inbound Integrations docs](/essentials/inbound#optional-additional-attribute-keys).
For compliance reasons, only Users with rights in the All Quiet team(s) connected to the incident can interact with the Message. Additionally, if users create incidents manually they can alway interact with the specific incident no matter which team(s) are assigned.
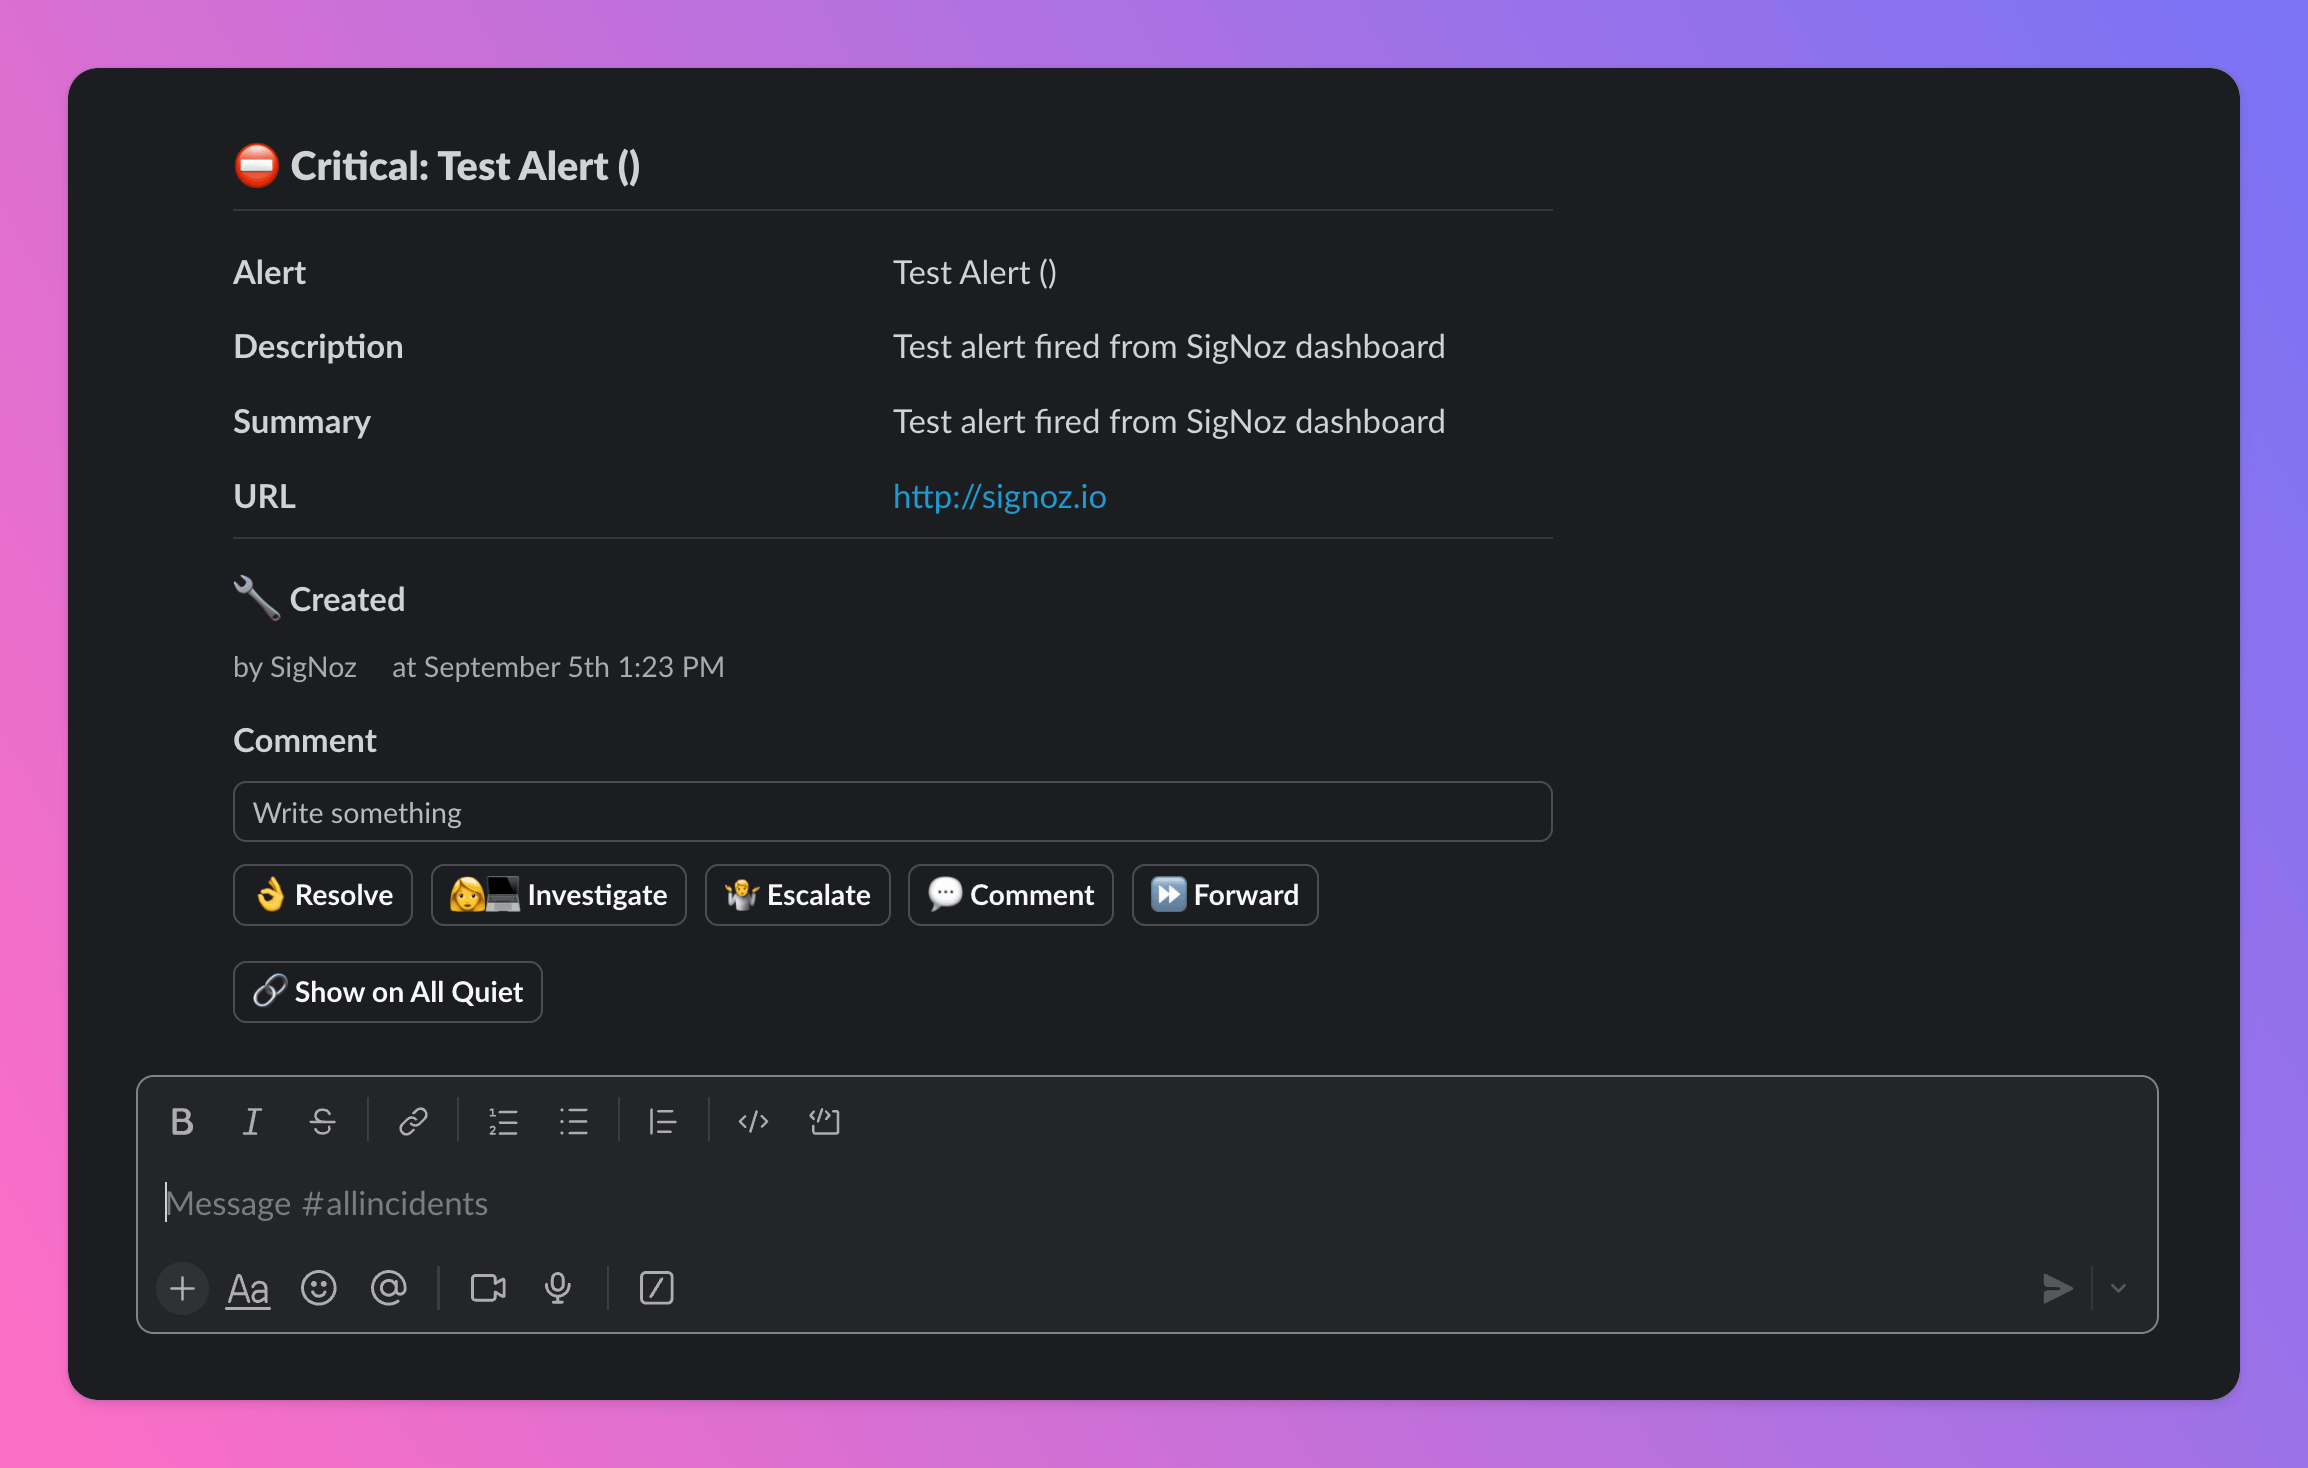 Slack is now integrated with All Quiet, simplifying incident management by consolidating notifications and actions in one place.
## All Quiet App for Slack Commands
Now that All Quiet is installed on your Slack workspace you can use some handy commands. To see all available All Quiet for App Slack commands start by typing `/aq` and a window with available commands should appear.
Slack is now integrated with All Quiet, simplifying incident management by consolidating notifications and actions in one place.
## All Quiet App for Slack Commands
Now that All Quiet is installed on your Slack workspace you can use some handy commands. To see all available All Quiet for App Slack commands start by typing `/aq` and a window with available commands should appear.
 ### /aq oncall
Type in `/aq oncall` to directly see on Slack who is currently on-call in which escalation tier in all of your teams.
```
/aq oncall
```
### /aq oncall
Type in `/aq oncall` to directly see on Slack who is currently on-call in which escalation tier in all of your teams.
```
/aq oncall
```
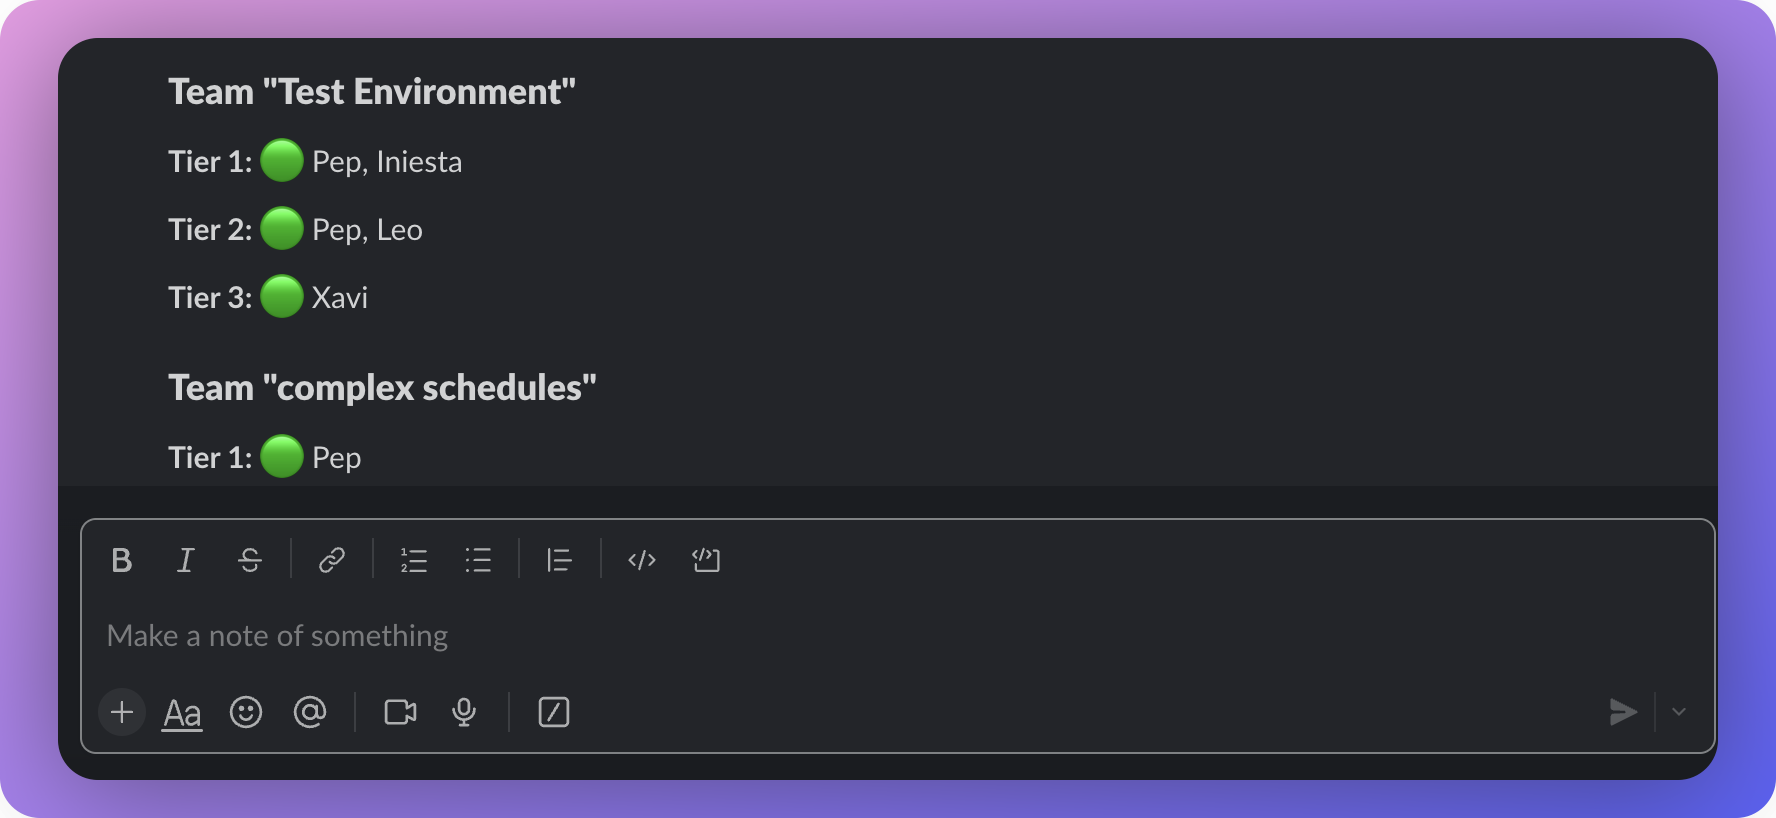 With `/aq oncall --ephemeral`, you can also see who's on-call, but this message is only visible for yourself. Nice hack if you don't want to spam your channel.
### /aq new
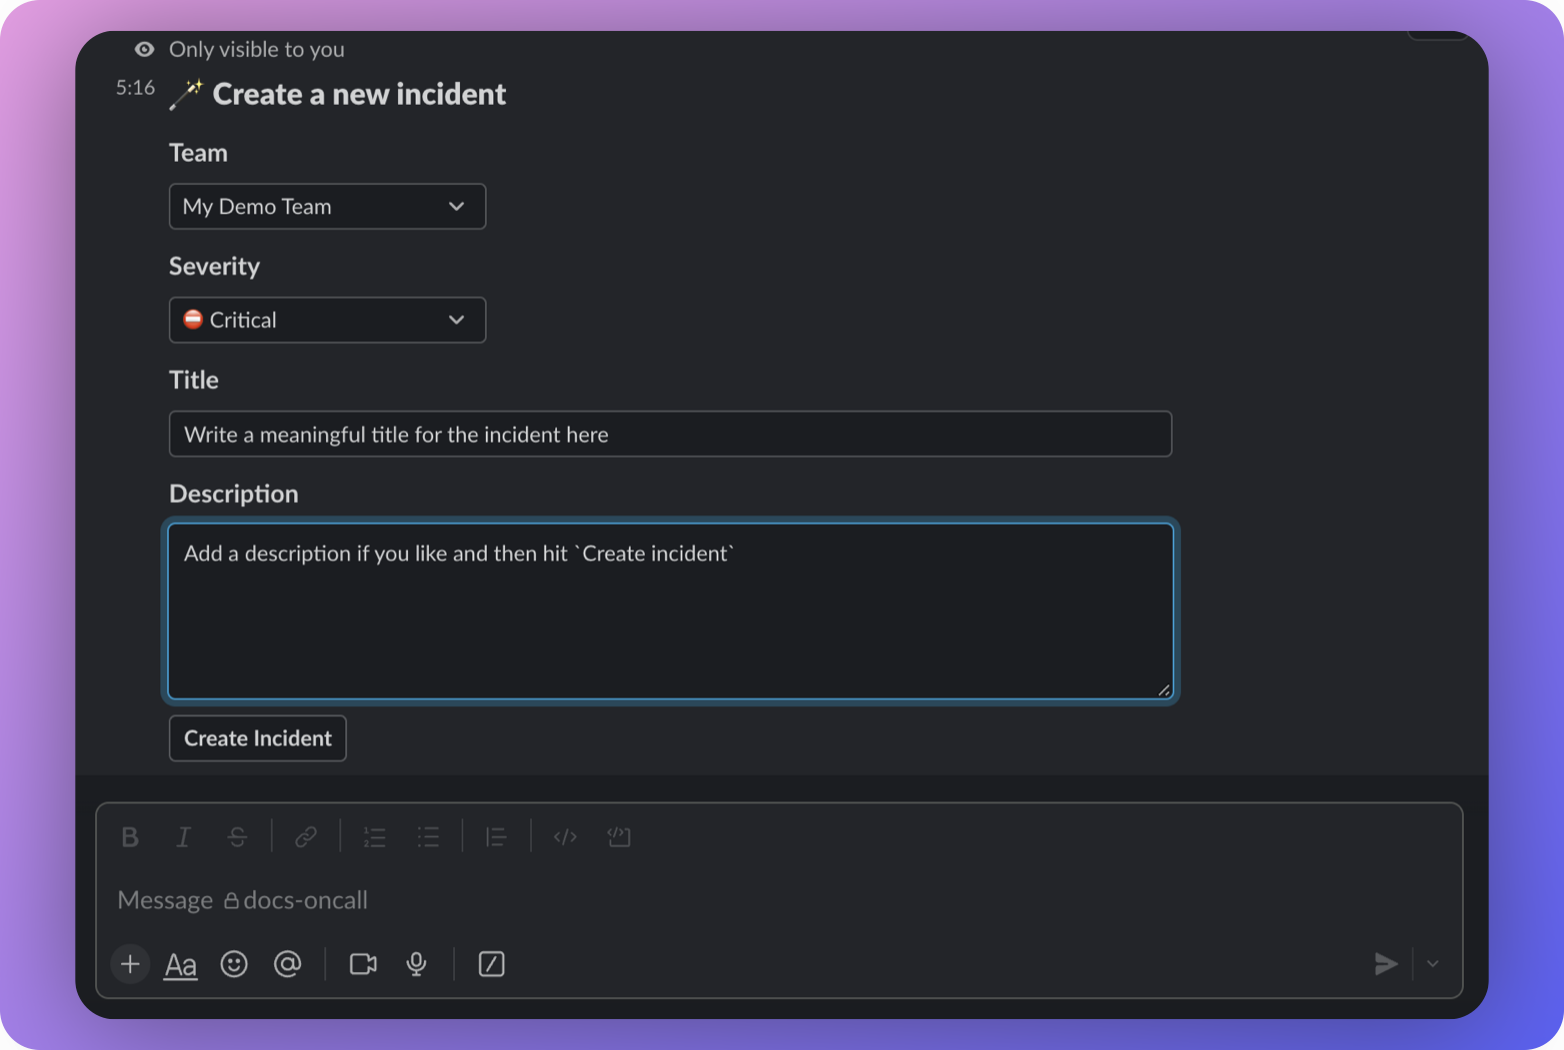
Type in `/aq new` to trigger an All Quiet incident directly from Slack
```
/aq new
```
You can
* choose the team you want to create the incident in
For compliance reasons, Users will only be able to select from the All Quiet teams they have rights in.
* the severity of the incident
* write a title for the incident
* add a description to the incident
With `/aq oncall --ephemeral`, you can also see who's on-call, but this message is only visible for yourself. Nice hack if you don't want to spam your channel.
### /aq new
Type in `/aq new` to trigger an All Quiet incident directly from Slack
```
/aq new
```
You can
* choose the team you want to create the incident in
For compliance reasons, Users will only be able to select from the All Quiet teams they have rights in.
* the severity of the incident
* write a title for the incident
* add a description to the incident
 ## Troubleshooting
**Team Administrators**, **Organization Administrators**, and **Organization Owners** can troubleshoot this integration using the **History** tab (**Outbound History**) on the integration details page. See **[Outbound History](/essentials/outbound#outbound-history)** for what is logged, who can access it, and how to read outcomes. For broader checks when outbound tools do not fire, see **[Outbound integrations — Troubleshooting](/essentials/outbound#outbound-troubleshooting-routing)** and **[advanced routing](/advanced/routing)**.
## Troubleshooting
**Team Administrators**, **Organization Administrators**, and **Organization Owners** can troubleshoot this integration using the **History** tab (**Outbound History**) on the integration details page. See **[Outbound History](/essentials/outbound#outbound-history)** for what is logged, who can access it, and how to read outcomes. For broader checks when outbound tools do not fire, see **[Outbound integrations — Troubleshooting](/essentials/outbound#outbound-troubleshooting-routing)** and **[advanced routing](/advanced/routing)**.