> ## Documentation Index
> Fetch the complete documentation index at: https://docs.allquiet.app/llms.txt
> Use this file to discover all available pages before exploring further.
# Jira
> Connect Your Jira Boards with All Quiet to create Jira issues based on All Quiet incidents.
Setup time: 5 Min
Effortlessly connect Jira with All Quiet for streamlined incident management.
The first part of this documentation focuses on creating the integration. The second explains how to create Jira issues based on All Quiet incidents (Outbound).
Want to create new incidents from Jira (Inbound)? Follow the [third part](/integrations/outbound/jira#create-all-quiet-incidents-from-jira) of this guideline. This way, you can seamlessly alert your development team about urgent Jira issues.
## Create Outbound Integration
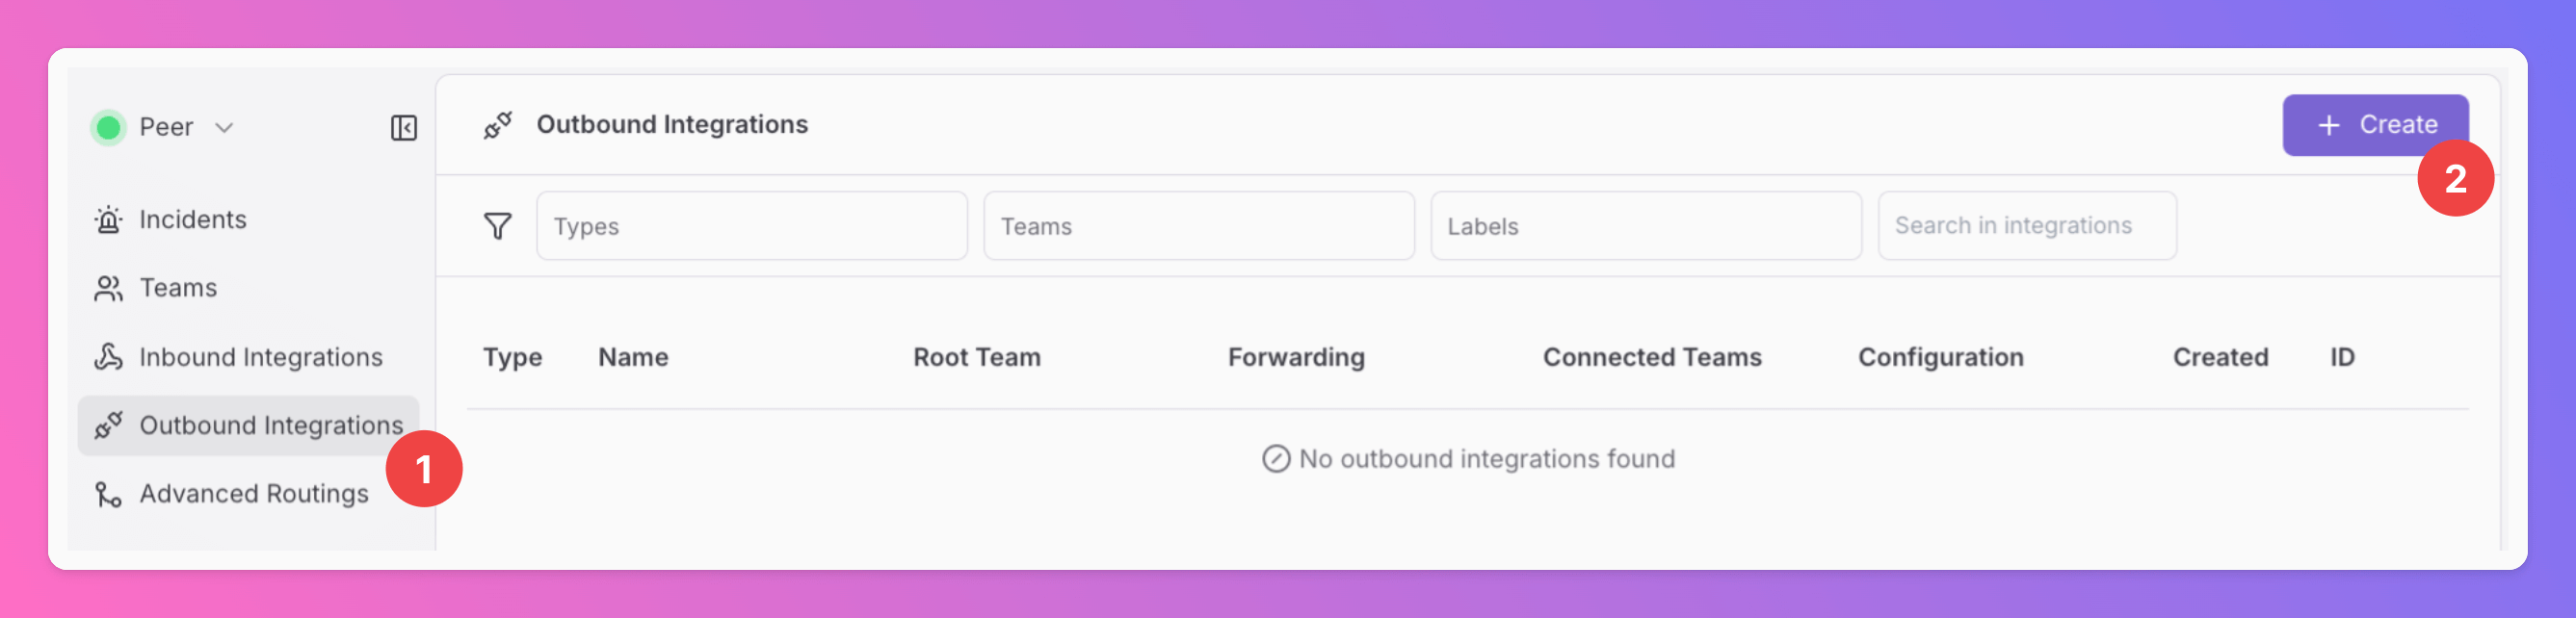
1. Click on the `Outbound Integrations` tab.
2. Click on `+ Create`.
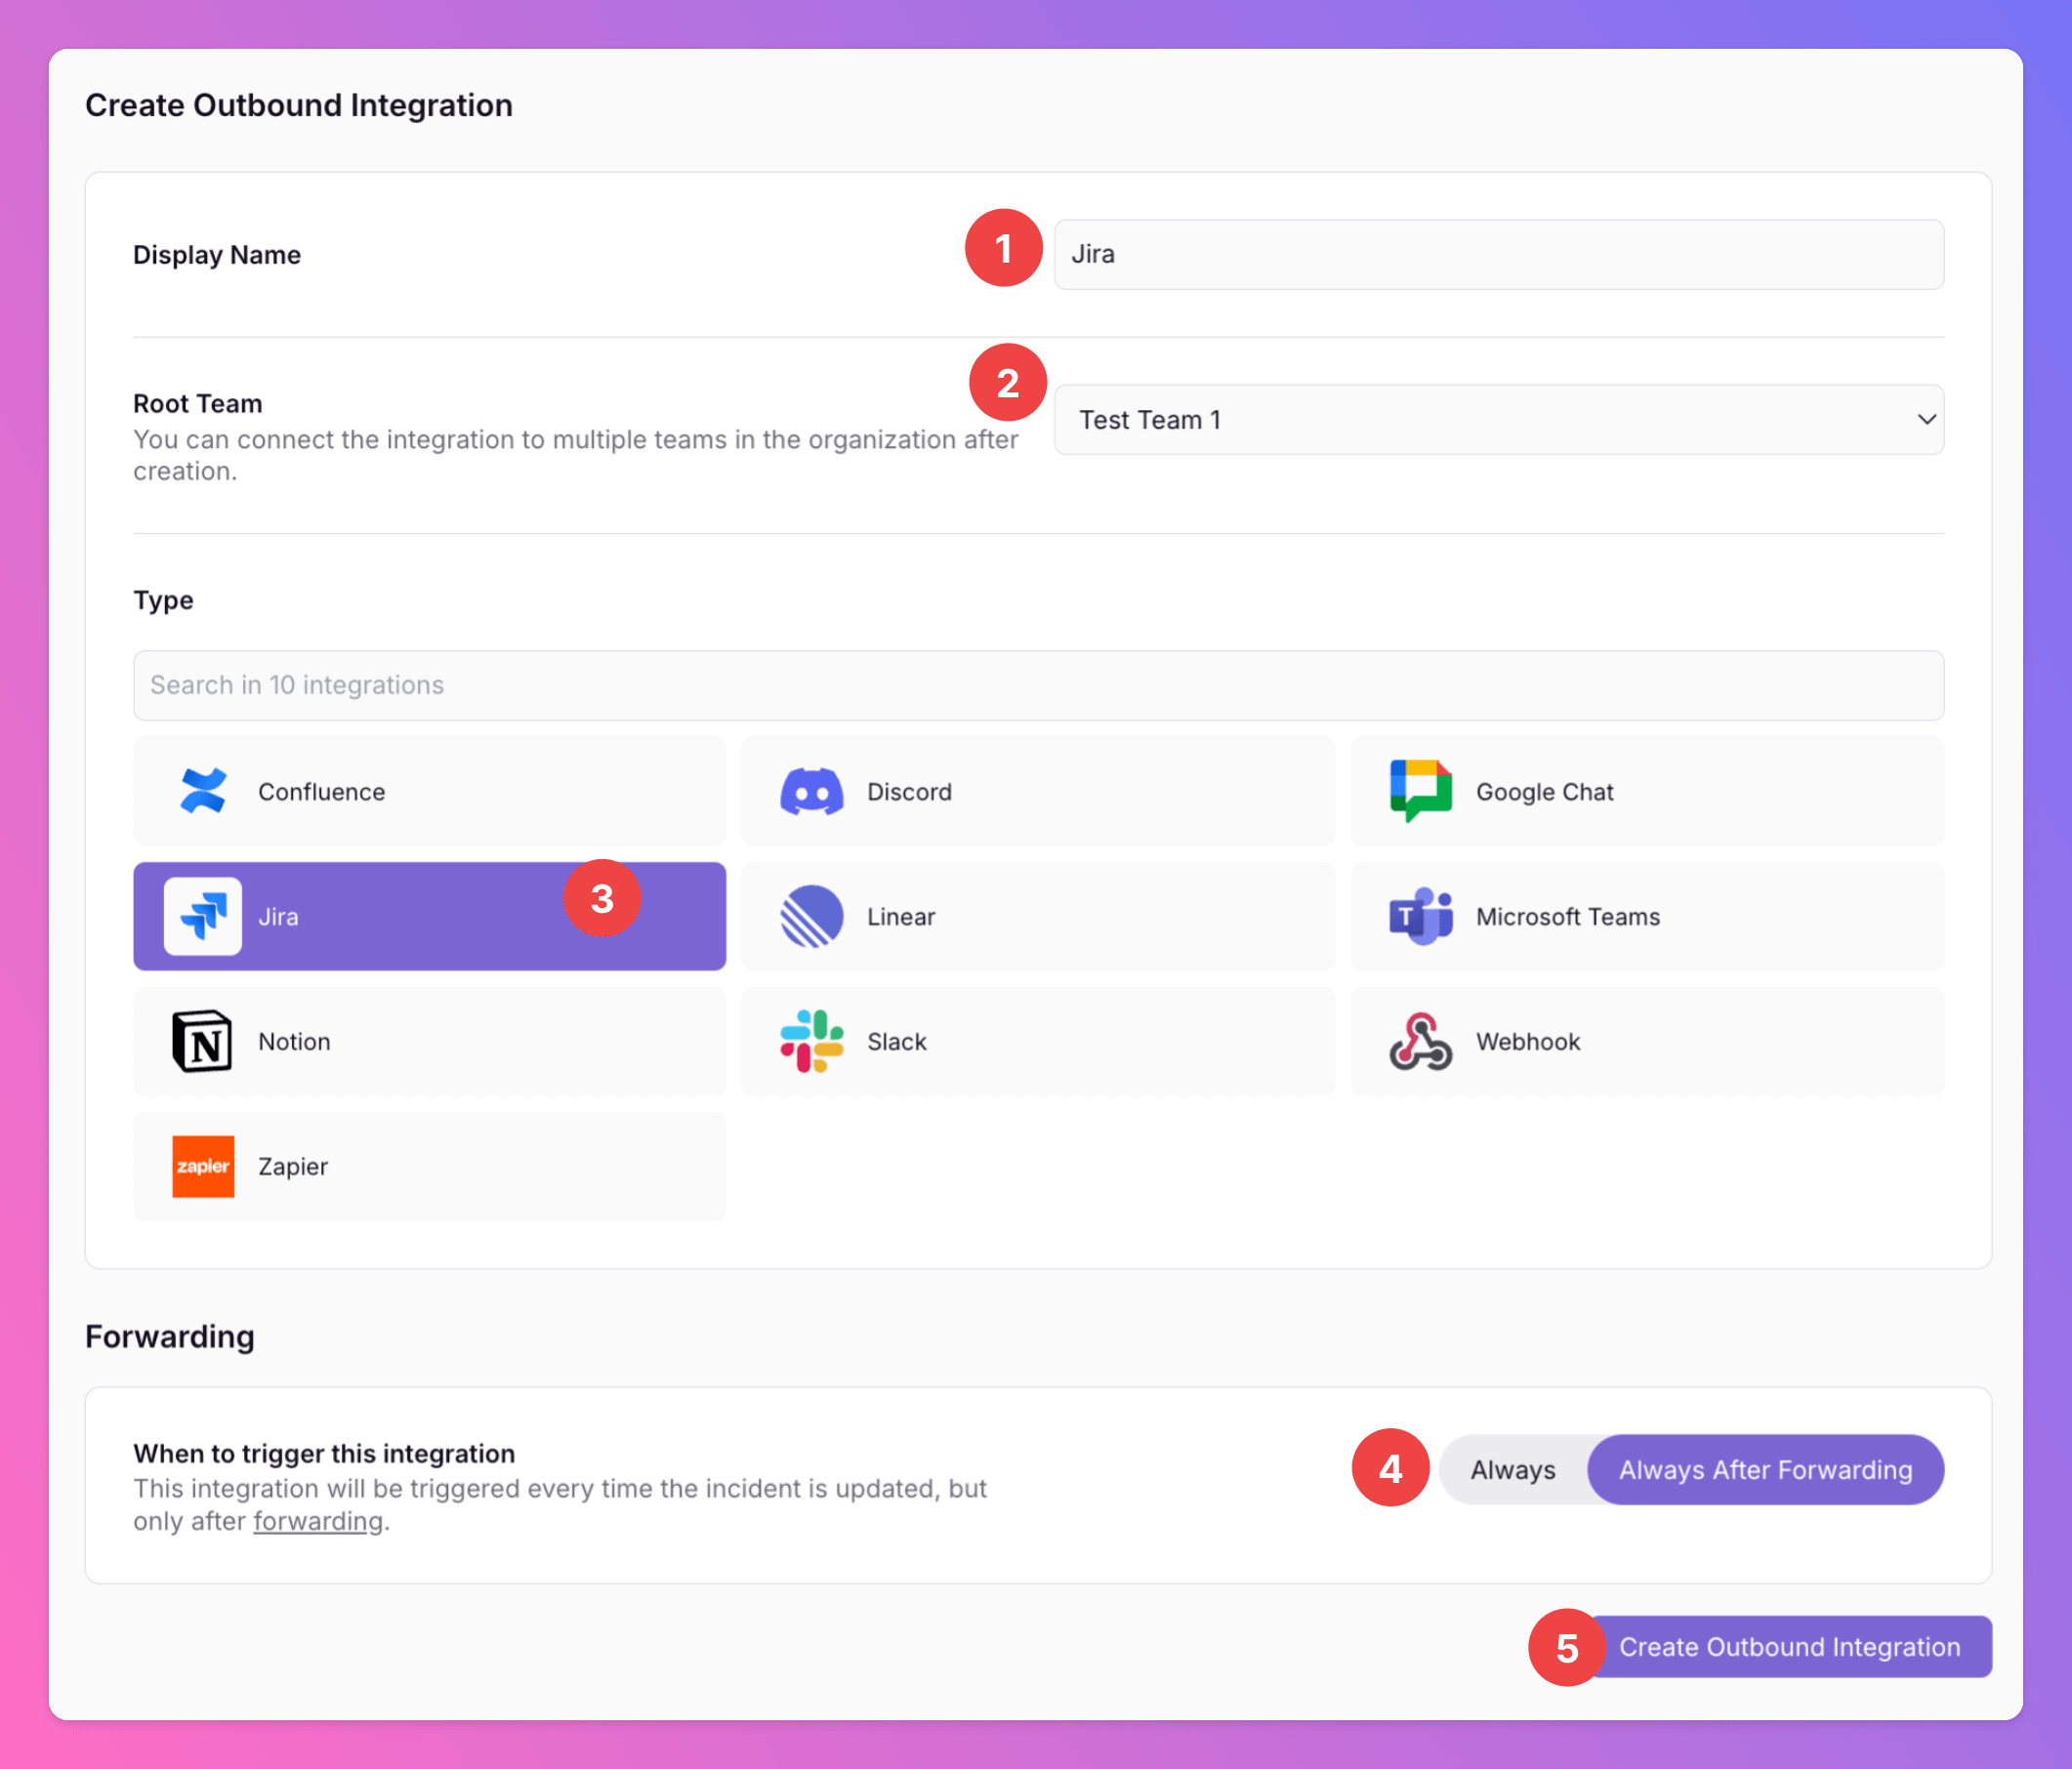
 1. Enter a `Display Name` for your integration, e.g. "Jira".
2. Select a `Team`. For Organizations with Pro and Enterprise plan: This is going to be the root team of your integration. You will be able to add additional teams in the next step.
3. Select `Jira` as the integration's type.
4. Forwarding settings:
1. **Default:** `Always After Forwarding` - Jira issues will only be created if users [manually forward specific incidents](/essentials/incident#forwarding) or if you set up [advanced routing rules](/advanced/routing) for your Jira integration that automatically forward incidents in specific scenarios.
2. **Alternative**: `Always` will automatically forward all incidents to Jira and create issues, unless excluded by additional [advanced routing rules](/advanced/routing).
You can change your selection anytime.
5. Click `Create Outbound Integration`.
1. Enter a `Display Name` for your integration, e.g. "Jira".
2. Select a `Team`. For Organizations with Pro and Enterprise plan: This is going to be the root team of your integration. You will be able to add additional teams in the next step.
3. Select `Jira` as the integration's type.
4. Forwarding settings:
1. **Default:** `Always After Forwarding` - Jira issues will only be created if users [manually forward specific incidents](/essentials/incident#forwarding) or if you set up [advanced routing rules](/advanced/routing) for your Jira integration that automatically forward incidents in specific scenarios.
2. **Alternative**: `Always` will automatically forward all incidents to Jira and create issues, unless excluded by additional [advanced routing rules](/advanced/routing).
You can change your selection anytime.
5. Click `Create Outbound Integration`.
 ### Add All Quiet to your Jira Space
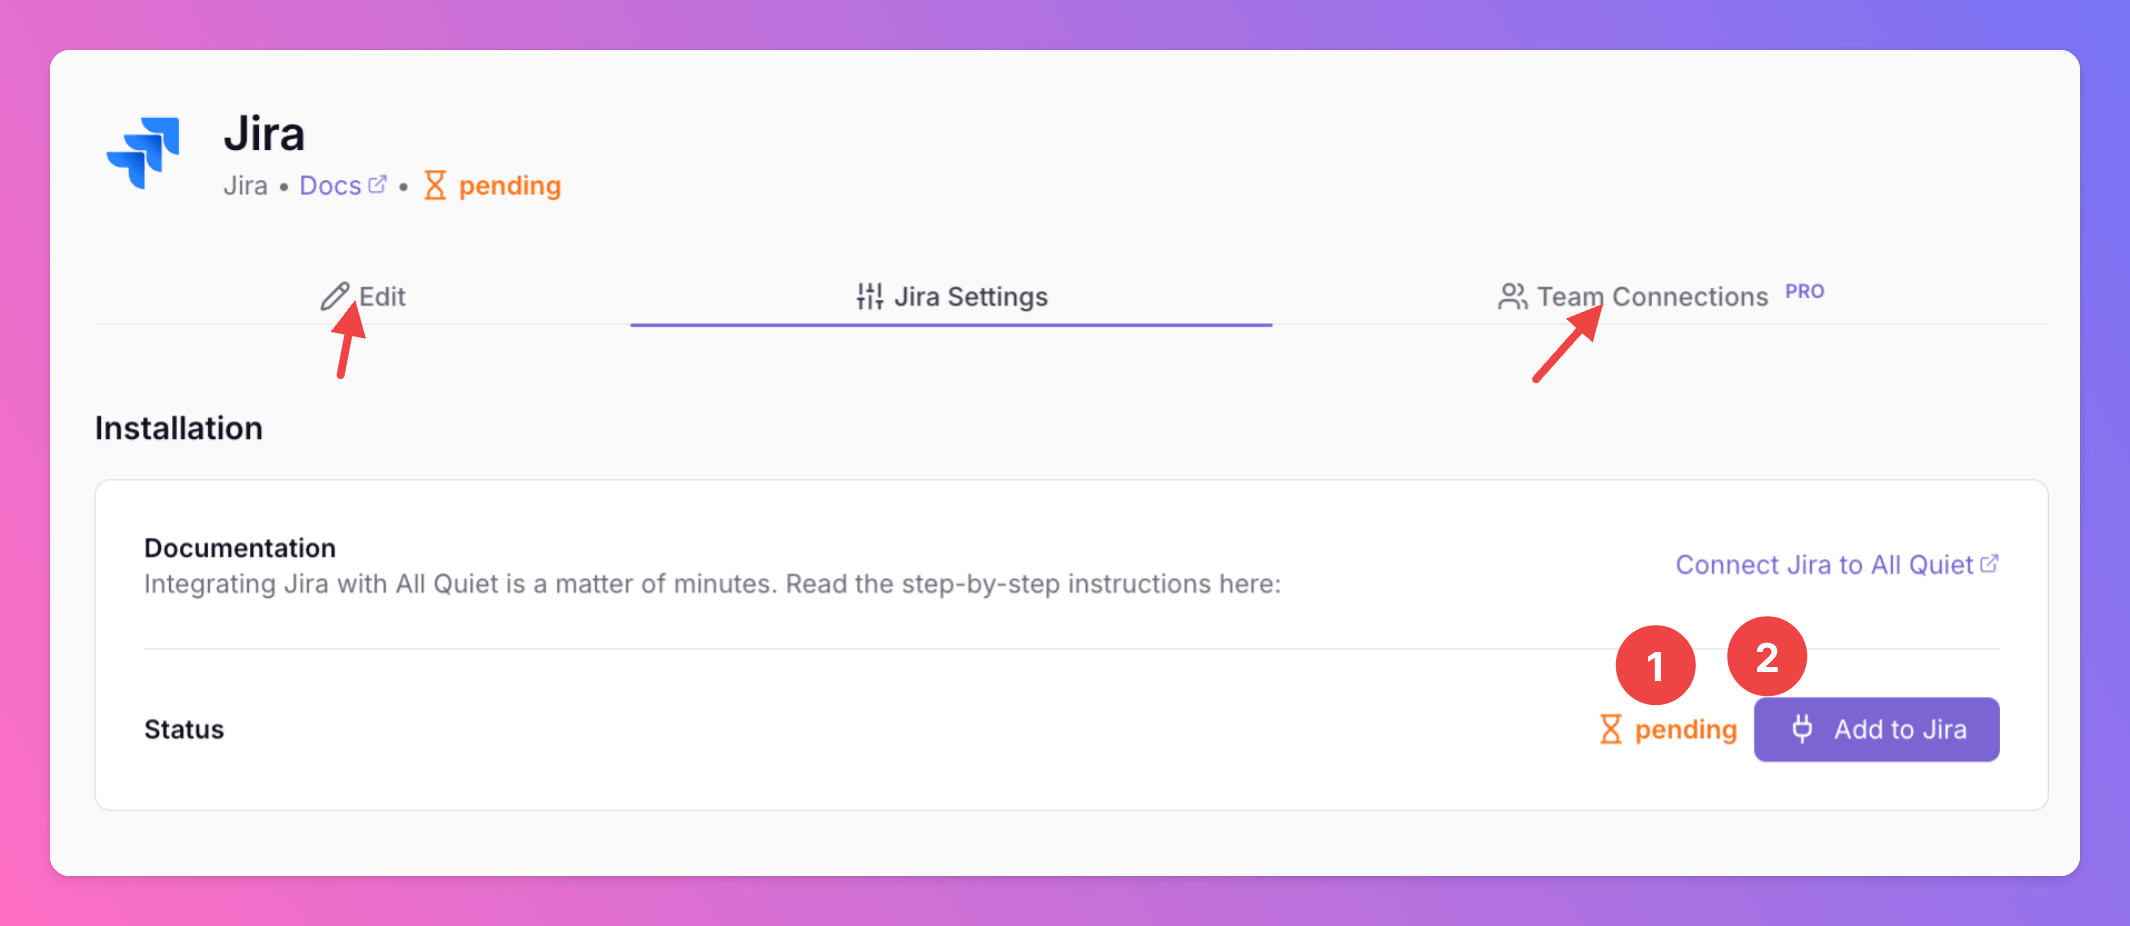
Once you've successfully created your new outbound integration, you'll automatically be redirected to its `Settings` page.
1. Observe that the installation status of the All Quiet integration is still pending.
2. To complete the integration with Jira, click `Add to Jira`.
In the `Edit` tab, you can change general settings like the integration's [Forwarding settings](/integrations/outbound/jira#create-outbound-integration).
**Only for Pro and Enterprise plan** - Manage your `Team Connections`: The root team is pre-selected, and you can add the integration to further teams within the root team's organization. *Team Administrators* can add / remove those teams they are an Administrator in, *Organization Administrators* & *Organization Owners* can manage the connections to all teams of the organization.
### Add All Quiet to your Jira Space
Once you've successfully created your new outbound integration, you'll automatically be redirected to its `Settings` page.
1. Observe that the installation status of the All Quiet integration is still pending.
2. To complete the integration with Jira, click `Add to Jira`.
In the `Edit` tab, you can change general settings like the integration's [Forwarding settings](/integrations/outbound/jira#create-outbound-integration).
**Only for Pro and Enterprise plan** - Manage your `Team Connections`: The root team is pre-selected, and you can add the integration to further teams within the root team's organization. *Team Administrators* can add / remove those teams they are an Administrator in, *Organization Administrators* & *Organization Owners* can manage the connections to all teams of the organization.
 You'll be redirected to Jira, where you'll have to login first.
After login, you you’ll need to grant All Quiet permissions for your the Jira site.
We request only the permissions essential for All Quiet to operate correctly. These permissions are utilized solely when you interact with the app and are never used for any other purpose.
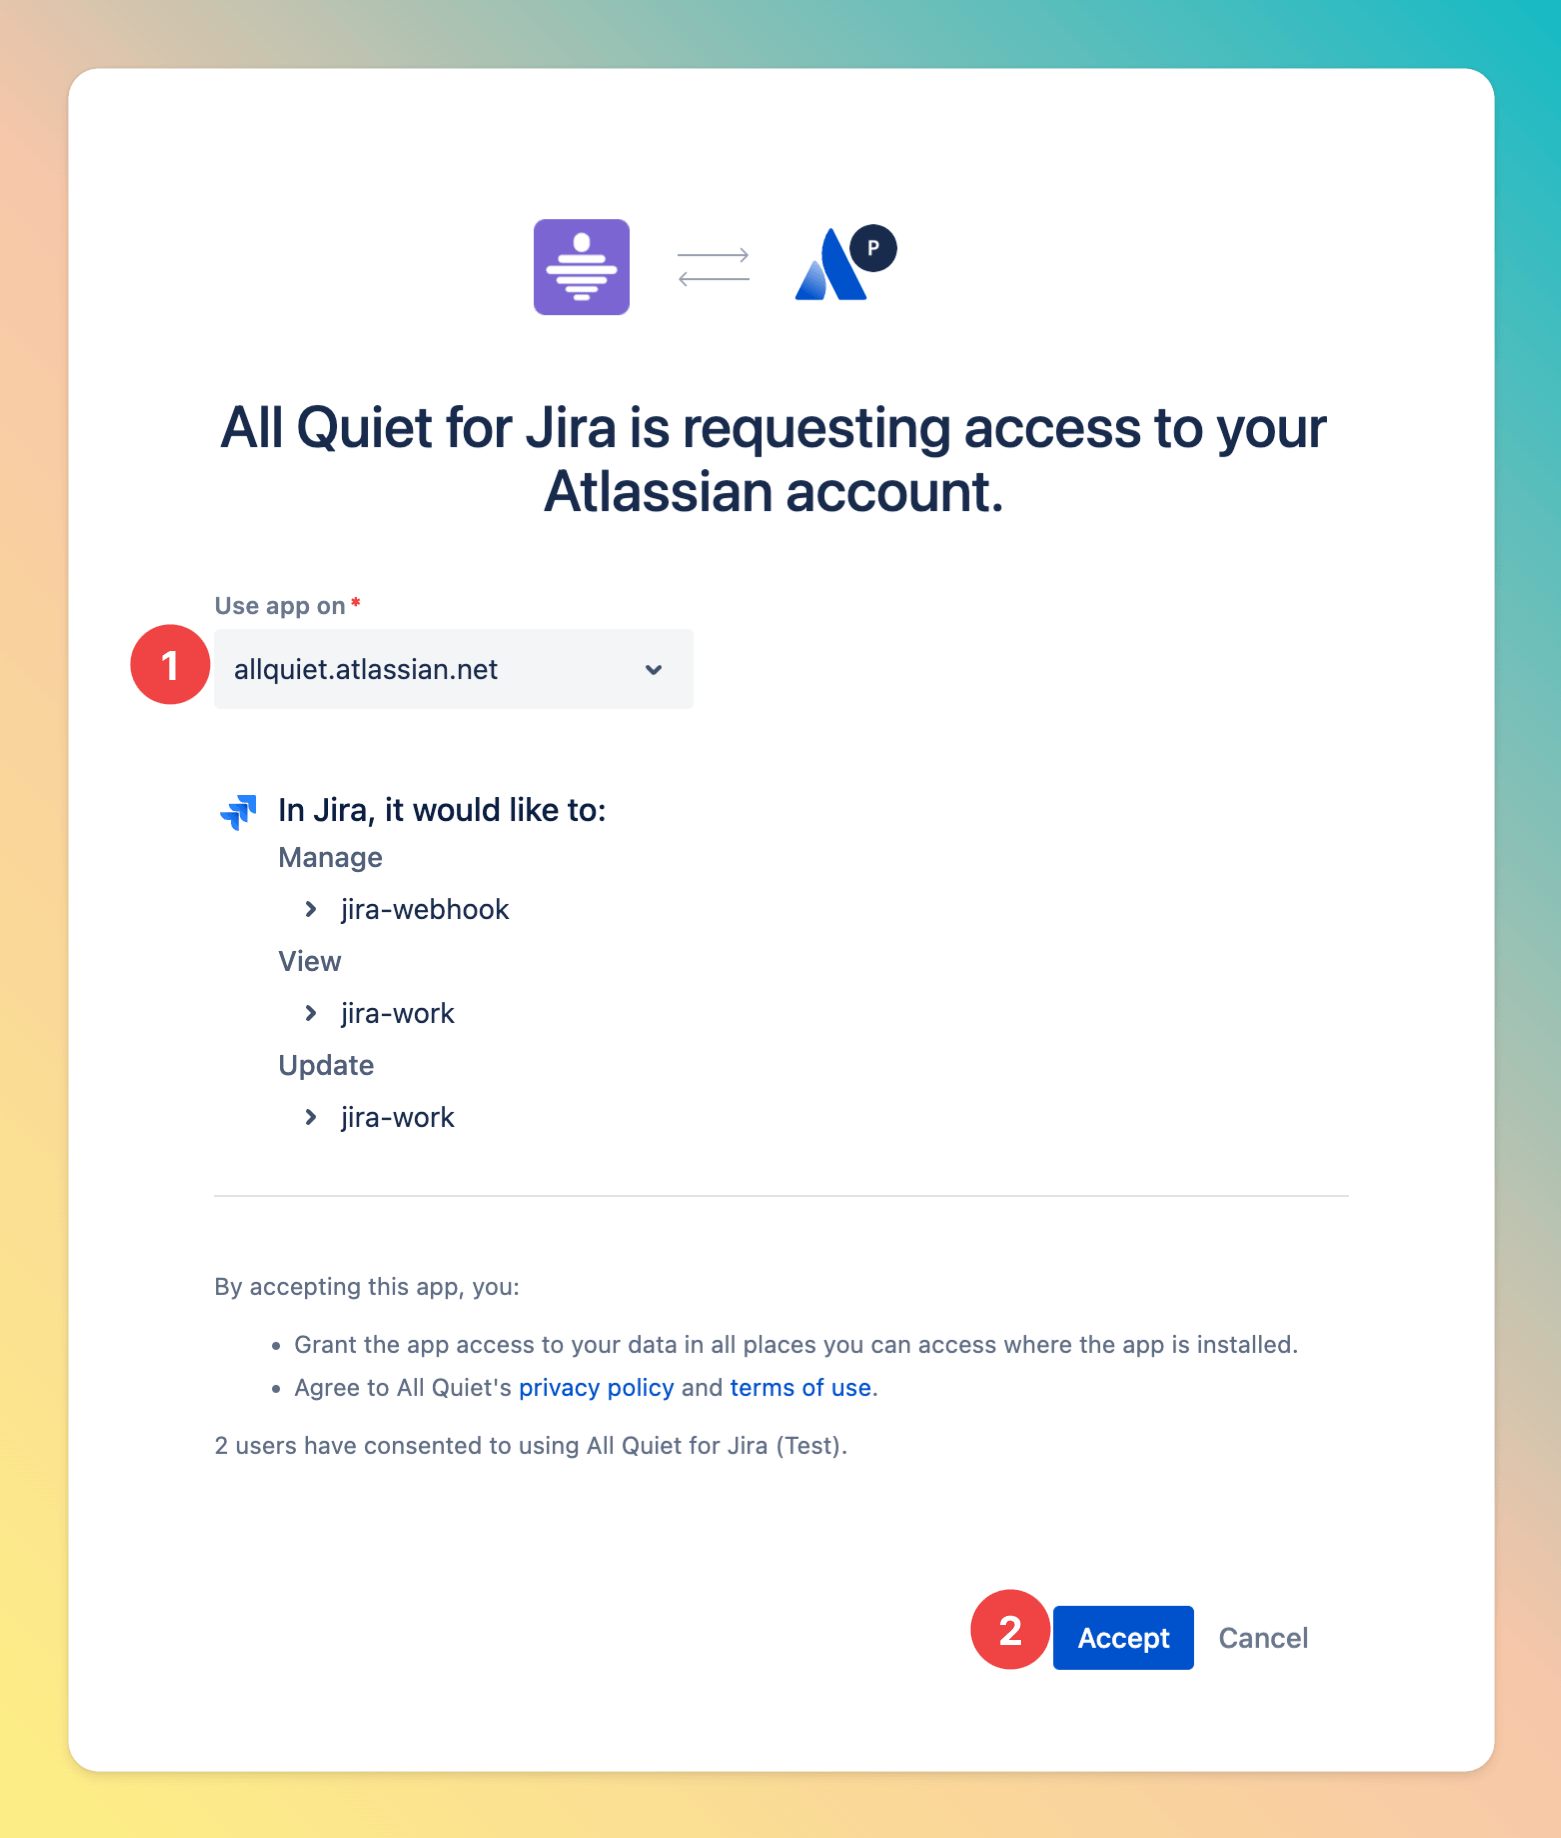
1. If your Atlassian account is linked to more than one Jira site, select the site you want to connect All Quiet to.
2. Click `Accept`.
You'll be redirected to Jira, where you'll have to login first.
After login, you you’ll need to grant All Quiet permissions for your the Jira site.
We request only the permissions essential for All Quiet to operate correctly. These permissions are utilized solely when you interact with the app and are never used for any other purpose.
1. If your Atlassian account is linked to more than one Jira site, select the site you want to connect All Quiet to.
2. Click `Accept`.
 ## Configure Outbound Integration
Next, your are redirected back to your Jira integration's `Settings` page in All Quiet.
Now, you need to configure the integration.
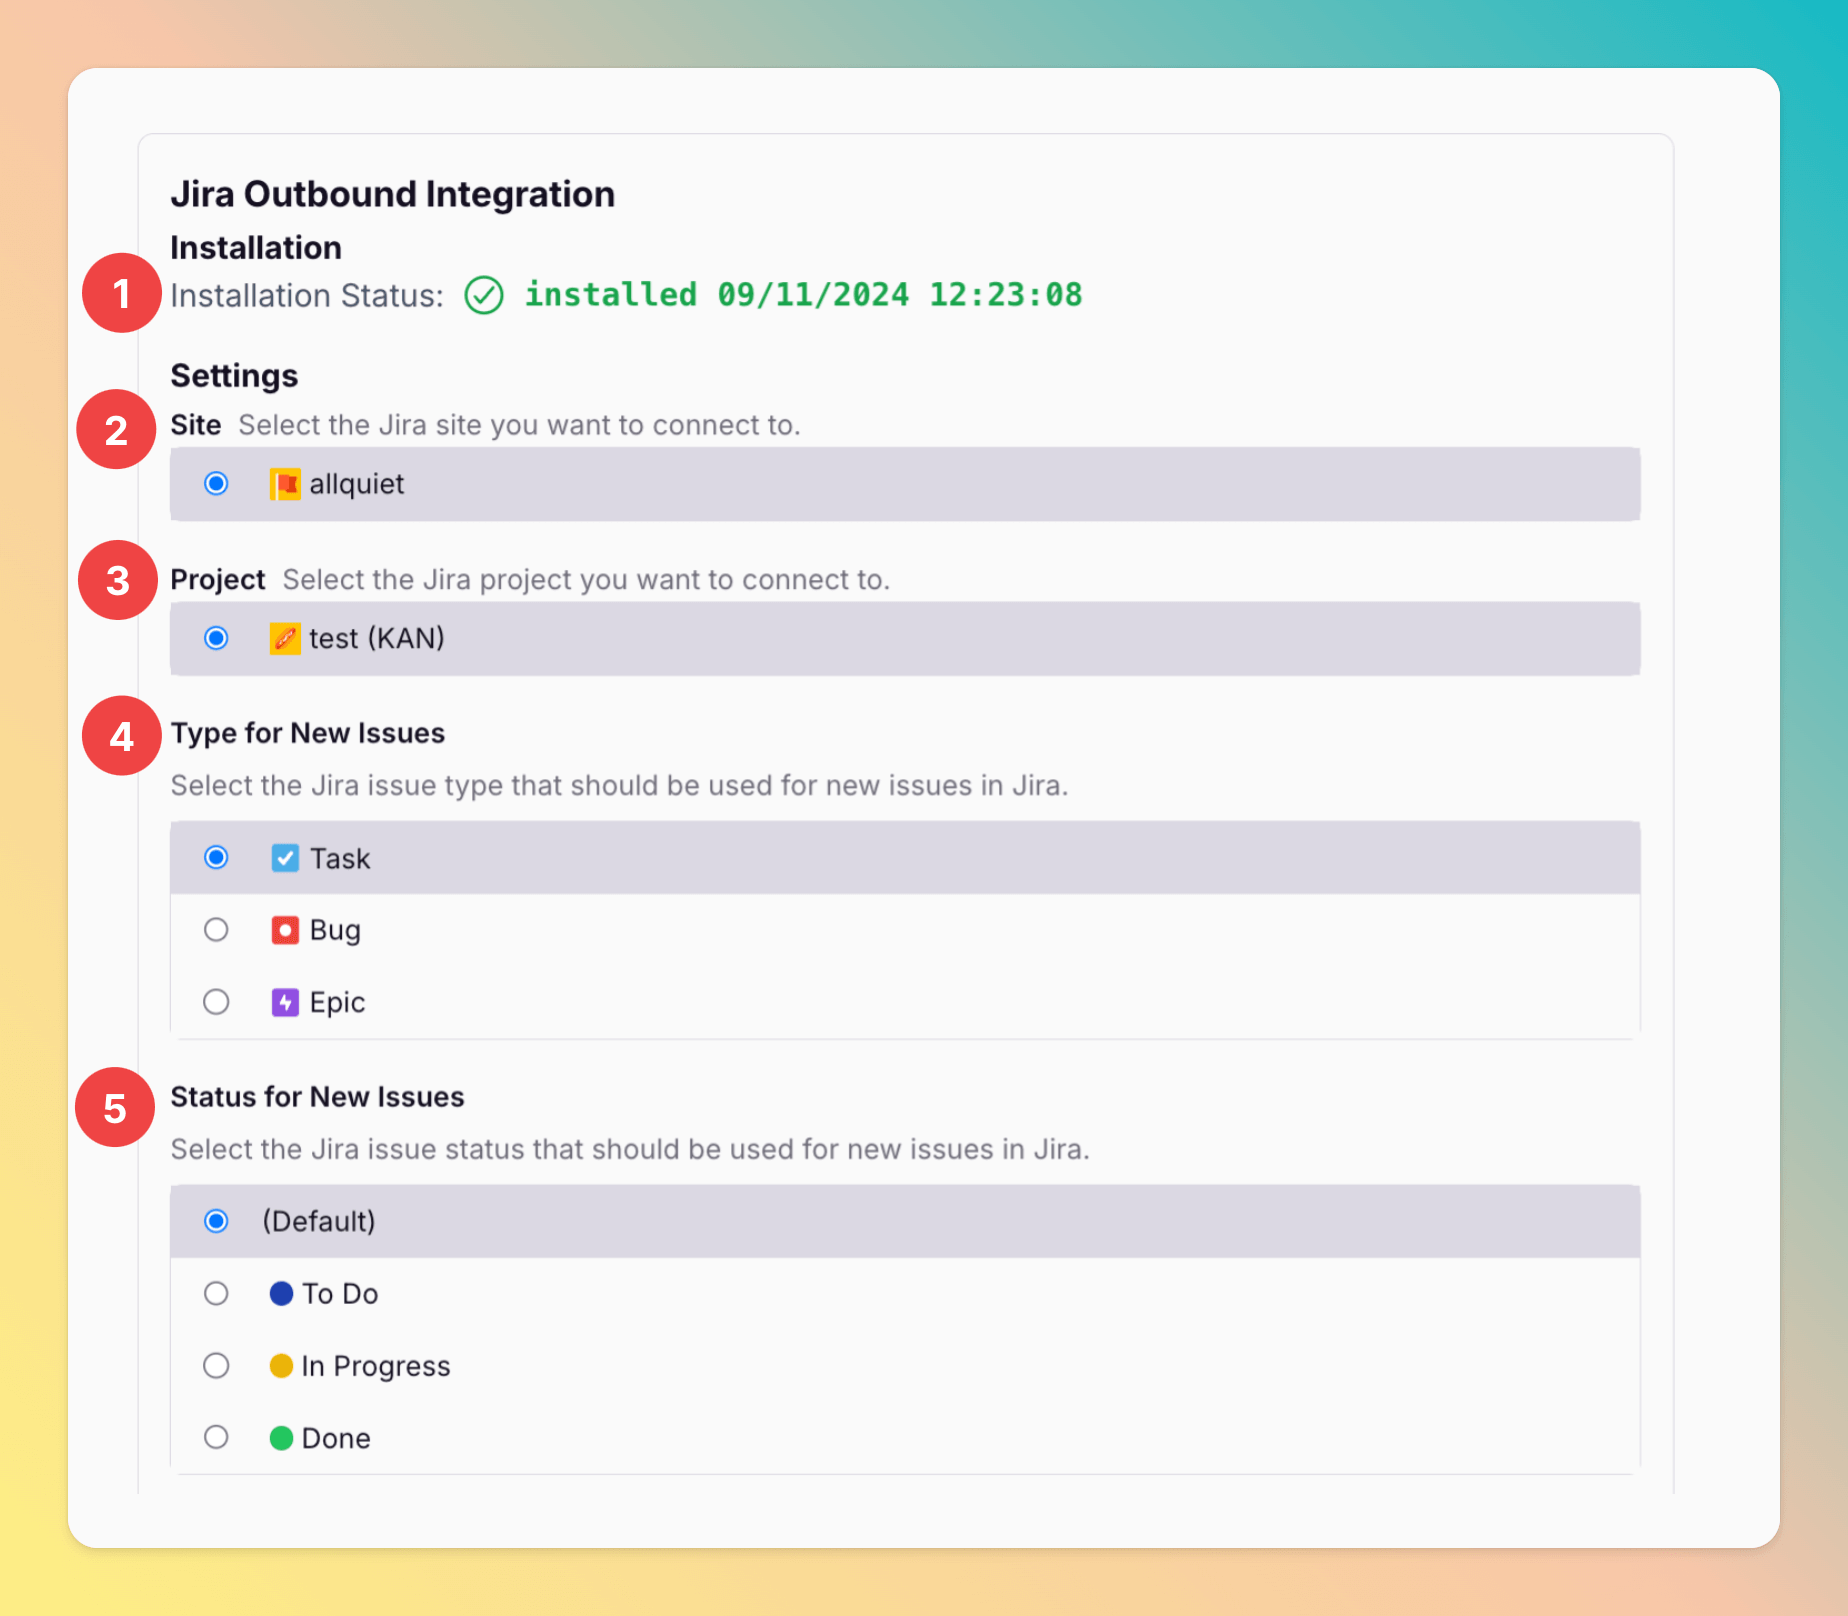
1. As you can see, the Installation Status changed to `installed`.
2. Select the Jira Site you want to forward the All Quiet incidents to. You can only select sites your granted All Quiet permission to (see prior step).
3. Select the Jira project in which you want to create issues based on All Quiet incidents.
4. Select the `Issue Type for New Issues`. This defines the type of issue that is created from an All Quiet incident.
5. You can add a `Status for New Issues` created from All Quiet incidents. If you don't add a status, we use the default status from your Jira settings.
## Configure Outbound Integration
Next, your are redirected back to your Jira integration's `Settings` page in All Quiet.
Now, you need to configure the integration.
1. As you can see, the Installation Status changed to `installed`.
2. Select the Jira Site you want to forward the All Quiet incidents to. You can only select sites your granted All Quiet permission to (see prior step).
3. Select the Jira project in which you want to create issues based on All Quiet incidents.
4. Select the `Issue Type for New Issues`. This defines the type of issue that is created from an All Quiet incident.
5. You can add a `Status for New Issues` created from All Quiet incidents. If you don't add a status, we use the default status from your Jira settings.
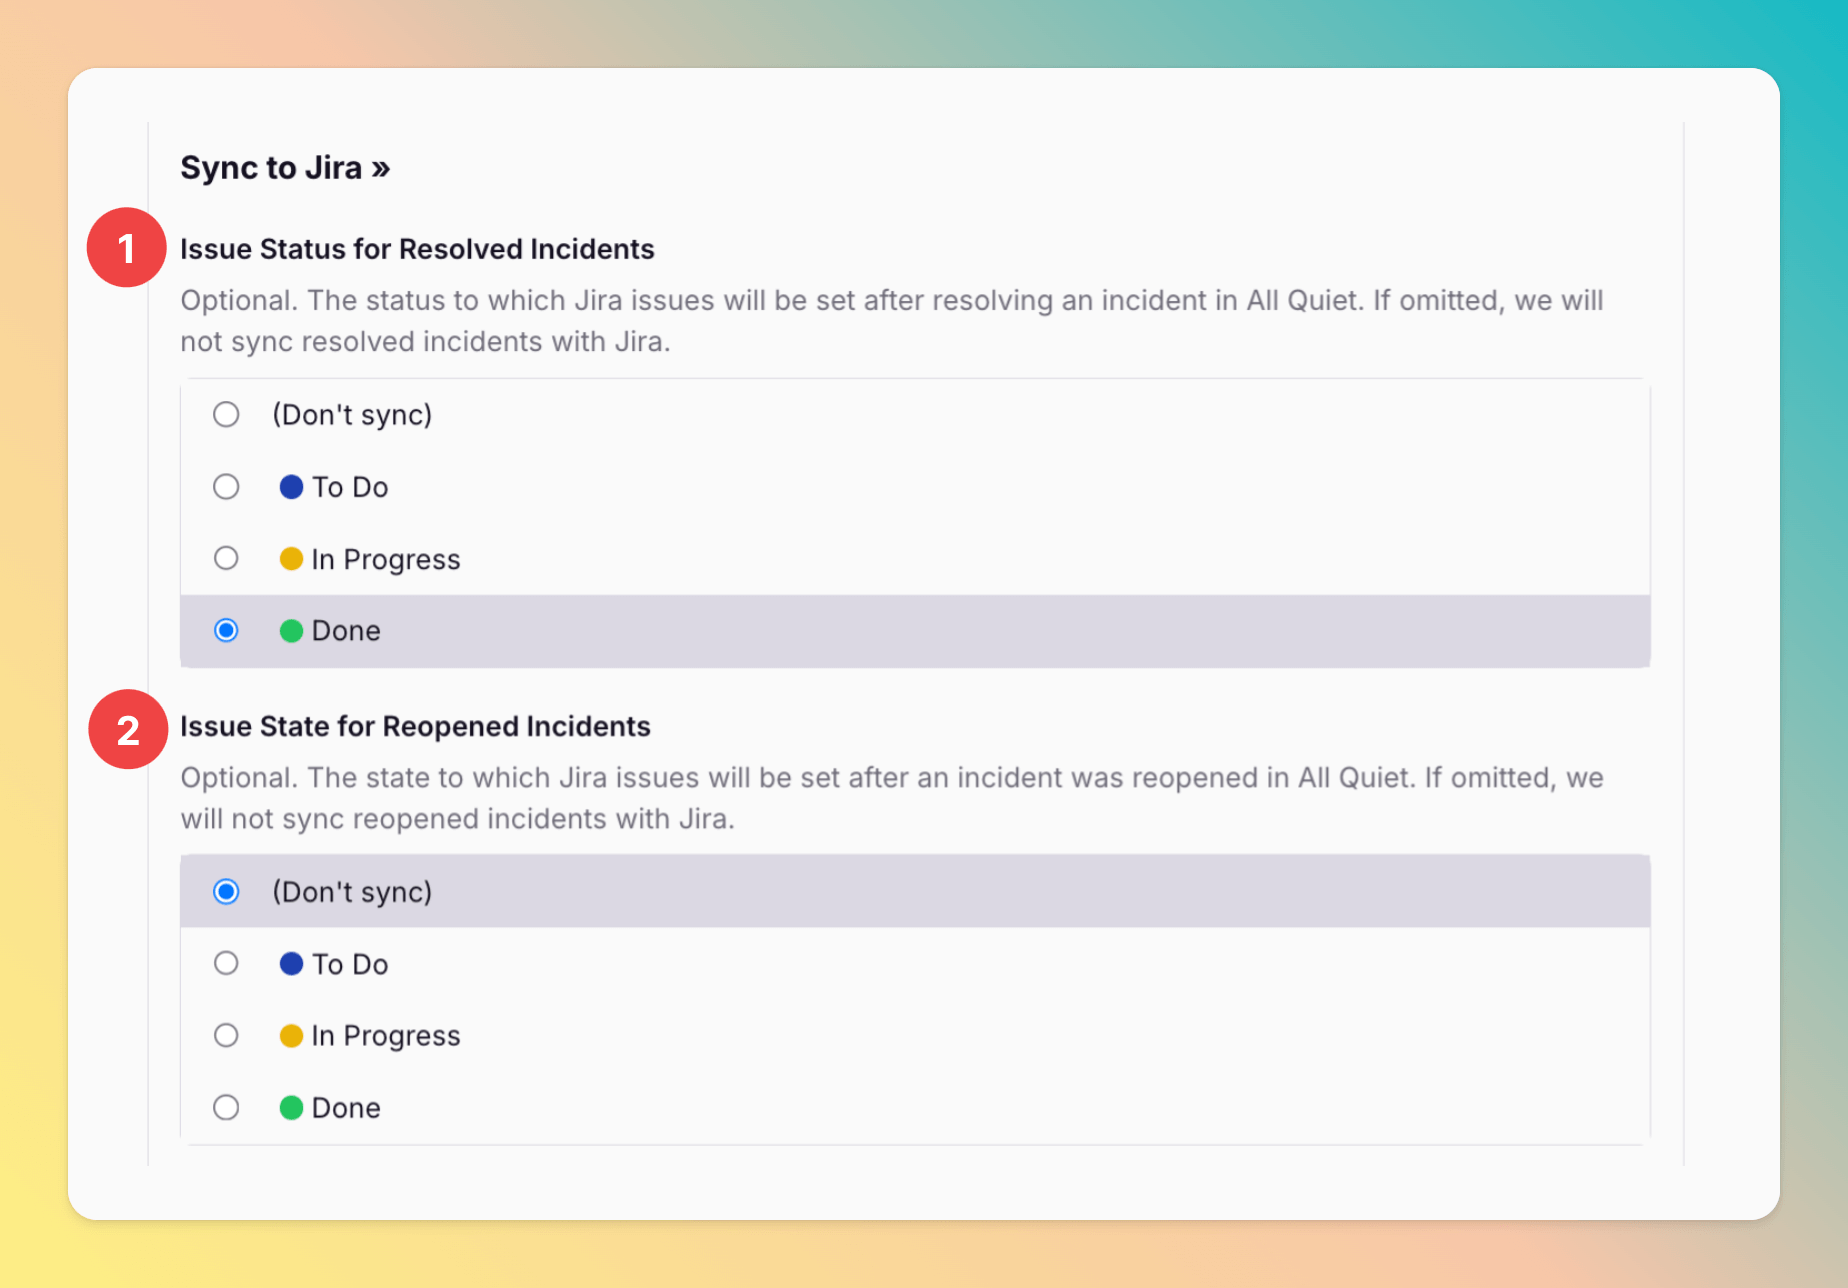
 As you can manage the incident in both, All Quiet and Jira, you can sync the status between both projects. This allows you to manage the incident on one platform only and you don't have to make changes twice.
For changes in All Quiet:
1. Select the Jira issue status you want to set after resolving an incident in All Quiet.
2. Select the Jira issue status you want to set after re-opening an incident in All Quiet.
As you can manage the incident in both, All Quiet and Jira, you can sync the status between both projects. This allows you to manage the incident on one platform only and you don't have to make changes twice.
For changes in All Quiet:
1. Select the Jira issue status you want to set after resolving an incident in All Quiet.
2. Select the Jira issue status you want to set after re-opening an incident in All Quiet.
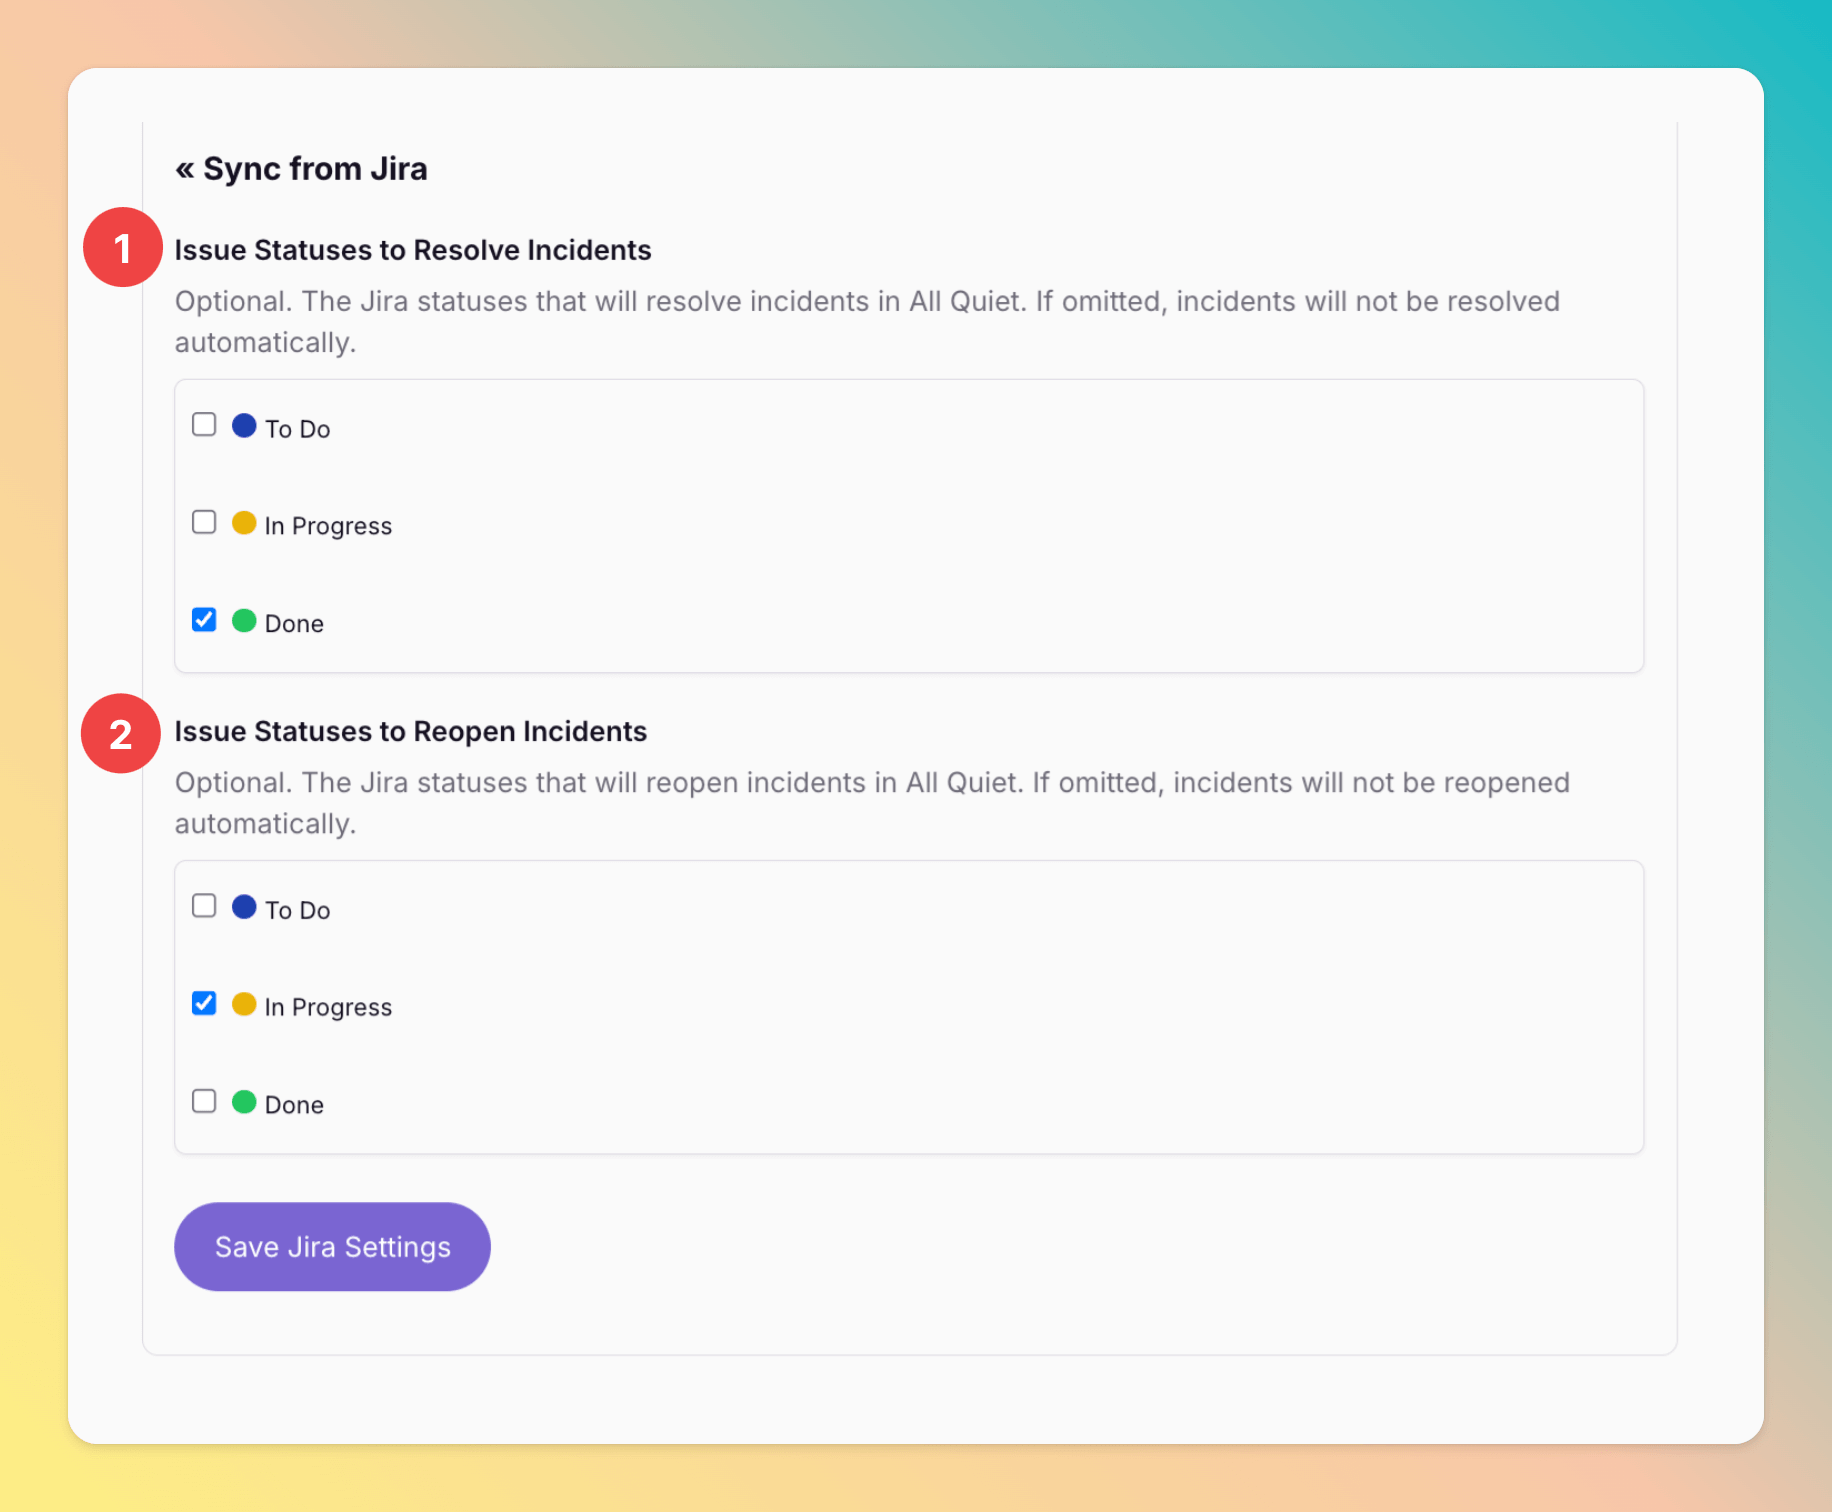
 For changes in Jira:
1. Select the Jira status that sets an incident to `Resolved` in All Quiet.
2. Select the Jira status that sets an incident to `Reopened` in All Quiet.
Don't forget to **Save Jira Settings**.
For changes in Jira:
1. Select the Jira status that sets an incident to `Resolved` in All Quiet.
2. Select the Jira status that sets an incident to `Reopened` in All Quiet.
Don't forget to **Save Jira Settings**.
 If you decide to save & stop here, your Jira Outbound Integration with All Quiet is ready to go. Depending on your [setup](/integrations/outbound/jira#add-all-quiet-to-your-jira-space), All Quiet incidents will now automatically create issues in Jira or can be [forwarded manually](/essentials/incident#forwarding) to your Jira projects. The states will be synced based on your selection.
## Create All Quiet Incidents From Jira
This feature is basically the **Jira Inbound Integration**. You can create All Quiet incidents from Jira issues. Here's how it works:
If you use both inbound and outbound, avoid creating multiple **Jira inbound** configurations that point to the same Jira site/project. Otherwise, an outbound-created issue can trigger another inbound configuration and accidentally create duplicate incidents or loops. We recommend using **only one inbound integration per Jira project**.
**For Pro and Enterprise plan users:** No matter which teams you added in `Team Connections` when setting up the [outbound integration](/integrations/outbound/jira#add-all-quiet-to-your-jira-space), all All Quiet incidents will always be created in the integration's root team.
On your Jira Outbound integration’s details page in All Quiet, **scroll below section `Create Incidents From Jira`**
To create Incidents from Jira
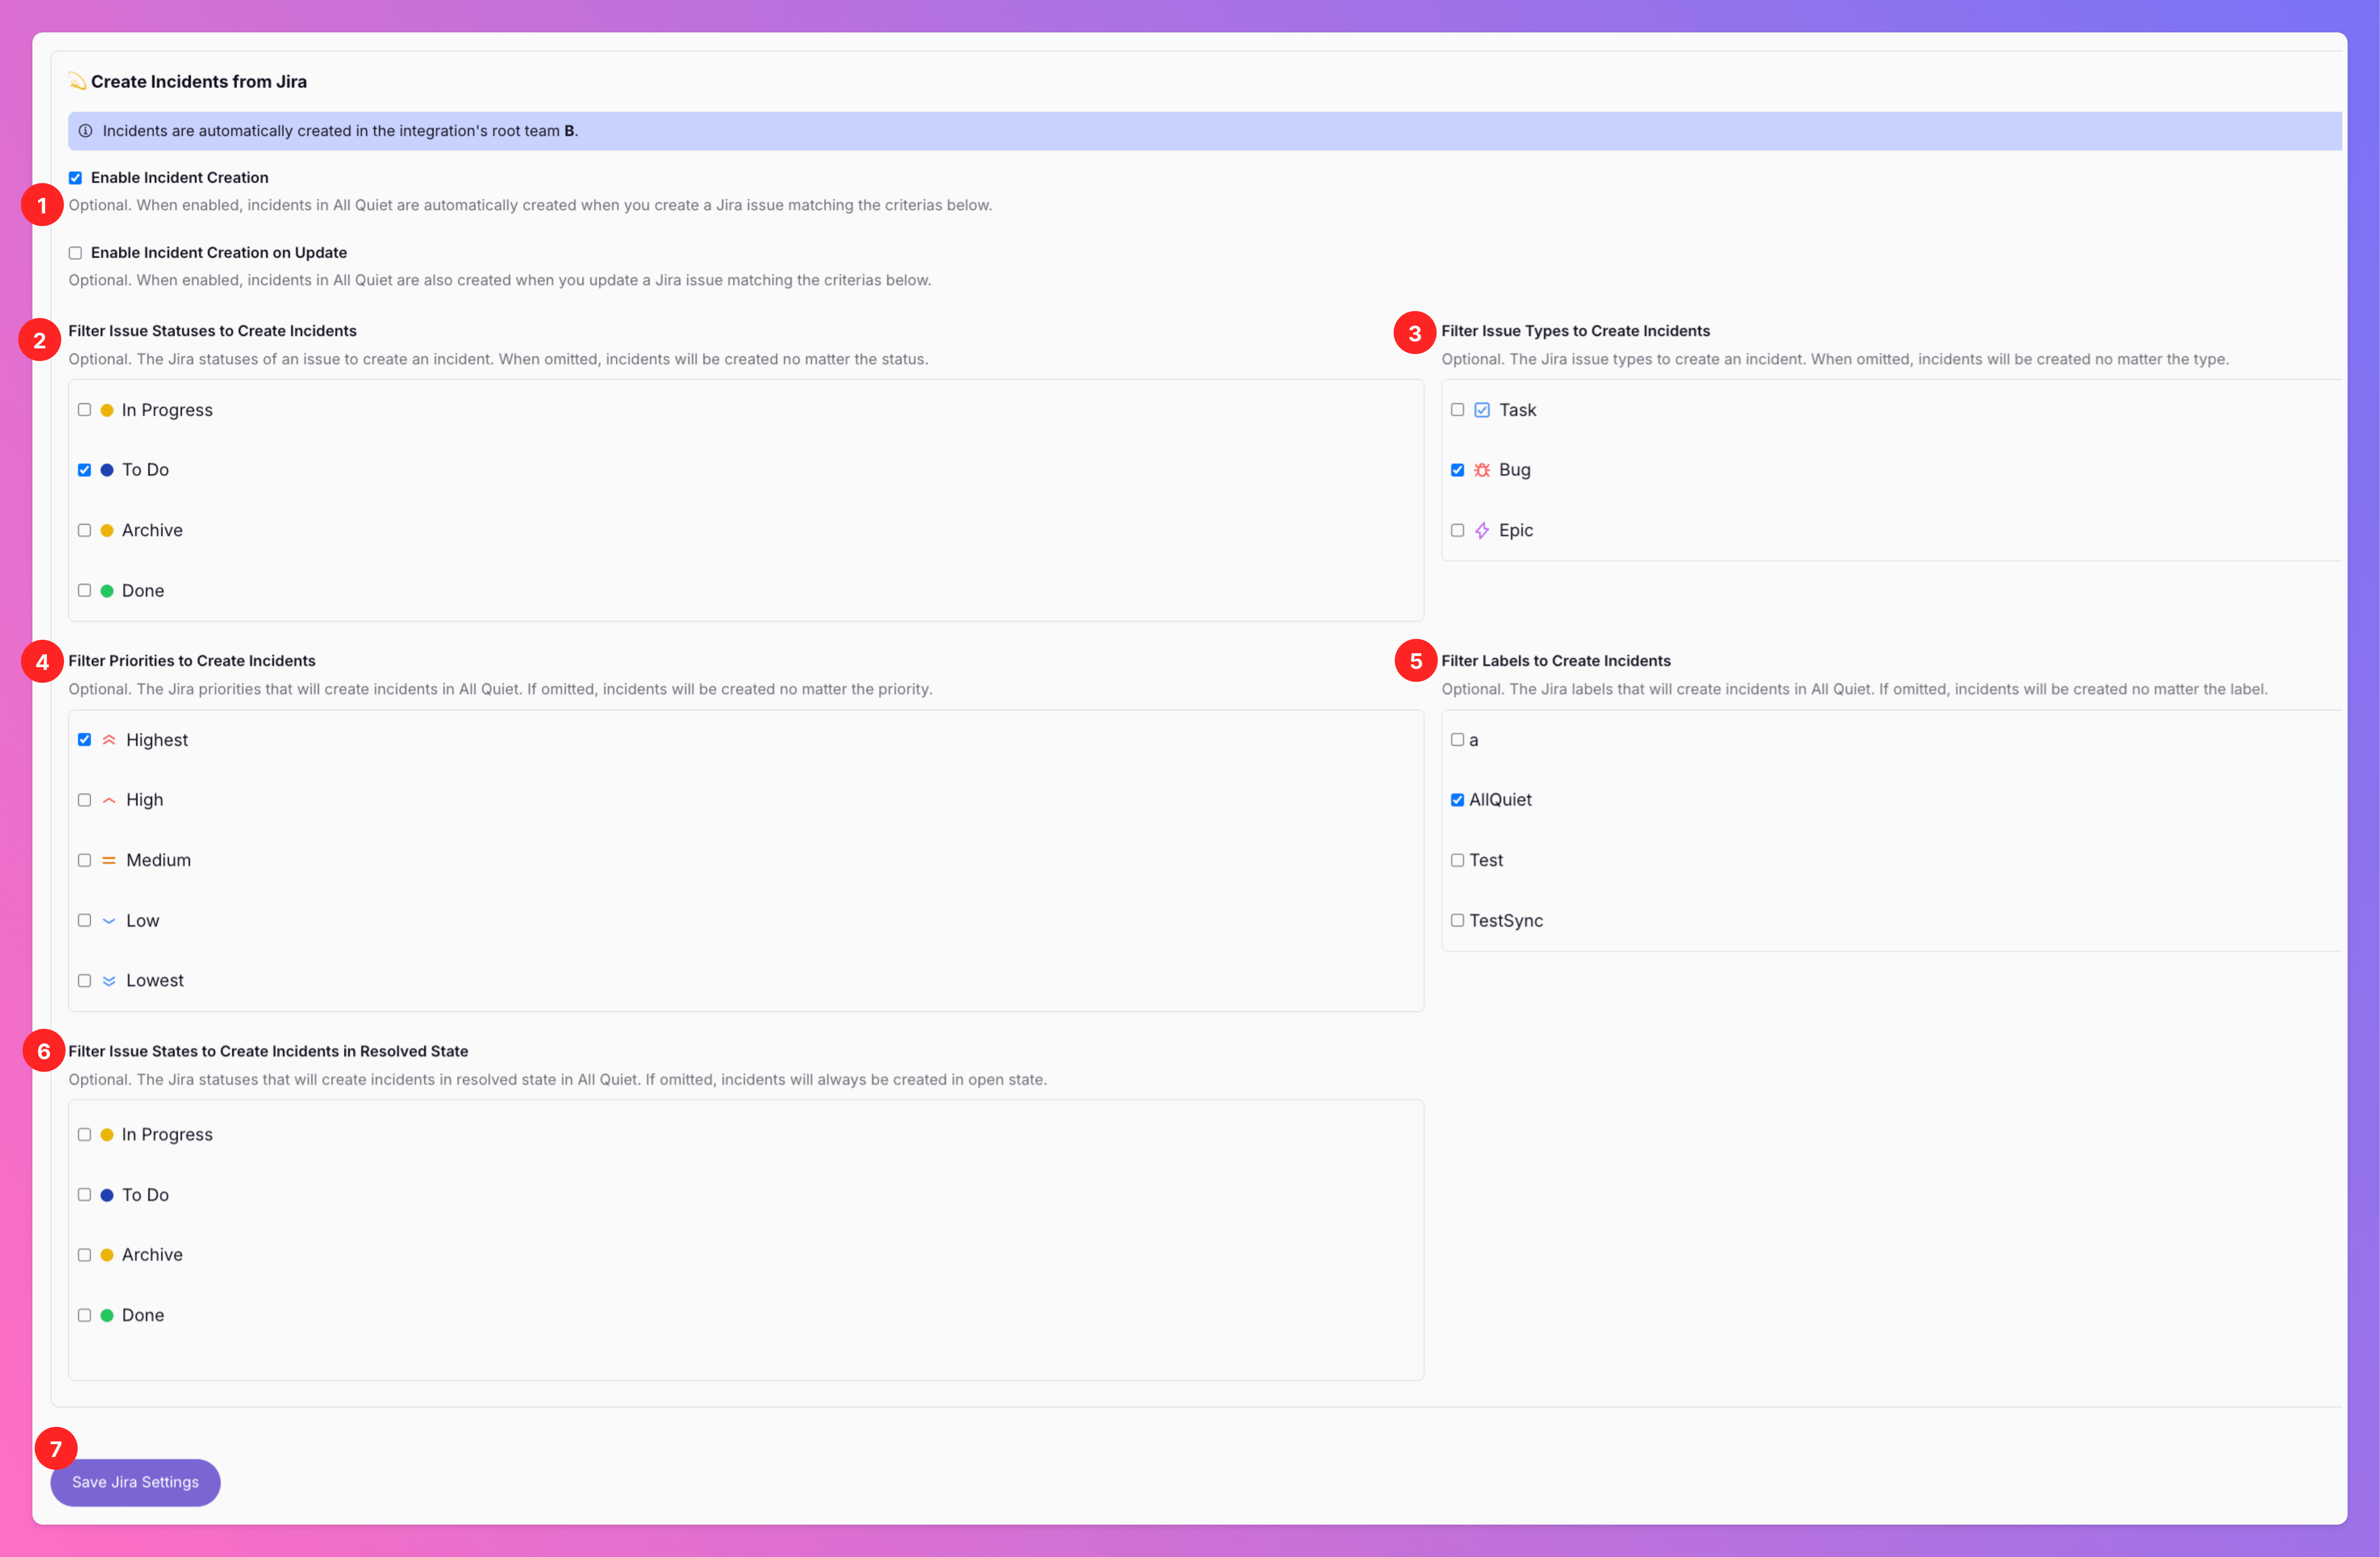
1. Activate `Enable Incident Creation` and / or `Enable Incident Creation on Update`. **Otherwise**, Jira Issues will **not create** new All Quiet incidents **at all**.
* `Enable Incident Creation`: All Quiet incidents will be created when **creating** a Jira issue matching the criteria below.
* `Enable Incident Creation on Update`: All Quiet incidents will be created when **updating an existing** Jira issue to match the criteria below.
2. You can select if only Jira Issues that are created in a **certain status** will create an All Quiet incident. If omitted, incidents will be created no matter of the state.
For `Enable Incident Creation`: Keep in mind that when you create a new Jira issue, Jira automatically creates it in the default status of the workflow, even if you select another status during issue creation.
3. You can select if only Jira Issues that are created with a **certain type** (Task, Bug...) will create an All Quiet incident. If omitted, incidents will be created no matter the issue type.
4. You can select if only Jira Issues that are created with a **certain priority** will create an All Quiet incident. If omitted, incidents will be created no matter the priority.
1. `No Priority`, `Highest` & `High` will create All Quiet incidents with `Critical` severity
2. `Medium` priority will create All Quiet incidents with `Warning` severity
3. `Low` & `Lowest` priority will create All Quiet incidents with `Minor` severity
5. You can select if only Jira Issues that are created with **certain labels** will create an All Quiet incident. If omitted, incidents will be created no matter the label.
6. You can select if Jira Issues that are created in a **certain state will create resolved All Quiet incidents**. If omitted, incidents will be always be created in open state.
7. `Save Jira Settings`.
If you decide to save & stop here, your Jira Outbound Integration with All Quiet is ready to go. Depending on your [setup](/integrations/outbound/jira#add-all-quiet-to-your-jira-space), All Quiet incidents will now automatically create issues in Jira or can be [forwarded manually](/essentials/incident#forwarding) to your Jira projects. The states will be synced based on your selection.
## Create All Quiet Incidents From Jira
This feature is basically the **Jira Inbound Integration**. You can create All Quiet incidents from Jira issues. Here's how it works:
If you use both inbound and outbound, avoid creating multiple **Jira inbound** configurations that point to the same Jira site/project. Otherwise, an outbound-created issue can trigger another inbound configuration and accidentally create duplicate incidents or loops. We recommend using **only one inbound integration per Jira project**.
**For Pro and Enterprise plan users:** No matter which teams you added in `Team Connections` when setting up the [outbound integration](/integrations/outbound/jira#add-all-quiet-to-your-jira-space), all All Quiet incidents will always be created in the integration's root team.
On your Jira Outbound integration’s details page in All Quiet, **scroll below section `Create Incidents From Jira`**
To create Incidents from Jira
1. Activate `Enable Incident Creation` and / or `Enable Incident Creation on Update`. **Otherwise**, Jira Issues will **not create** new All Quiet incidents **at all**.
* `Enable Incident Creation`: All Quiet incidents will be created when **creating** a Jira issue matching the criteria below.
* `Enable Incident Creation on Update`: All Quiet incidents will be created when **updating an existing** Jira issue to match the criteria below.
2. You can select if only Jira Issues that are created in a **certain status** will create an All Quiet incident. If omitted, incidents will be created no matter of the state.
For `Enable Incident Creation`: Keep in mind that when you create a new Jira issue, Jira automatically creates it in the default status of the workflow, even if you select another status during issue creation.
3. You can select if only Jira Issues that are created with a **certain type** (Task, Bug...) will create an All Quiet incident. If omitted, incidents will be created no matter the issue type.
4. You can select if only Jira Issues that are created with a **certain priority** will create an All Quiet incident. If omitted, incidents will be created no matter the priority.
1. `No Priority`, `Highest` & `High` will create All Quiet incidents with `Critical` severity
2. `Medium` priority will create All Quiet incidents with `Warning` severity
3. `Low` & `Lowest` priority will create All Quiet incidents with `Minor` severity
5. You can select if only Jira Issues that are created with **certain labels** will create an All Quiet incident. If omitted, incidents will be created no matter the label.
6. You can select if Jira Issues that are created in a **certain state will create resolved All Quiet incidents**. If omitted, incidents will be always be created in open state.
7. `Save Jira Settings`.
 You have successfully created the **Jira Inbound Integration**. To manage your settings, open your Jira Outbound Integration details page.
To check if everything works as expected, create a Jira Issue that should create an All Quiet incident based on your integrations. Then, navigate to the incidents overview in All Quiet. You should find an incident created by Jira.
You have successfully created the **Jira Inbound Integration**. To manage your settings, open your Jira Outbound Integration details page.
To check if everything works as expected, create a Jira Issue that should create an All Quiet incident based on your integrations. Then, navigate to the incidents overview in All Quiet. You should find an incident created by Jira.
 ## Troubleshooting
**Team Administrators**, **Organization Administrators**, and **Organization Owners** can troubleshoot this integration using the **History** tab (**Outbound History**) on the integration details page. See **[Outbound History](/essentials/outbound#outbound-history)** for what is logged, who can access it, and how to read outcomes. For broader checks when outbound tools do not fire, see **[Outbound integrations — Troubleshooting](/essentials/outbound#outbound-troubleshooting-routing)** and **[advanced routing](/advanced/routing)**.
## Troubleshooting
**Team Administrators**, **Organization Administrators**, and **Organization Owners** can troubleshoot this integration using the **History** tab (**Outbound History**) on the integration details page. See **[Outbound History](/essentials/outbound#outbound-history)** for what is logged, who can access it, and how to read outcomes. For broader checks when outbound tools do not fire, see **[Outbound integrations — Troubleshooting](/essentials/outbound#outbound-troubleshooting-routing)** and **[advanced routing](/advanced/routing)**.