> ## Documentation Index
> Fetch the complete documentation index at: https://docs.allquiet.app/llms.txt
> Use this file to discover all available pages before exploring further.
# All Quiet Website / HTTP Monitor
> Use our HTTP Monitor to check your websites health
Setup time: 2 Min
Set up our All Quiet HTTP Monitor to ping your website anytime. The monitor is set up within a few clicks. After setting it up, we'll create incidents to inform you if anything is wrong.
## 1. Create All Quiet Website / HTTP Monitor
Sign in to your All Quiet account.
### Create Integration
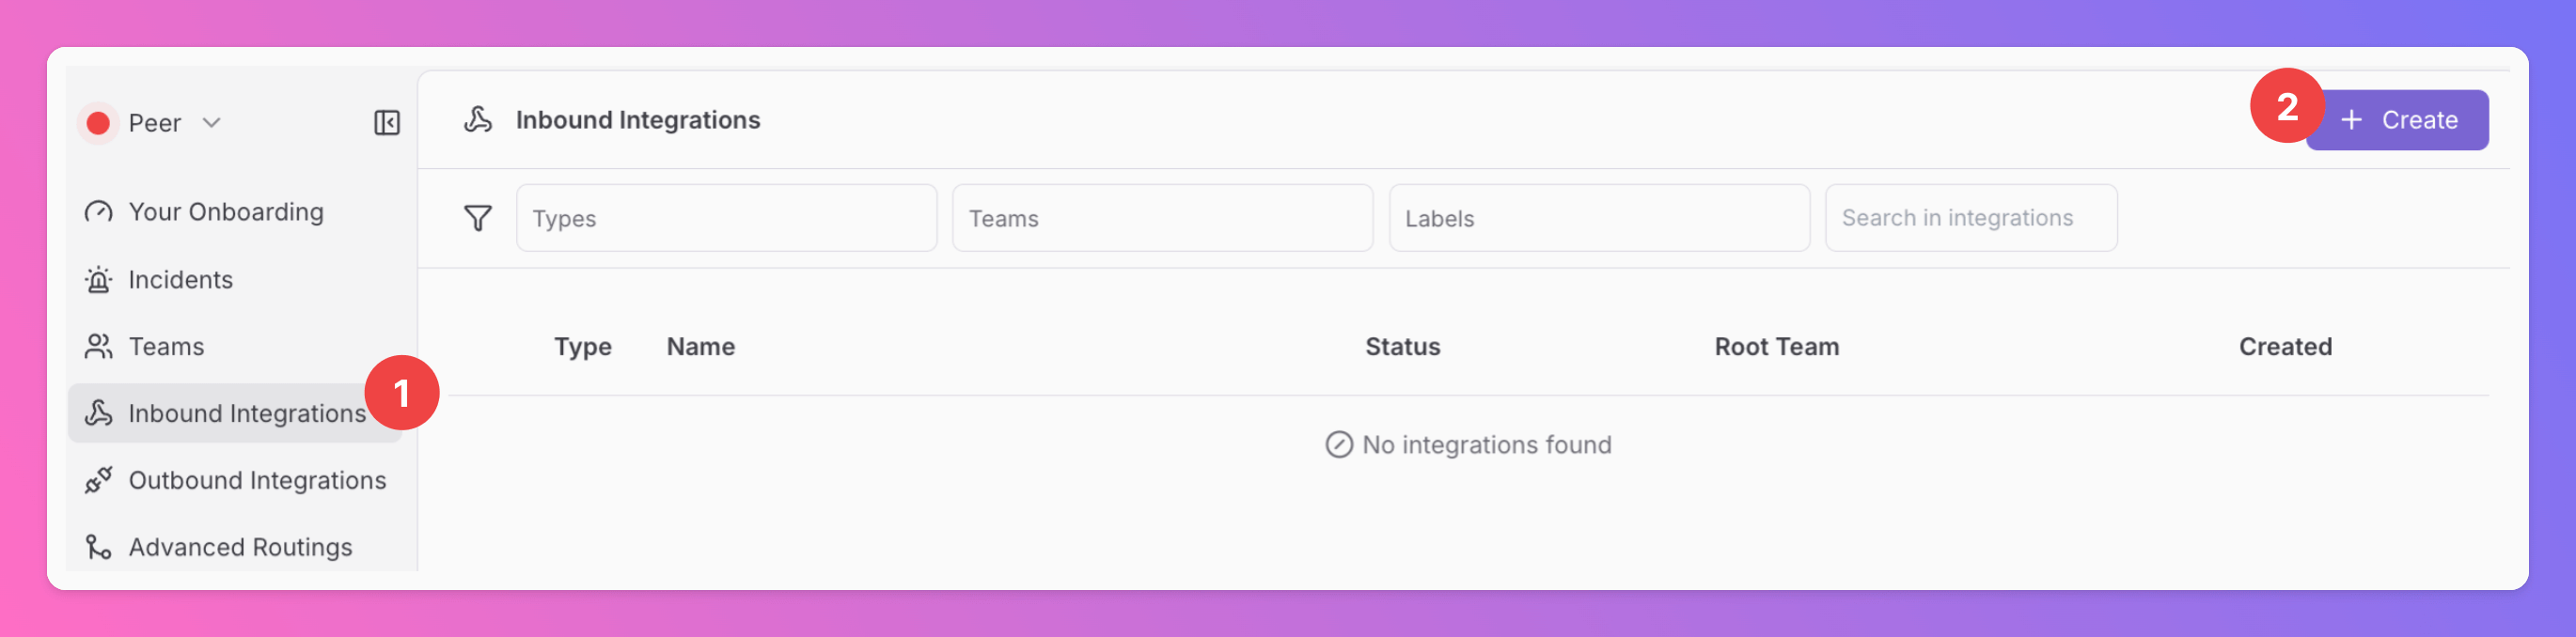
1. Click on the `Inbound Integrations` tab.
2. Click on `+ Create`.
 ### Select Website / HTTP Monitor as the integration's type
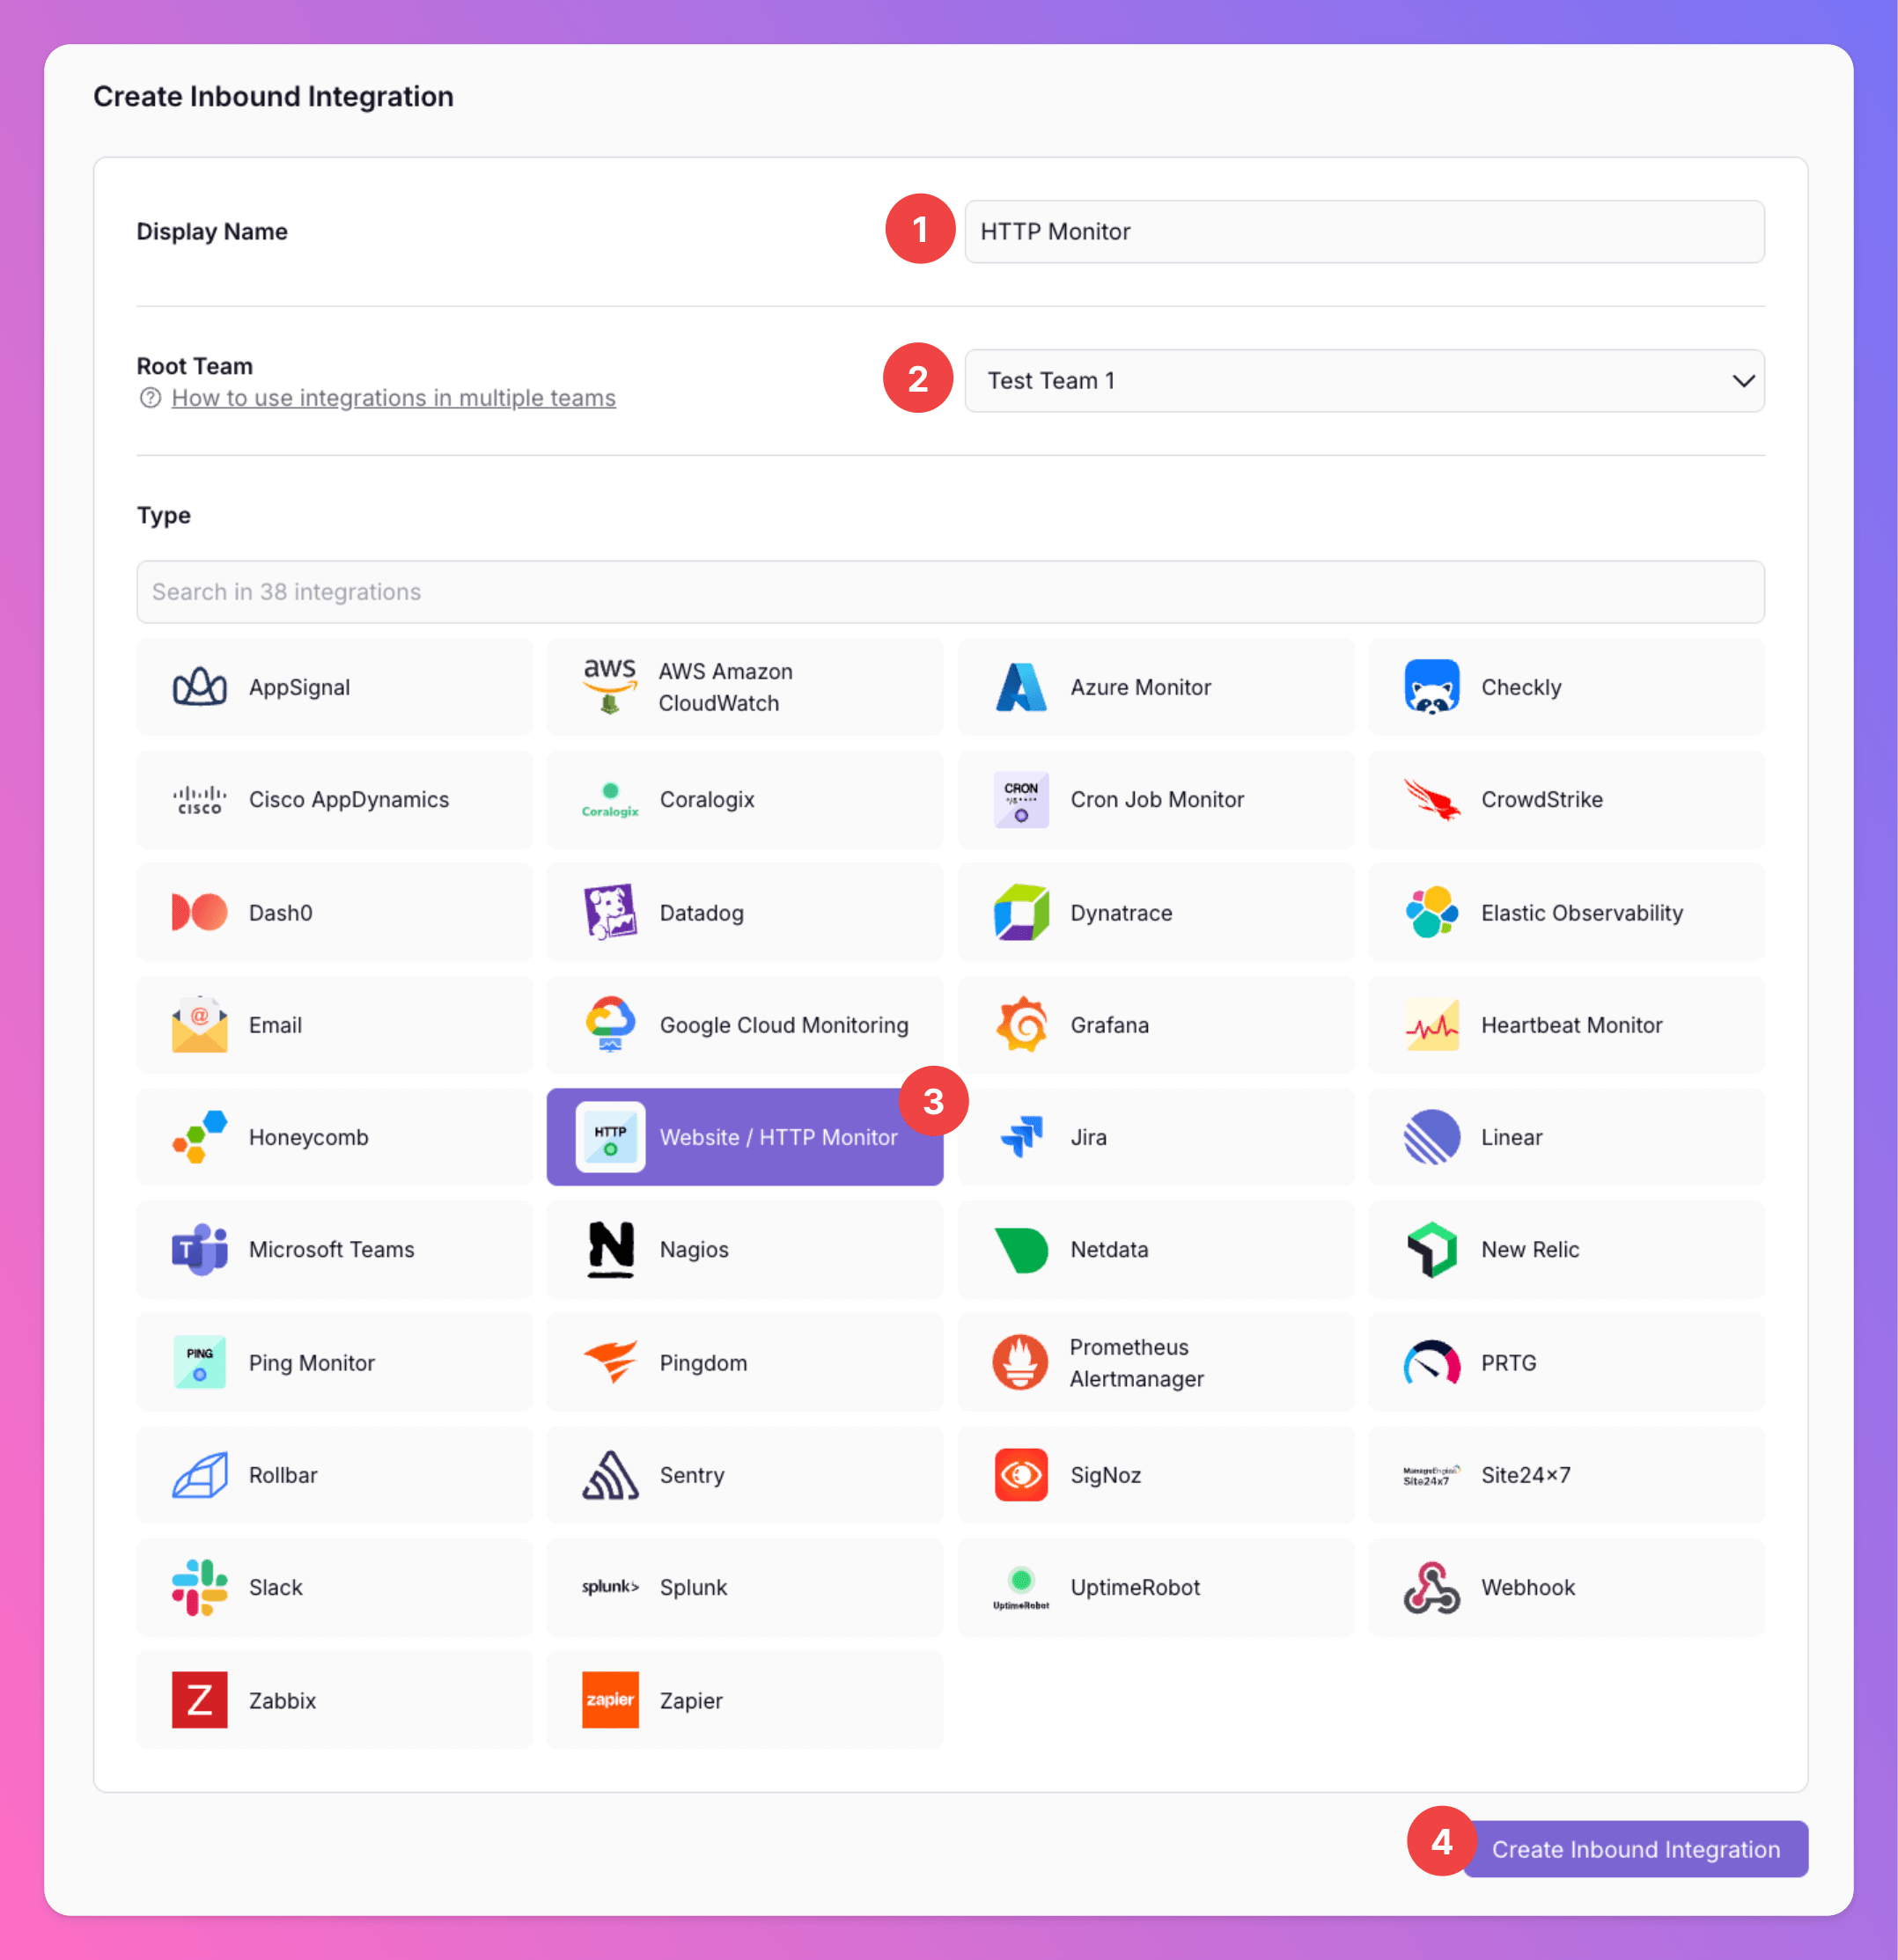
1. Enter a `Display Name` for your integration, e.g. "HTTP Monitor".
Pick a name that makes it obvious which website the HTTP monitor belongs to.
2. Select a `Team`.
3. Select `Website / HTTP Monitor` as the integration's type.
4. Click `Create Inbound Integration`.
### Select Website / HTTP Monitor as the integration's type
1. Enter a `Display Name` for your integration, e.g. "HTTP Monitor".
Pick a name that makes it obvious which website the HTTP monitor belongs to.
2. Select a `Team`.
3. Select `Website / HTTP Monitor` as the integration's type.
4. Click `Create Inbound Integration`.
 ## 2. Configure your Website / HTTP Monitor
Once you've set up the "Website / HTTP Monitor", it's time to configure it. This can be done on the the integration's page.
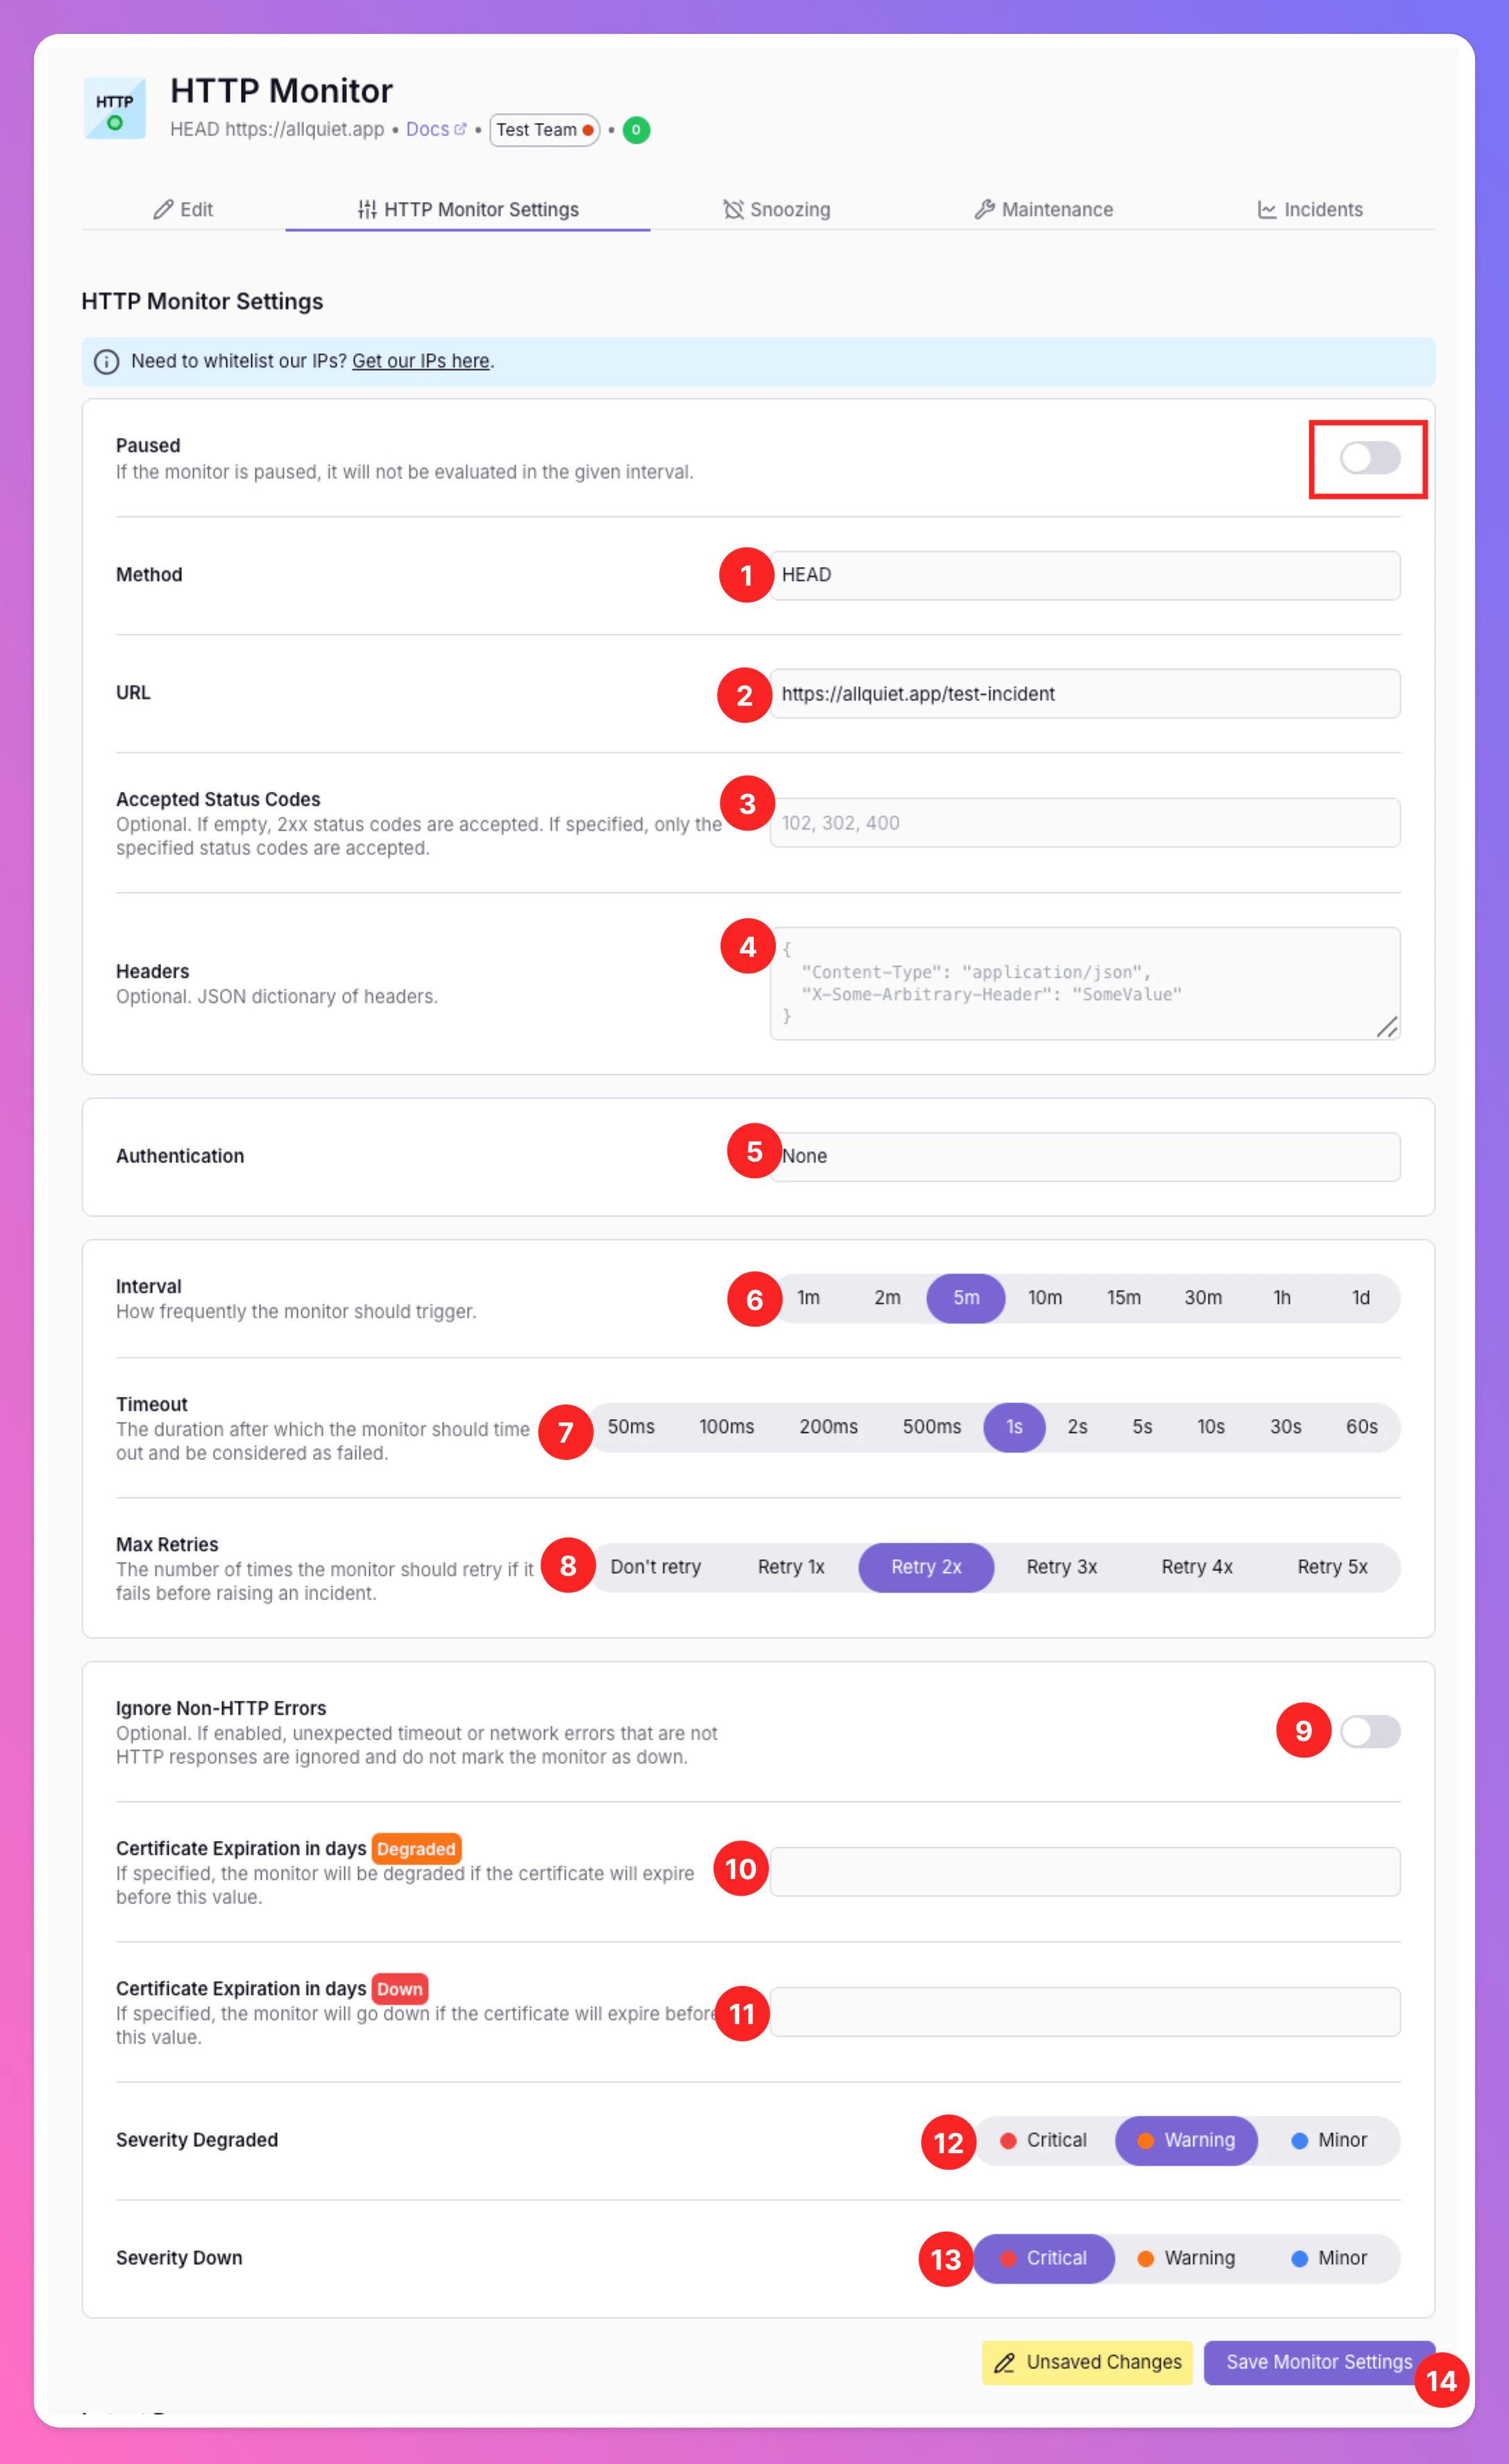
1. Select your Method (`HEAD`, `GET`, `POST`, `PUT`, `DELETE` or `PATCH`)
2. Enter the URL you want to Monitor. If you want to monitor different URLs, simply set up several monitors.
3. Optionally, you can define `Accepted Status Codes`. If empty, 2xx status codes are accepted. If specified, only the specified status codes are accepted and other status codes trigger an incident.
4. Optionally, you can add Headers in JSON format.
5. Select your Authentification method (`None`, `Basic` or `Bearer`).
6. `Interval`: Select how often the monitor should be triggered.
7. Select the `Timeout`, the duration after which the monitor should time out and considered to be failed.
8. Select how often the Monitor should `retry` the request before creating an incident if something is wrong.
9. Optionally, you can ignore non-HTTP errors, like timeouts that can occur due to internet issues.
10. You may add the number of days until your SSL certificate expires that should set your monitor to `Degraded`. The monitor will be degraded if the certification's expiration is closer than this value.
11. You may add the number of days until your SSL certificate expires that should set your monitor to `Down`. The monitor will be down if the certification's expiration is closer than this value. This makes sure we notifiy you and you won't miss the expiration.
12. Select the **severity** of incidents triggered for `Degraded` monitor results.
13. Select the **severity** of incidents triggered for `Down` monitor results.
14. To finish your setup, click `Save Monitor Settings`.
You can always pause your monitor by activating the toggle at the top of the settings and saving.
## 2. Configure your Website / HTTP Monitor
Once you've set up the "Website / HTTP Monitor", it's time to configure it. This can be done on the the integration's page.
1. Select your Method (`HEAD`, `GET`, `POST`, `PUT`, `DELETE` or `PATCH`)
2. Enter the URL you want to Monitor. If you want to monitor different URLs, simply set up several monitors.
3. Optionally, you can define `Accepted Status Codes`. If empty, 2xx status codes are accepted. If specified, only the specified status codes are accepted and other status codes trigger an incident.
4. Optionally, you can add Headers in JSON format.
5. Select your Authentification method (`None`, `Basic` or `Bearer`).
6. `Interval`: Select how often the monitor should be triggered.
7. Select the `Timeout`, the duration after which the monitor should time out and considered to be failed.
8. Select how often the Monitor should `retry` the request before creating an incident if something is wrong.
9. Optionally, you can ignore non-HTTP errors, like timeouts that can occur due to internet issues.
10. You may add the number of days until your SSL certificate expires that should set your monitor to `Degraded`. The monitor will be degraded if the certification's expiration is closer than this value.
11. You may add the number of days until your SSL certificate expires that should set your monitor to `Down`. The monitor will be down if the certification's expiration is closer than this value. This makes sure we notifiy you and you won't miss the expiration.
12. Select the **severity** of incidents triggered for `Degraded` monitor results.
13. Select the **severity** of incidents triggered for `Down` monitor results.
14. To finish your setup, click `Save Monitor Settings`.
You can always pause your monitor by activating the toggle at the top of the settings and saving.
 Your monitor is now set up, configured and running.
### Test your Monitor
We recommend testing your monitor after setting it up to see if it works as expected.
After saving the monitor,
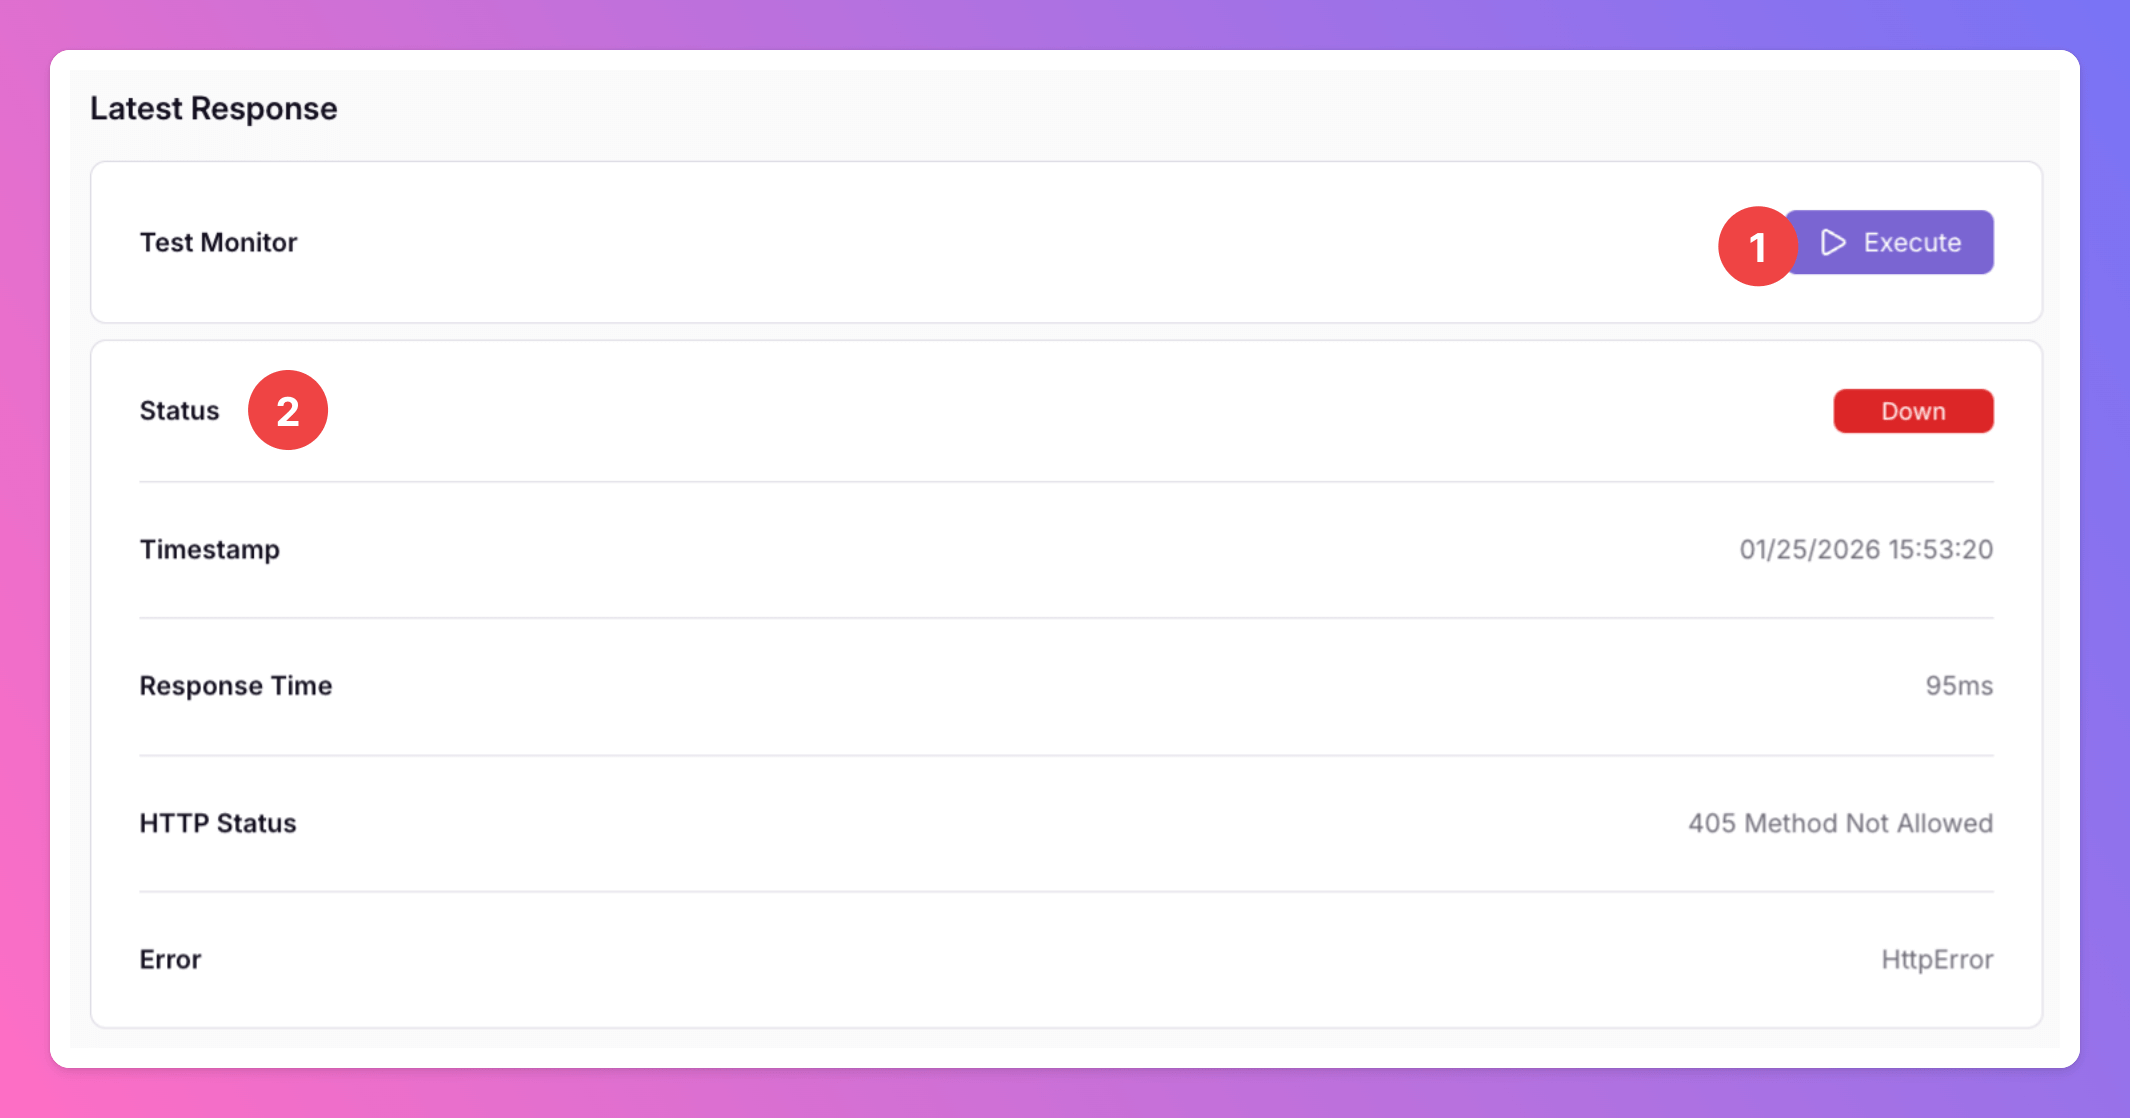
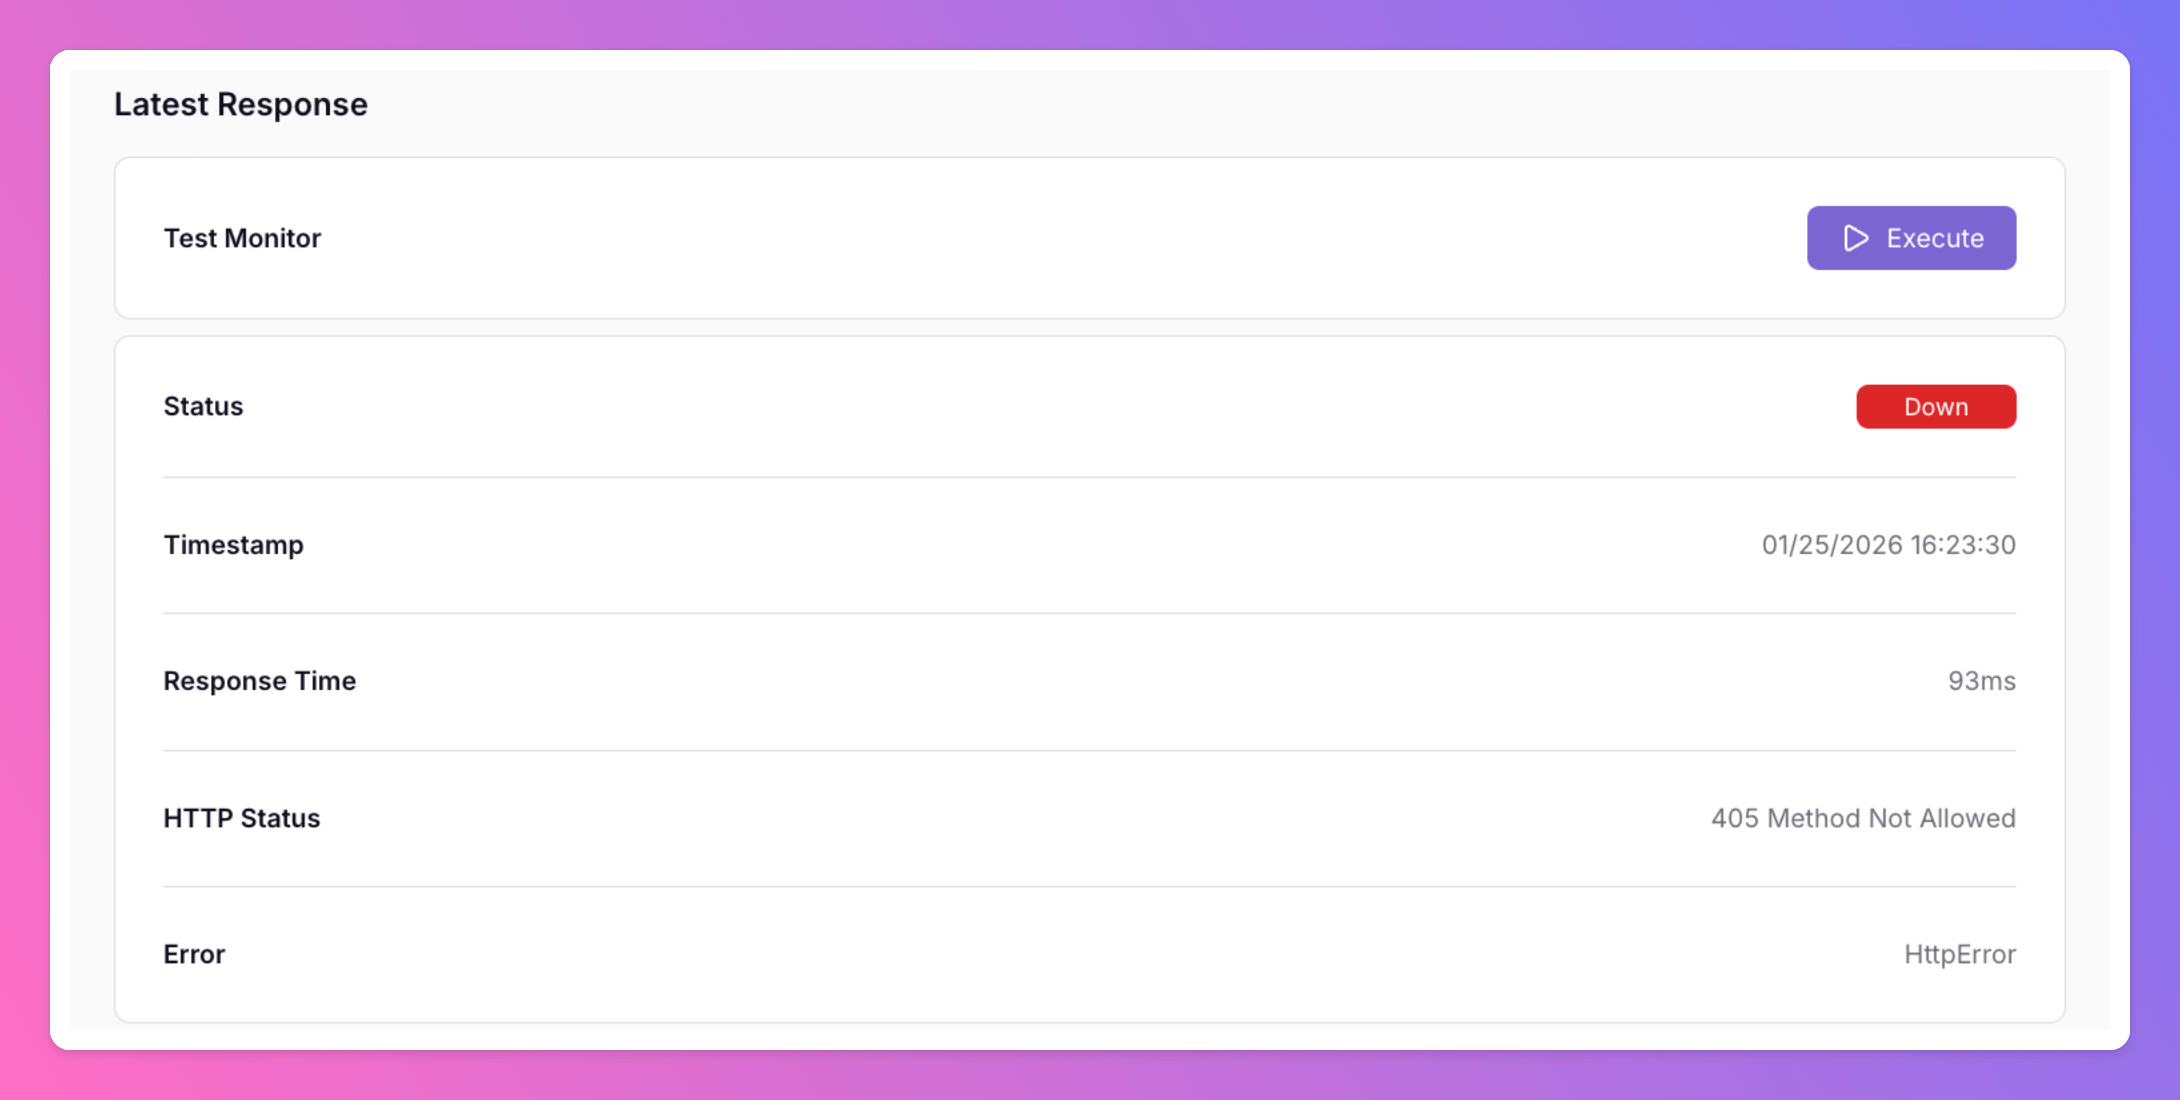
1. Click "Execute" in the `Last Response` section.
2. You'll find the result below. Here, the monitor fails...
Your monitor is now set up, configured and running.
### Test your Monitor
We recommend testing your monitor after setting it up to see if it works as expected.
After saving the monitor,
1. Click "Execute" in the `Last Response` section.
2. You'll find the result below. Here, the monitor fails...
 ### Outbound IP Addresses
The outbound IP addresses used for HTTP monitoring are dynamic and can be retrieved from the following endpoints:
* US Region: [https://allquiet.app/api/public/v1/metadata/ips](https://allquiet.app/api/public/v1/metadata/ips)
* EU Region: [https://allquiet.eu/api/public/v1/metadata/ips](https://allquiet.eu/api/public/v1/metadata/ips)
While these IP addresses are generally stable, we do not guarantee their persistence. It's recommended to regularly check these endpoints for any changes.
### Incident creation from Monitor
If the monitor fails, you will see that in the results...
### Outbound IP Addresses
The outbound IP addresses used for HTTP monitoring are dynamic and can be retrieved from the following endpoints:
* US Region: [https://allquiet.app/api/public/v1/metadata/ips](https://allquiet.app/api/public/v1/metadata/ips)
* EU Region: [https://allquiet.eu/api/public/v1/metadata/ips](https://allquiet.eu/api/public/v1/metadata/ips)
While these IP addresses are generally stable, we do not guarantee their persistence. It's recommended to regularly check these endpoints for any changes.
### Incident creation from Monitor
If the monitor fails, you will see that in the results...
 ...as well as in your incidents overview. An All Quiet incident is created from your HTTP Monitor.
 ### How HTTP Monitoring Status Handling Works
When HTTP monitoring checks a target, the system compares the new status with the most recent one. If the status has changed (for example, from Up to Down or from Down to Up), the system processes the result fully. This includes updating records, sending notifications, and managing incidents.
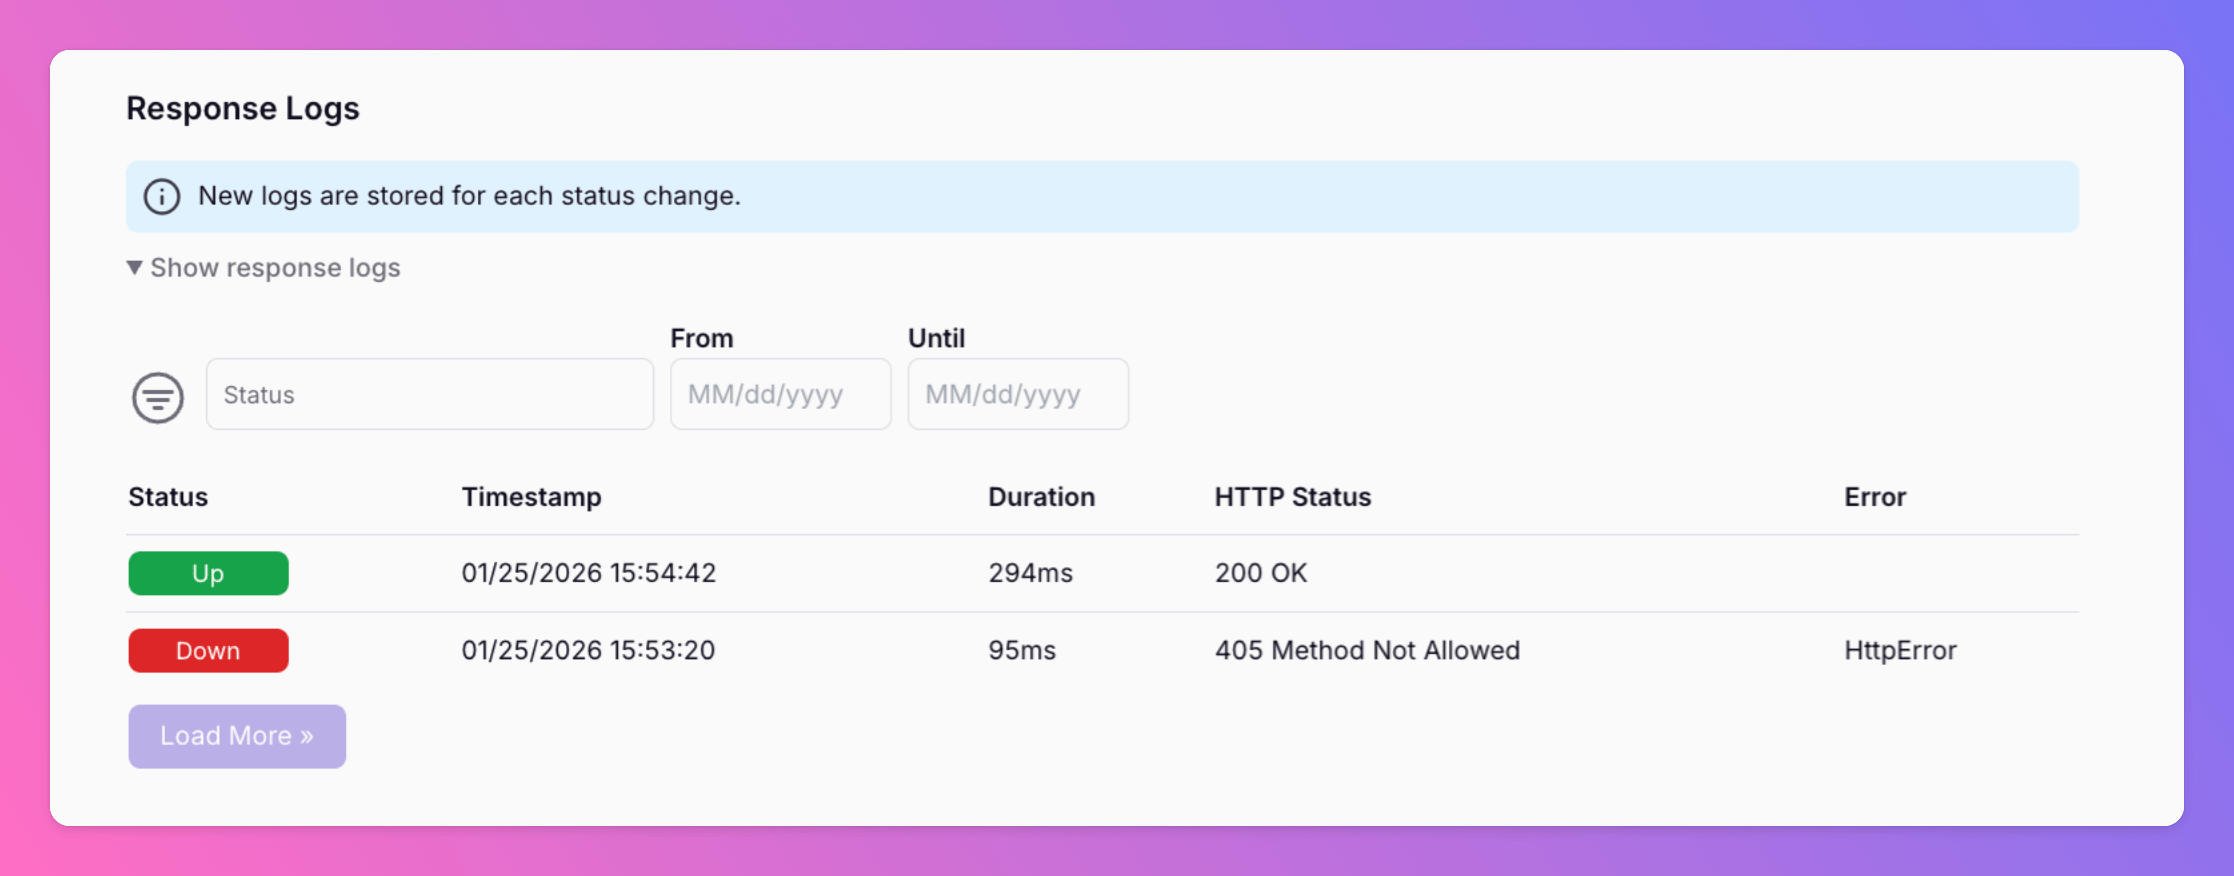
If the status remains the same (for example, Up to Up or Down to Down), the system stops early without further processing. This prevents duplicate alerts and avoids unnecessary incident creation. You can also see this in the `Response Logs` at the bottom of the `HTTP Monitor Settings` page. The reponse logs will only show one entry per status change, but will update the timestamp based on the last response for the given status.
This behavior differs from other inbound integrations, which create a new incident whenever an alert is received if there is no open incident yet. HTTP monitoring is designed to reduce noise by only acting when a real status change occurs.
### How HTTP Monitoring Status Handling Works
When HTTP monitoring checks a target, the system compares the new status with the most recent one. If the status has changed (for example, from Up to Down or from Down to Up), the system processes the result fully. This includes updating records, sending notifications, and managing incidents.
If the status remains the same (for example, Up to Up or Down to Down), the system stops early without further processing. This prevents duplicate alerts and avoids unnecessary incident creation. You can also see this in the `Response Logs` at the bottom of the `HTTP Monitor Settings` page. The reponse logs will only show one entry per status change, but will update the timestamp based on the last response for the given status.
This behavior differs from other inbound integrations, which create a new incident whenever an alert is received if there is no open incident yet. HTTP monitoring is designed to reduce noise by only acting when a real status change occurs.
 If you close an incident manually and the status has not changed, the system will not create a new incident for the same issue. This helps you stay focused on real changes, reduces unnecessary noise, and keeps incident management cleaner.