> ## Documentation Index
> Fetch the complete documentation index at: https://docs.allquiet.app/llms.txt
> Use this file to discover all available pages before exploring further.
# UptimeRobot
> Integrate your UptimeRobot Monitors with All Quiet
Setup time: 5 Min
Upgrade your UptimeRobot alerts with All Quiet. Take action on alerts and set escalation policies seamlessly.
## 1. Create UptimeRobot Integration on All Quiet
### Create a UptimeRobot integration
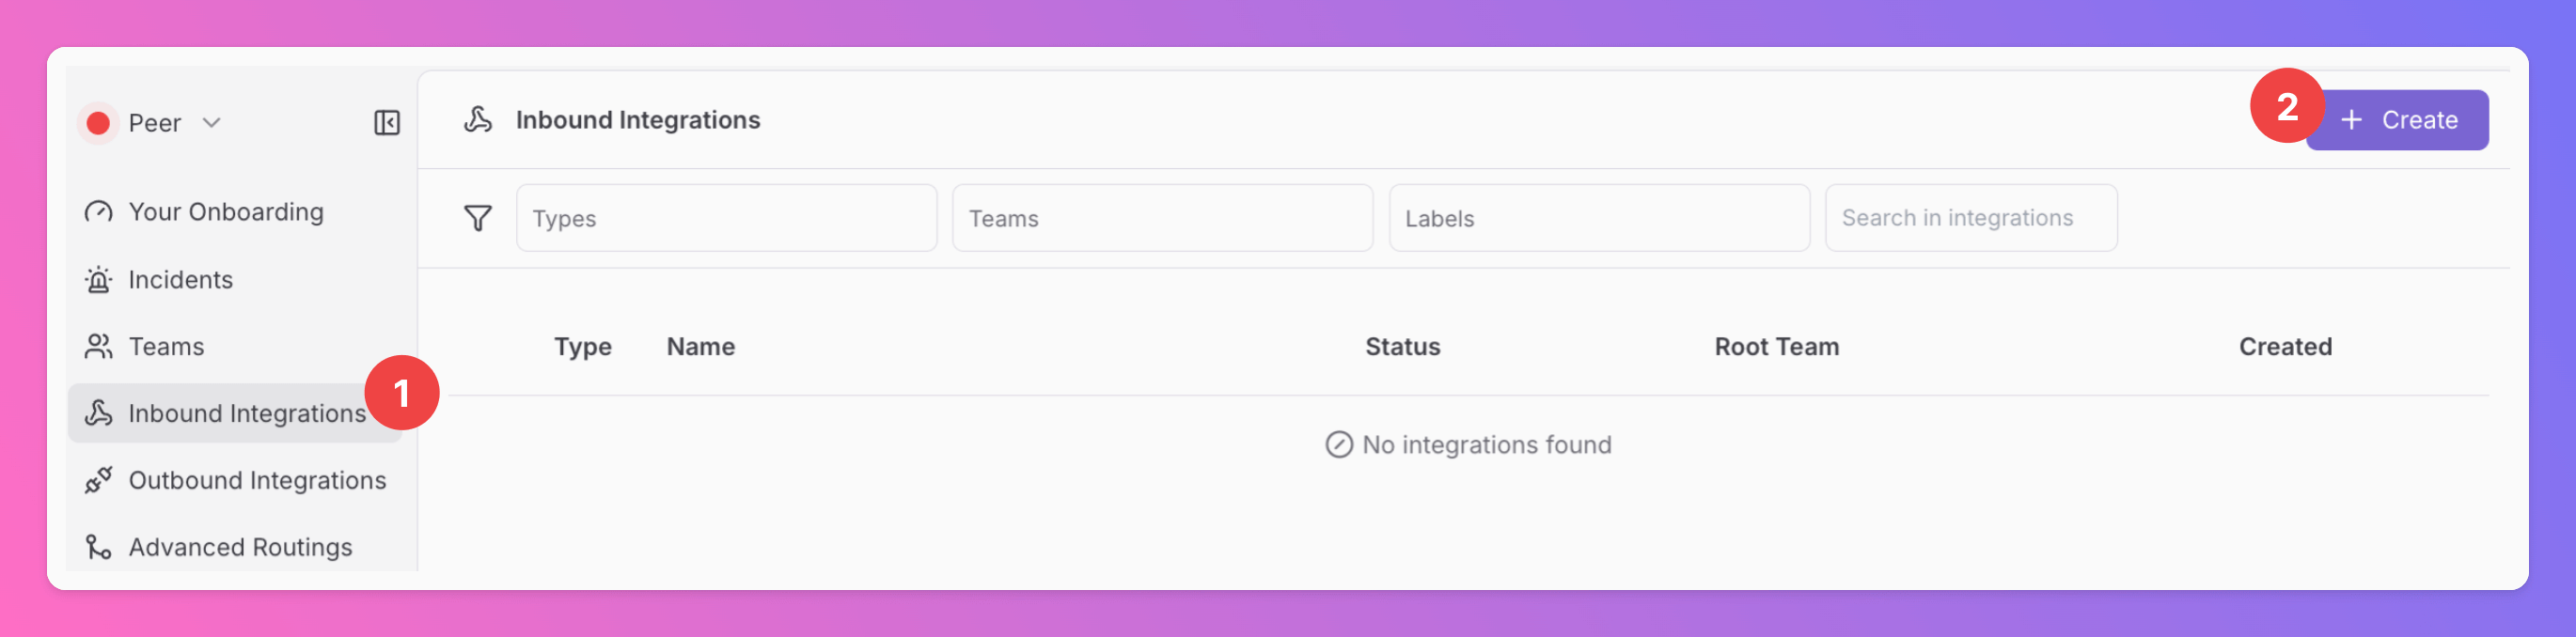
1. Click on the `Inbound Integrations` tab.
2. Click on `+ Create`.
 ### Select UptimeRobot for the integration's type
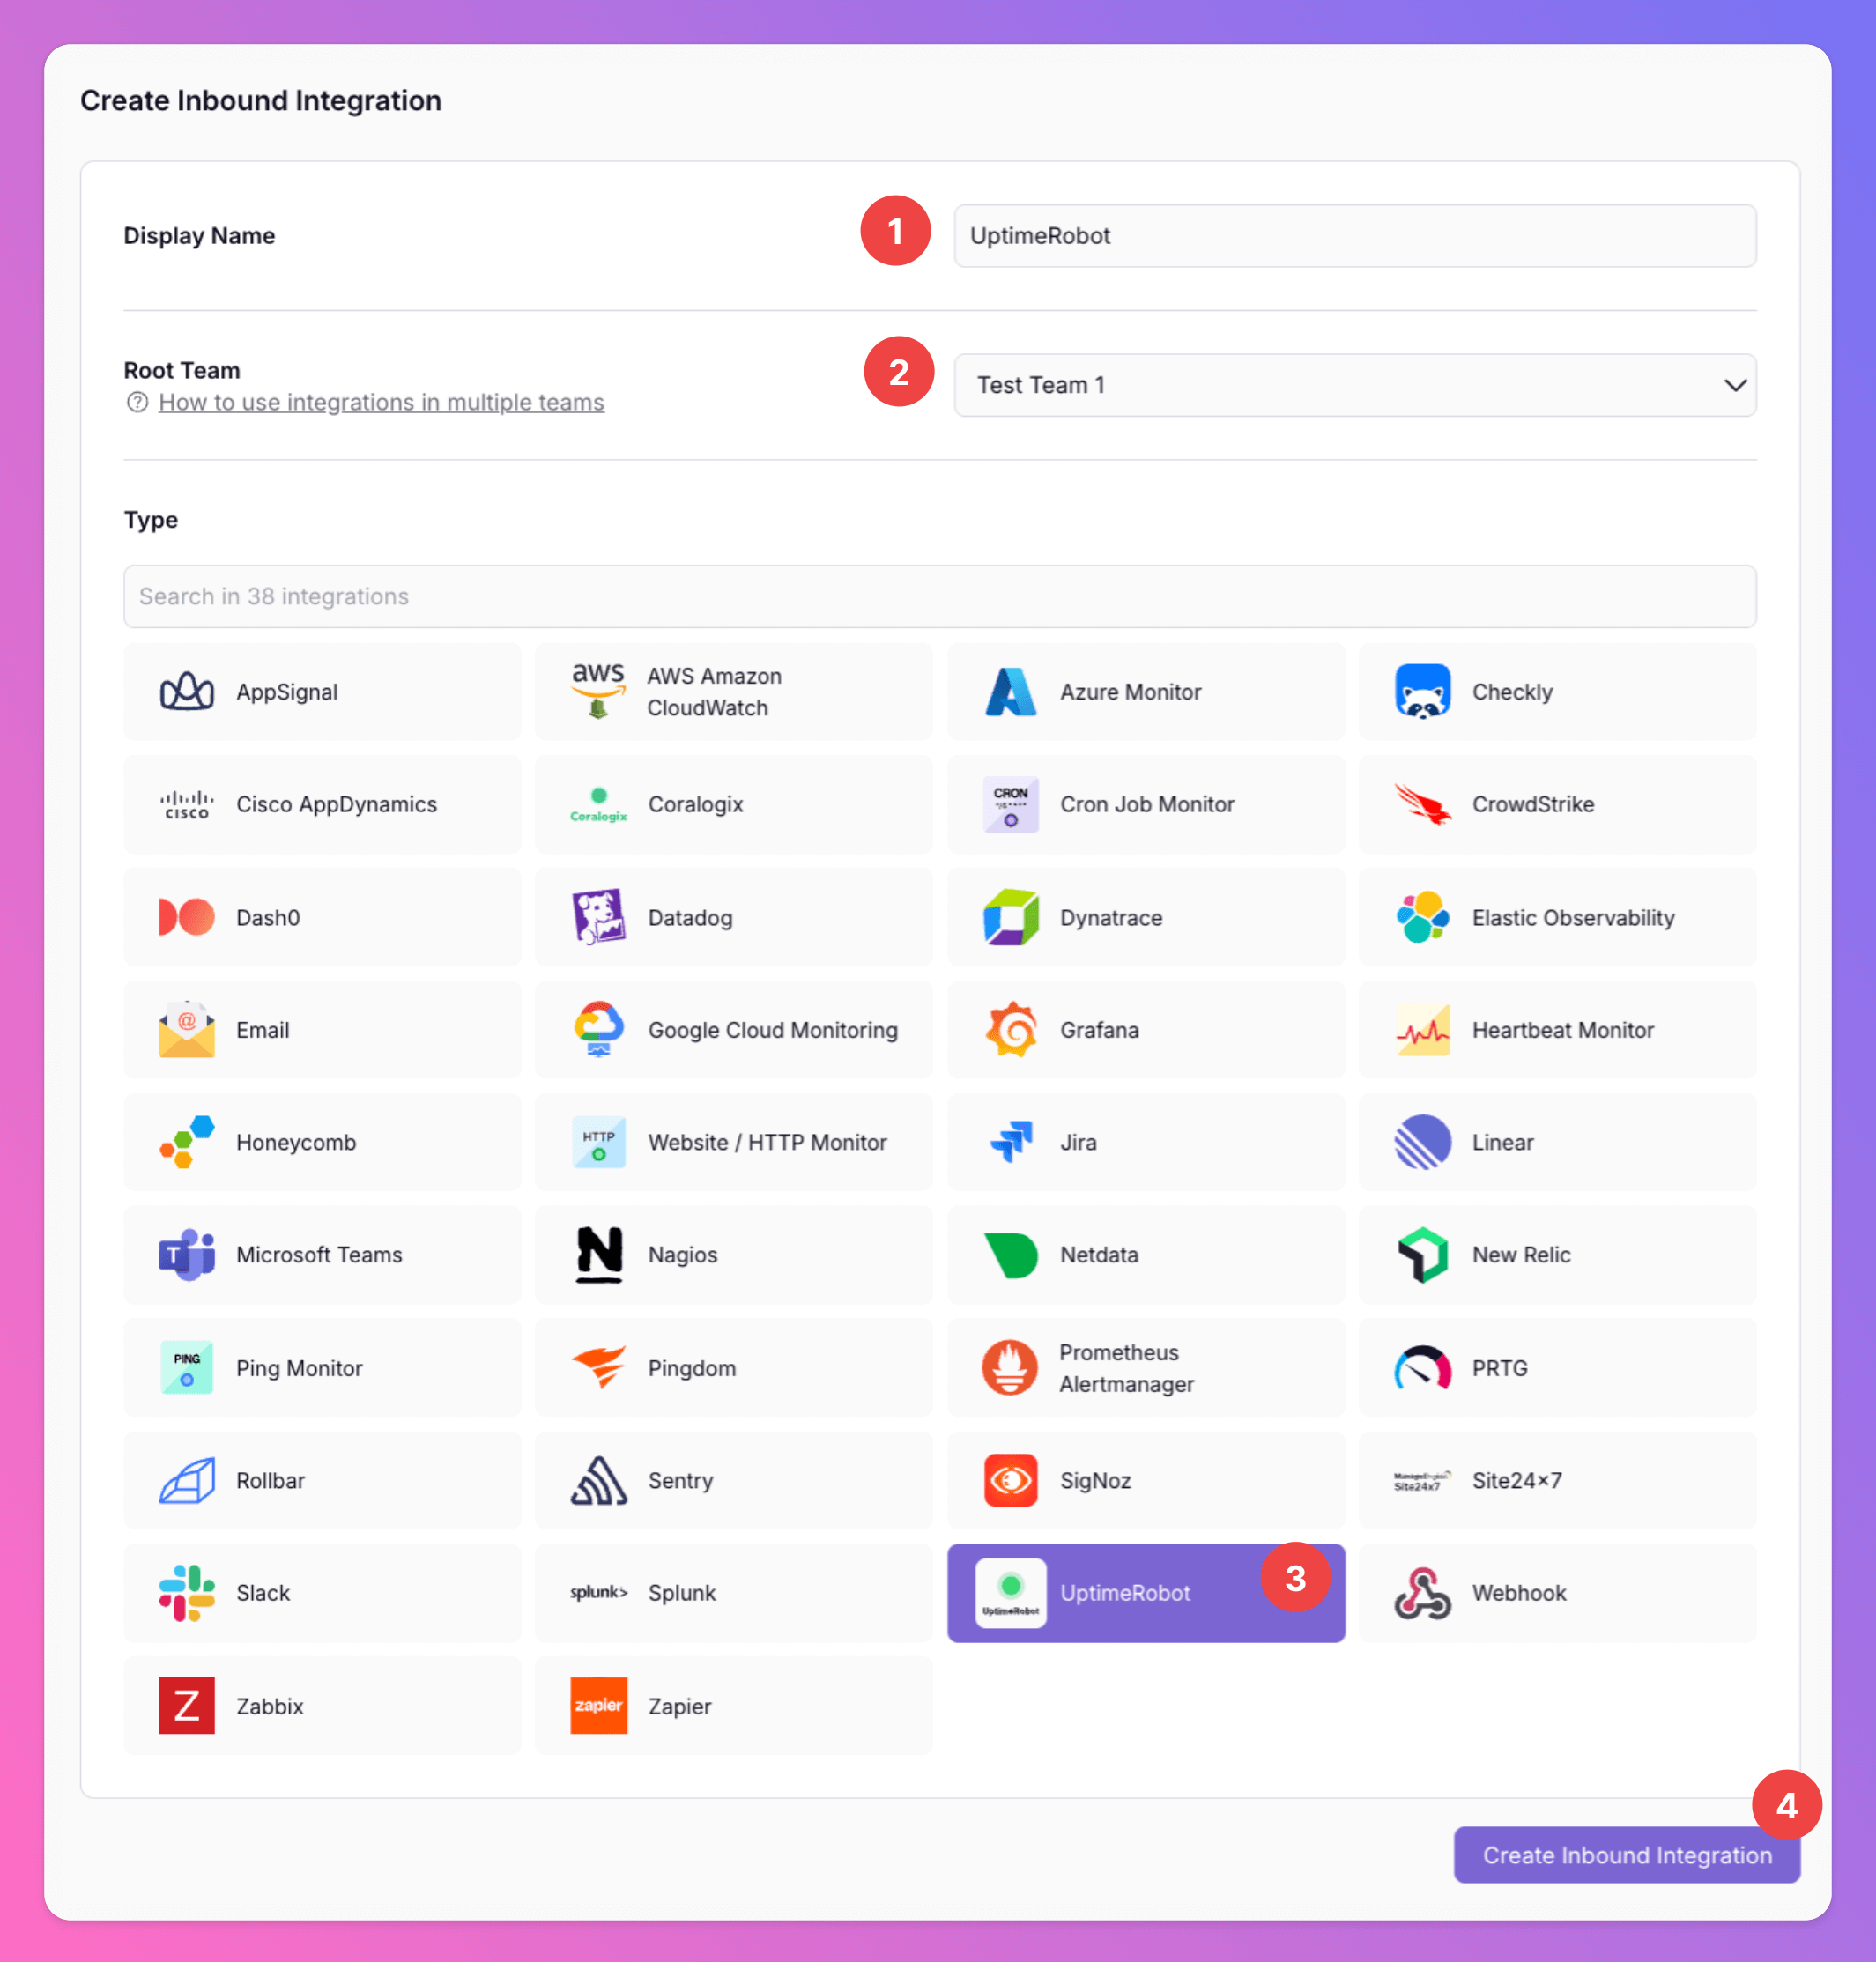
1. Enter a `Display Name` for your integration, e.g. "UptimeRobot".
2. Select a `Team`.
3. Select `UptimeRobot` as the integration's type.
4. Click `Create Inbound Integration`.
### Select UptimeRobot for the integration's type
1. Enter a `Display Name` for your integration, e.g. "UptimeRobot".
2. Select a `Team`.
3. Select `UptimeRobot` as the integration's type.
4. Click `Create Inbound Integration`.
 ### Get the All Quiet webhook URL
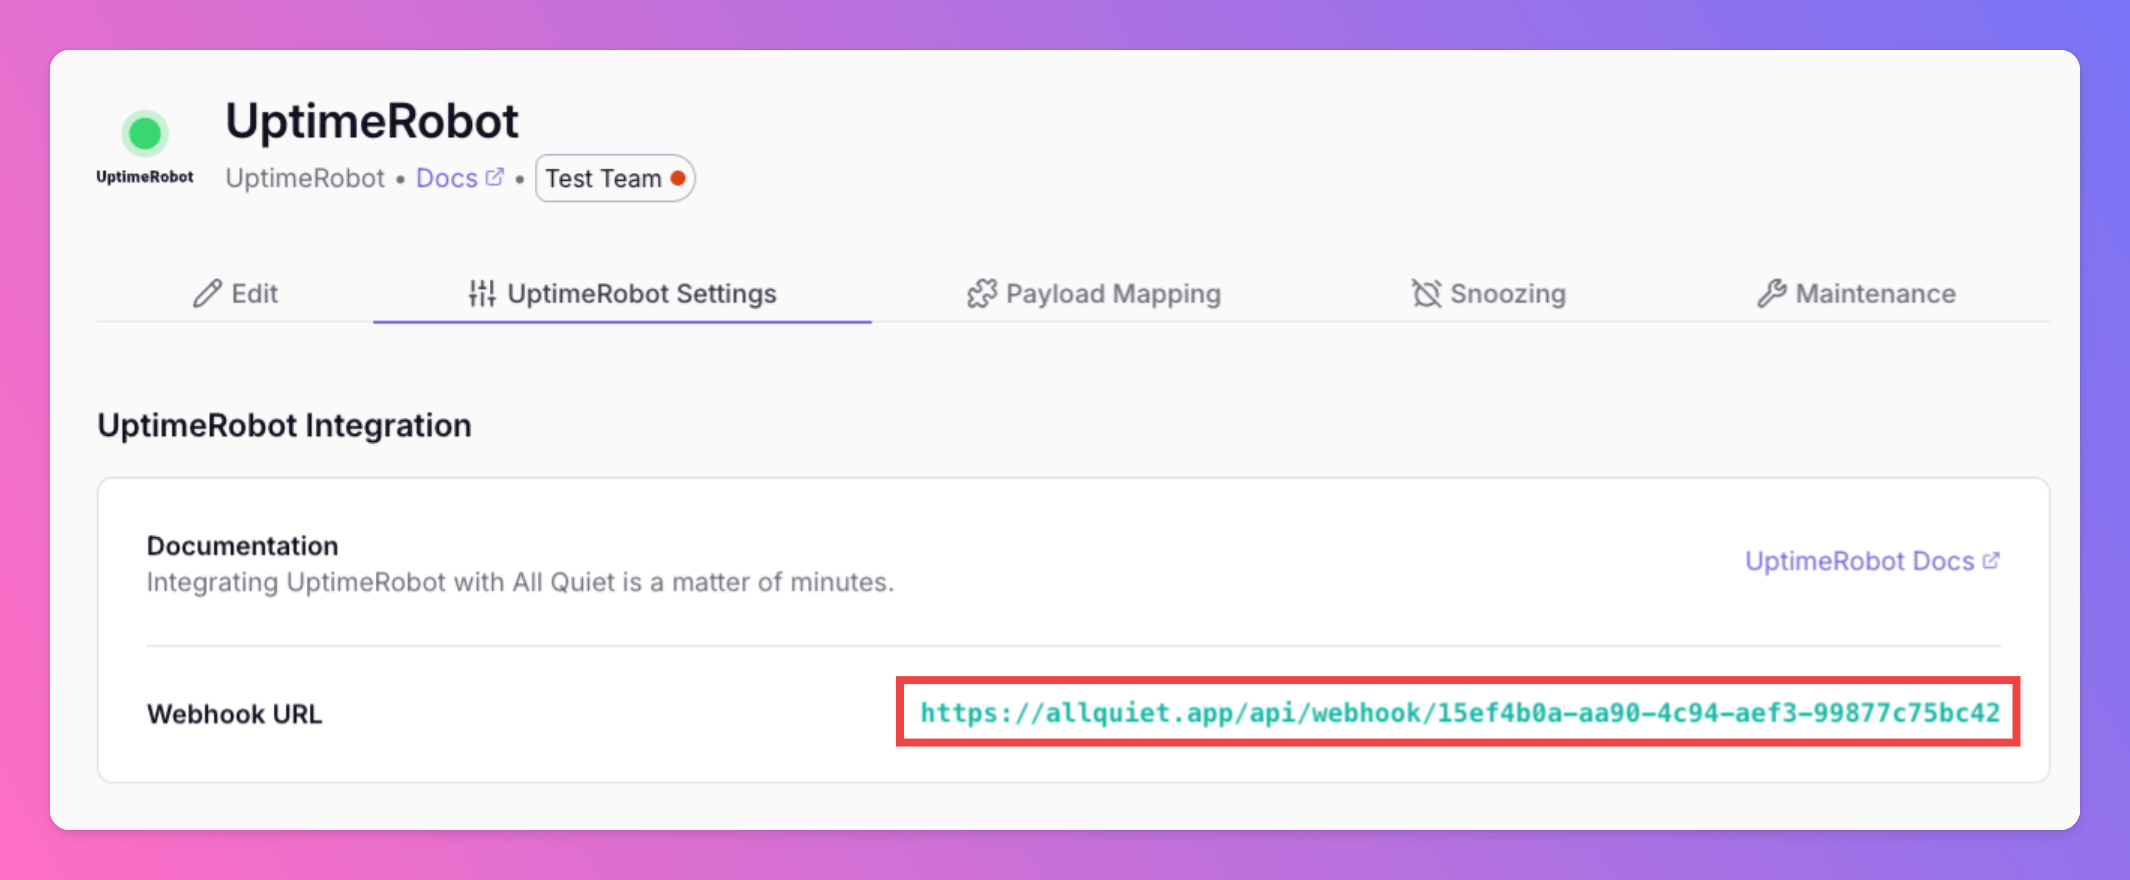
After creating the webhook integration on All Quiet, you can view and copy the URL of the newly generated webhook. You will require this URL in step 2 when configuring the webhook integration on UptimeRobot.
### Get the All Quiet webhook URL
After creating the webhook integration on All Quiet, you can view and copy the URL of the newly generated webhook. You will require this URL in step 2 when configuring the webhook integration on UptimeRobot.
 Optionally toggle `Enable additional Authentication & Security` below the webhook URL to restrict who can POST payloads.
* **IP Filter** — Allow requests only from specific IPs or CIDR ranges. Failed checks return **404 Not Found**.
* **Bearer authentication** — Require `Authorization: Bearer YOUR_TOKEN`. Missing or invalid tokens return **401 Unauthorized**.
If both are enabled, the request must pass both checks to be accepted.
## 2. Configure UptimeRobot
The following steps will be done on the UptimeRobot platform. So, log in to UptimeRobot with your account.
### Install Webhook integration
1. In the sidebar select `Integrations & API`
2. Scroll down to `Webhook` and select it.
This opens and Overlay called `Add Webhook integration`.
1. In the `Webhook URL` field, enter the webhook URL that you [generated in step one](/integrations/inbound/uptimerobot#get-the-all-quiet-webhook-url) of the All Quiet integration setup.
2. "Send default variables": Select "As query string of webhook URL" toggle.
3. Select which events you would like to be notified about via the webhook.
4. Save your new webhook integration by clicking "Create integration".
### Test your setup
Now, it's time to test your setup by sending a notification to All Quiet. This will help you inspect the payload that UptimeRobot sends and eventually map it to an incident on All Quiet.
Here's how to do it:
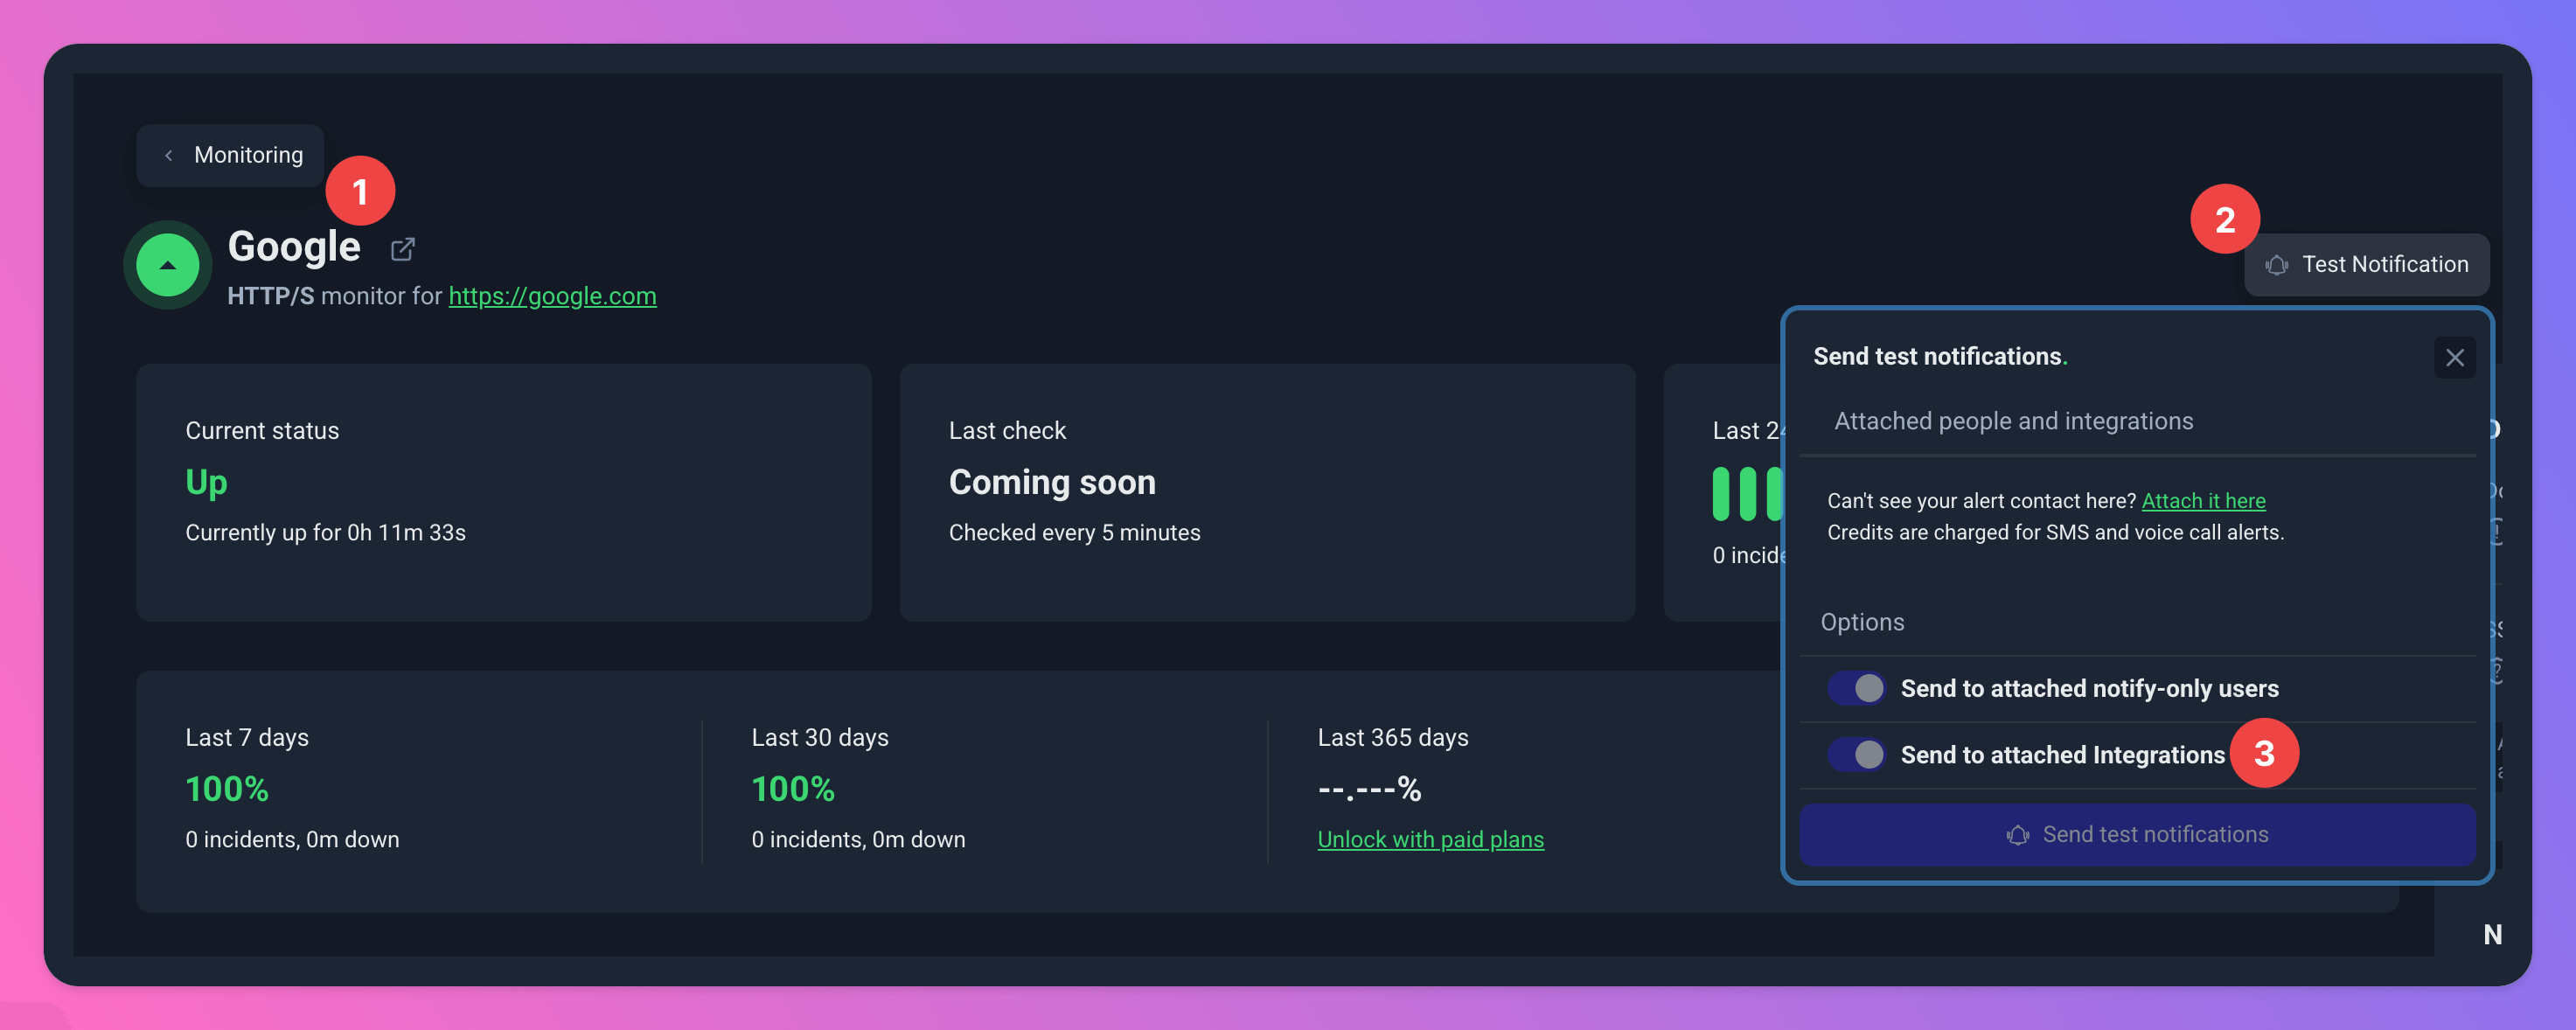
1. Select one of your Monitors
2. Click on `Test Notification`.
3. Select `Send to attached integrations` toggle and click on `Send test notifications`
Optionally toggle `Enable additional Authentication & Security` below the webhook URL to restrict who can POST payloads.
* **IP Filter** — Allow requests only from specific IPs or CIDR ranges. Failed checks return **404 Not Found**.
* **Bearer authentication** — Require `Authorization: Bearer YOUR_TOKEN`. Missing or invalid tokens return **401 Unauthorized**.
If both are enabled, the request must pass both checks to be accepted.
## 2. Configure UptimeRobot
The following steps will be done on the UptimeRobot platform. So, log in to UptimeRobot with your account.
### Install Webhook integration
1. In the sidebar select `Integrations & API`
2. Scroll down to `Webhook` and select it.
This opens and Overlay called `Add Webhook integration`.
1. In the `Webhook URL` field, enter the webhook URL that you [generated in step one](/integrations/inbound/uptimerobot#get-the-all-quiet-webhook-url) of the All Quiet integration setup.
2. "Send default variables": Select "As query string of webhook URL" toggle.
3. Select which events you would like to be notified about via the webhook.
4. Save your new webhook integration by clicking "Create integration".
### Test your setup
Now, it's time to test your setup by sending a notification to All Quiet. This will help you inspect the payload that UptimeRobot sends and eventually map it to an incident on All Quiet.
Here's how to do it:
1. Select one of your Monitors
2. Click on `Test Notification`.
3. Select `Send to attached integrations` toggle and click on `Send test notifications`
 ## 3. Map UptimeRobot payload to All Quiet incident
Great news, we're almost finished with setting up your UptimeRobot integration! To complete the process, navigate back to All Quiet and open the `Payload Mapping` tab of the integration that you've just created.
1. Find the test notification sent from UptimeRobot in the previous step in the`latest payloads`.
2. Our pre-configured `payload mapping` will transform UptimeRobot alerts into All Quiet incidents. You can adjust the mapping to your liking anytime.
3. Observe how the mapping transforms the selected UptimeRobot payload into an All Quiet incident.
## 3. Map UptimeRobot payload to All Quiet incident
Great news, we're almost finished with setting up your UptimeRobot integration! To complete the process, navigate back to All Quiet and open the `Payload Mapping` tab of the integration that you've just created.
1. Find the test notification sent from UptimeRobot in the previous step in the`latest payloads`.
2. Our pre-configured `payload mapping` will transform UptimeRobot alerts into All Quiet incidents. You can adjust the mapping to your liking anytime.
3. Observe how the mapping transforms the selected UptimeRobot payload into an All Quiet incident.
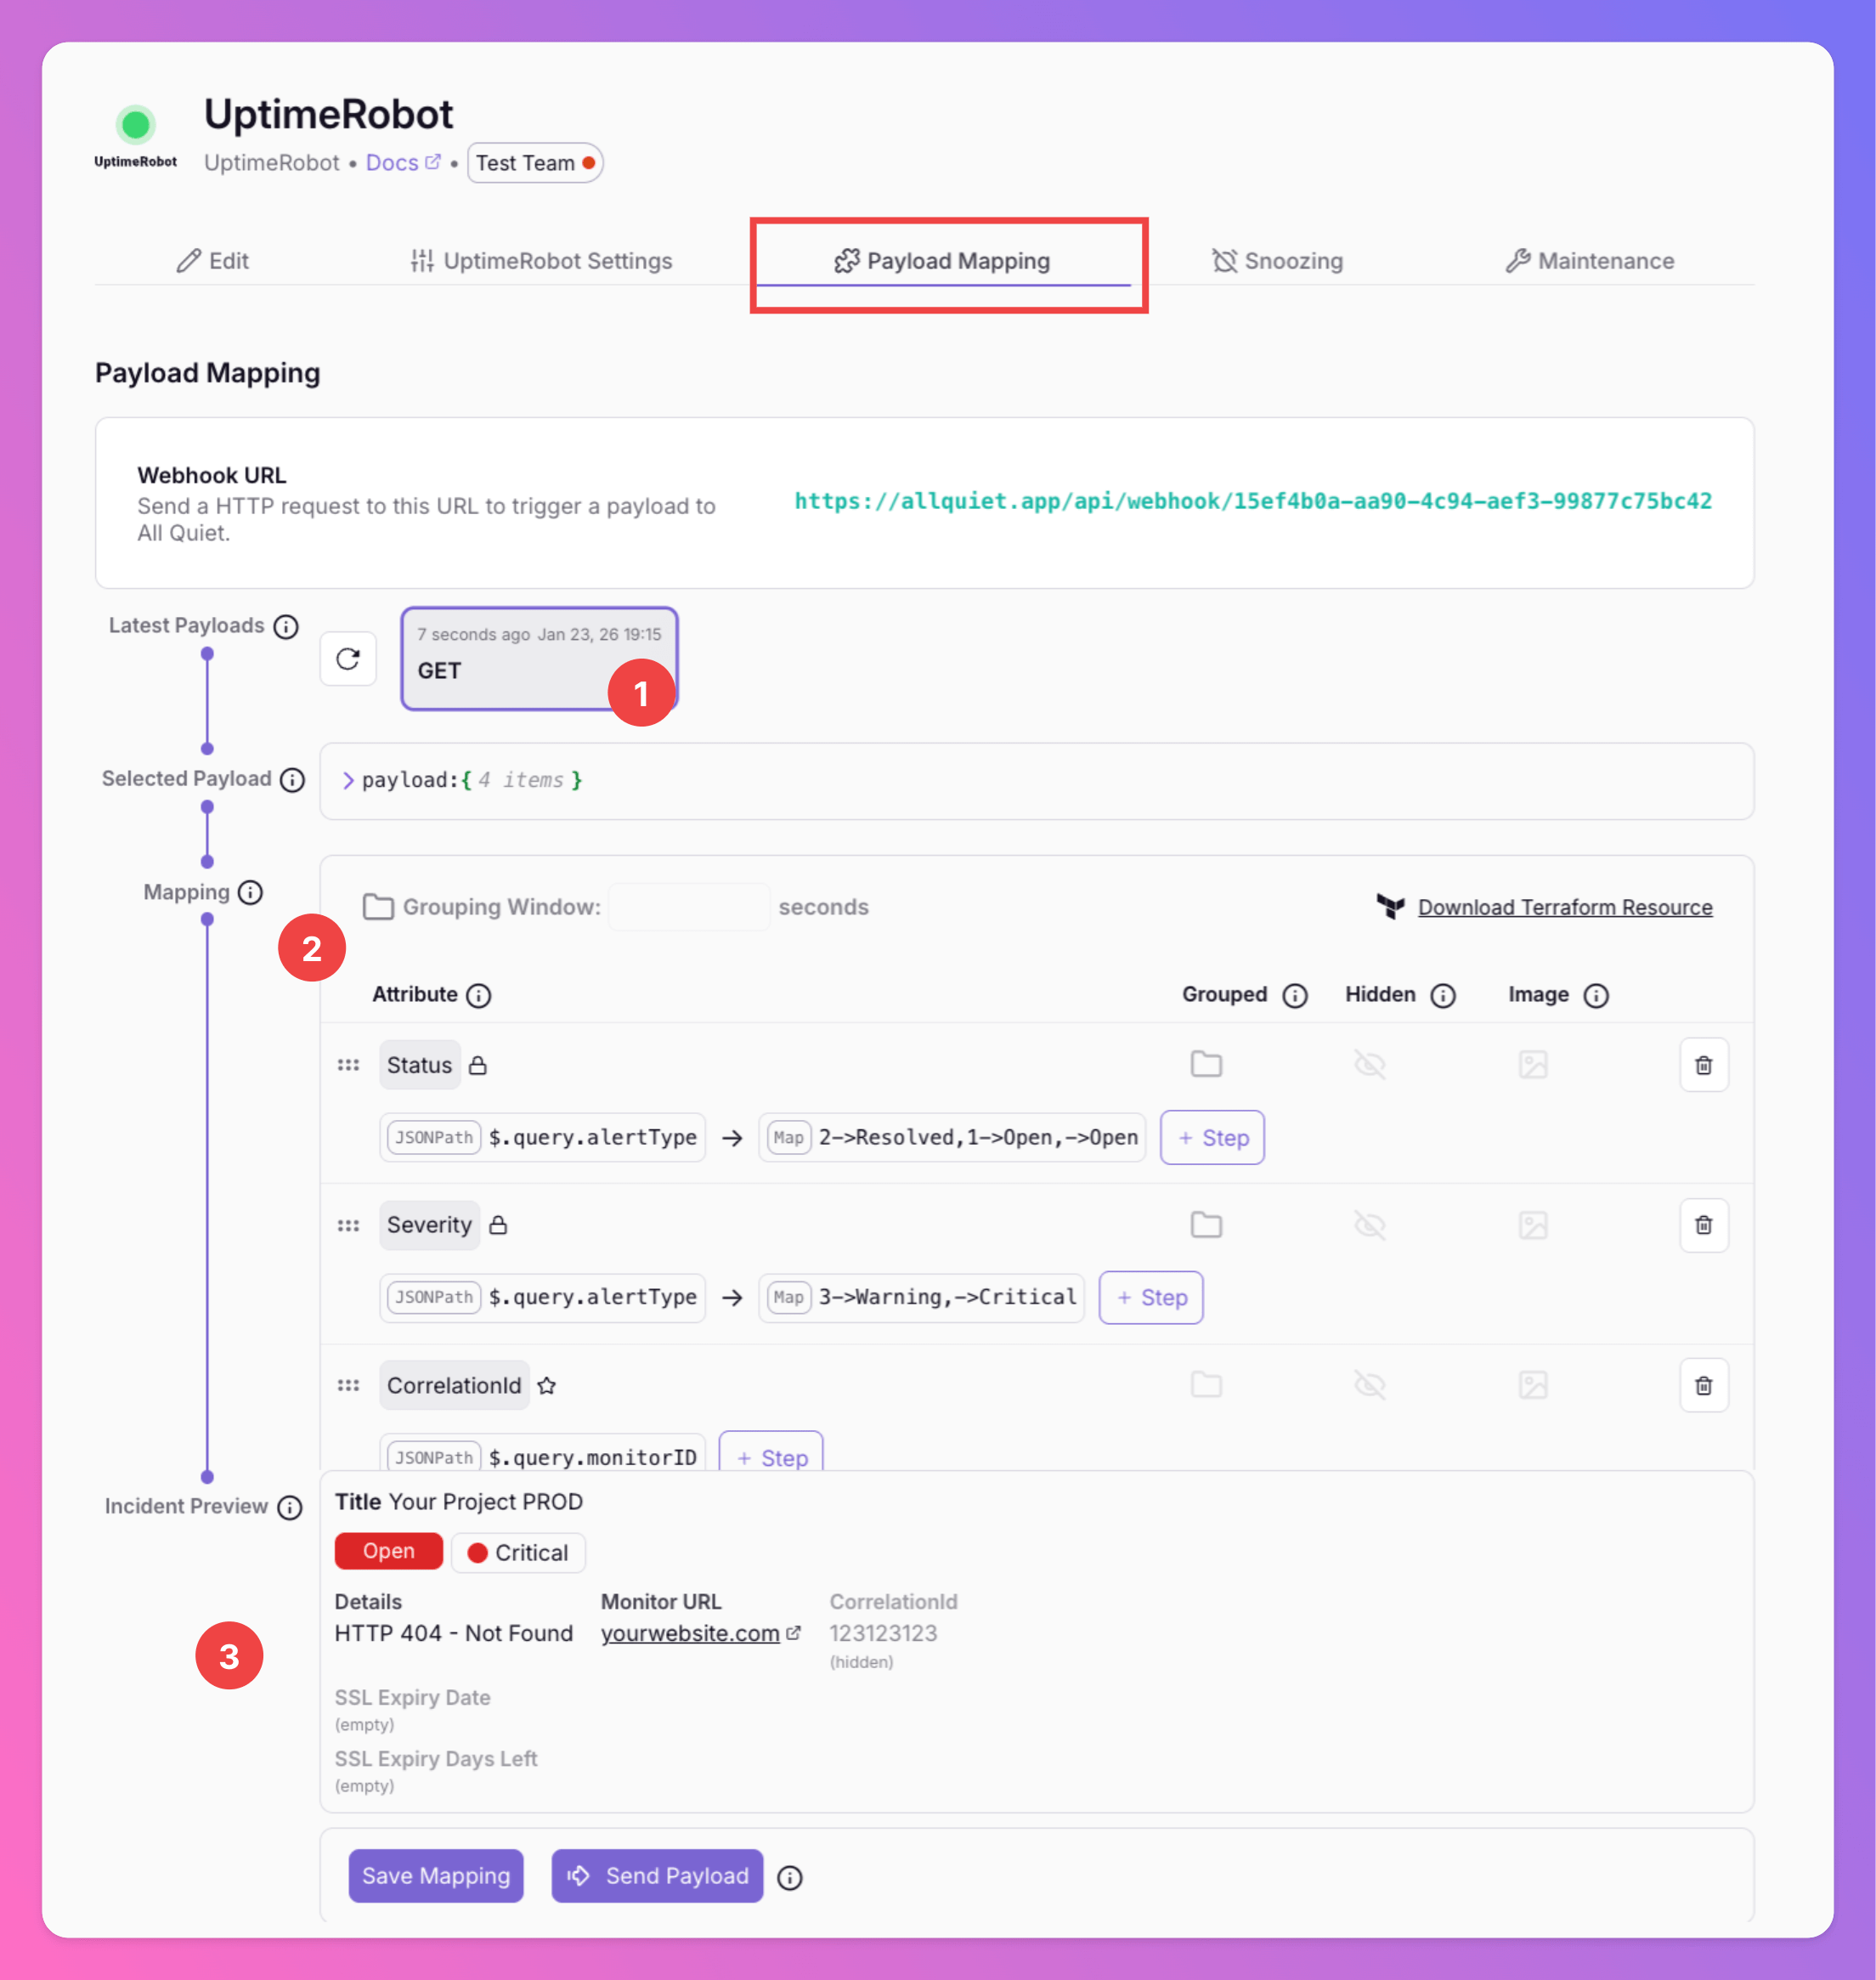 UptimeRobot monitors are now integrated with All Quiet, enhancing your website's monitoring and alert management capabilities through our easy-to-use platform and mobile apps.
### Adjust Payload Mapping
For detailed guidance on payload mapping, you may check out our [payload mapping documentation](/essentials/inbound#how-does-attribute-mapping-work).
Using our Terraform provider? [Download](https://allquiet.app/api/integrations/terraform/default/UptimeRobot.tf) the default mapping of the `allquiet_integration_mapping` resource for the UptimeRobot integration. Simply copy the syntax to your .tf file and tailor the resource to your team's needs!
UptimeRobot monitors are now integrated with All Quiet, enhancing your website's monitoring and alert management capabilities through our easy-to-use platform and mobile apps.
### Adjust Payload Mapping
For detailed guidance on payload mapping, you may check out our [payload mapping documentation](/essentials/inbound#how-does-attribute-mapping-work).
Using our Terraform provider? [Download](https://allquiet.app/api/integrations/terraform/default/UptimeRobot.tf) the default mapping of the `allquiet_integration_mapping` resource for the UptimeRobot integration. Simply copy the syntax to your .tf file and tailor the resource to your team's needs!