> ## Documentation Index
> Fetch the complete documentation index at: https://docs.allquiet.app/llms.txt
> Use this file to discover all available pages before exploring further.
# New Relic
> Connect New Relic Alerts into All Quiet
Setup time: 6 Min
Integrate New Relic with All Quiet for streamlined incident management and enhanced alert handling.
The process of integrating New Relic alerts involves only two steps:
1. Create a New Relic integration on the All Quiet platform to obtain a webhook URL.
2. Use this URL in New Relic to create a workflow with a webhook destination.
## 1. Create a New Relic integration on All Quiet
### 1.1 Create an Integration on All Quiet
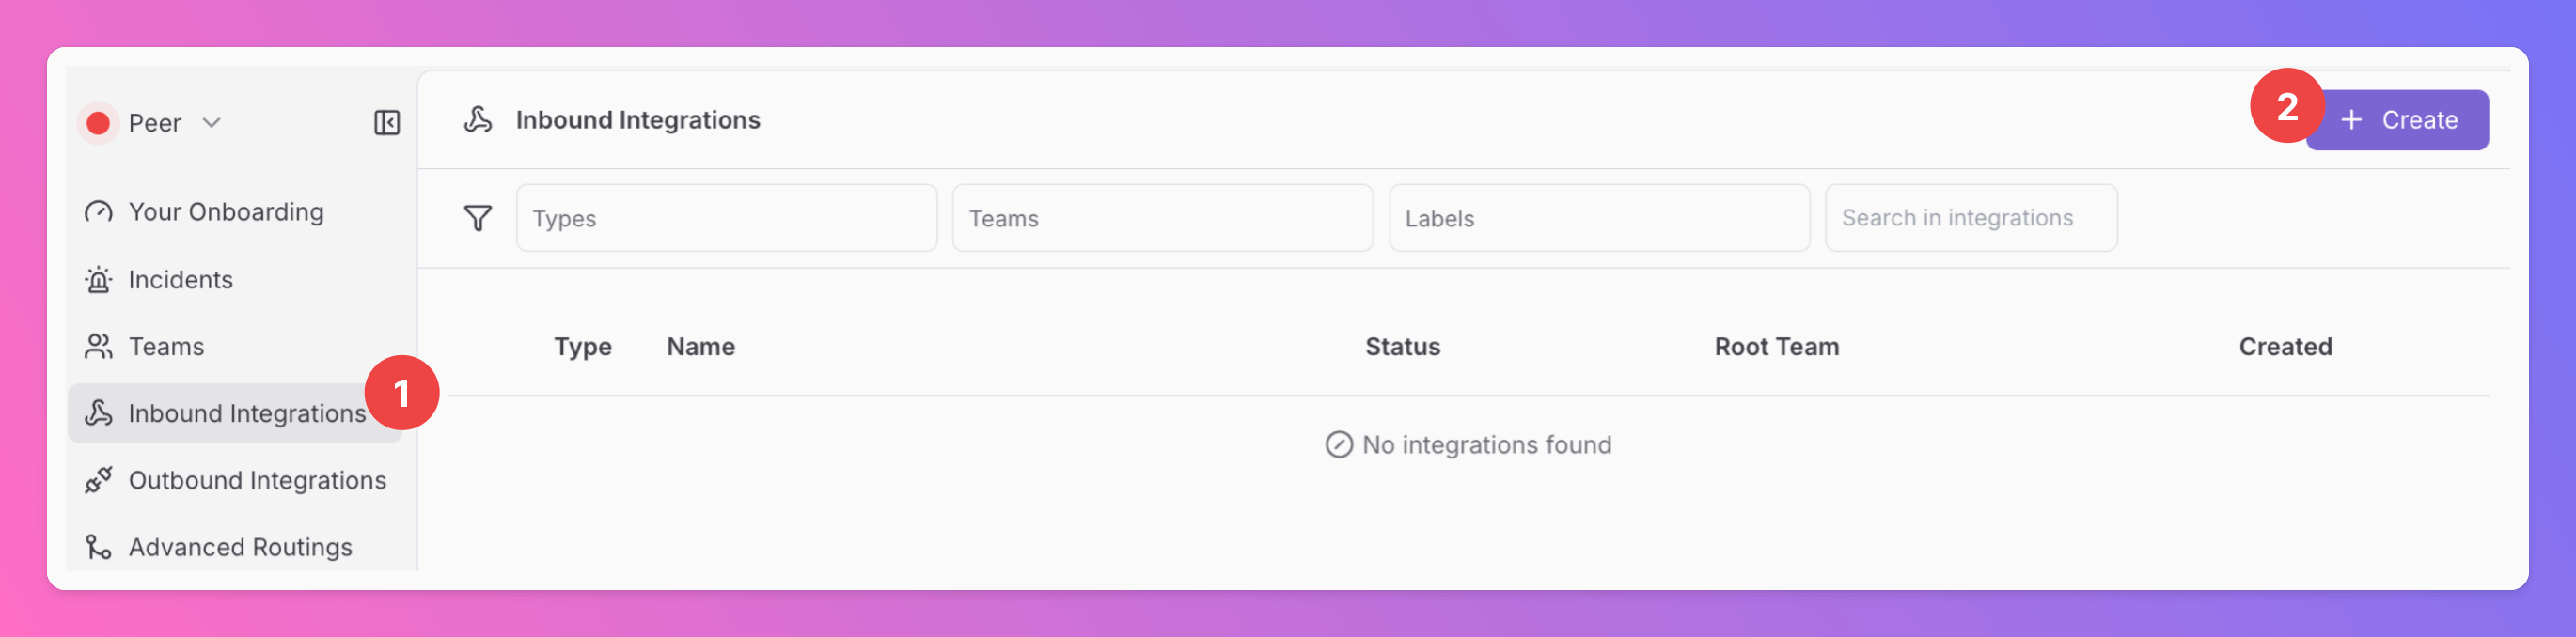
1. Click on the `Inbound Integrations` tab.
2. Click on `+ Create`.
 ### 1.2 Select New Relic for the integration's type
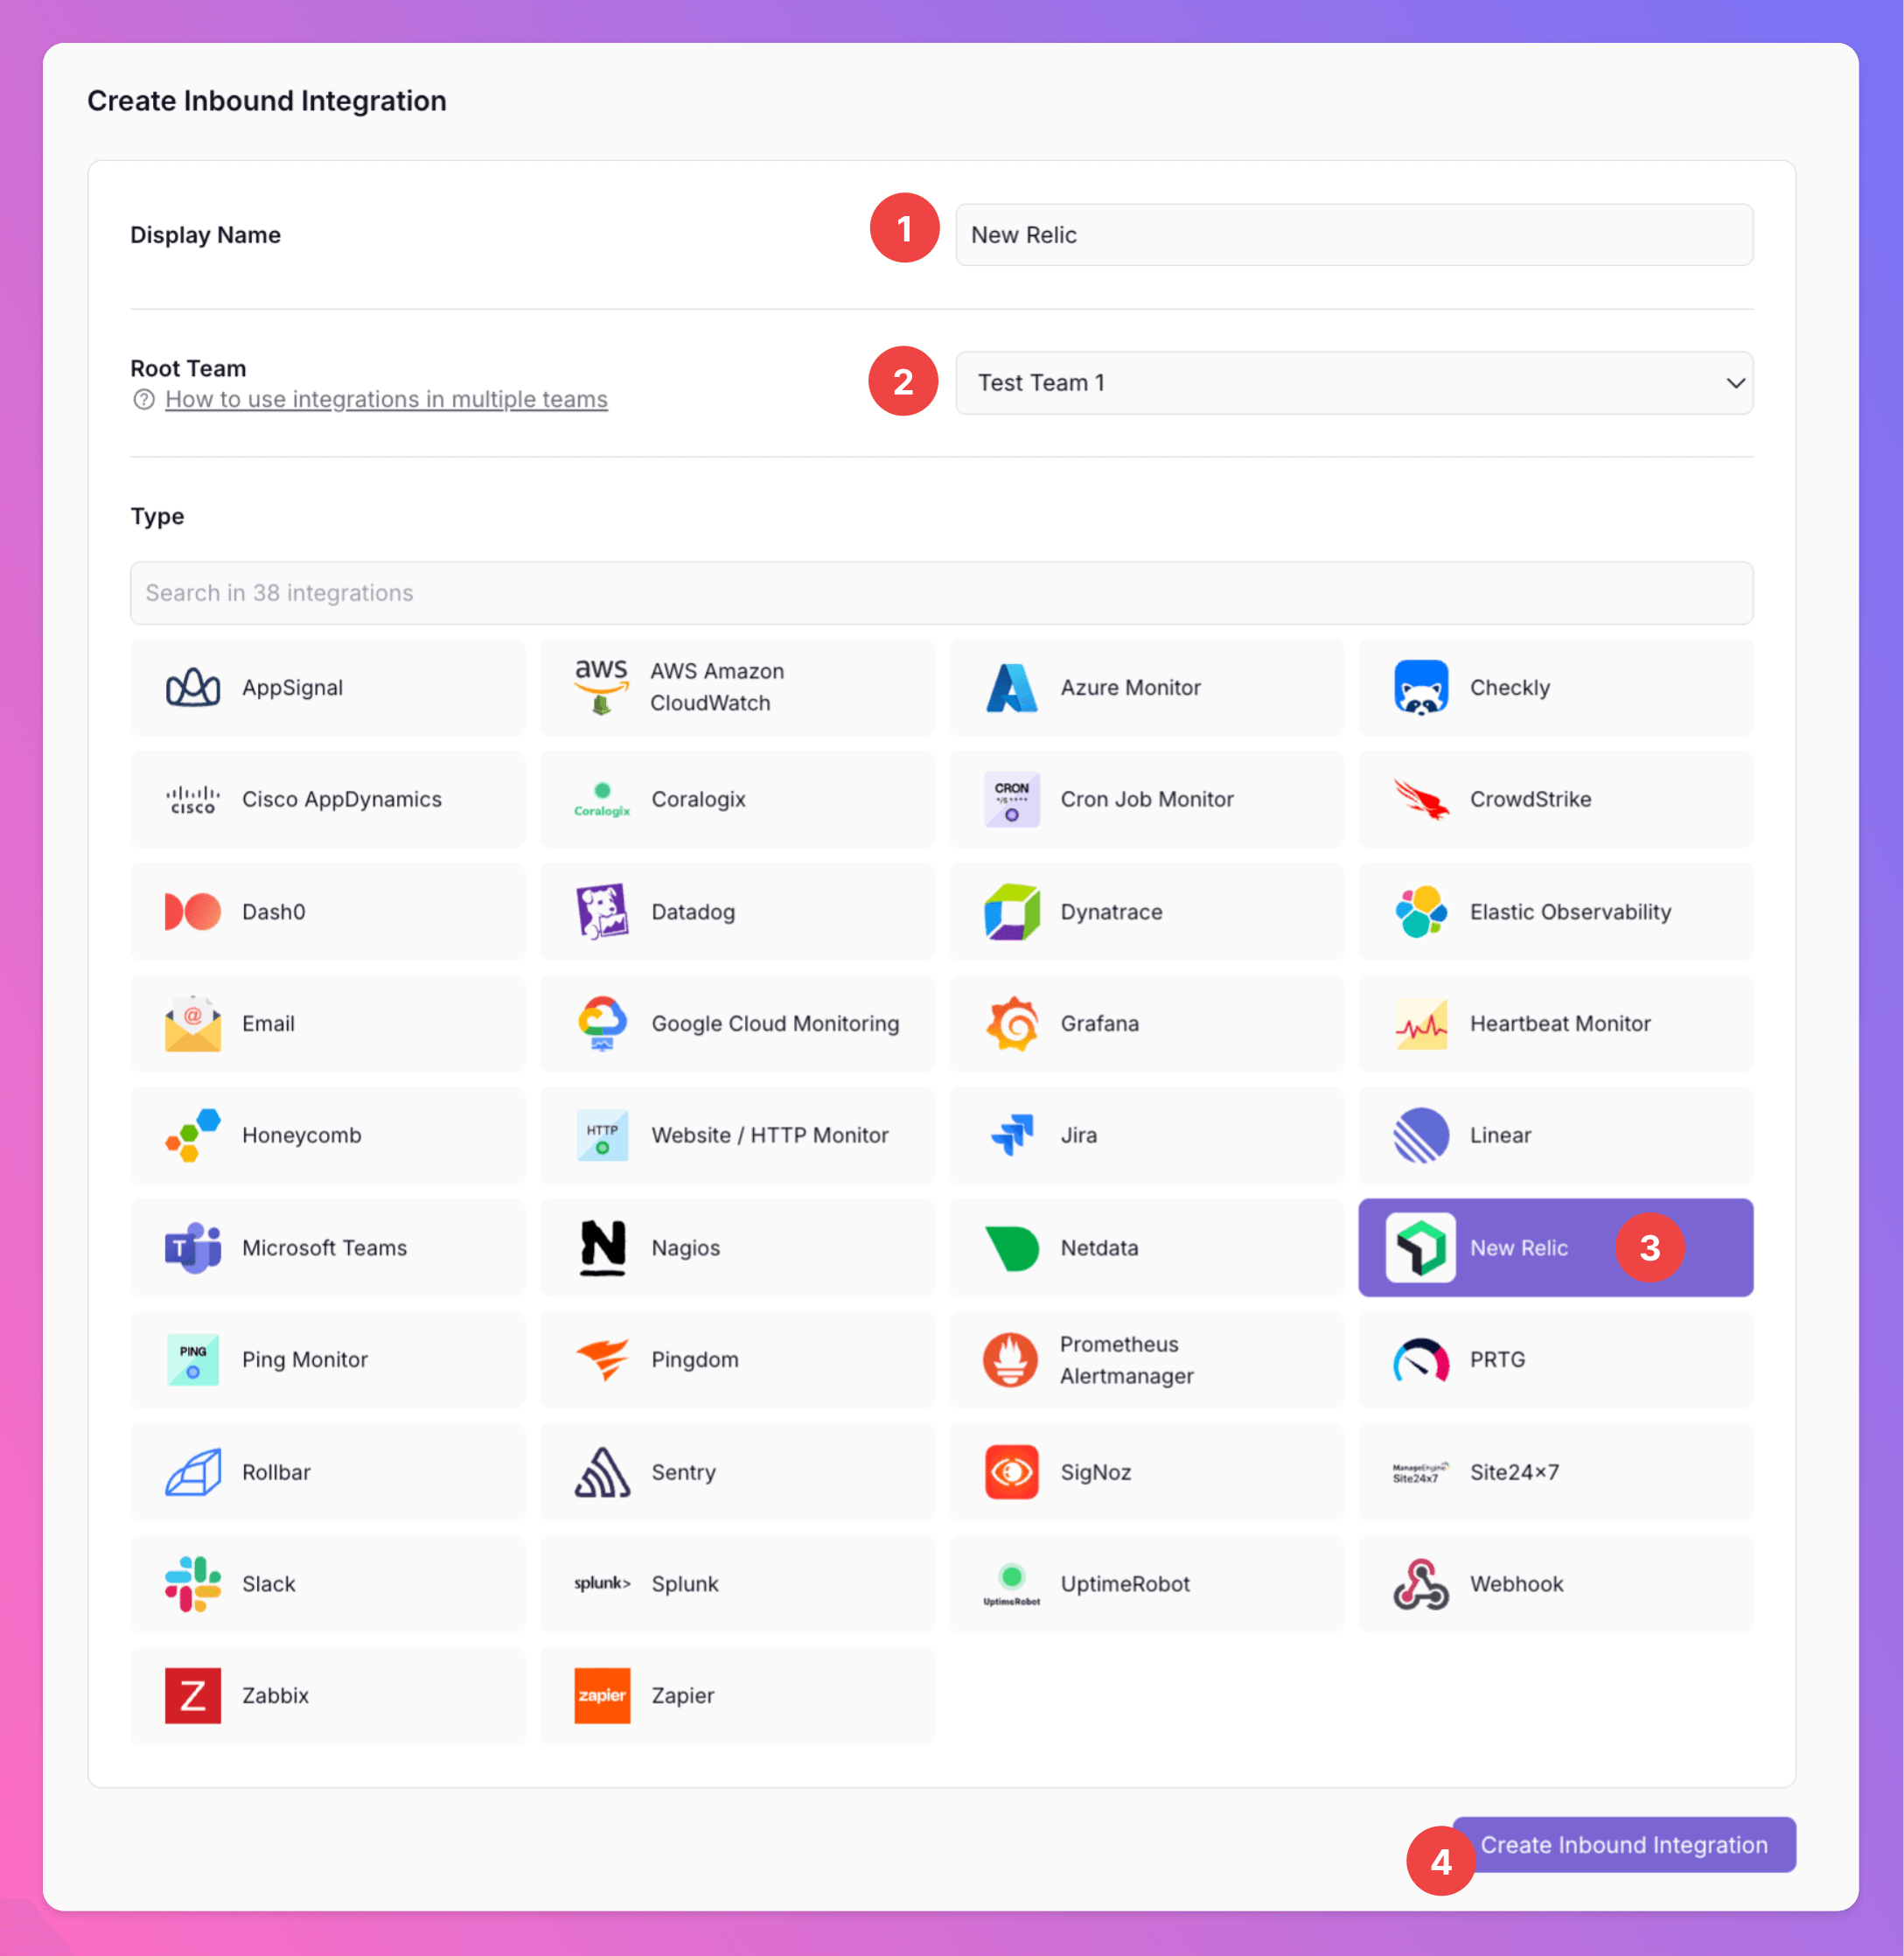
1. Enter a `Display Name` for your integration, e.g. "New Relic".
2. Select a `Team`.
3. Select `New Relic` as the integration's type.
4. Click `Create Inbound Integration`.
### 1.2 Select New Relic for the integration's type
1. Enter a `Display Name` for your integration, e.g. "New Relic".
2. Select a `Team`.
3. Select `New Relic` as the integration's type.
4. Click `Create Inbound Integration`.
 ### 1.3 Get the All Quiet webhook URL
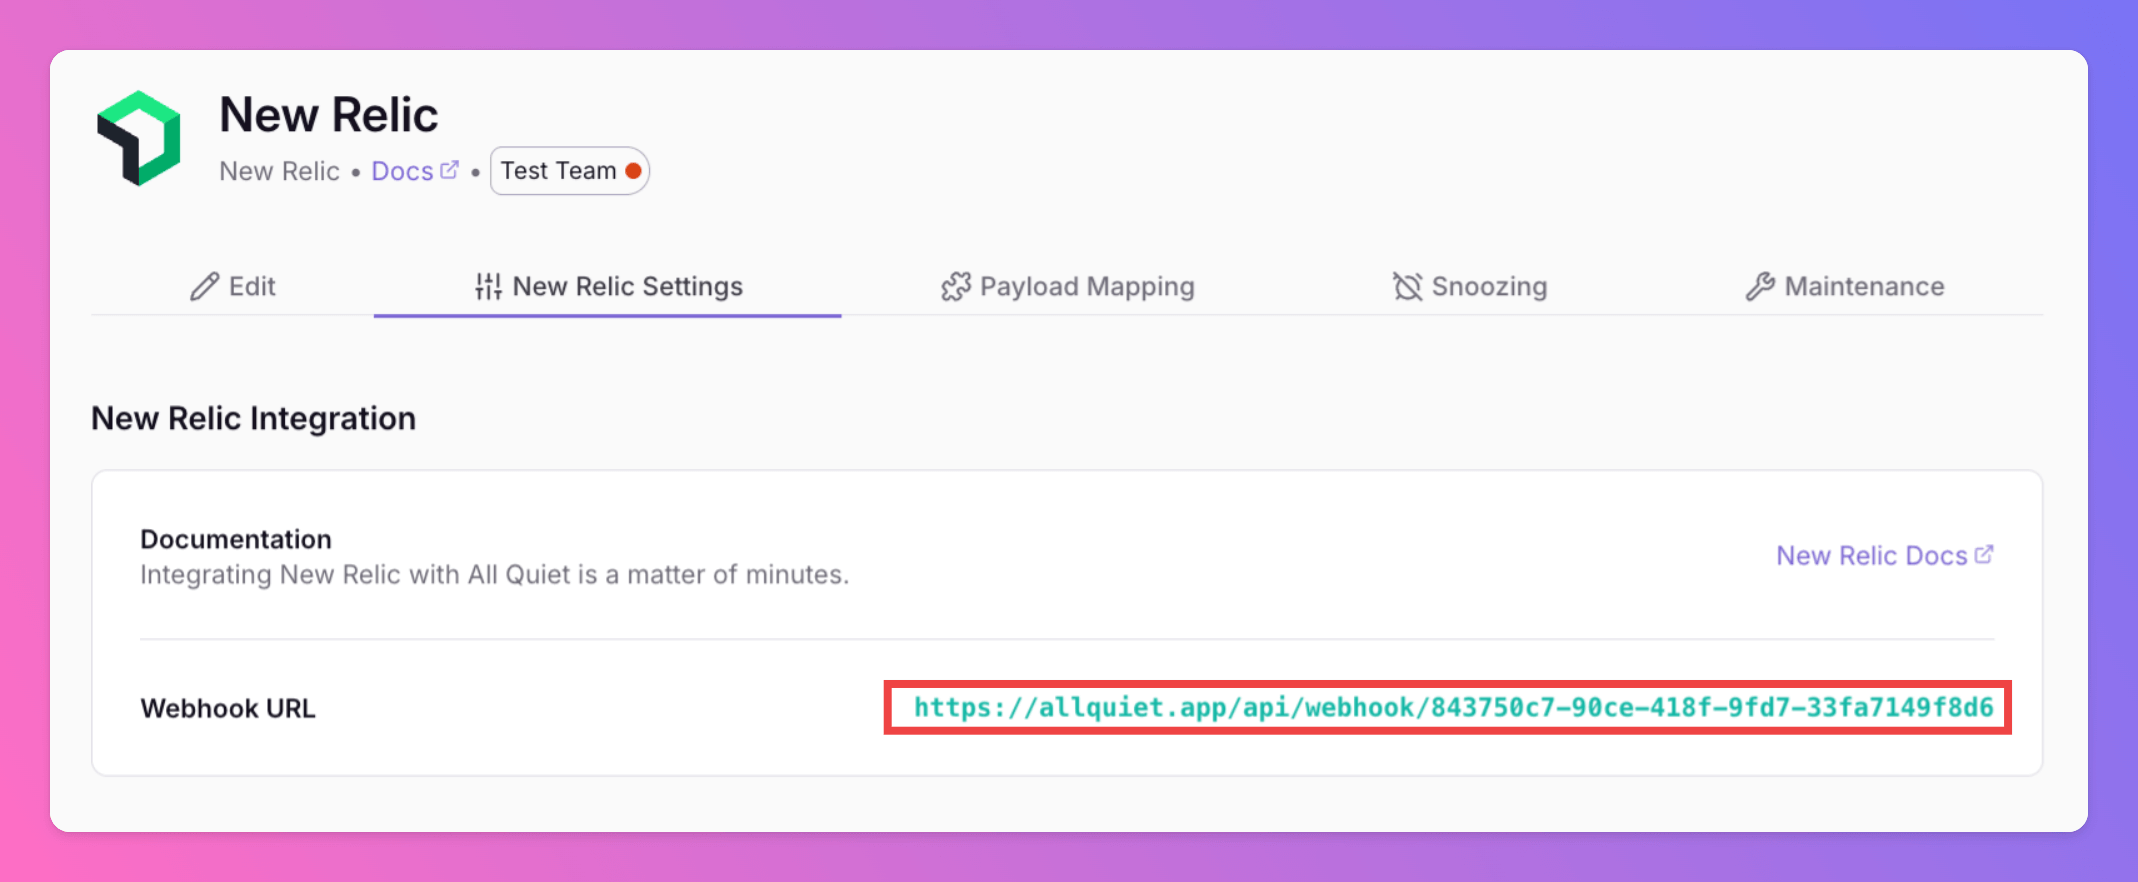
Copy your webhook URL. You'll need it later on the New Relic platform.
### 1.3 Get the All Quiet webhook URL
Copy your webhook URL. You'll need it later on the New Relic platform.
 Optionally toggle `Enable additional Authentication & Security` below the webhook URL to restrict who can POST payloads.
* **IP Filter** — Allow requests only from specific IPs or CIDR ranges. Failed checks return **404 Not Found**.
* **Bearer authentication** — Require `Authorization: Bearer YOUR_TOKEN`. Missing or invalid tokens return **401 Unauthorized**.
If both are enabled, the request must pass both checks to be accepted.
## 2. Create a New Relic workflow with a webhook destination
The following steps will be done on the New Relic platform. So, log in to New Relic with your account.
### 2.1 Create an Alert Condition
1. Go to *Alerts & UI -> Alert Conditions (policies)*
2. Create an alert condition that you'd like to monitor. In the example provided, a condition has been added to monitor if the CPU load is above 50%.
3. Navigate to the *Notification settings* tab
Optionally toggle `Enable additional Authentication & Security` below the webhook URL to restrict who can POST payloads.
* **IP Filter** — Allow requests only from specific IPs or CIDR ranges. Failed checks return **404 Not Found**.
* **Bearer authentication** — Require `Authorization: Bearer YOUR_TOKEN`. Missing or invalid tokens return **401 Unauthorized**.
If both are enabled, the request must pass both checks to be accepted.
## 2. Create a New Relic workflow with a webhook destination
The following steps will be done on the New Relic platform. So, log in to New Relic with your account.
### 2.1 Create an Alert Condition
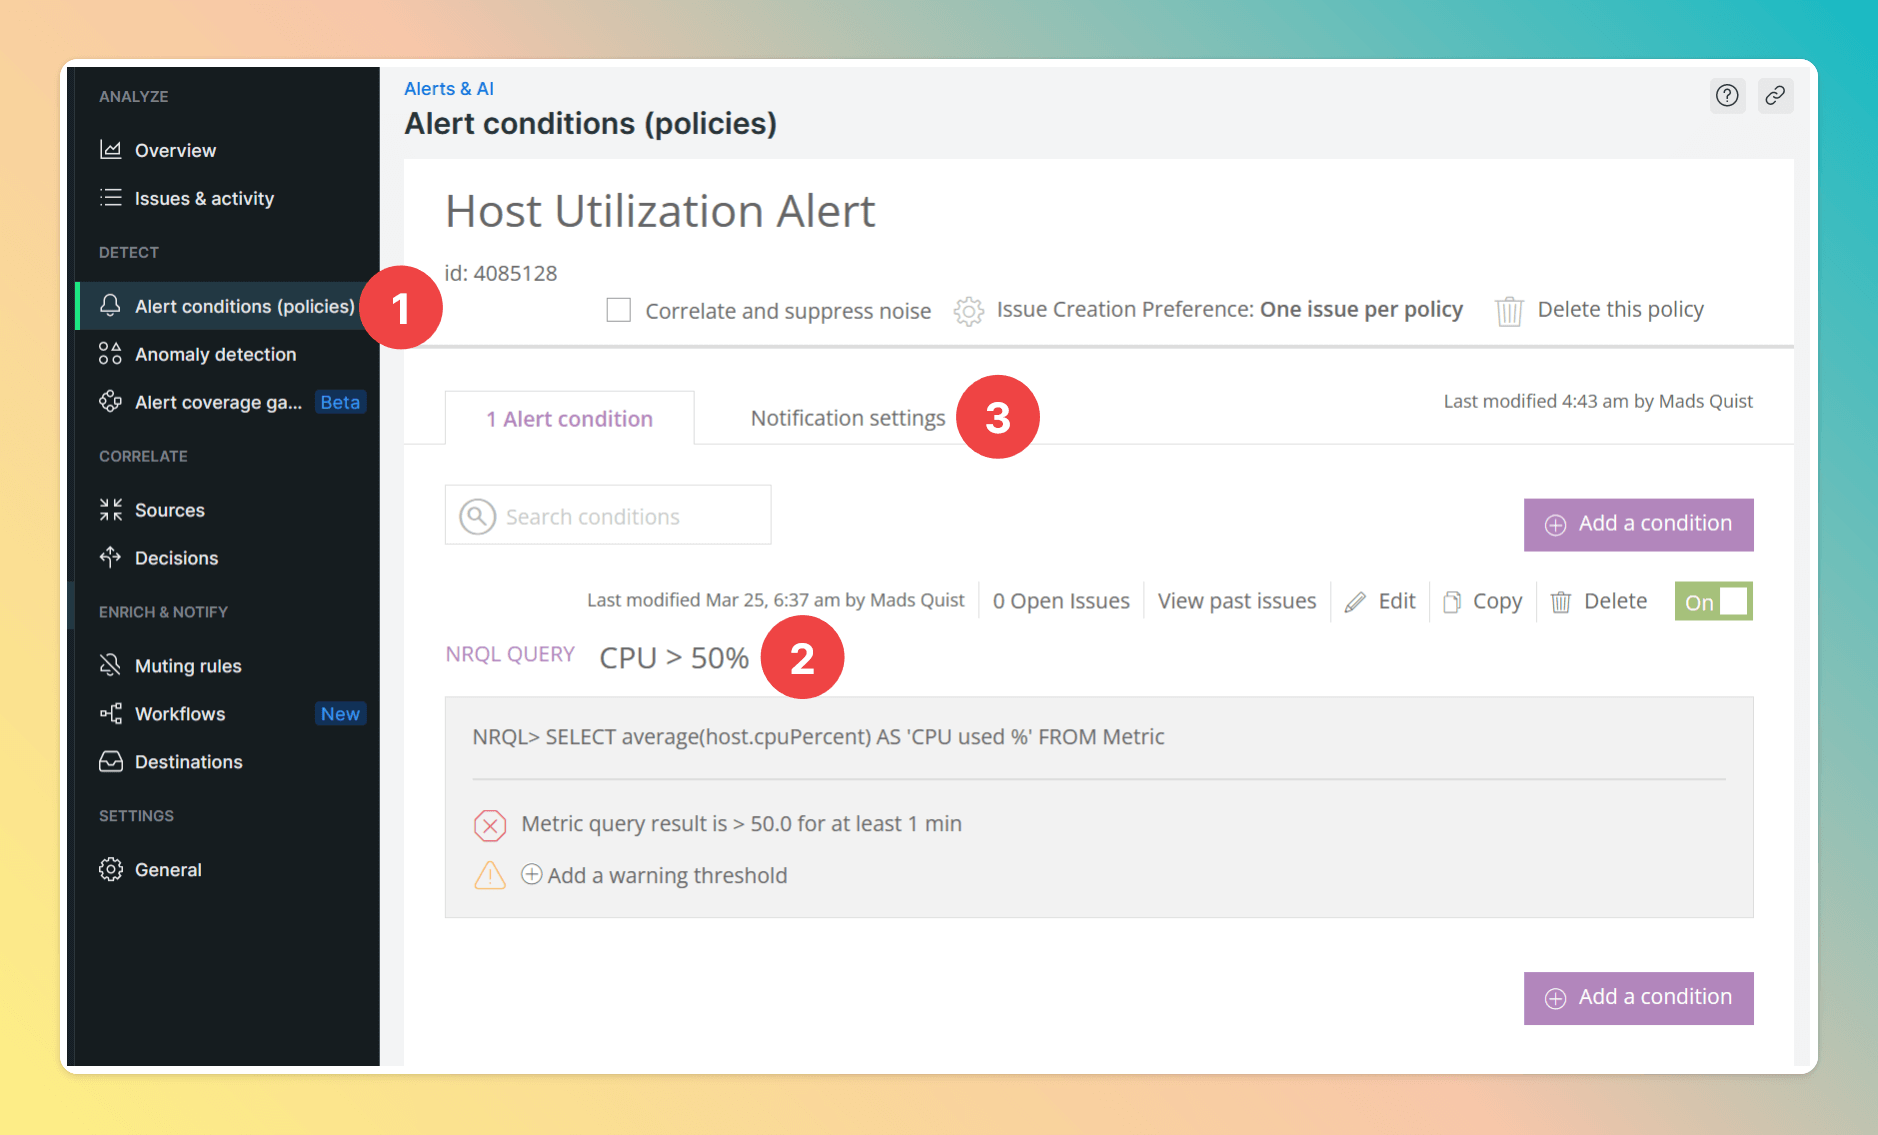
1. Go to *Alerts & UI -> Alert Conditions (policies)*
2. Create an alert condition that you'd like to monitor. In the example provided, a condition has been added to monitor if the CPU load is above 50%.
3. Navigate to the *Notification settings* tab
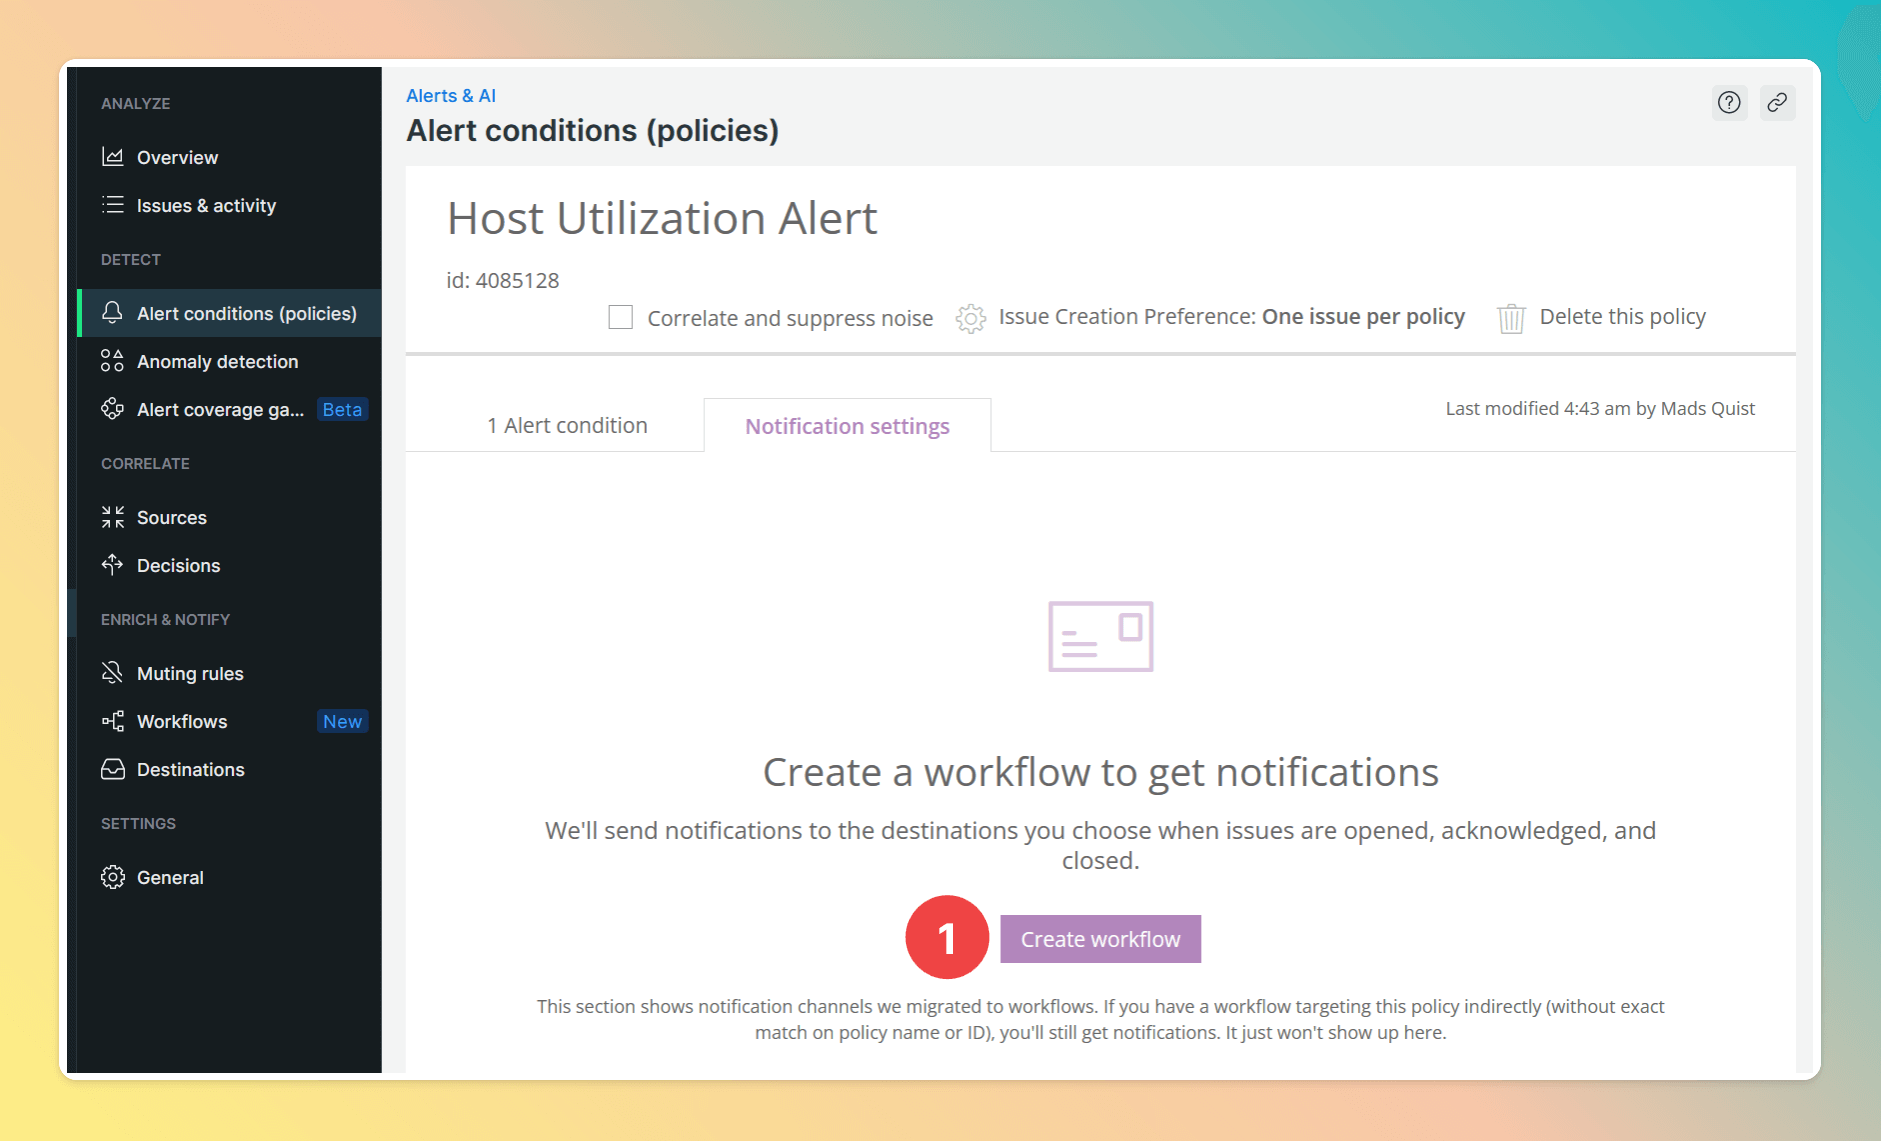
 ### 2.2 Create a workflow
In the Notification settings, click `Create workflow`
### 2.2 Create a workflow
In the Notification settings, click `Create workflow`
 ### 2.3 Add Webhook channel
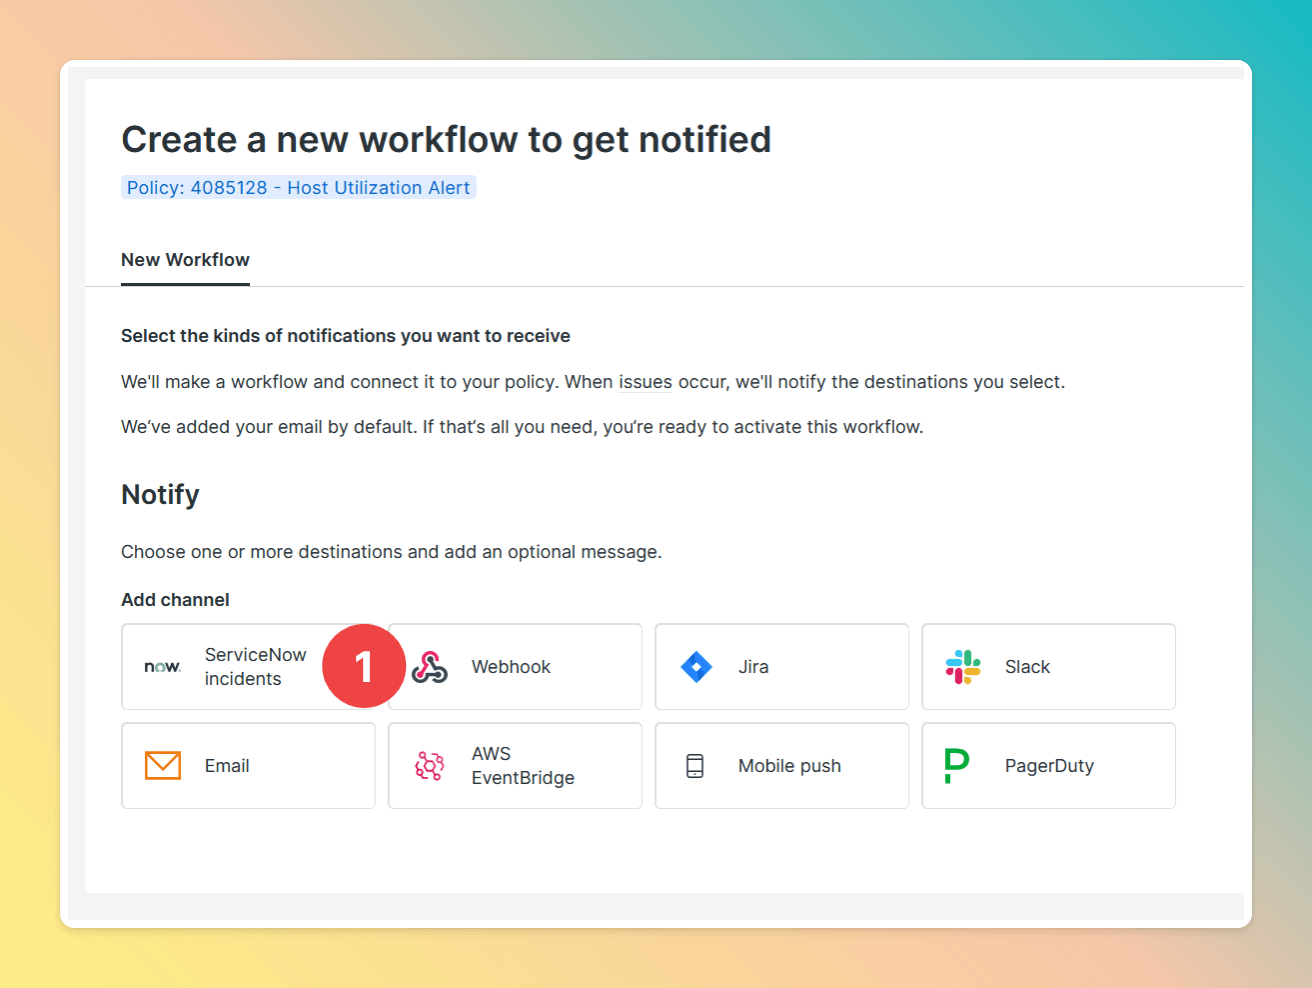
Click on `Webhook` to add a webhook notification channel
### 2.3 Add Webhook channel
Click on `Webhook` to add a webhook notification channel
 ### 2.4 Add a destination to Webhook channel
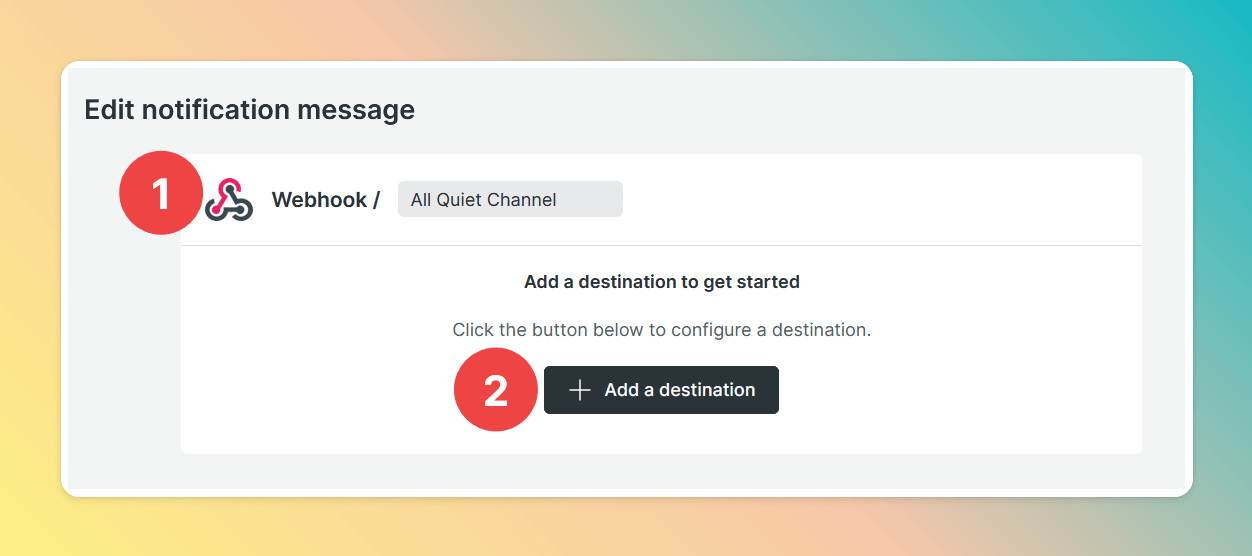
1. Enter a channel name, e.g. *"All Quiet Channel"*
2. Click on "Add a destination" to configure the destination (Webhook)
### 2.4 Add a destination to Webhook channel
1. Enter a channel name, e.g. *"All Quiet Channel"*
2. Click on "Add a destination" to configure the destination (Webhook)
 ### 2.5 Configure Webhook channel
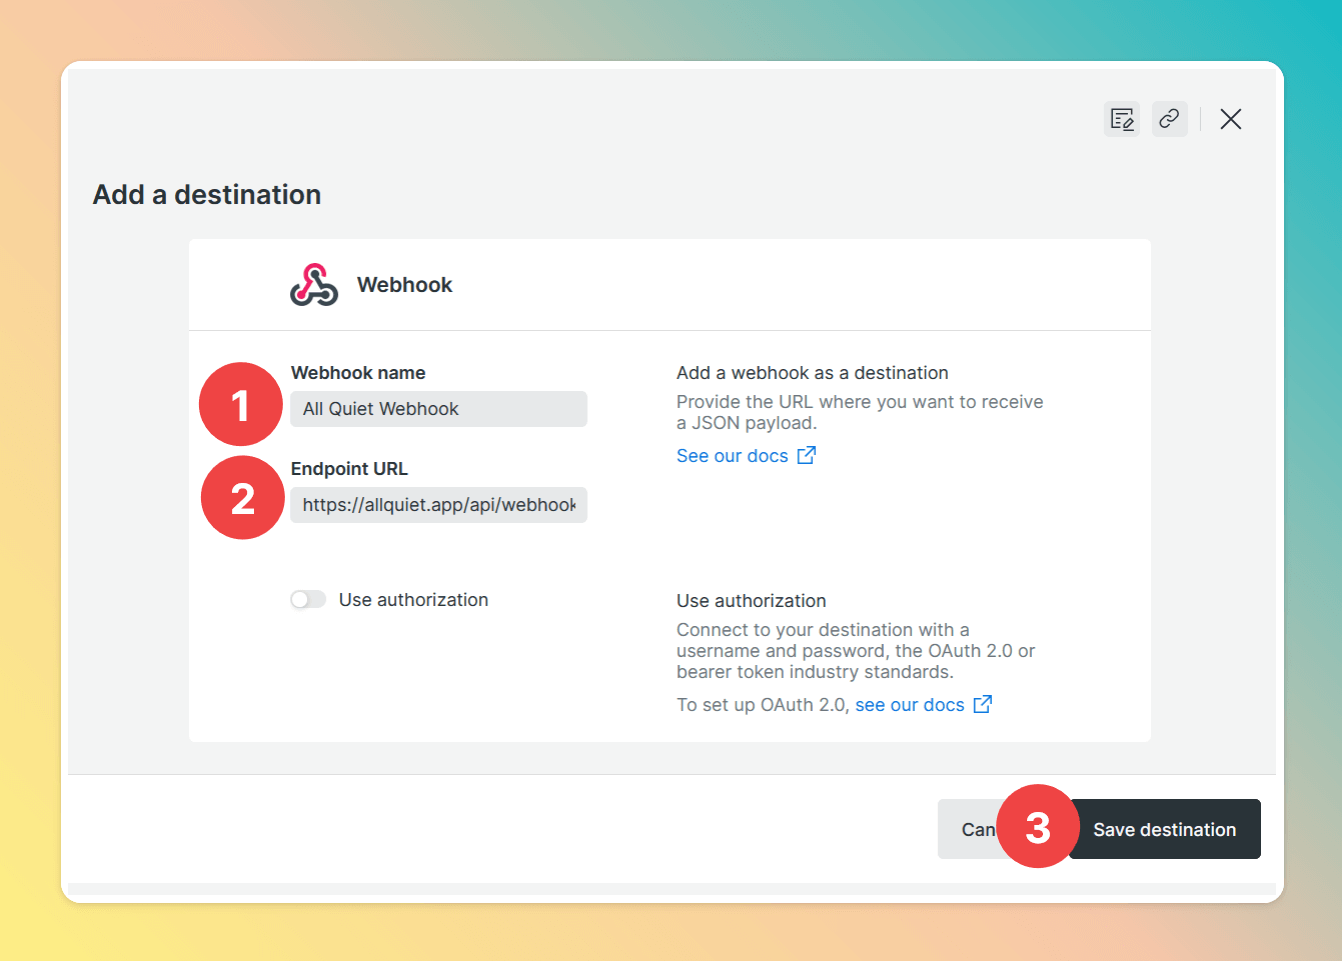
1. Enter a name for the Webhook, e.g. *"All Quiet Webhook"*
2. Paste the All Quiet webhook URL from [step 1.3.](/integrations/inbound/newrelic#1-3-get-the-all-quiet-webhook-url) into *Endpoint URL*
3. Click *"Save destination"*
### 2.5 Configure Webhook channel
1. Enter a name for the Webhook, e.g. *"All Quiet Webhook"*
2. Paste the All Quiet webhook URL from [step 1.3.](/integrations/inbound/newrelic#1-3-get-the-all-quiet-webhook-url) into *Endpoint URL*
3. Click *"Save destination"*
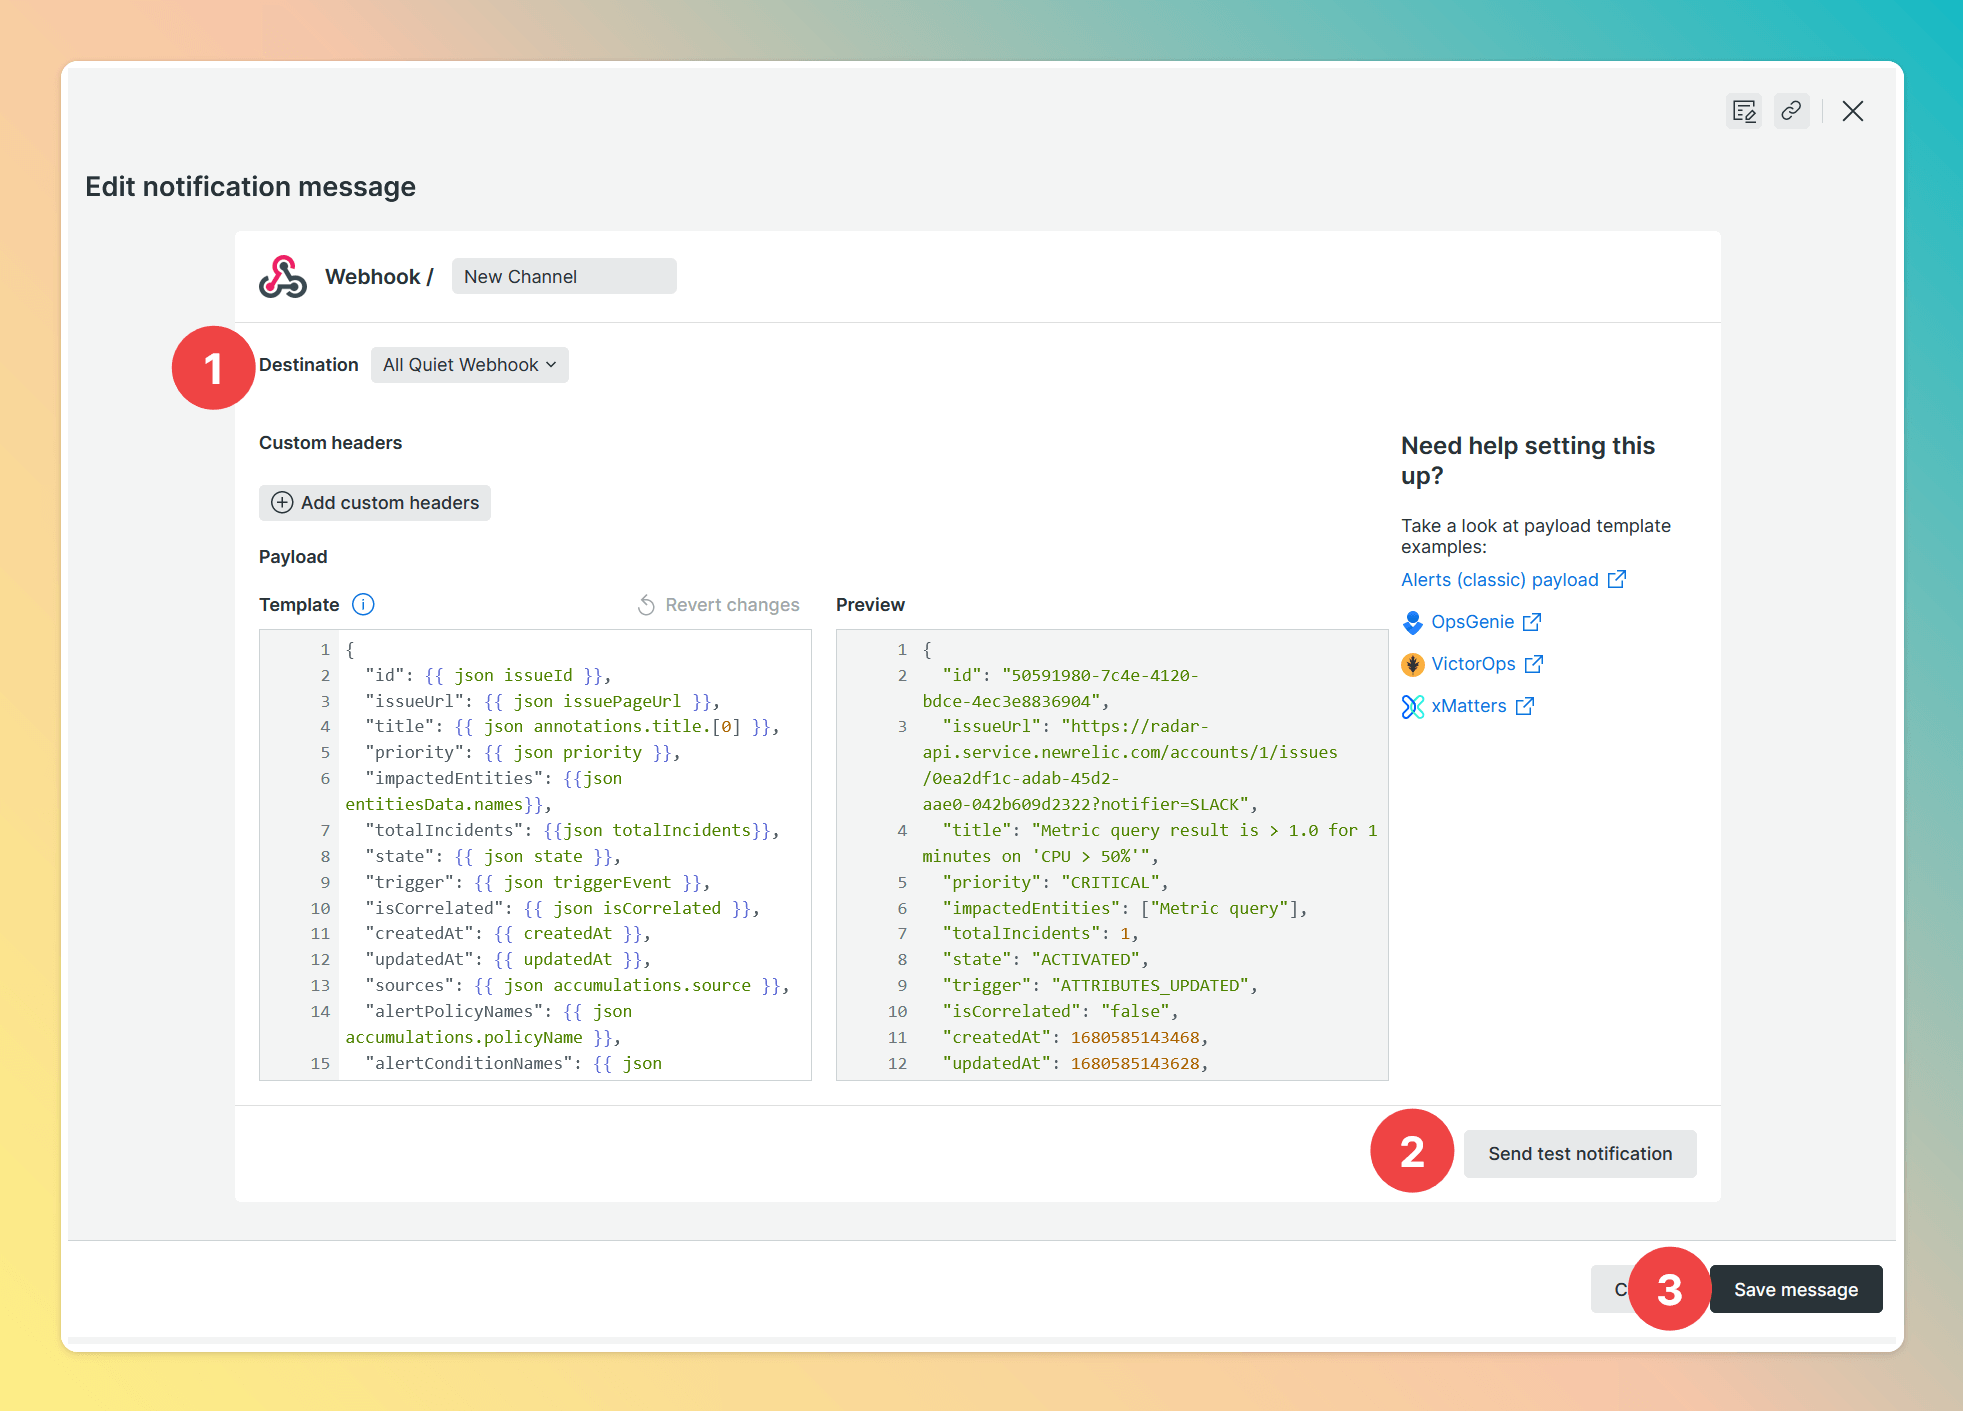
 ### 2.6 Finish editing notification message
1. Now that you've configured a new destination, select the corresponding item for the *"Destination"* field.
2. Click *`Send test notification`*. It's helpful to send a test notification to All Quiet so you can easily map the message payload on the All Quiet platform.
3. Click *`Save message`.*
### 2.6 Finish editing notification message
1. Now that you've configured a new destination, select the corresponding item for the *"Destination"* field.
2. Click *`Send test notification`*. It's helpful to send a test notification to All Quiet so you can easily map the message payload on the All Quiet platform.
3. Click *`Save message`.*
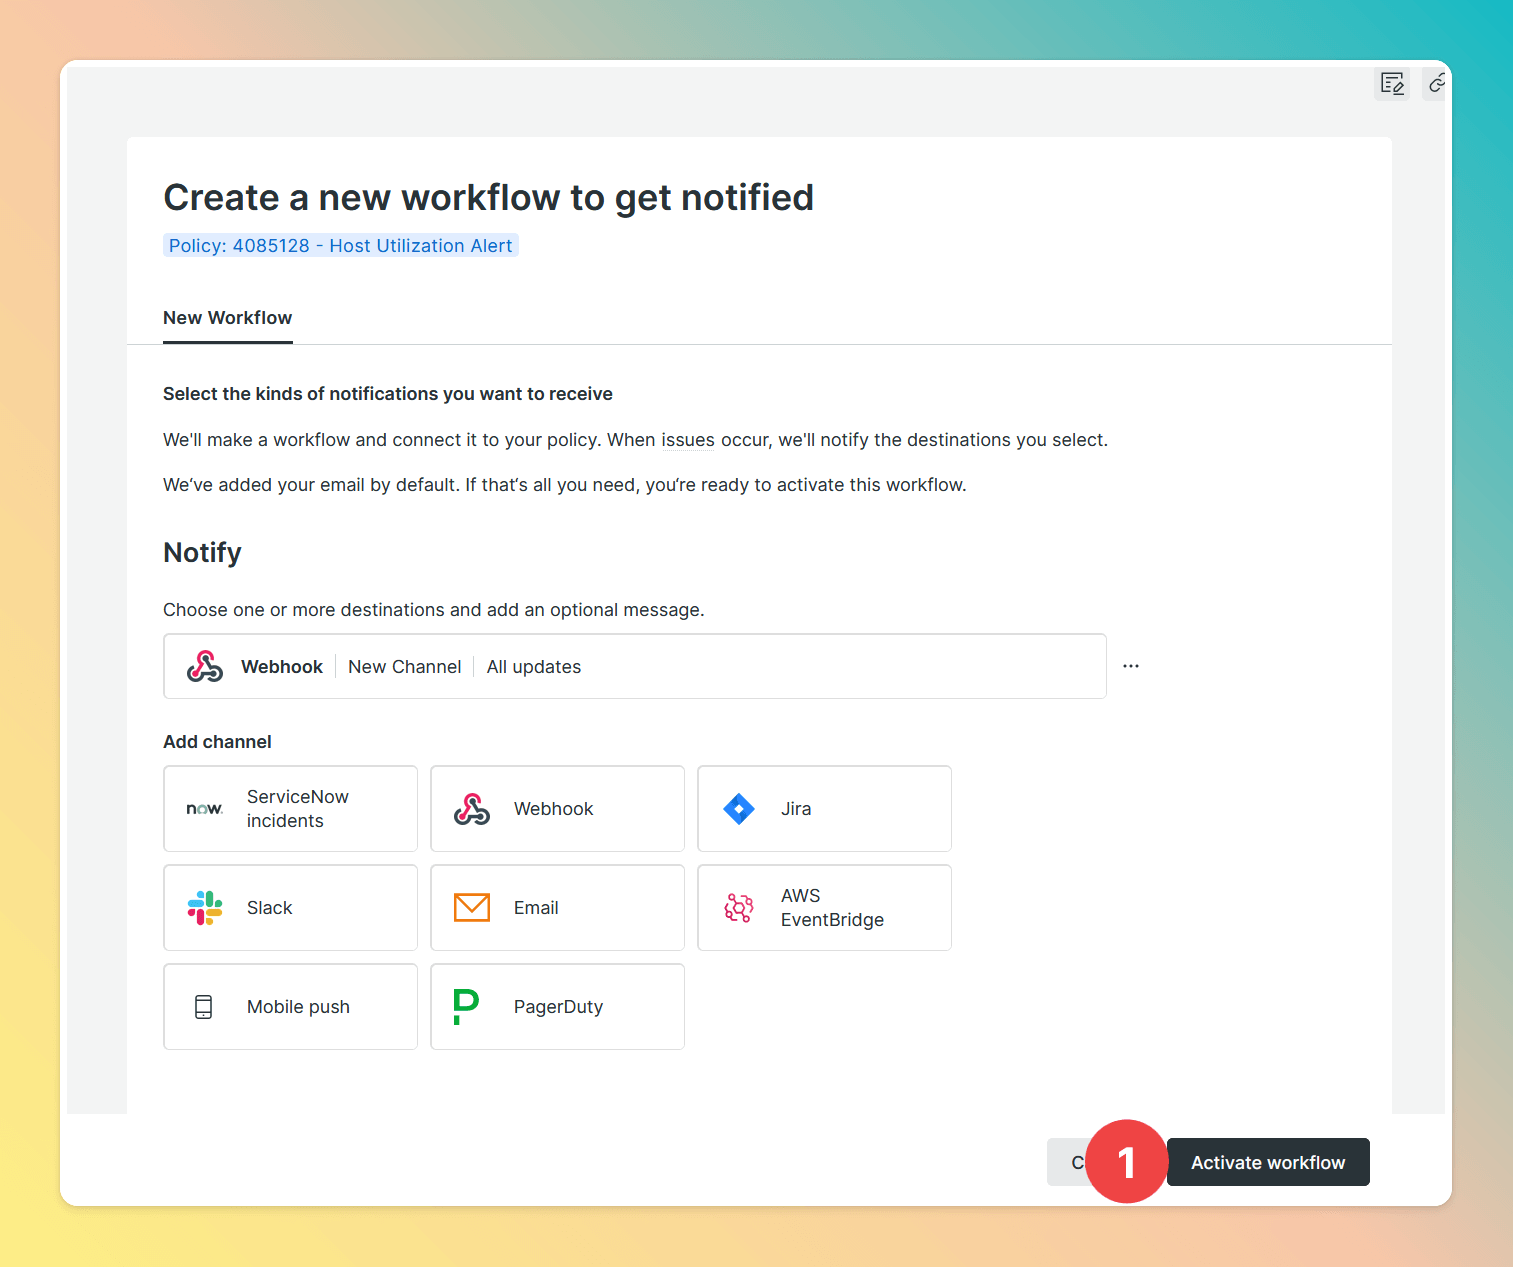
 ### 2.7. Active your workflow
Click `Activate Workflow`. Don't forget this step, otherwise, your workflow won't work!
### 2.7. Active your workflow
Click `Activate Workflow`. Don't forget this step, otherwise, your workflow won't work!
 ## 3. Test the New Relic notification message payload
You're almost done. 🥳 You can now test how New Relic's palyoad maps to your All Quiet incident:
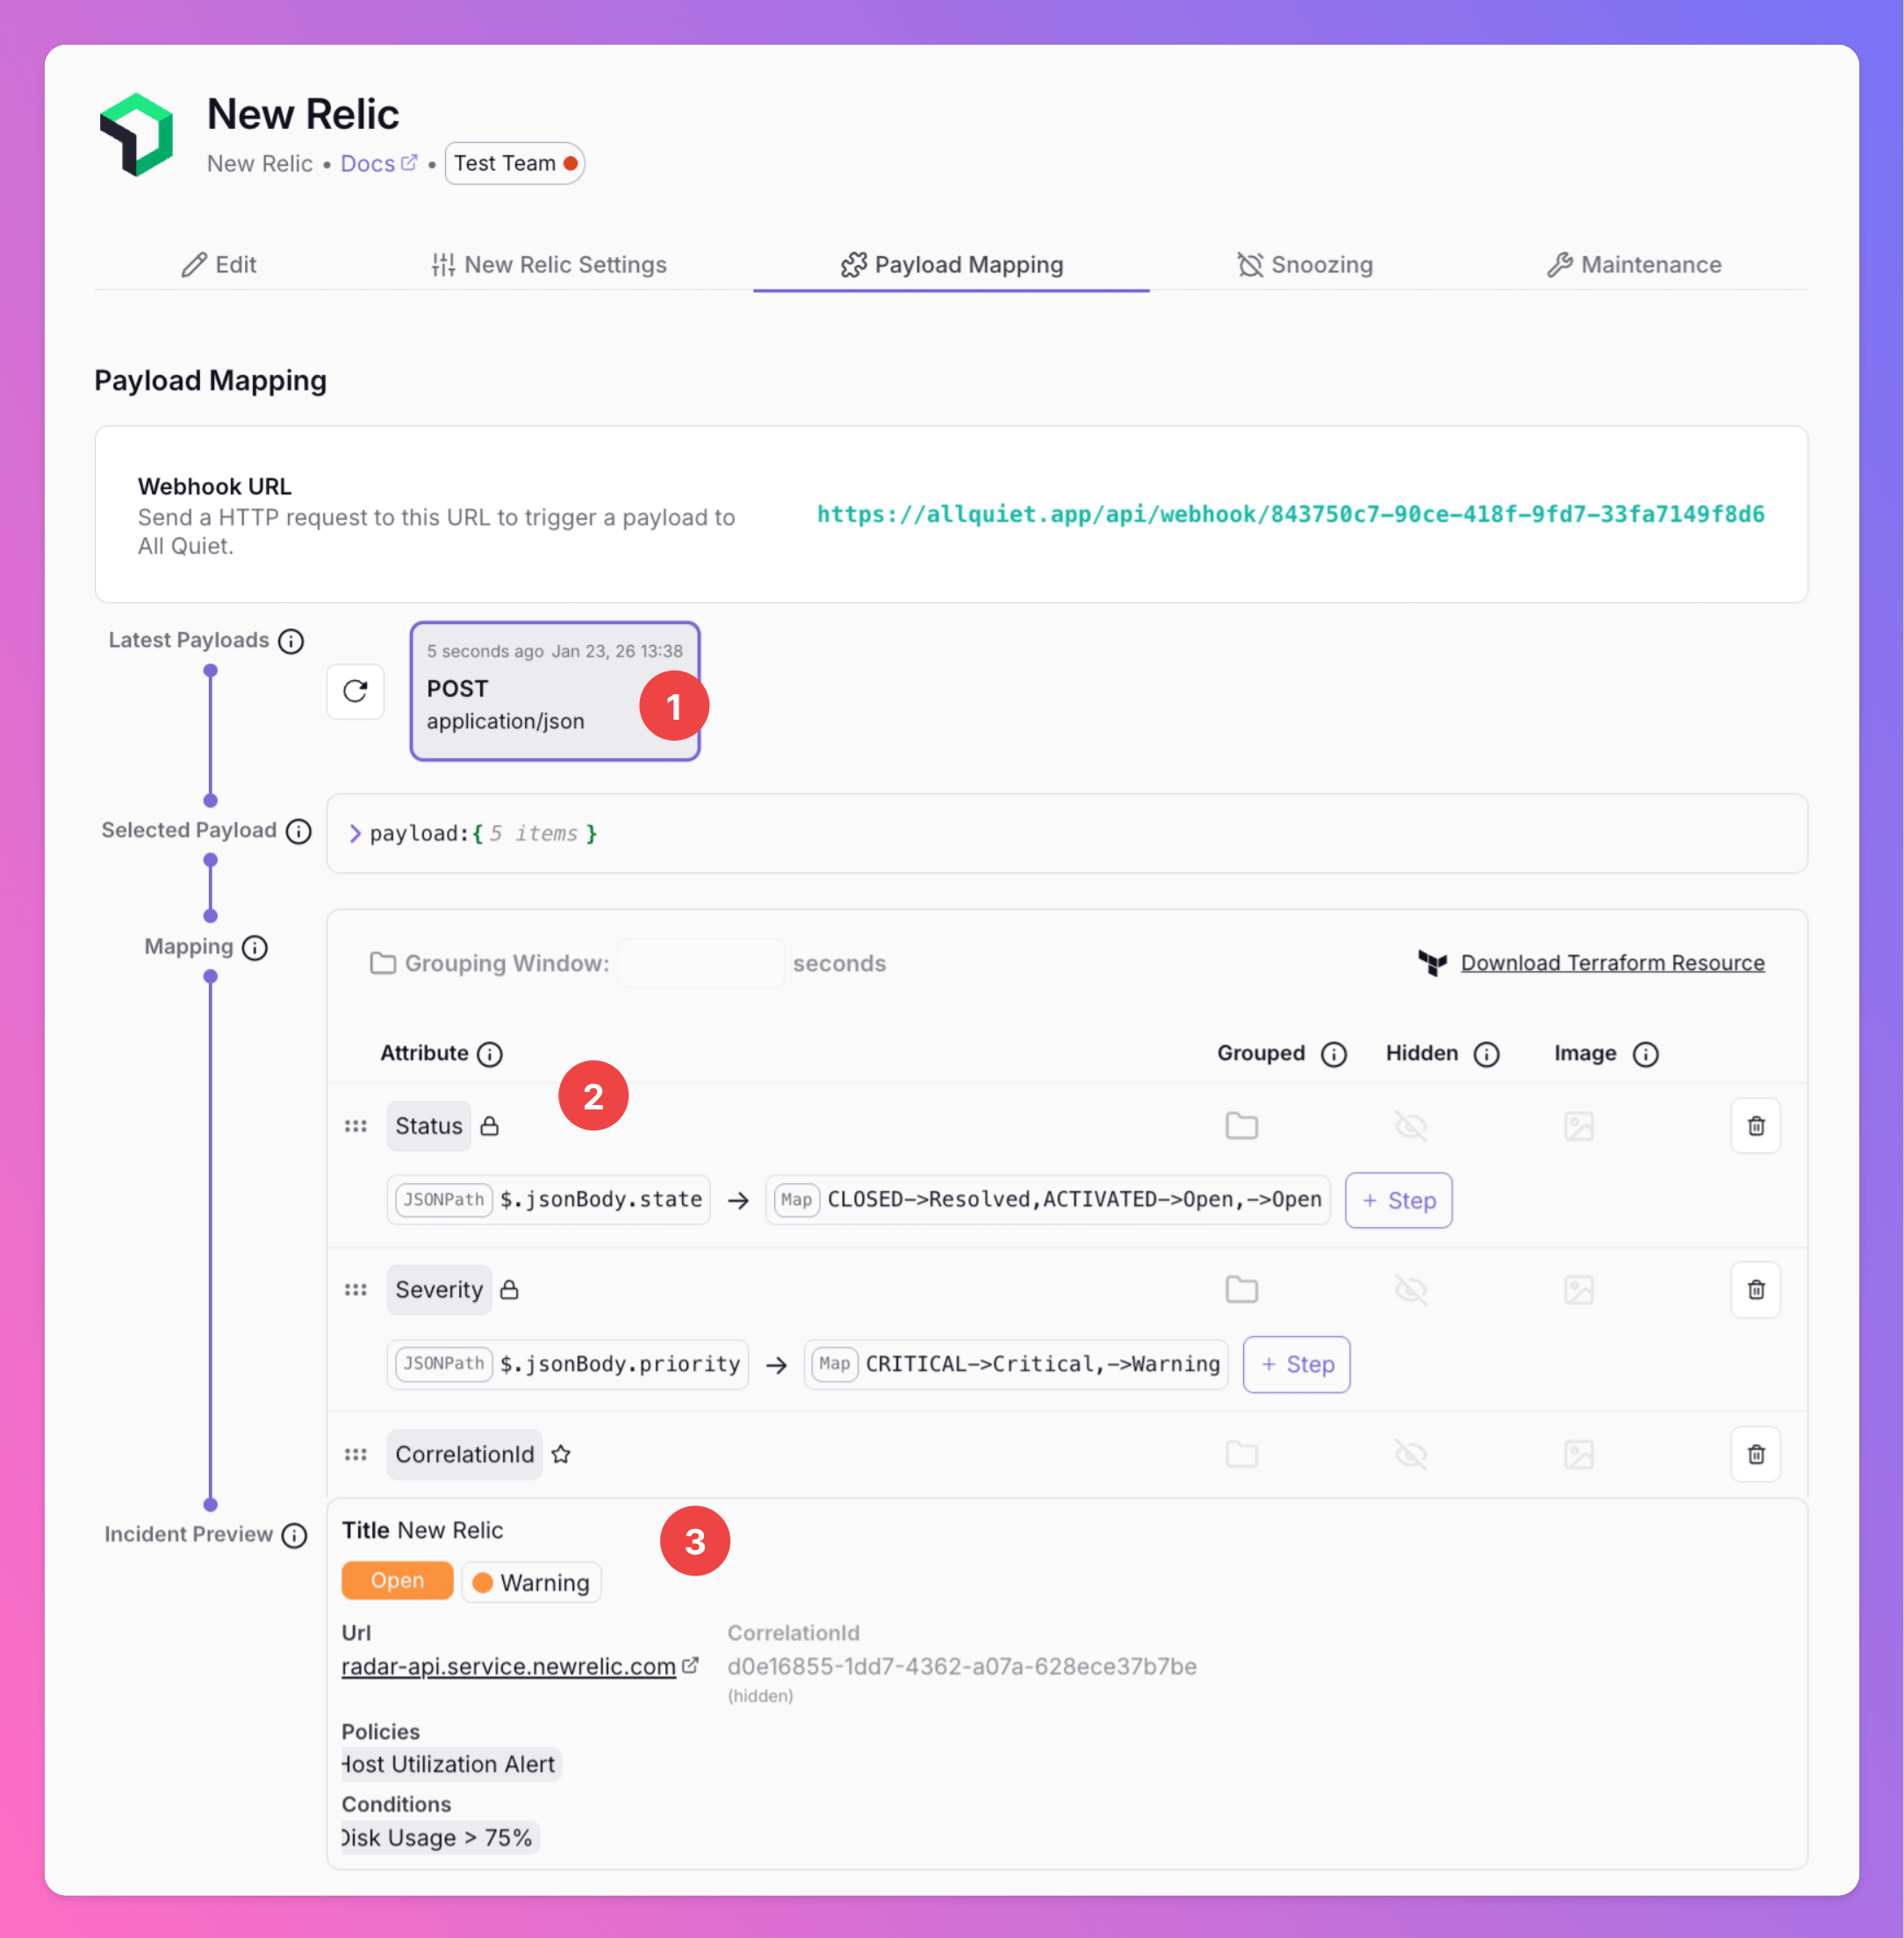
### 3.1 Load New Relic Payload
Go back to your All Quiet New Relic integration that you've created in [step 1.2.](/integrations/inbound/newrelic#1-2-select-new-relic-for-the-integration’s-type)
1. You will find the test notification payload New Relic sent to All Quiet.
2. With the our `Mapping` engine, you can transform New Relic alerts in any type of All Quiet incident that works for you.
3. Take a look at the incident preview at the bottom. It should be correctly mapped from New Relic's test notification.
## 3. Test the New Relic notification message payload
You're almost done. 🥳 You can now test how New Relic's palyoad maps to your All Quiet incident:
### 3.1 Load New Relic Payload
Go back to your All Quiet New Relic integration that you've created in [step 1.2.](/integrations/inbound/newrelic#1-2-select-new-relic-for-the-integration’s-type)
1. You will find the test notification payload New Relic sent to All Quiet.
2. With the our `Mapping` engine, you can transform New Relic alerts in any type of All Quiet incident that works for you.
3. Take a look at the incident preview at the bottom. It should be correctly mapped from New Relic's test notification.
 Webhook integration with New Relic is now successfully configured on All Quiet, enhancing incident response efficiency.
### 3.2 Adjust Payload Mapping
Looking to customize the fields of your incidents by adjusting the pre-built payload mapping? Simply head over to the “Payload” tab within your integration and make the necessary edits to the mapping. For detailed guidance, you may check out our [payload mapping documentation](/essentials/inbound#how-does-attribute-mapping-work).
Using our Terraform provider? [Download](https://allquiet.app/api/integrations/terraform/default/NewRelic.tf) the default mapping of the `allquiet_integration_mapping` resource for the New Relic integration. Simply copy the syntax to your .tf file and tailor the resource to your team's needs!
Webhook integration with New Relic is now successfully configured on All Quiet, enhancing incident response efficiency.
### 3.2 Adjust Payload Mapping
Looking to customize the fields of your incidents by adjusting the pre-built payload mapping? Simply head over to the “Payload” tab within your integration and make the necessary edits to the mapping. For detailed guidance, you may check out our [payload mapping documentation](/essentials/inbound#how-does-attribute-mapping-work).
Using our Terraform provider? [Download](https://allquiet.app/api/integrations/terraform/default/NewRelic.tf) the default mapping of the `allquiet_integration_mapping` resource for the New Relic integration. Simply copy the syntax to your .tf file and tailor the resource to your team's needs!