> ## Documentation Index
> Fetch the complete documentation index at: https://docs.allquiet.app/llms.txt
> Use this file to discover all available pages before exploring further.
# Elastic Observability
> Connect Your Elastic Observability Projects with All Quiet
Setup time: 5 Min
Easily integrate Elastic with All Quiet. Automatically forward alerts from your Elastic observability projects to All Quiet, streamline your incident response.
## 1. Create Elastic Integration on All Quiet
Sign in to your All Quiet account.
### Create Integration
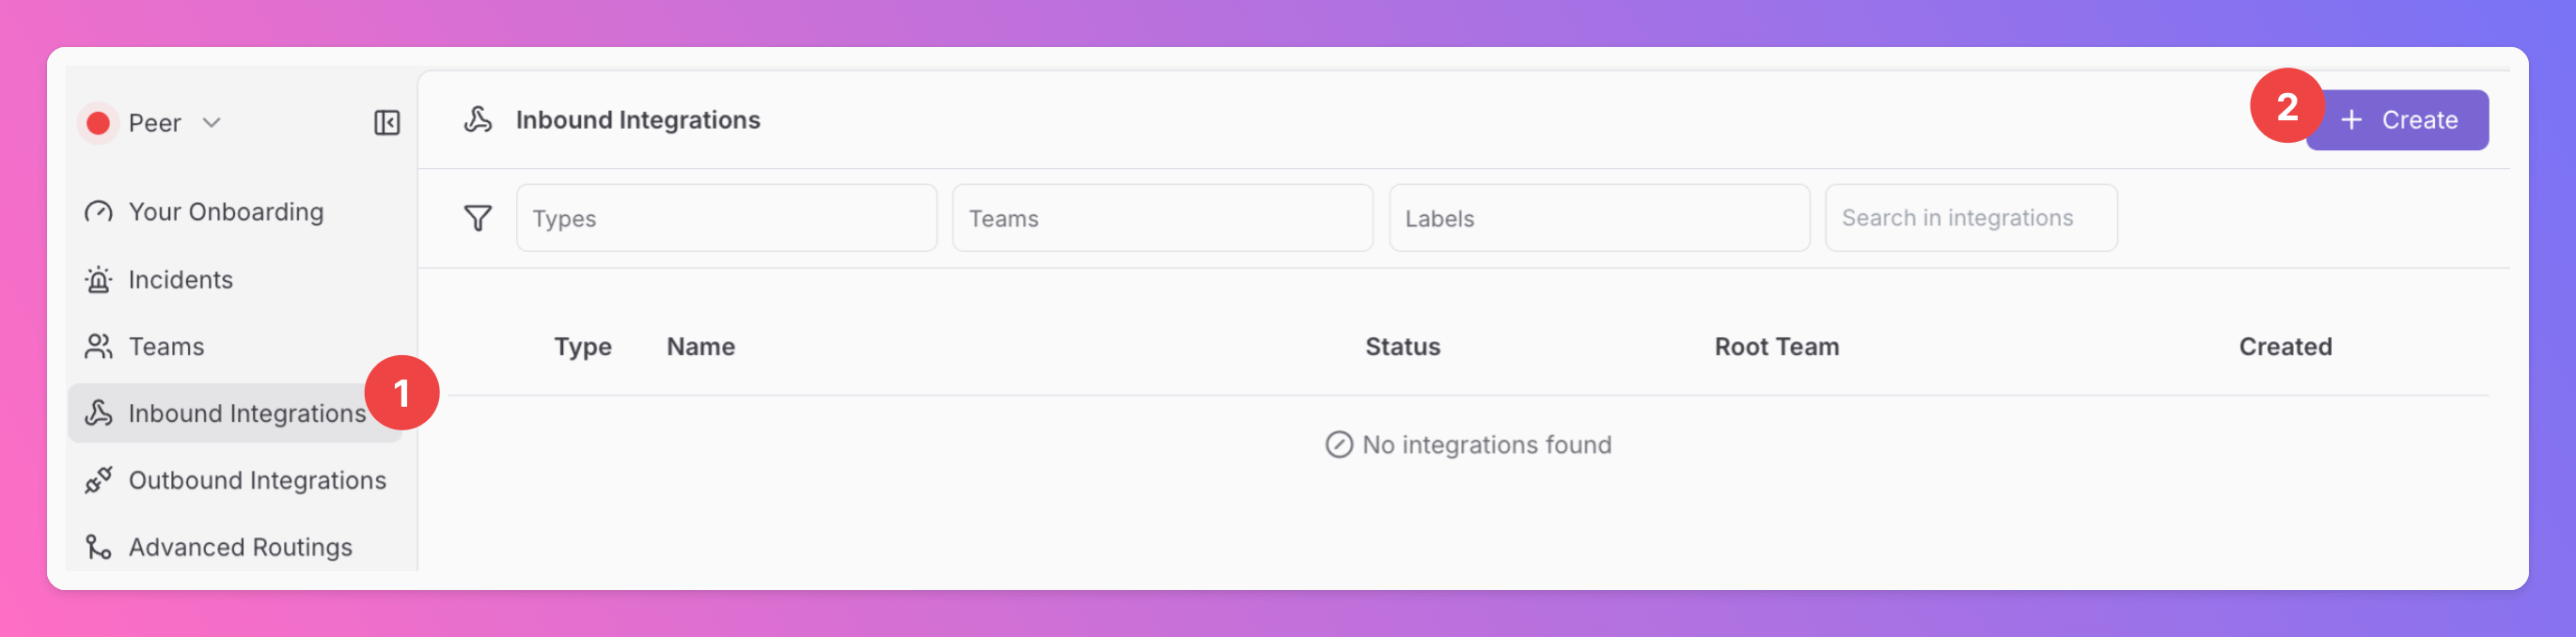
1. Click on the `Inbound Integrations` tab.
2. Click on `+ Create`.
 ### Select Elastic Observability as the Integration's Type
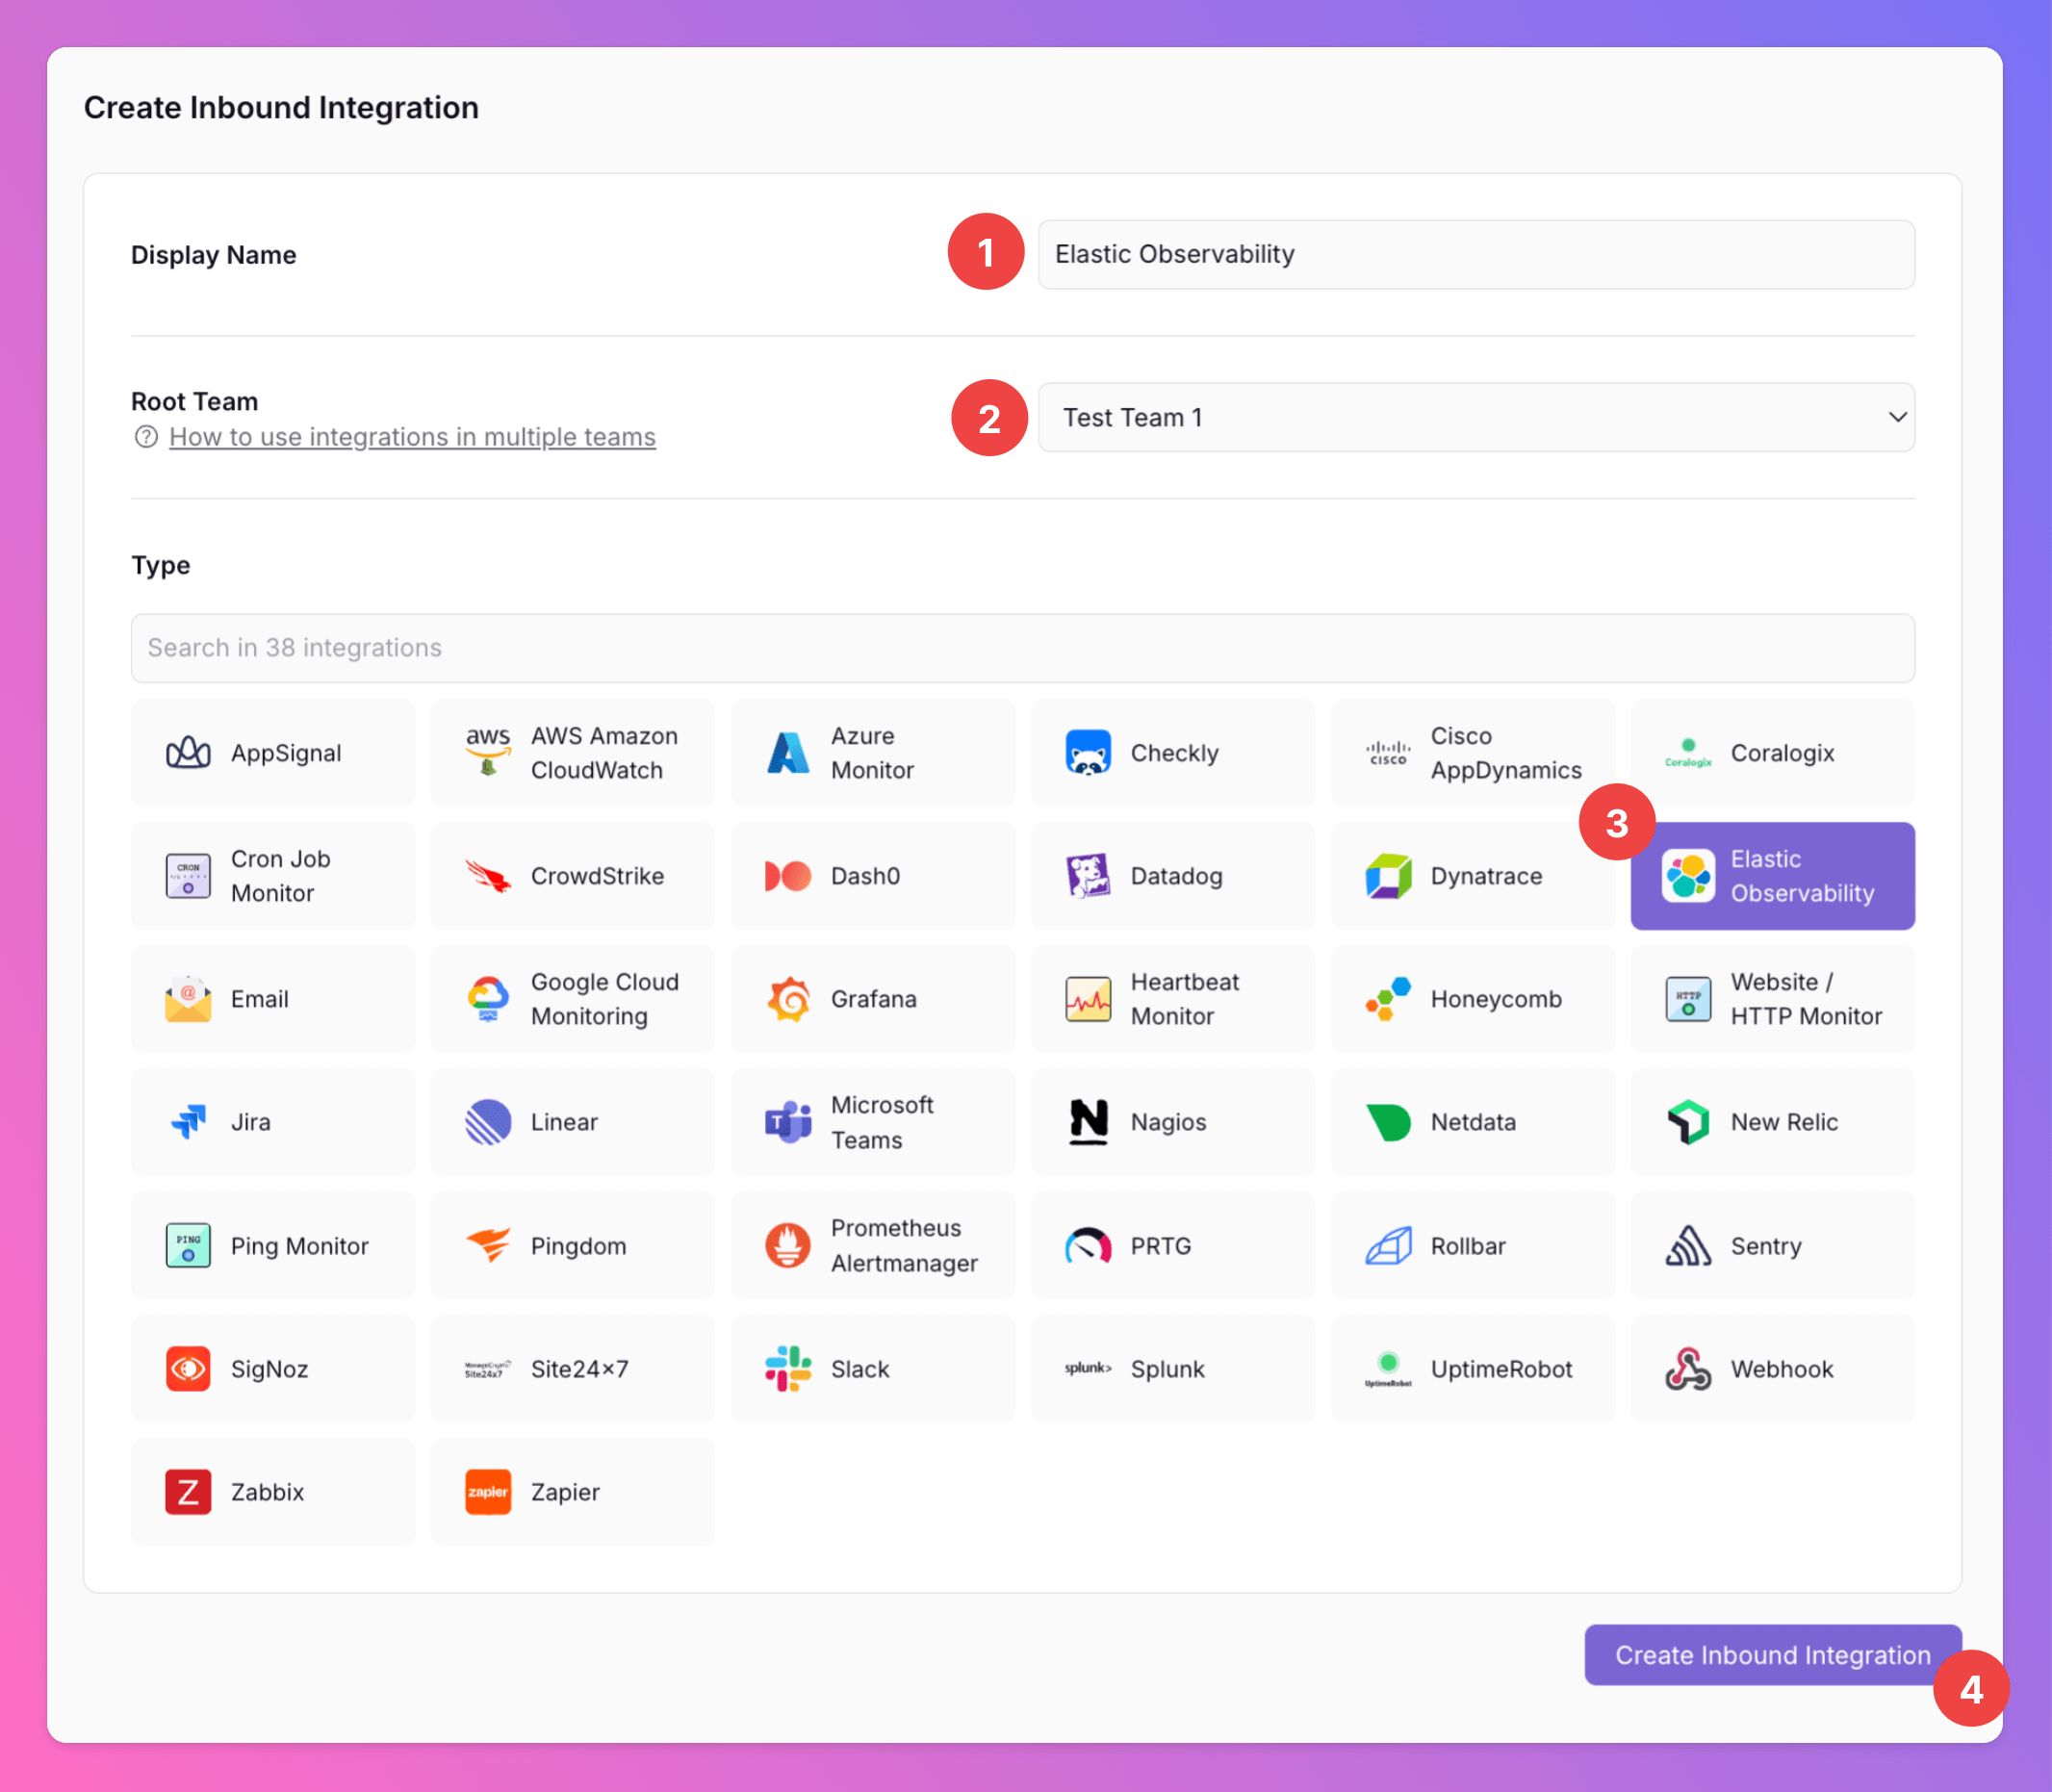
1. Enter a `Display Name` for your integration, e.g. "Elastic Observability".
2. Select a `Team`.
3. Select `Elastic Observability` as the integration's type.
4. Click `Create Inbound Integration`.
### Select Elastic Observability as the Integration's Type
1. Enter a `Display Name` for your integration, e.g. "Elastic Observability".
2. Select a `Team`.
3. Select `Elastic Observability` as the integration's type.
4. Click `Create Inbound Integration`.
 ### Get the All Quiet Webhook URL
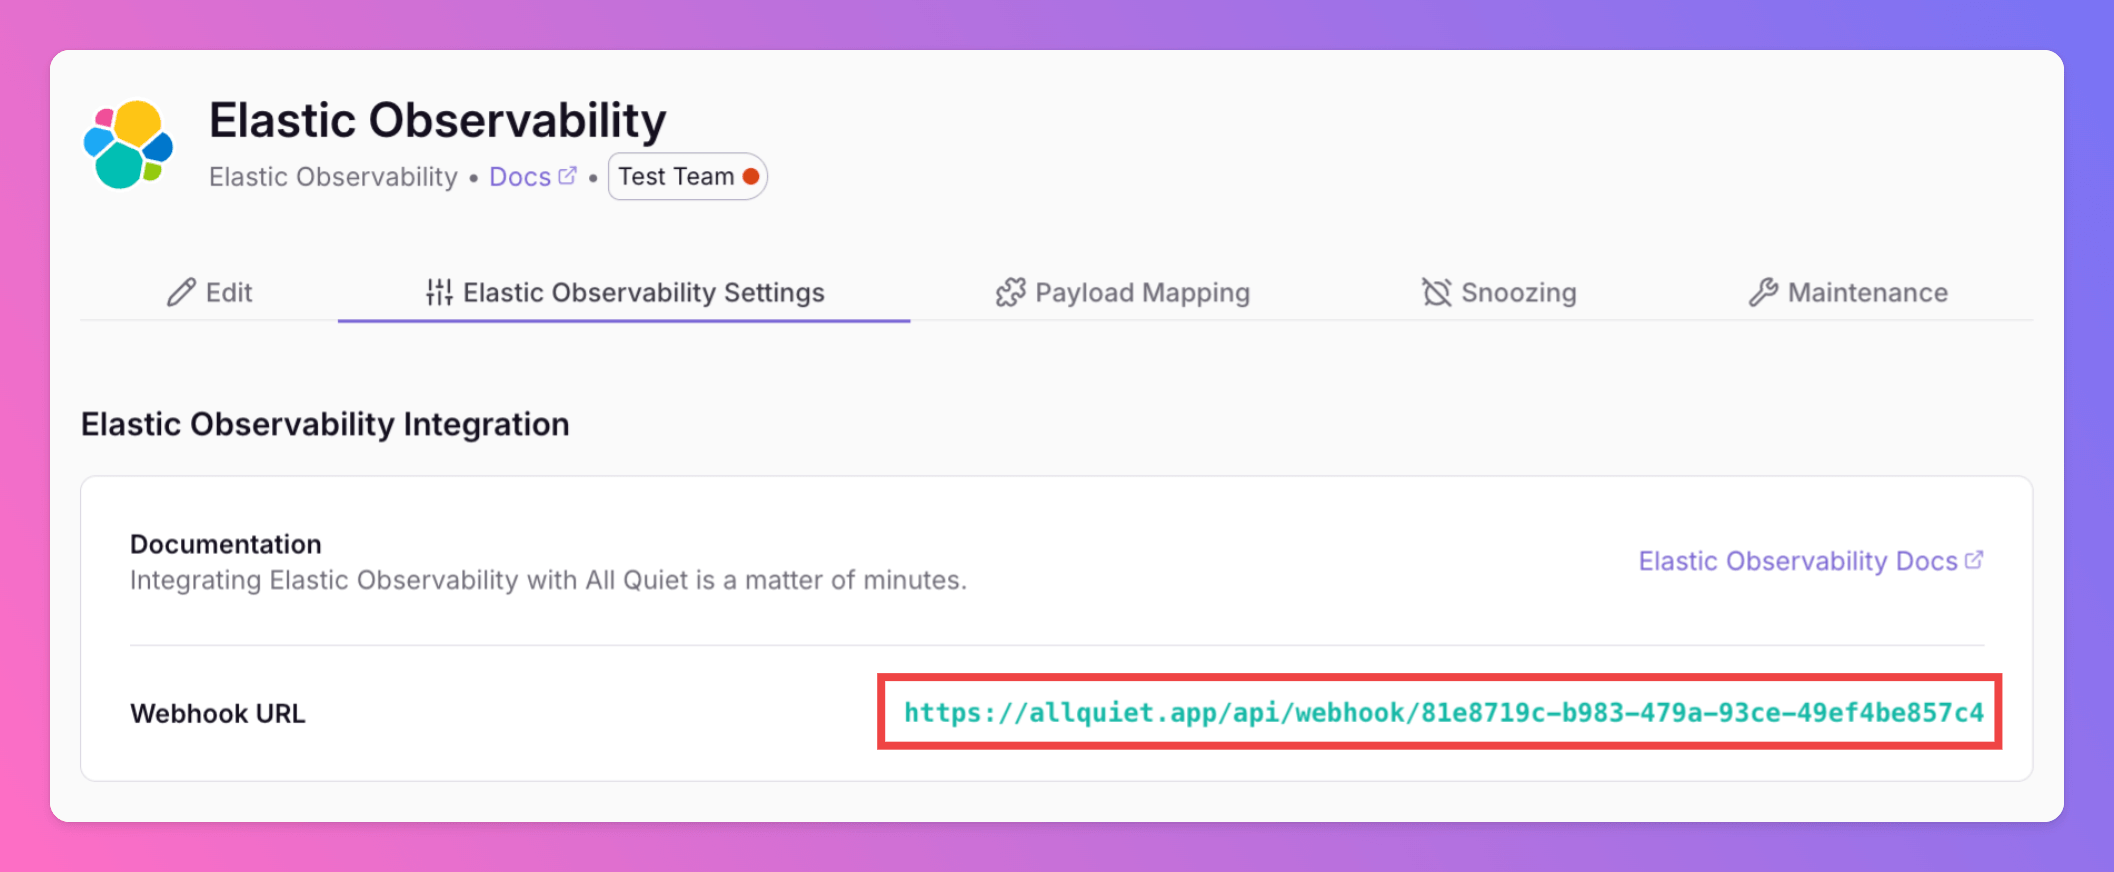
After creating the integration on All Quiet, you can view the unique All Quiet Webhook URL of your Elastic integration.
You will require it in step 2 when configuring the custom integration on Elastic.
### Get the All Quiet Webhook URL
After creating the integration on All Quiet, you can view the unique All Quiet Webhook URL of your Elastic integration.
You will require it in step 2 when configuring the custom integration on Elastic.
 Optionally toggle `Enable additional Authentication & Security` below the webhook URL to restrict who can POST payloads.
* **IP Filter** — Allow requests only from specific IPs or CIDR ranges. Failed checks return **404 Not Found**.
* **Bearer authentication** — Require `Authorization: Bearer YOUR_TOKEN`. Missing or invalid tokens return **401 Unauthorized**.
If both are enabled, the request must pass both checks to be accepted.
## 2. Configure a custom integration with Elastic Observability
Once you've set up an integration of type "Elastic Observability" with All Quiet, the next step is connect your Elastic Observability Project with All Quiet to forward Alerts to All Quiet.
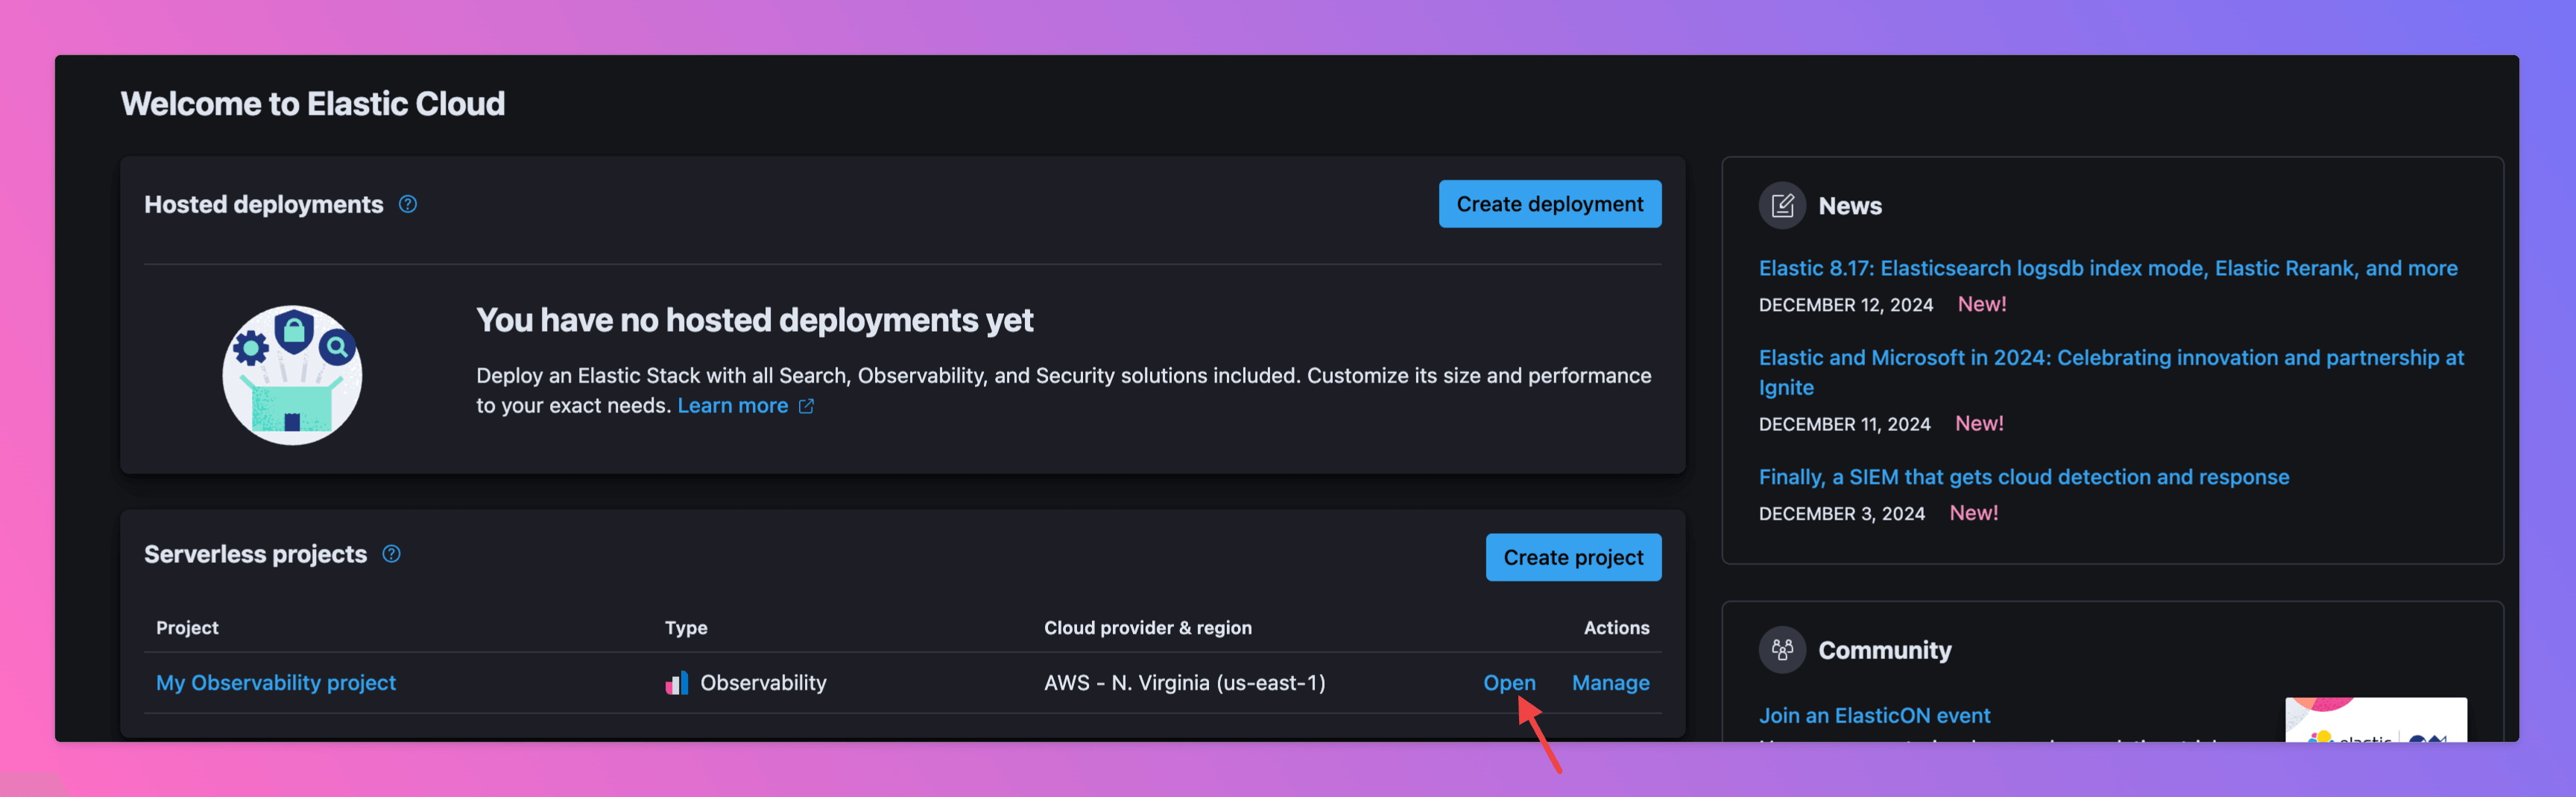
Sign in to your Elastic account and open the project you want to connect with All Quiet.
Optionally toggle `Enable additional Authentication & Security` below the webhook URL to restrict who can POST payloads.
* **IP Filter** — Allow requests only from specific IPs or CIDR ranges. Failed checks return **404 Not Found**.
* **Bearer authentication** — Require `Authorization: Bearer YOUR_TOKEN`. Missing or invalid tokens return **401 Unauthorized**.
If both are enabled, the request must pass both checks to be accepted.
## 2. Configure a custom integration with Elastic Observability
Once you've set up an integration of type "Elastic Observability" with All Quiet, the next step is connect your Elastic Observability Project with All Quiet to forward Alerts to All Quiet.
Sign in to your Elastic account and open the project you want to connect with All Quiet.
 ### Create Connector
To send alerts to All Quiet, you first need to create a connection with All Quiet. Here's how:
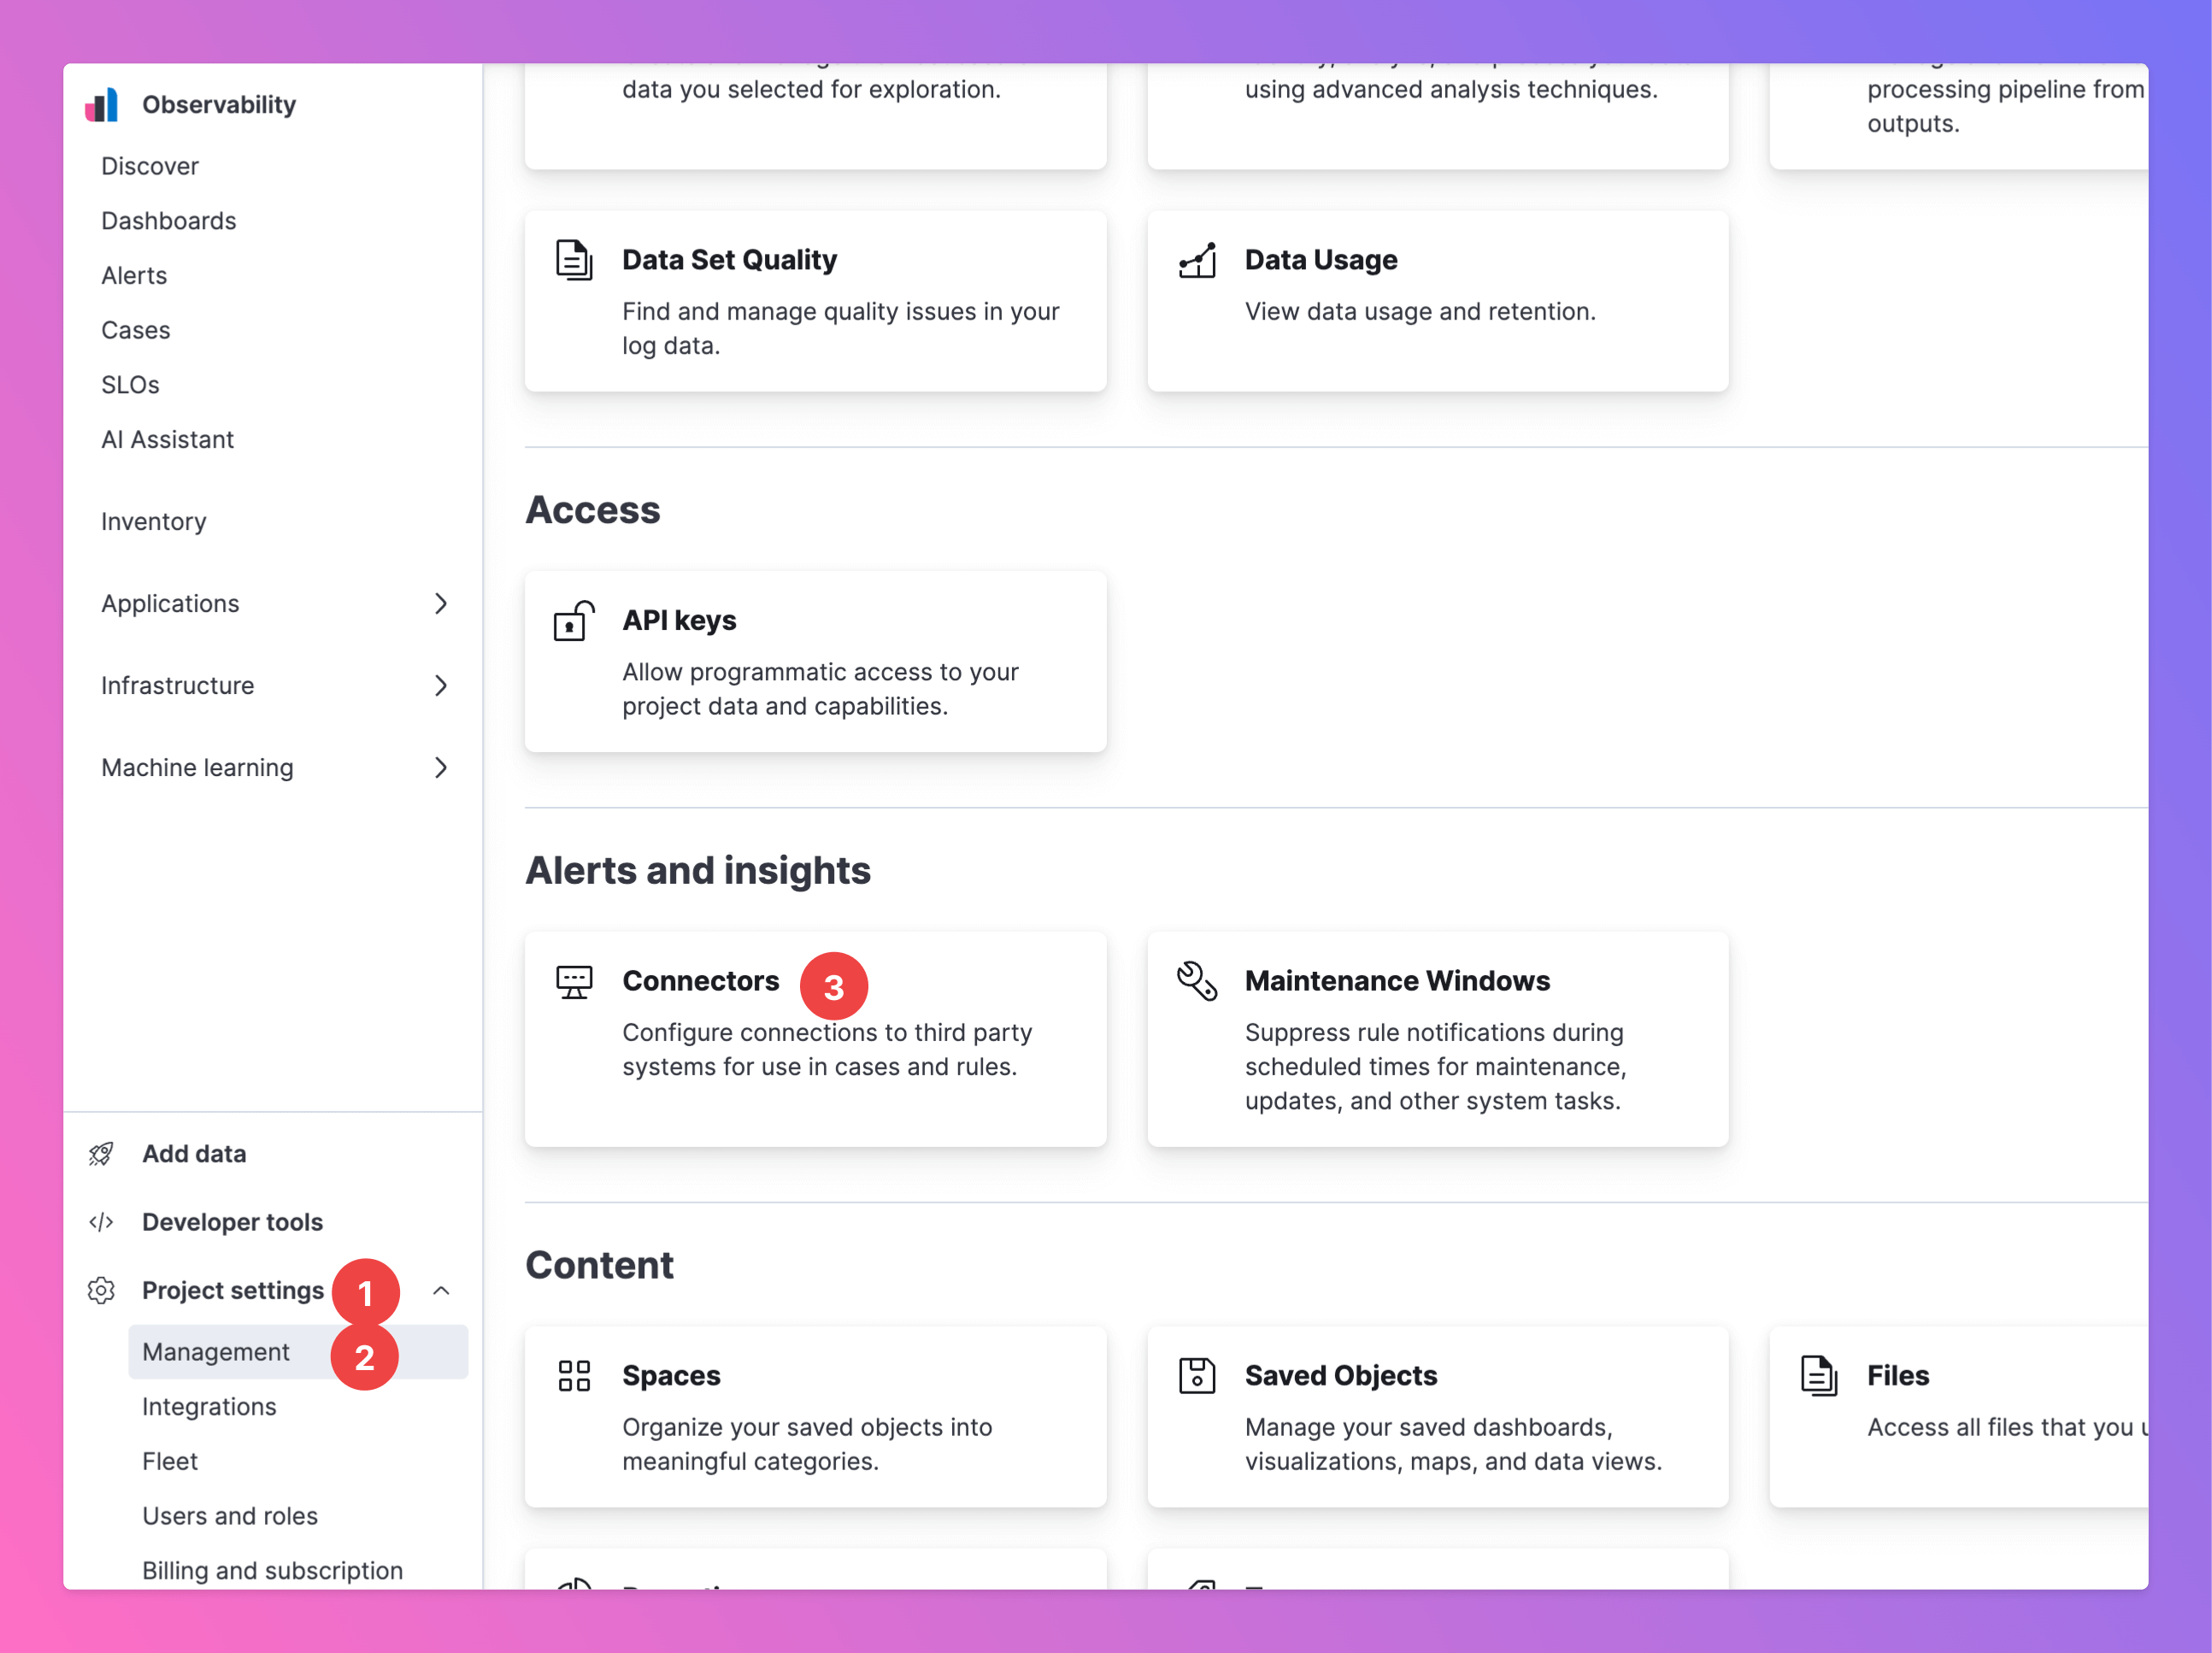
1. Click on `Project settings`.
2. Then, select `Management`.
3. In the Management section, select `Connectors`.
### Create Connector
To send alerts to All Quiet, you first need to create a connection with All Quiet. Here's how:
1. Click on `Project settings`.
2. Then, select `Management`.
3. In the Management section, select `Connectors`.
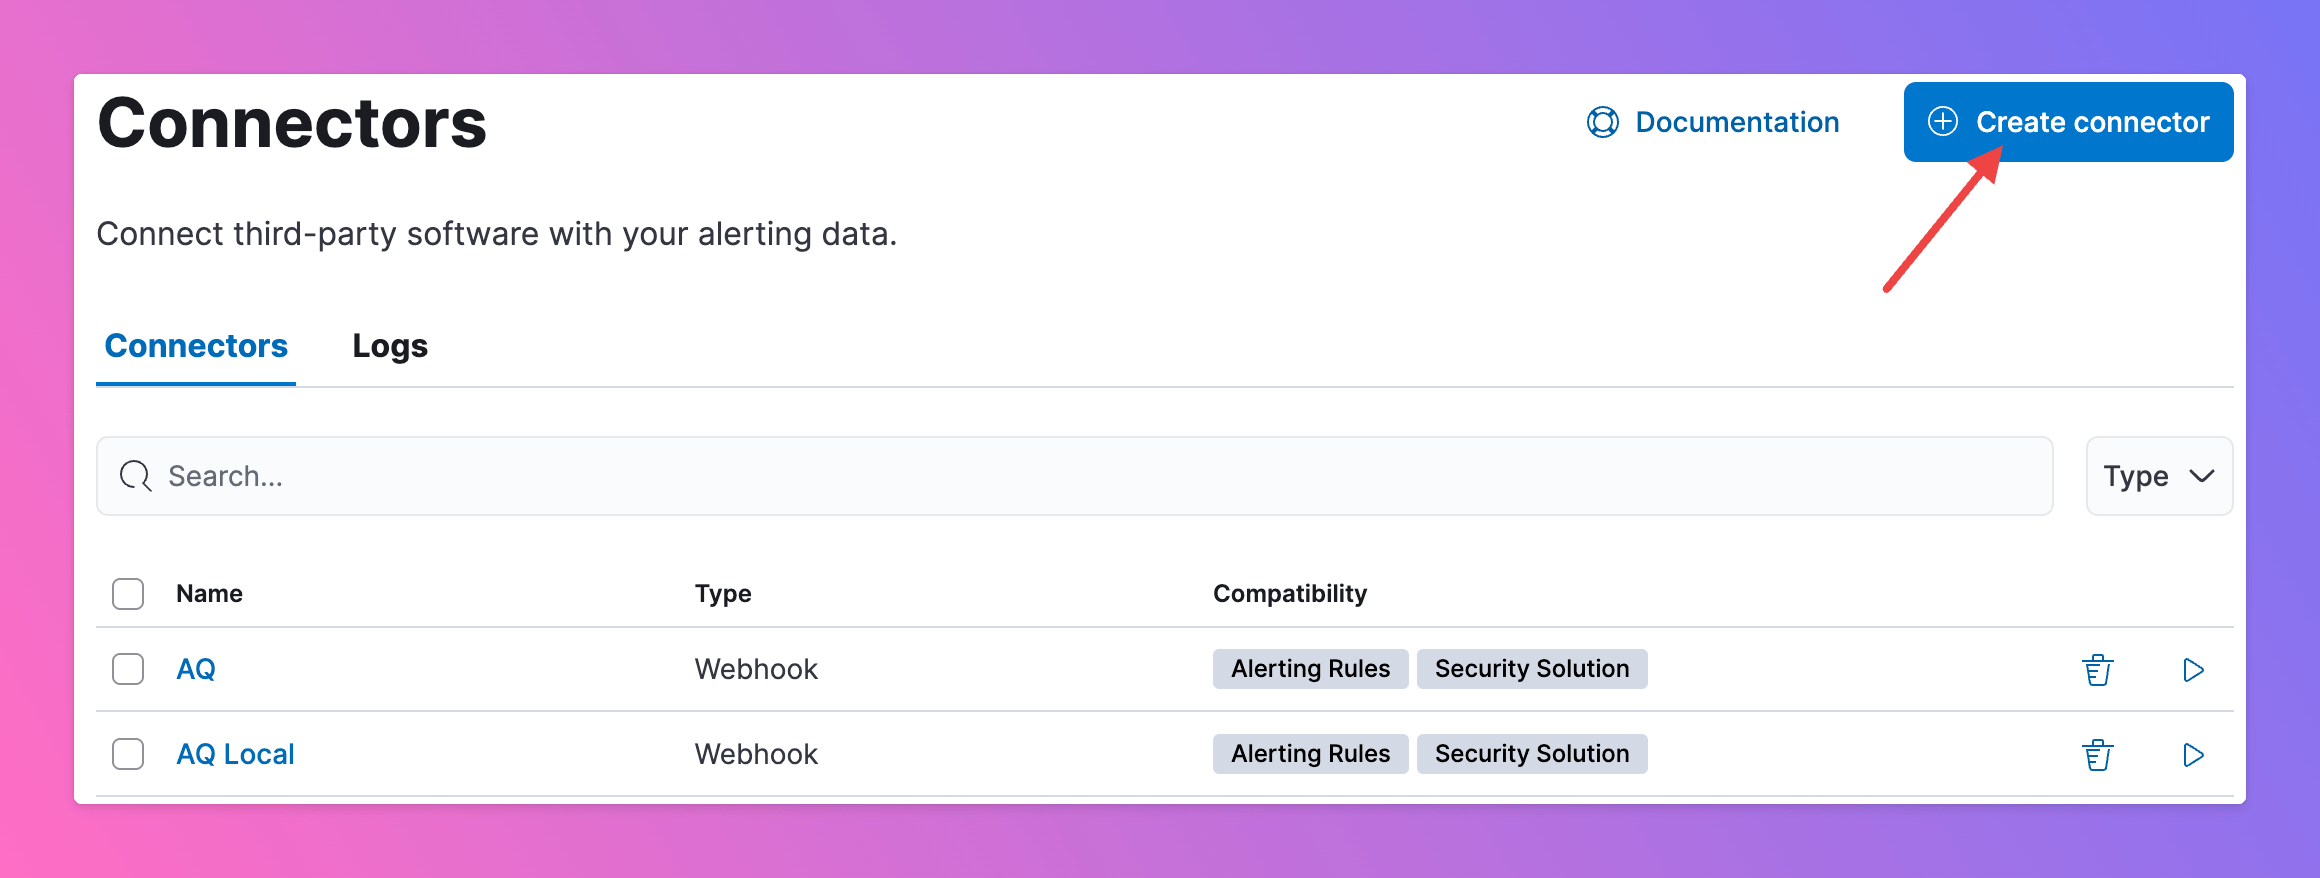
 Click `Create connector`.
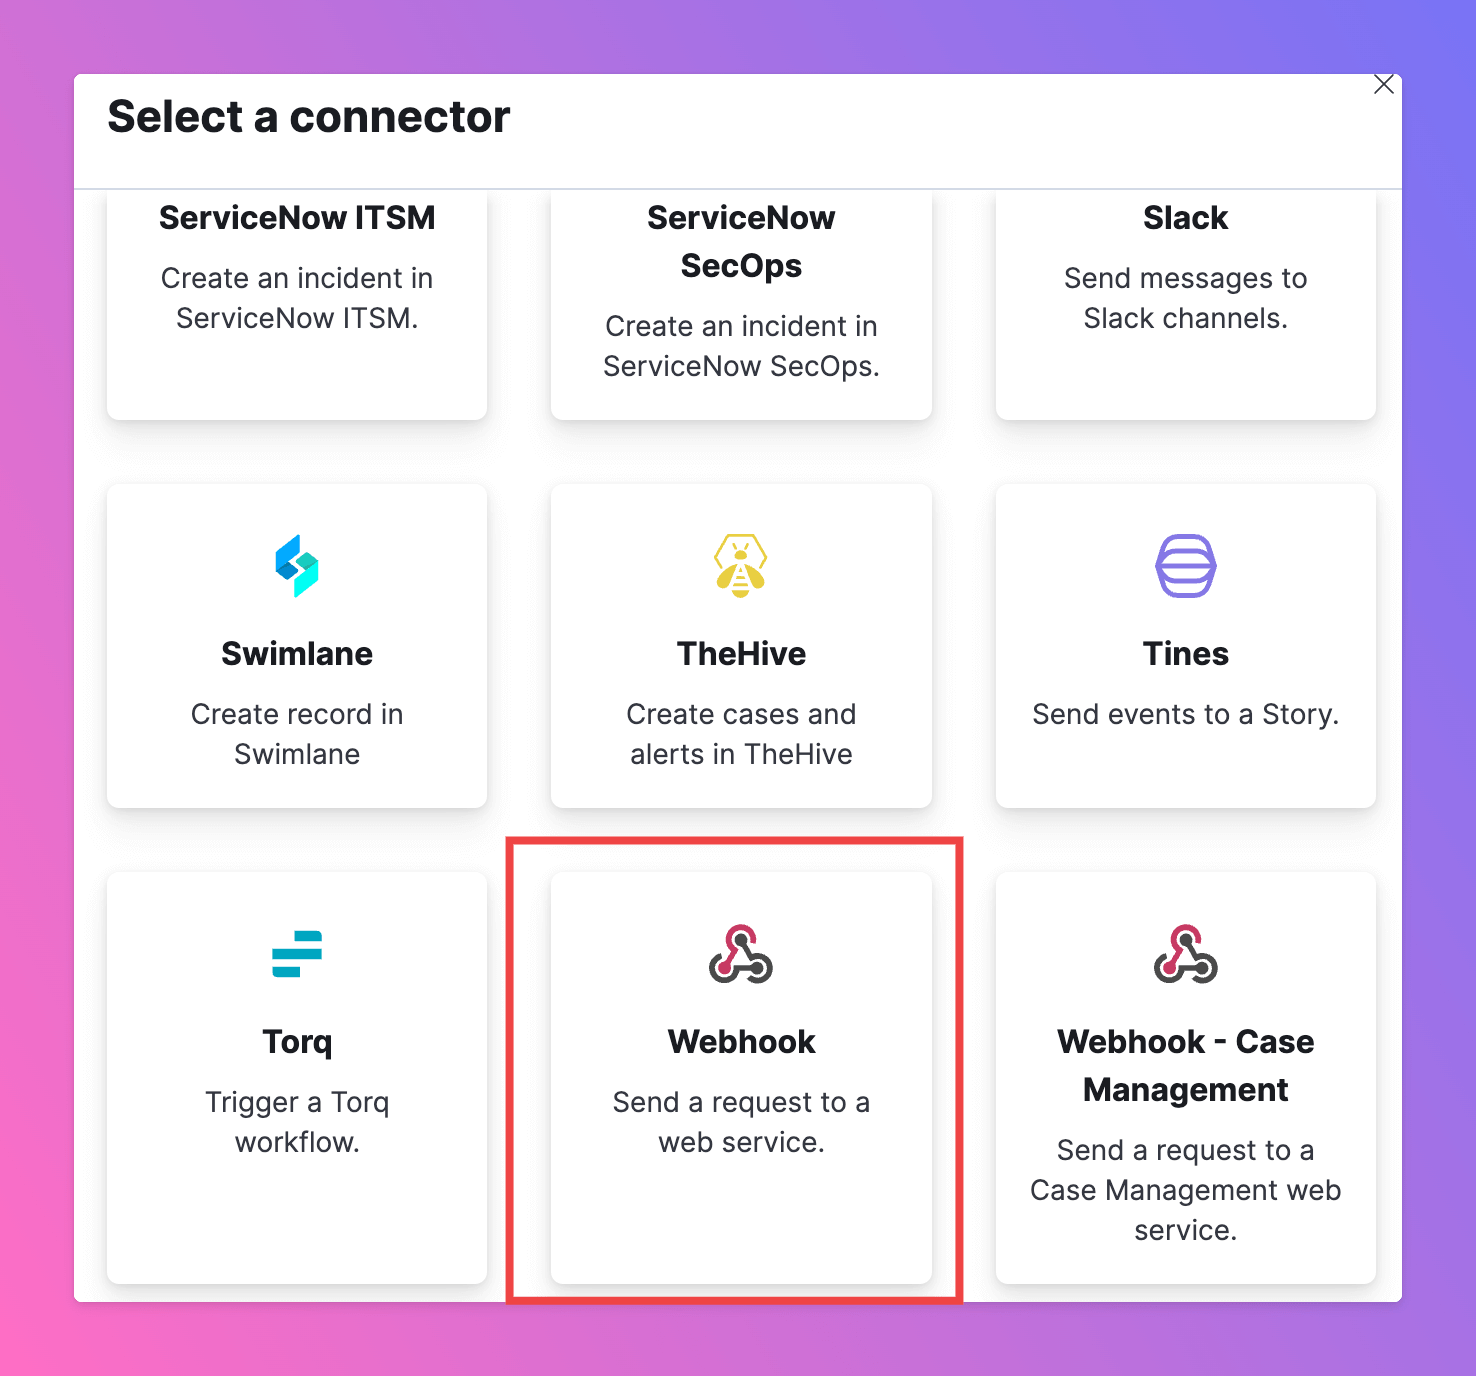
 As connector, select `Webhook`.
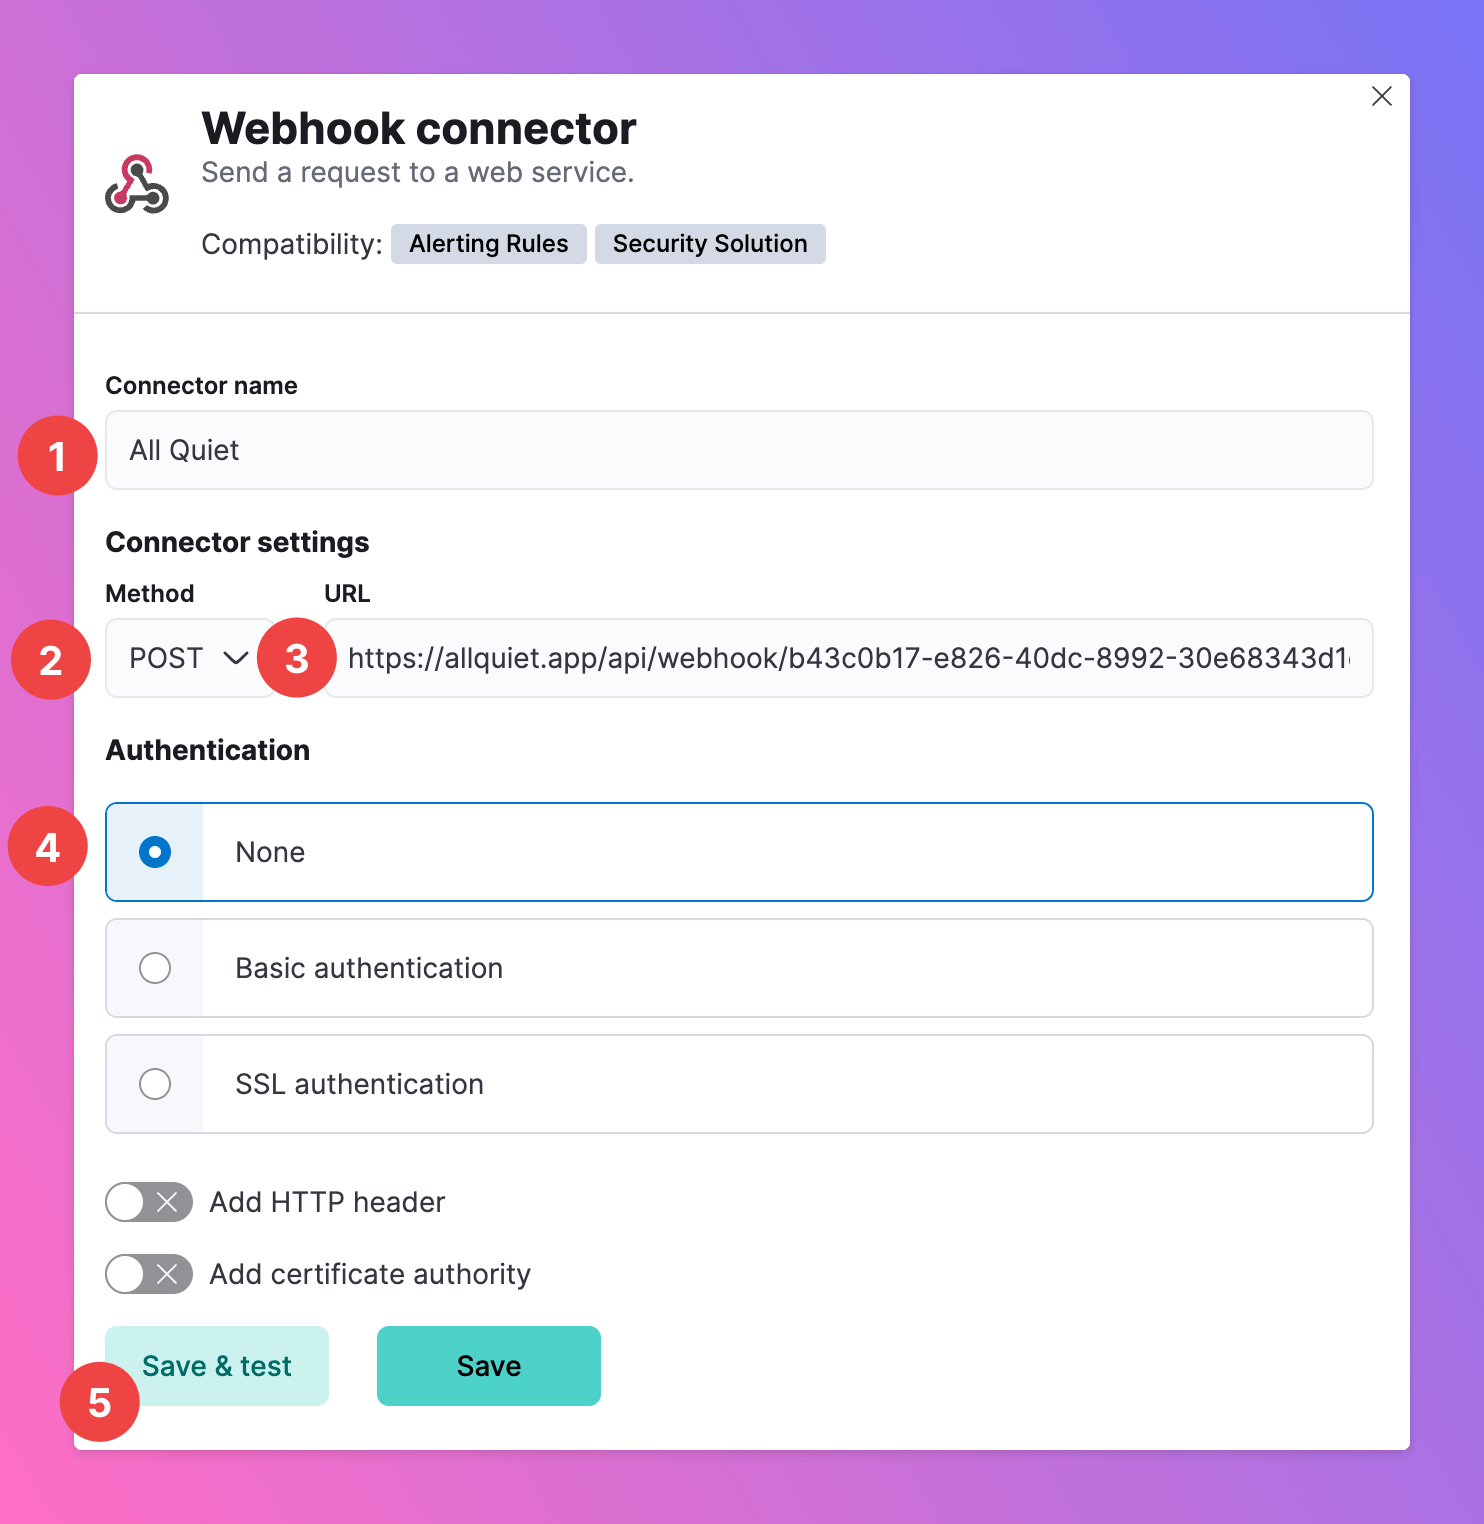
 Set up a webhook that you can use to connect Elastic with All Quiet.
1. Select a name, e.g. `All Quiet`
2. As Method, select `Post`.
3. As `URL`, paste in the All Quiet Webhook URL you've obtained in step [Get the All Quiet Webhook URL](/integrations/inbound/elastic-observability#get-the-all-quiet-webhook-url).
4. As authentication method, select `None`.
5. Then, click `Save & Test`. In the next step, we can check if the connection was successful.
Set up a webhook that you can use to connect Elastic with All Quiet.
1. Select a name, e.g. `All Quiet`
2. As Method, select `Post`.
3. As `URL`, paste in the All Quiet Webhook URL you've obtained in step [Get the All Quiet Webhook URL](/integrations/inbound/elastic-observability#get-the-all-quiet-webhook-url).
4. As authentication method, select `None`.
5. Then, click `Save & Test`. In the next step, we can check if the connection was successful.
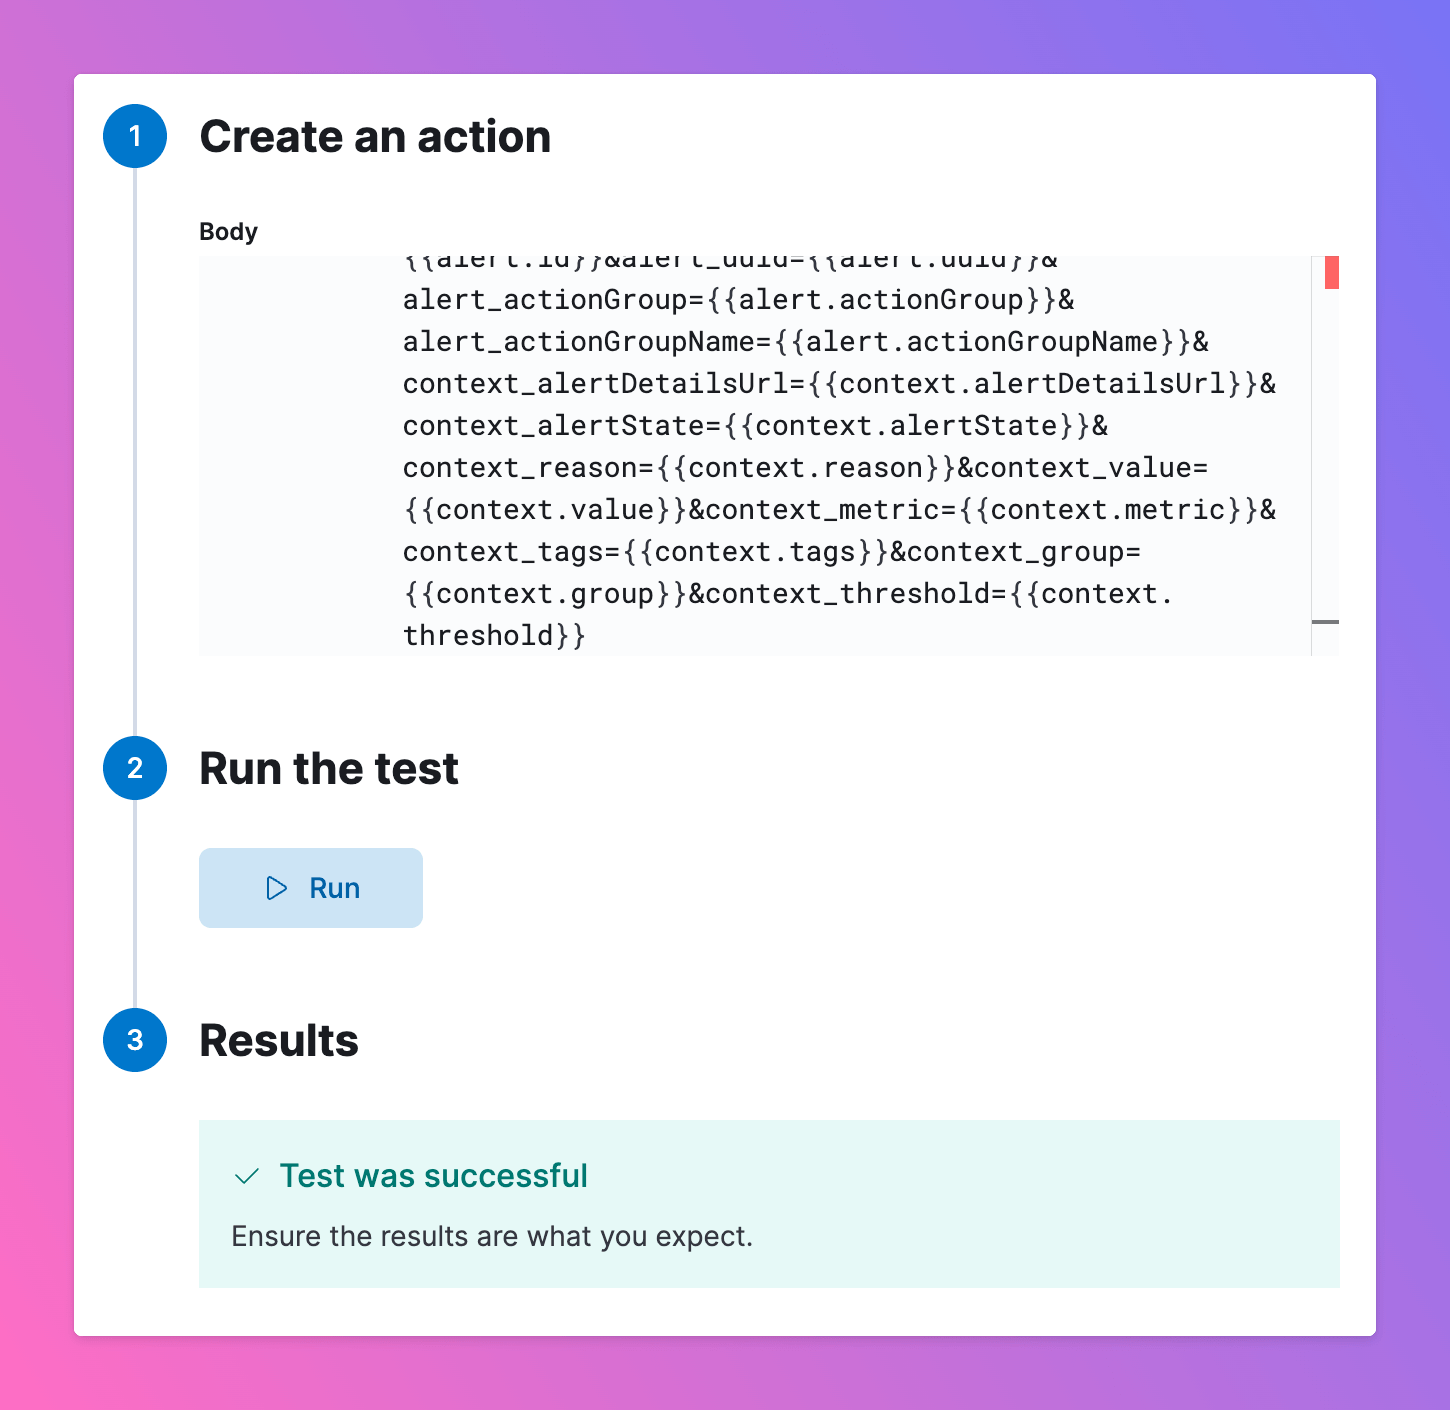
 1. To test the connection, paste in the following body. You will also need it later when configuring rules for [real alerts](/integrations/inbound/elastic-observability#create-all-quiet-incidents-from-elastic-observability-alerts).
```Body elastic-observability-payload theme={null}
rule_url={{rule.url}}&rule_name={{rule.name}}&rule_type={{rule.type}}&rule_params={{rule.params}}&alert_id={{alert.id}}&alert_uuid={{alert.uuid}}&alert_actionGroup={{alert.actionGroup}}&alert_actionGroupName={{alert.actionGroupName}}&context_alertDetailsUrl={{context.alertDetailsUrl}}&context_alertState={{context.alertState}}&context_reason={{context.reason}}&context_value={{context.value}}&context_metric={{context.metric}}&context_tags={{context.tags}}&context_group={{context.group}}&context_threshold={{context.threshold}}
```
2. Click `Run`.
3. If the connection was establish, you will receive a sucess notification...
1. To test the connection, paste in the following body. You will also need it later when configuring rules for [real alerts](/integrations/inbound/elastic-observability#create-all-quiet-incidents-from-elastic-observability-alerts).
```Body elastic-observability-payload theme={null}
rule_url={{rule.url}}&rule_name={{rule.name}}&rule_type={{rule.type}}&rule_params={{rule.params}}&alert_id={{alert.id}}&alert_uuid={{alert.uuid}}&alert_actionGroup={{alert.actionGroup}}&alert_actionGroupName={{alert.actionGroupName}}&context_alertDetailsUrl={{context.alertDetailsUrl}}&context_alertState={{context.alertState}}&context_reason={{context.reason}}&context_value={{context.value}}&context_metric={{context.metric}}&context_tags={{context.tags}}&context_group={{context.group}}&context_threshold={{context.threshold}}
```
2. Click `Run`.
3. If the connection was establish, you will receive a sucess notification...
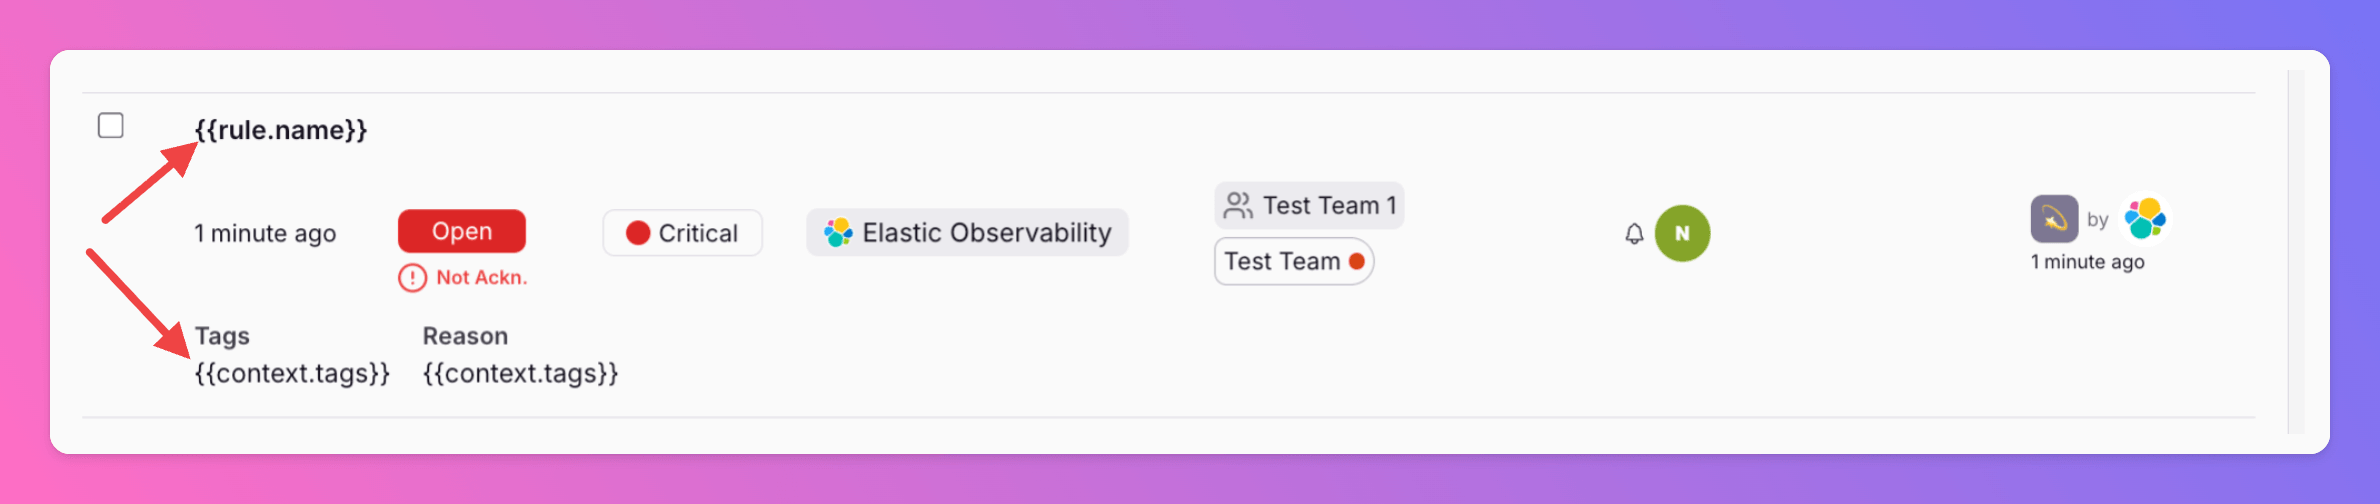
 ...and you will also find a test incident in All Quiet.
Please note since the're no real data to fill the body, you will only see the variable names in this case.
...and you will also find a test incident in All Quiet.
Please note since the're no real data to fill the body, you will only see the variable names in this case.
 ### Create All Quiet Incidents From Elastic Observability Alerts
Now, we want to use the connector we just created to send real alerts to All Quiet.
In the following, you can find an example how to set up an alerting rule for an incident in All Quiet. You can use your All Quiet connector for all your alerting rules in your Elastic Observability project and forward incidents to All Quiet.
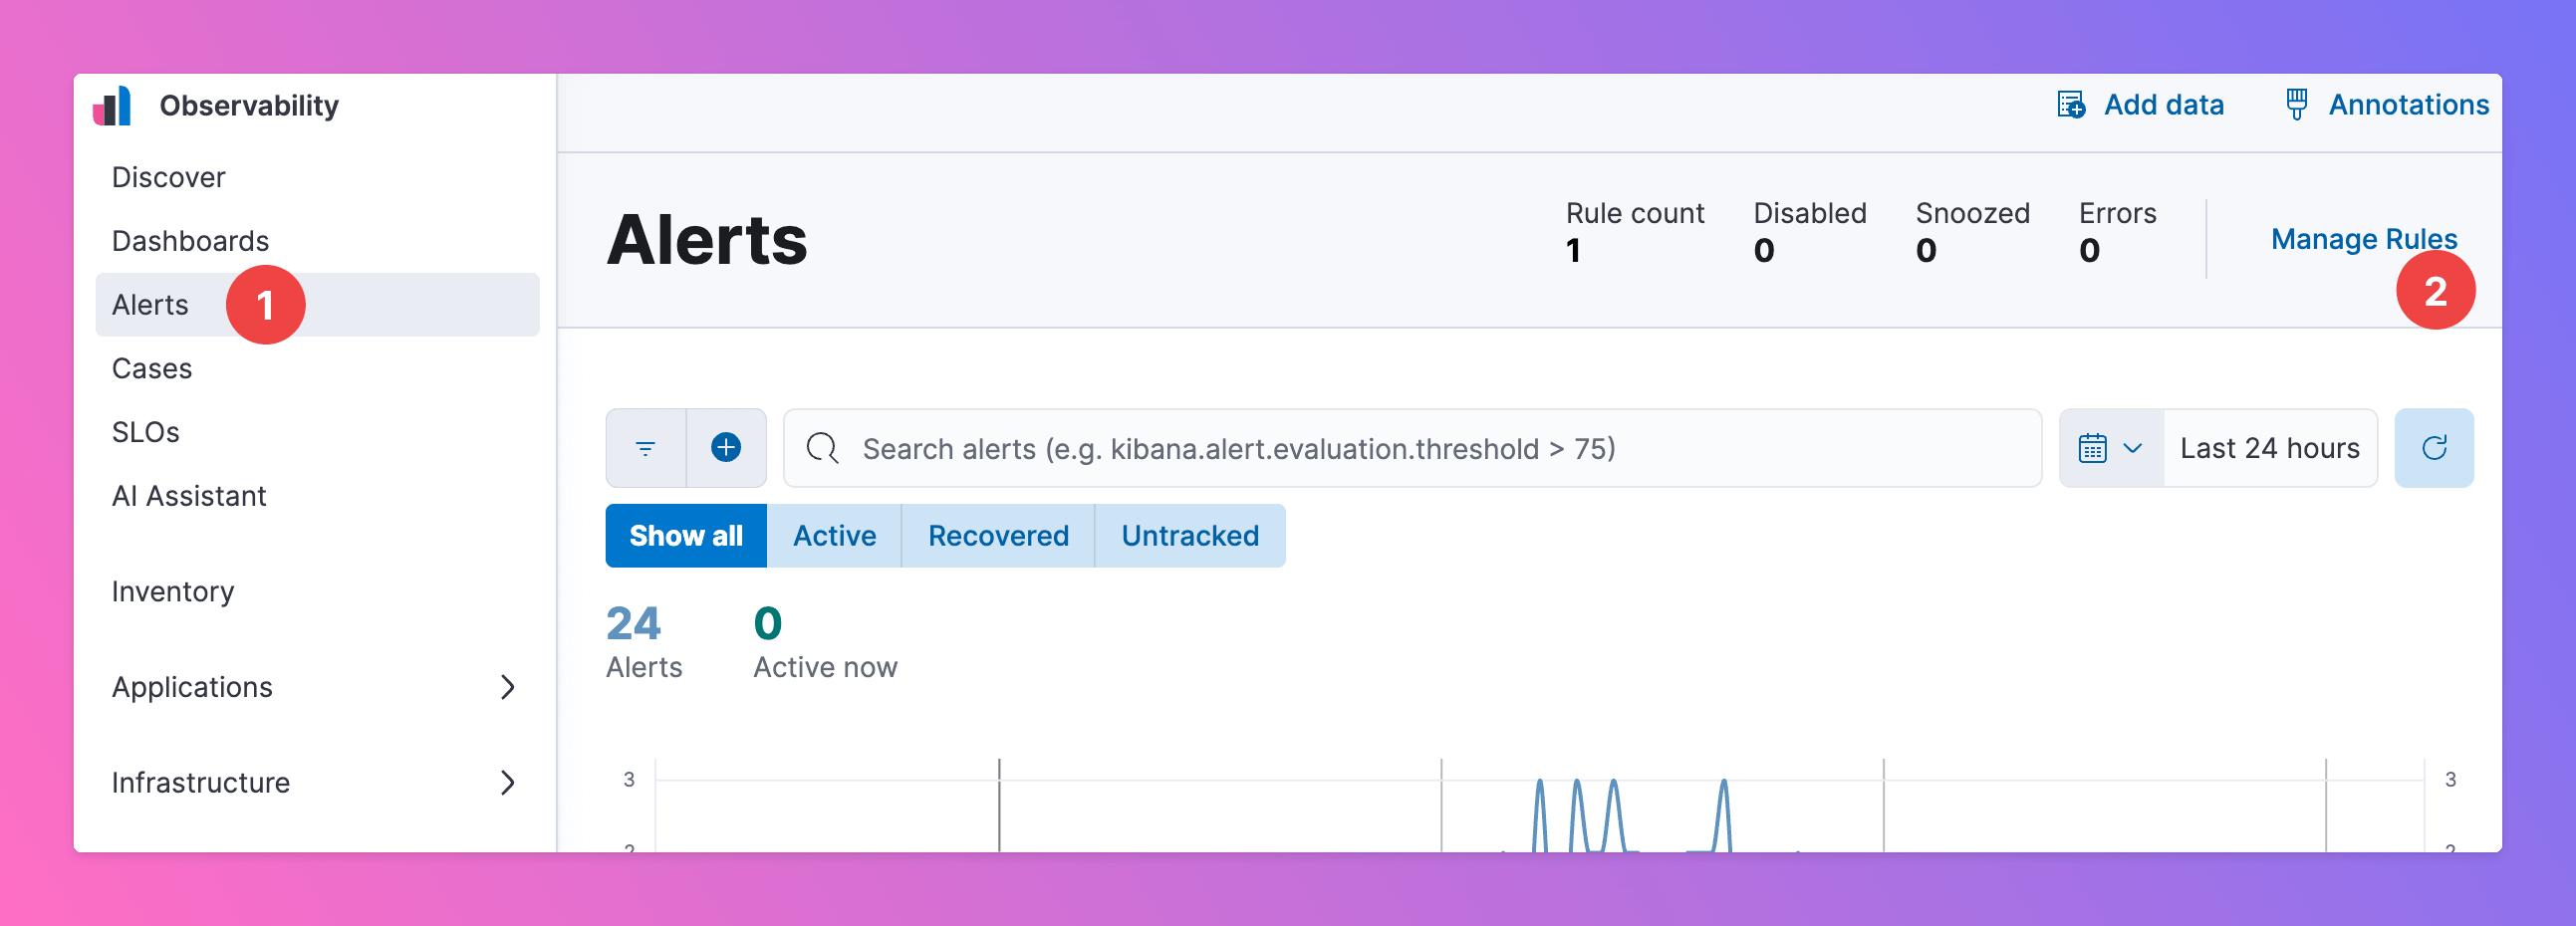
1. First, Select `Alerts`.
2. Click `Manage Rules`.
### Create All Quiet Incidents From Elastic Observability Alerts
Now, we want to use the connector we just created to send real alerts to All Quiet.
In the following, you can find an example how to set up an alerting rule for an incident in All Quiet. You can use your All Quiet connector for all your alerting rules in your Elastic Observability project and forward incidents to All Quiet.
1. First, Select `Alerts`.
2. Click `Manage Rules`.
 You can either add the All Quiet connector as an Action to your existing Rules or create a new one. Here, we create a new rule.
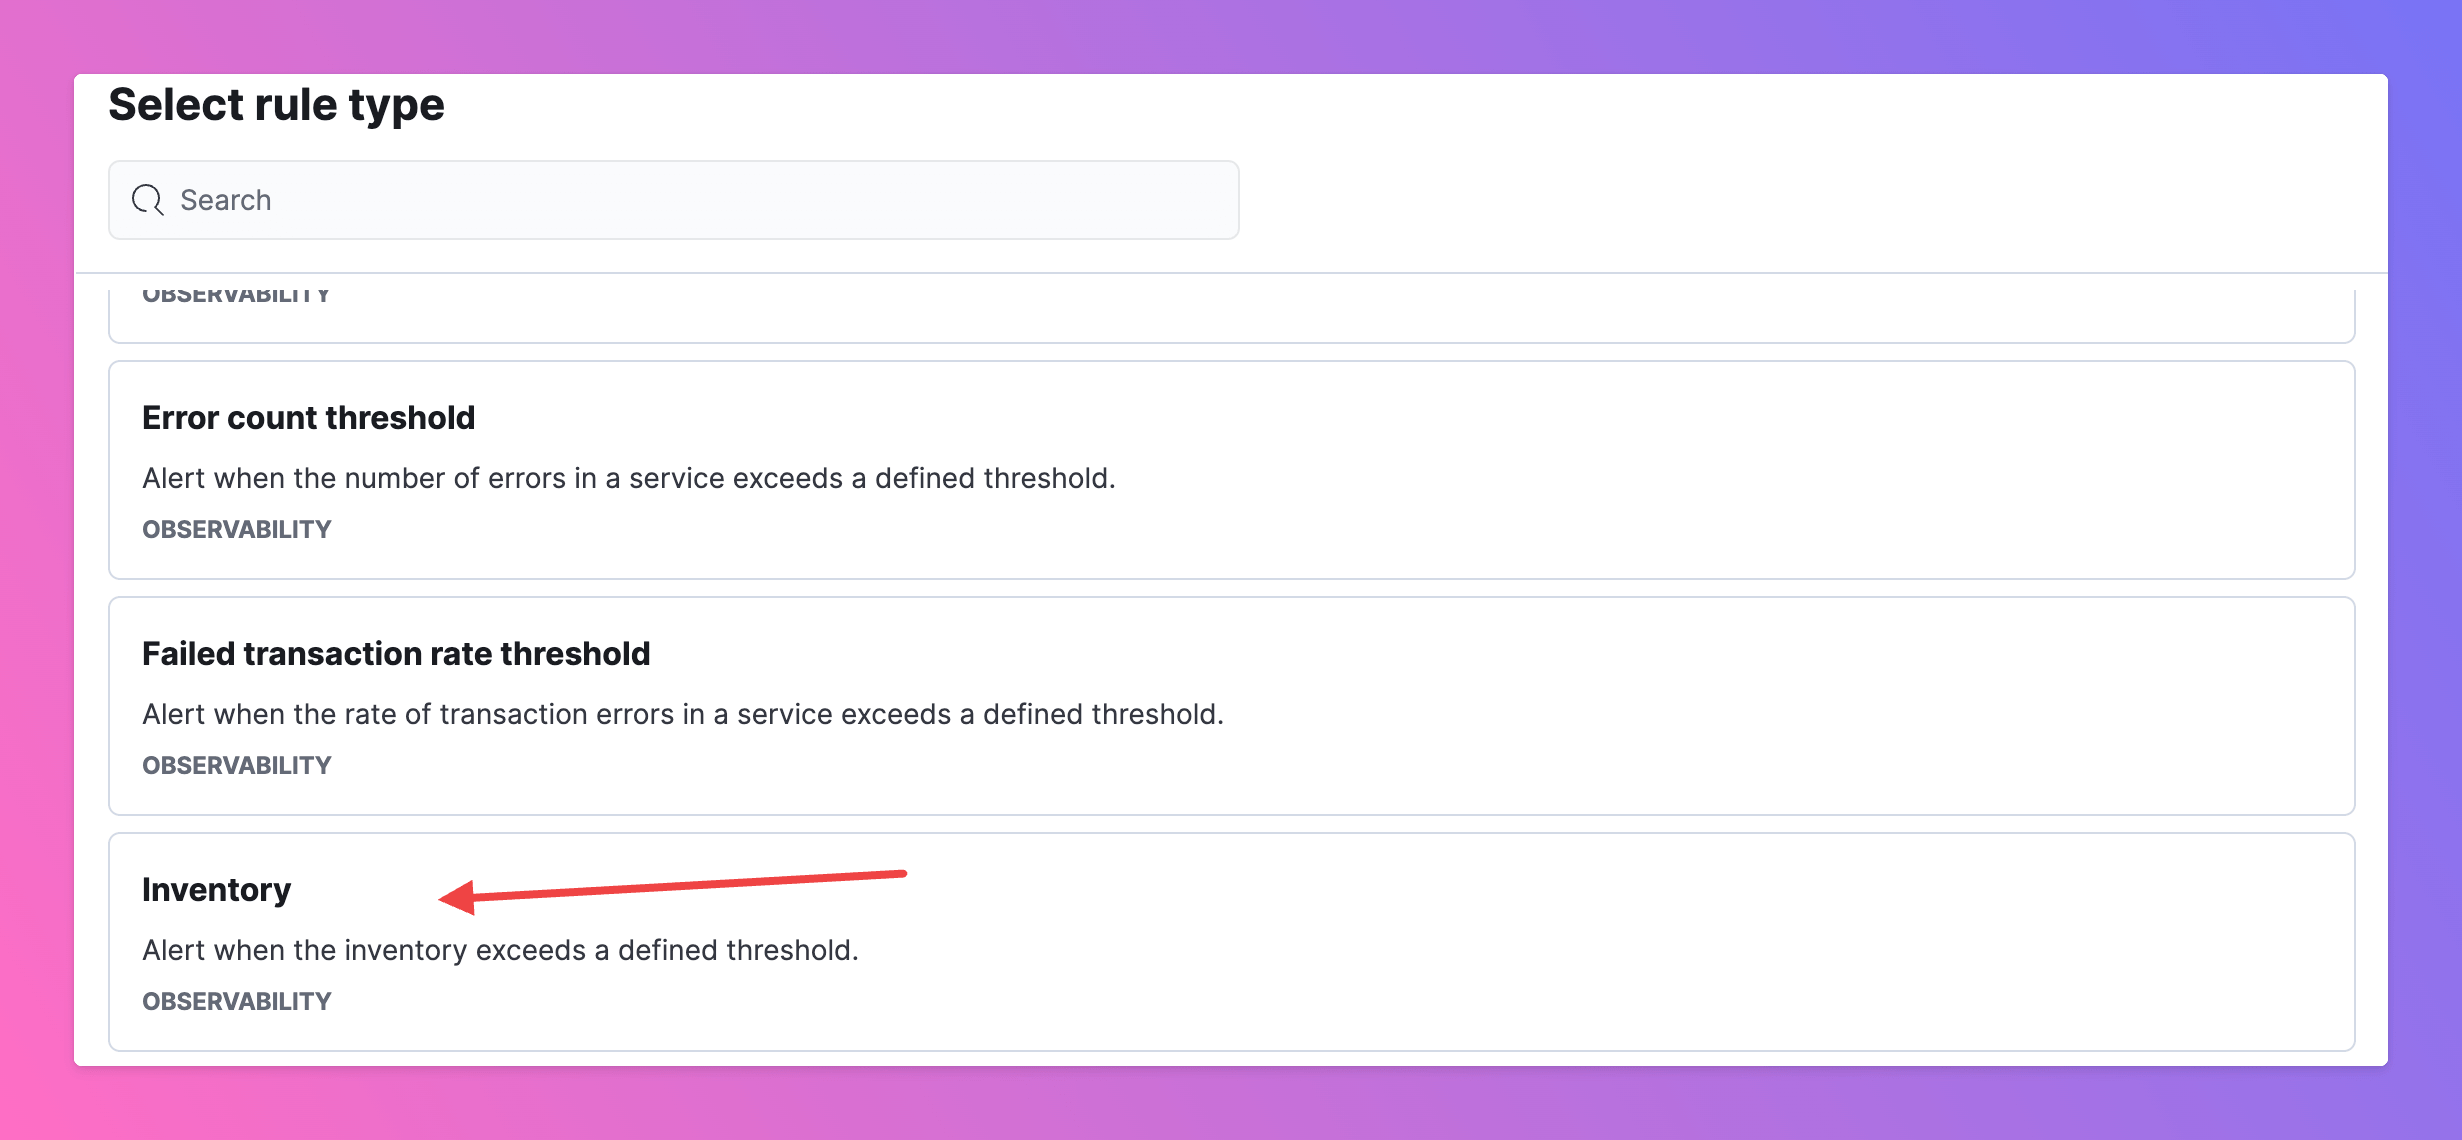
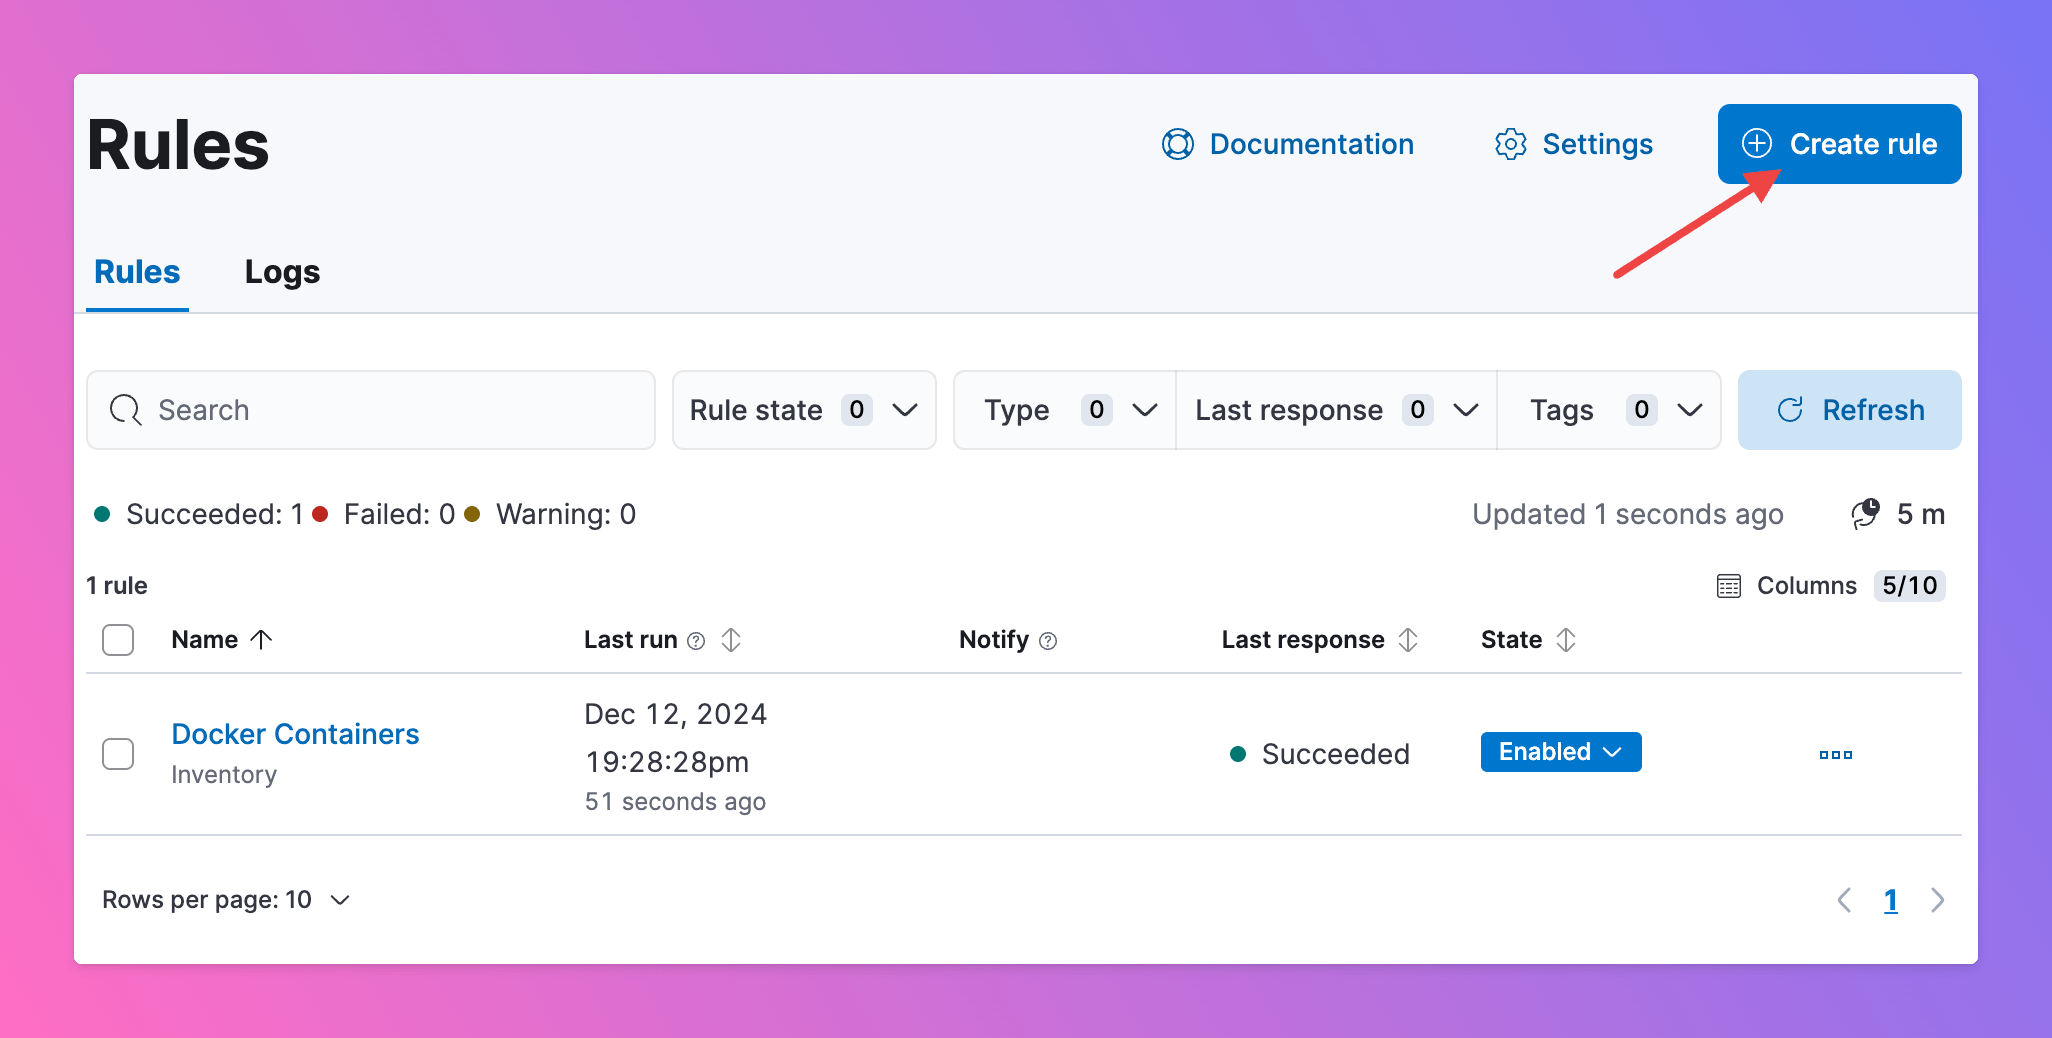 For the example, we select "rule type" `Inventory`.
 Now, we define a rule
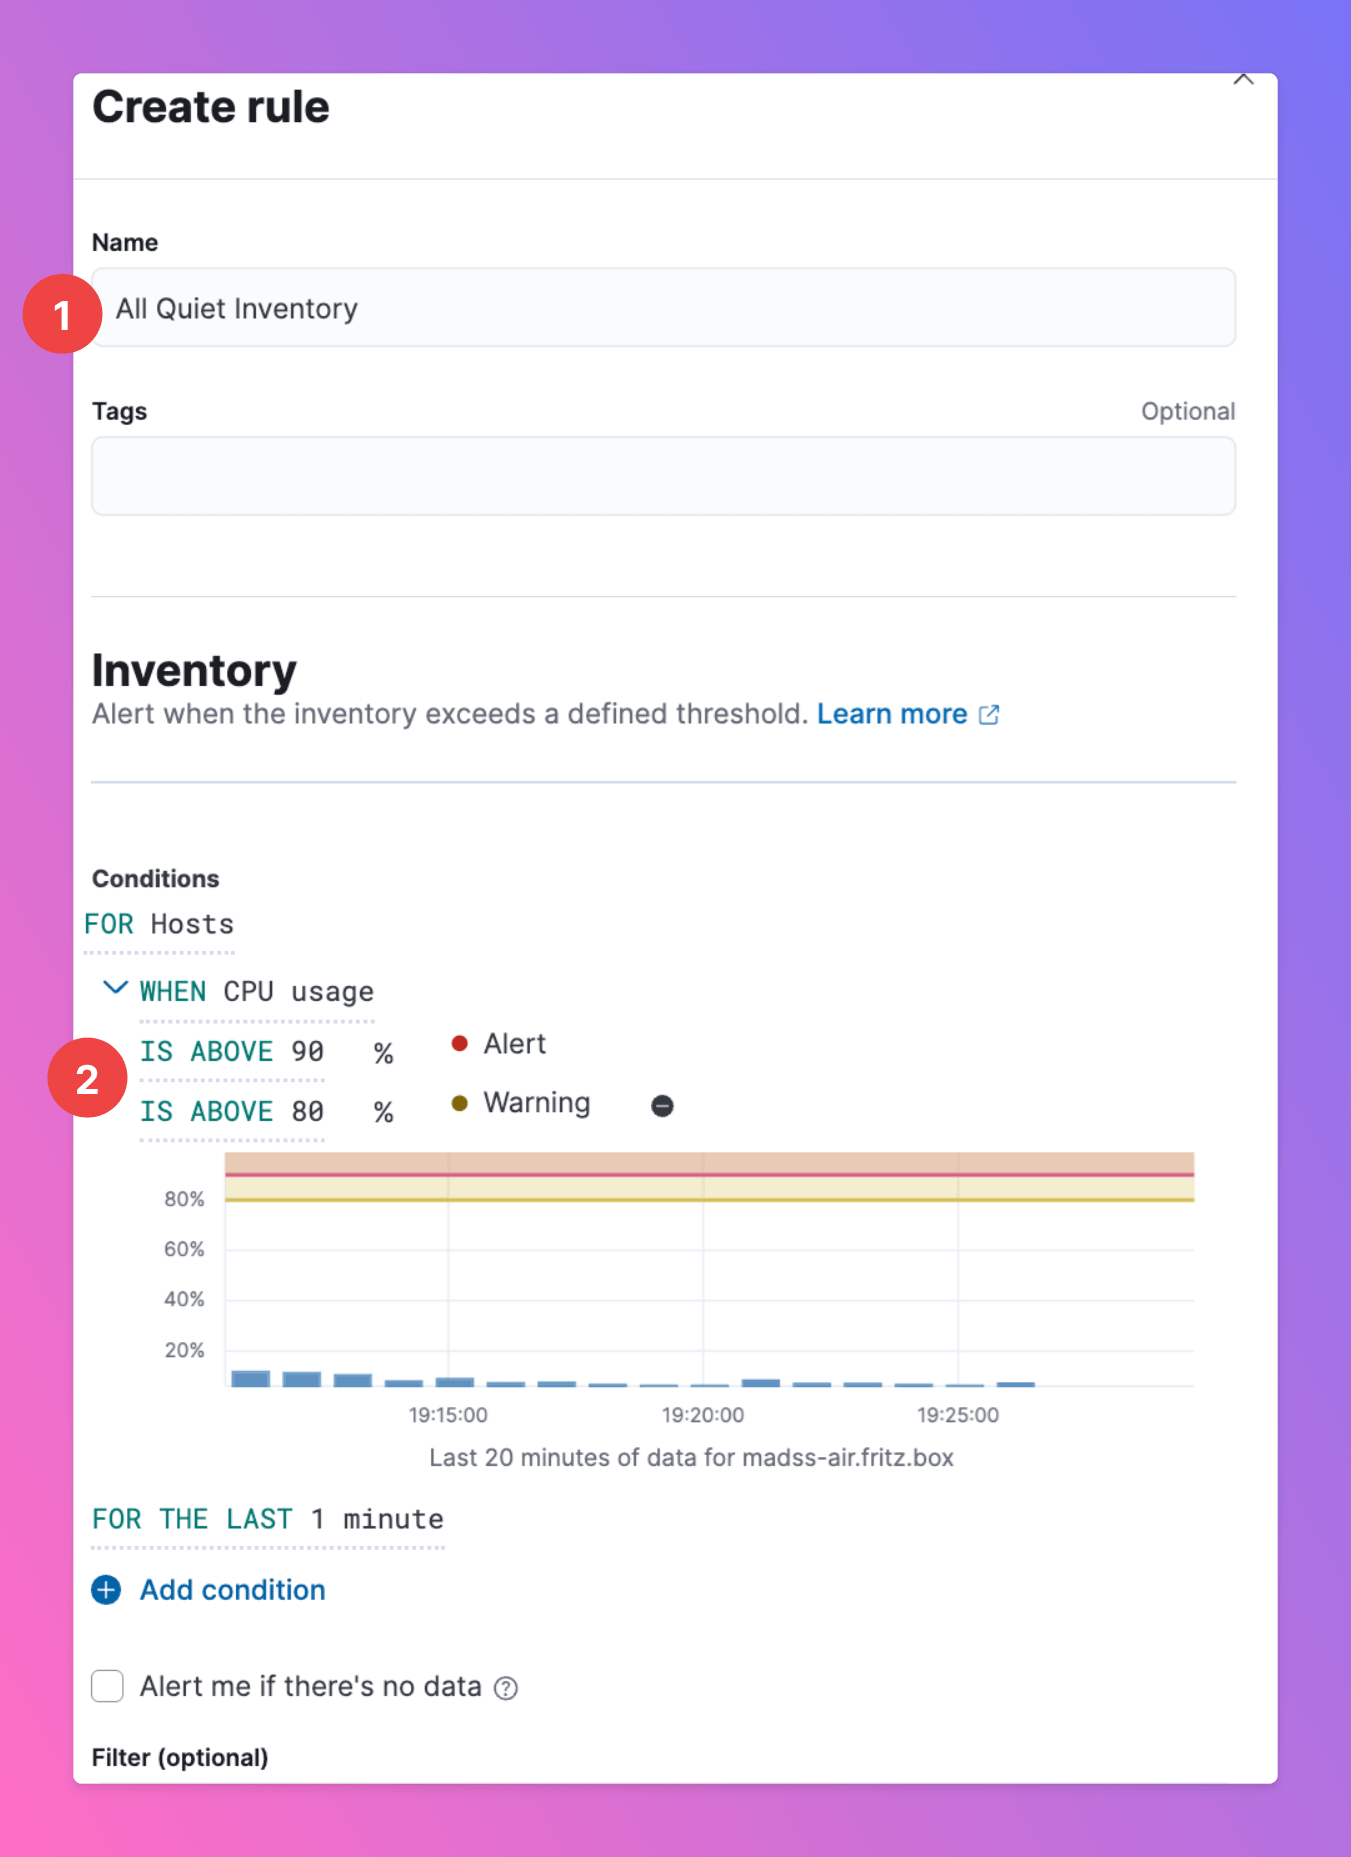
1. Enter a `Name` and, optionally `Tags`. Note tha based on our pre-configured [default mapping](/essentials/inbound#mapping-payloads), this info will also be visible in All Quiet after an incident is created.
2. Select the conditions that trigger the rule. For "rule type" `Inventory`, you can add a `Warning` Threshold. By default, these alerts will trigger an All Quiet incident of severity "Warning", why `Alert` will trigger an incident with `Critical` severity.
Scroll down to add the actions.
Now, we define a rule
1. Enter a `Name` and, optionally `Tags`. Note tha based on our pre-configured [default mapping](/essentials/inbound#mapping-payloads), this info will also be visible in All Quiet after an incident is created.
2. Select the conditions that trigger the rule. For "rule type" `Inventory`, you can add a `Warning` Threshold. By default, these alerts will trigger an All Quiet incident of severity "Warning", why `Alert` will trigger an incident with `Critical` severity.
Scroll down to add the actions.
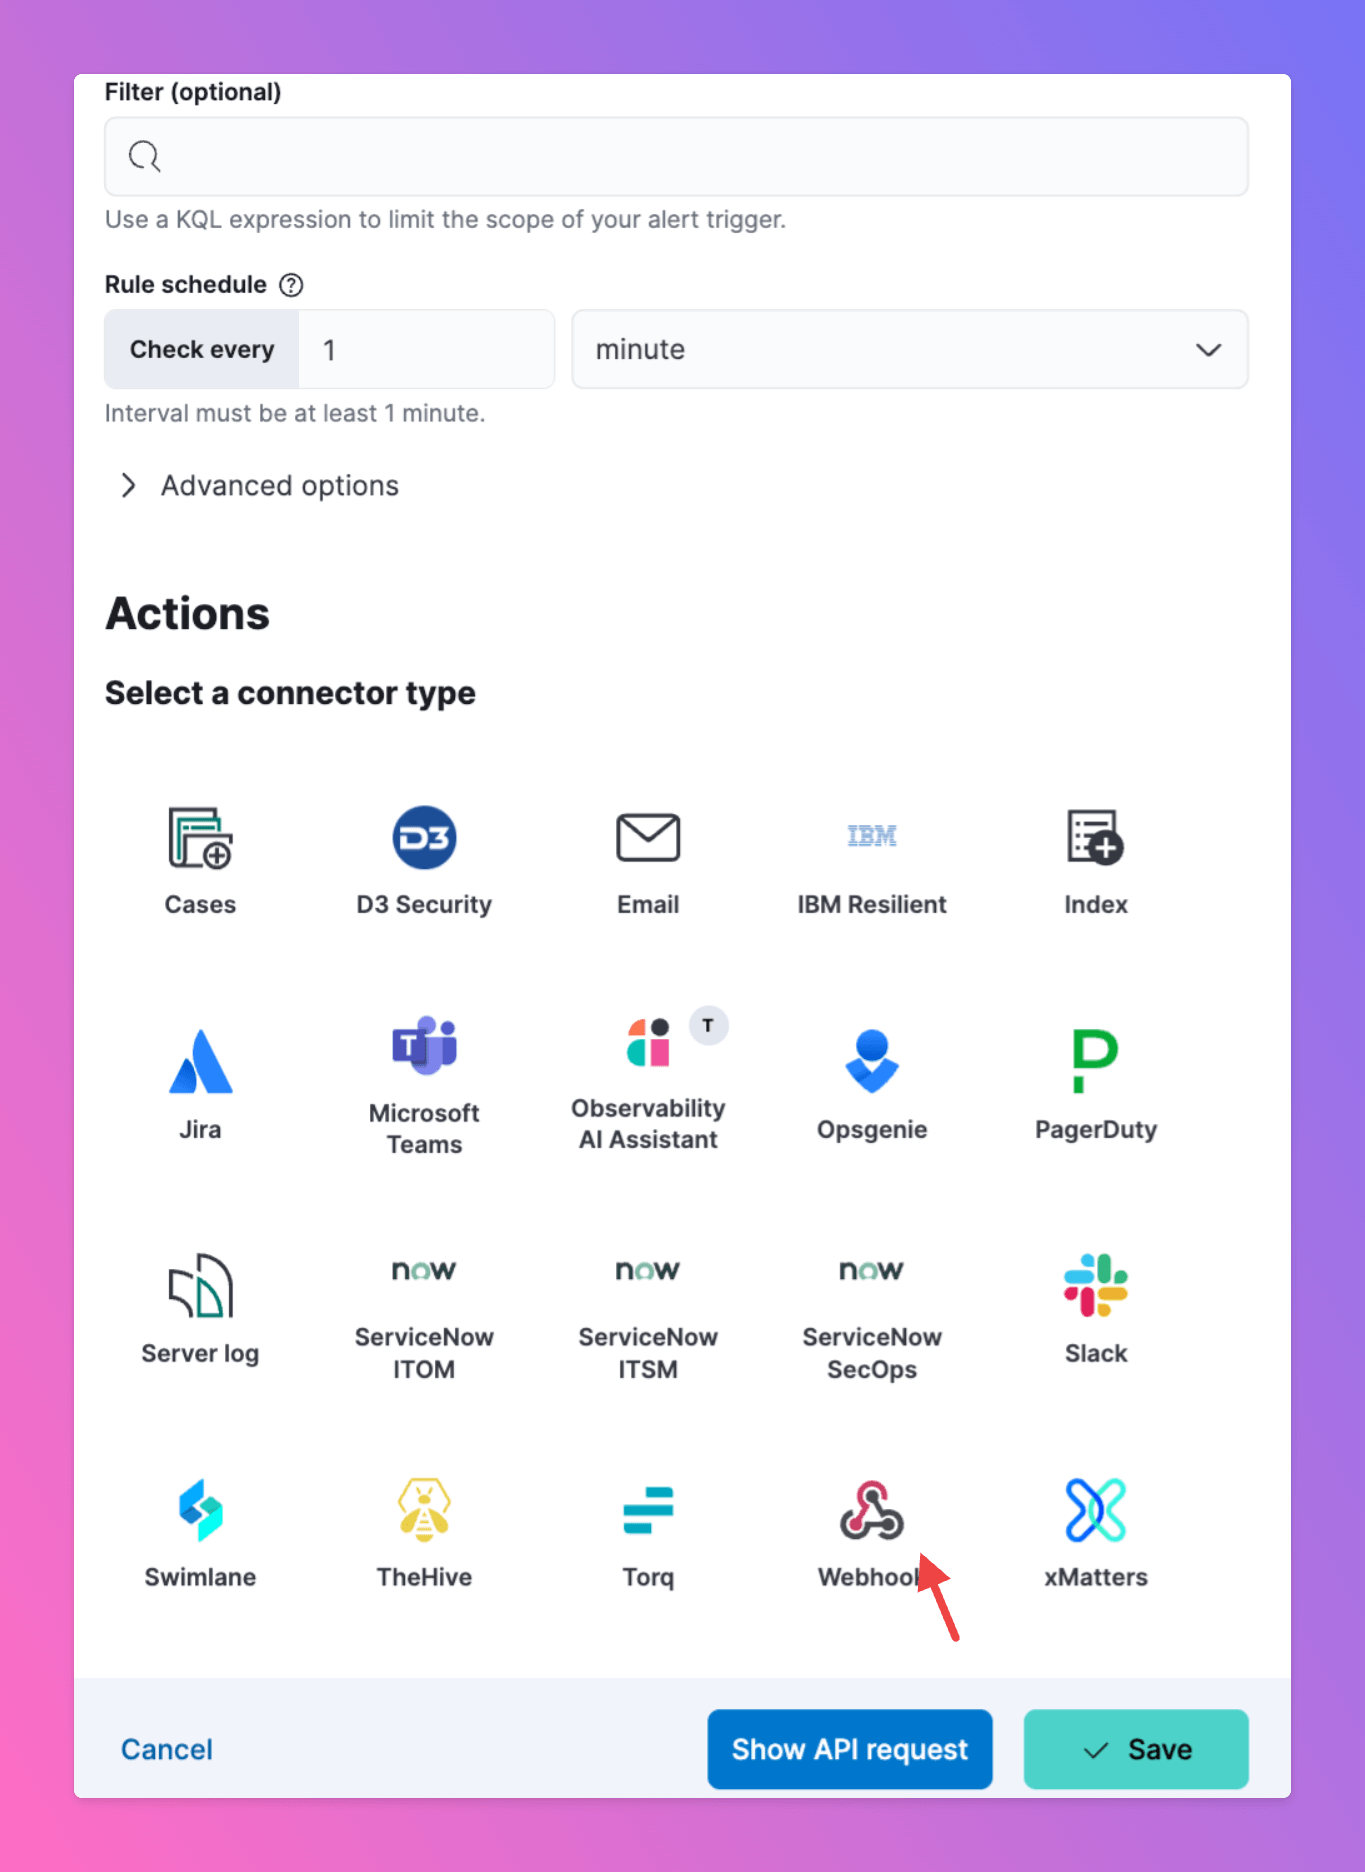
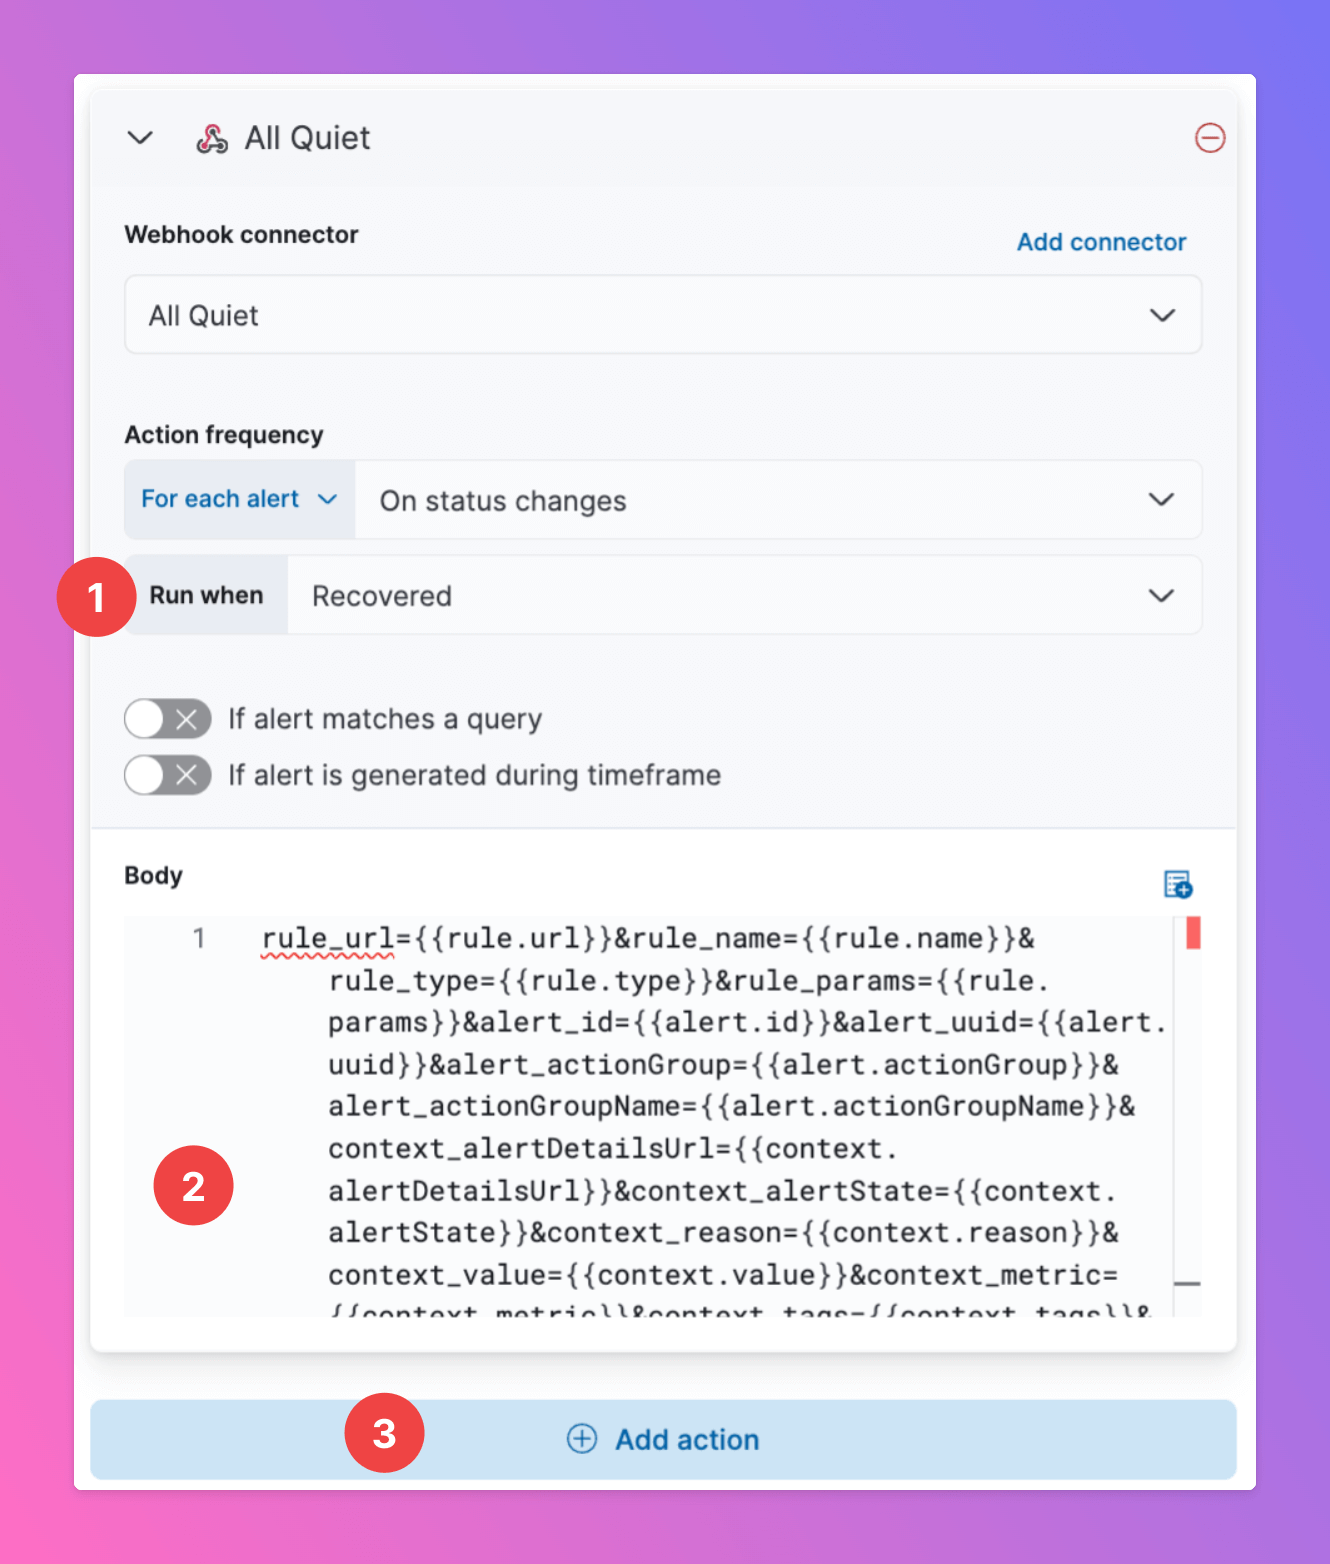
 Select Webhook.
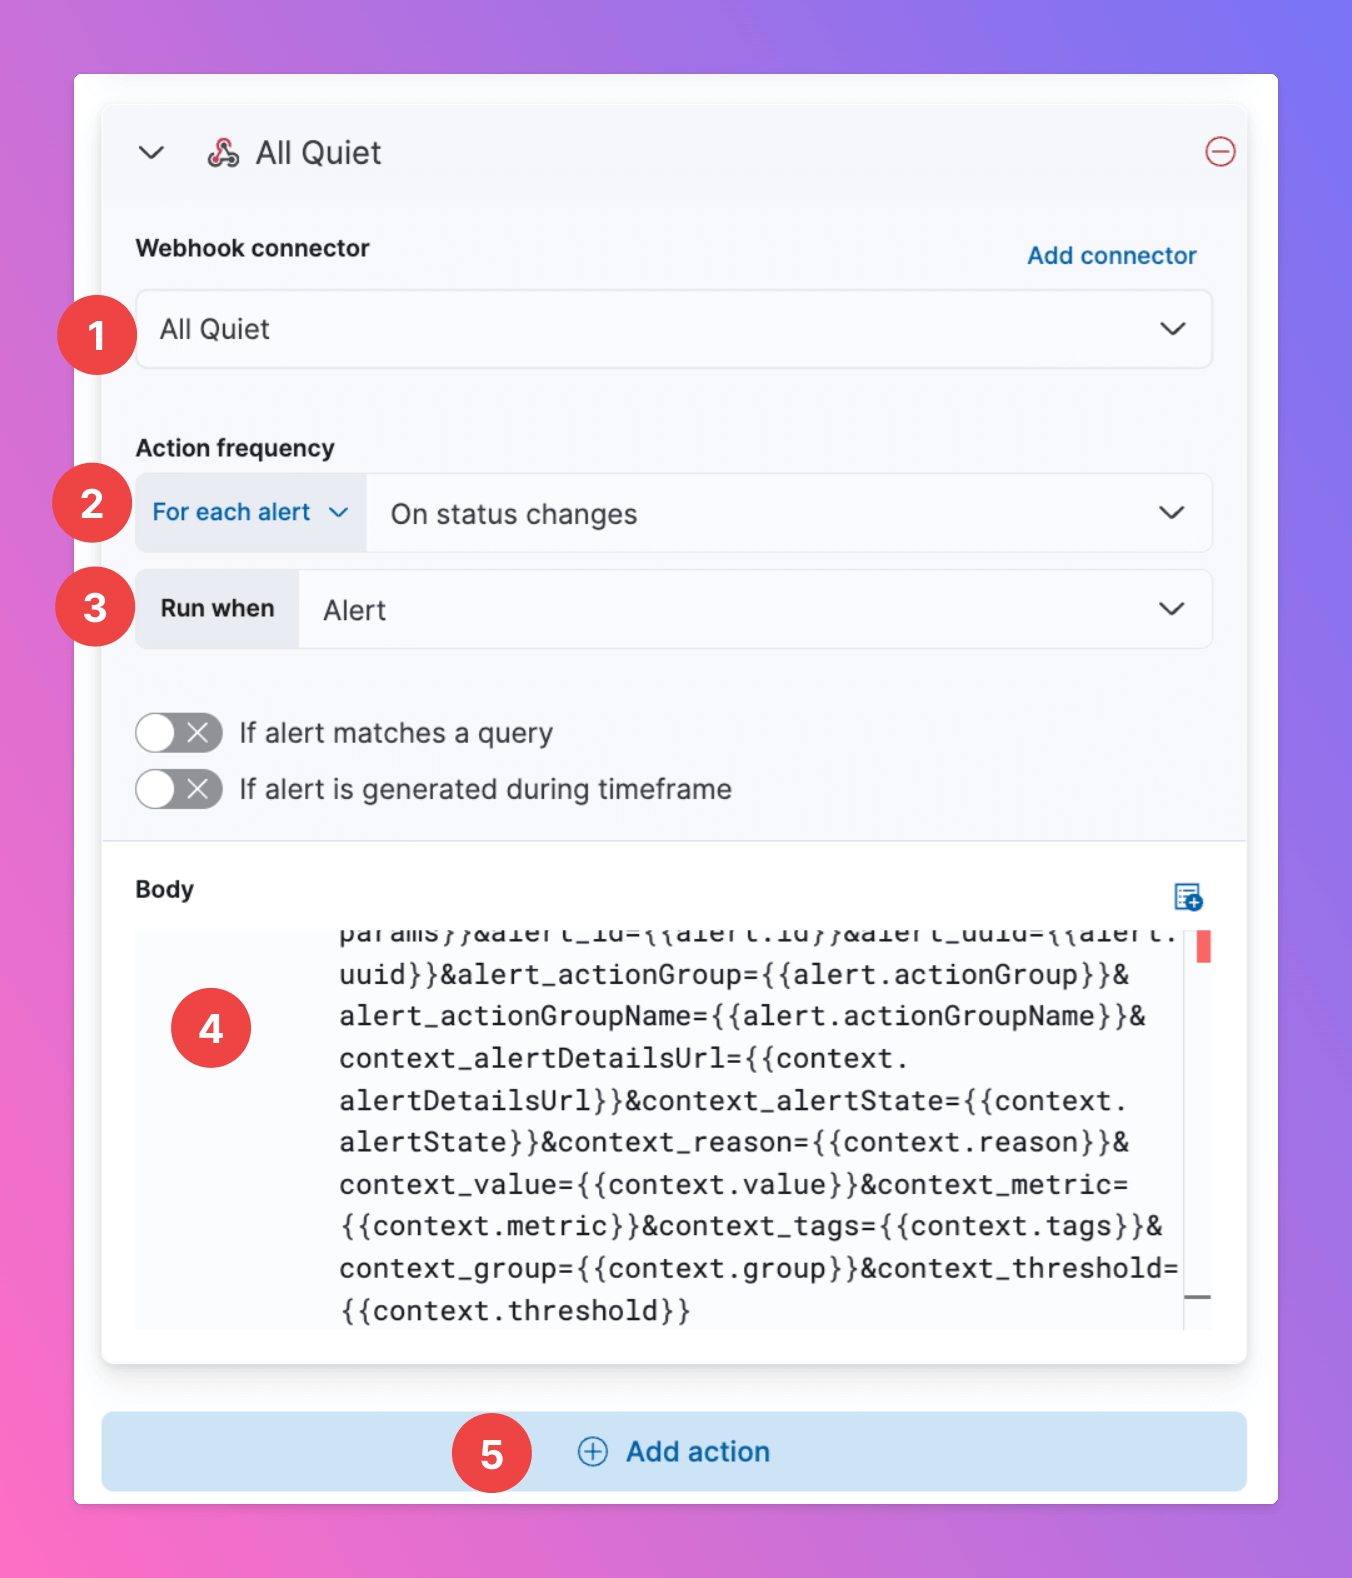
 1. Select the All Quiet Webhook connector you [set up earlier](/integrations/inbound/elastic-observability#create-connector).
2. We recommend setting Action frequency to "For each alert" and "On status changes". This means that the webhook will be triggered when the status is changed to the status selected in 3 and forward the new information to All Quiet.
3. With this selection, the webhook is only triggered when the status changes to `Alert`.**Note** that it will not be triggered if there's a chance to another status (that's why we added 5.)
4. Paste in this same `Body` to send a payload that works in All Quiet.
```Body elastic-observability-payload.json theme={null}
rule_url={{rule.url}}&rule_name={{rule.name}}&rule_type={{rule.type}}&rule_params={{rule.params}}&alert_id={{alert.id}}&alert_uuid={{alert.uuid}}&alert_actionGroup={{alert.actionGroup}}&alert_actionGroupName={{alert.actionGroupName}}&context_alertDetailsUrl={{context.alertDetailsUrl}}&context_alertState={{context.alertState}}&context_reason={{context.reason}}&context_value={{context.value}}&context_metric={{context.metric}}&context_tags={{context.tags}}&context_group={{context.group}}&context_threshold={{context.threshold}}
```
5. As we also want to be updated when the status changes to `Warning` or `Recovered`, we need to add 2 more actions in this case.
1. Select the All Quiet Webhook connector you [set up earlier](/integrations/inbound/elastic-observability#create-connector).
2. We recommend setting Action frequency to "For each alert" and "On status changes". This means that the webhook will be triggered when the status is changed to the status selected in 3 and forward the new information to All Quiet.
3. With this selection, the webhook is only triggered when the status changes to `Alert`.**Note** that it will not be triggered if there's a chance to another status (that's why we added 5.)
4. Paste in this same `Body` to send a payload that works in All Quiet.
```Body elastic-observability-payload.json theme={null}
rule_url={{rule.url}}&rule_name={{rule.name}}&rule_type={{rule.type}}&rule_params={{rule.params}}&alert_id={{alert.id}}&alert_uuid={{alert.uuid}}&alert_actionGroup={{alert.actionGroup}}&alert_actionGroupName={{alert.actionGroupName}}&context_alertDetailsUrl={{context.alertDetailsUrl}}&context_alertState={{context.alertState}}&context_reason={{context.reason}}&context_value={{context.value}}&context_metric={{context.metric}}&context_tags={{context.tags}}&context_group={{context.group}}&context_threshold={{context.threshold}}
```
5. As we also want to be updated when the status changes to `Warning` or `Recovered`, we need to add 2 more actions in this case.
 1. Set up the same action as before, but change the status that makes it run, here `Recovered`.
2. Paste in the same body.
3. Add a third action for `Warning` (only if you added a `Warning` condition earlier).
After configuring all Actions, safe the rule.
1. Set up the same action as before, but change the status that makes it run, here `Recovered`.
2. Paste in the same body.
3. Add a third action for `Warning` (only if you added a `Warning` condition earlier).
After configuring all Actions, safe the rule.
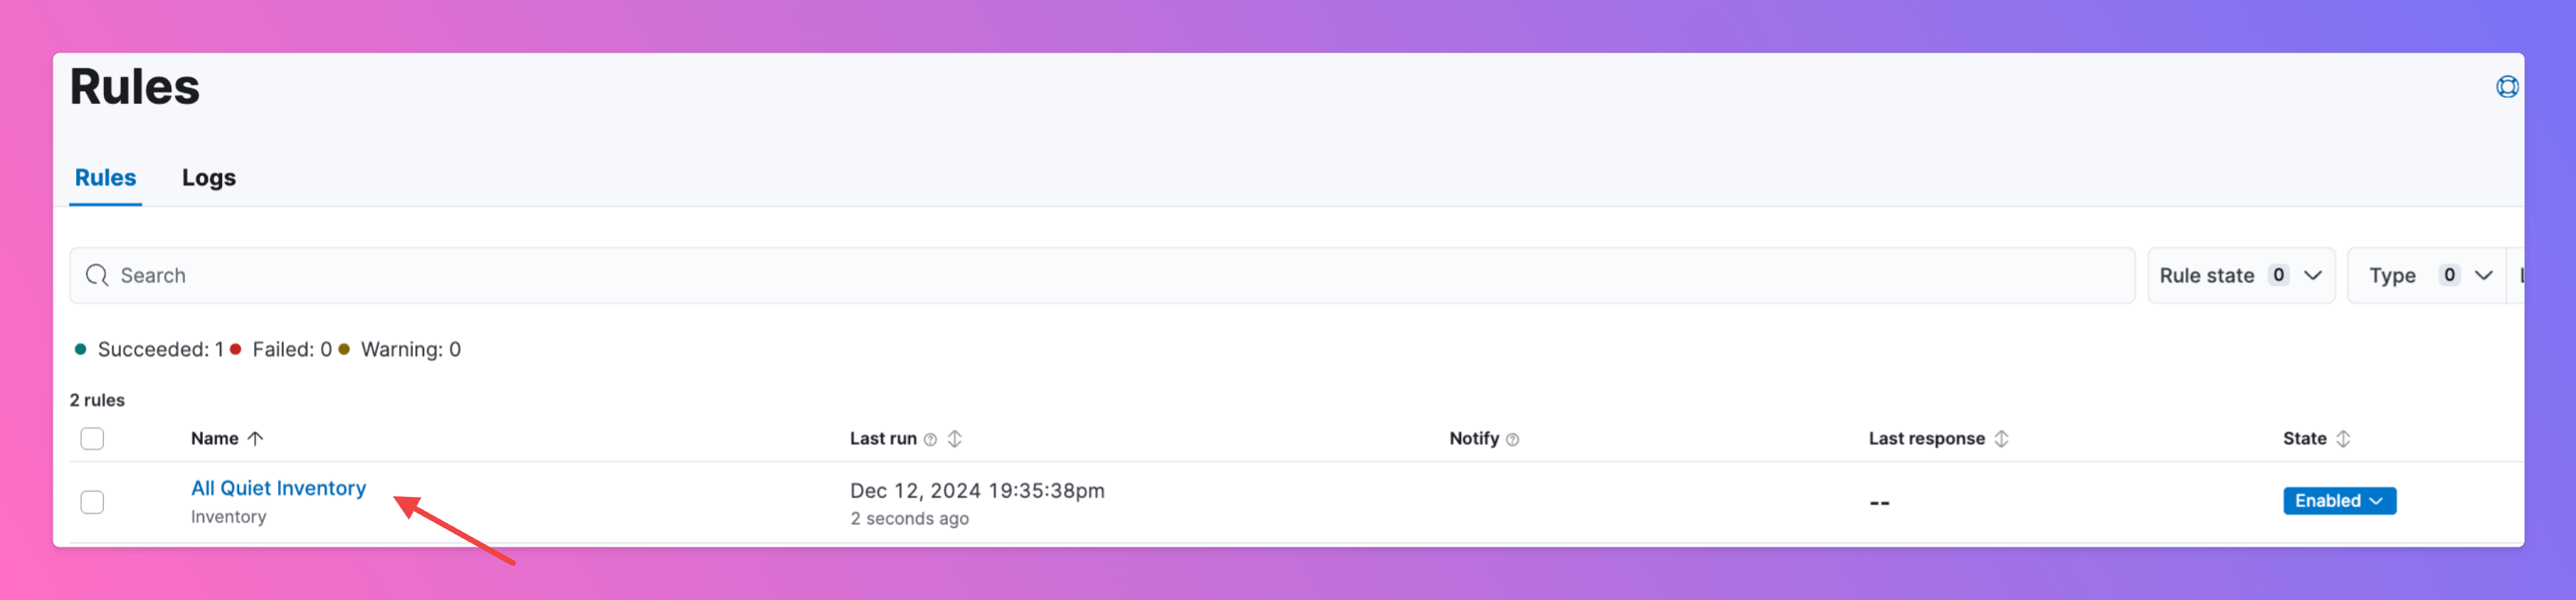
 You can now find and edit it under `Rules`.
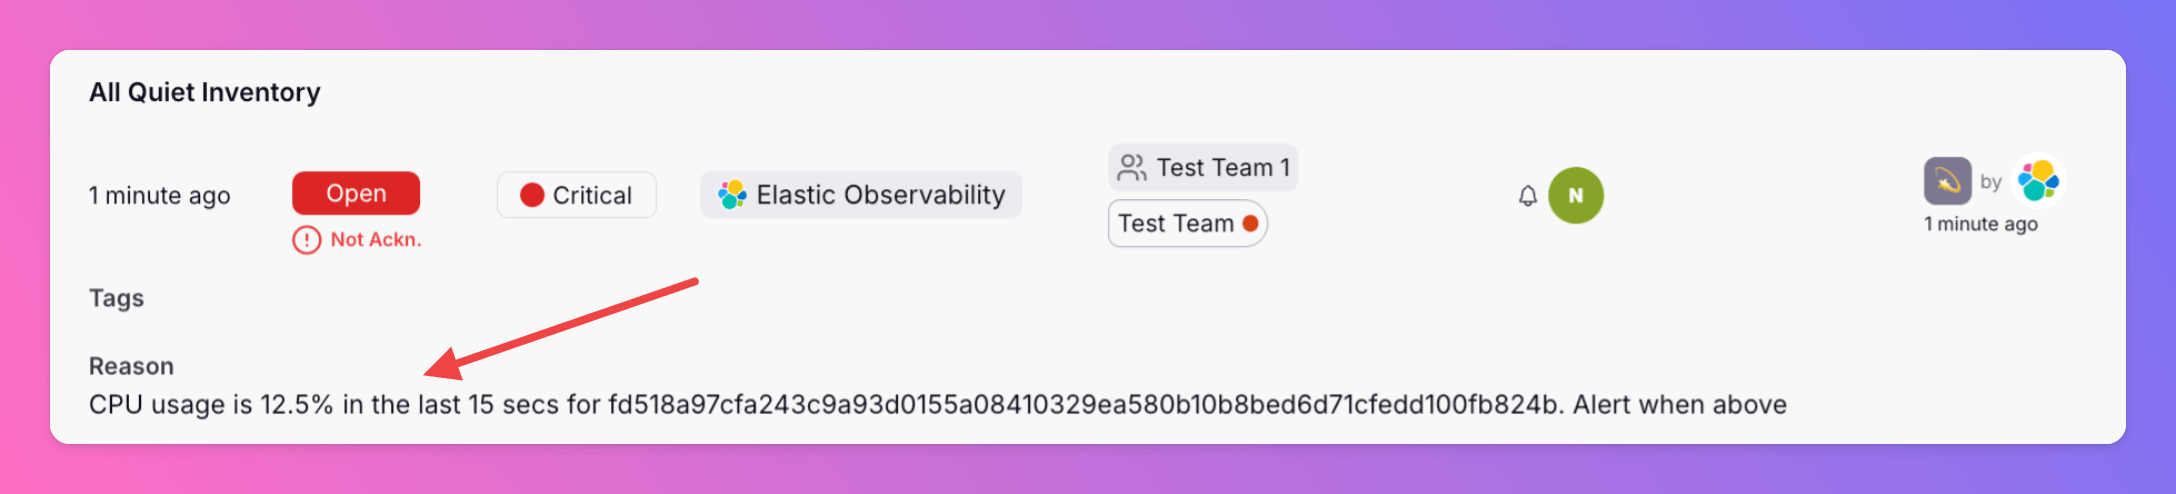
 You have successfully connected All Quiet with your Elastic Observability project. Add the All Quiet connector as Action(s) to all your rules to forward all Alerts to All Quiet.
Below, you can see how the All Quiet incident looks based on the Inventory rule we created above.
You have successfully connected All Quiet with your Elastic Observability project. Add the All Quiet connector as Action(s) to all your rules to forward all Alerts to All Quiet.
Below, you can see how the All Quiet incident looks based on the Inventory rule we created above.
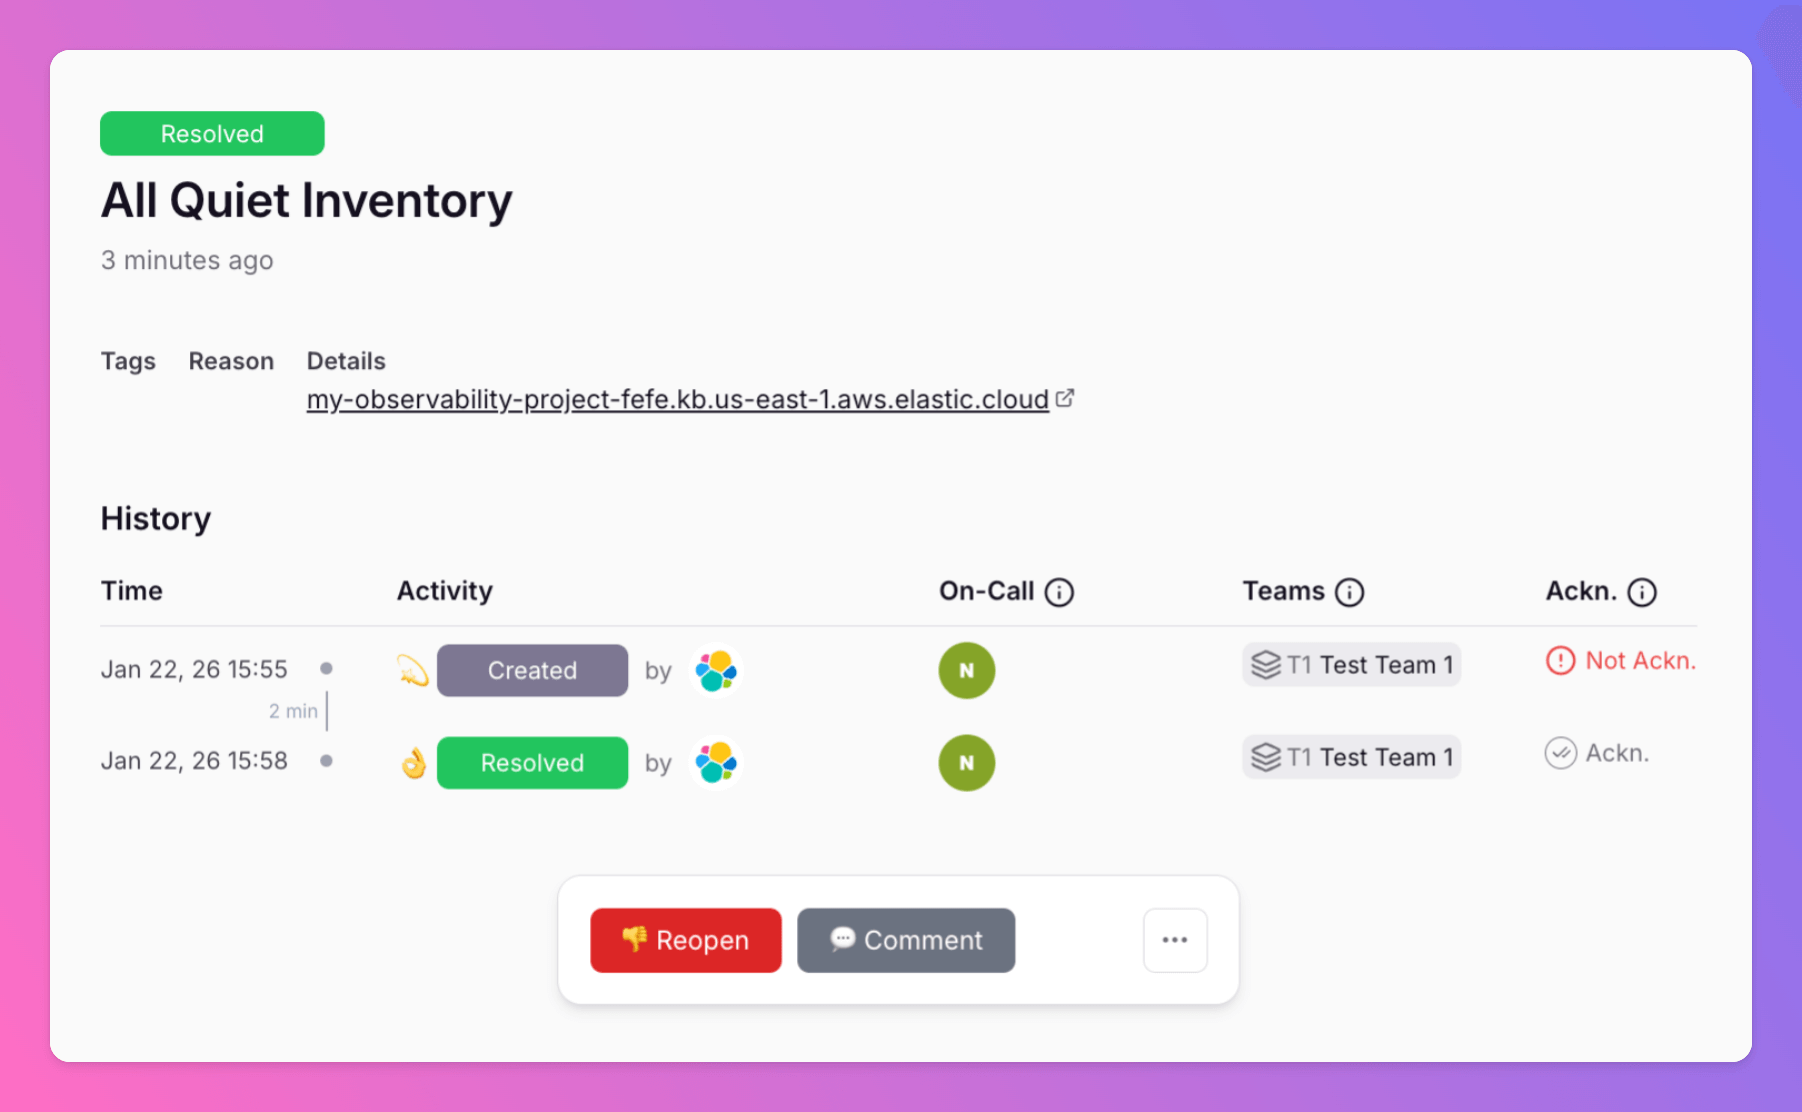
 When the status in your Elastic project changes to to `Recovered` adding the extra action for recovered ensures the incident in All Quiet is also `Resolved`.
 ### Adjust Payload Mapping
Looking to customize the fields of your incidents by adjusting the pre-built payload mapping? Simply head over to the “Payload” tab within your integration and make the necessary edits to the mapping. For detailed guidance, you may check out our [payload mapping documentation](/essentials/inbound#how-does-attribute-mapping-work).
Using our Terraform provider? [Download](https://allquiet.app/api/integrations/terraform/default/ElasticObservability.tf) the default mapping of the `allquiet_integration_mapping` resource for the Elastic Observability integration. Simply copy the syntax to your .tf file and tailor the resource to your team's needs!
### Adjust Payload Mapping
Looking to customize the fields of your incidents by adjusting the pre-built payload mapping? Simply head over to the “Payload” tab within your integration and make the necessary edits to the mapping. For detailed guidance, you may check out our [payload mapping documentation](/essentials/inbound#how-does-attribute-mapping-work).
Using our Terraform provider? [Download](https://allquiet.app/api/integrations/terraform/default/ElasticObservability.tf) the default mapping of the `allquiet_integration_mapping` resource for the Elastic Observability integration. Simply copy the syntax to your .tf file and tailor the resource to your team's needs!