> ## Documentation Index
> Fetch the complete documentation index at: https://docs.allquiet.app/llms.txt
> Use this file to discover all available pages before exploring further.
# Checkly
> Connect Checkly Monitoring with All Quiet
Setup time: 3 Min
Integrate Checkly with All Quiet in a matter of minutes. With webhooks, you can automatically send alerts from your Checkly monitoring directly to All Quiet, streamlining your team's incident management process.
## 1. Create Checkly Integration on All Quiet
Sign in to your All Quiet account.
### Create Integration
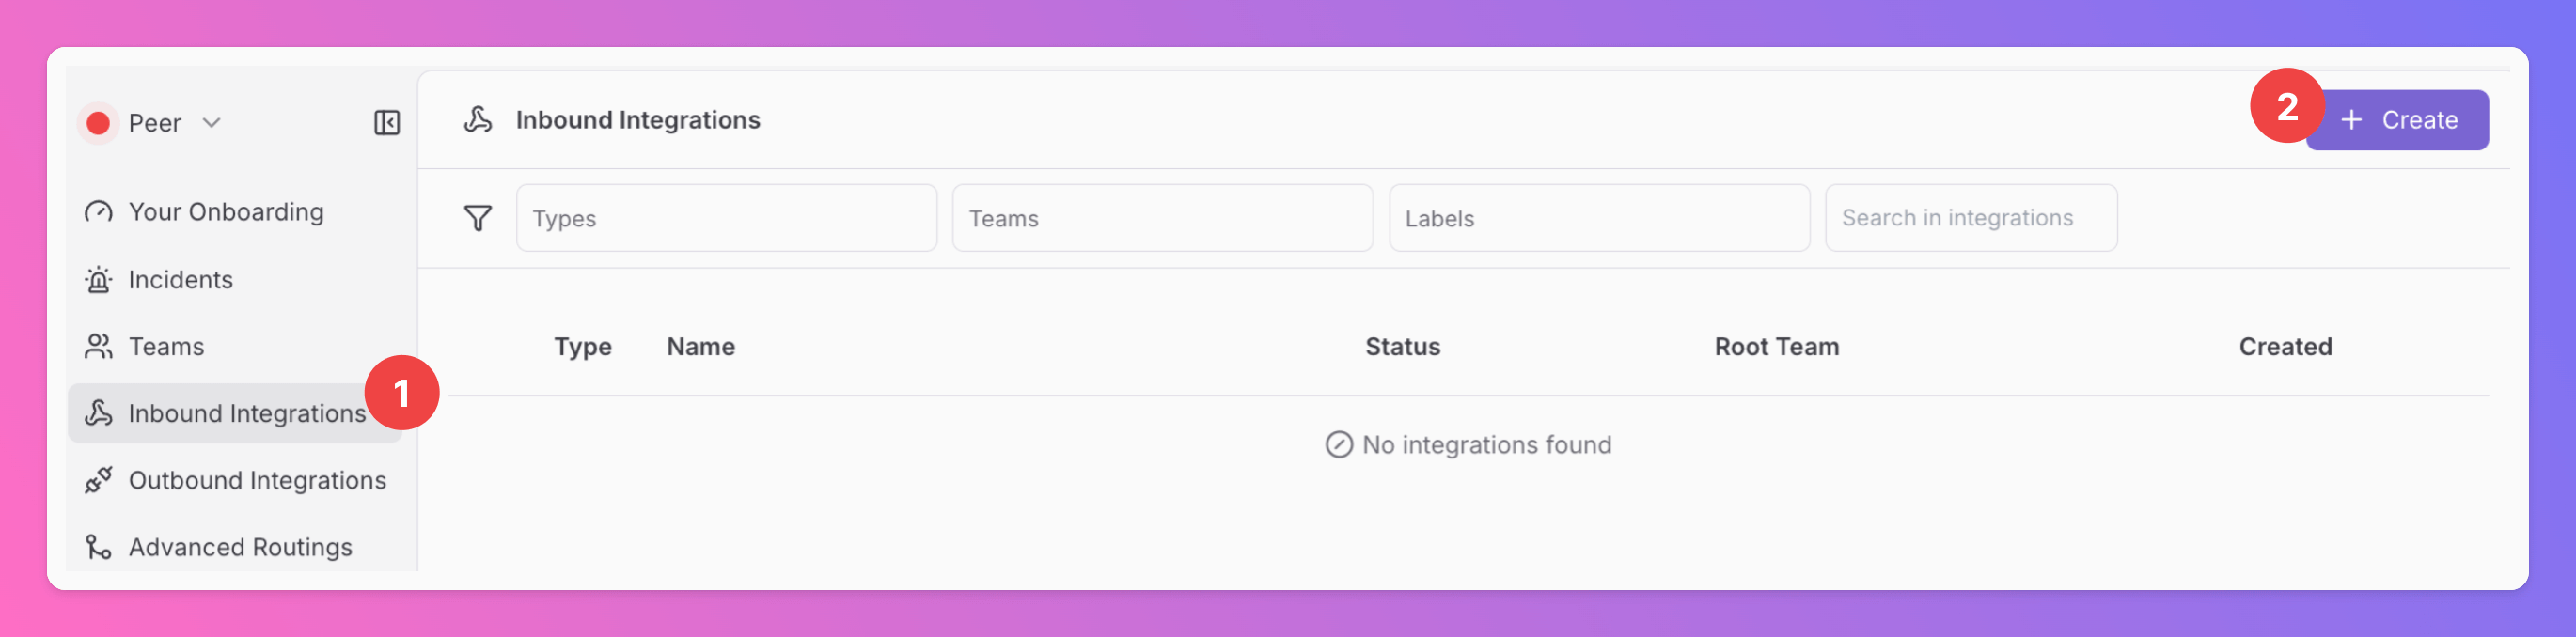
1. Click on the `Inbound Integrations` tab.
2. Click on `+ Create`.
 ### Select Checkly as the integration's type
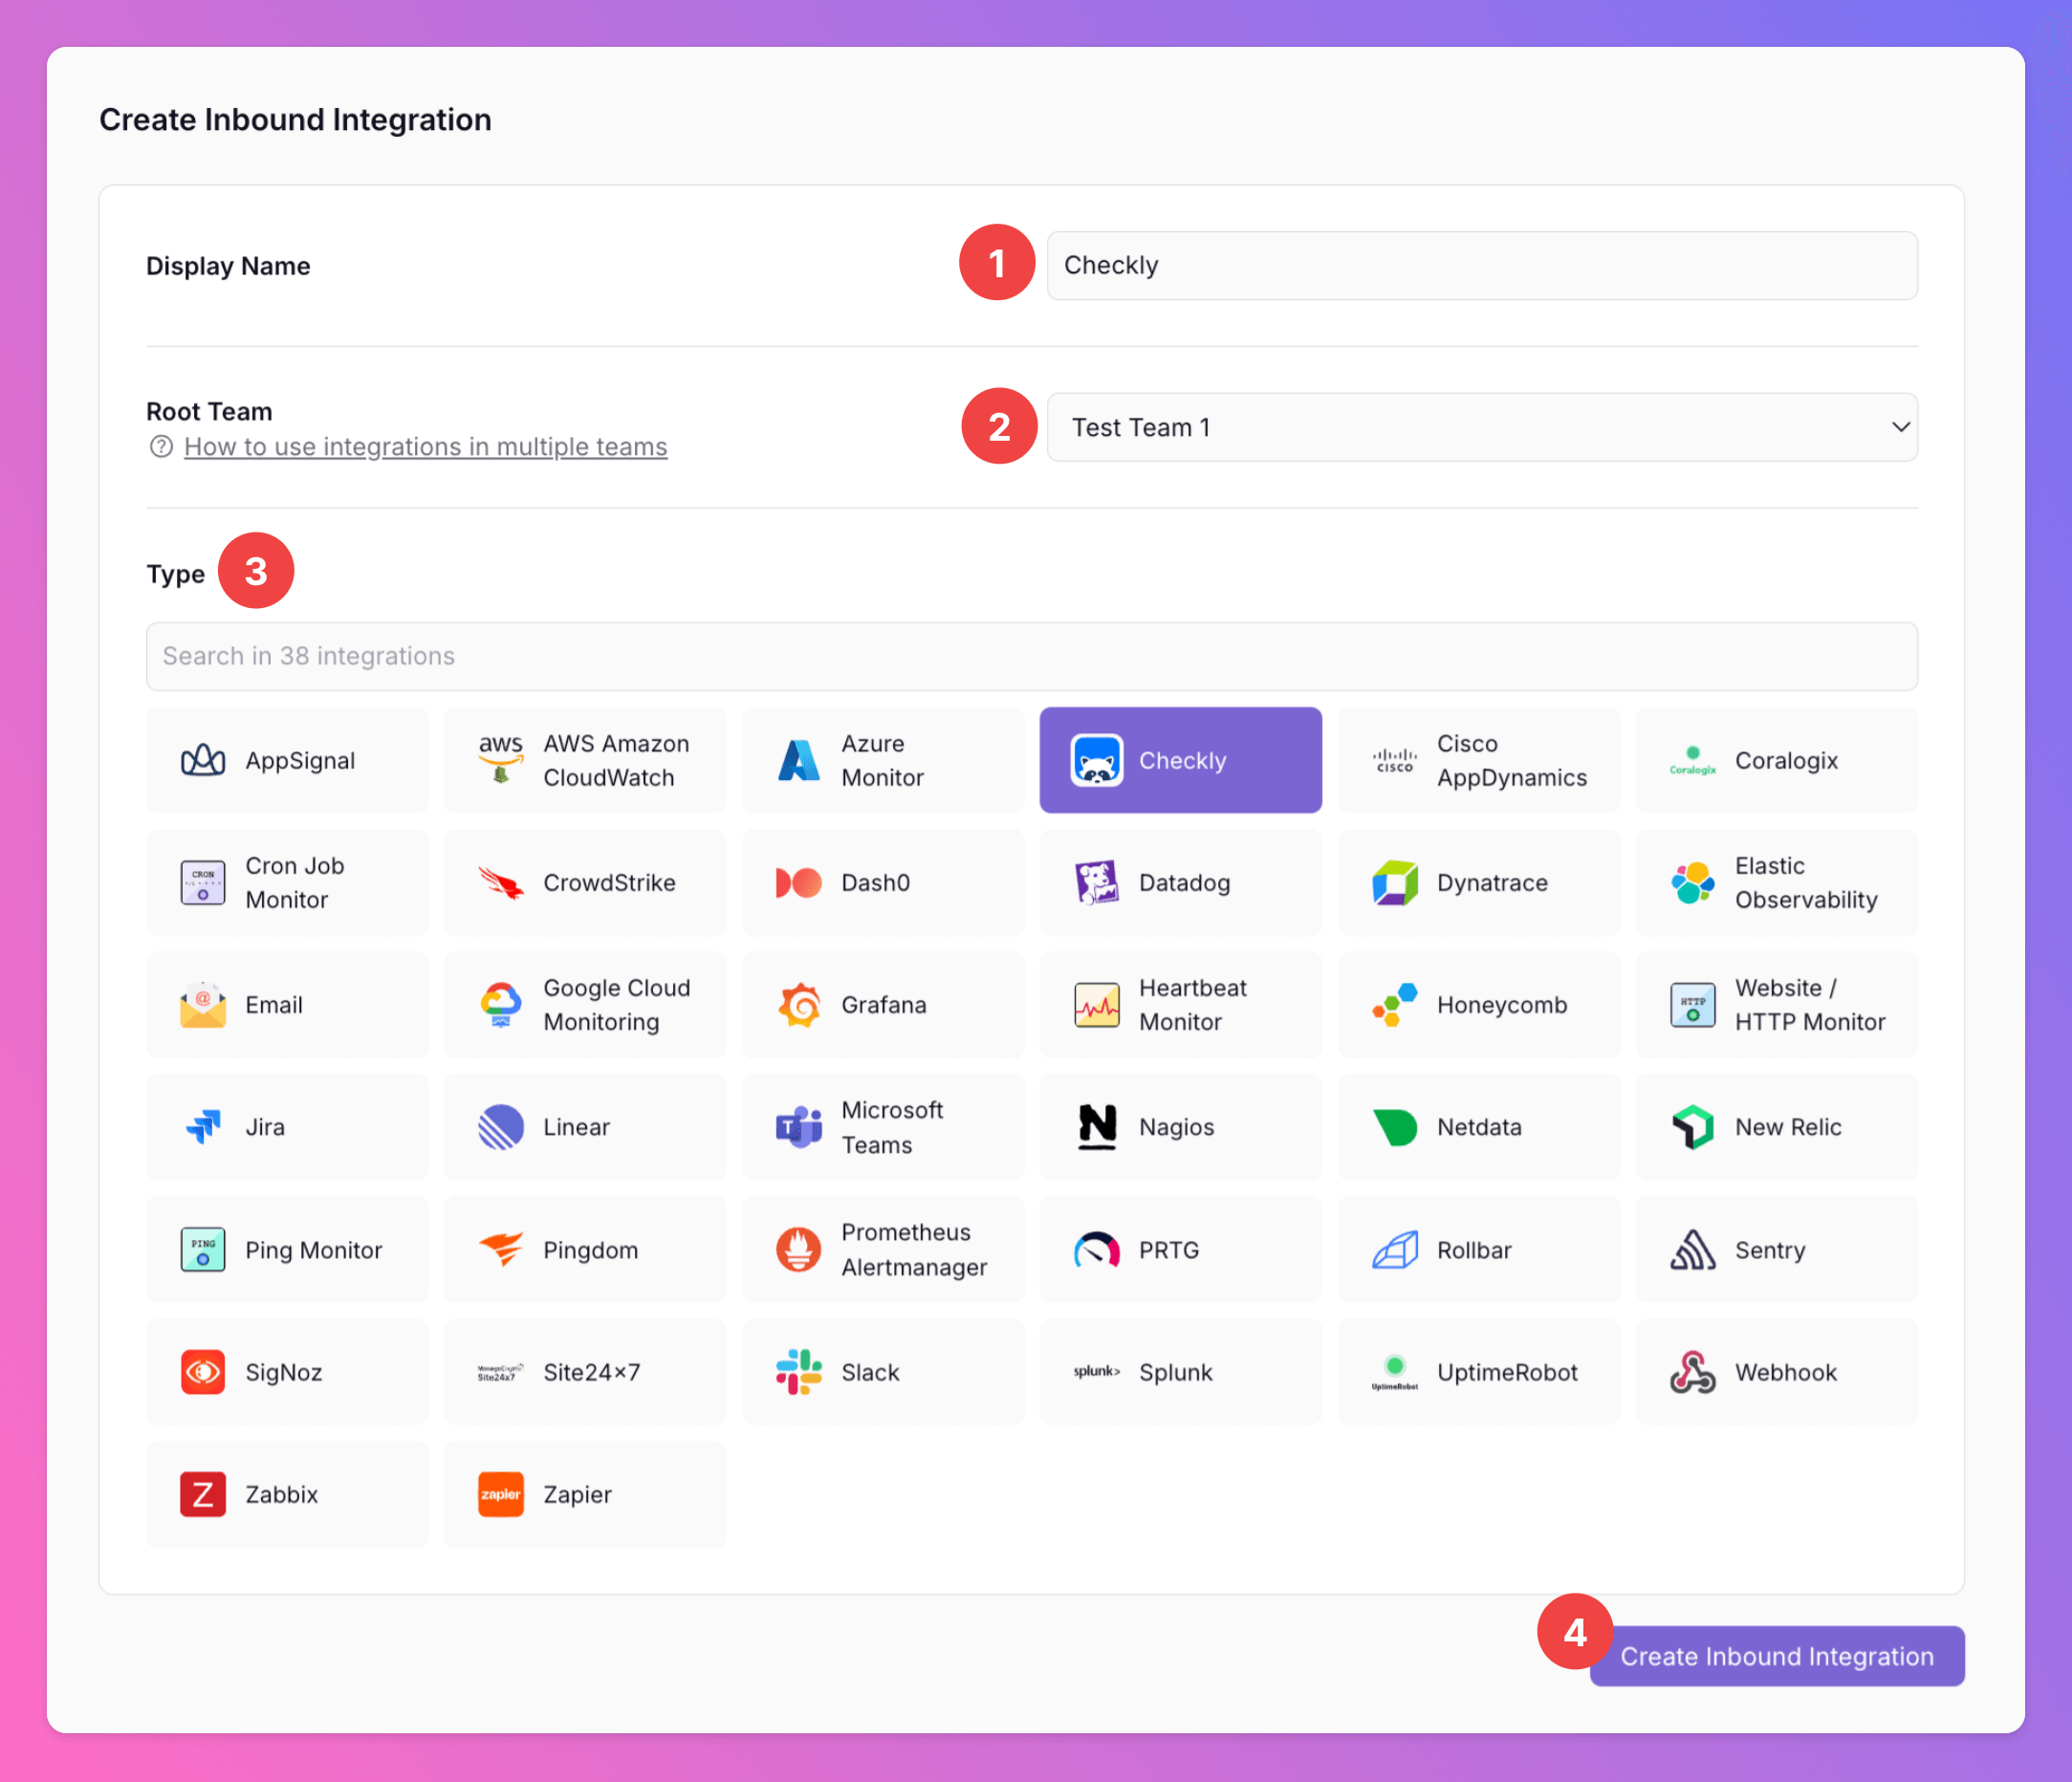
1. Enter a `Display Name` for your integration, e.g. "Checkly".
2. Select a `Team`.
3. Select `Checkly` as the integration's type.
4. Click `Create Inbound Integration`.
### Select Checkly as the integration's type
1. Enter a `Display Name` for your integration, e.g. "Checkly".
2. Select a `Team`.
3. Select `Checkly` as the integration's type.
4. Click `Create Inbound Integration`.
 ### Copy Webhook URL
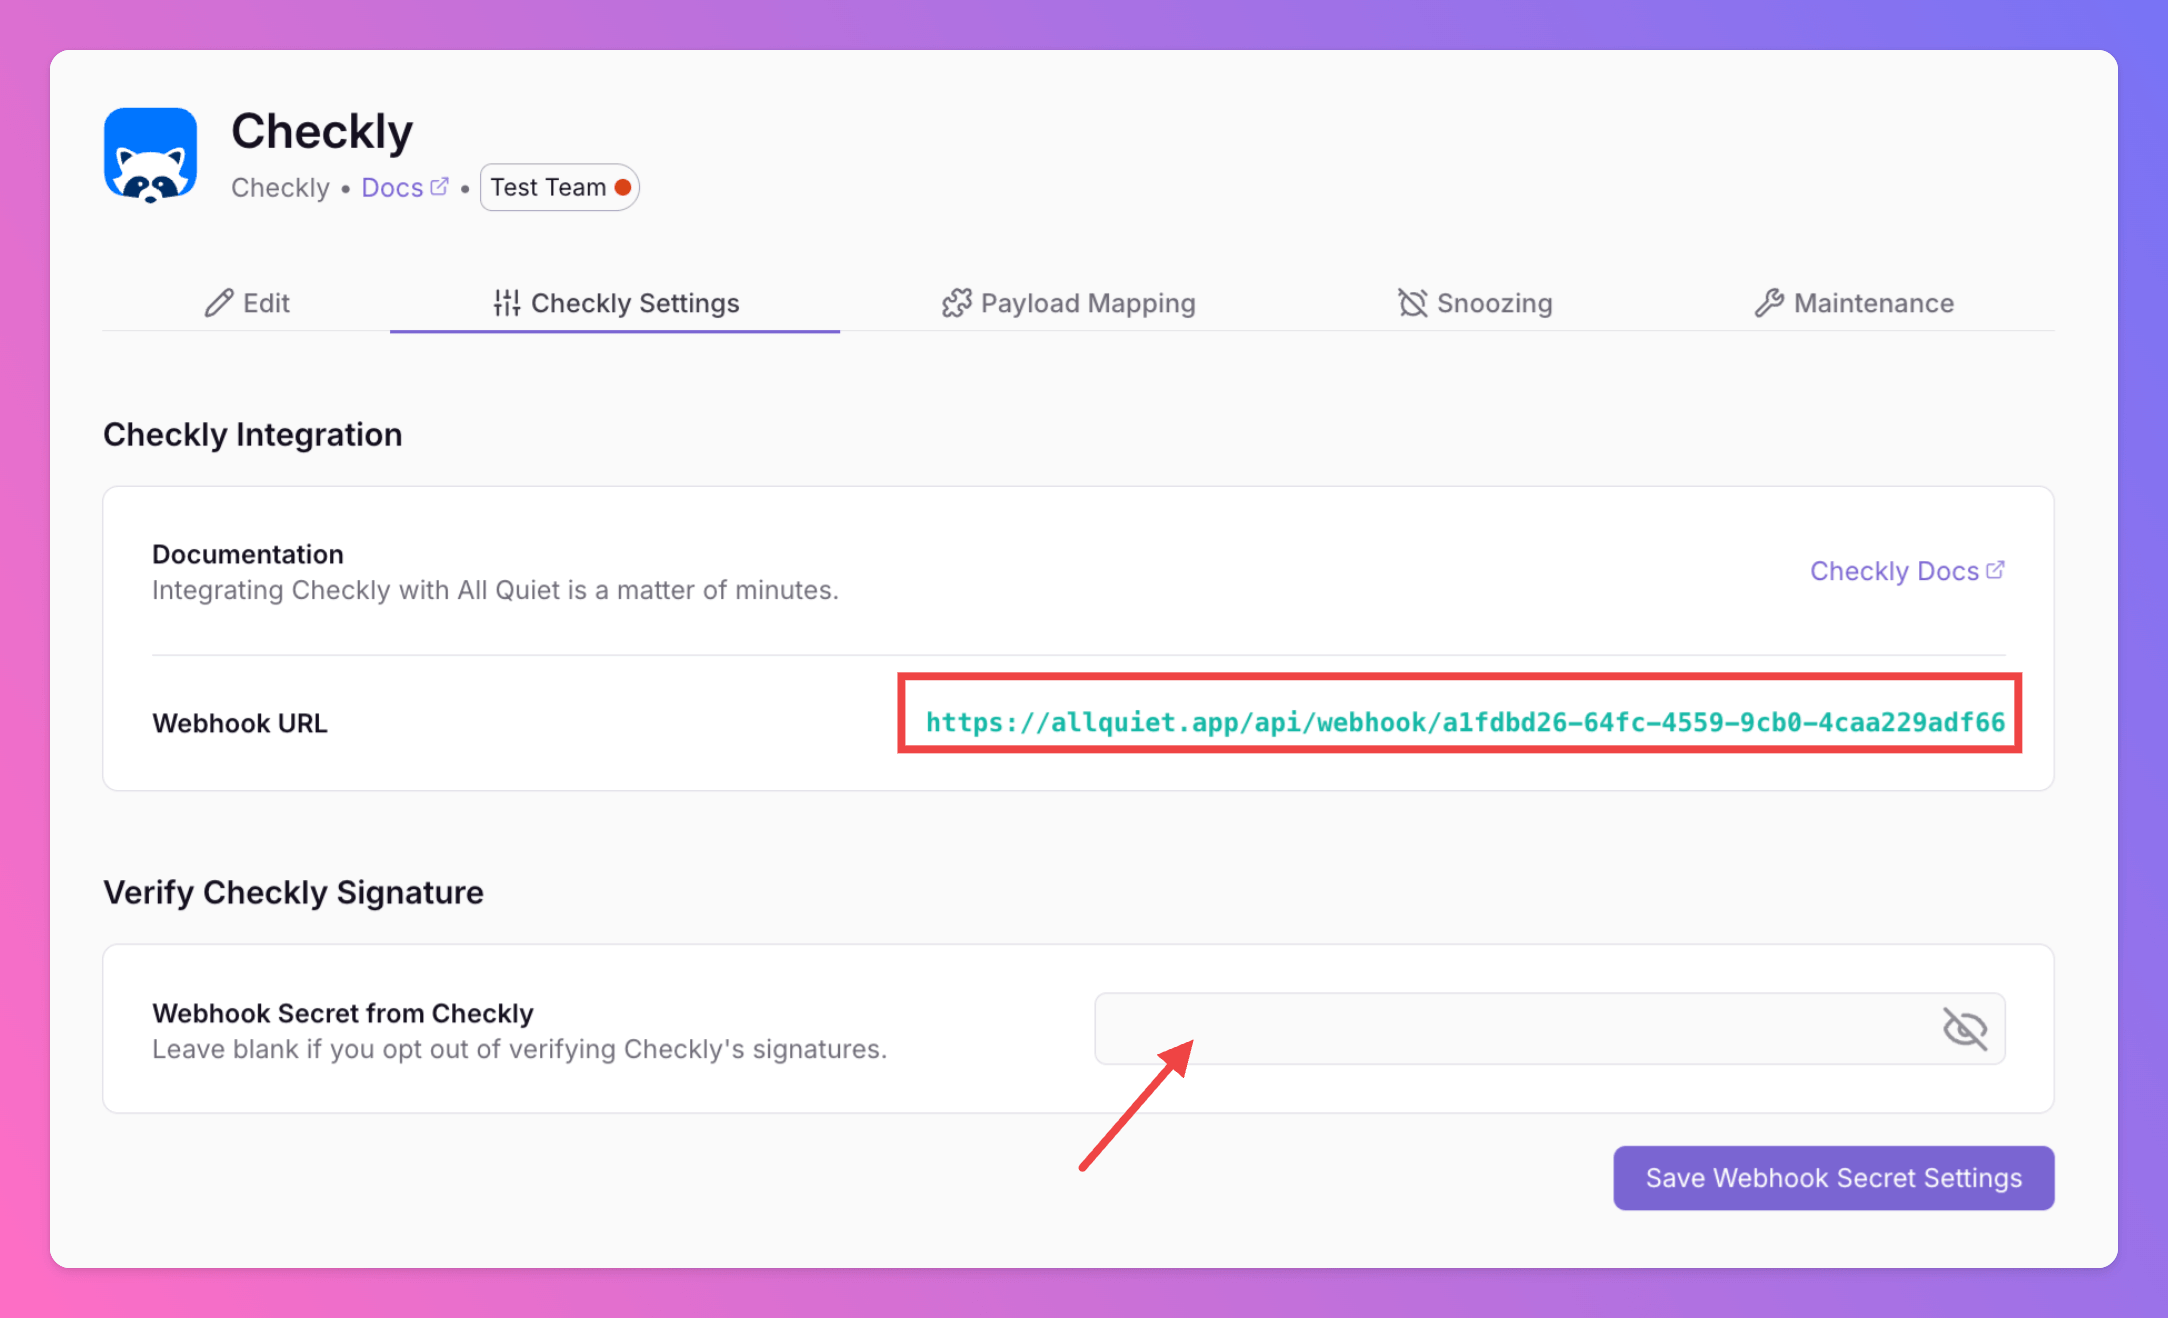
After creating the integration on All Quiet, you can view and copy the webhook URL. You will require this URL in step 2 when configuring the custom integration on Checkly.
If you choose to add a webhook secret in Checkly for increased security, you’ll need to add it here later.
### Copy Webhook URL
After creating the integration on All Quiet, you can view and copy the webhook URL. You will require this URL in step 2 when configuring the custom integration on Checkly.
If you choose to add a webhook secret in Checkly for increased security, you’ll need to add it here later.
 Optionally toggle `Enable additional Authentication & Security` below the webhook URL to restrict who can POST payloads.
* **IP Filter** — Allow requests only from specific IPs or CIDR ranges. Failed checks return **404 Not Found**.
* **Bearer authentication** — Require `Authorization: Bearer YOUR_TOKEN`. Missing or invalid tokens return **401 Unauthorized**.
If both are enabled, the request must pass both checks to be accepted.
## 2. Configure a custom integration with Checkly
Once you've set up an integration of type "Checkly" with All Quiet, the next crucial steps involve configuring your Checkly alerts. This is essential for ensuring that your monitoring setup can effectively send incidents to the All Quiet webhook.
First, you need to sign in to your Checkly Account.
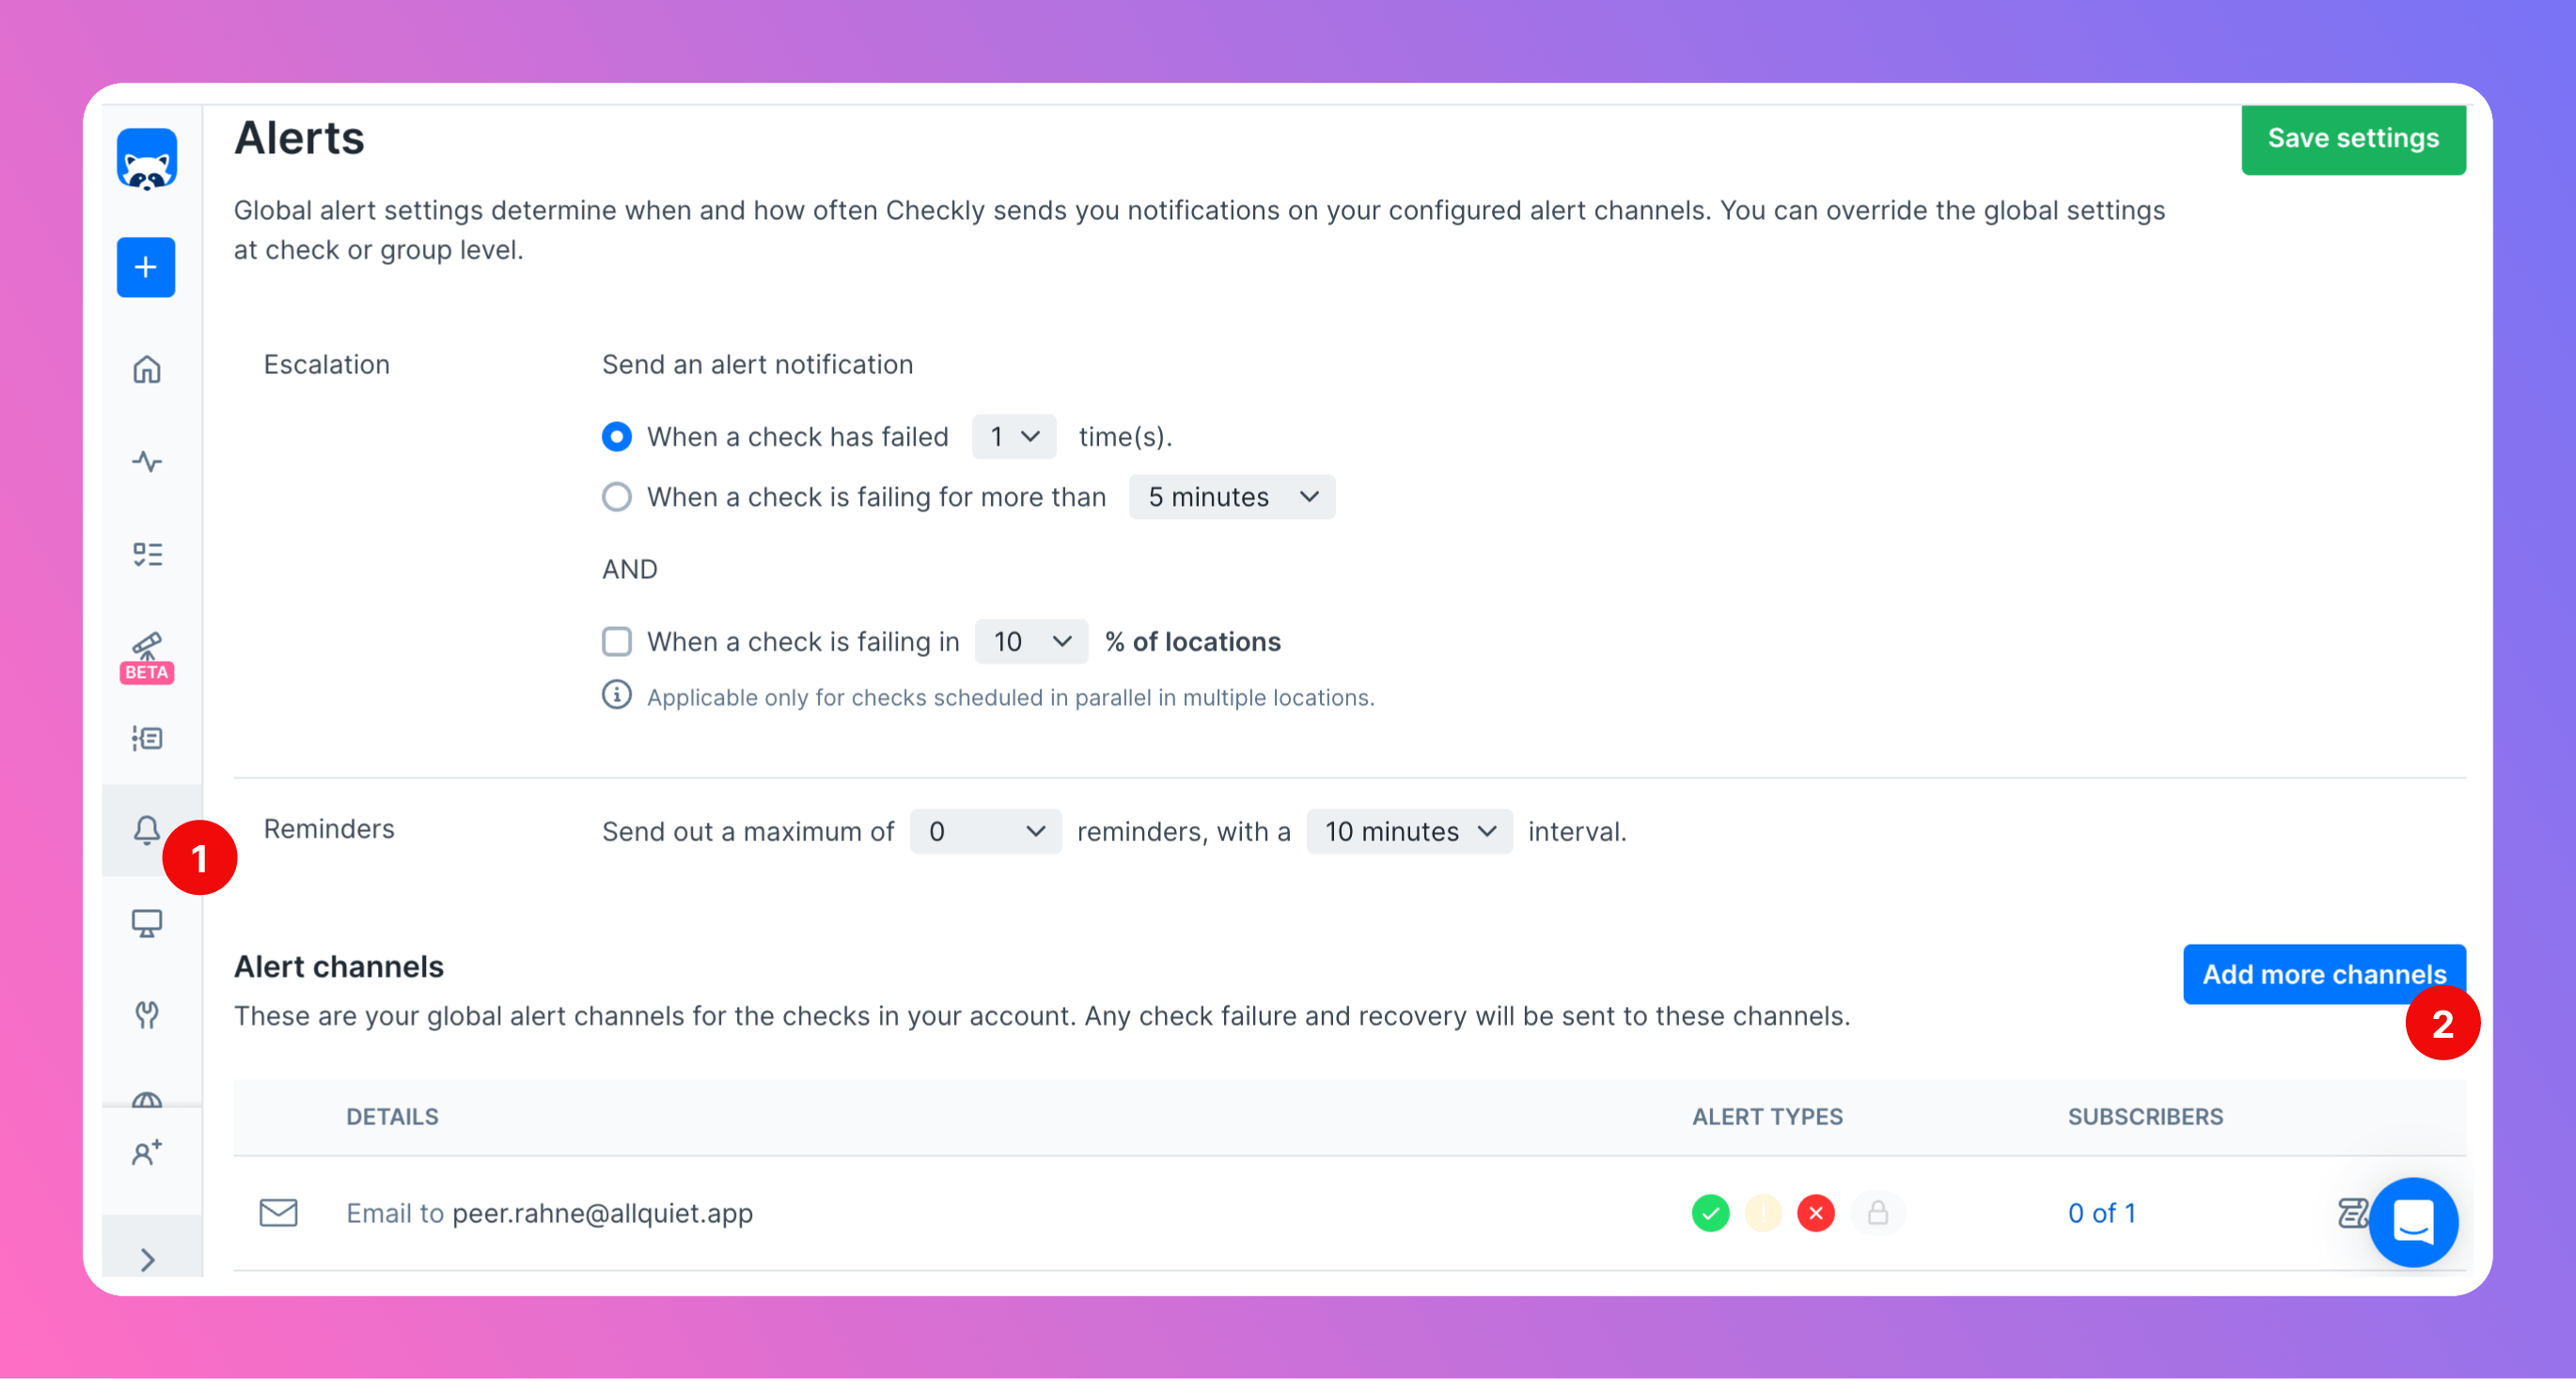
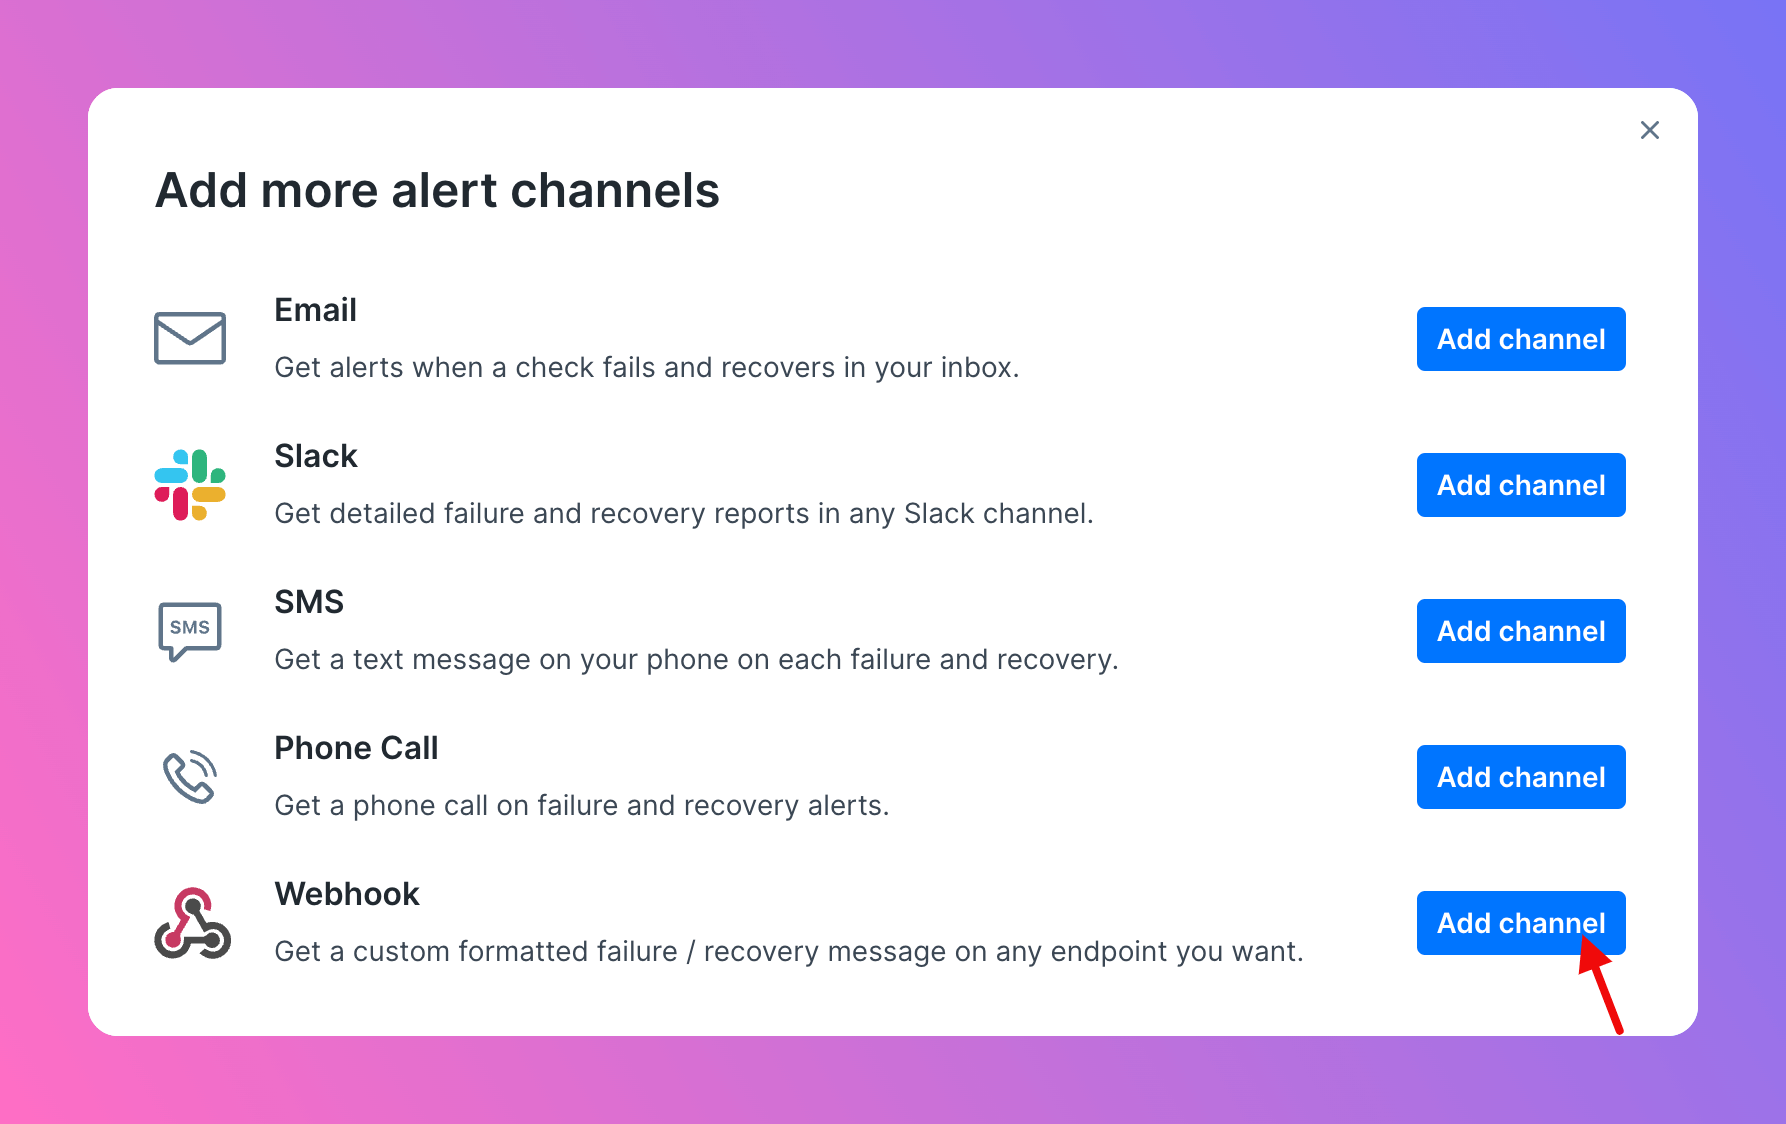
1. Open `Alerts`
2. Click `Add more channels`
Optionally toggle `Enable additional Authentication & Security` below the webhook URL to restrict who can POST payloads.
* **IP Filter** — Allow requests only from specific IPs or CIDR ranges. Failed checks return **404 Not Found**.
* **Bearer authentication** — Require `Authorization: Bearer YOUR_TOKEN`. Missing or invalid tokens return **401 Unauthorized**.
If both are enabled, the request must pass both checks to be accepted.
## 2. Configure a custom integration with Checkly
Once you've set up an integration of type "Checkly" with All Quiet, the next crucial steps involve configuring your Checkly alerts. This is essential for ensuring that your monitoring setup can effectively send incidents to the All Quiet webhook.
First, you need to sign in to your Checkly Account.
1. Open `Alerts`
2. Click `Add more channels`
 Select `Webhook` as the channel type.
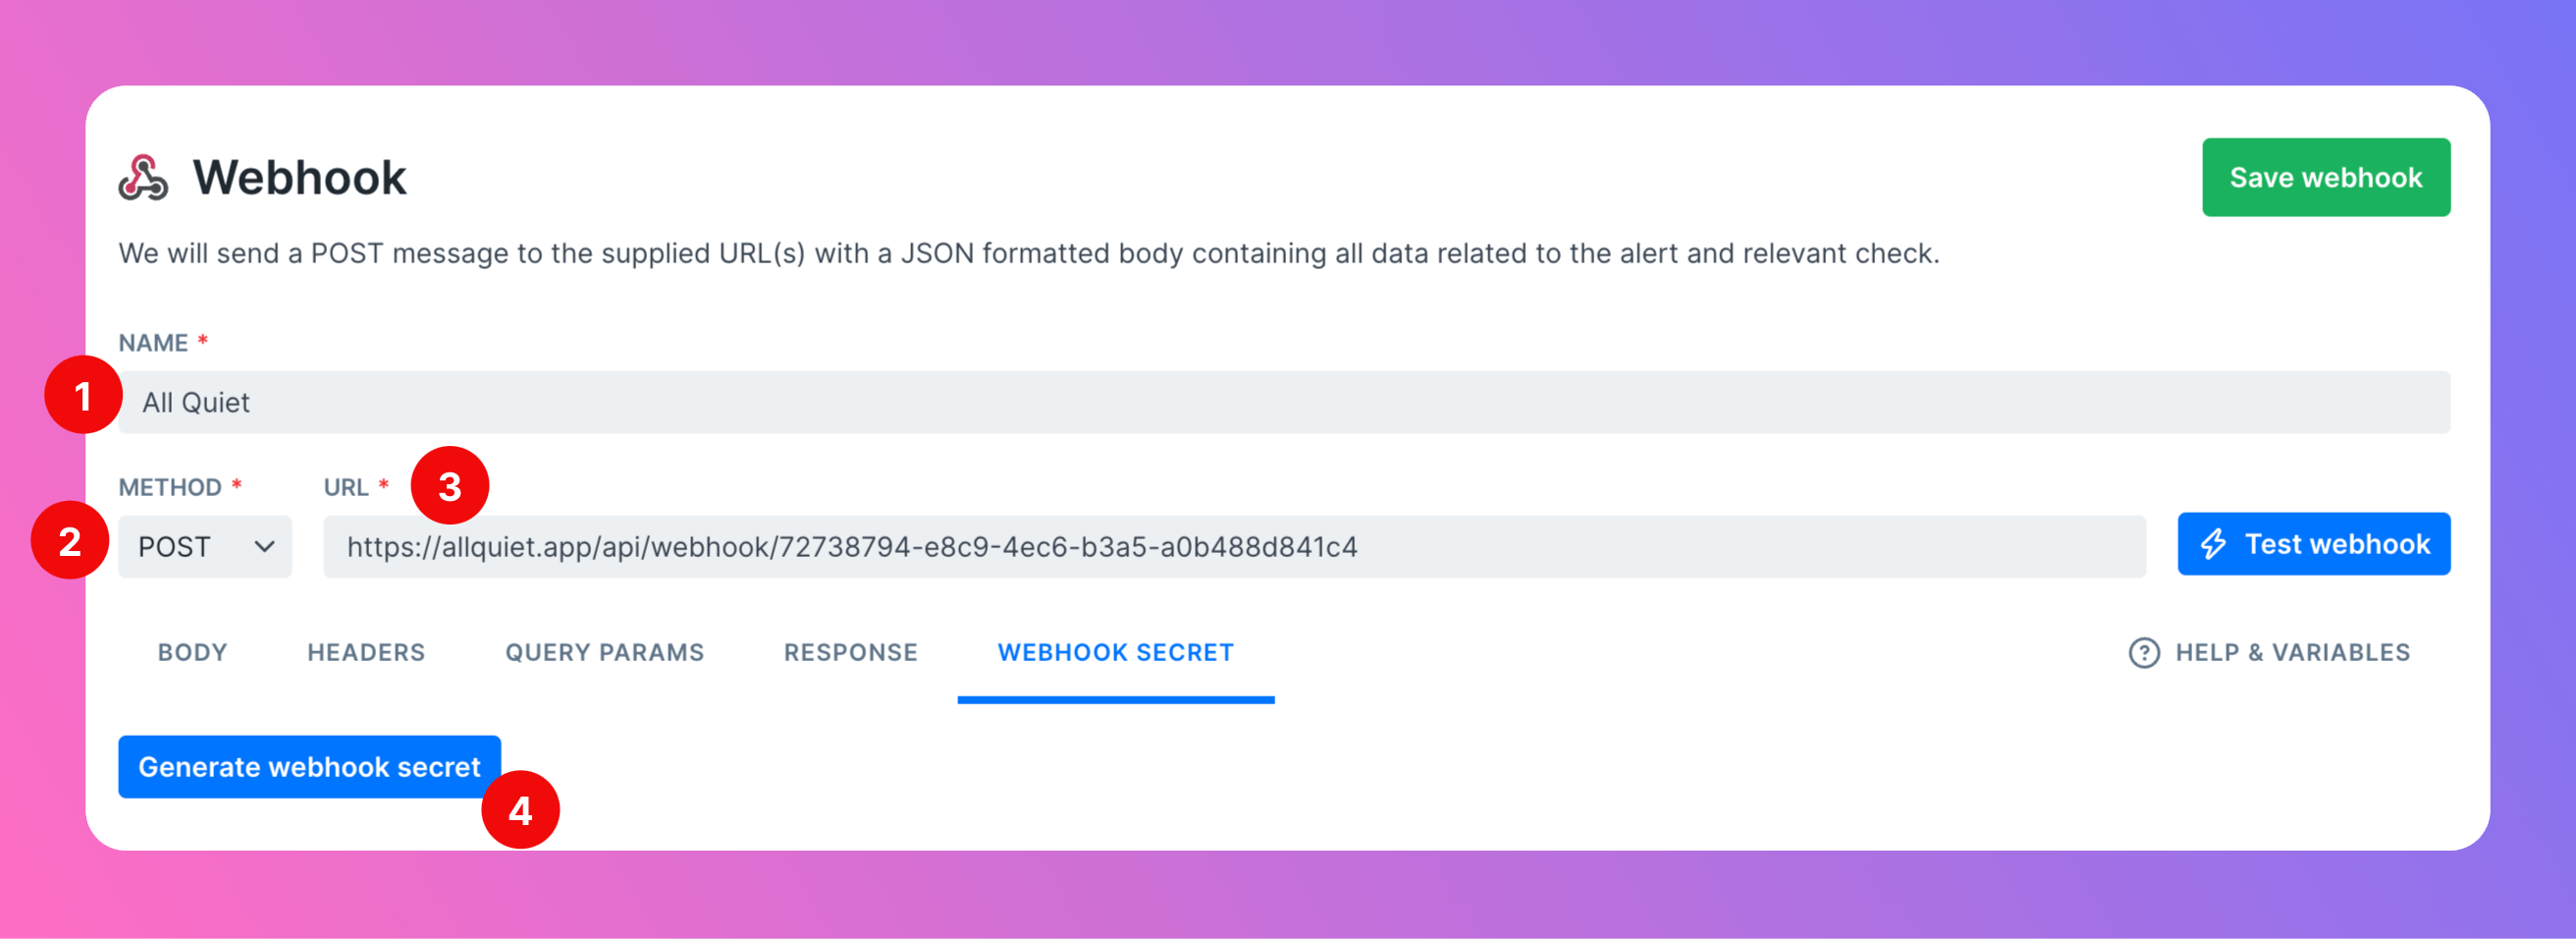
 Now, it's time to set up the webhook.
1. Select a name for the webhook, e.g. `All Quiet`.
2. Method should be `POST` as we want to forward alerts to All Quiet.
3. As URL, paste in the All Quiet webhook URL you've obtained in step [Get The All Quiet Webhook URL](/integrations/inbound/checkly#copy-webhook-url).
4. For extra security, you can select the tab `Webhook secret` and generate a webhook secret.
Now, it's time to set up the webhook.
1. Select a name for the webhook, e.g. `All Quiet`.
2. Method should be `POST` as we want to forward alerts to All Quiet.
3. As URL, paste in the All Quiet webhook URL you've obtained in step [Get The All Quiet Webhook URL](/integrations/inbound/checkly#copy-webhook-url).
4. For extra security, you can select the tab `Webhook secret` and generate a webhook secret.
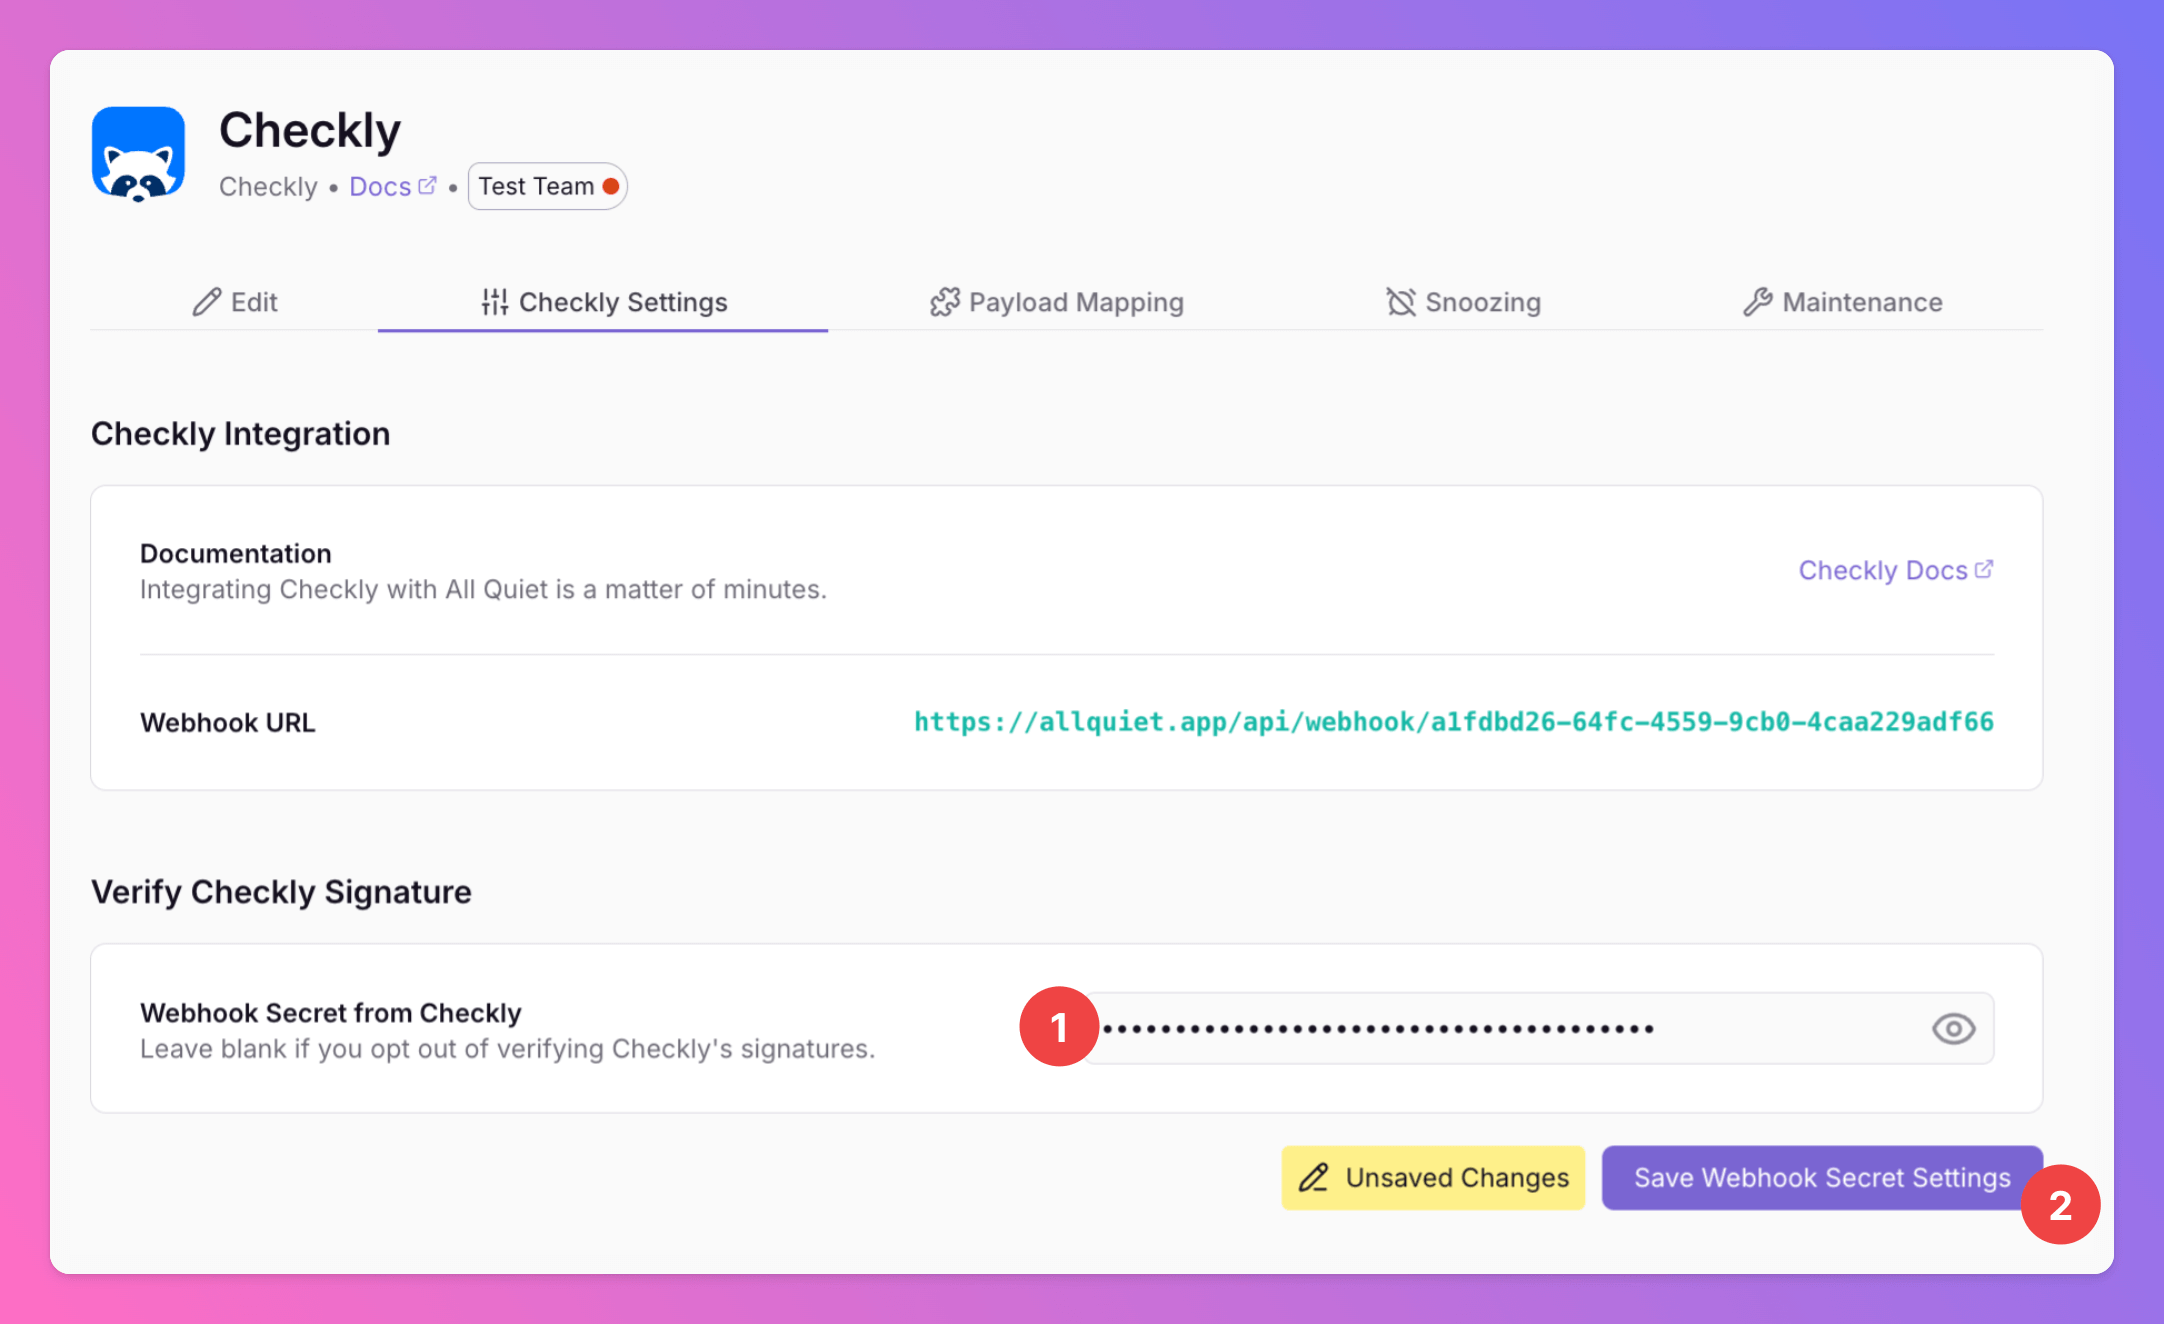
 If generated, copy the secret.
 Open your All Quiet Checkly integration settings in a second tab.
1. Paste the webhook secret.
2. `Save Webhook Secret Settings`
Open your All Quiet Checkly integration settings in a second tab.
1. Paste the webhook secret.
2. `Save Webhook Secret Settings`
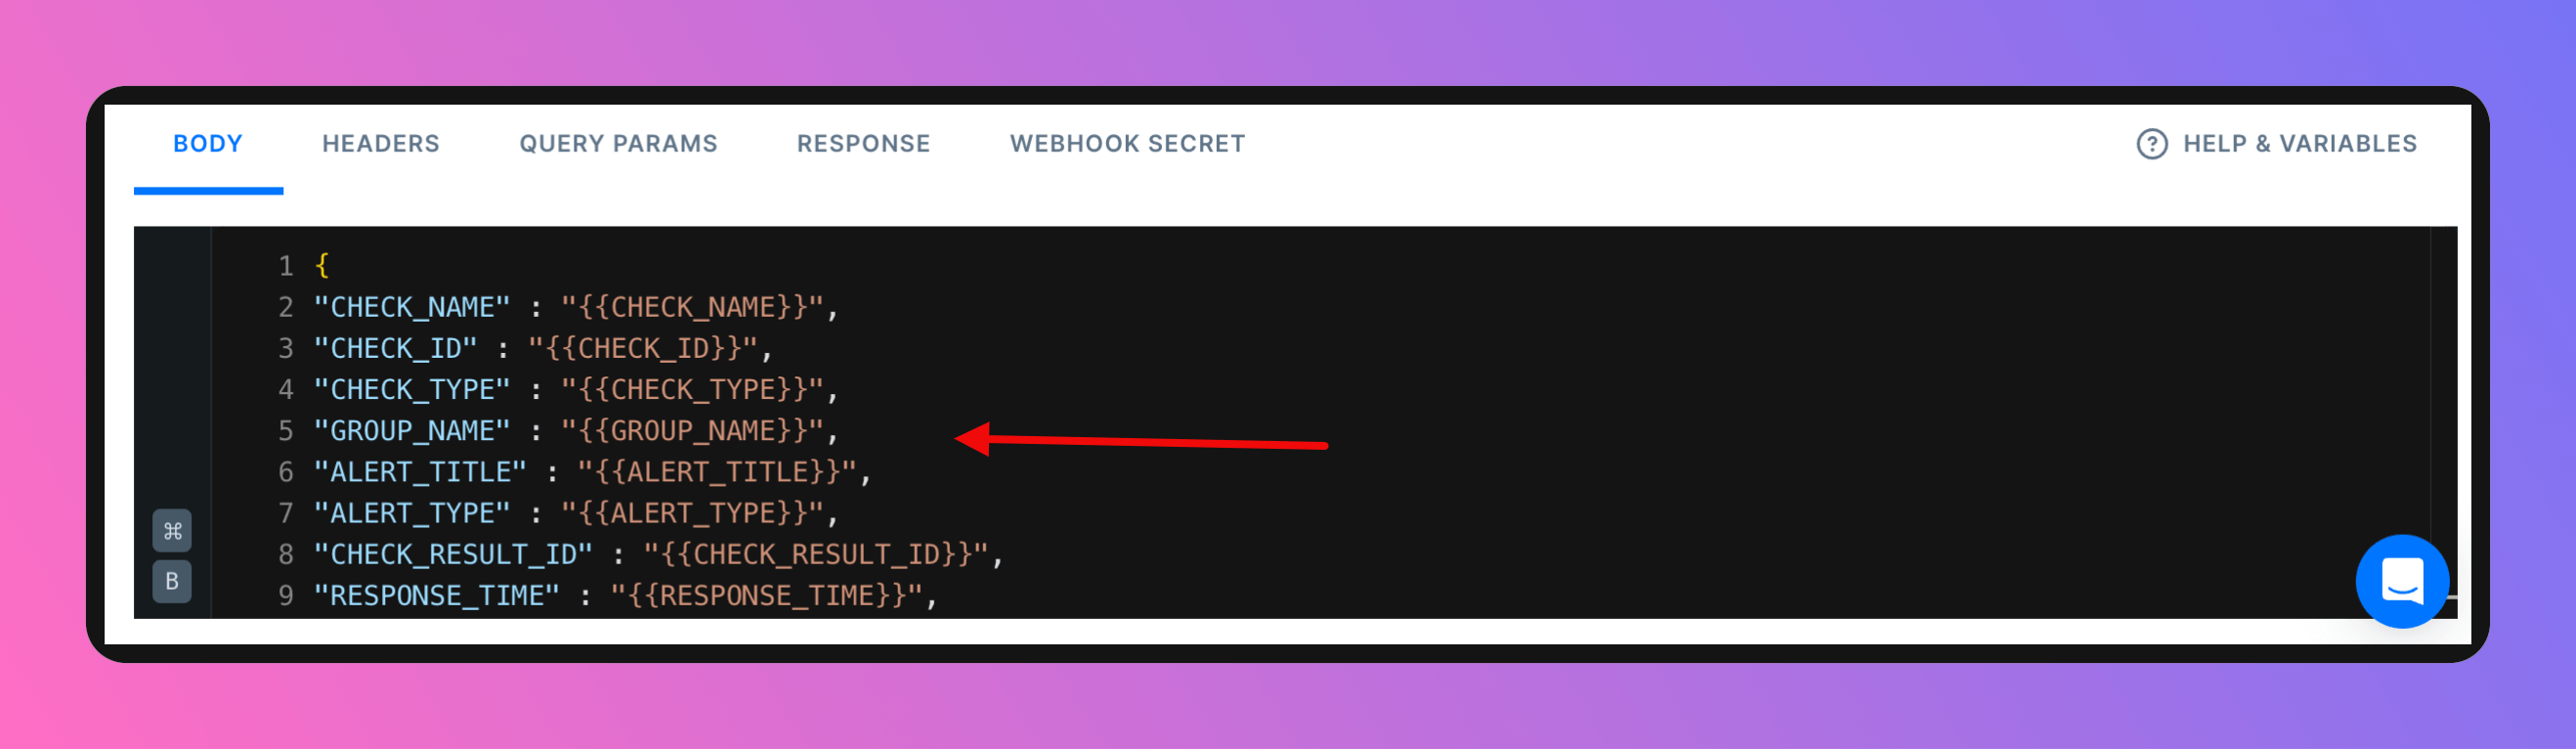
 Return to your webhook configuration in Checkly and open the `BODY` tab.
Paste the following payload into your checkly webhook template.
```
{
"CHECK_NAME" : "{{CHECK_NAME}}",
"CHECK_ID" : "{{CHECK_ID}}",
"CHECK_TYPE" : "{{CHECK_TYPE}}",
"GROUP_NAME" : "{{GROUP_NAME}}",
"ALERT_TITLE" : "{{ALERT_TITLE}}",
"ALERT_TYPE" : "{{ALERT_TYPE}}",
"CHECK_RESULT_ID" : "{{CHECK_RESULT_ID}}",
"RESPONSE_TIME" : "{{RESPONSE_TIME}}",
"API_CHECK_RESPONSE_STATUS_CODE" : "{{API_CHECK_RESPONSE_STATUS_CODE}}",
"API_CHECK_RESPONSE_STATUS_TEXT" : "{{API_CHECK_RESPONSE_STATUS_TEXT}}",
"RUN_LOCATION" : "{{RUN_LOCATION}}",
"RESULT_LINK" : "{{RESULT_LINK}}",
"SSL_DAYS_REMAINING" : "{{SSL_DAYS_REMAINING}}",
"SSL_CHECK_DOMAIN" : "{{SSL_CHECK_DOMAIN}}",
"STARTED_AT" : "{{STARTED_AT}}",
"TAGS" : "{{TAGS}}"
}
```
Return to your webhook configuration in Checkly and open the `BODY` tab.
Paste the following payload into your checkly webhook template.
```
{
"CHECK_NAME" : "{{CHECK_NAME}}",
"CHECK_ID" : "{{CHECK_ID}}",
"CHECK_TYPE" : "{{CHECK_TYPE}}",
"GROUP_NAME" : "{{GROUP_NAME}}",
"ALERT_TITLE" : "{{ALERT_TITLE}}",
"ALERT_TYPE" : "{{ALERT_TYPE}}",
"CHECK_RESULT_ID" : "{{CHECK_RESULT_ID}}",
"RESPONSE_TIME" : "{{RESPONSE_TIME}}",
"API_CHECK_RESPONSE_STATUS_CODE" : "{{API_CHECK_RESPONSE_STATUS_CODE}}",
"API_CHECK_RESPONSE_STATUS_TEXT" : "{{API_CHECK_RESPONSE_STATUS_TEXT}}",
"RUN_LOCATION" : "{{RUN_LOCATION}}",
"RESULT_LINK" : "{{RESULT_LINK}}",
"SSL_DAYS_REMAINING" : "{{SSL_DAYS_REMAINING}}",
"SSL_CHECK_DOMAIN" : "{{SSL_CHECK_DOMAIN}}",
"STARTED_AT" : "{{STARTED_AT}}",
"TAGS" : "{{TAGS}}"
}
```
 Scroll down further.
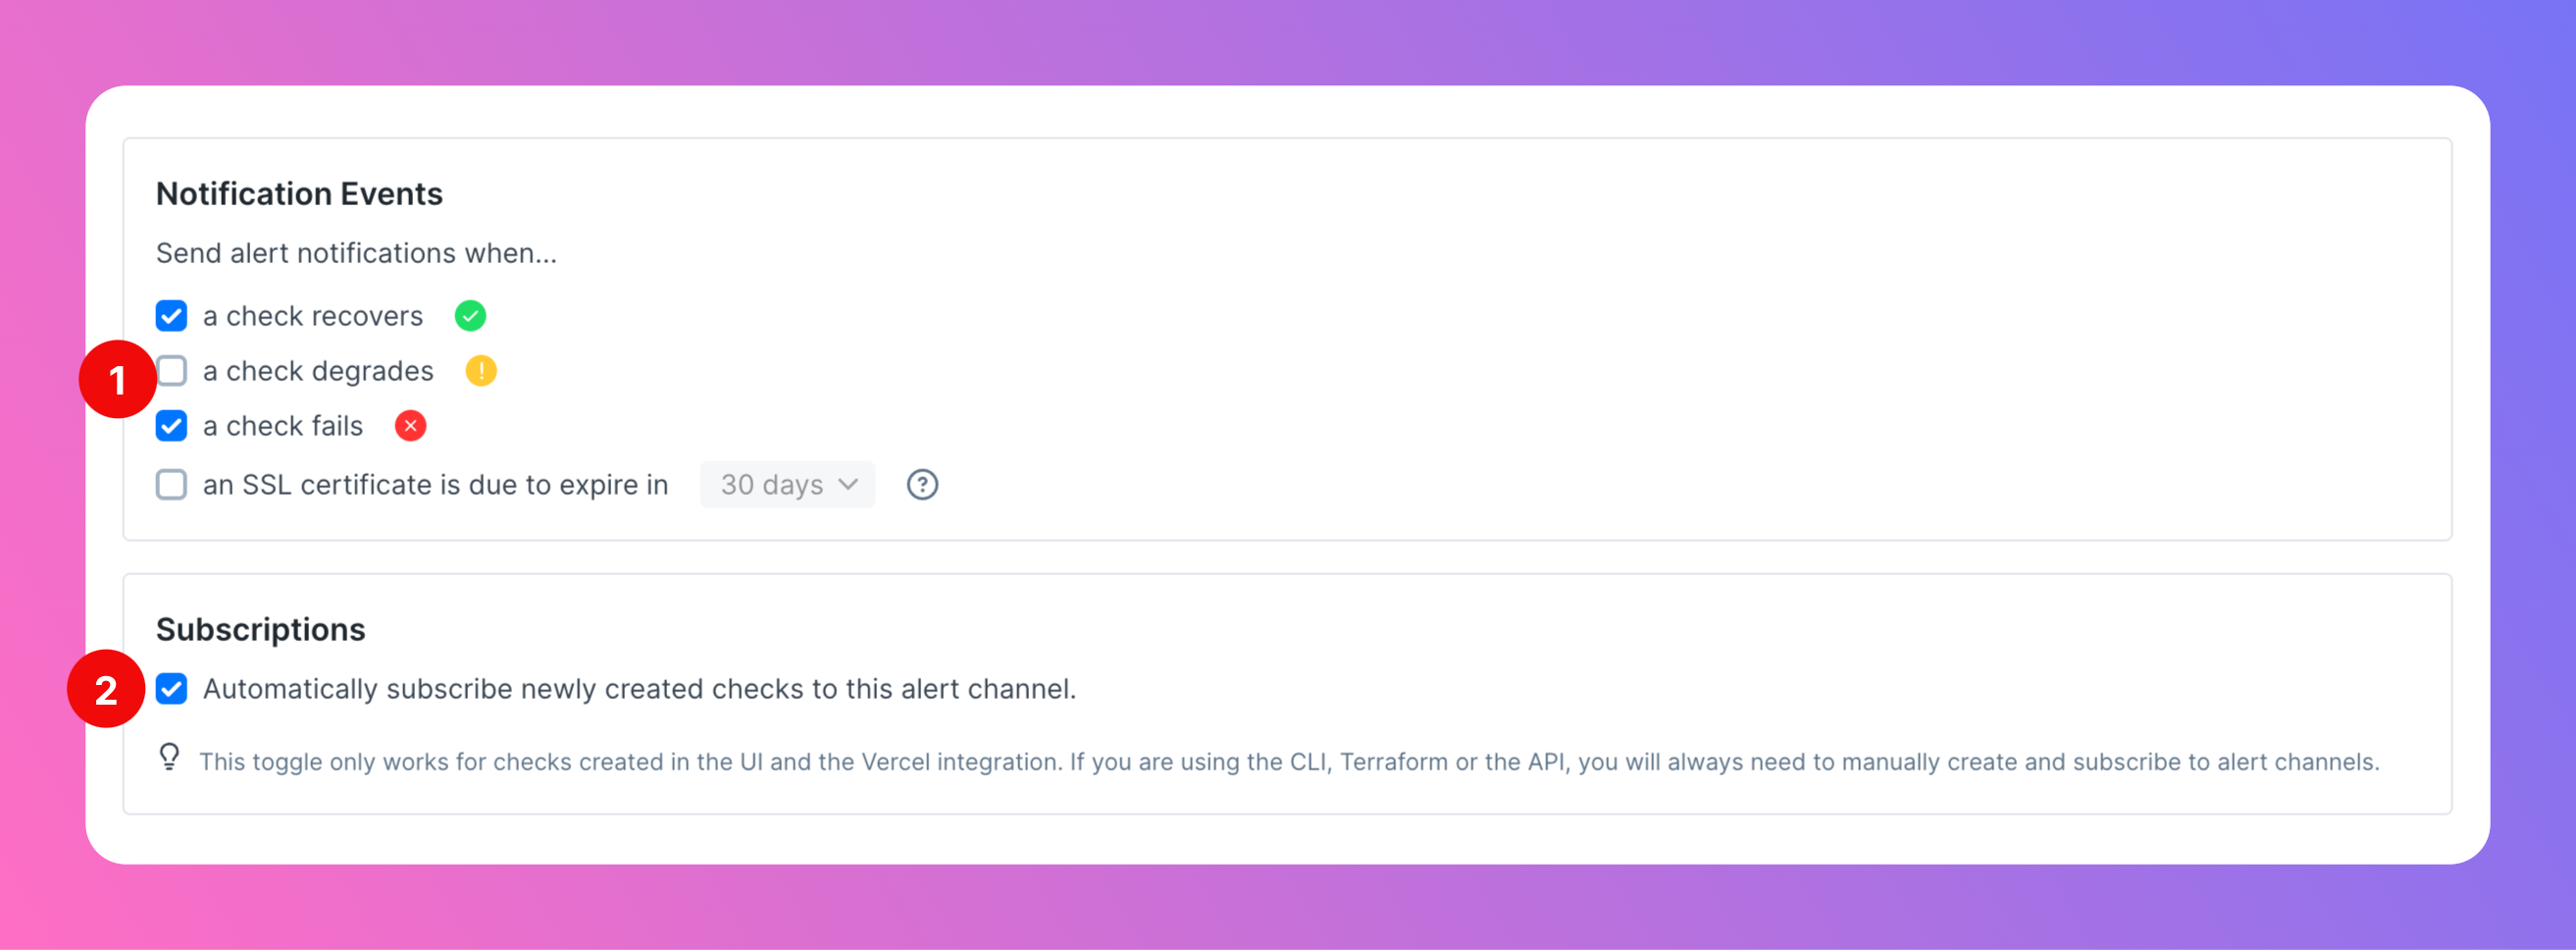
1. Select the type of `Notification Events` for which you would like to create All Quiet alerts.
2. Activate `Subscriptions` if you want to make sure that alerts for newly created checks will also be sent to All Quiet.
Scroll down further.
1. Select the type of `Notification Events` for which you would like to create All Quiet alerts.
2. Activate `Subscriptions` if you want to make sure that alerts for newly created checks will also be sent to All Quiet.
 Scroll back up to the top of the page.
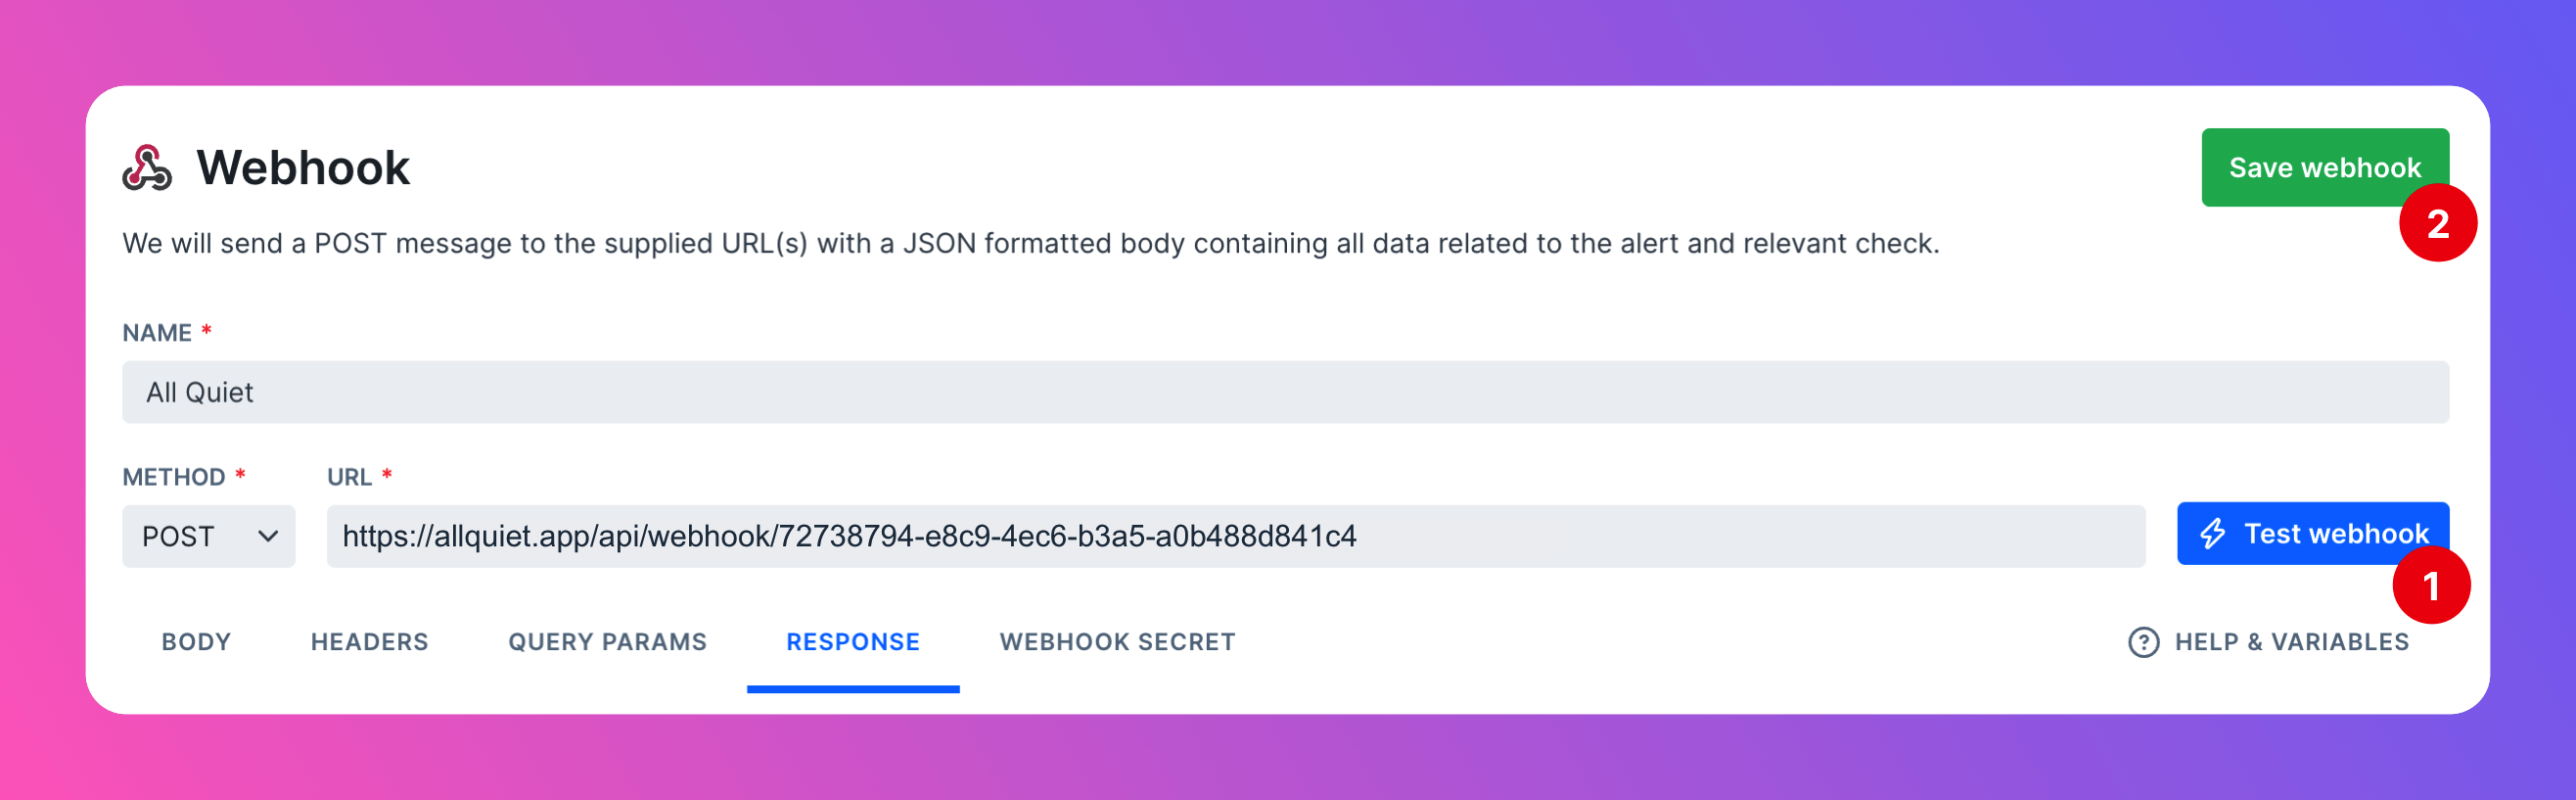
1. Test the Webhook. If successful, you will find the generated incident on your All Quiet incident overview (see 2nd screenshot).
2. Save the webhook.
Scroll back up to the top of the page.
1. Test the Webhook. If successful, you will find the generated incident on your All Quiet incident overview (see 2nd screenshot).
2. Save the webhook.
 Checkly incident in All Quiet
 You're ready to go. If you set up your integration this way, Checkly will send alerts for all of your checks to All Quiet.
### Adjust Payload Mapping
Looking to customize the fields of your incidents by adjusting the pre-built payload mapping? Simply head over to the “Payload” tab within your integration and make the necessary edits to the mapping. For detailed guidance, you may check out our [payload mapping documentation](/essentials/inbound#how-does-attribute-mapping-work).
Using our Terraform provider? [Download](https://allquiet.app/api/integrations/terraform/default/Checkly.tf) the default mapping of the `allquiet_integration_mapping` resource for the Checkly integration. Simply copy the syntax to your .tf file and tailor the resource to your team's needs!
You're ready to go. If you set up your integration this way, Checkly will send alerts for all of your checks to All Quiet.
### Adjust Payload Mapping
Looking to customize the fields of your incidents by adjusting the pre-built payload mapping? Simply head over to the “Payload” tab within your integration and make the necessary edits to the mapping. For detailed guidance, you may check out our [payload mapping documentation](/essentials/inbound#how-does-attribute-mapping-work).
Using our Terraform provider? [Download](https://allquiet.app/api/integrations/terraform/default/Checkly.tf) the default mapping of the `allquiet_integration_mapping` resource for the Checkly integration. Simply copy the syntax to your .tf file and tailor the resource to your team's needs!