> ## Documentation Index
> Fetch the complete documentation index at: https://docs.allquiet.app/llms.txt
> Use this file to discover all available pages before exploring further.
# AppDynamics
> Connect AppDynamics to All Quiet
Setup time: 3 Min
Integrate AppDynamics into All Quiet by using our custom integration.
## 1. Add AppDynamics Integration to Your All Quiet Team
### Create an AppDynamics integration
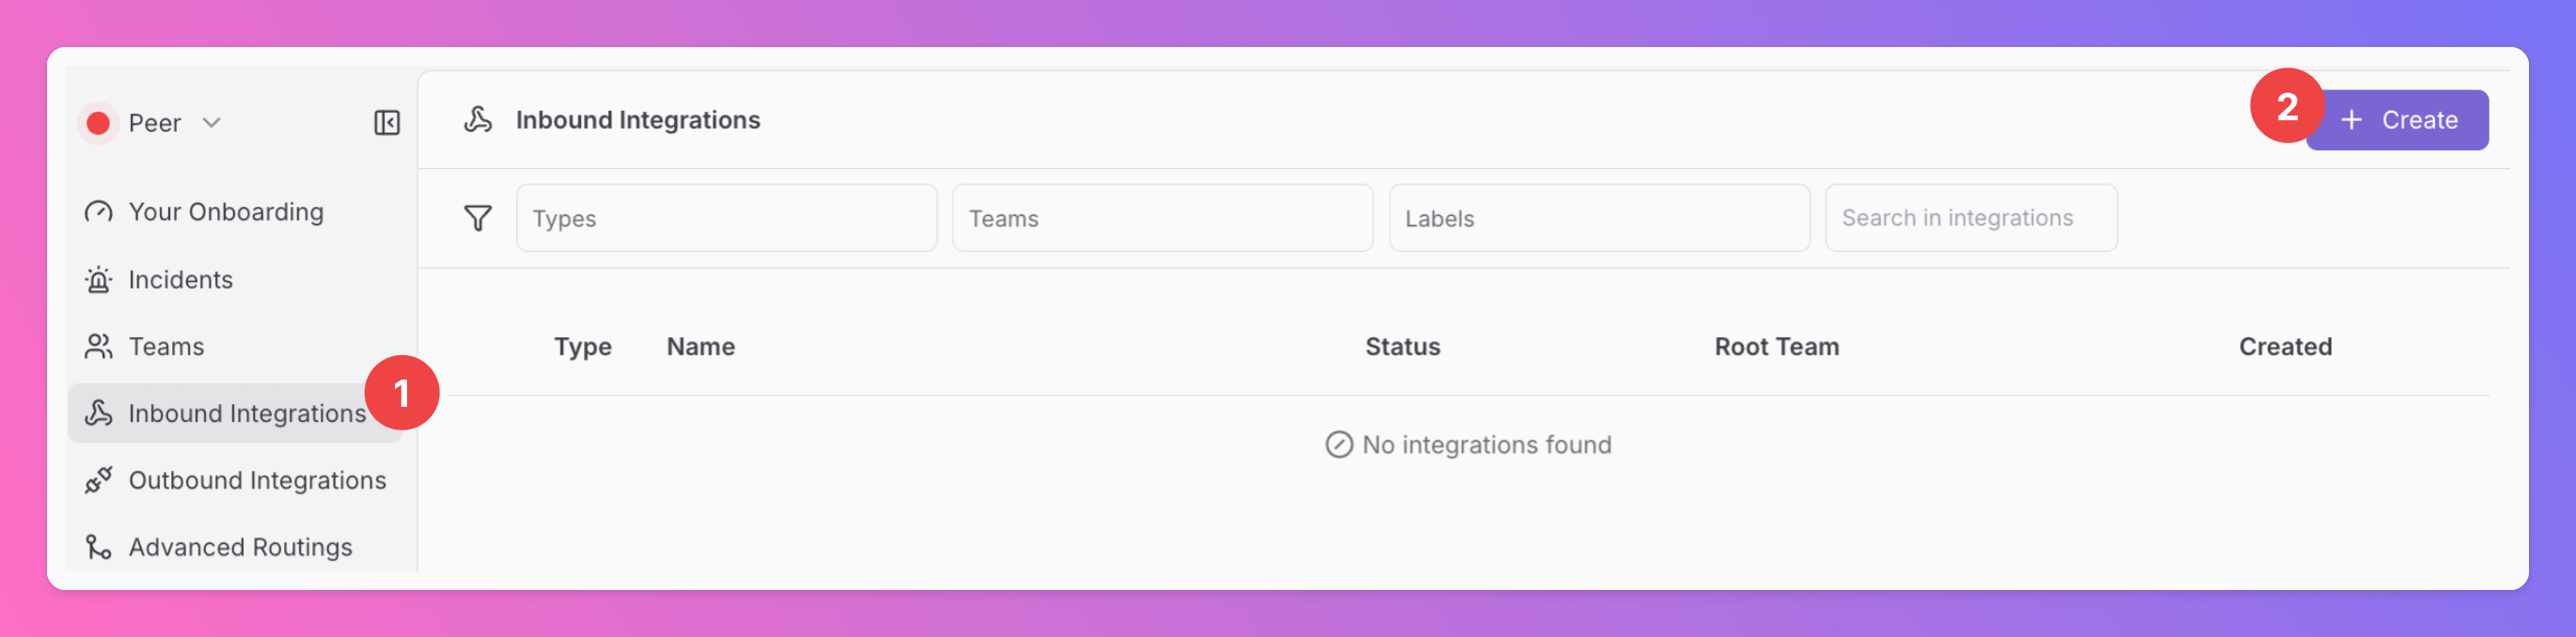
1. Click on the `Inbound Integrations` Tab.
2. Click on `+ Create`.
 ### Select AppDynamics as the Integration's Type
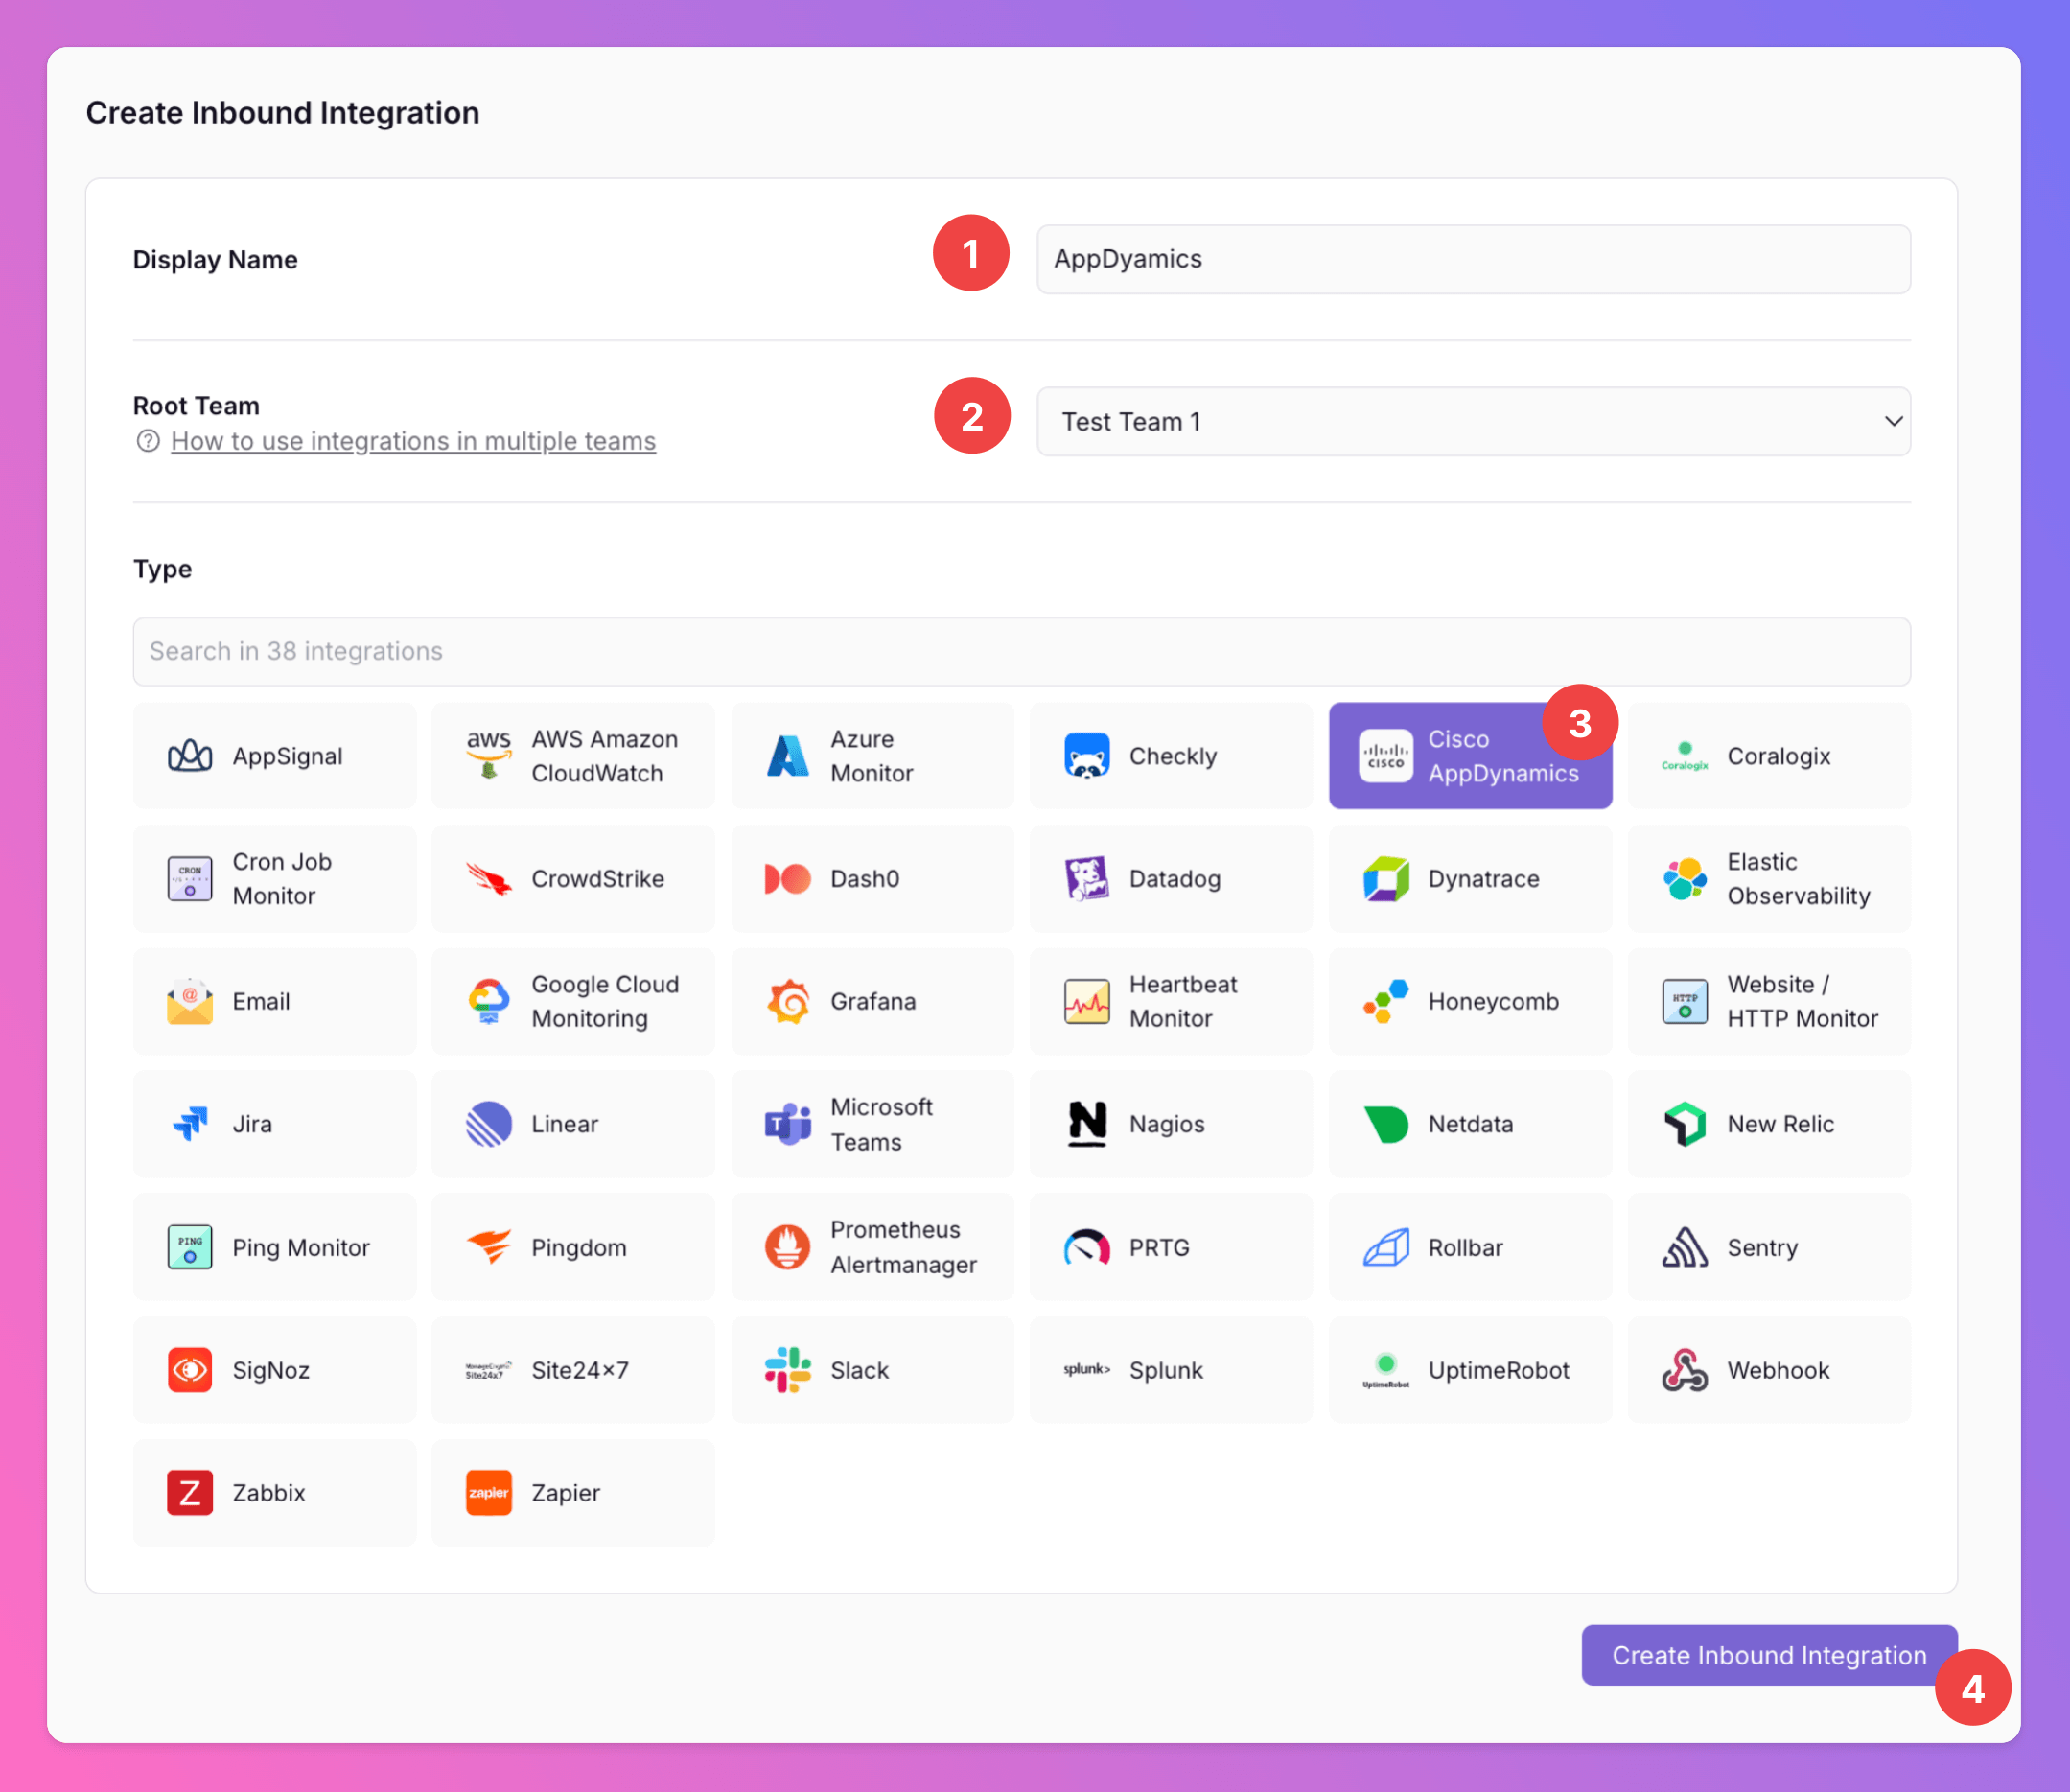
1. Enter a `Display Name` for your AppDynamics integration, e.g. "AppDynamics".
2. Pick the `Team` you'd like to add the integration to.
3. Select `AppDynamics` as the type.
4. Click `Create Inbound Integration`.
### Select AppDynamics as the Integration's Type
1. Enter a `Display Name` for your AppDynamics integration, e.g. "AppDynamics".
2. Pick the `Team` you'd like to add the integration to.
3. Select `AppDynamics` as the type.
4. Click `Create Inbound Integration`.
 ### Get the All Quiet webhook URL
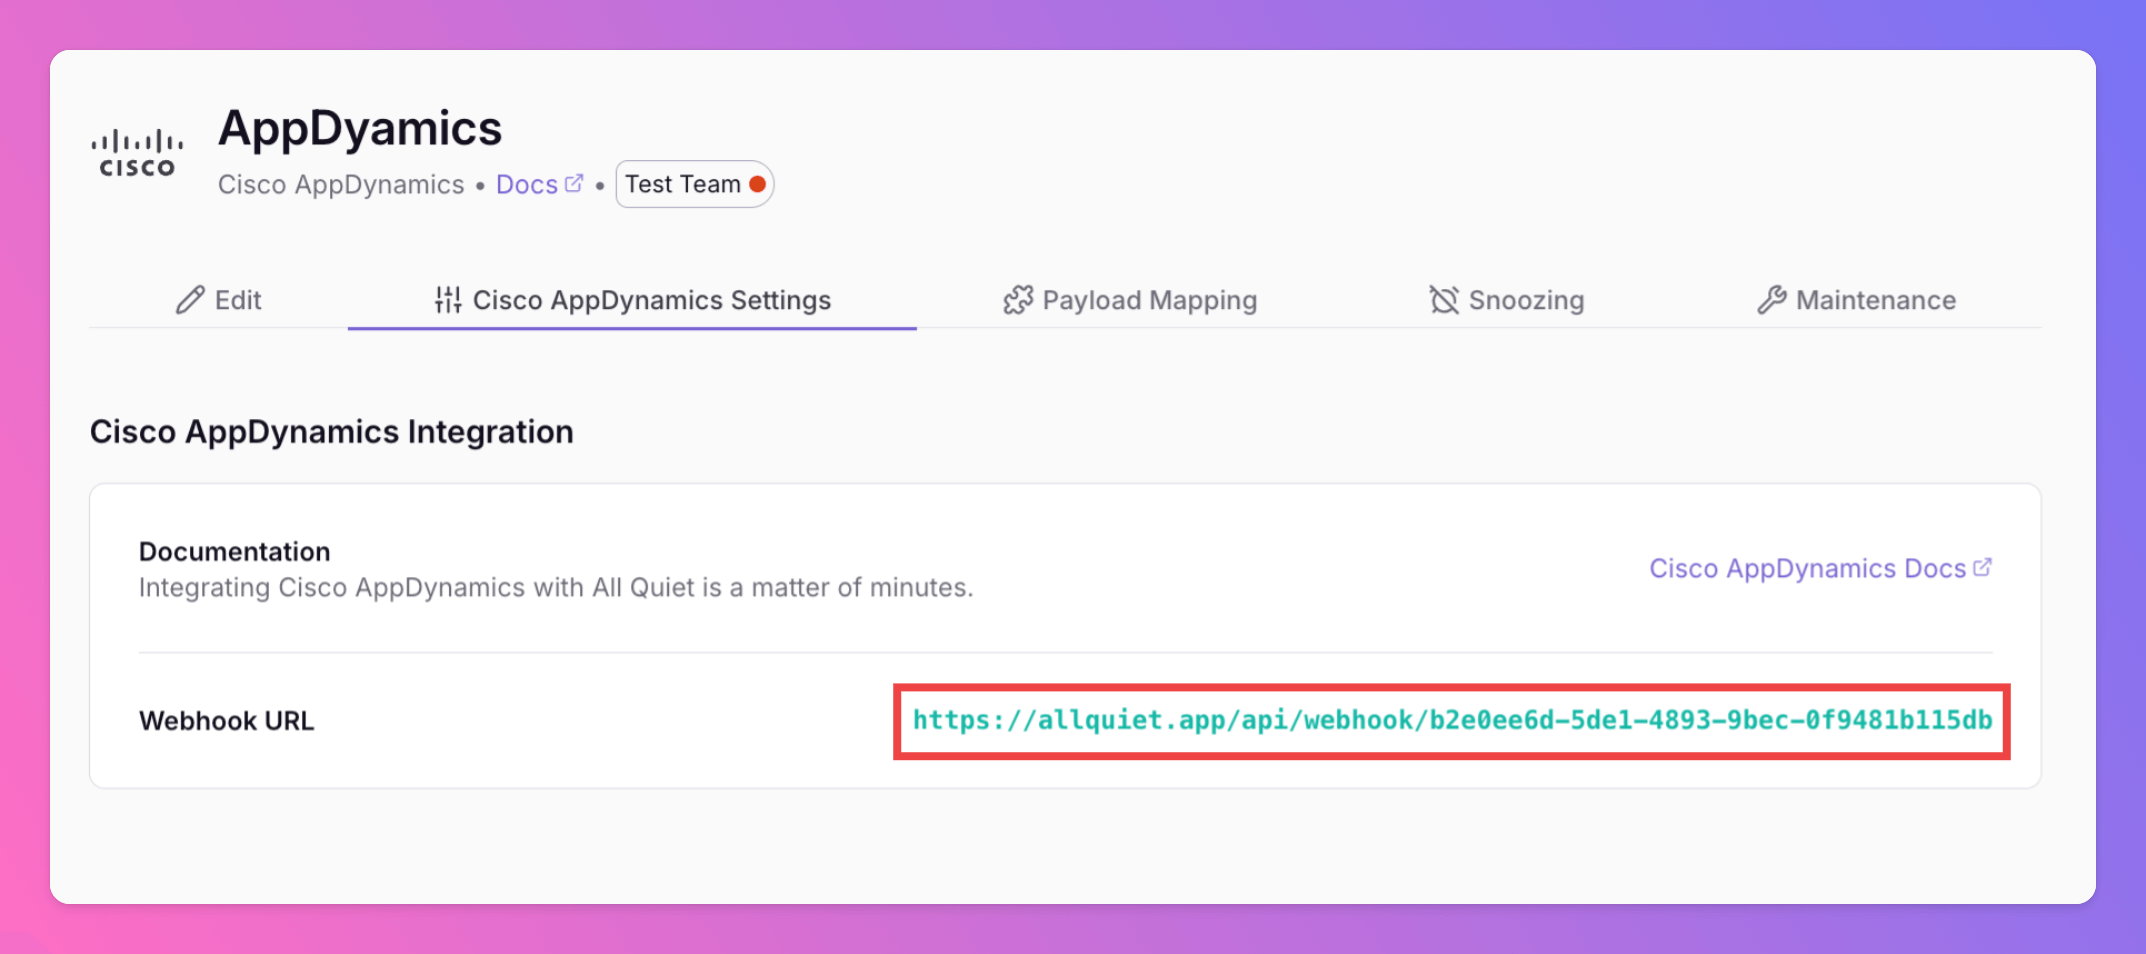
After creating the integration on All Quiet, you can view and copy the webhook URL. You will require this URL in step 2 when configuring the custom integration on AppDynamics.
### Get the All Quiet webhook URL
After creating the integration on All Quiet, you can view and copy the webhook URL. You will require this URL in step 2 when configuring the custom integration on AppDynamics.
 Optionally toggle `Enable additional Authentication & Security` below the webhook URL to restrict who can POST payloads.
* **IP Filter** — Allow requests only from specific IPs or CIDR ranges. Failed checks return **404 Not Found**.
* **Bearer authentication** — Require `Authorization: Bearer YOUR_TOKEN`. Missing or invalid tokens return **401 Unauthorized**.
If both are enabled, the request must pass both checks to be accepted.
## 2. Create a custom integration on AppDynamics
Sign in to your AppDynamics Account.
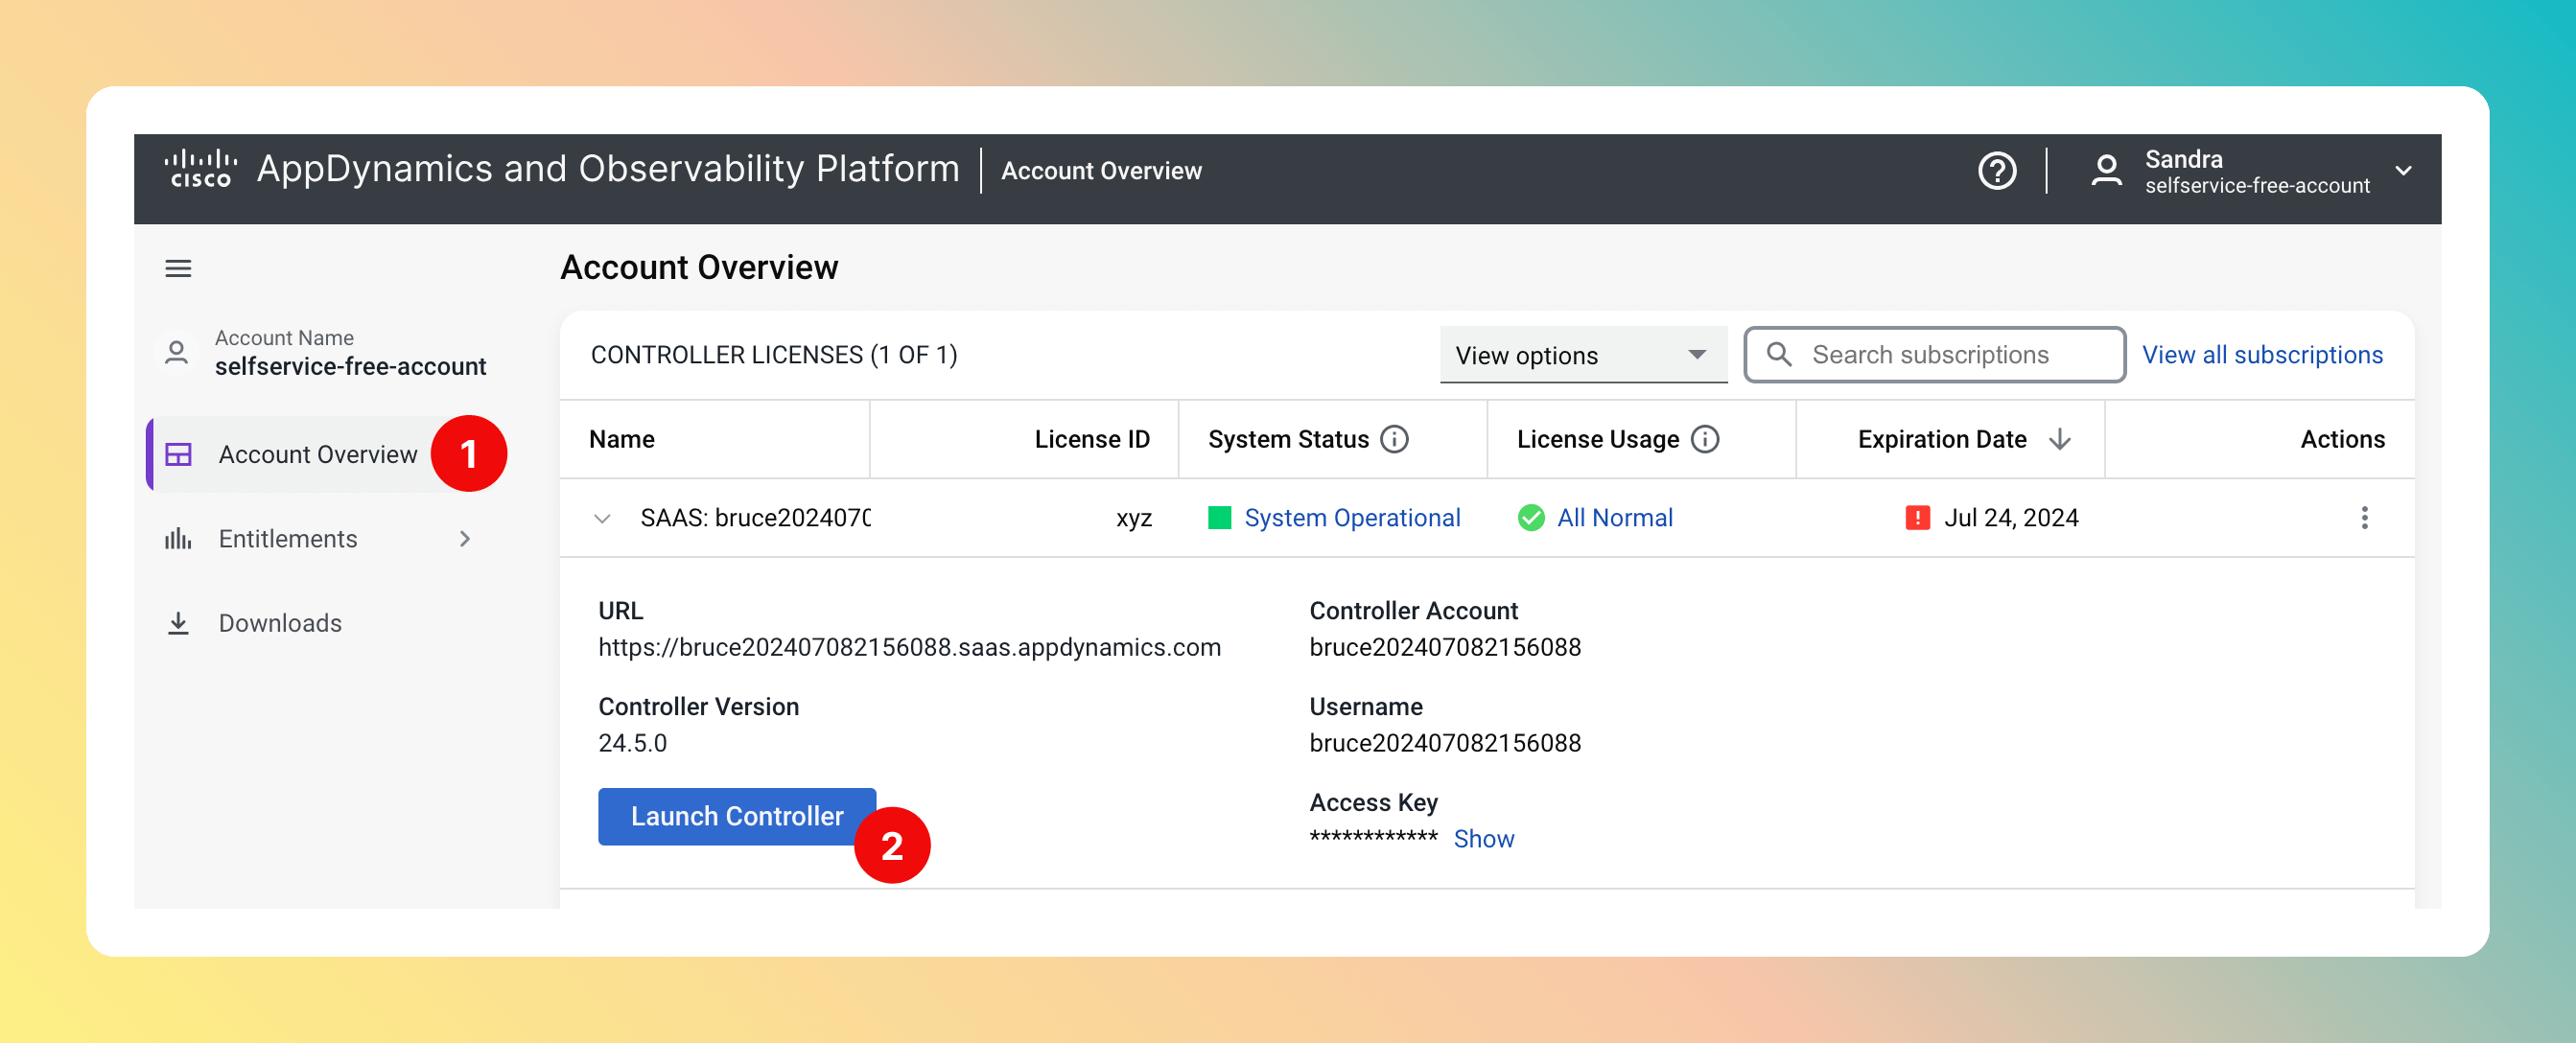
1. Open `Account Overview`
2. `Launch Controller`.
Optionally toggle `Enable additional Authentication & Security` below the webhook URL to restrict who can POST payloads.
* **IP Filter** — Allow requests only from specific IPs or CIDR ranges. Failed checks return **404 Not Found**.
* **Bearer authentication** — Require `Authorization: Bearer YOUR_TOKEN`. Missing or invalid tokens return **401 Unauthorized**.
If both are enabled, the request must pass both checks to be accepted.
## 2. Create a custom integration on AppDynamics
Sign in to your AppDynamics Account.
1. Open `Account Overview`
2. `Launch Controller`.
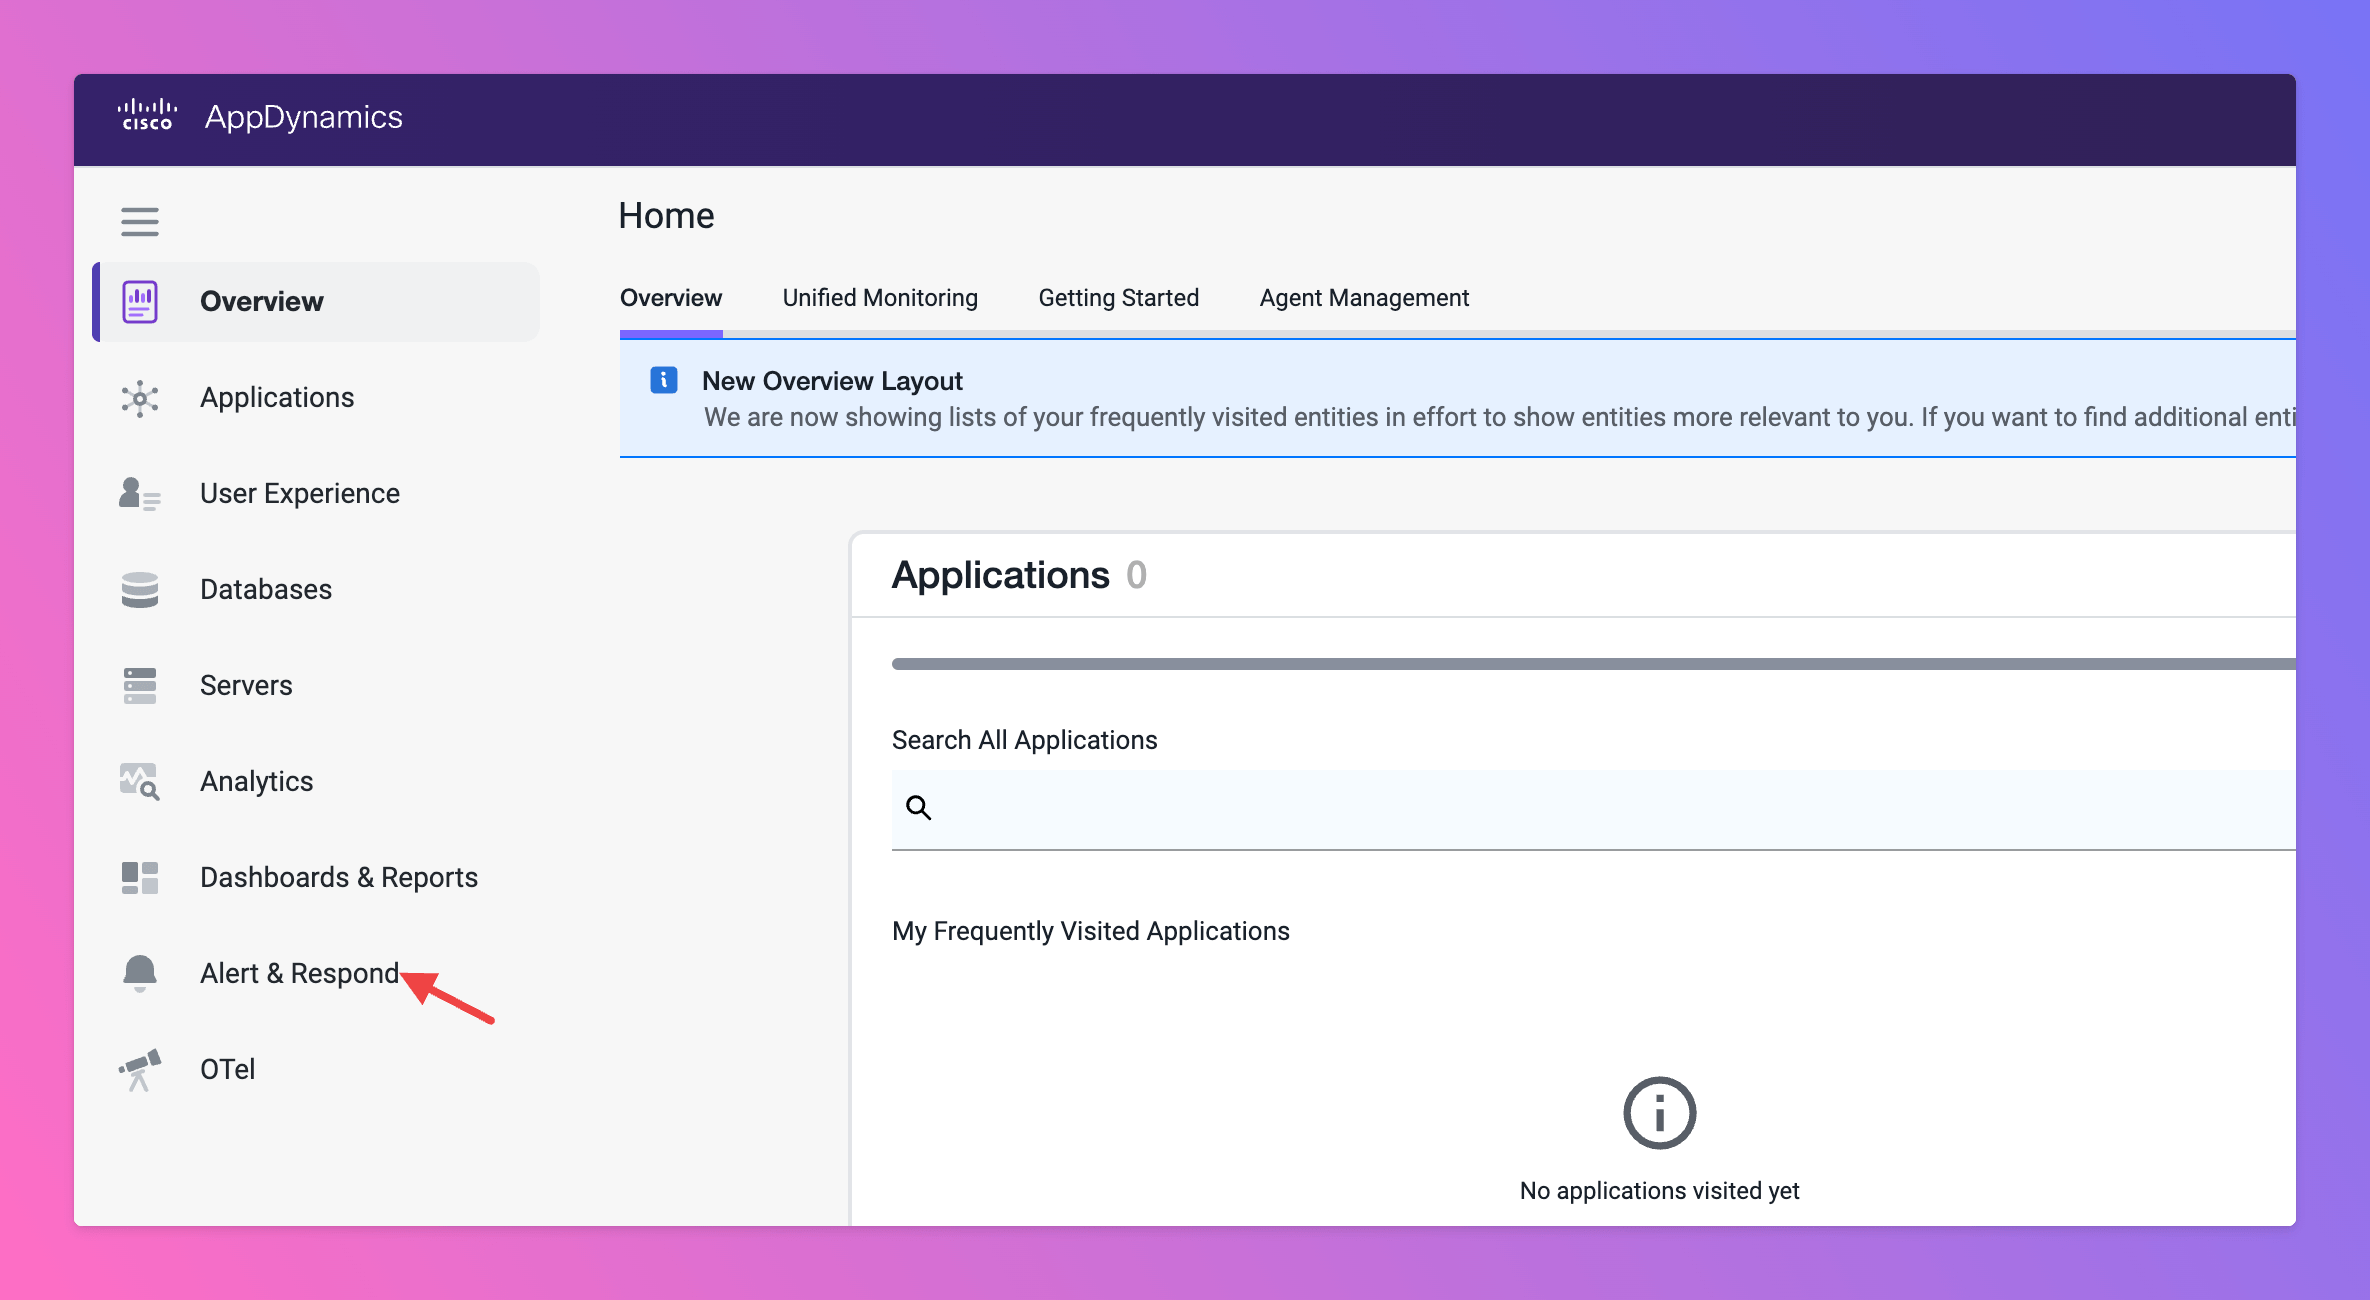
 Select `Alert & Respond` page.
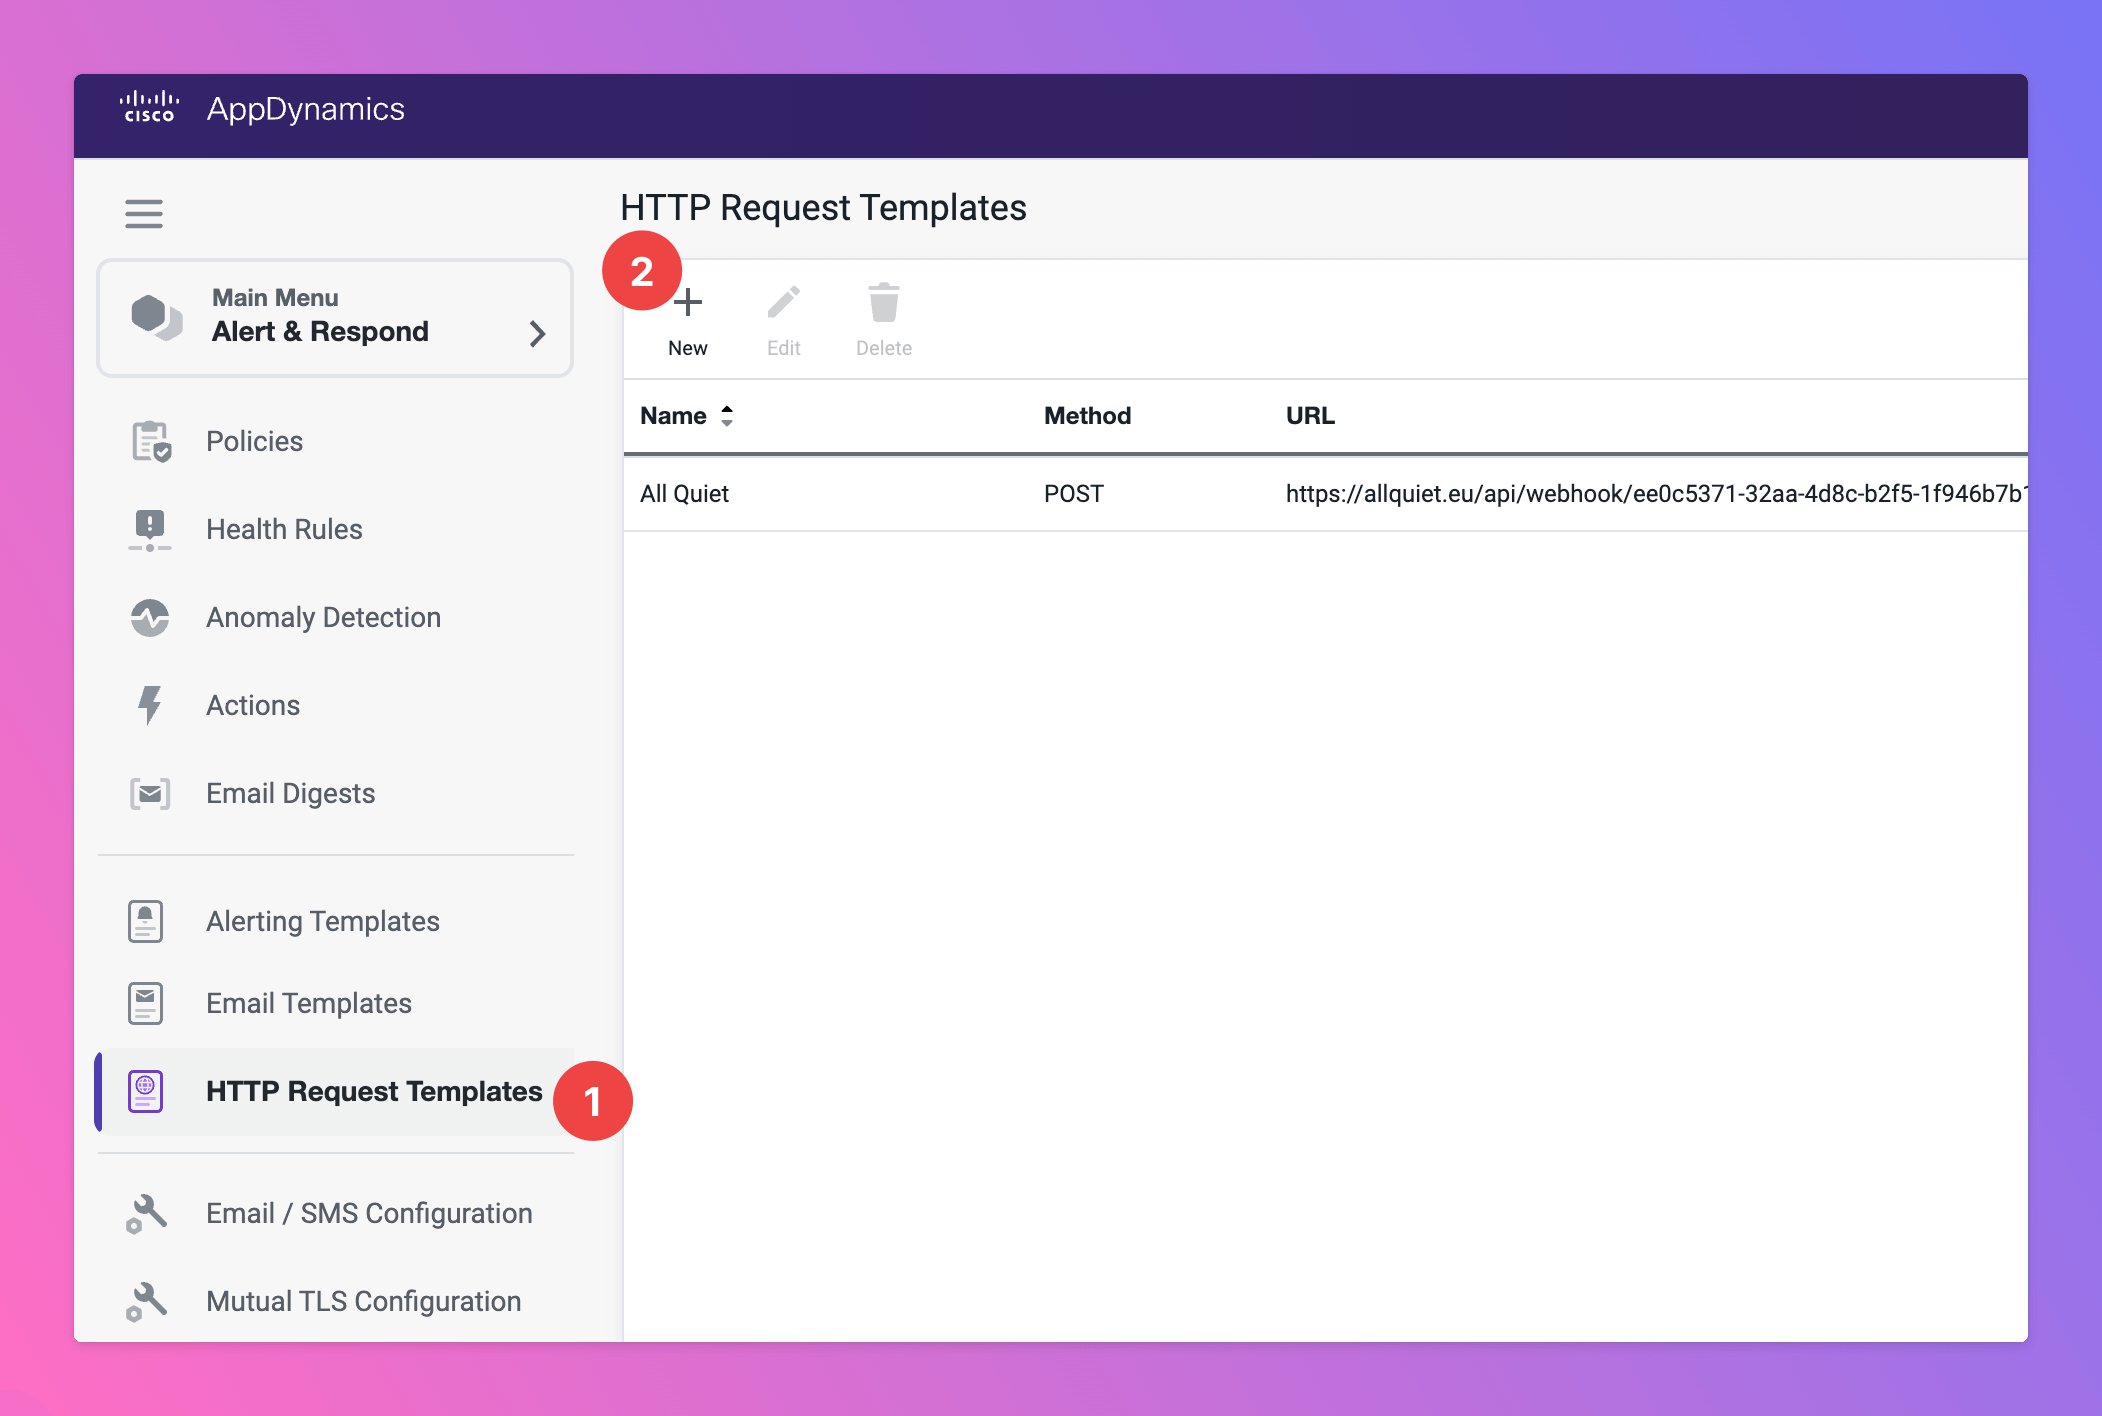
 1. Open `HTTP Request Templates` in sitenav.
2. Start `New` template.
1. Open `HTTP Request Templates` in sitenav.
2. Start `New` template.
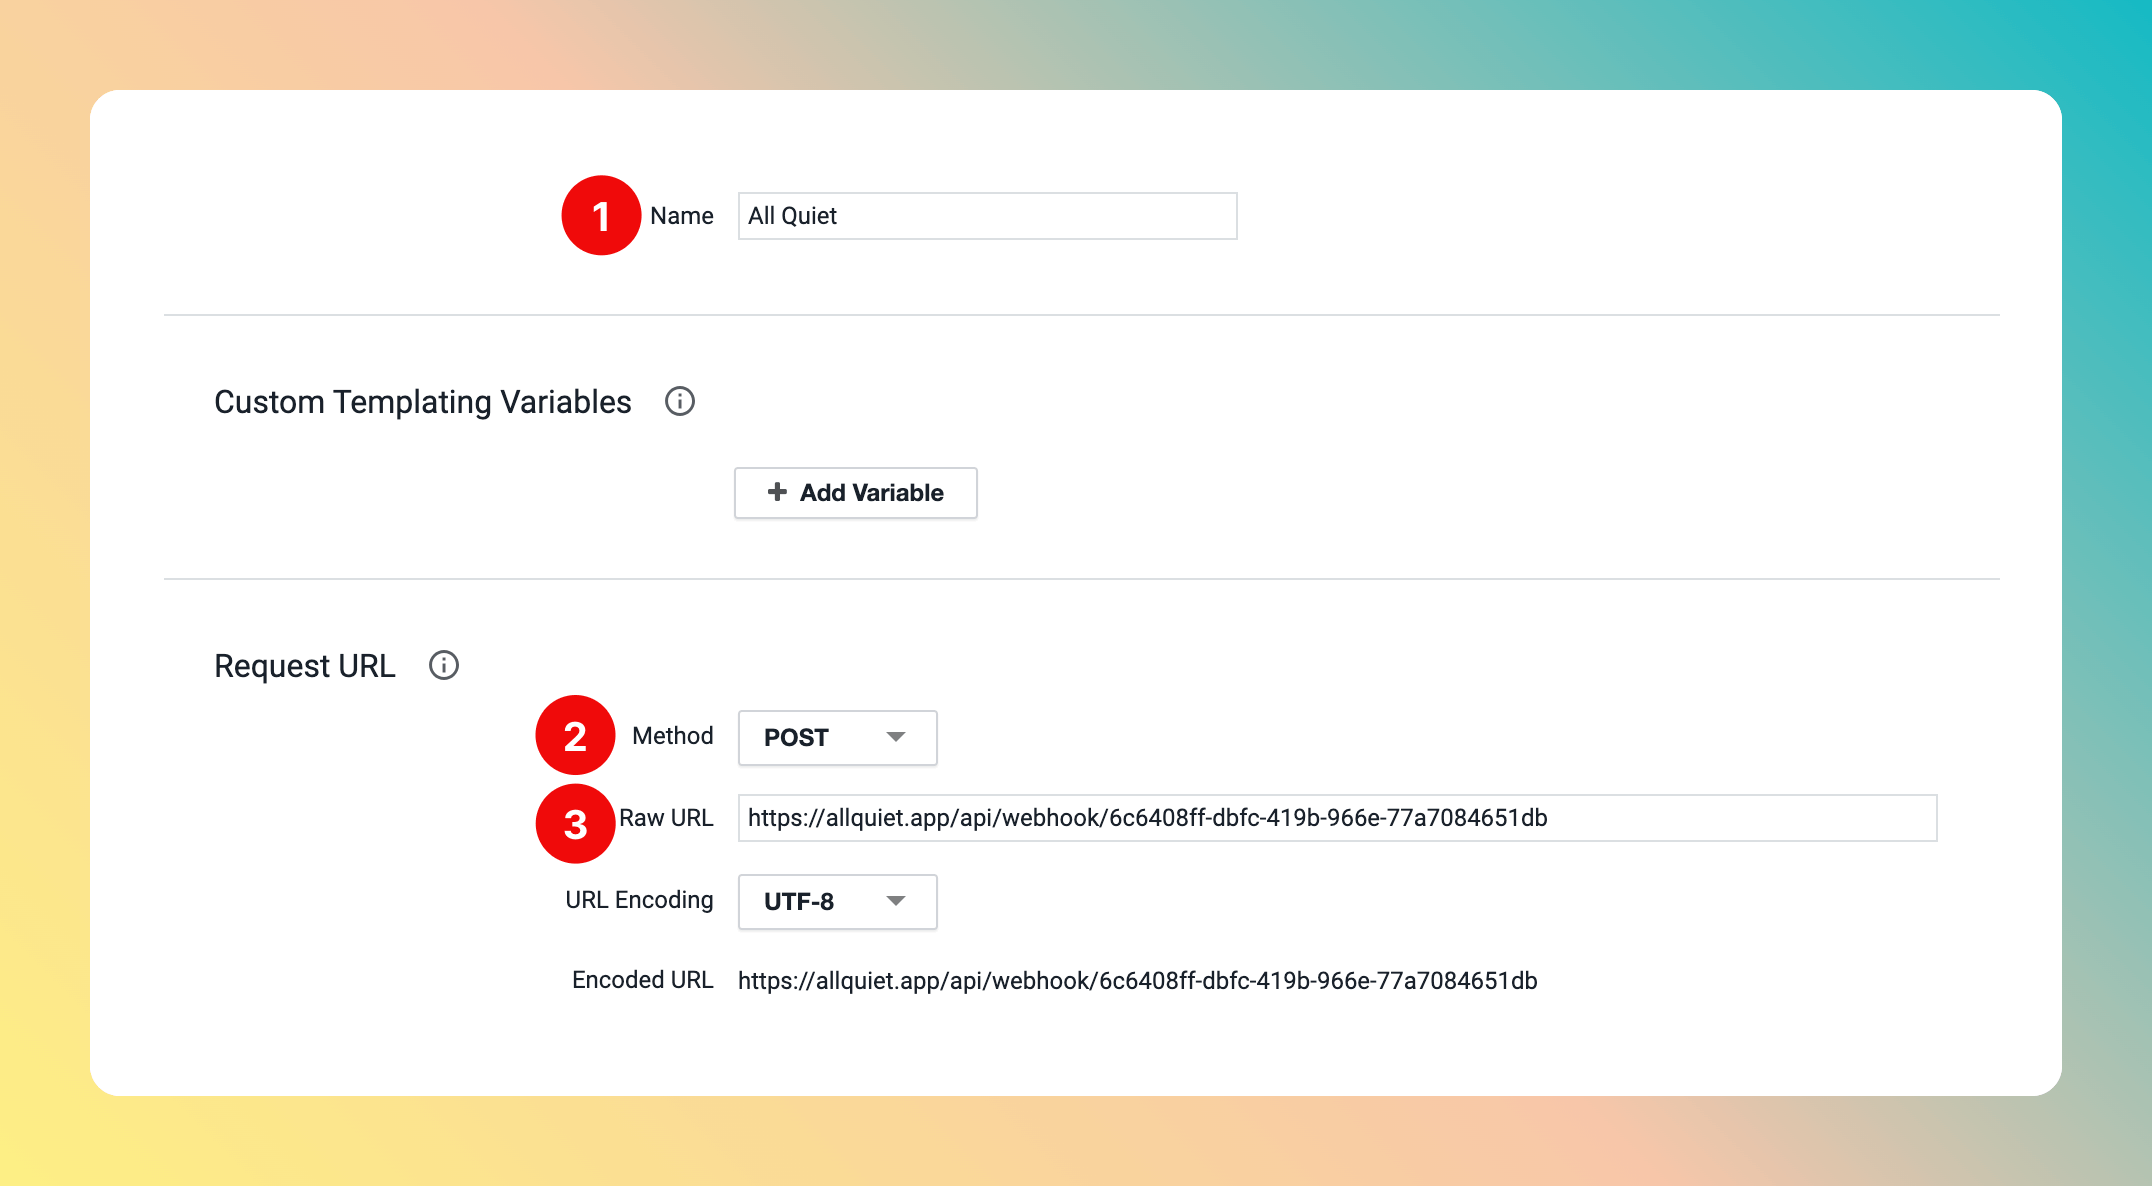
 It's time to define the template.
1. Add a `Name` for your HTTP request template, like "All Quiet"
2. For the `Request URL`, select `Method` "Post"
3. As `Raw URL`, paste in the All Quiet webhook URL you've obtained in step [Get The All Quiet Webhook URL](/integrations/inbound/appdynamics#get-the-all-quiet-webhook-url).
It's time to define the template.
1. Add a `Name` for your HTTP request template, like "All Quiet"
2. For the `Request URL`, select `Method` "Post"
3. As `Raw URL`, paste in the All Quiet webhook URL you've obtained in step [Get The All Quiet Webhook URL](/integrations/inbound/appdynamics#get-the-all-quiet-webhook-url).
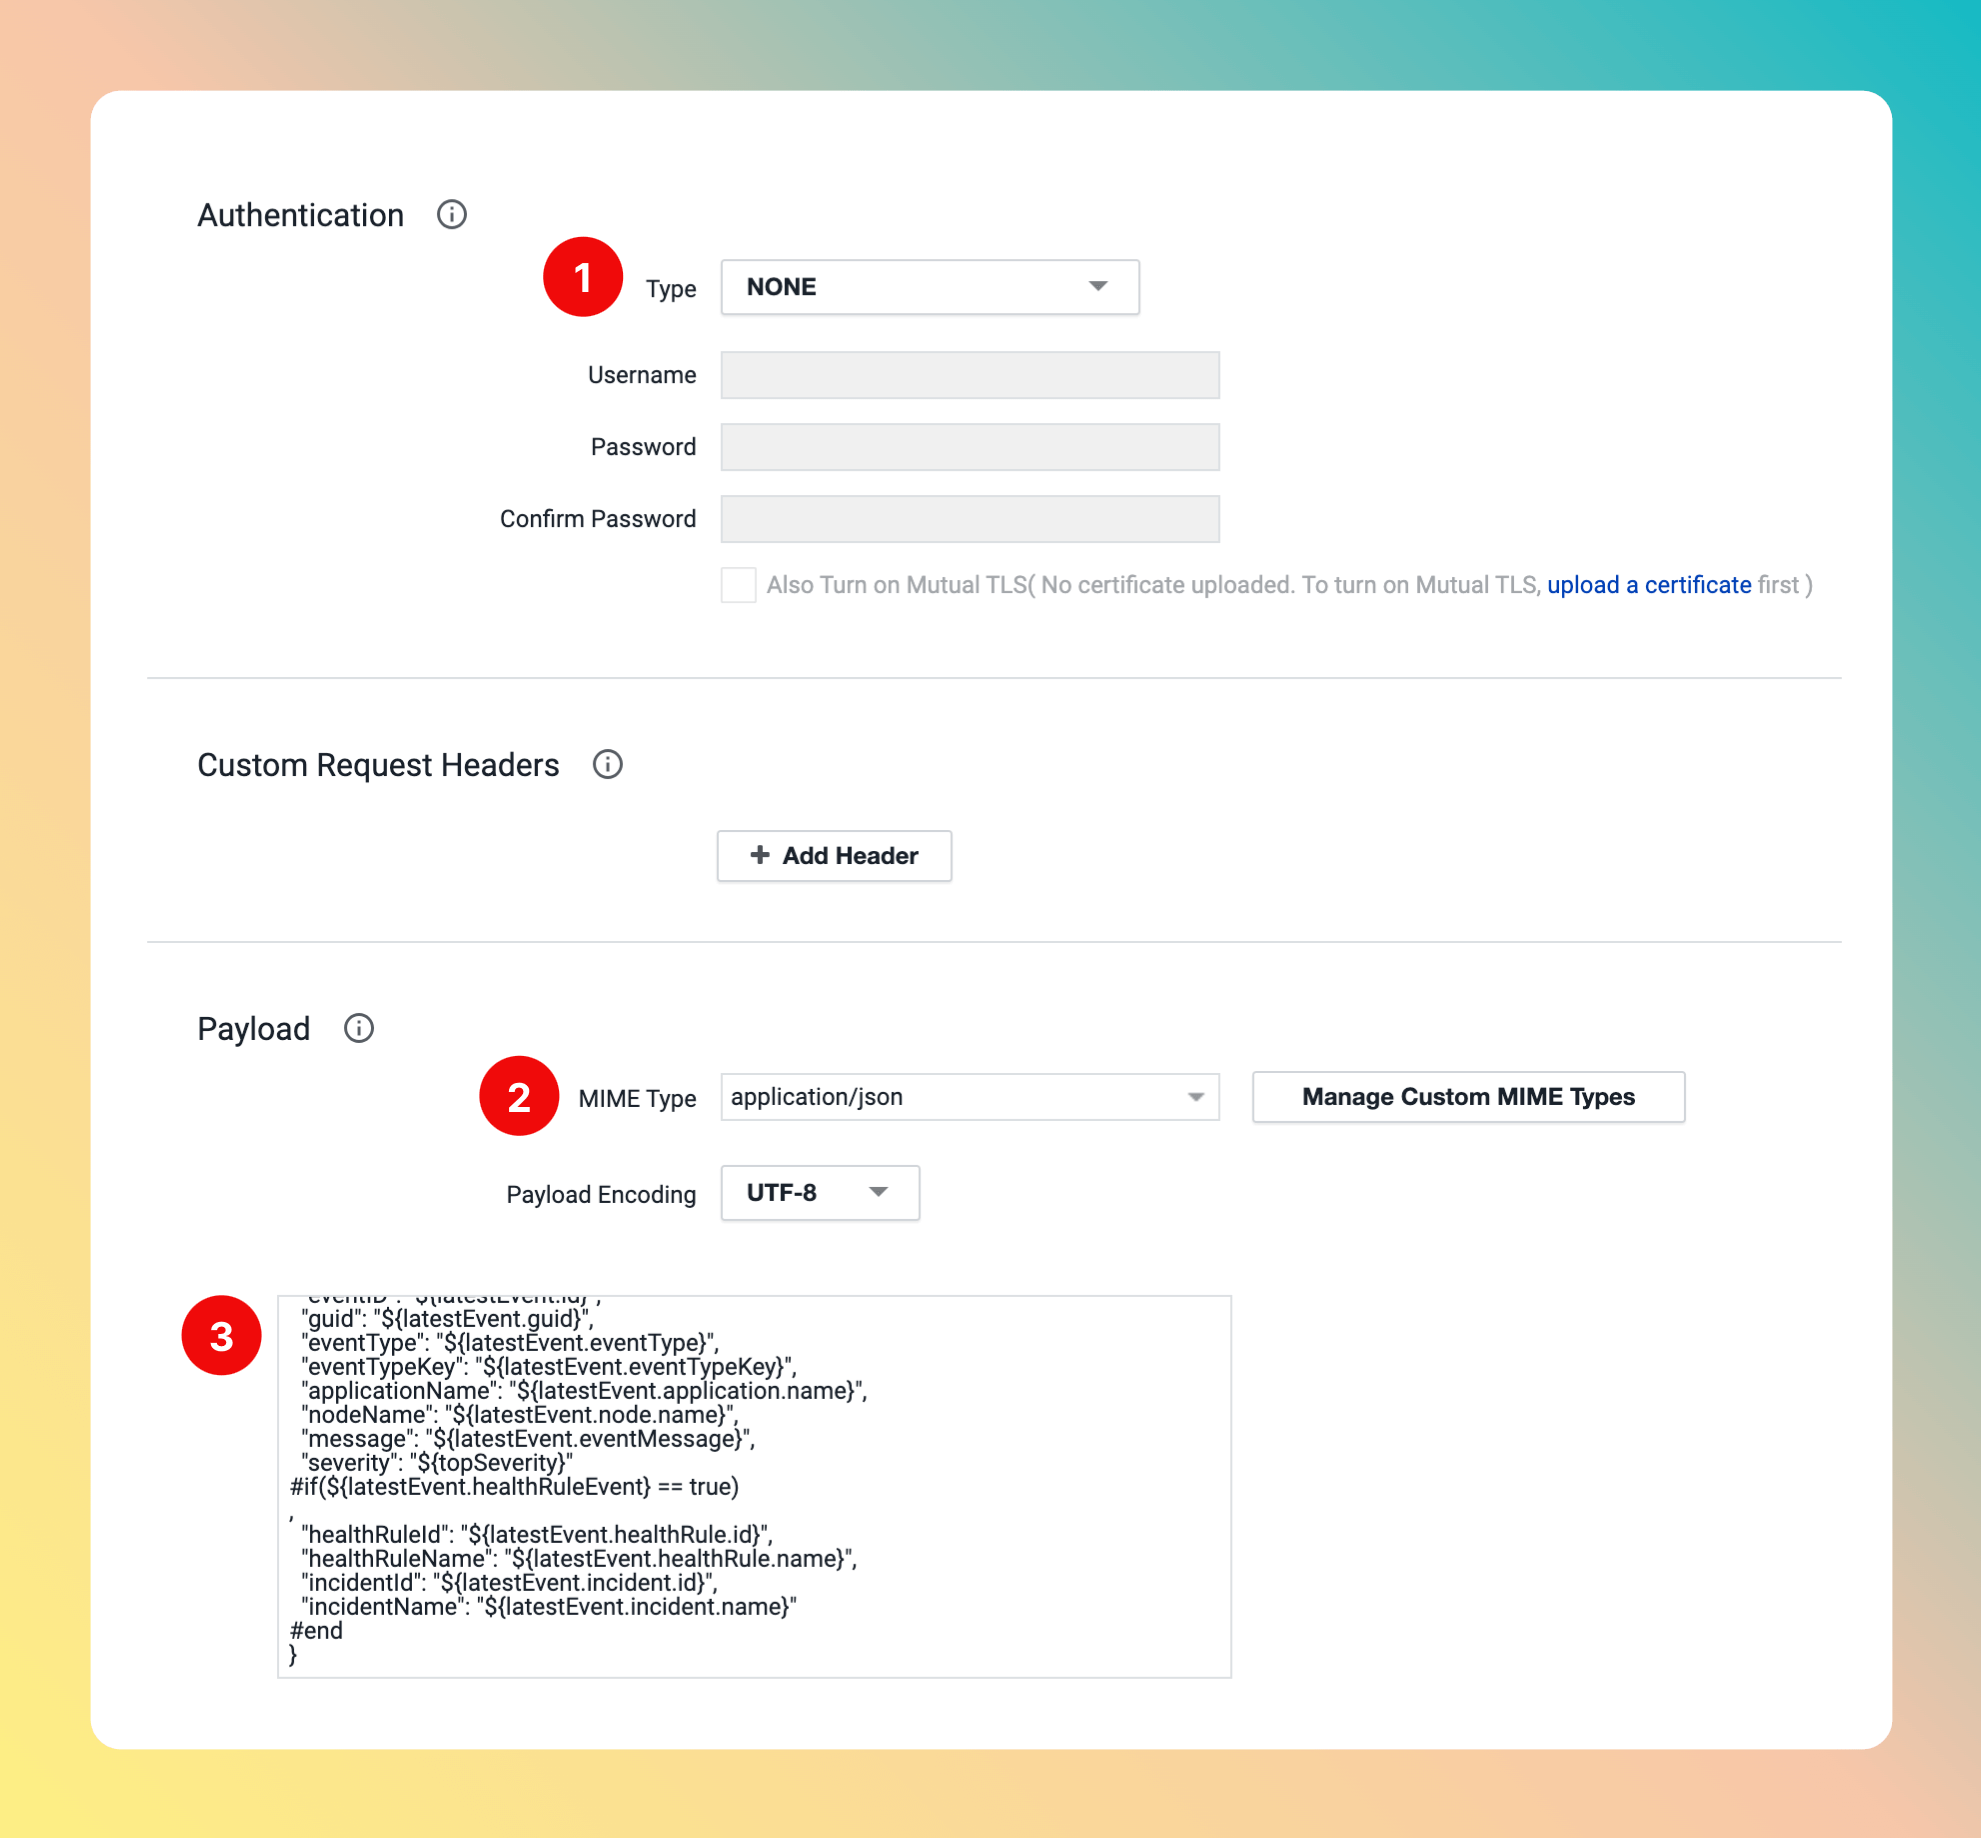
 1. As `Authentification` `Type`, select "NONE"
2. As `Payload` `MIME Type`, select "application/json"
3. Use the following `Payload`
```
{
"deepLink": "${latestEvent.deepLink}",
"eventName": "${latestEvent.displayName}",
"summary": "${latestEvent.summaryMessage}",
"eventID": "${latestEvent.id}",
"guid": "${latestEvent.guid}",
"eventType": "${latestEvent.eventType}",
"eventTypeKey": "${latestEvent.eventTypeKey}",
"applicationName": "${latestEvent.application.name}",
"nodeName": "${latestEvent.node.name}",
"message": "${latestEvent.eventMessage}",
"severity": "${topSeverity}"
#if(${latestEvent.healthRuleEvent} == true)
,
"healthRuleId": "${latestEvent.healthRule.id}",
"healthRuleName": "${latestEvent.healthRule.name}",
"incidentId": "${latestEvent.incident.id}",
"incidentName": "${latestEvent.incident.name}"
#end
}
```
1. As `Authentification` `Type`, select "NONE"
2. As `Payload` `MIME Type`, select "application/json"
3. Use the following `Payload`
```
{
"deepLink": "${latestEvent.deepLink}",
"eventName": "${latestEvent.displayName}",
"summary": "${latestEvent.summaryMessage}",
"eventID": "${latestEvent.id}",
"guid": "${latestEvent.guid}",
"eventType": "${latestEvent.eventType}",
"eventTypeKey": "${latestEvent.eventTypeKey}",
"applicationName": "${latestEvent.application.name}",
"nodeName": "${latestEvent.node.name}",
"message": "${latestEvent.eventMessage}",
"severity": "${topSeverity}"
#if(${latestEvent.healthRuleEvent} == true)
,
"healthRuleId": "${latestEvent.healthRule.id}",
"healthRuleName": "${latestEvent.healthRule.name}",
"incidentId": "${latestEvent.incident.id}",
"incidentName": "${latestEvent.incident.name}"
#end
}
```
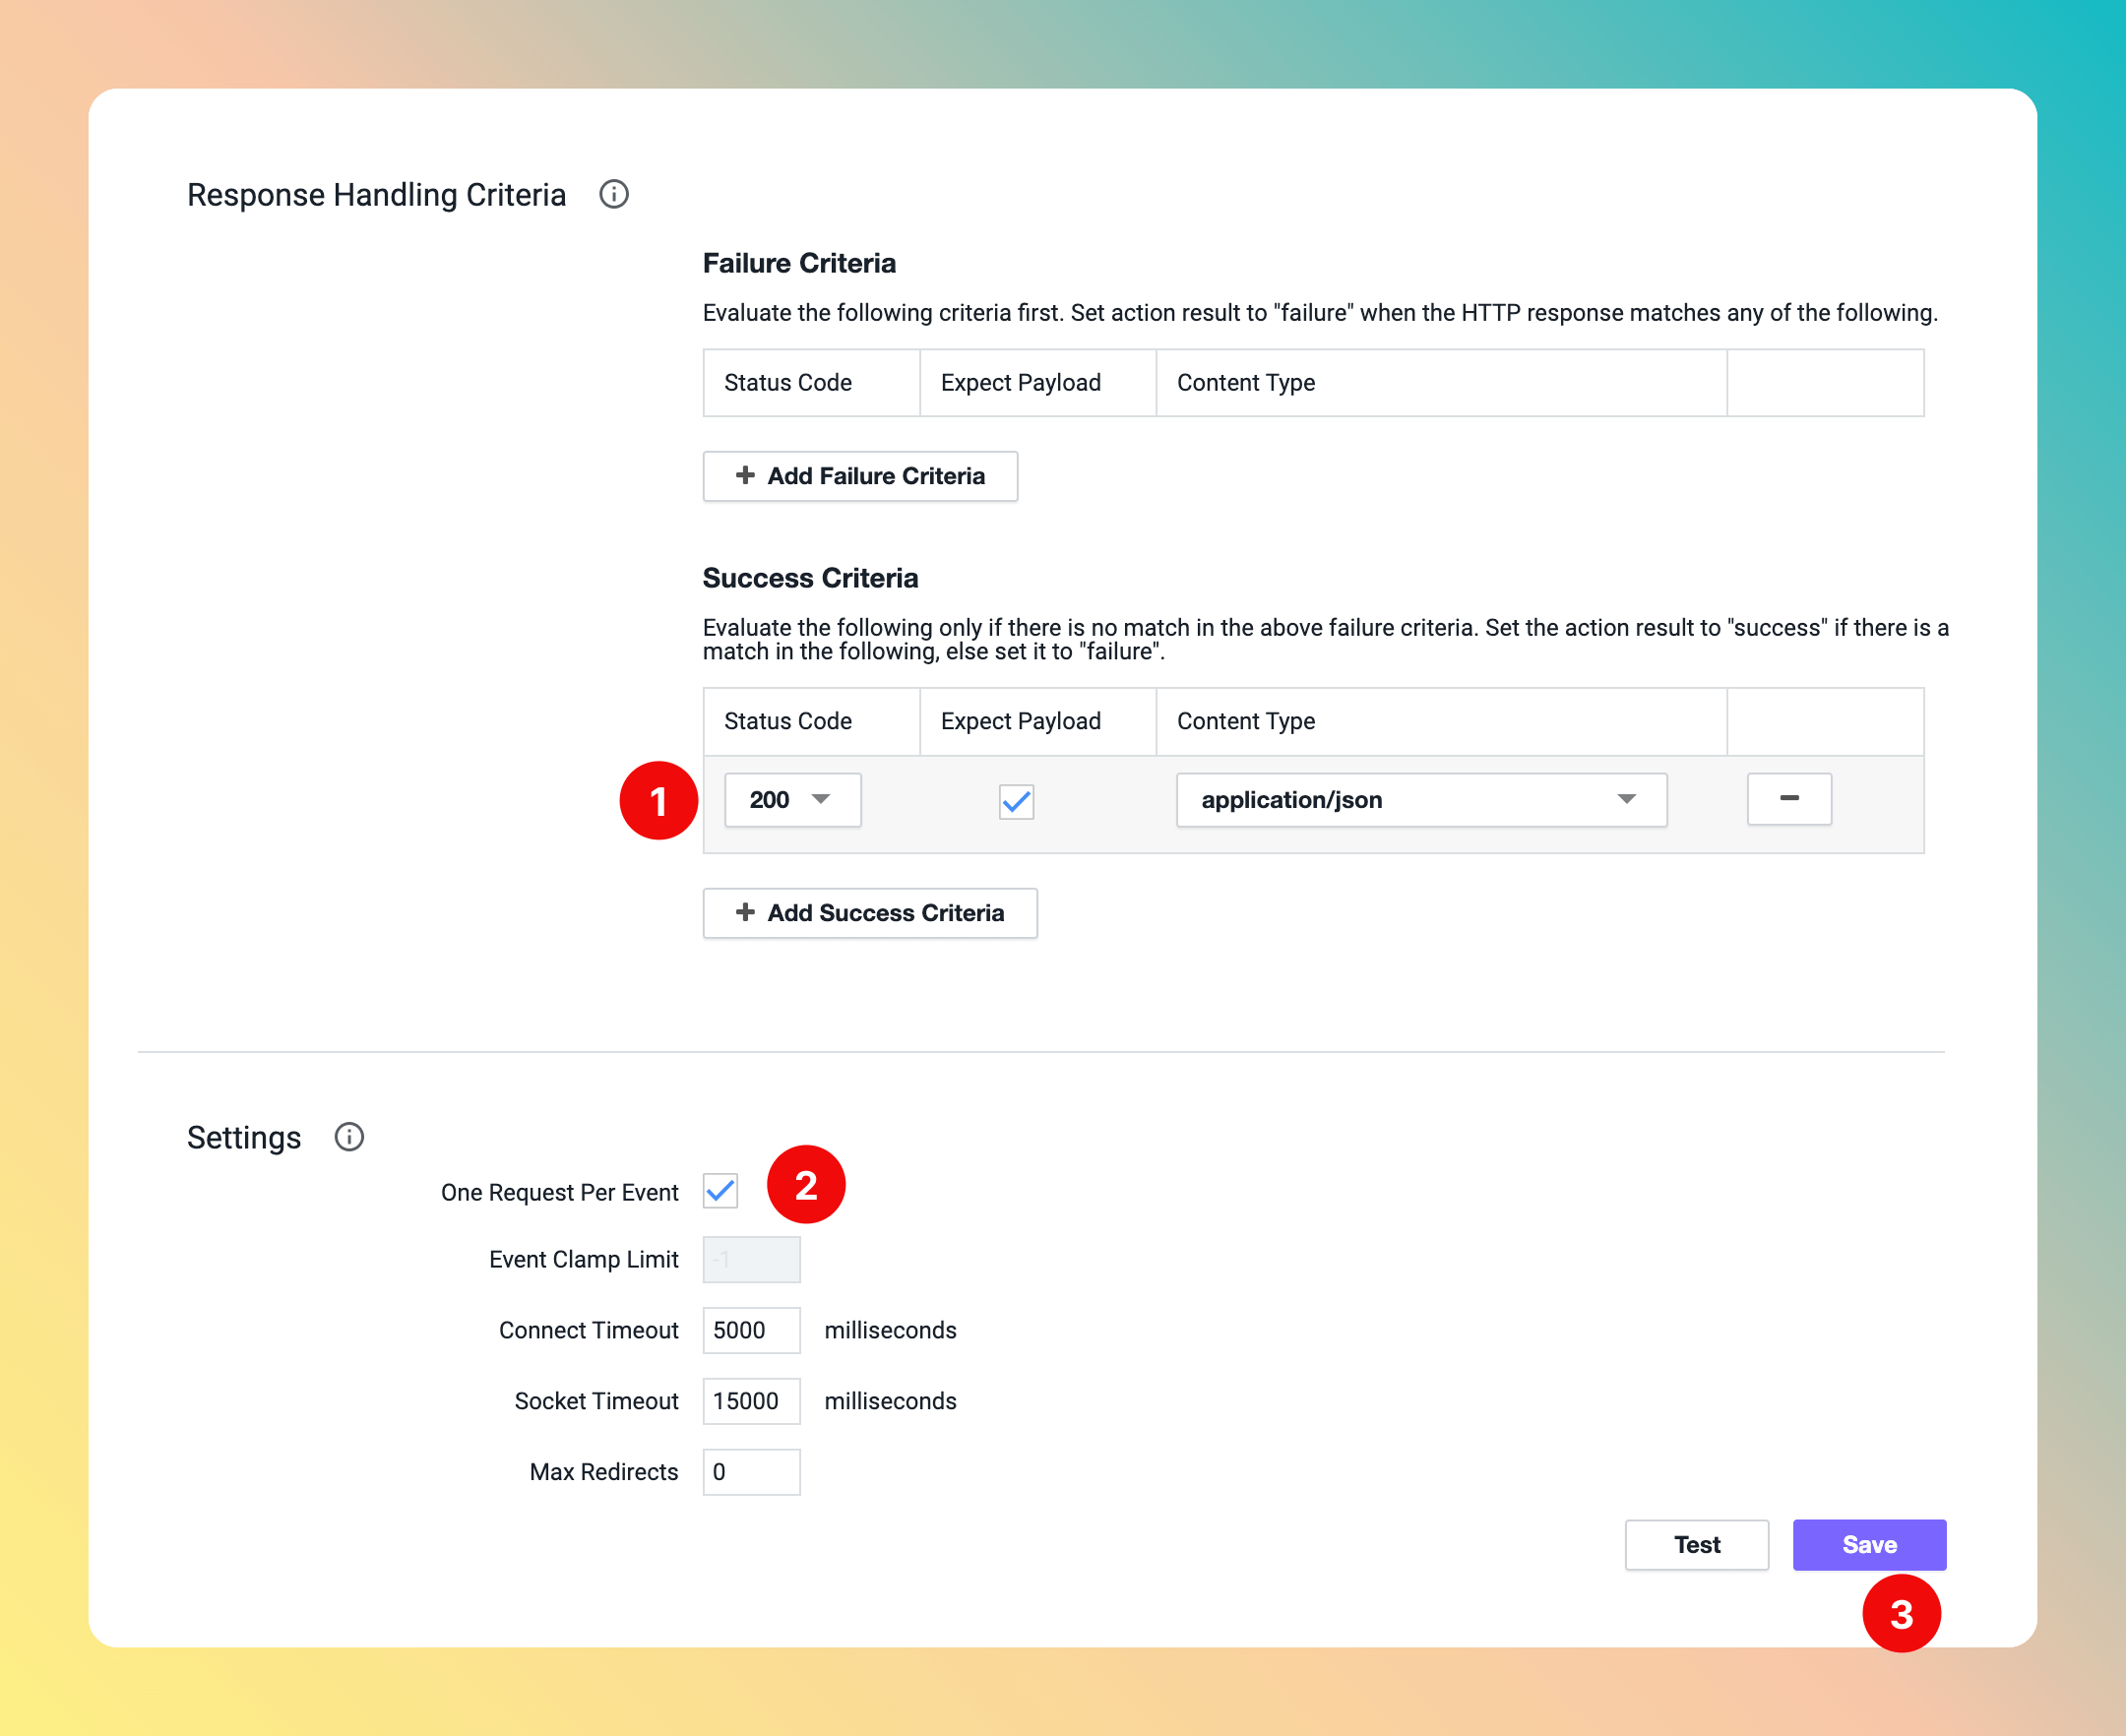
 1. In section `Response Handling Criteria`, add `Success Criteria` with `Status Code` 200 and `Content Type` "application/json".
2. In `Settings`, check `One Request Per Event` box.
3. Click on `Save`.
1. In section `Response Handling Criteria`, add `Success Criteria` with `Status Code` 200 and `Content Type` "application/json".
2. In `Settings`, check `One Request Per Event` box.
3. Click on `Save`.
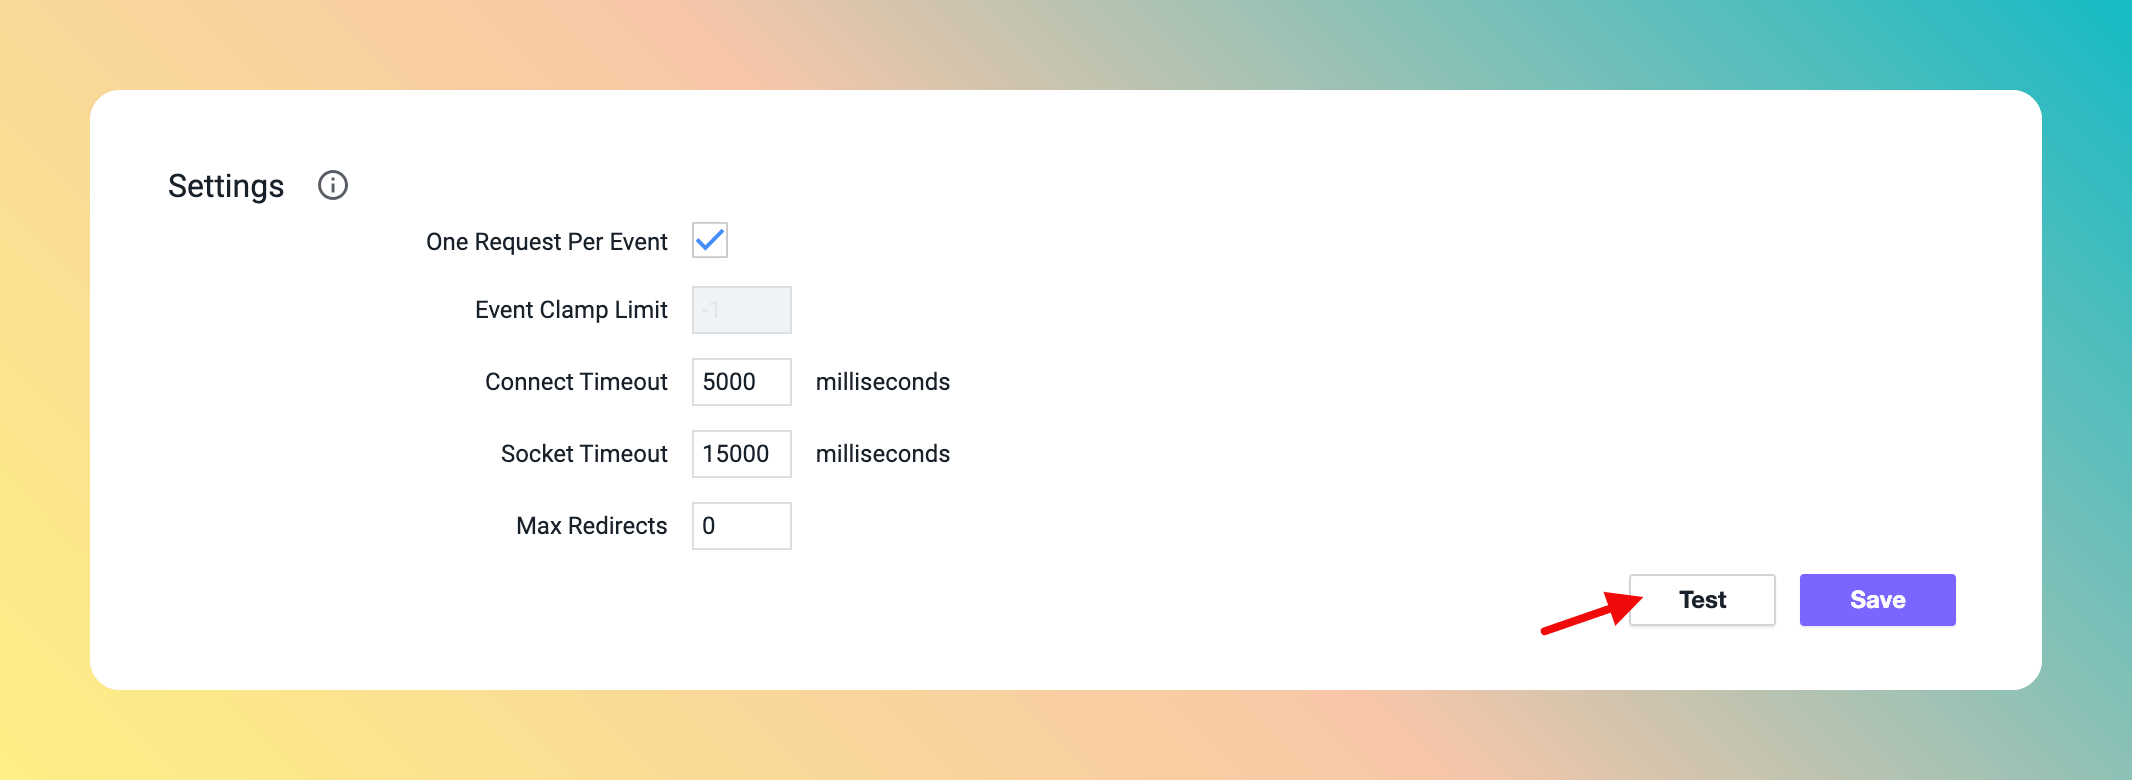
 To test the configuration, return to the template and click on `Test`.
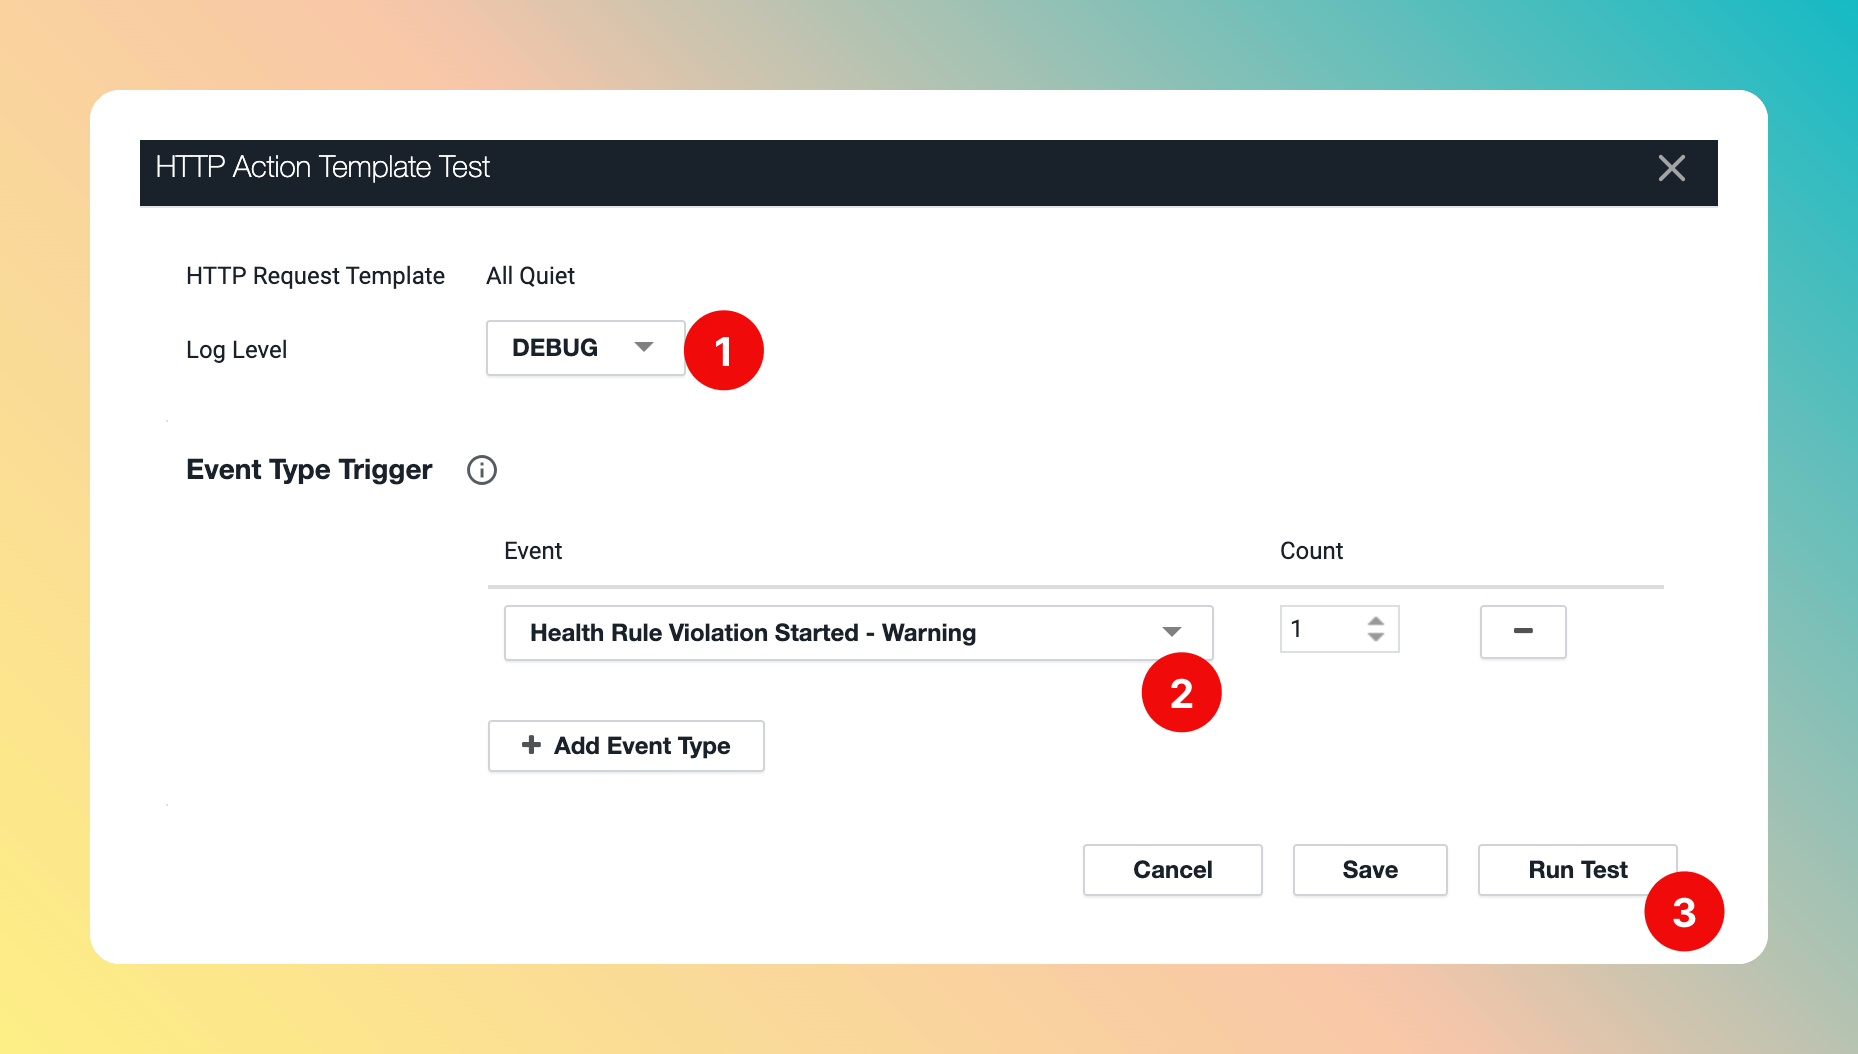
 For the test, you can choose between different `Log Level` and `Criteria`.
1. Select a `Log Level`, like "Debug".
2. Select an `Event Type Trigger`. Here, we chose "Health Rule Violation Started - Warning". This means we expect a new All Quiet Incident with Severity "Warning" when running the test.
3. `Run Test`.
For the test, you can choose between different `Log Level` and `Criteria`.
1. Select a `Log Level`, like "Debug".
2. Select an `Event Type Trigger`. Here, we chose "Health Rule Violation Started - Warning". This means we expect a new All Quiet Incident with Severity "Warning" when running the test.
3. `Run Test`.
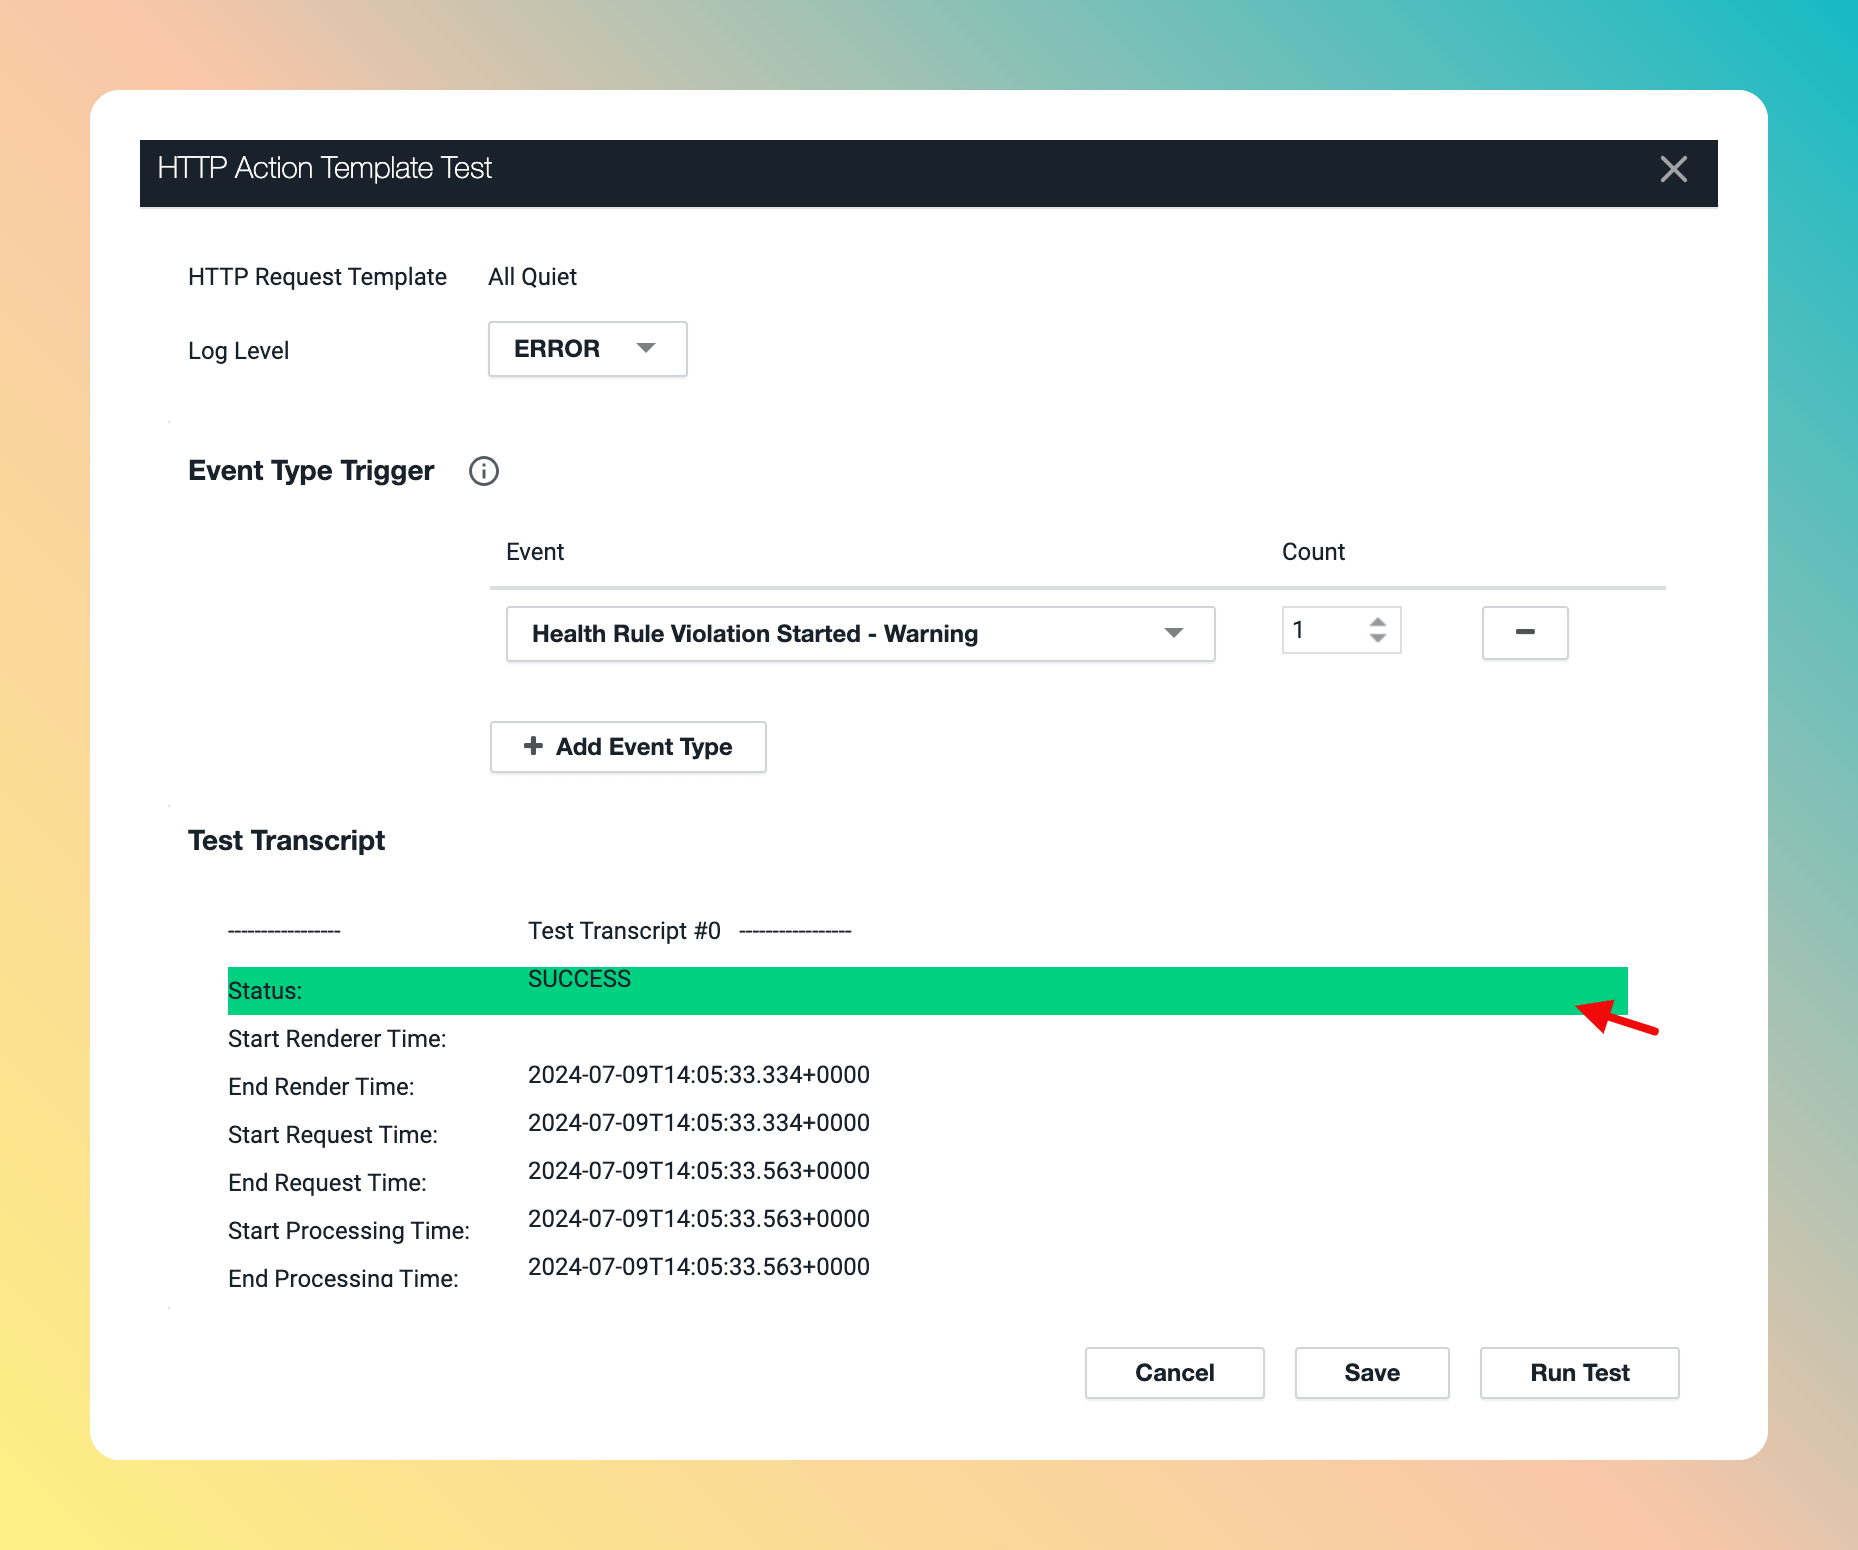
 After running the test, you'll receive a notification if the test run was successful.
 To check if the expected All Quiet Incident was created, open our Web App and navigate to /app/incidents.
 AppDynamics is now successfully integrated with All Quiet.
### Adjust Payload Mapping
Looking to customize the fields of your incidents by adjusting the pre-built payload mapping? Simply head over to the “Payload” tab within your integration and make the necessary edits to the mapping. For detailed guidance, you may check out our [payload mapping documentation](/essentials/inbound#how-does-attribute-mapping-work).
Using our Terraform provider? [Download](https://allquiet.app/api/integrations/terraform/default/AppDynamics.tf) the default mapping of the `allquiet_integration_mapping` resource for the AppDynamics integration. Simply copy the syntax to your .tf file and tailor the resource to your team's needs!
AppDynamics is now successfully integrated with All Quiet.
### Adjust Payload Mapping
Looking to customize the fields of your incidents by adjusting the pre-built payload mapping? Simply head over to the “Payload” tab within your integration and make the necessary edits to the mapping. For detailed guidance, you may check out our [payload mapping documentation](/essentials/inbound#how-does-attribute-mapping-work).
Using our Terraform provider? [Download](https://allquiet.app/api/integrations/terraform/default/AppDynamics.tf) the default mapping of the `allquiet_integration_mapping` resource for the AppDynamics integration. Simply copy the syntax to your .tf file and tailor the resource to your team's needs!