> ## Documentation Index
> Fetch the complete documentation index at: https://docs.allquiet.app/llms.txt
> Use this file to discover all available pages before exploring further.
# Teams
> Modern teams are at the heart of All Quiet
Teams are a means of organizing **collaborators** (team members) and **integrations**.
* Each user can be a member of multiple teams.
* Each integration is connected to exactly one (root) team.
* Each incident triggered by an integration is thus per default available for collaboration to the members of the integration's team. Within [Organizations](/advanced/organizations), collaboration across multiple teams is possible.
## Create a team
New Teams can be created by Users who signed up without being invited, as well as Billable Users, *Organization Administrators* and *Organization Owners*.
This documentation explains team creation without an Organization. Check out our doc for [Organizations](/advanced/organizations#creating-a-new-team-in-your-organization) to learn more about the team creation within an Organization.
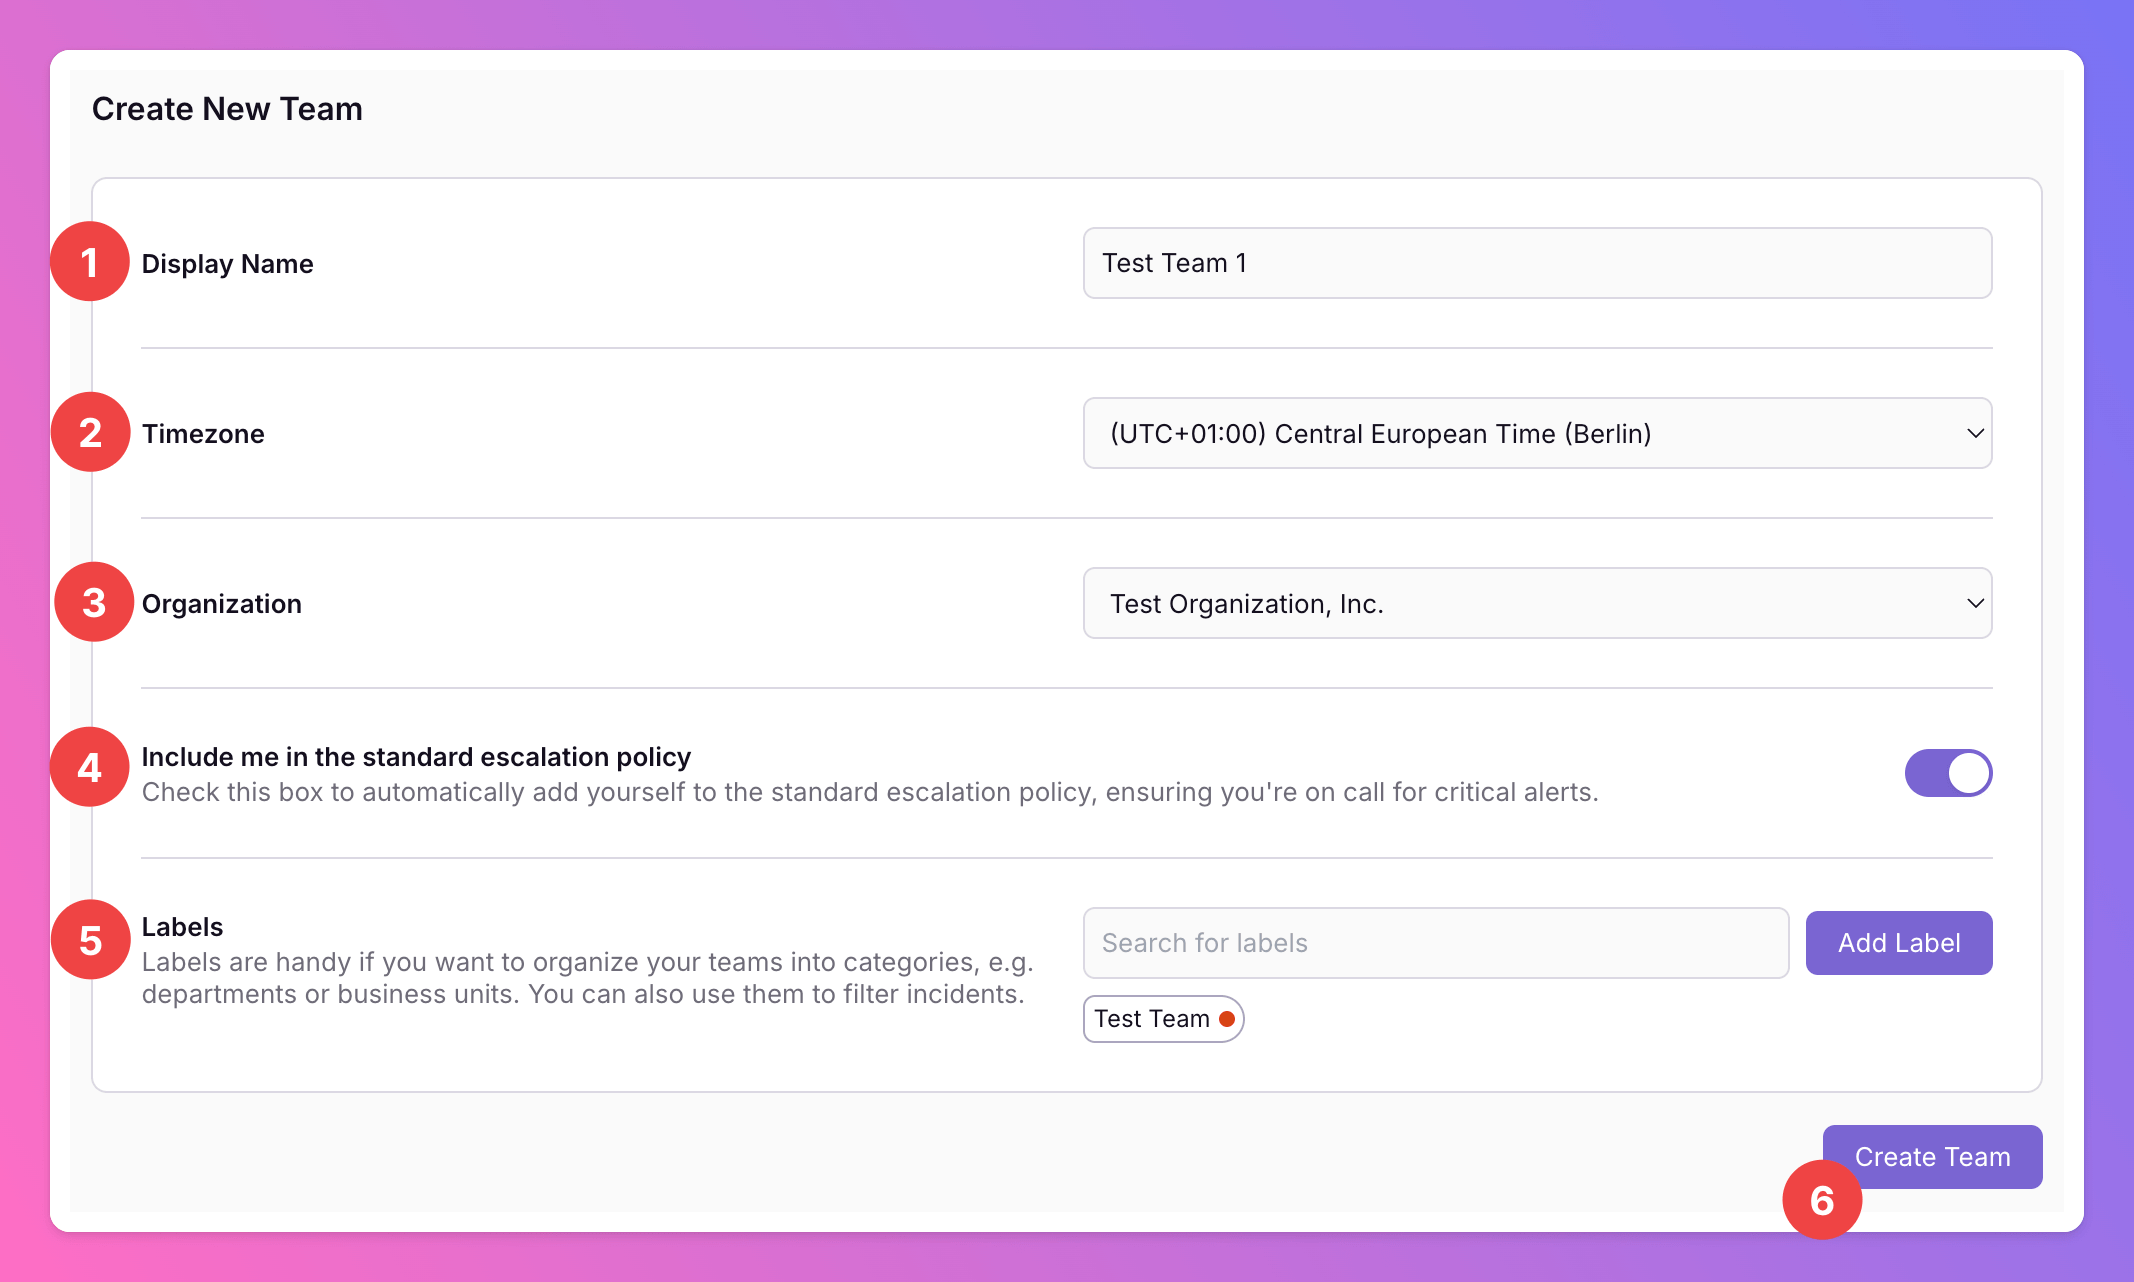
Under `Teams` click `Create Team`.
 1. Enter a `Diplay Name` for your team.
2. Optionally, you can enter a timezone. Per default, we select your browser's timezone.
3. For Pro and Enterprise plans: Select the [Organization](/advanced/organizations) you want to add the team to, or select "No organization".
4. Decide if you want to be included in the standard escalation policy.
5. Optionally, you can add `Labels`. This is handy if you want to organizae your teams into categories, e.g. departments or business units. You can use the labels to filter [incidents](/essentials/incident#filtering-incidents), integrations and your [team overview](/essentials/teams#team-overview).
6. Hit `Create Team`. You can later change these settings.
1. Enter a `Diplay Name` for your team.
2. Optionally, you can enter a timezone. Per default, we select your browser's timezone.
3. For Pro and Enterprise plans: Select the [Organization](/advanced/organizations) you want to add the team to, or select "No organization".
4. Decide if you want to be included in the standard escalation policy.
5. Optionally, you can add `Labels`. This is handy if you want to organizae your teams into categories, e.g. departments or business units. You can use the labels to filter [incidents](/essentials/incident#filtering-incidents), integrations and your [team overview](/essentials/teams#team-overview).
6. Hit `Create Team`. You can later change these settings.
 After creating your team, you’ll have several options to manage it. Let’s explore them below.
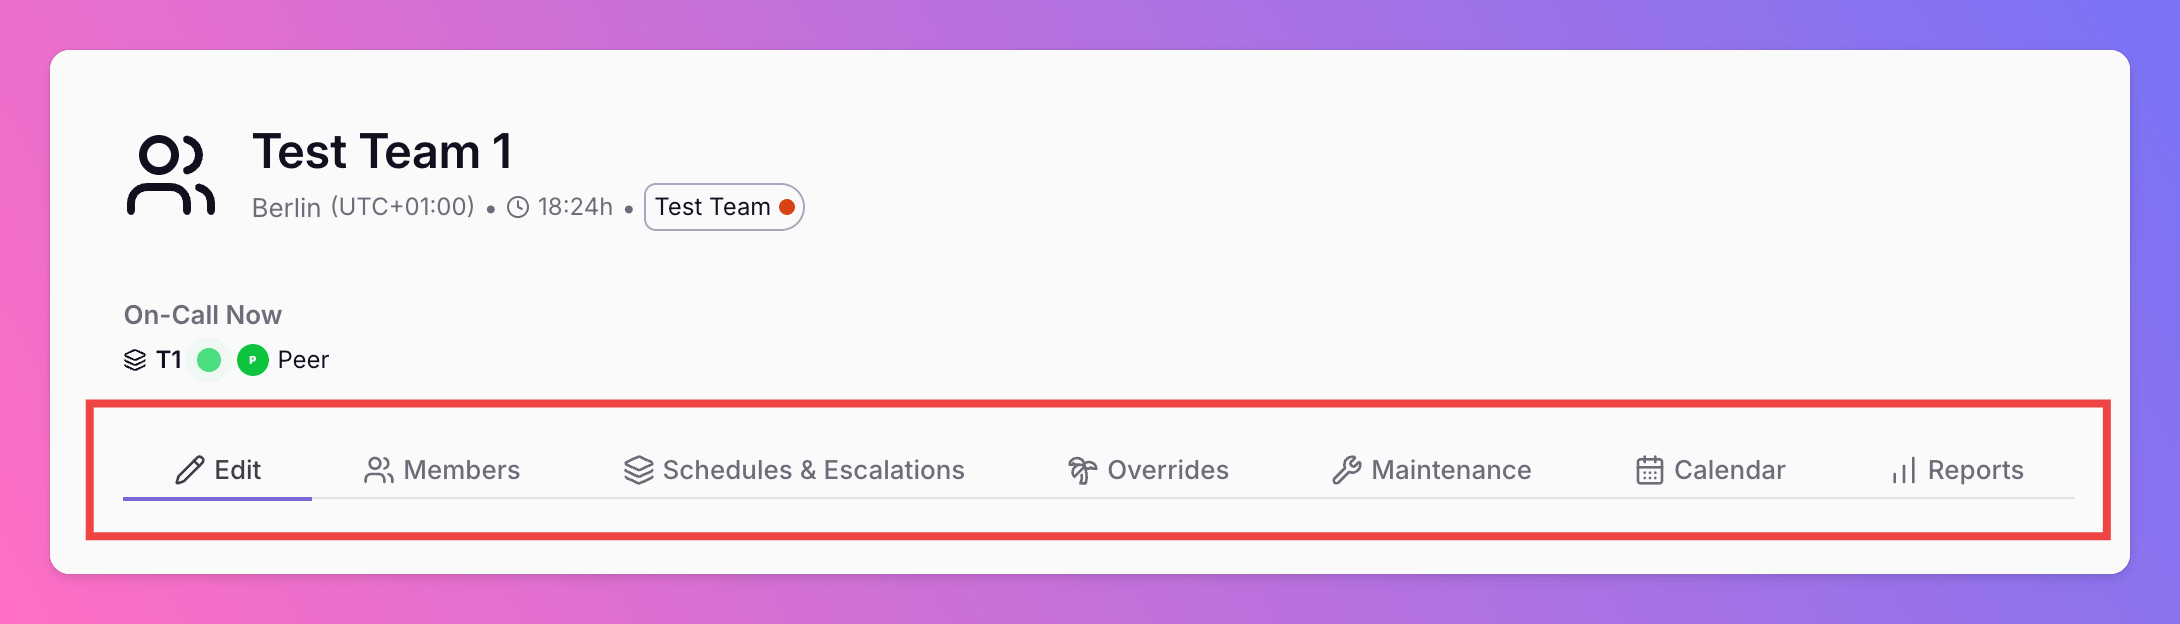 ## Edit Team
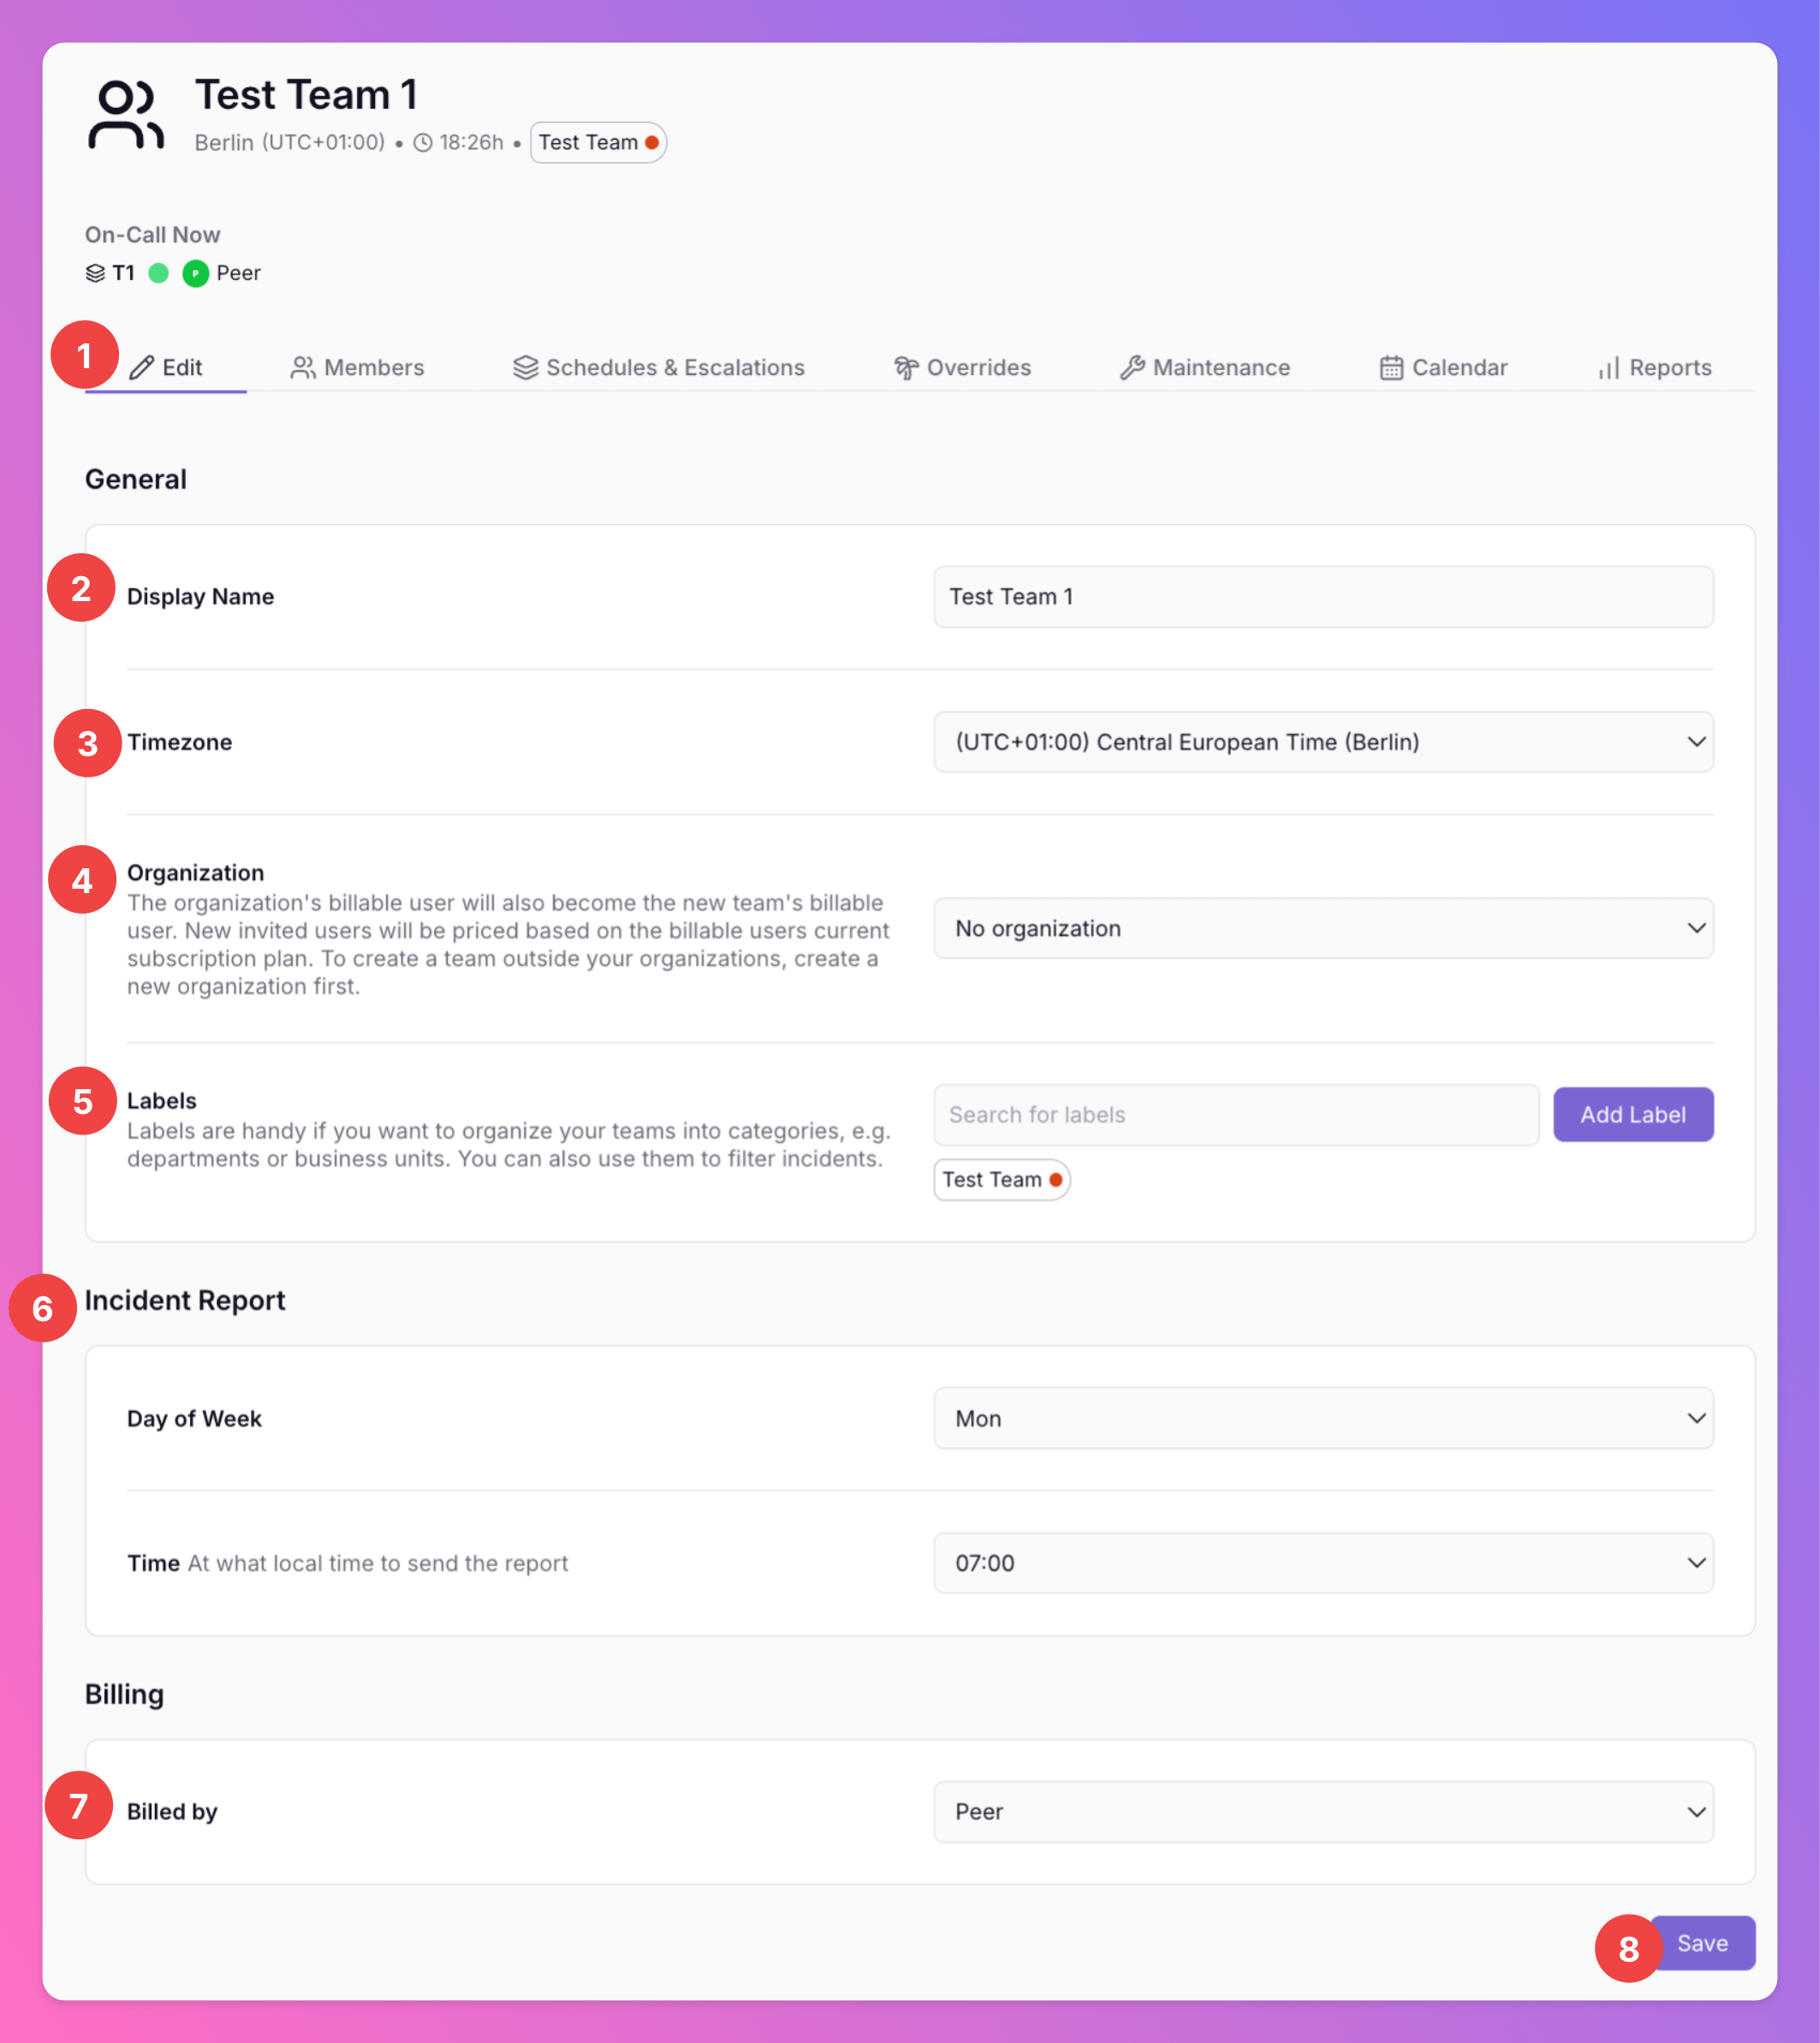
1. In the `Edit` tab, you can configure the general settings for your team.
2. This includes your team's `Display Name`
3. Adjust your team's `Timezone`. The timezone is used for your teams calendar, schedules and escalations. Per default, it's UTC.
4. For Pro and Enterprise plans: Select the [Organization](/advanced/organizations) you want to add the team to, or select "No organization".
5. You can add or remove `Labels`. This is handy if you want to organize your teams into categories, e.g. departments or business units. They are combined with [inbound integration labels](/essentials/inbound#edit-your-integration’s-general-settings) when [filtering incidents](/essentials/incident#filtering-incidents). You can also the team labels to filter integrations and your [team overview](/essentials/teams#team-overview).
6. Schedule delivery of your team' weekly [Engagement Report](/advanced/report#engagement-report).
7. You can edit the billable user of your team. If your team is part of an [organization](/advanced/organizations), this field will not be available, as the team will be billed through the organization's billable user.
8. Make sure to `Save` your changes.
## Edit Team
1. In the `Edit` tab, you can configure the general settings for your team.
2. This includes your team's `Display Name`
3. Adjust your team's `Timezone`. The timezone is used for your teams calendar, schedules and escalations. Per default, it's UTC.
4. For Pro and Enterprise plans: Select the [Organization](/advanced/organizations) you want to add the team to, or select "No organization".
5. You can add or remove `Labels`. This is handy if you want to organize your teams into categories, e.g. departments or business units. They are combined with [inbound integration labels](/essentials/inbound#edit-your-integration’s-general-settings) when [filtering incidents](/essentials/incident#filtering-incidents). You can also the team labels to filter integrations and your [team overview](/essentials/teams#team-overview).
6. Schedule delivery of your team' weekly [Engagement Report](/advanced/report#engagement-report).
7. You can edit the billable user of your team. If your team is part of an [organization](/advanced/organizations), this field will not be available, as the team will be billed through the organization's billable user.
8. Make sure to `Save` your changes.
 ## Members
### Roles
A user has one of the following roles within a team:
* `Member`: A member can collaborate on all incidents, view the team calendar, get an engagement report and create their own personal overrides.
* `Administrator`: An admin can additionally set up the escalation schedules, create overrides for the whole team and create and manage all of the team's integrations plus the respective advanced routing in the team. Also, they can manage the team's users and, [if applicable, the billable user](/miscellaneous/billing#how-to-change-the-billable-user).
### Inviting Members
After setting up your team, you're instantly assigned the `Administrator` role and become the primary account holder for billing purposes. Refer to our [Billing](/miscellaneous/billing) section for more details.
Inviting colleagues is straightforward:
* Simply send them an invite via email.
* They'll need to sign up and accept your invitation to collaborate.
This process ensures a secure and efficient team collaboration setup.
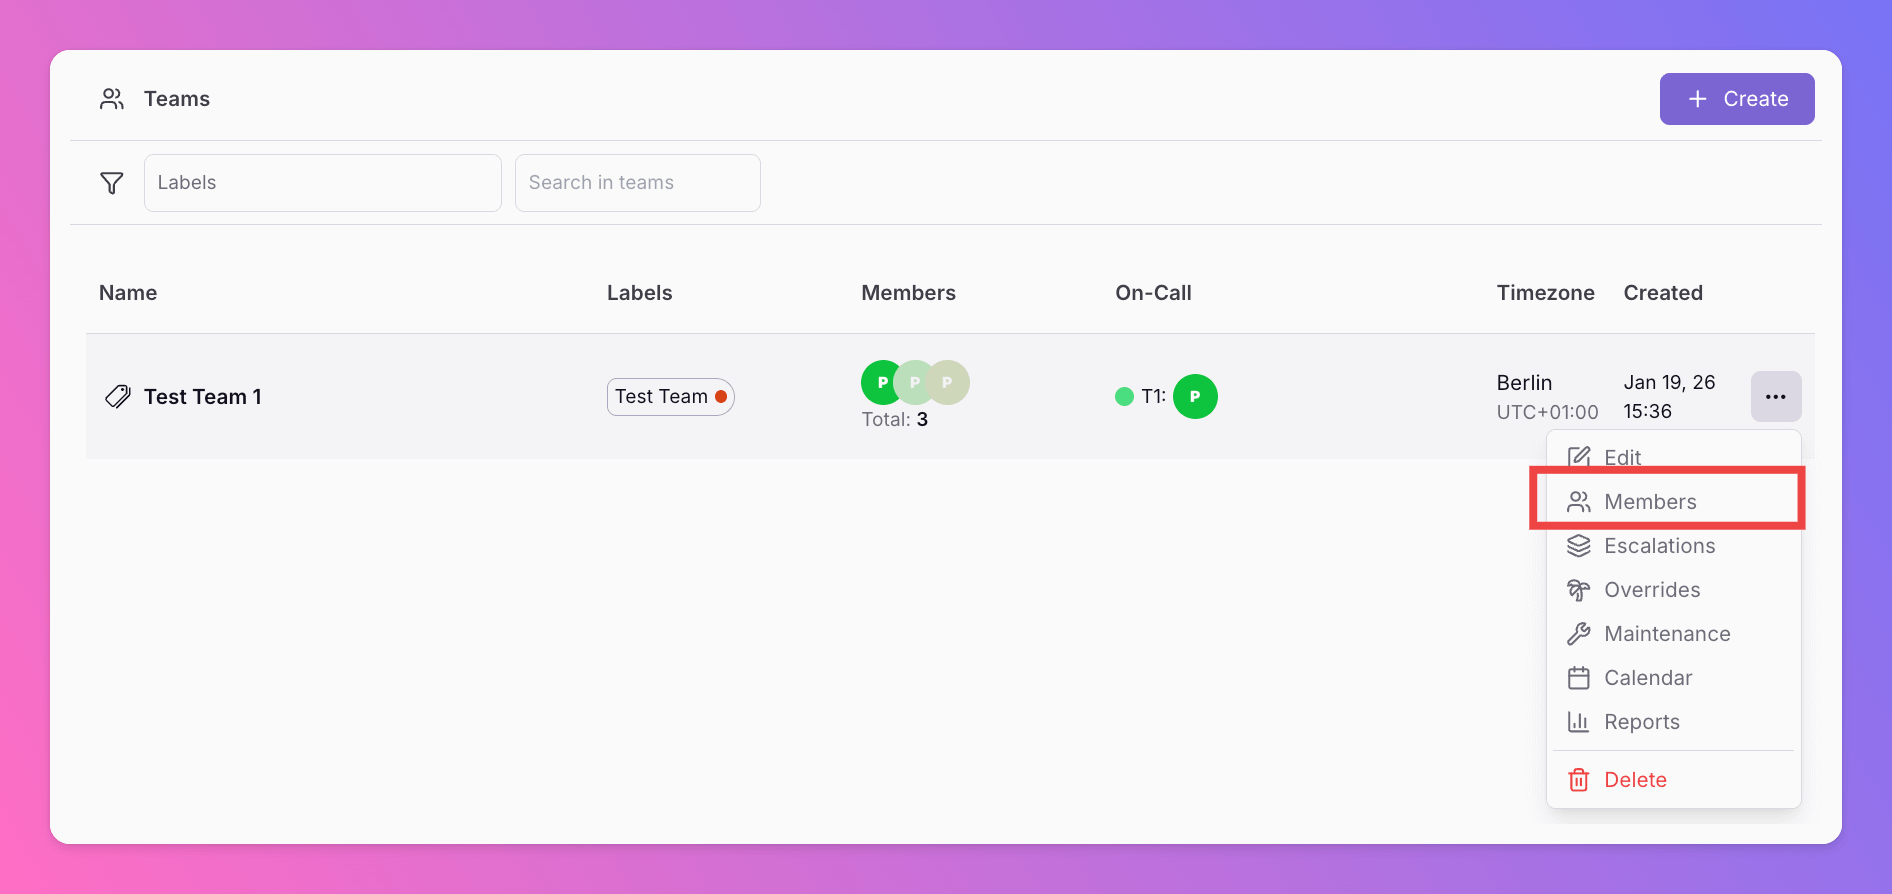
Navigate to the `Members` section within your team settings.
## Members
### Roles
A user has one of the following roles within a team:
* `Member`: A member can collaborate on all incidents, view the team calendar, get an engagement report and create their own personal overrides.
* `Administrator`: An admin can additionally set up the escalation schedules, create overrides for the whole team and create and manage all of the team's integrations plus the respective advanced routing in the team. Also, they can manage the team's users and, [if applicable, the billable user](/miscellaneous/billing#how-to-change-the-billable-user).
### Inviting Members
After setting up your team, you're instantly assigned the `Administrator` role and become the primary account holder for billing purposes. Refer to our [Billing](/miscellaneous/billing) section for more details.
Inviting colleagues is straightforward:
* Simply send them an invite via email.
* They'll need to sign up and accept your invitation to collaborate.
This process ensures a secure and efficient team collaboration setup.
Navigate to the `Members` section within your team settings.
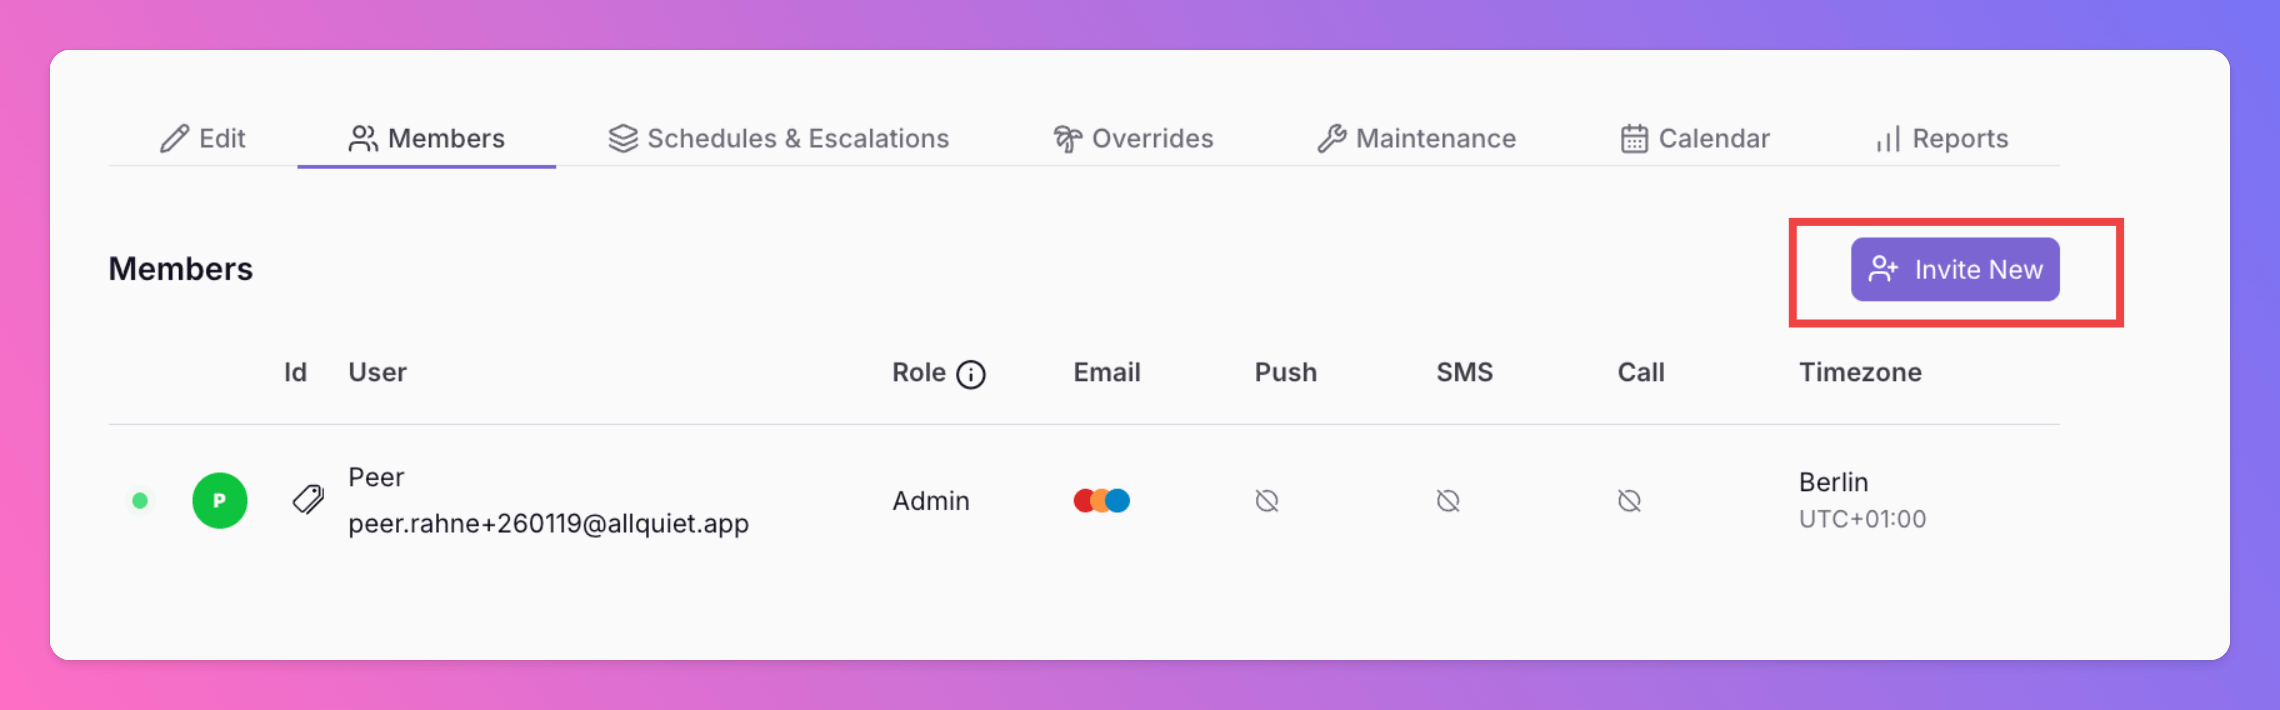
 Click "Invite New".
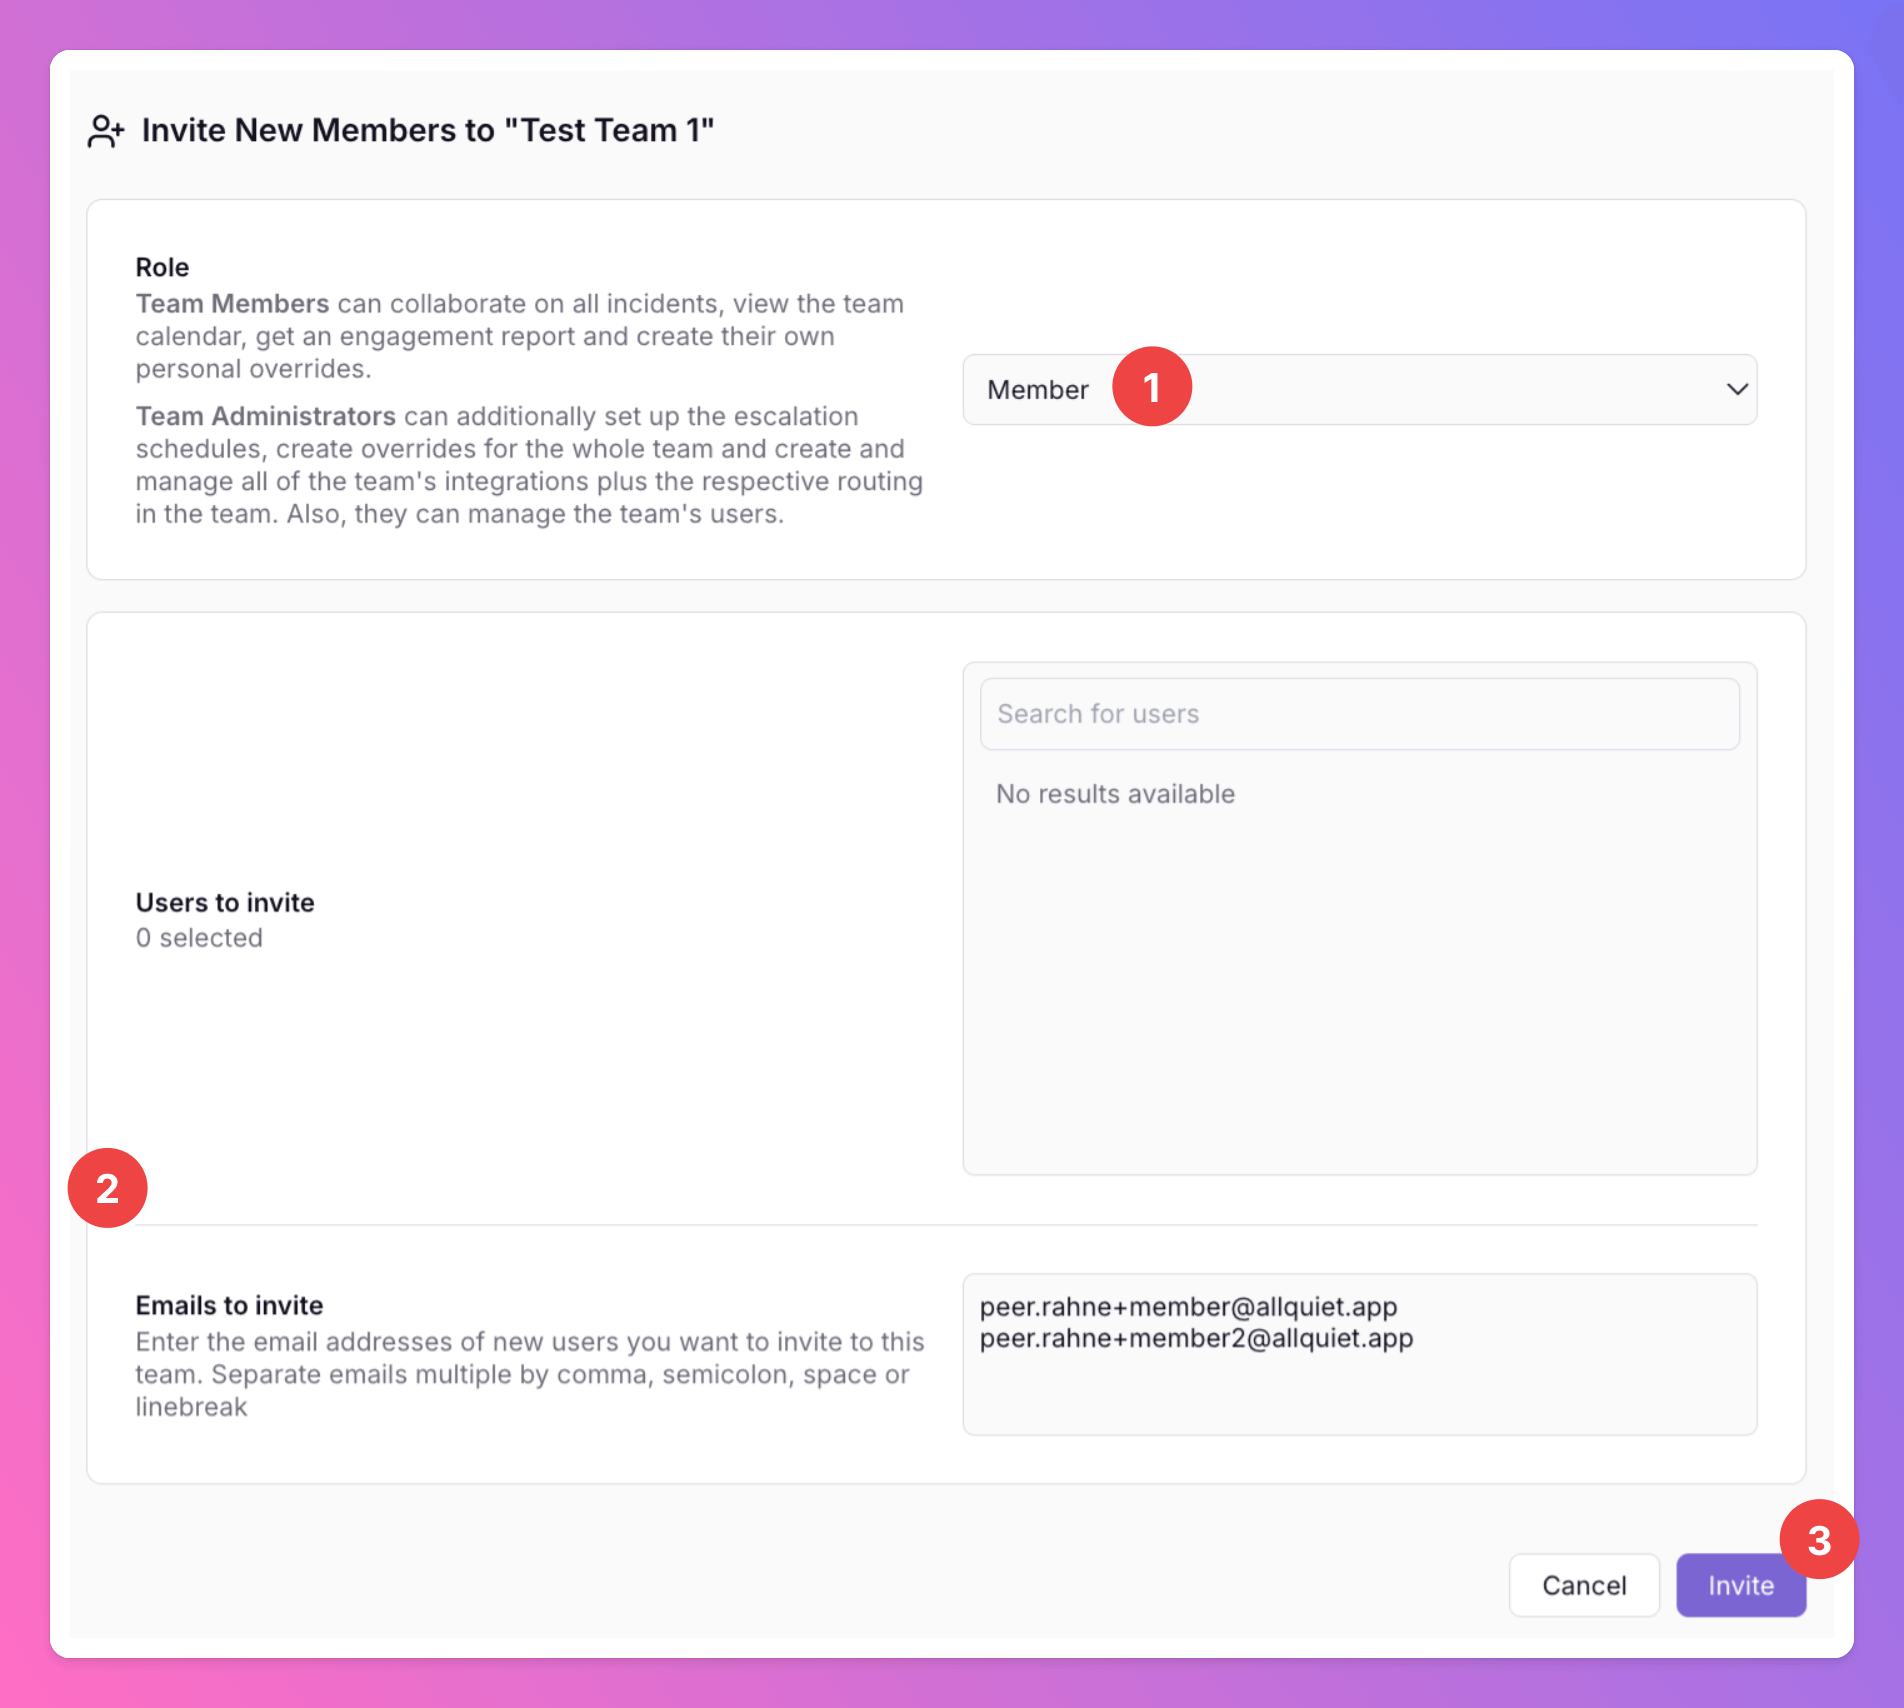
- 1. Choose the Role that the new team members should receive. Select between [`Member` and `Administrator`](/essentials/teams#roles).
- 2. Simply add Users from your [Organization](/advanced/organizations) or enter the email addresses of colleagues you wish to invite.
- 3. Click `Invite`. An invitation email will be sent to each with further instructions.
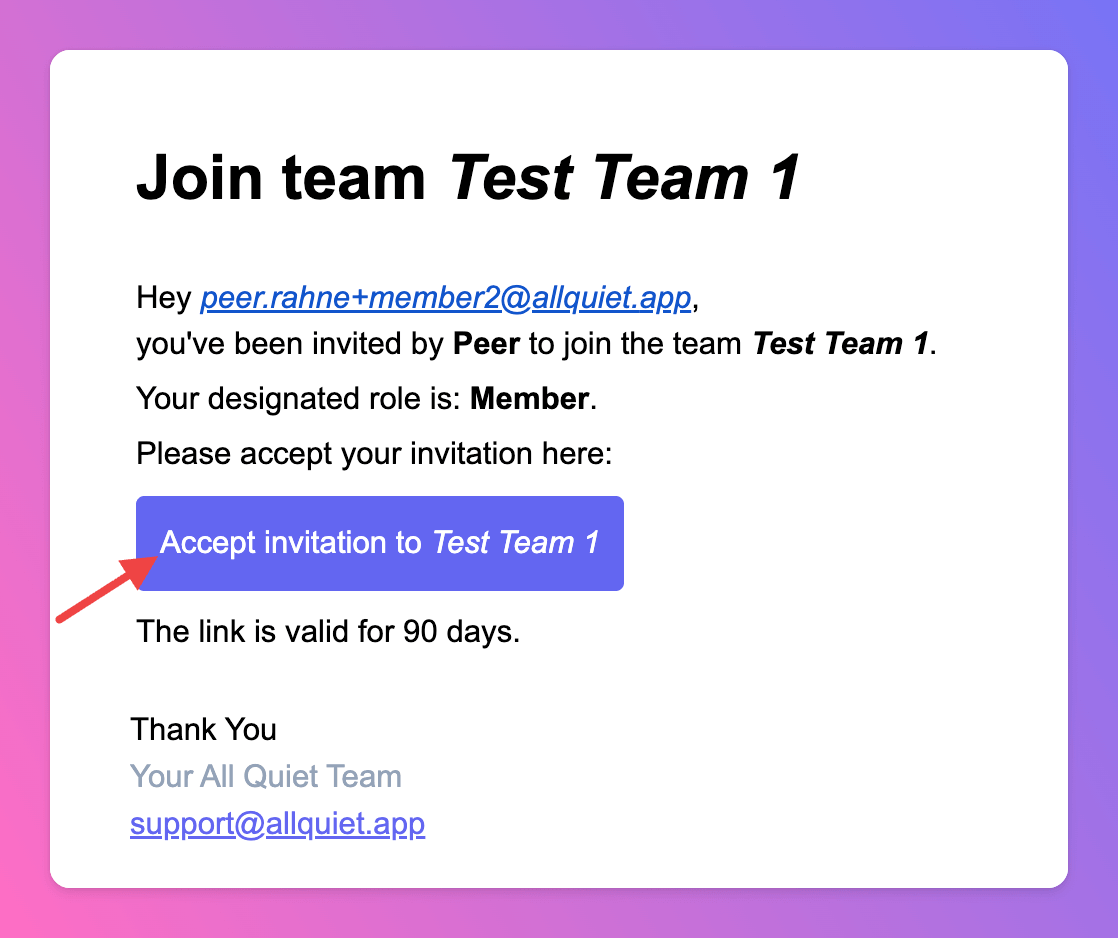
 Invitees receive an email with a link to `Accept Invitation to [Team Name]`. Clicking this confirms their membership and grants access to collaborate.
 ## Schedules & Escalations
* To learn more about **team schedules**, follow this [link](/essentials/escalations#schedules).
* To learn more about **team escalations**, follow this [link](/essentials/escalations#escalation-tiers).
* For more information about **escalating an incident to additional teams** or **reassigning an incident to a different team**, follow this link [link](/essentials/escalations#auto-escalations-across-several-teams).
## Team Overrides
To learn more about **team overrides**, follow this [link](/essentials/escalations#team-member-overrides).
## Maintenance Mode
The maintenance mode feature for teams allows for the management of incident alerts during times of scheduled maintenance or expected downtime. It is accessible through the `Team > Maintenance` page in the All Quiet Web App.
You can either
1. Create new maintenance window.
2. Edit planned maintenances.
## Schedules & Escalations
* To learn more about **team schedules**, follow this [link](/essentials/escalations#schedules).
* To learn more about **team escalations**, follow this [link](/essentials/escalations#escalation-tiers).
* For more information about **escalating an incident to additional teams** or **reassigning an incident to a different team**, follow this link [link](/essentials/escalations#auto-escalations-across-several-teams).
## Team Overrides
To learn more about **team overrides**, follow this [link](/essentials/escalations#team-member-overrides).
## Maintenance Mode
The maintenance mode feature for teams allows for the management of incident alerts during times of scheduled maintenance or expected downtime. It is accessible through the `Team > Maintenance` page in the All Quiet Web App.
You can either
1. Create new maintenance window.
2. Edit planned maintenances.
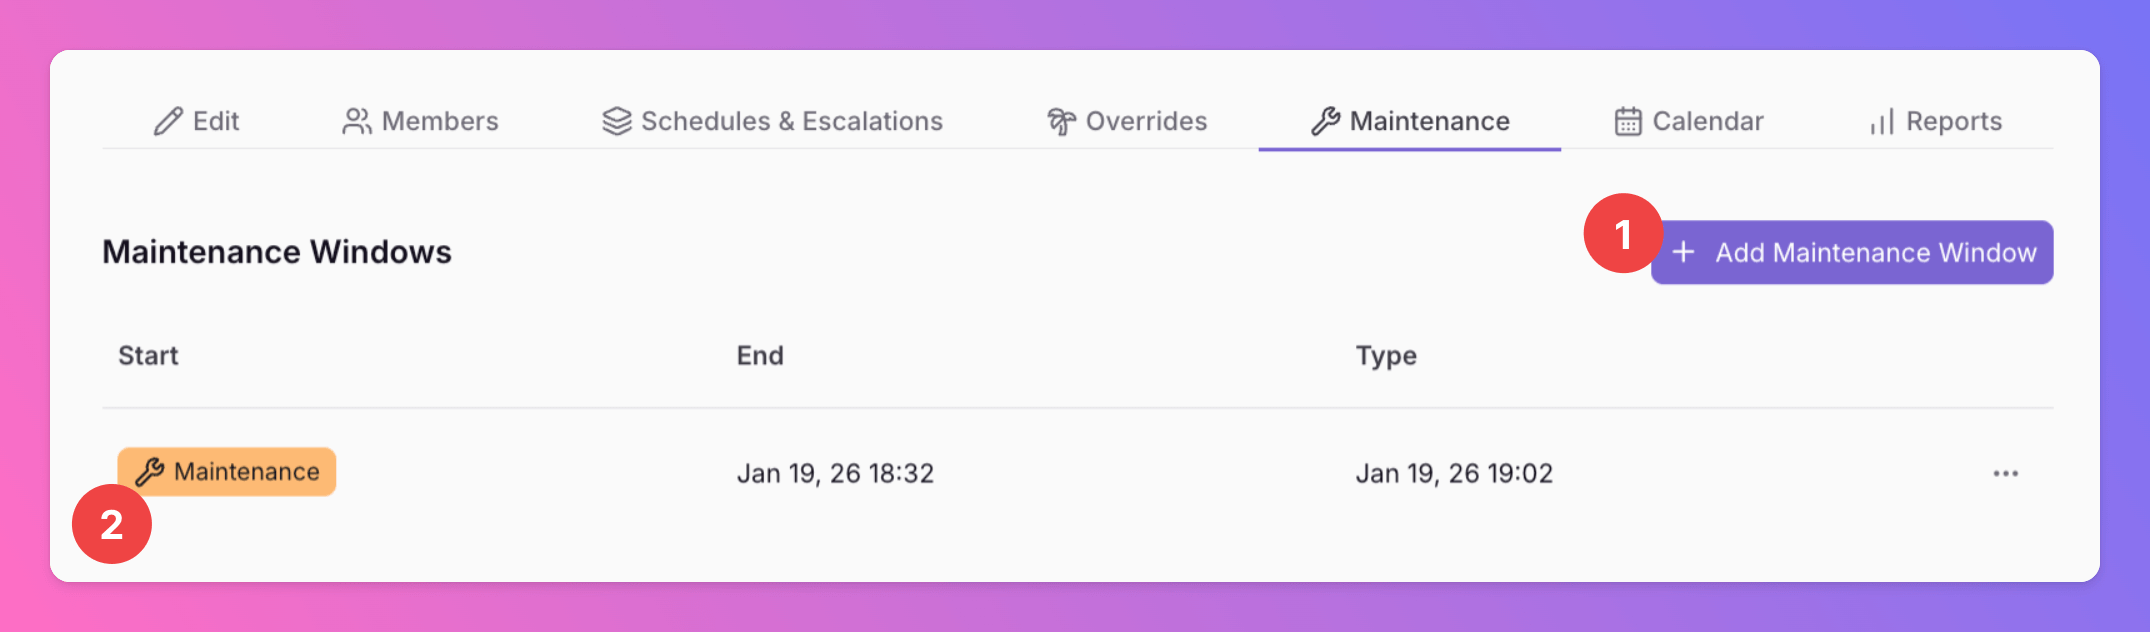 The maintenance schedule, once created, is also visible in the team's calendar, offering insight into planned maintenance or downtime.
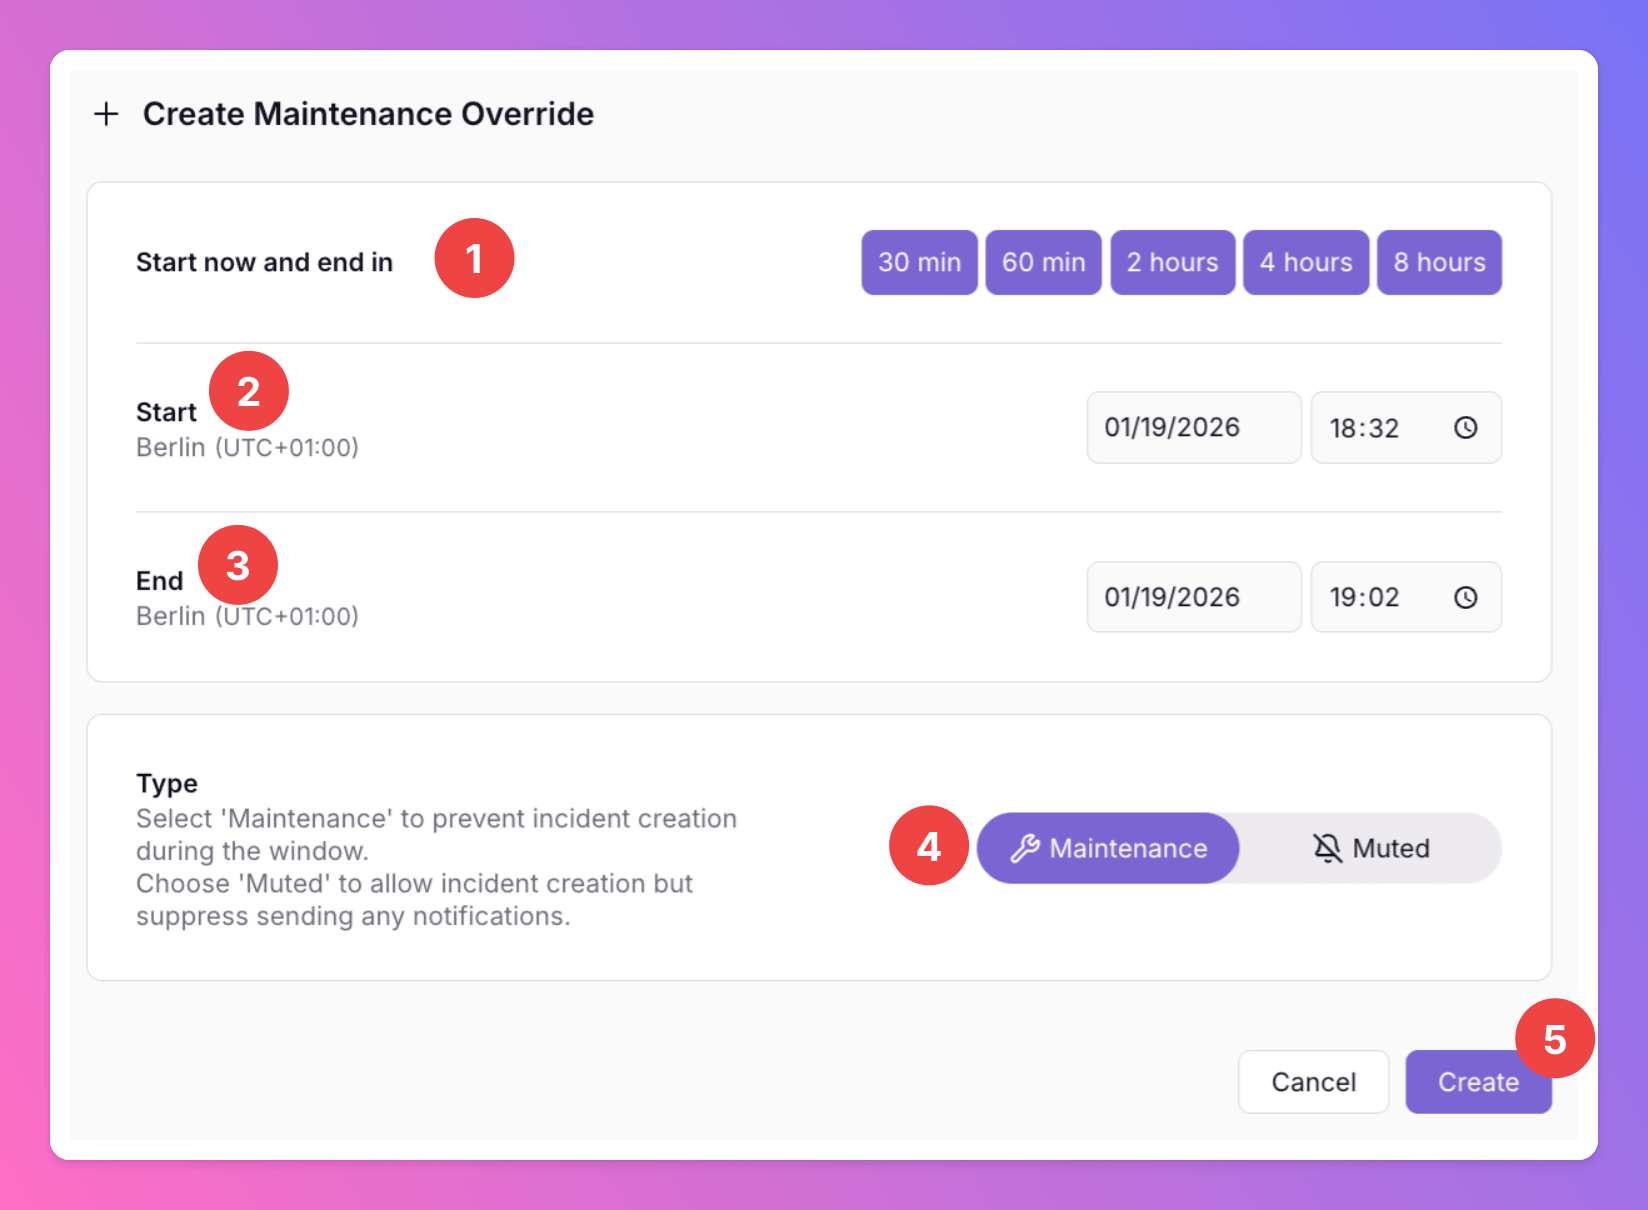
When creating a new maintenance window, you can configure the following elements:
Use these to quickly populate the start and end times with predetermined durations ranging from 30 minutes to 8 hours.
Specify the start date and time for the maintenance window according to the team's timezone.
Specify the end date and time to mark the conclusion of the maintenance window.
Choose between two types of maintenance modes:
The maintenance schedule, once created, is also visible in the team's calendar, offering insight into planned maintenance or downtime.
When creating a new maintenance window, you can configure the following elements:
Use these to quickly populate the start and end times with predetermined durations ranging from 30 minutes to 8 hours.
Specify the start date and time for the maintenance window according to the team's timezone.
Specify the end date and time to mark the conclusion of the maintenance window.
Choose between two types of maintenance modes:
- Maintenance: Selecting this option will prevent the creation of new incidents during the scheduled period.
- Muted: This option allows incidents to be created without sending out any notifications during the period.
Clicking the `Create` button will confirm and activate the maintenance schedule. It will also be displayed in the team's calendar.
 ## Calendar
To learn more about **team calendars**, follow this [link](/essentials/escalations#team-calendar).
## Incident Report
To learn more about your Incident KPIs, check our your [Team's Incident Report](/advanced/report#incident-report).
You can also find the [Engagement Report](/advanced/report#engagement-report) on this tab.
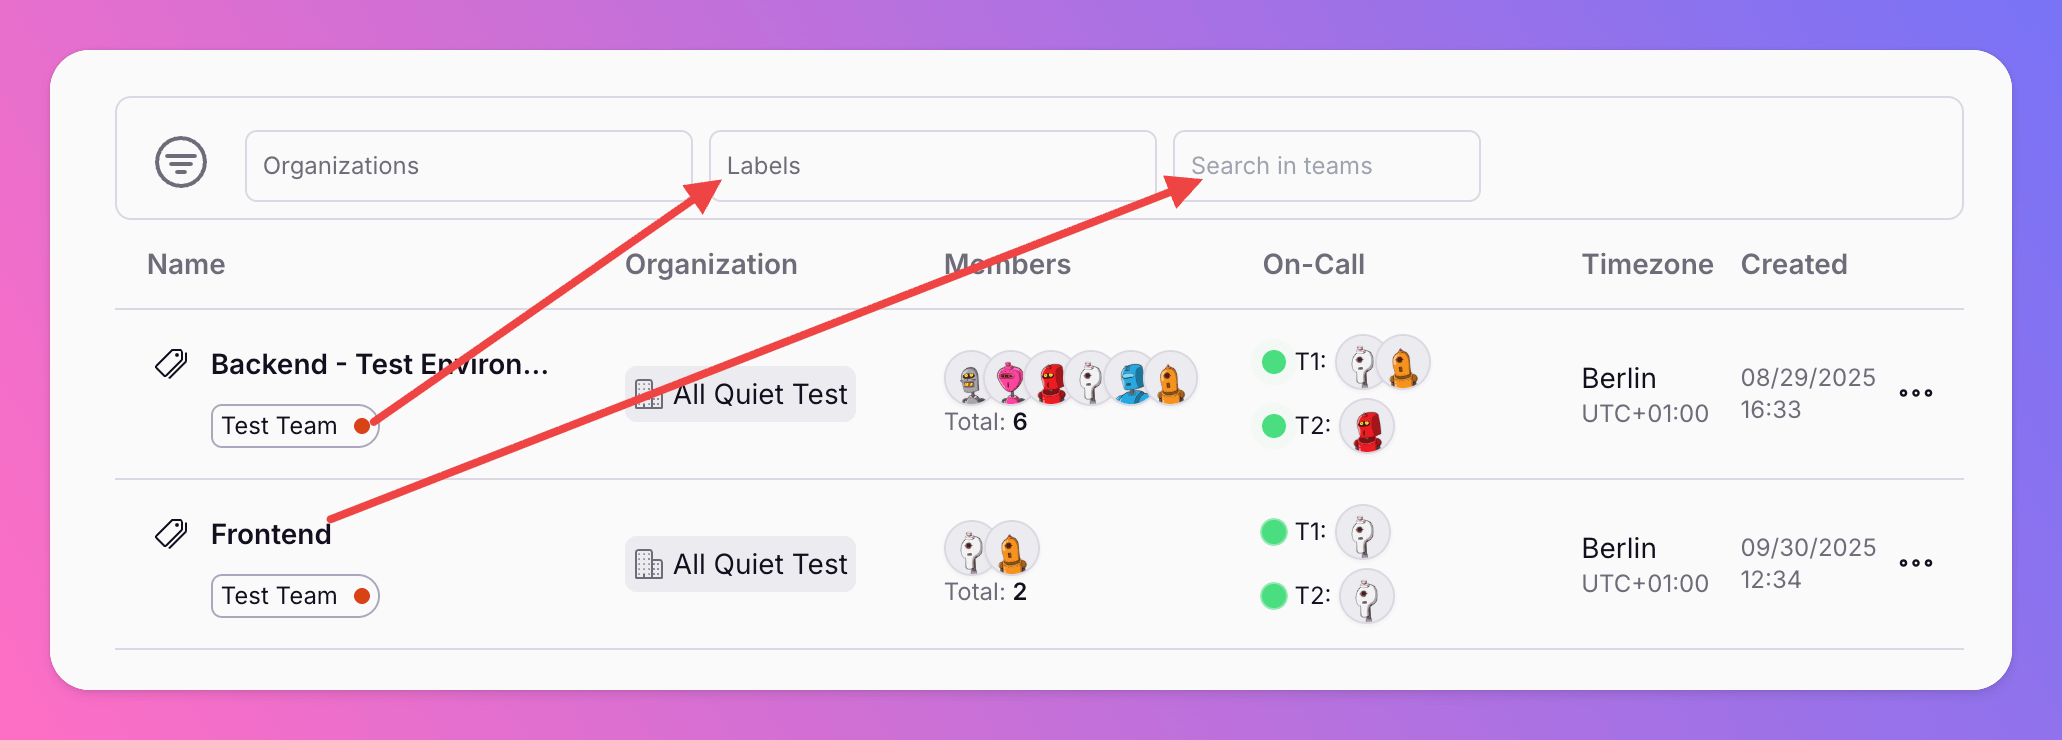
## Team Overview
The team overview show all the teams you have a [team role](/essentials/teams#roles) in or, if you're a billable user, that are biiled by you.
For users wit [organization roles](/advanced/organizations#key-features-of-organizations), it also shows teams of your organization that you don't have an explicit role in.
Therefore, filtering this view via team labels or team names can be handy for people with a higher number of teams.
## Calendar
To learn more about **team calendars**, follow this [link](/essentials/escalations#team-calendar).
## Incident Report
To learn more about your Incident KPIs, check our your [Team's Incident Report](/advanced/report#incident-report).
You can also find the [Engagement Report](/advanced/report#engagement-report) on this tab.
## Team Overview
The team overview show all the teams you have a [team role](/essentials/teams#roles) in or, if you're a billable user, that are biiled by you.
For users wit [organization roles](/advanced/organizations#key-features-of-organizations), it also shows teams of your organization that you don't have an explicit role in.
Therefore, filtering this view via team labels or team names can be handy for people with a higher number of teams.