> ## Documentation Index
> Fetch the complete documentation index at: https://docs.allquiet.app/llms.txt
> Use this file to discover all available pages before exploring further.
# Incident Collaboration
> Solve incidents faster with All Quiet
Explore how to manage incidents in All Quiet, including filtering, sorting, and searching, plus team collaboration techniques. This guide, focusing on the web app, mirrors the functionality you'll find in our mobile apps,
## Incidents Overview
Open `Incidents`. Per Default, it shows all `Open` incidents of your teams.
For help when alerts, payloads, or notifications do not match what you expect, see [Troubleshooting inbound payloads & incidents](/essentials/inbound#troubleshooting-missing-or-unexpected-incidents) in **Inbound Integrations**.
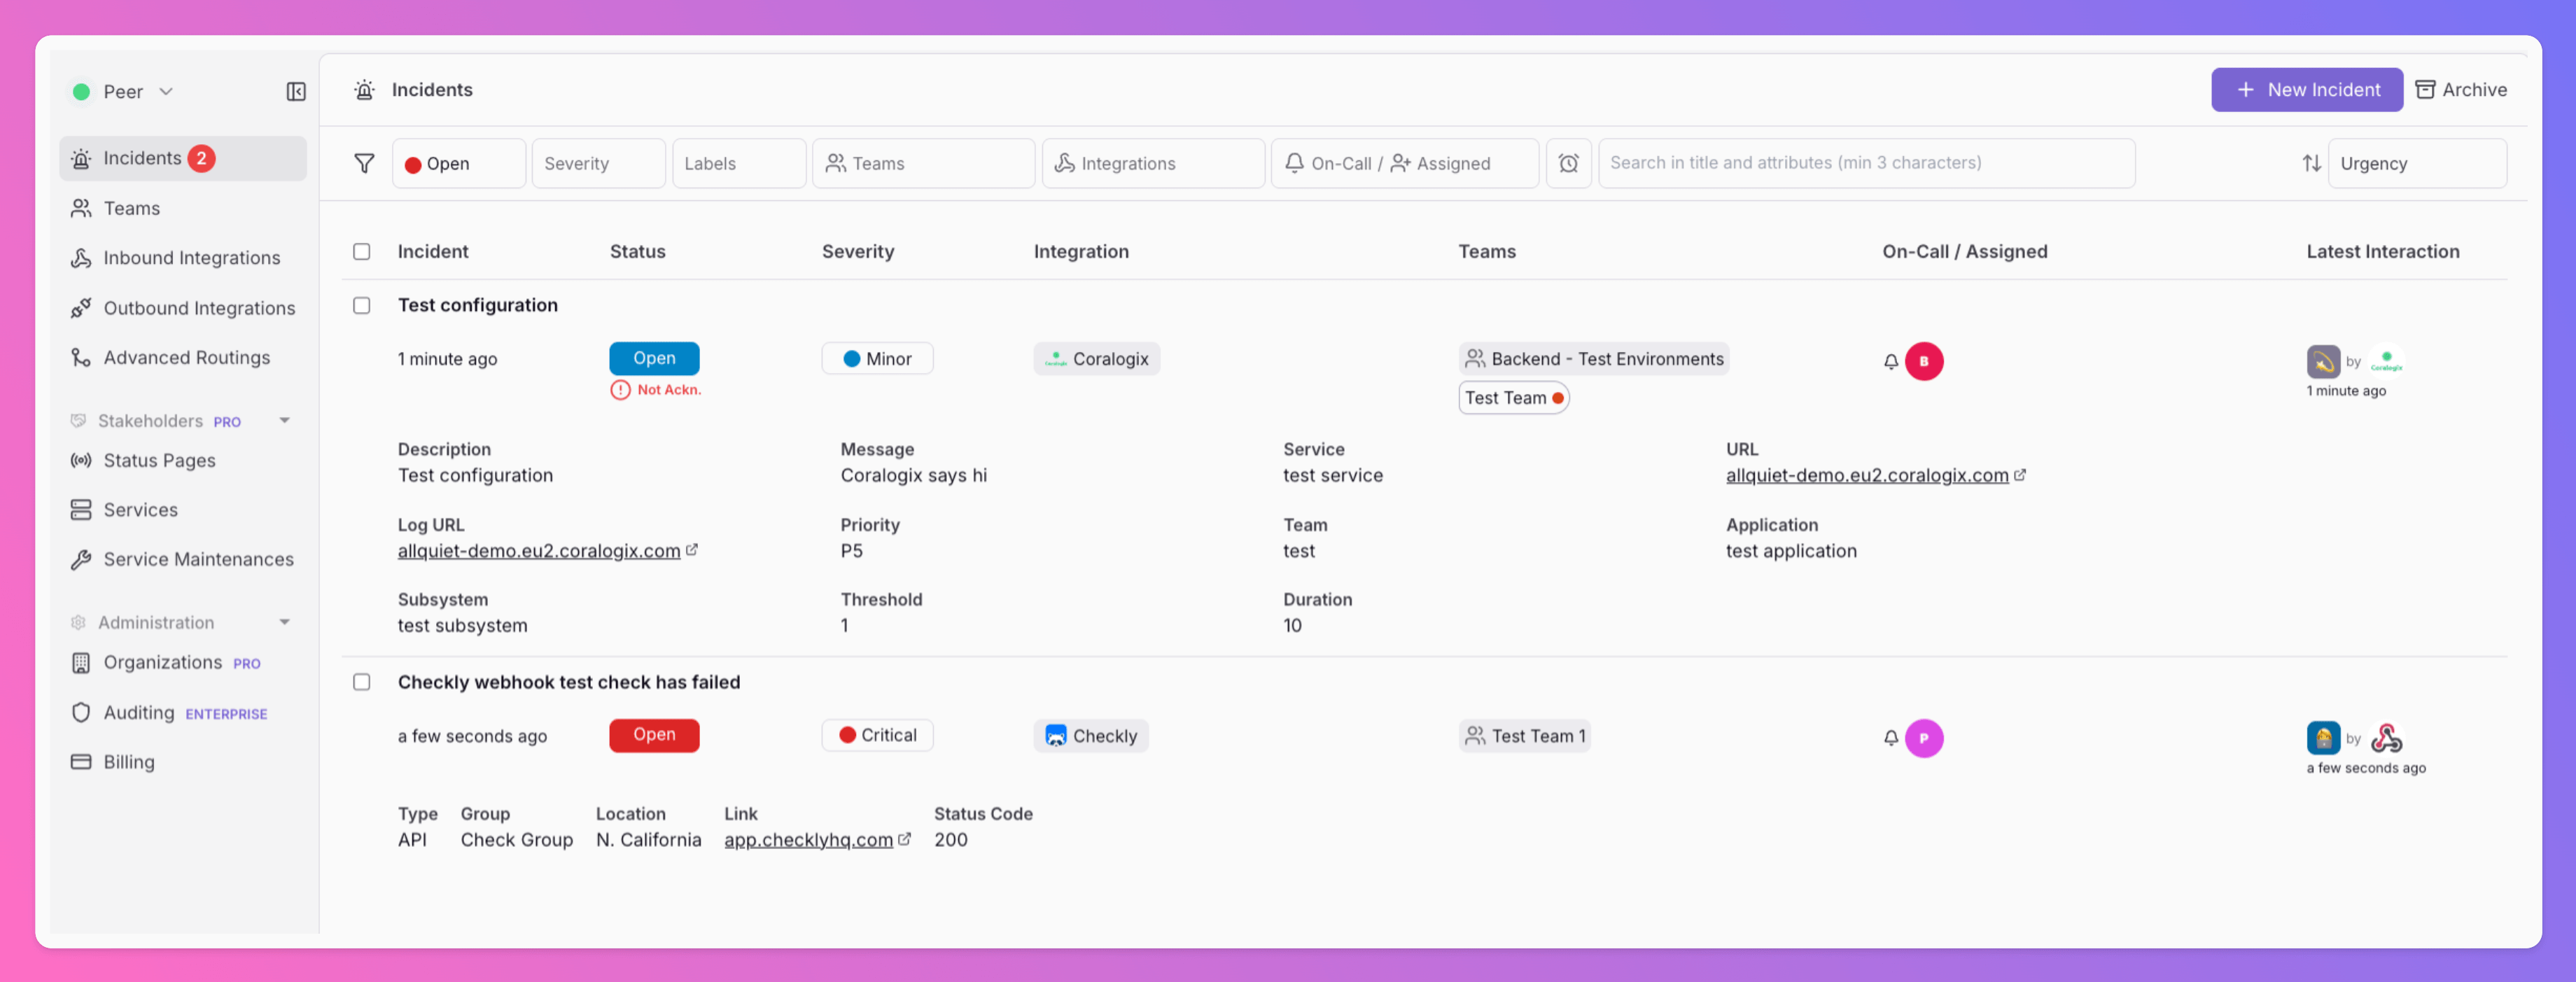 ## Filtering and Sorting incidents
You can filter, sort and search incidents within All Quiet. We automatically save your filter settings.
### Sorting incidents
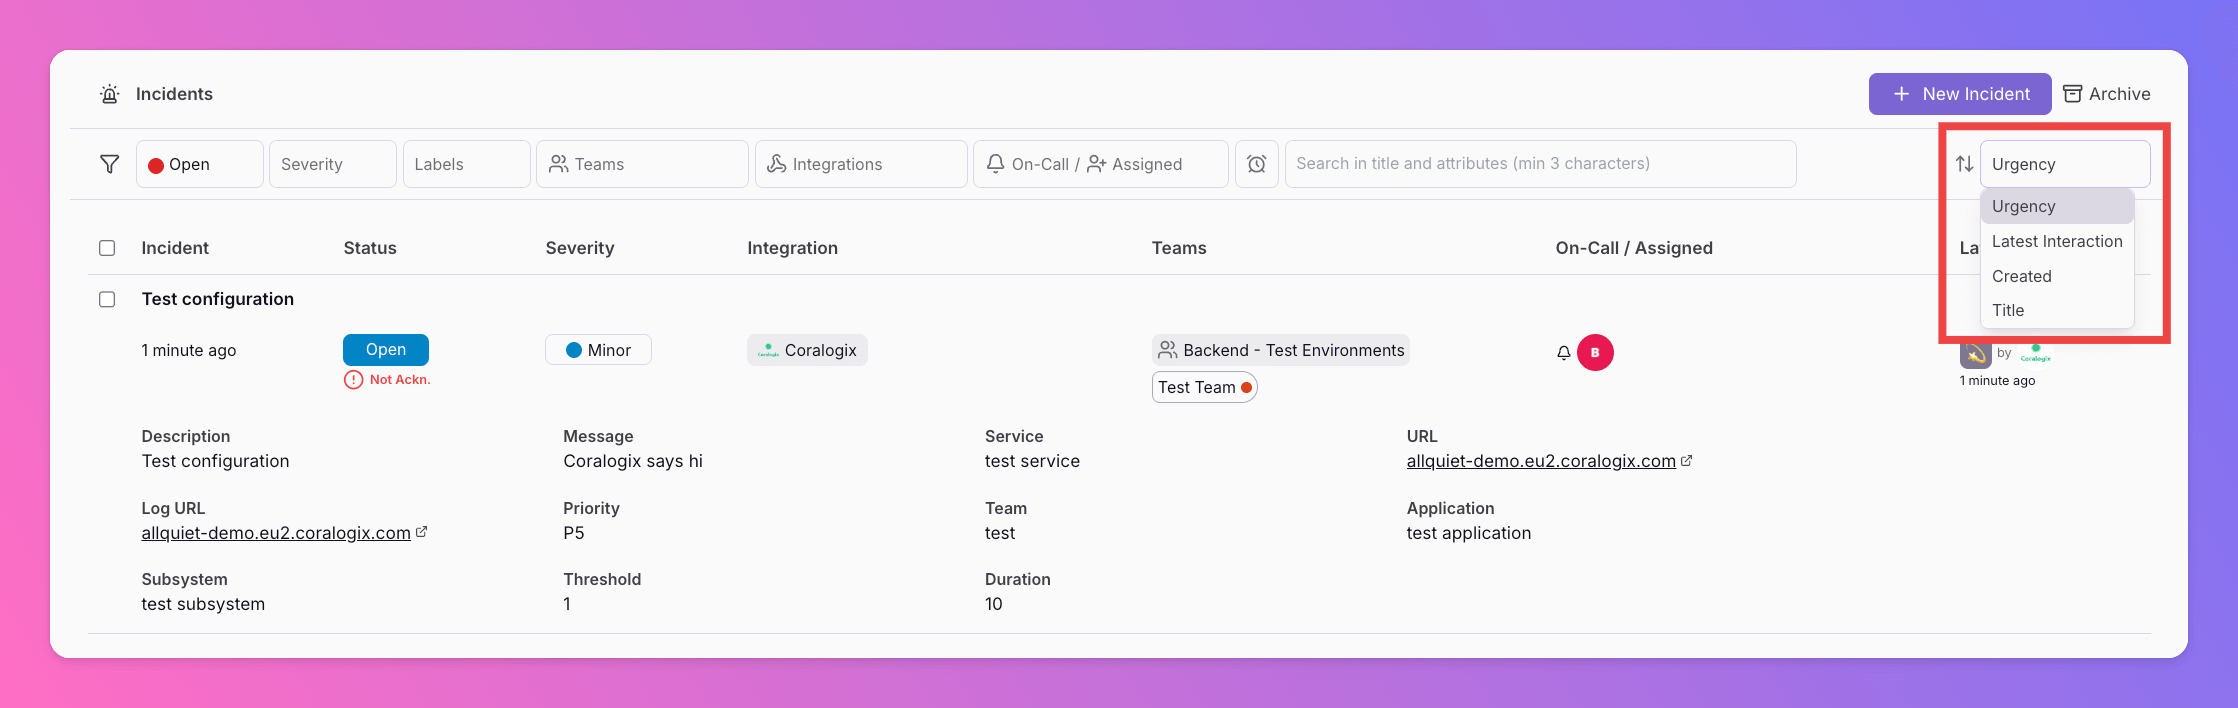
By default, incidents are sorted by `Urgency`. You can change this to `Latest interaction`, `Created` or `Title`by clicking on `Urgency`.
## Filtering and Sorting incidents
You can filter, sort and search incidents within All Quiet. We automatically save your filter settings.
### Sorting incidents
By default, incidents are sorted by `Urgency`. You can change this to `Latest interaction`, `Created` or `Title`by clicking on `Urgency`.
 ### Filtering incidents
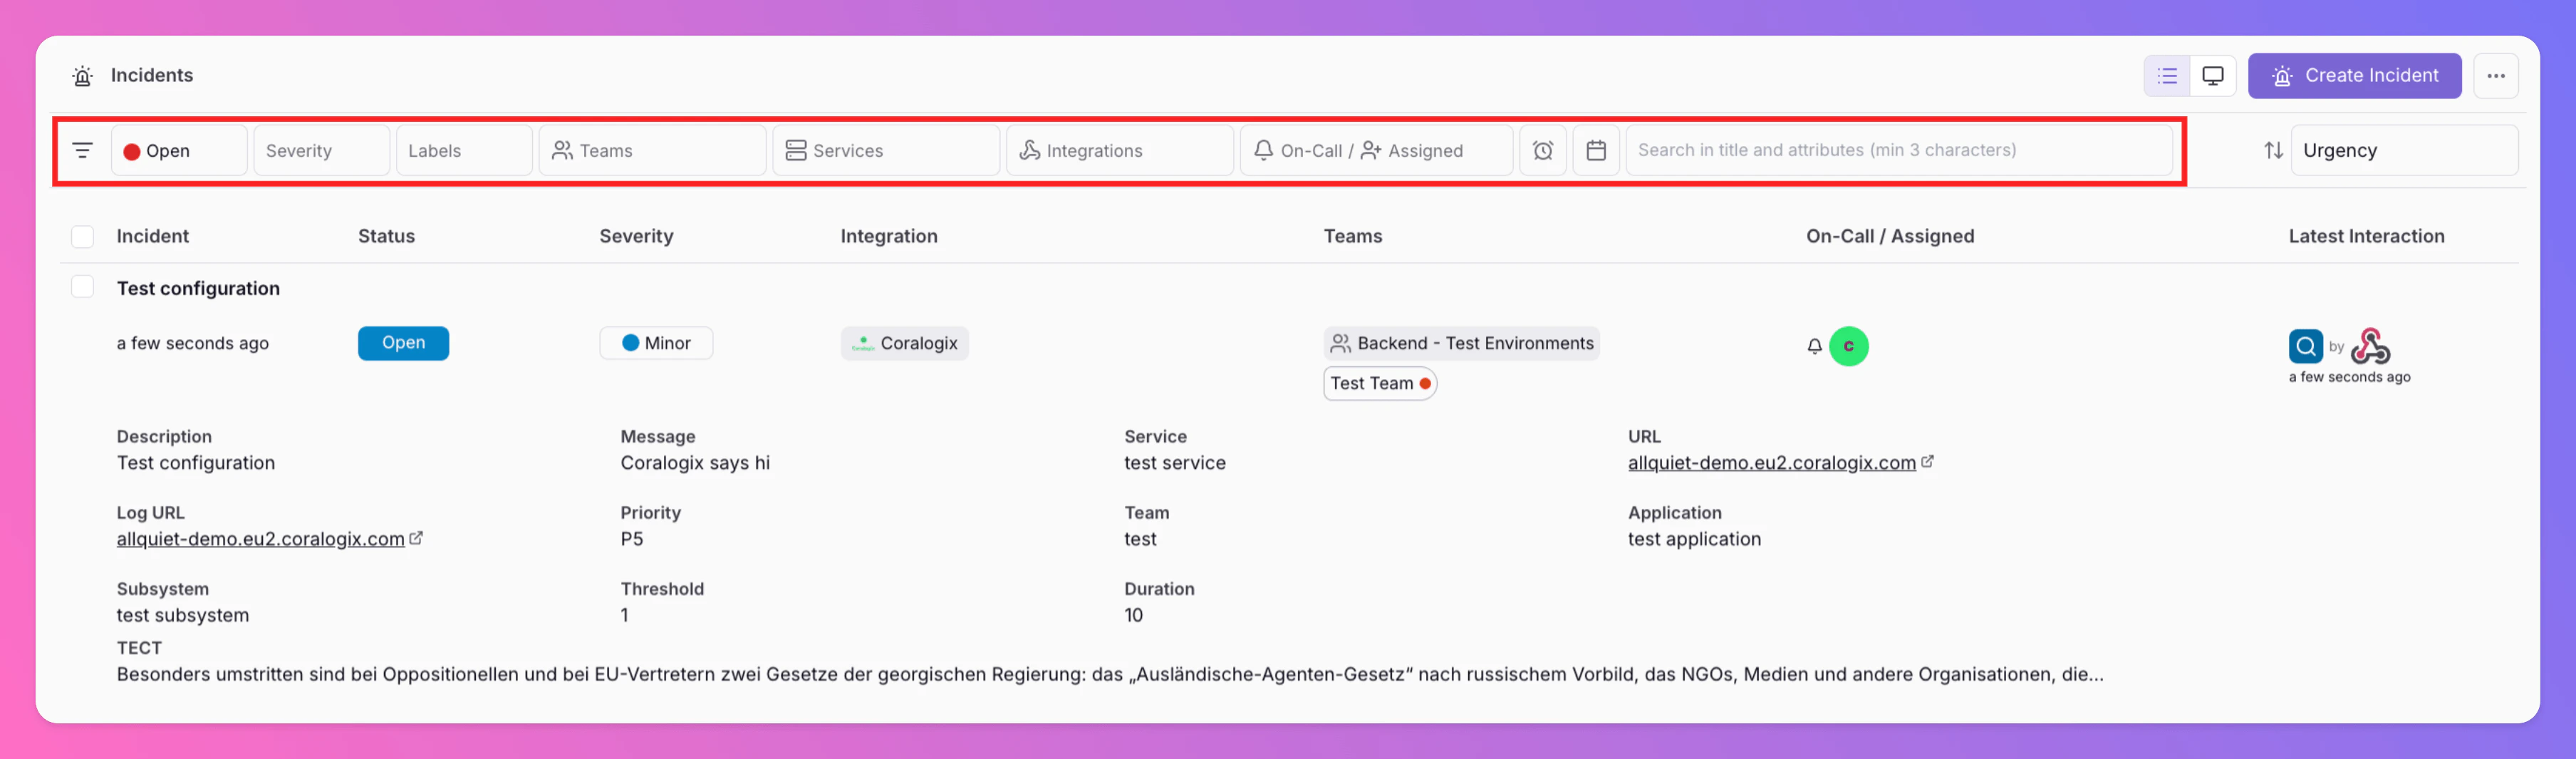
You can filter the list of incidents based on:
* **Status:** `Open` or `Resolved`. Per Default, we only show `Open` incidents.
* **Severity:** `Critical`, `Warning` or `Minor`
* **Labels:** Choose between all labels of your [Teams](/essentials/teams#edit-team) and [Inbound Integrations](/essentials/inbound#edit-your-integration’s-general-settings), here.
* **Teams:** Choose between all of your teams here
* **Integrations:** Choose between all of your integrations here
* [**On-Call / Assigned Users:**](/essentials/incident#filter-for-on-call-%2F-assigned-users) Display only incidents where the selected users were on-call in the assigned teams during the last interaction or those assigned to specific users (the latter only available only with Organizations).
* **View Snoozed Incidents:** Per default, we exclude snoozed incidents from this view. You can [adjust](/essentials/incident#include-snoozed-incidents) this setting, here.
* **Date Range:** Only show All Quiet incidents created within a certain date range. You can either select from our pre-configured options, such as "Last 7 Days" or choose custom dates if you are searching for an incident that occured during a specific timeframe.
* You can also [**Search in Incident Titles and Attributes**](/essentials/incident#text-search-for-incidents) to filter.
To filter any of these, click on the attribute you'd like to filter and choose what you'd like to filter for.
### Filtering incidents
You can filter the list of incidents based on:
* **Status:** `Open` or `Resolved`. Per Default, we only show `Open` incidents.
* **Severity:** `Critical`, `Warning` or `Minor`
* **Labels:** Choose between all labels of your [Teams](/essentials/teams#edit-team) and [Inbound Integrations](/essentials/inbound#edit-your-integration’s-general-settings), here.
* **Teams:** Choose between all of your teams here
* **Integrations:** Choose between all of your integrations here
* [**On-Call / Assigned Users:**](/essentials/incident#filter-for-on-call-%2F-assigned-users) Display only incidents where the selected users were on-call in the assigned teams during the last interaction or those assigned to specific users (the latter only available only with Organizations).
* **View Snoozed Incidents:** Per default, we exclude snoozed incidents from this view. You can [adjust](/essentials/incident#include-snoozed-incidents) this setting, here.
* **Date Range:** Only show All Quiet incidents created within a certain date range. You can either select from our pre-configured options, such as "Last 7 Days" or choose custom dates if you are searching for an incident that occured during a specific timeframe.
* You can also [**Search in Incident Titles and Attributes**](/essentials/incident#text-search-for-incidents) to filter.
To filter any of these, click on the attribute you'd like to filter and choose what you'd like to filter for.
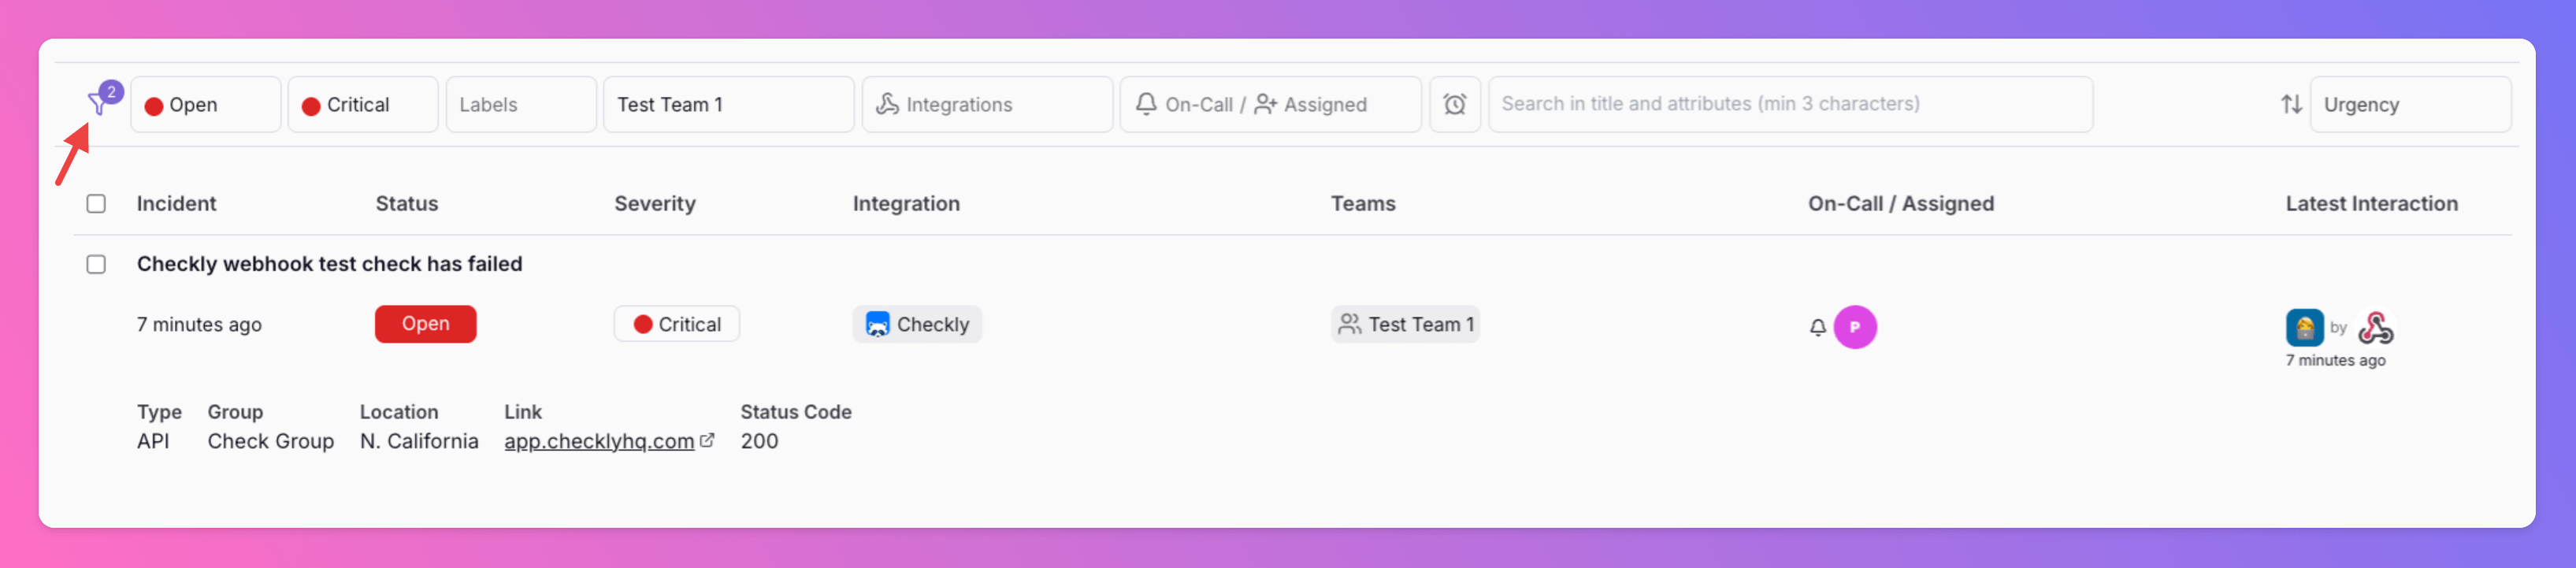
 In this example, we are filtering for `Open` incidents with severity `Critical` from team `Test Team 1`:
To delete all filters, simply click on the filter icon.
In this example, we are filtering for `Open` incidents with severity `Critical` from team `Test Team 1`:
To delete all filters, simply click on the filter icon.
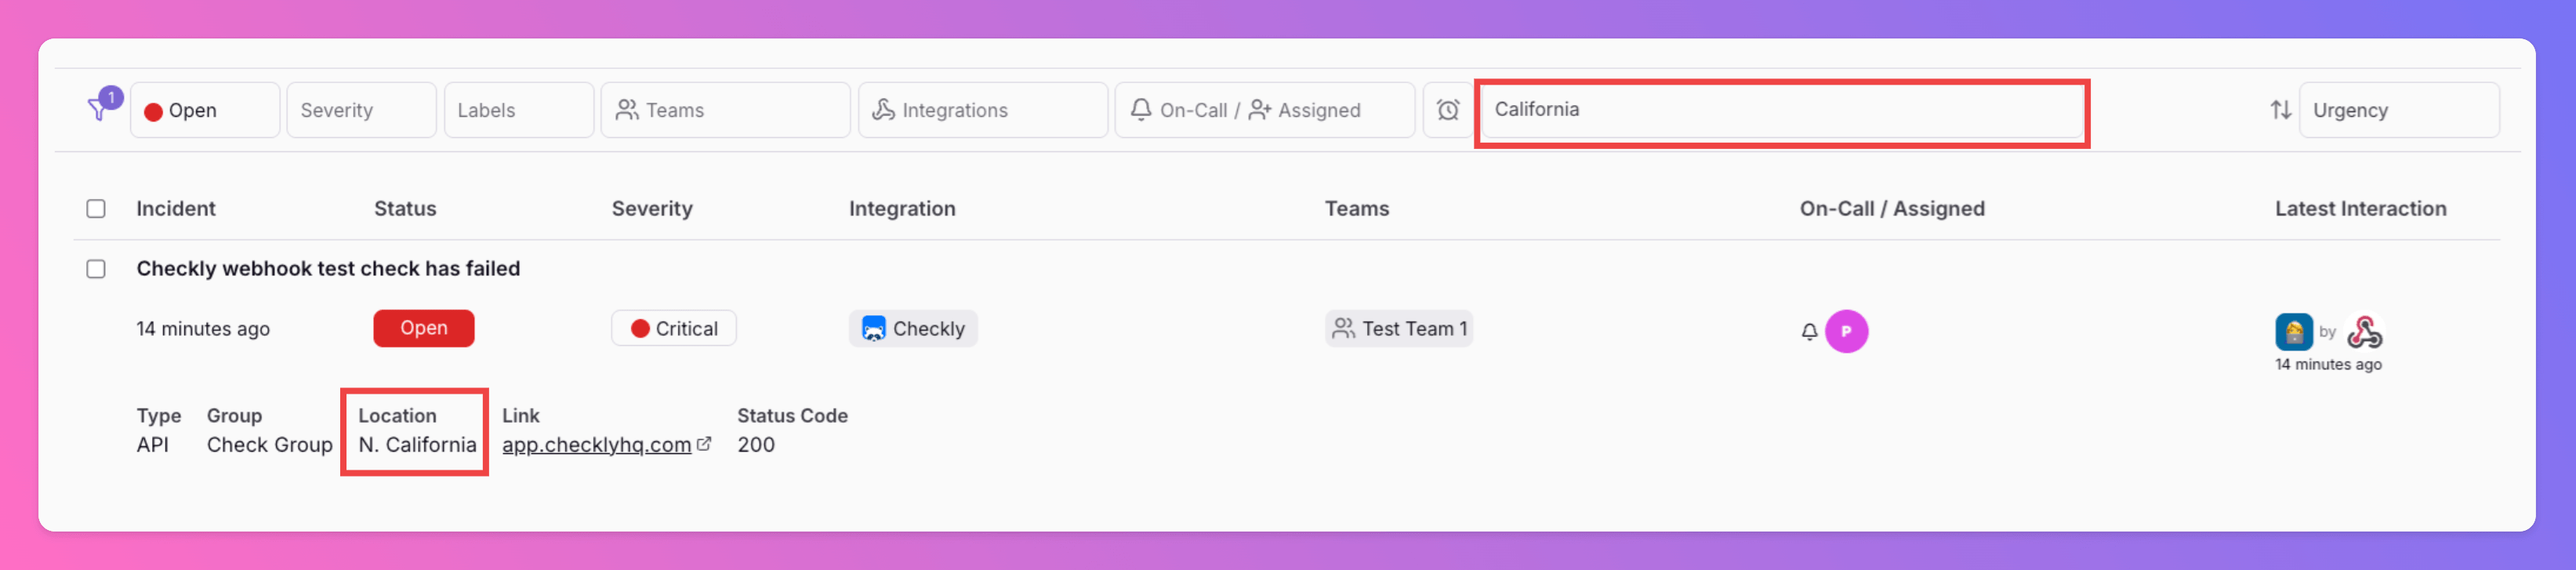
 ### Text search for incidents
All Quiet allows you to do a text search for incidents in `title` and `attributes`. Just write what you're looking for in the text field `Search in title and attributes` and hit **ENTER** to see the resulting incidents.
### Text search for incidents
All Quiet allows you to do a text search for incidents in `title` and `attributes`. Just write what you're looking for in the text field `Search in title and attributes` and hit **ENTER** to see the resulting incidents.
 ### Filter for On-Call / Assigned Users
Use the "On-Call / Assigned Users" filter to display only incidents assigned to specific users (available only for Organizations) or incidents where certain users are currently on-call in the assigned teams based on the last interaction.
If an incident is assigned only to specific users and not to any team, it can only be accessed by the assigned users, users with [organization roles](/advanced/organizations#key-features-of-organizations), and the user who cretead the incident - if it's a [manually created incident](/essentials/incident#manually-create-an-incident).
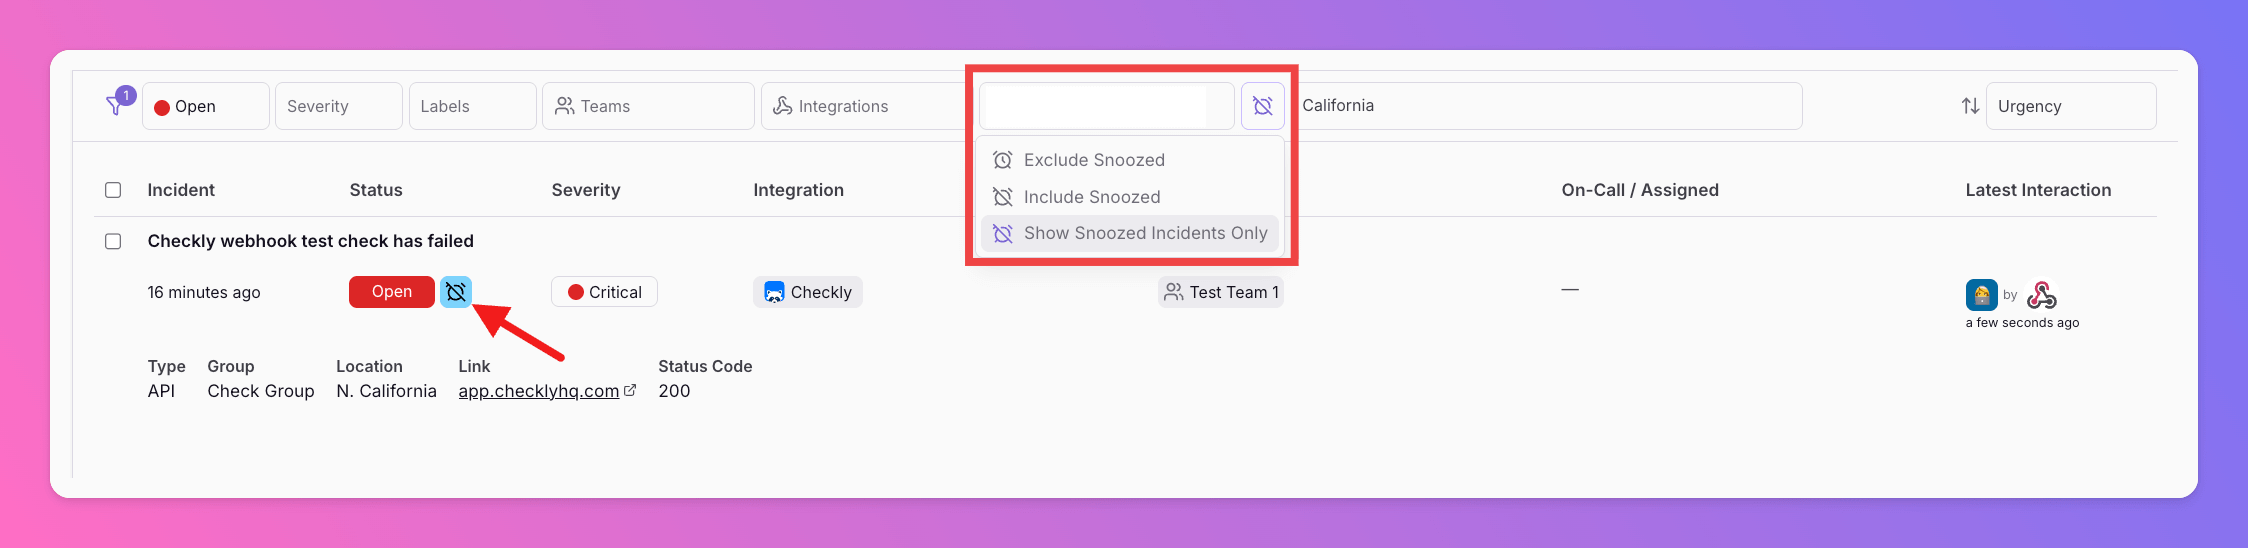
### Include Snoozed Incidents
Per default, [snoozed incidents](/essentials/inbound#snoozing-inbound-integrations) are hidden. If you change the view from `Hide Snoozed` to `Include Snoozed` or `Only Snoozed`, the incident overview will display snoozed incidents as well / solely, identified by a Snooze symbol.
[Unsnooze](/essentials/incident#manually-snooze-%2F-unsnooze) the incident to inform your on-call colleagues about this incident.
### Filter for On-Call / Assigned Users
Use the "On-Call / Assigned Users" filter to display only incidents assigned to specific users (available only for Organizations) or incidents where certain users are currently on-call in the assigned teams based on the last interaction.
If an incident is assigned only to specific users and not to any team, it can only be accessed by the assigned users, users with [organization roles](/advanced/organizations#key-features-of-organizations), and the user who cretead the incident - if it's a [manually created incident](/essentials/incident#manually-create-an-incident).
### Include Snoozed Incidents
Per default, [snoozed incidents](/essentials/inbound#snoozing-inbound-integrations) are hidden. If you change the view from `Hide Snoozed` to `Include Snoozed` or `Only Snoozed`, the incident overview will display snoozed incidents as well / solely, identified by a Snooze symbol.
[Unsnooze](/essentials/incident#manually-snooze-%2F-unsnooze) the incident to inform your on-call colleagues about this incident.
 ## Compact List View (Reduced View of Incident List)
In addition to the default `Detailed List View`, you can also use our `Compact List View`.
The Compact List View is designed for fast scanning when you want to focus on the essentials and fit more incidents on the screen.
1. **How to switch**: Use the view toggle in the incident list header and select `Compact List View`. You can switch back anytime by selecting `Detailed List View`.
2. * **What you’ll see in Compact List View**: A condensed incident row with the most important identifiers and status information (for example incident name/title, current state/severity, and key timestamps/status indicators), optimized for quick overview. The order of the attributes shown depends on the order of the attributes in [Payload Mapping](/essentials/inbound#mapping-payloads).
* **What you won’t see (vs. Detailed List View)**: Detailed per-incident context and extended fields that are available in Detailed List View view (such as expanded descriptions, additional metadata, and other secondary details) are hidden to keep the layout minimal. "Affected Services" are also only visible in the "Detailed List View"
3. **Actions**: Different to Detailed List View, in Compact List View, quick **actions per incident are directly available**. This makes the Compact List View especially useful for teams like NOC (Network Operations Center) teams that manage and distribute All Quiet incidents directly from the overview.
## Compact List View (Reduced View of Incident List)
In addition to the default `Detailed List View`, you can also use our `Compact List View`.
The Compact List View is designed for fast scanning when you want to focus on the essentials and fit more incidents on the screen.
1. **How to switch**: Use the view toggle in the incident list header and select `Compact List View`. You can switch back anytime by selecting `Detailed List View`.
2. * **What you’ll see in Compact List View**: A condensed incident row with the most important identifiers and status information (for example incident name/title, current state/severity, and key timestamps/status indicators), optimized for quick overview. The order of the attributes shown depends on the order of the attributes in [Payload Mapping](/essentials/inbound#mapping-payloads).
* **What you won’t see (vs. Detailed List View)**: Detailed per-incident context and extended fields that are available in Detailed List View view (such as expanded descriptions, additional metadata, and other secondary details) are hidden to keep the layout minimal. "Affected Services" are also only visible in the "Detailed List View"
3. **Actions**: Different to Detailed List View, in Compact List View, quick **actions per incident are directly available**. This makes the Compact List View especially useful for teams like NOC (Network Operations Center) teams that manage and distribute All Quiet incidents directly from the overview.
 ## Manually Create an Incident
Sometimes, your integrations are quiet, but you still find an incident.
That's why we added the option to manually create incidents.
1. Select `Incidents` in the sidebar of the Web App.
2. Click `Create Incident`.
## Manually Create an Incident
Sometimes, your integrations are quiet, but you still find an incident.
That's why we added the option to manually create incidents.
1. Select `Incidents` in the sidebar of the Web App.
2. Click `Create Incident`.
 If you’re using All Quiet [Services and Status Pages](/advanced/status-pages), you can also create incidents manually from those menus, with the relevant Services already preselected.
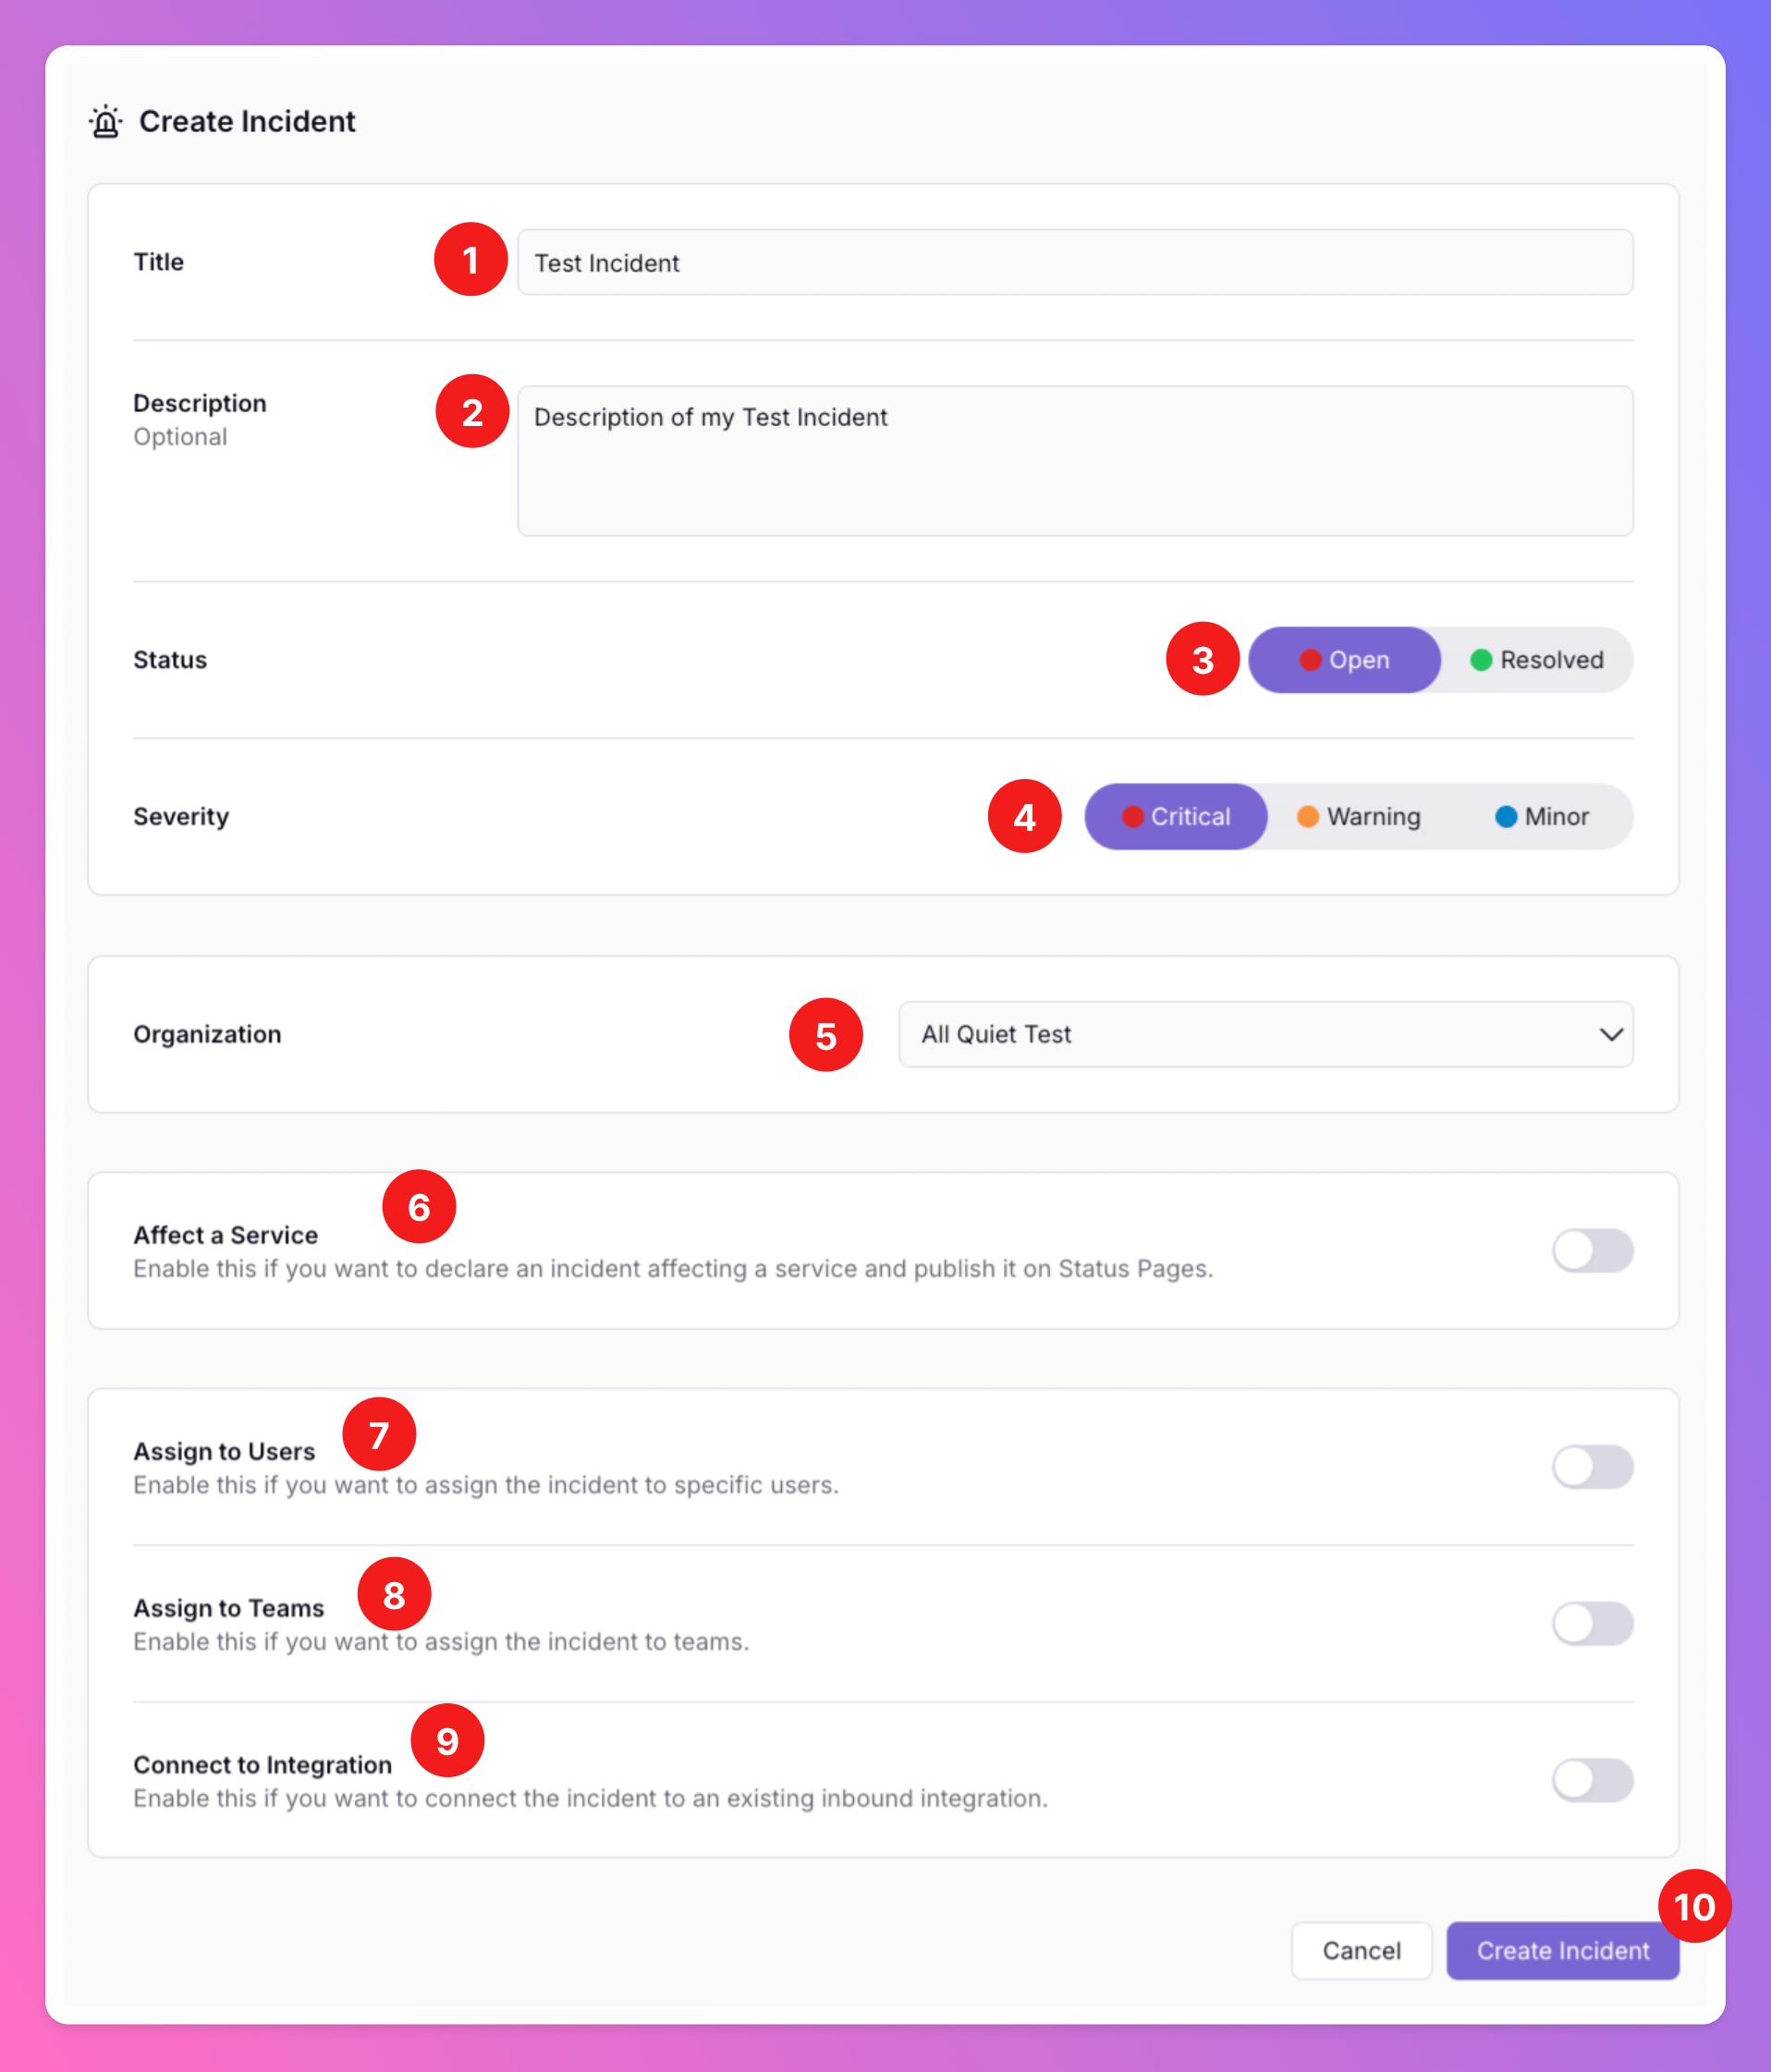
An overlay opens. It's time to add the All Quiet incident details.
1. Add a `Title`. This is the only mandatory attribute you need to add to create the incident.
2. Optionally, add a `Description`.
3. Select the `Status` of the incident.
4. Select the `Severity`.
5. Select one of your Organizations or "No organization". Depending on your selection, you will see the related Teams and Users below.
Only visible for users of [organizations](/advanced/organizations).
6. If the incident directly [affects](/essentials/incident#affects-services) the functionality of one of your [services](/advanced/status-pages#services), you can flag this, here. Only visible for users of [status pages](/advanced/status-pages).
1. When enabled, you may add a comment to further describe the incident.
2. Optionally, you can share this comment with the subscribers of the status pages attached to your service.
3. Use [**Affects Uptime**](/essentials/incident#affects-services) to control whether the incident counts toward downtime on your status pages. This option is **enabled by default** when you create an incident with affected services.
7. If you selected an Organization in step 5, you can assign the incident to one of your Organizations specific users and notify them, regardless if they are currently on-call or not. This is great if you need one specific person to be notified about an issue.
Only available for users of [organizations](/advanced/organizations).
8. Select the `Team` you want to create the incident in. After creation, on-call team members will be notified.
If the incident is created within an [organization](/advanced/organizations), you don't need to assign a team.
9. Based on the selected team, you can add an `Inbound Integration`. If it's a general incident that isn't realted to any integration, select `(No Integration)` or `All Quiet`.
10. Click `Create incident`.
If you’re using All Quiet [Services and Status Pages](/advanced/status-pages), you can also create incidents manually from those menus, with the relevant Services already preselected.
An overlay opens. It's time to add the All Quiet incident details.
1. Add a `Title`. This is the only mandatory attribute you need to add to create the incident.
2. Optionally, add a `Description`.
3. Select the `Status` of the incident.
4. Select the `Severity`.
5. Select one of your Organizations or "No organization". Depending on your selection, you will see the related Teams and Users below.
Only visible for users of [organizations](/advanced/organizations).
6. If the incident directly [affects](/essentials/incident#affects-services) the functionality of one of your [services](/advanced/status-pages#services), you can flag this, here. Only visible for users of [status pages](/advanced/status-pages).
1. When enabled, you may add a comment to further describe the incident.
2. Optionally, you can share this comment with the subscribers of the status pages attached to your service.
3. Use [**Affects Uptime**](/essentials/incident#affects-services) to control whether the incident counts toward downtime on your status pages. This option is **enabled by default** when you create an incident with affected services.
7. If you selected an Organization in step 5, you can assign the incident to one of your Organizations specific users and notify them, regardless if they are currently on-call or not. This is great if you need one specific person to be notified about an issue.
Only available for users of [organizations](/advanced/organizations).
8. Select the `Team` you want to create the incident in. After creation, on-call team members will be notified.
If the incident is created within an [organization](/advanced/organizations), you don't need to assign a team.
9. Based on the selected team, you can add an `Inbound Integration`. If it's a general incident that isn't realted to any integration, select `(No Integration)` or `All Quiet`.
10. Click `Create incident`.
 After creation, the incident is added to the incidents overview and behaves exactly as the incidents that are automatically created from your [inbound integrations](/essentials/inbound). You can perform the same actions and workflows for both types of incidents.
You can always interact with an incident that was created by you, even if it is later assigned to a Team that you usually don't have access to.
After creation, the incident is added to the incidents overview and behaves exactly as the incidents that are automatically created from your [inbound integrations](/essentials/inbound). You can perform the same actions and workflows for both types of incidents.
You can always interact with an incident that was created by you, even if it is later assigned to a Team that you usually don't have access to.
 ## How to Change Incident Severity
Need to update the severity of an incident? It's quick and easy!
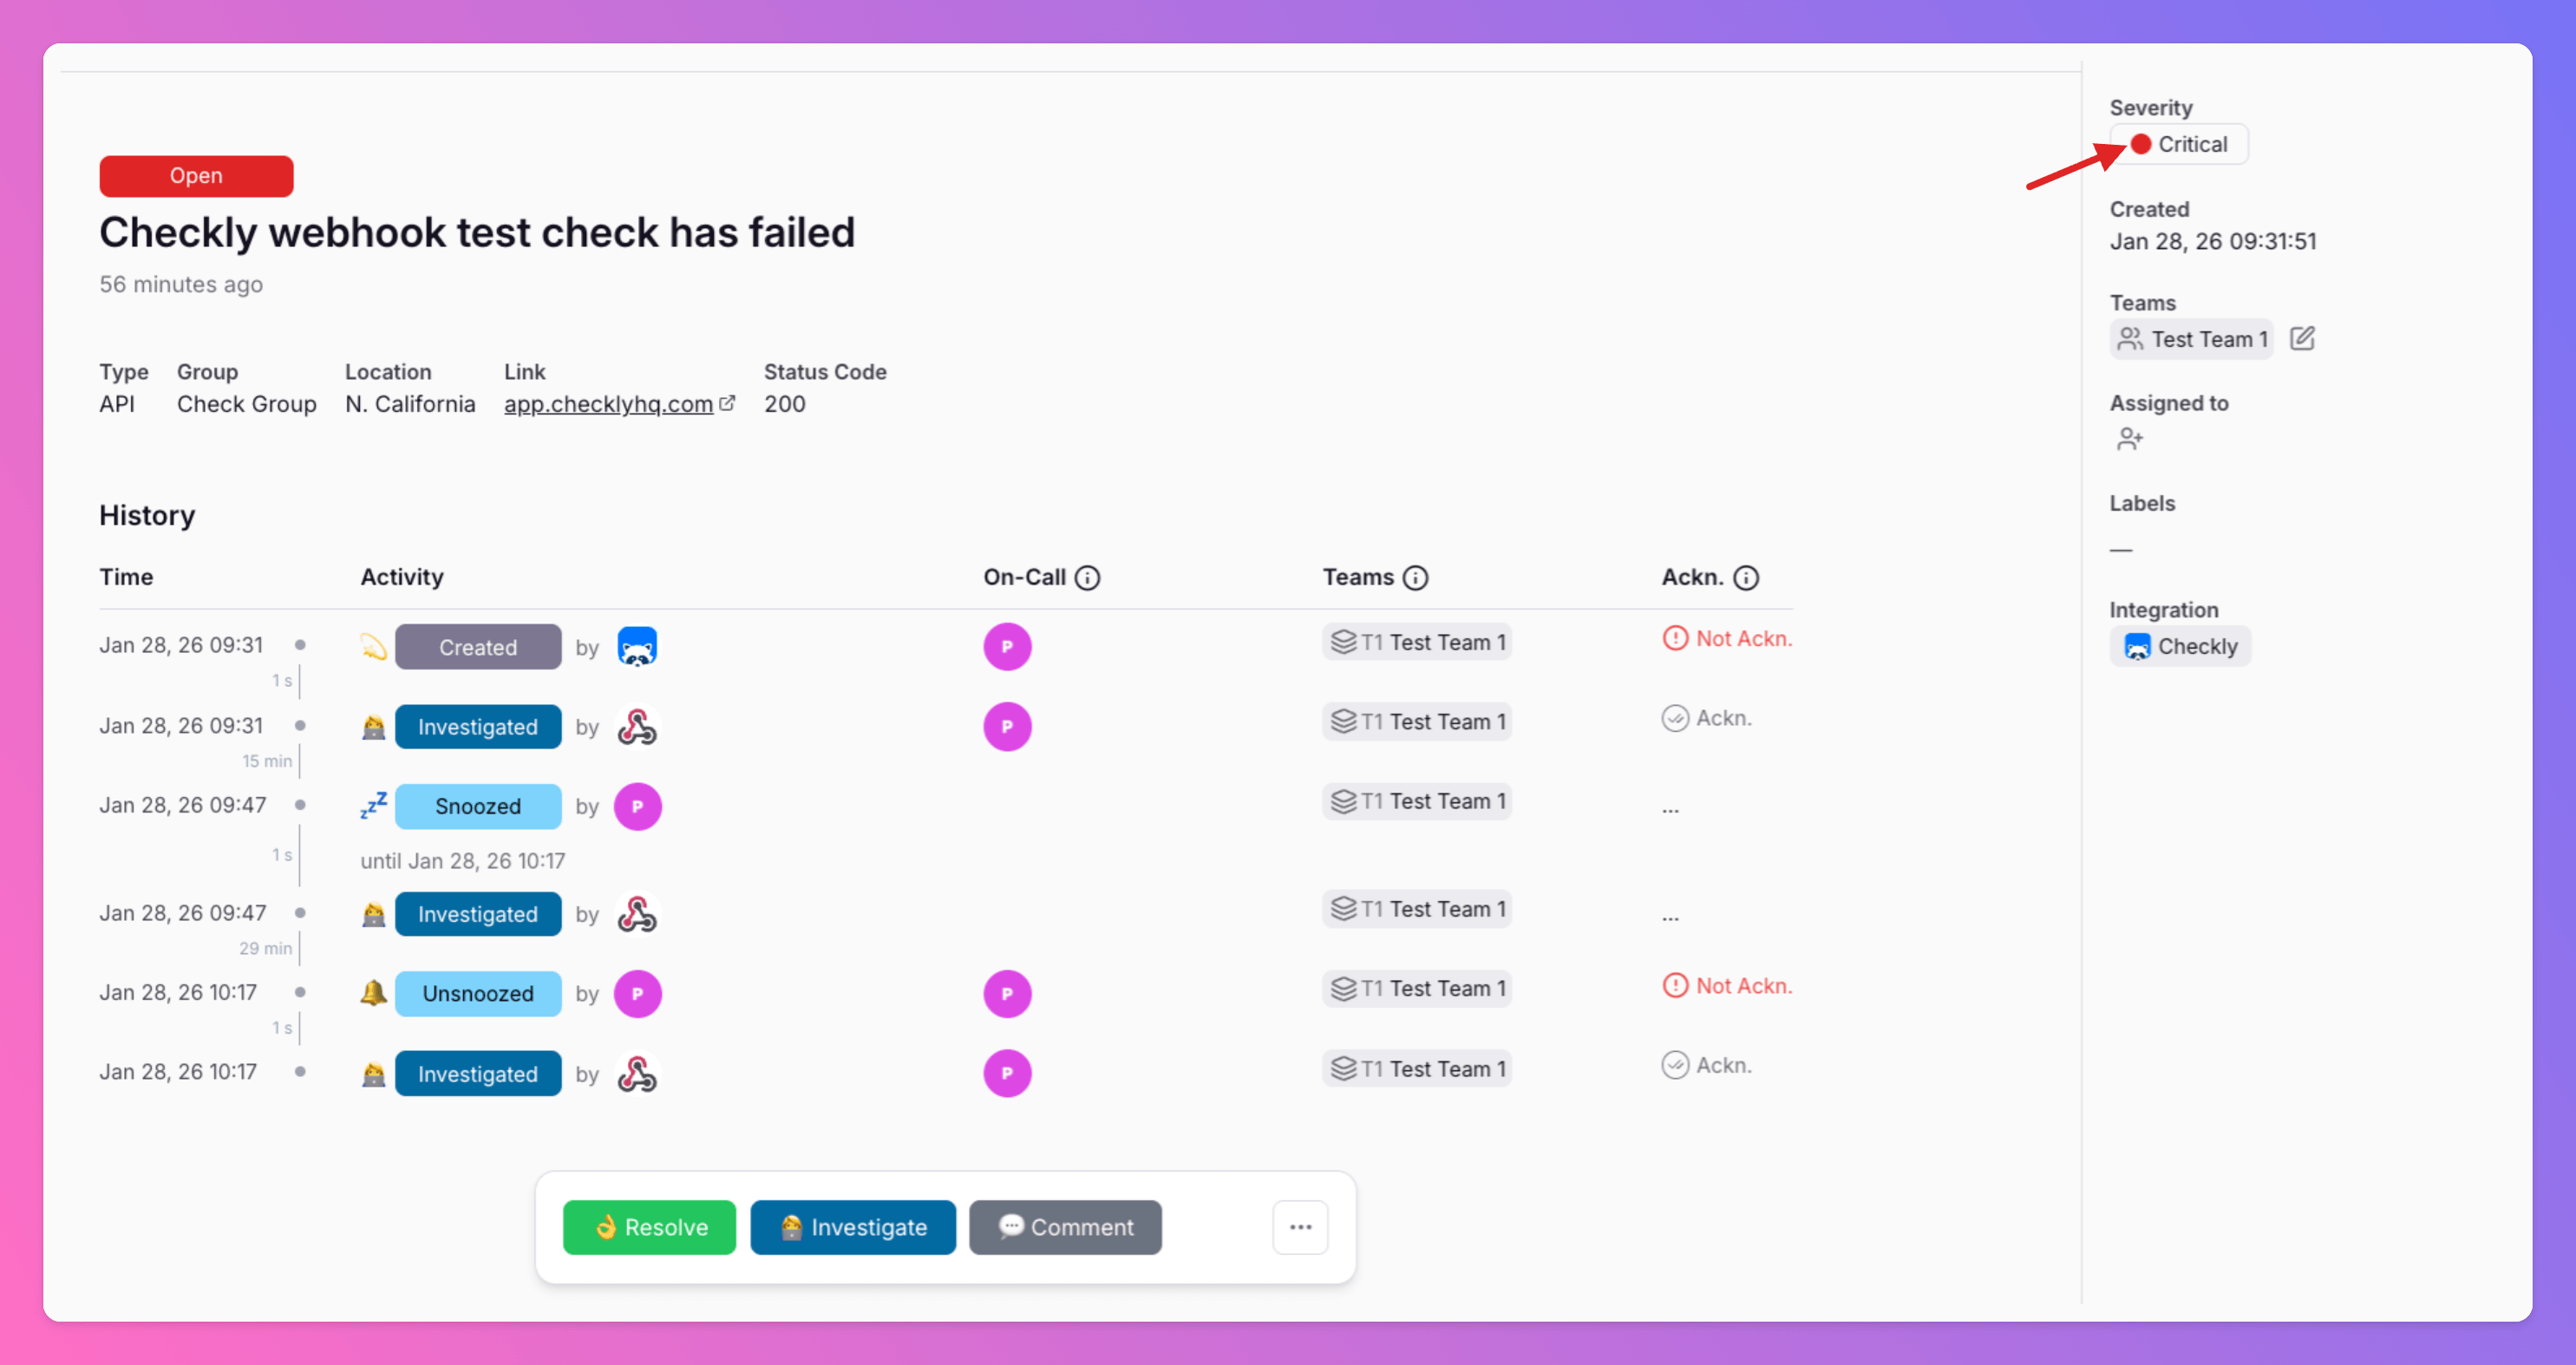
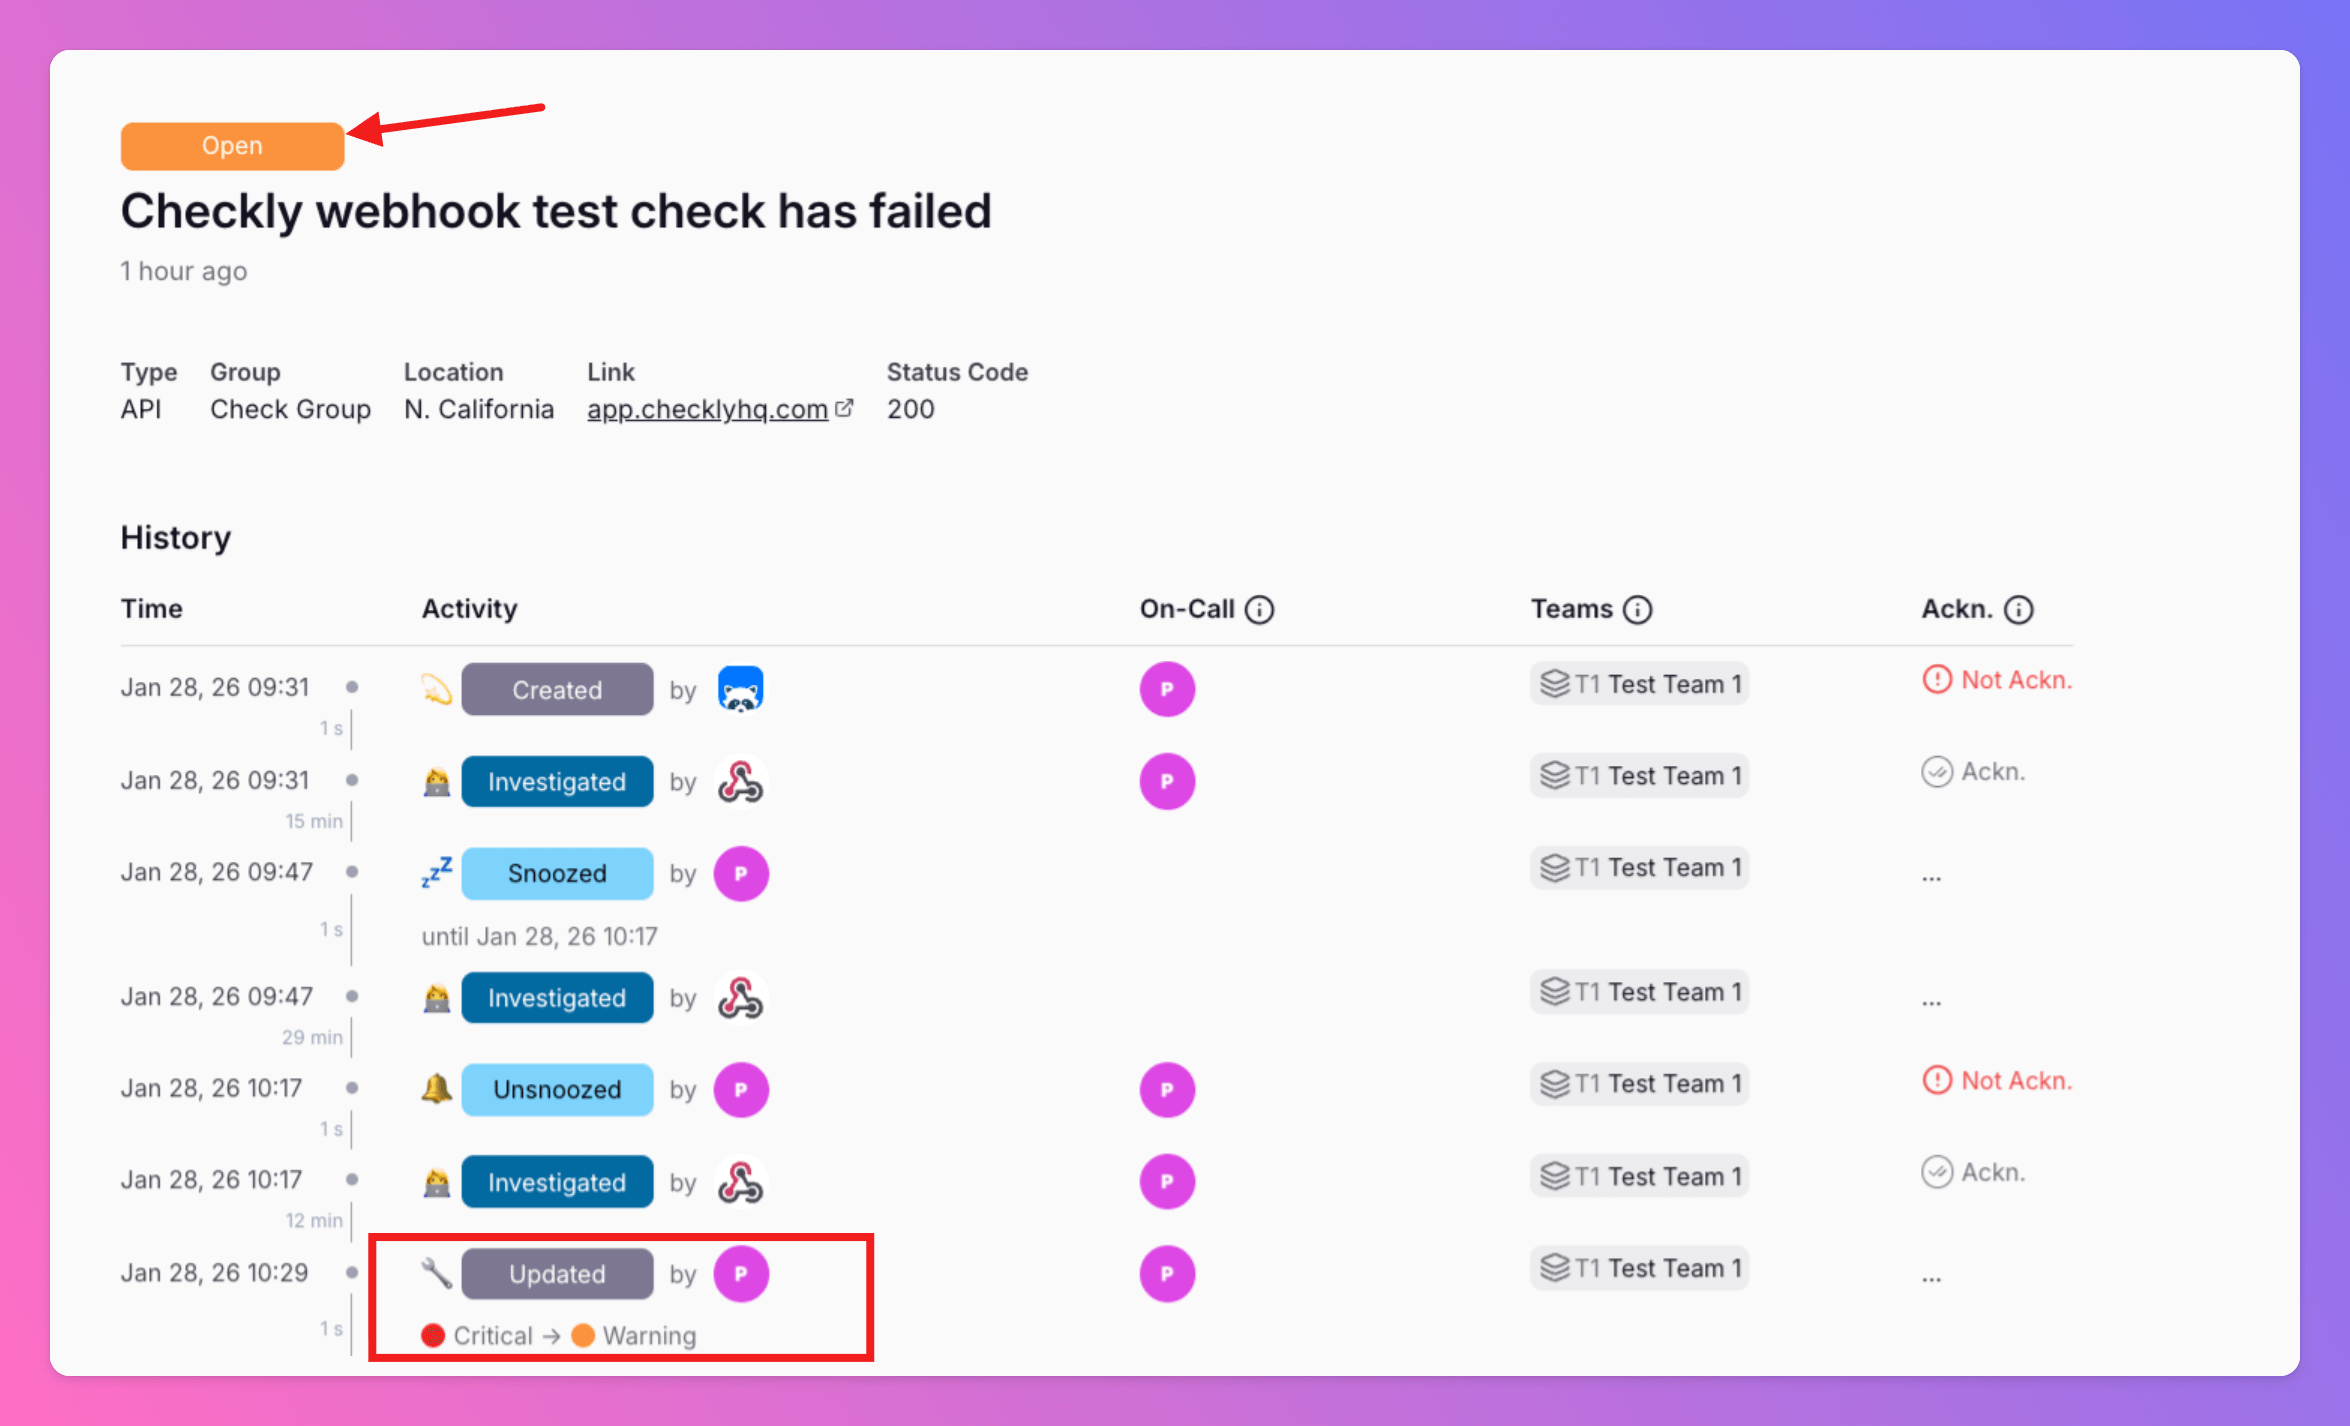
To get started, open the incident details or incident overview. You'll see the current severity displayed - just like in the image below, where an arrow points it out for you.
## How to Change Incident Severity
Need to update the severity of an incident? It's quick and easy!
To get started, open the incident details or incident overview. You'll see the current severity displayed - just like in the image below, where an arrow points it out for you.
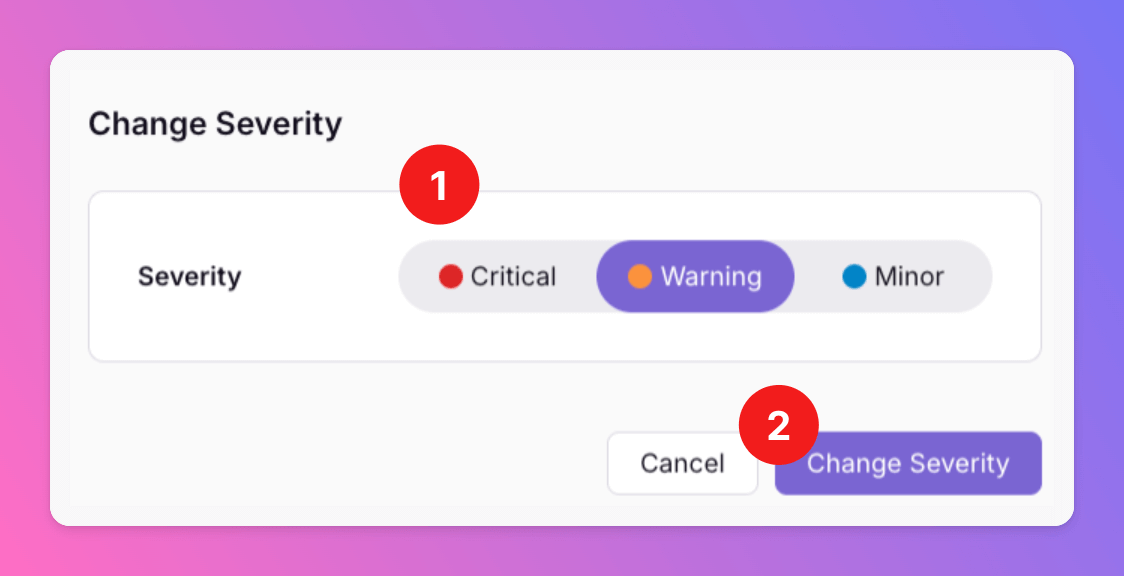
 Click on the severity to open a handy overlay. Here, you can select a new severity for your incident. In this example, we're changing it from `Critical` to `Warning` (1). Once you've made your choice, simply save your changes (2).
 After saving, you'll see the updated severity right in the incident details. Plus, every change is transparently tracked in the incident history - including who made the change - so your team always stays in the loop.
 Keep in mind: Changing the severity of an incident can affect advanced routing, escalation flows, alerting, outbound integrations, and how incidents appear on your status pages. Make sure to consider these impacts when updating severity!
## Quick Actions
Keep in mind: Changing the severity of an incident can affect advanced routing, escalation flows, alerting, outbound integrations, and how incidents appear on your status pages. Make sure to consider these impacts when updating severity!
## Quick Actions
 ### Resolving
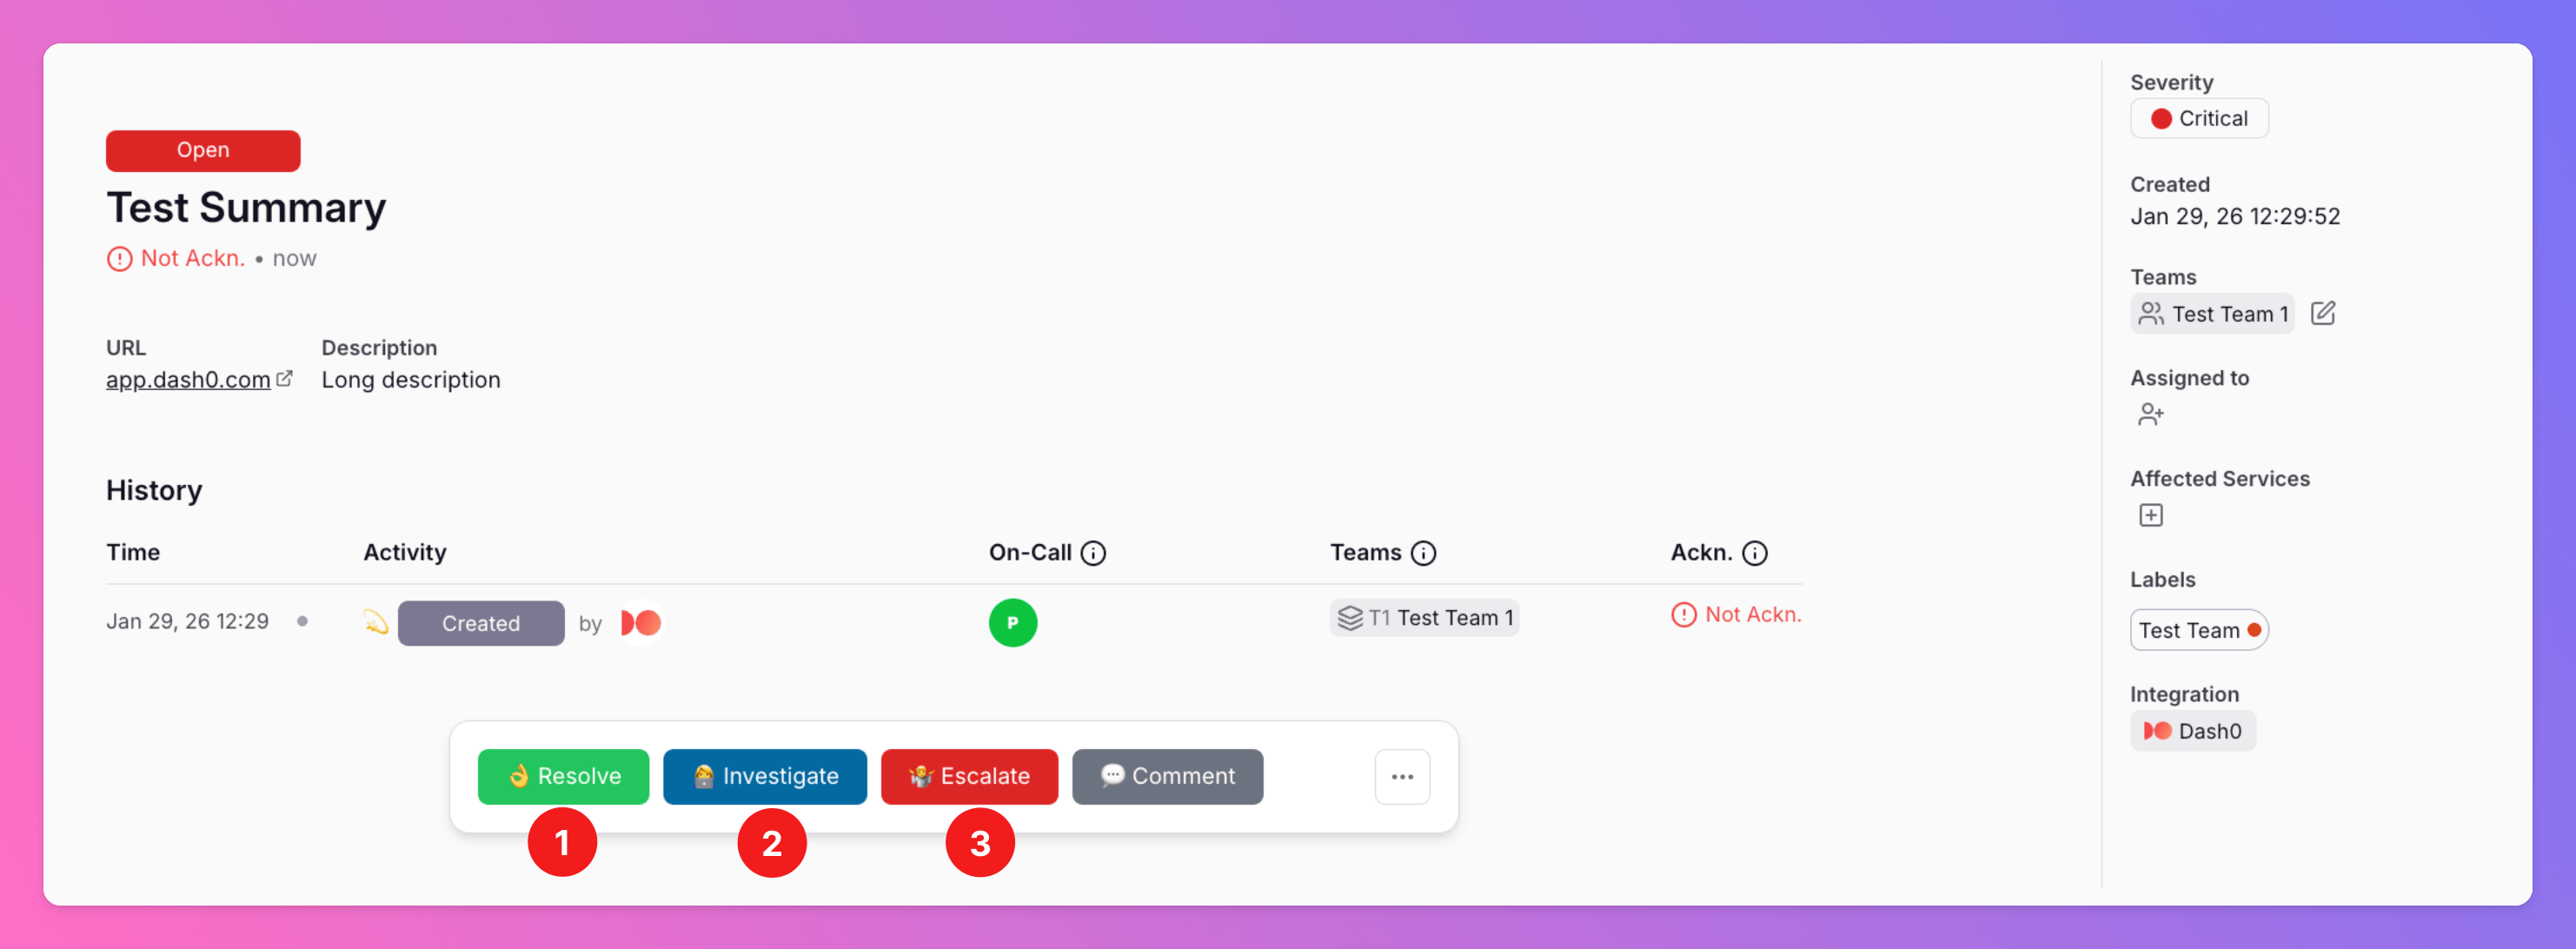
1. To resolve an open incident click the green `Resolve` button. This will notify all colleagues of the current escalation tier that the incident was resolved. Always **stops any auto-escalations**.
For [status page](/advanced/status-pages) users: If an incident is currently [affecting](/essentials/incident#affects-services) at least one service, resolving it will also automatically update the related services and status pages.
### Investigating
2. In case you've been notified of an open incident, and you can tell you're team that you're looking into the incident by clicking the blue `Investigate` button. This will notify all colleagues of the current escalation tiers that you're investigating the issue. It will also mark the incident as [acknowledged](/essentials/incident#history-acknowledged). Auto-escalations are stopped if your [settings](/essentials/escalations#automatic-escalation) say "Stop Auto-Escalation" if "Incident is acknowledged".
### Escalating
3. In case you need help from your colleagues, you can escalate the incident to the next escalation tier by clicking the red `Escalate` button. This will notify all colleagues of the current escalation tiers as well as the following escalation tier. This action **re-initiates / sustains** auto-escalations.
For Pro and Enterprise Users: If an **incident involves 2 or more teams**, escalations work slightly different. Using the "escalate" function escalates the incident in all currently involved teams.
## Action with Comment
In case you want to add a comment to your action, select `Comment`.
### Resolving
1. To resolve an open incident click the green `Resolve` button. This will notify all colleagues of the current escalation tier that the incident was resolved. Always **stops any auto-escalations**.
For [status page](/advanced/status-pages) users: If an incident is currently [affecting](/essentials/incident#affects-services) at least one service, resolving it will also automatically update the related services and status pages.
### Investigating
2. In case you've been notified of an open incident, and you can tell you're team that you're looking into the incident by clicking the blue `Investigate` button. This will notify all colleagues of the current escalation tiers that you're investigating the issue. It will also mark the incident as [acknowledged](/essentials/incident#history-acknowledged). Auto-escalations are stopped if your [settings](/essentials/escalations#automatic-escalation) say "Stop Auto-Escalation" if "Incident is acknowledged".
### Escalating
3. In case you need help from your colleagues, you can escalate the incident to the next escalation tier by clicking the red `Escalate` button. This will notify all colleagues of the current escalation tiers as well as the following escalation tier. This action **re-initiates / sustains** auto-escalations.
For Pro and Enterprise Users: If an **incident involves 2 or more teams**, escalations work slightly different. Using the "escalate" function escalates the incident in all currently involved teams.
## Action with Comment
In case you want to add a comment to your action, select `Comment`.
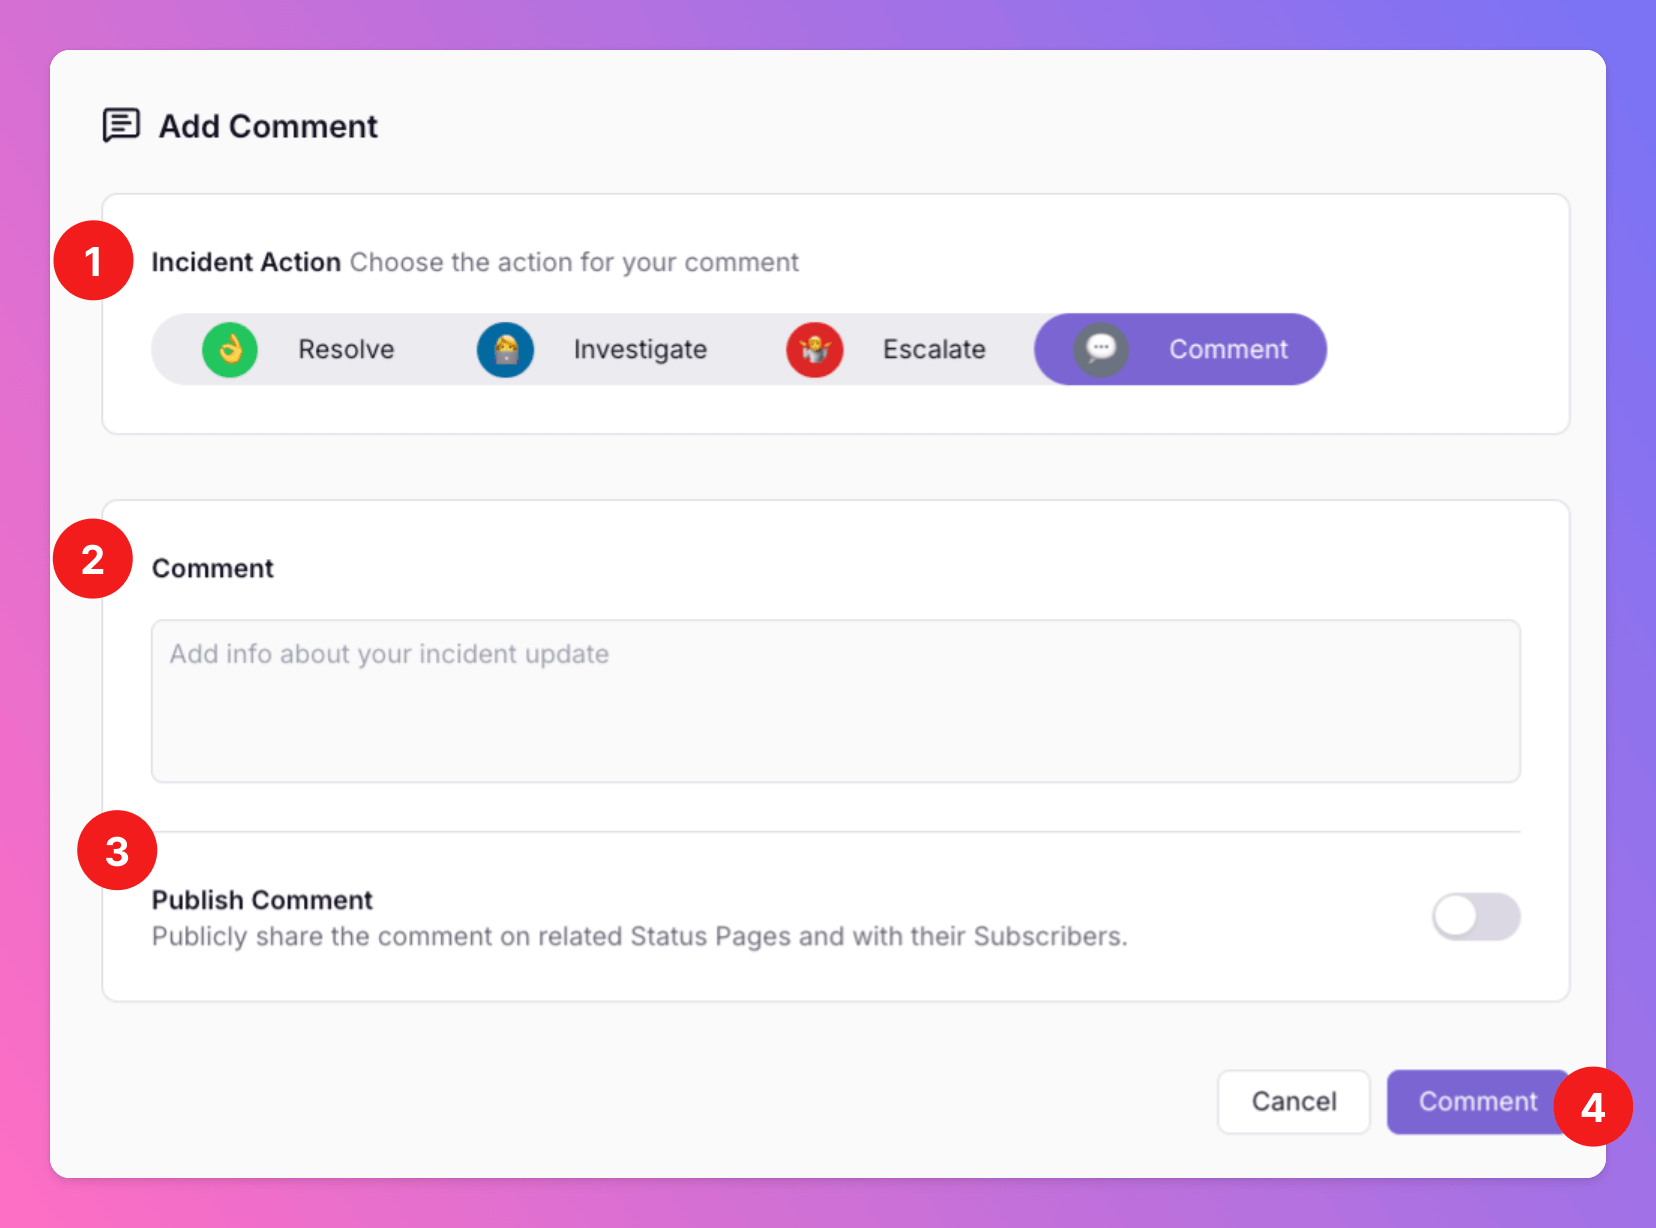
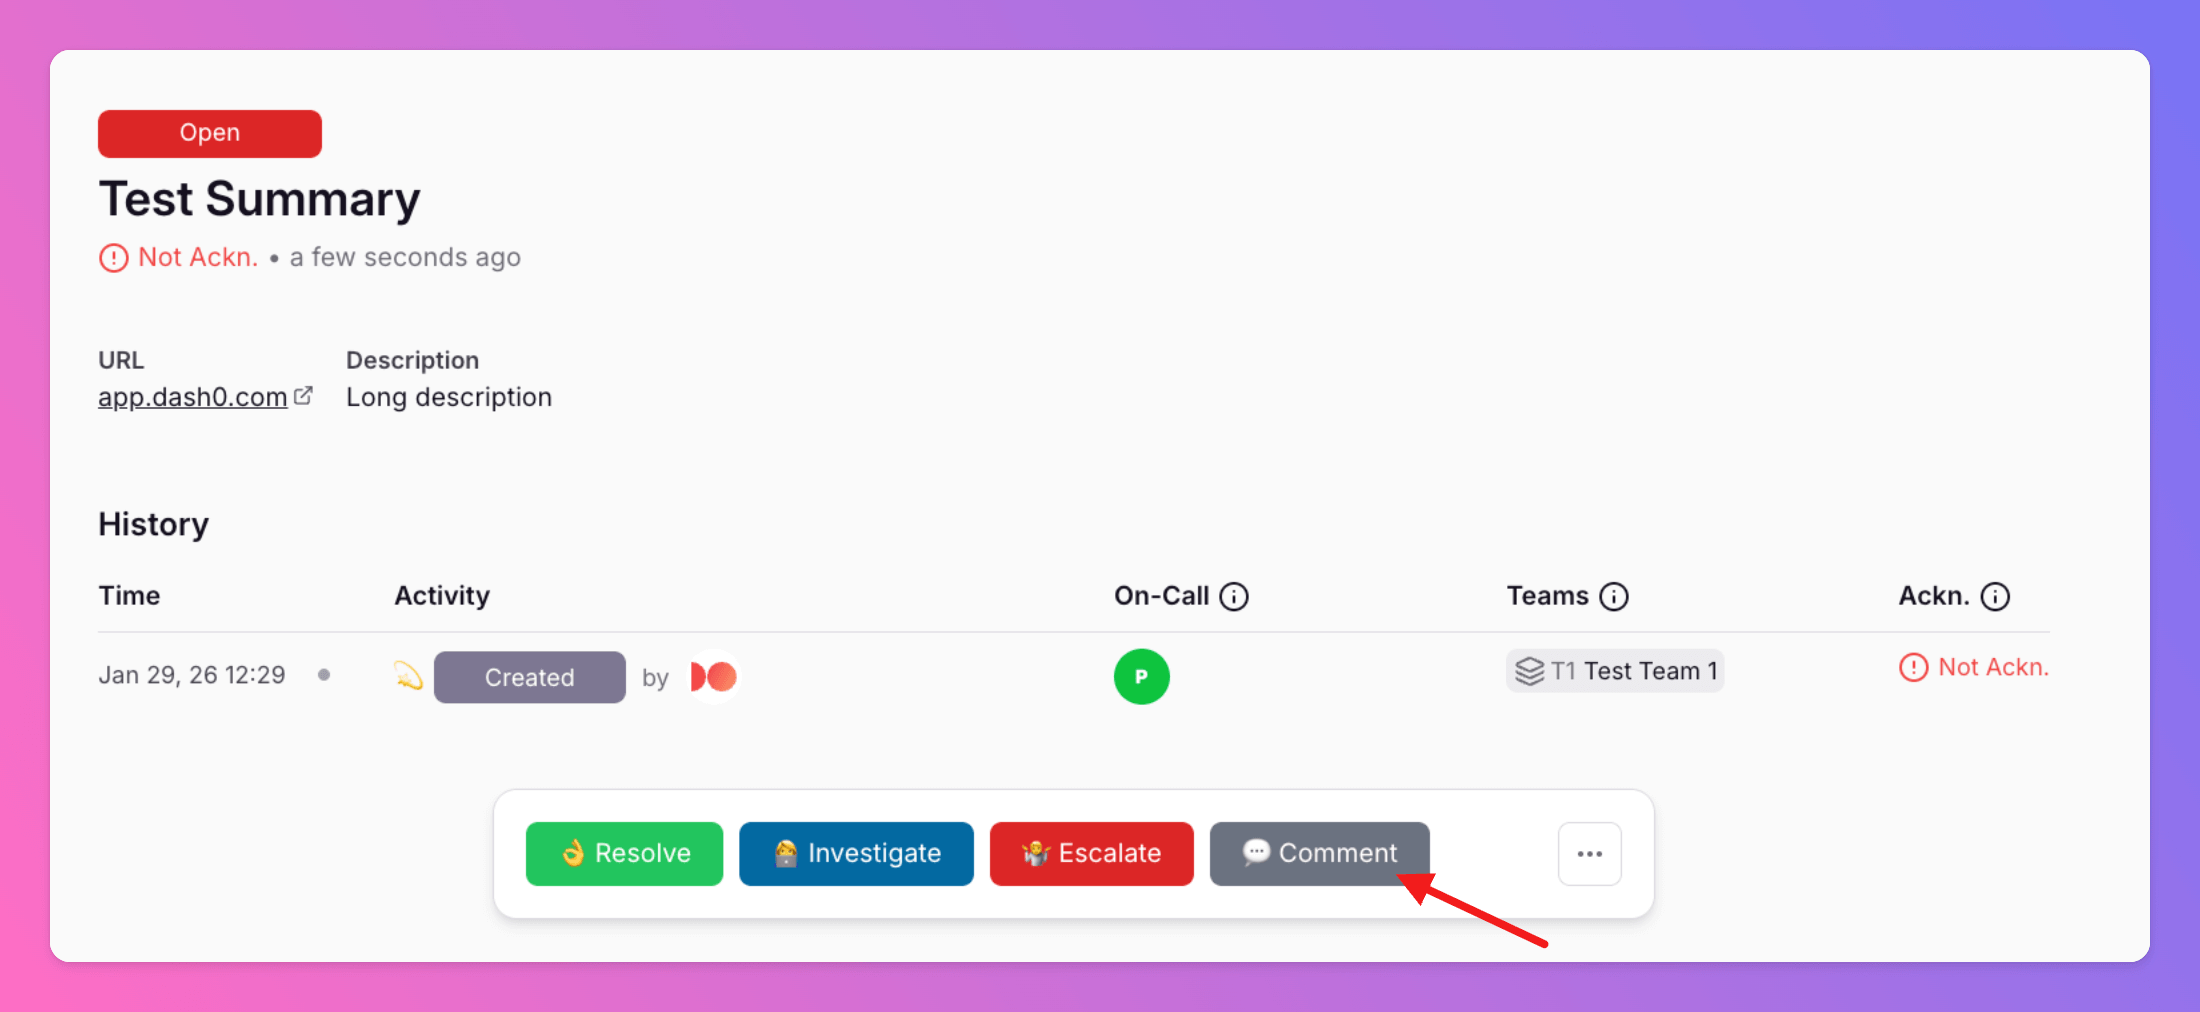 An overlay opens.
1. Select the Action you would like to perform.
An overlay opens.
1. Select the Action you would like to perform.
- Resolve: For more info, see section [Resolving](/essentials/incident#resolving).
- Investigate: For more info, see section [Investigating](/essentials/incident#investigating).
- Escalate: For more info, see section [Escalating](/essentials/incident#escalating).
- Comment: Simply add a comment with context. Marks the incident as [acknowledged](/essentials/incident#history-acknowledged). Auto-escalations are stopped if your [settings](/essentials/escalations#automatic-escalation) say "Stop Auto-Escalation" if "Incident is acknowledged".
- Reopen: Only visible if an incident is in state `resolved`. For more info, see section [Reopening Incidents](/essentials/incident#reopening-incidents).
2. Add your comment.
3. You can decide whether you want to publicly share the comment on your Status Pages.
Only visible for users of [status pages](/advanced/status-pages) and if the incident is currently [affecting](/essentials/incident#affects-services) at least one Service.
4. Comment
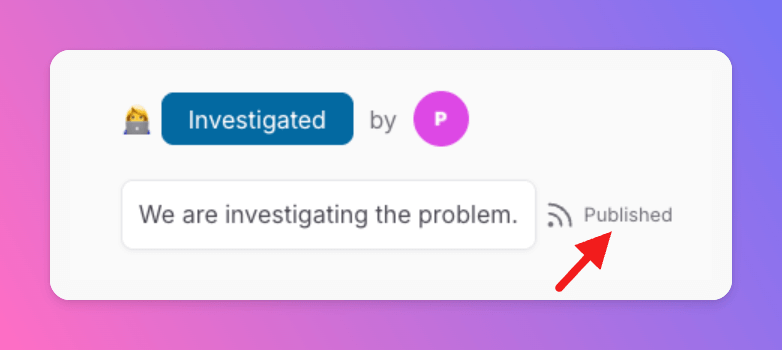
 Next, you will see the action plus the comment in your incident history.
For [status page](/advanced/status-pages) users: If your decided to share the comment publicly, we will add a litte `Public` flag.
Next, you will see the action plus the comment in your incident history.
For [status page](/advanced/status-pages) users: If your decided to share the comment publicly, we will add a litte `Public` flag.
 ## Advanced Actions
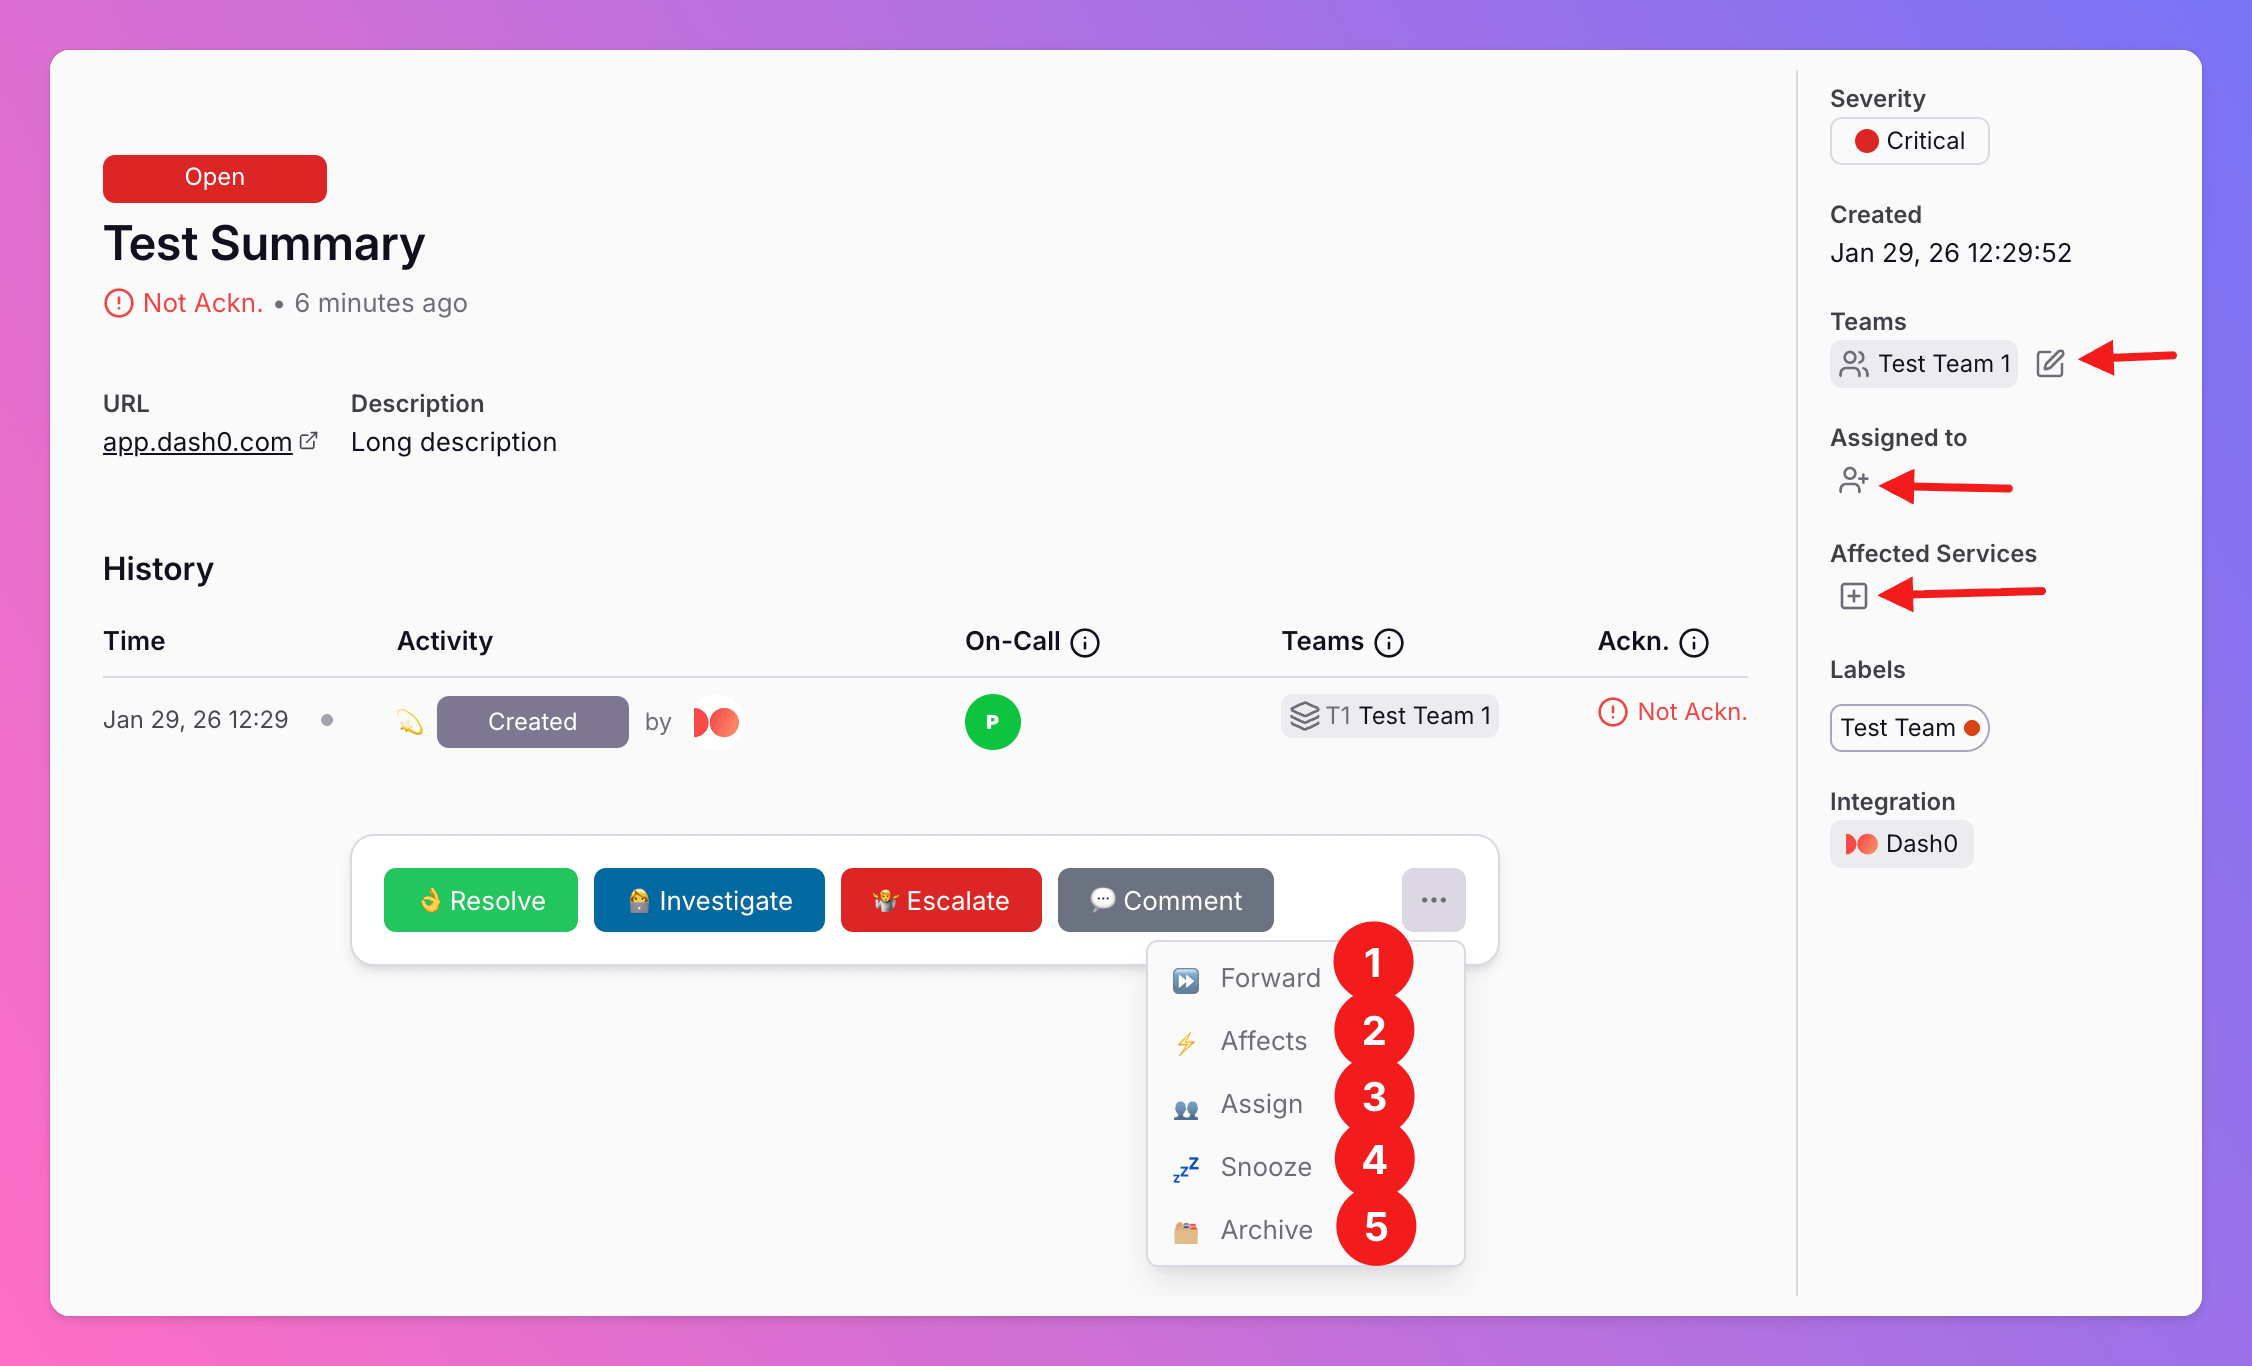
Special operations are forwarding (1), affecting (2), assigning (3), manually snoozing / unsnoozing (4) and archiving (5) incidents.
In the incident details view, these actions are available via the 3-dot-menu as well as some of them the additionally via the sidebar.
## Advanced Actions
Special operations are forwarding (1), affecting (2), assigning (3), manually snoozing / unsnoozing (4) and archiving (5) incidents.
In the incident details view, these actions are available via the 3-dot-menu as well as some of them the additionally via the sidebar.
 ### Forwarding
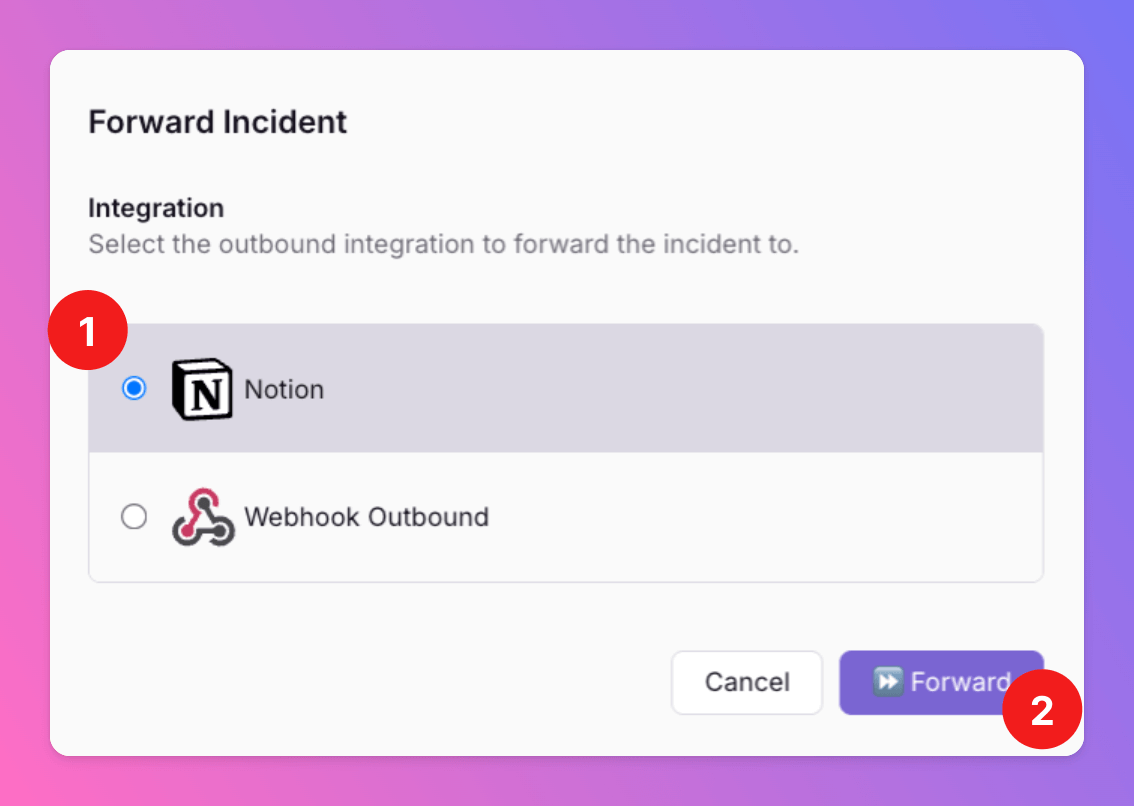
You can manually `forward` single incidents to your team's [Outbound Integrations](/essentials/outbound). First, click "Forward".
You will only see the `Forward` button if you activated the `Triggers Always After Forwarding / Triggers Only On Forwarding` feature for at least one [Outbound Integration](/essentials/outbound). Else, we will automatically forward incidents to your outbound integrations. The setup can defined in each integration's details page.
After clicking `Forward` in the incidents details view,
1. you can select the outbound integration you want to forward the issue to. Incidents can always be forwarded, even after they are resolved.
2. Click `Forward` to send the incident to the outbound integration.
In case they are still active, this action **does not** stop auto-escalations.
### Forwarding
You can manually `forward` single incidents to your team's [Outbound Integrations](/essentials/outbound). First, click "Forward".
You will only see the `Forward` button if you activated the `Triggers Always After Forwarding / Triggers Only On Forwarding` feature for at least one [Outbound Integration](/essentials/outbound). Else, we will automatically forward incidents to your outbound integrations. The setup can defined in each integration's details page.
After clicking `Forward` in the incidents details view,
1. you can select the outbound integration you want to forward the issue to. Incidents can always be forwarded, even after they are resolved.
2. Click `Forward` to send the incident to the outbound integration.
In case they are still active, this action **does not** stop auto-escalations.
 ### Affects Services
Only visible for users of [status pages](/advanced/status-pages).
With the `Affects` action, you can easily connect incidents with your services and status pages, allowing you semlessly share downtime and incident updates with your customers, allowing you to fully focus on fixing the issue whilst having everyone onboard.
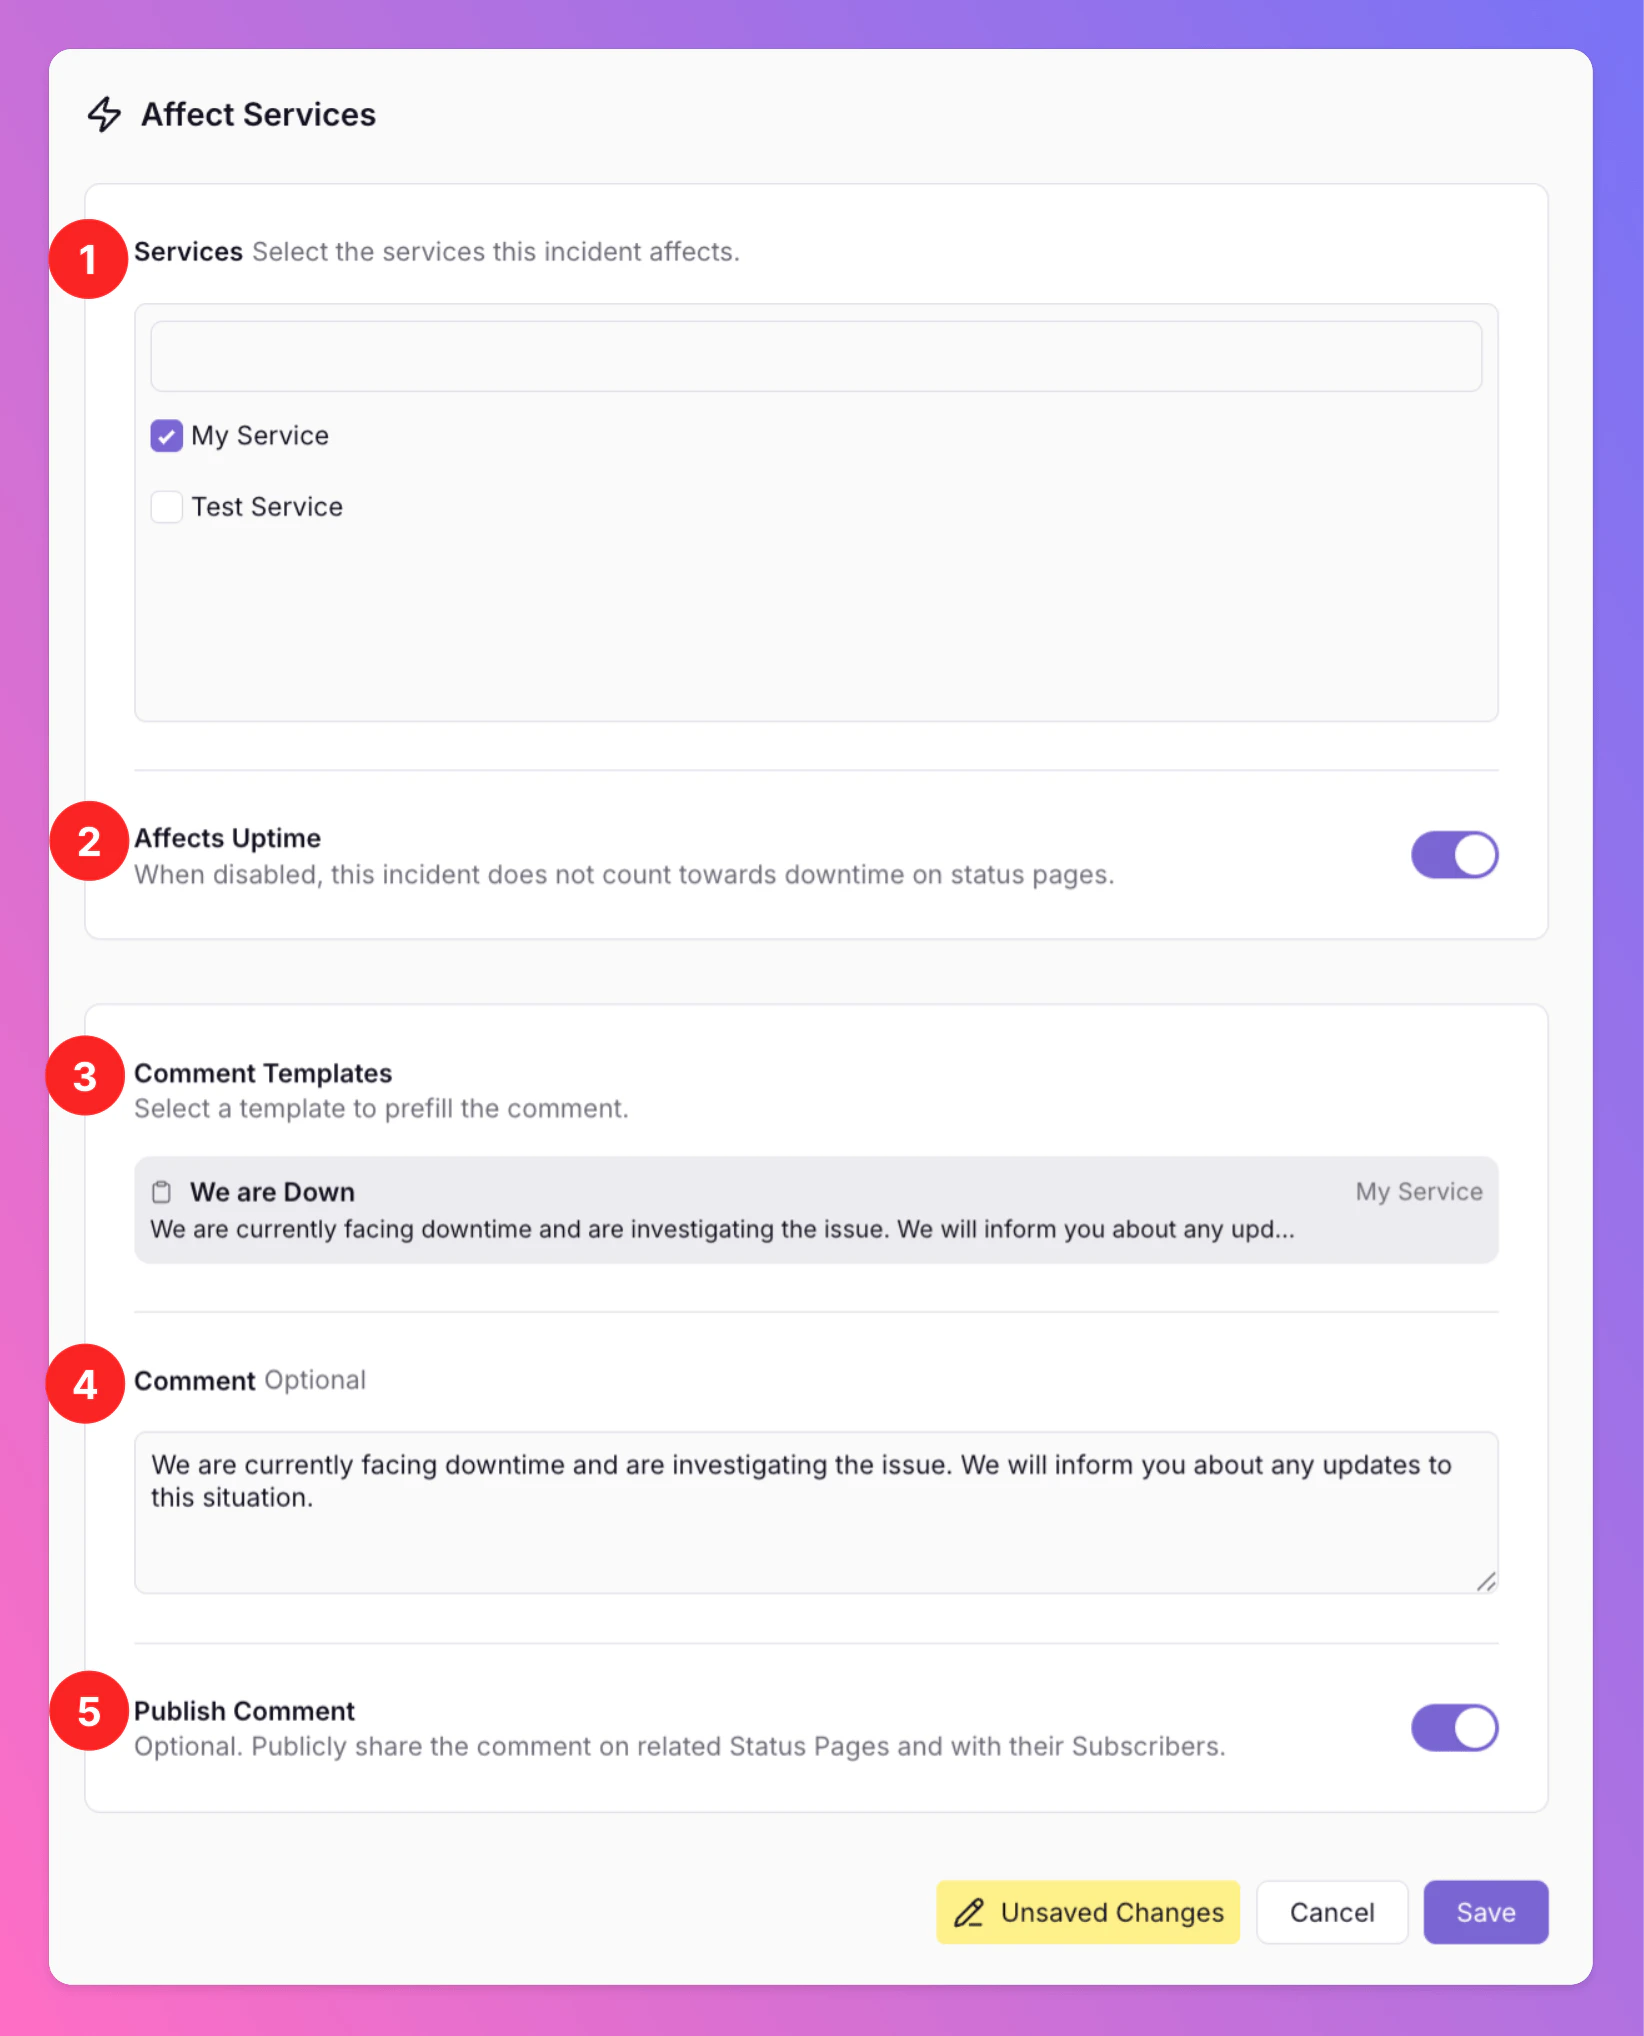
After clicking `Affects` in the incidents details view, an overlay opens.
1. Select the Services affected by the incident. The **affect action itself will always automatically update your services and status pages**, as it's only reason is to make sure incidents are shared with your customers.
2. **Affects Uptime** is **enabled by default**. You can disable it if you want to share the incident on status pages without it counting toward downtime.
3. In case you prepared [Message Templates](/advanced/status-pages#add-messagem-templates-to-service) for the affected service, you will find them here and can select them per click.
4. Optionally, you may add a comment. Here, we used the template.
5. You can decide whether you want to publicly share the comment on your Status Pages.
If you want to remove the connection between a Service and an Incident, simply open the `Affects Services` overlay in the respective incident, deselect the respective service and click `Save`. The incident will no longer show up on your status pages.
In case they are still active, this action **does not** stop auto-escalations.
### Affects Services
Only visible for users of [status pages](/advanced/status-pages).
With the `Affects` action, you can easily connect incidents with your services and status pages, allowing you semlessly share downtime and incident updates with your customers, allowing you to fully focus on fixing the issue whilst having everyone onboard.
After clicking `Affects` in the incidents details view, an overlay opens.
1. Select the Services affected by the incident. The **affect action itself will always automatically update your services and status pages**, as it's only reason is to make sure incidents are shared with your customers.
2. **Affects Uptime** is **enabled by default**. You can disable it if you want to share the incident on status pages without it counting toward downtime.
3. In case you prepared [Message Templates](/advanced/status-pages#add-messagem-templates-to-service) for the affected service, you will find them here and can select them per click.
4. Optionally, you may add a comment. Here, we used the template.
5. You can decide whether you want to publicly share the comment on your Status Pages.
If you want to remove the connection between a Service and an Incident, simply open the `Affects Services` overlay in the respective incident, deselect the respective service and click `Save`. The incident will no longer show up on your status pages.
In case they are still active, this action **does not** stop auto-escalations.
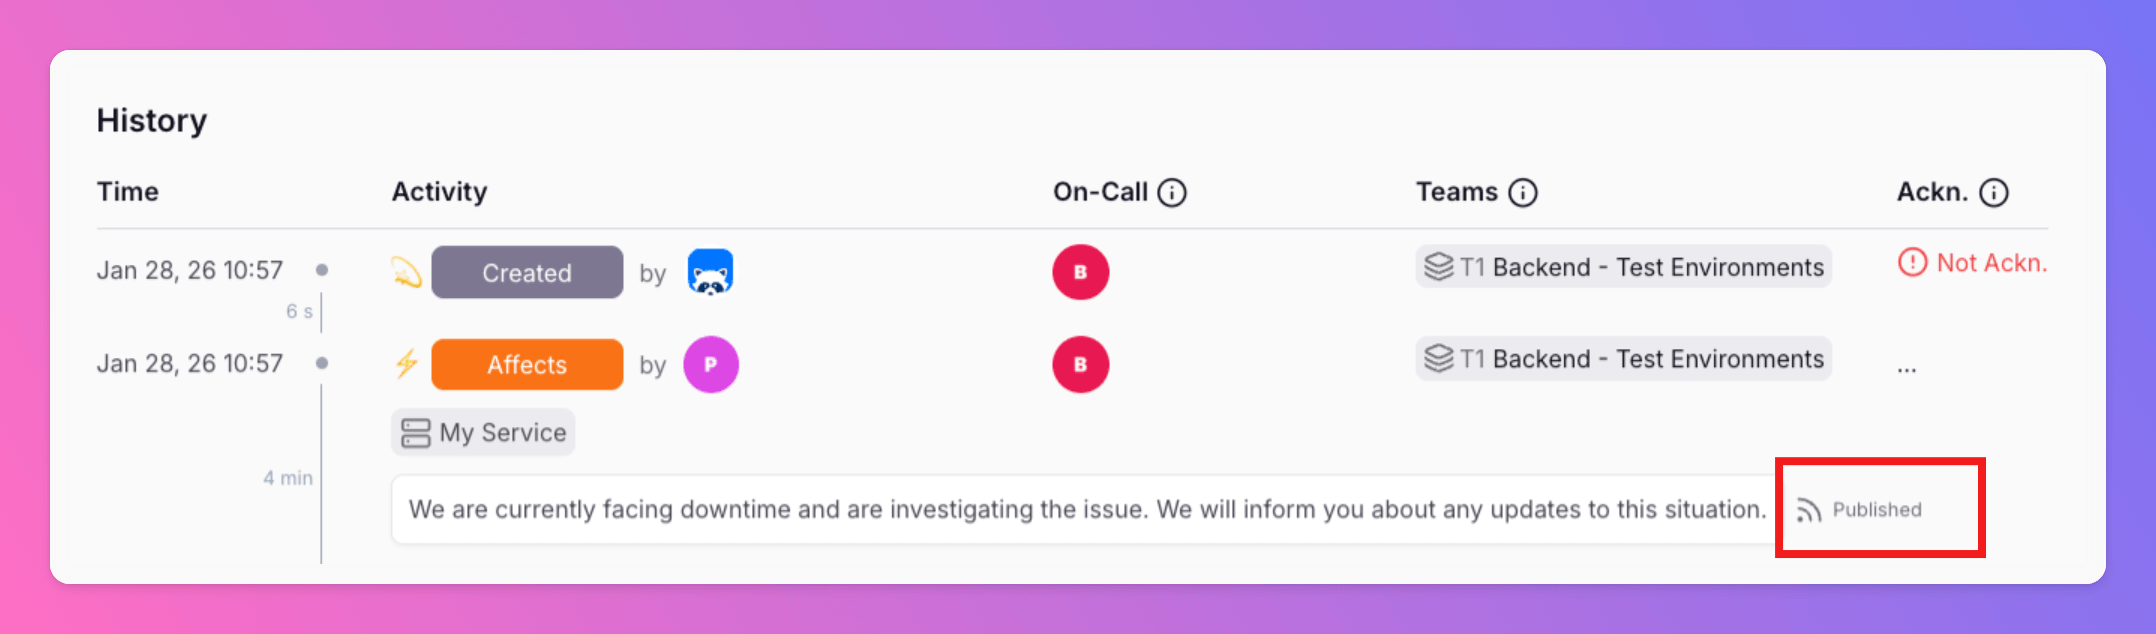
 Next, you will see the action in your incident history.
If your decided to publicly share a comment, we will add a litte `Public` flag.
Next, you will see the action in your incident history.
If your decided to publicly share a comment, we will add a litte `Public` flag.
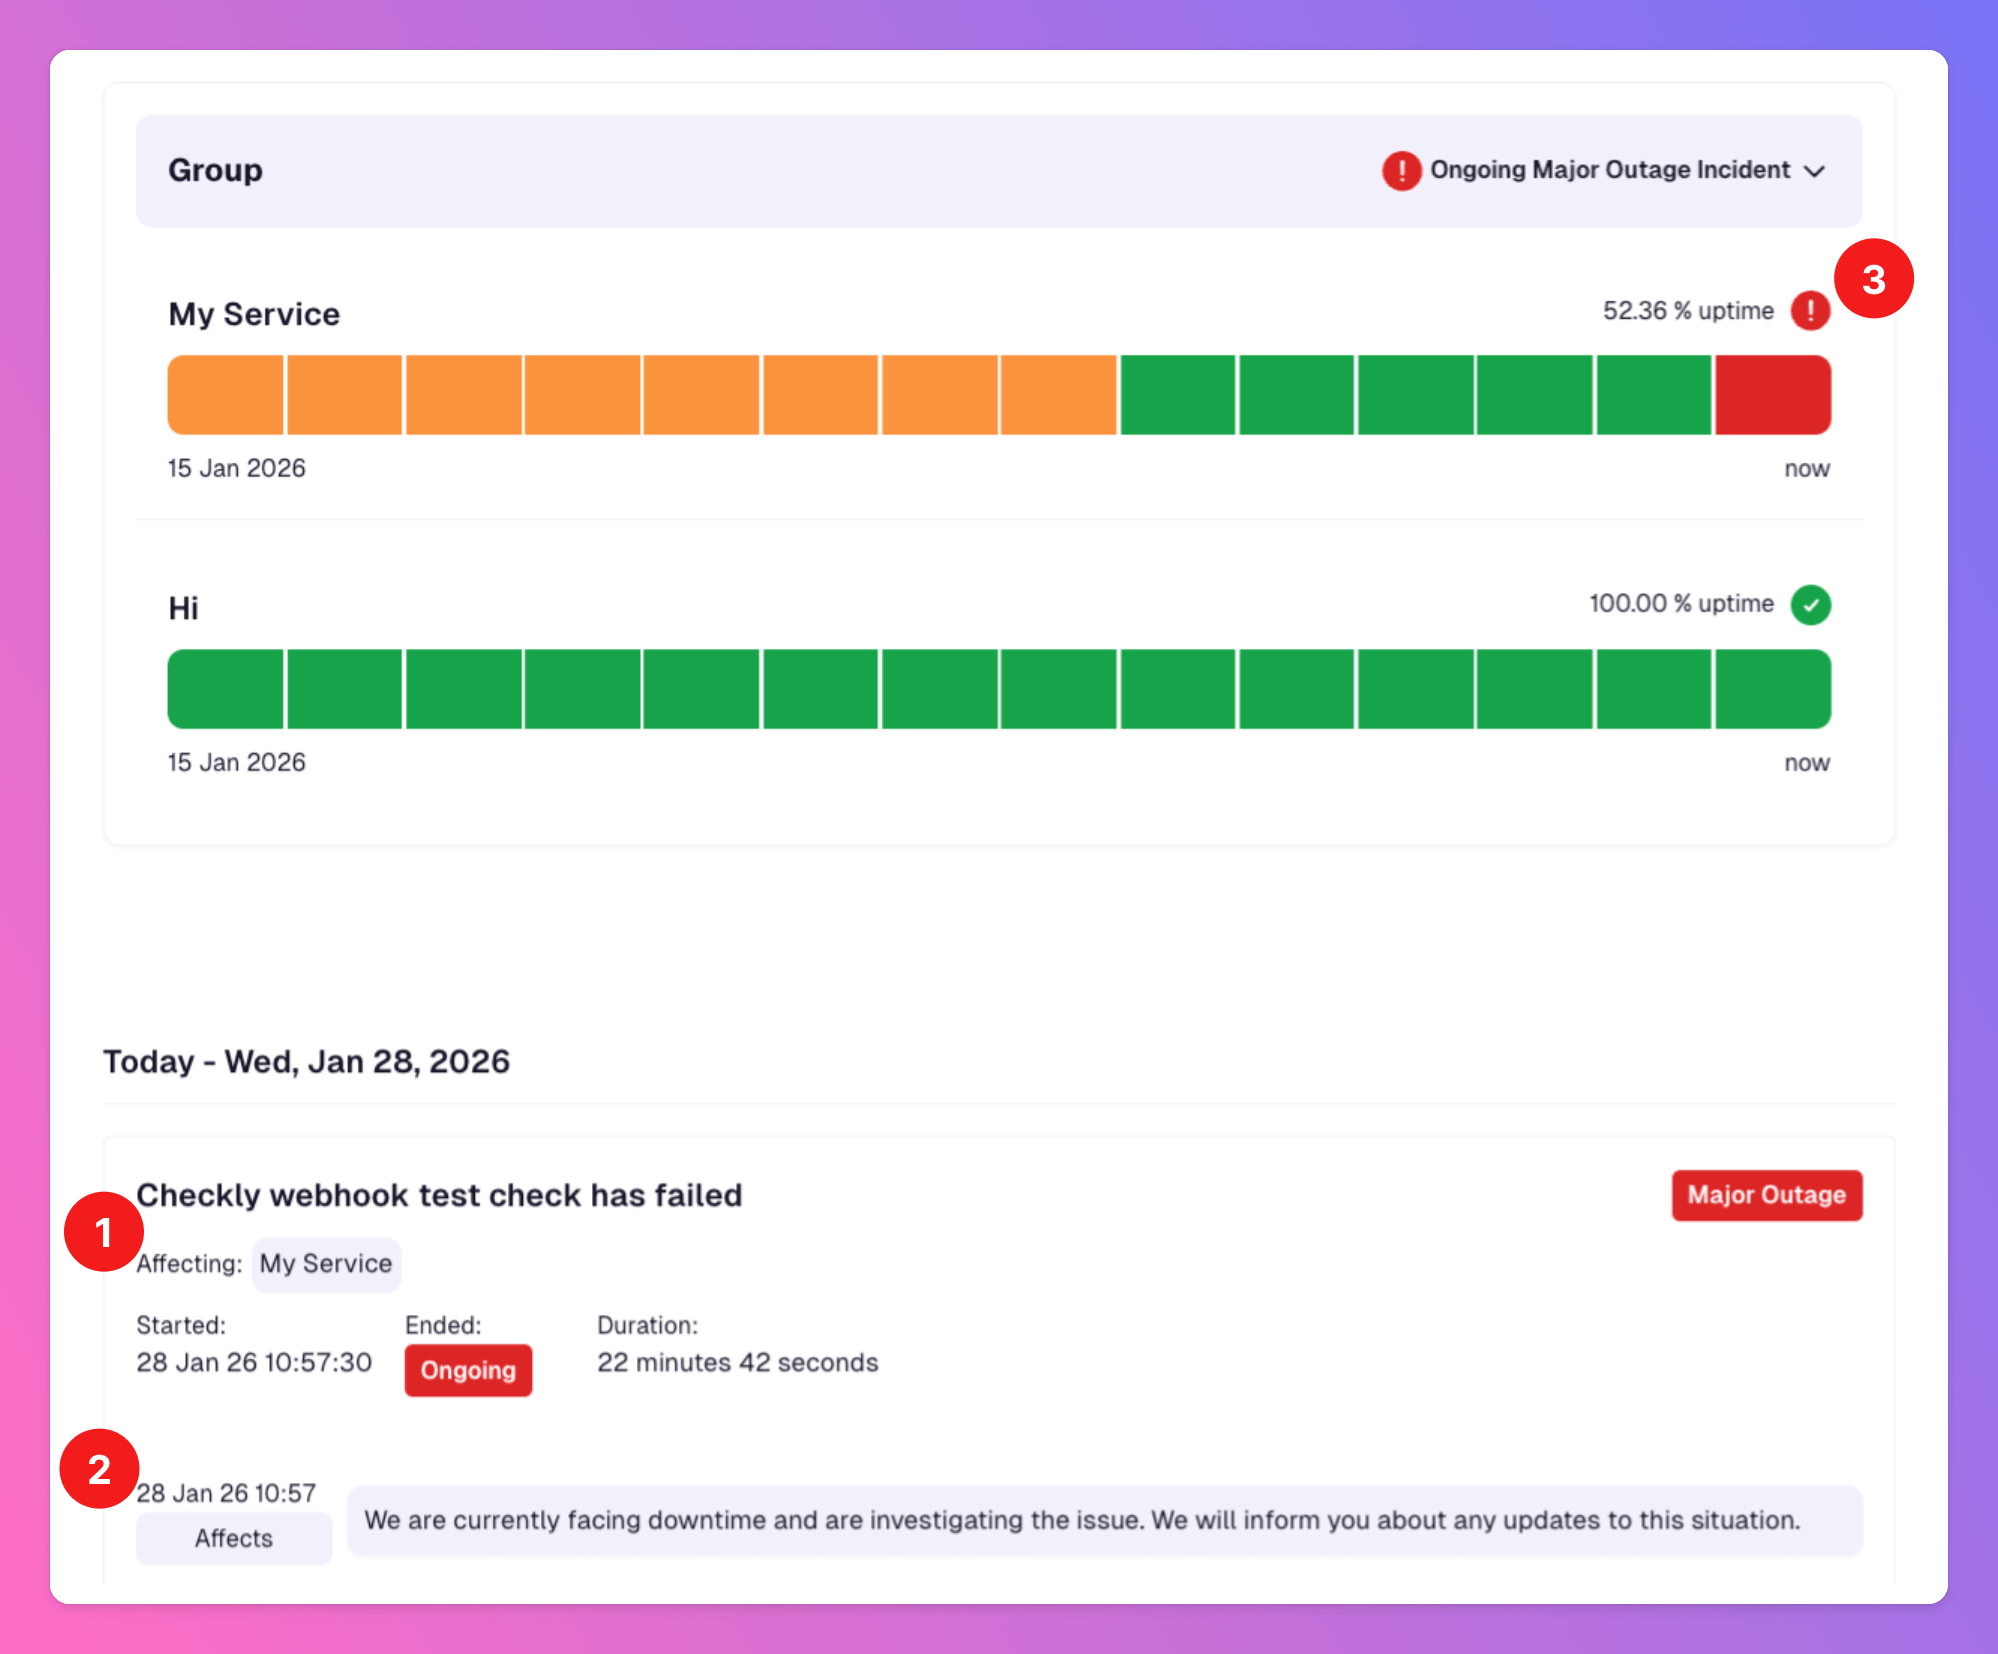
 By marking the incident as affecting, it will also be diplayed on your [status pages](/advanced/status-pages).
1. See the incident that we marked as affecting for service `Cloud Infrastructure`.
2. The comment that we decided to share publicly.
3. Please note that the incident severity (Critical, Warning or Minor) also has an impact on how the incidents are displayed in the status graph. You can change the public description of the severity in the [public appearance section of your status page](/advanced/status-pages#public-appearance-of-status-page).
By marking the incident as affecting, it will also be diplayed on your [status pages](/advanced/status-pages).
1. See the incident that we marked as affecting for service `Cloud Infrastructure`.
2. The comment that we decided to share publicly.
3. Please note that the incident severity (Critical, Warning or Minor) also has an impact on how the incidents are displayed in the status graph. You can change the public description of the severity in the [public appearance section of your status page](/advanced/status-pages#public-appearance-of-status-page).
 ### Assign
Only available for users of Pro and Enterprise plans.
You can use the `Assign` action to assign an incident to teams, specific users, or both.
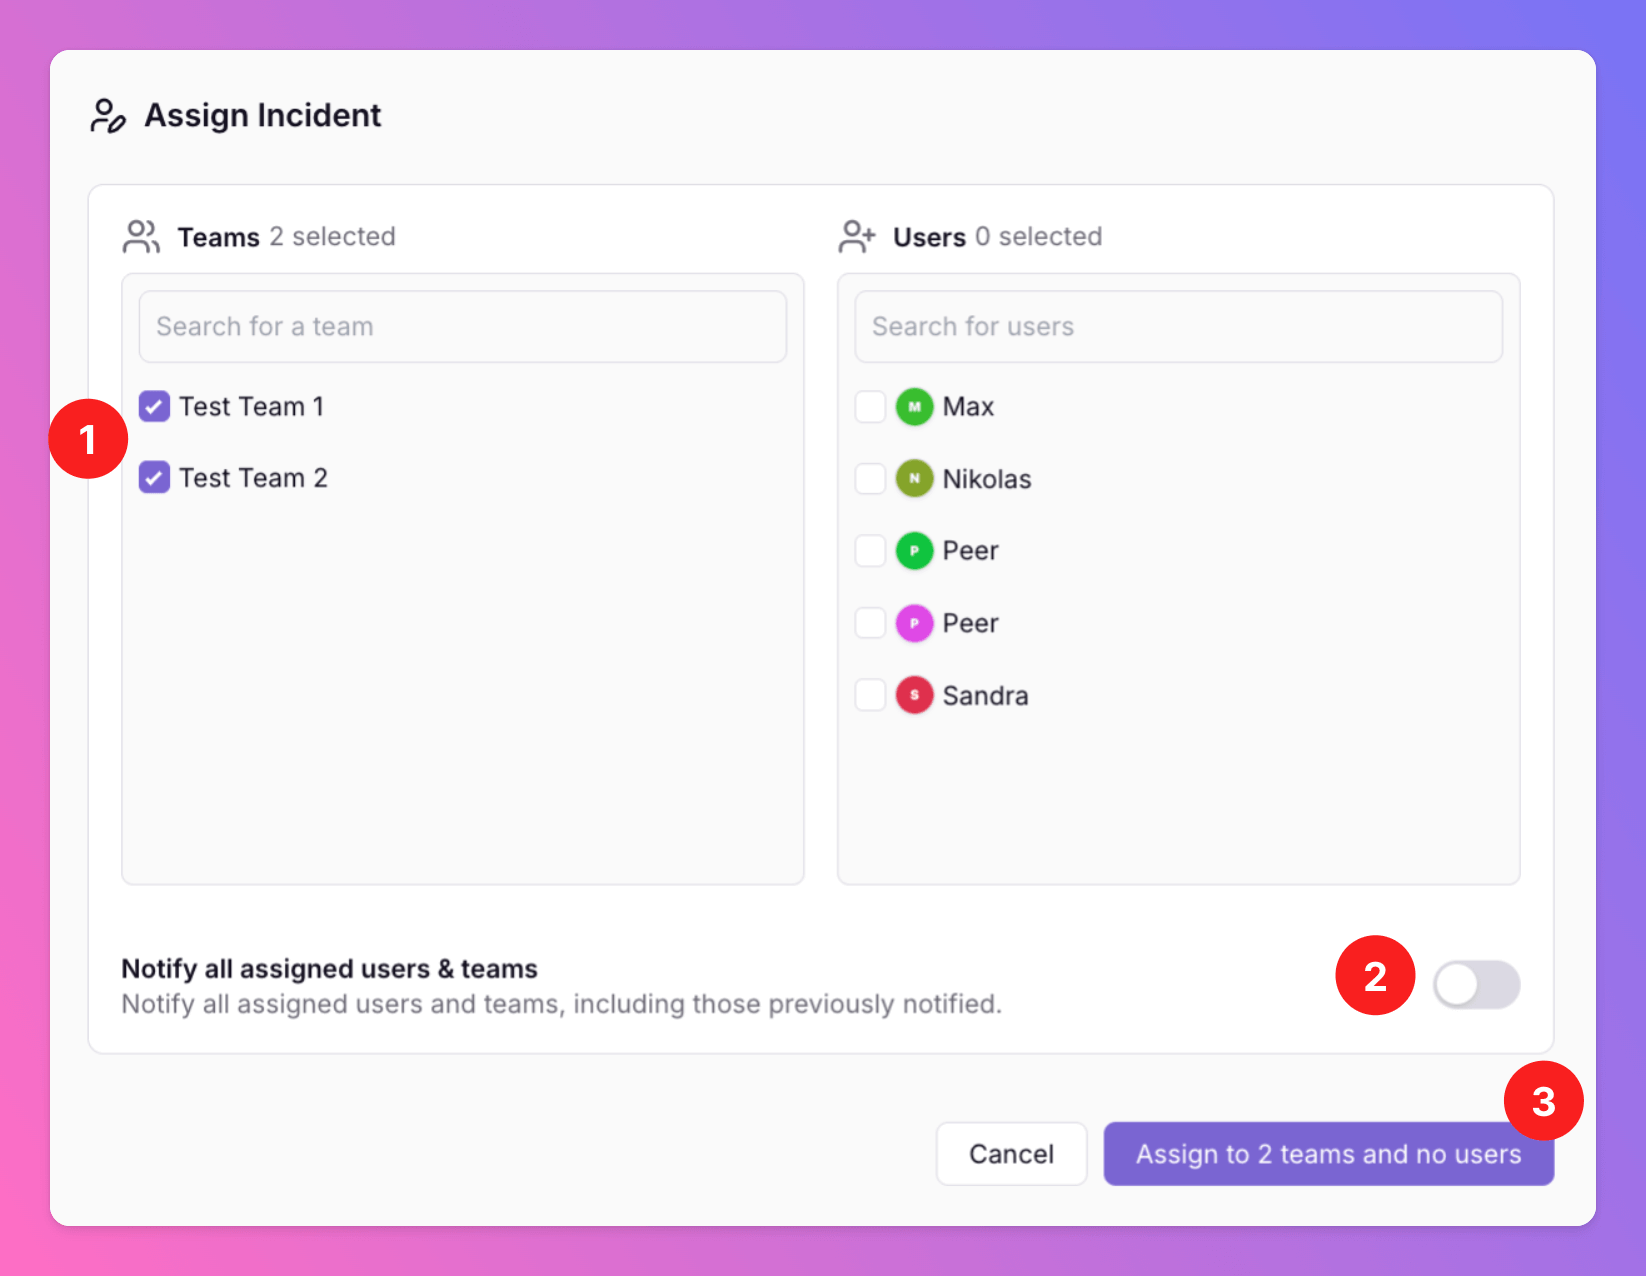
After clicking `Assign` in the incident's detail view, an overlay will open.
#### Assign to Team
Do you need help from an additional team to resolve an incident? Or do you want to reassign the incident to another team better suited to handle it?
1. After clicking the `Assign` button, you will see all teams in your [organization](/advanced/organizations). Select the teams you want to assign the incident to. You can either add teams to the currently assigned ones or reassign the incident to entirely different teams.
2. Select whether the Assign action should notify all assigned users and teams or only those that are newly assigned (default).
When you add a new team, its on-call members are notified even if they were already notified through another assigned team. When assigning an incident to a team, All Quiet evaluates notification scope at the **team** level, not per user — so "Only those that are newly assigned" applies to teams (and their on-call members), not to whether an individual user has already received a notification.
3. Confirm with `Assign` to reassign the incident to the selected team(s). All involved on-call members of the all assigned teams will be notified about the incident.
### Assign
Only available for users of Pro and Enterprise plans.
You can use the `Assign` action to assign an incident to teams, specific users, or both.
After clicking `Assign` in the incident's detail view, an overlay will open.
#### Assign to Team
Do you need help from an additional team to resolve an incident? Or do you want to reassign the incident to another team better suited to handle it?
1. After clicking the `Assign` button, you will see all teams in your [organization](/advanced/organizations). Select the teams you want to assign the incident to. You can either add teams to the currently assigned ones or reassign the incident to entirely different teams.
2. Select whether the Assign action should notify all assigned users and teams or only those that are newly assigned (default).
When you add a new team, its on-call members are notified even if they were already notified through another assigned team. When assigning an incident to a team, All Quiet evaluates notification scope at the **team** level, not per user — so "Only those that are newly assigned" applies to teams (and their on-call members), not to whether an individual user has already received a notification.
3. Confirm with `Assign` to reassign the incident to the selected team(s). All involved on-call members of the all assigned teams will be notified about the incident.
 On the incident details view
1. You can see the assign action in the history.
2. You can view which team(s) is/are currently in charge of the incident.
3. You can see the currently notified escalation tiers for each team.
On the incident details view
1. You can see the assign action in the history.
2. You can view which team(s) is/are currently in charge of the incident.
3. You can see the currently notified escalation tiers for each team.
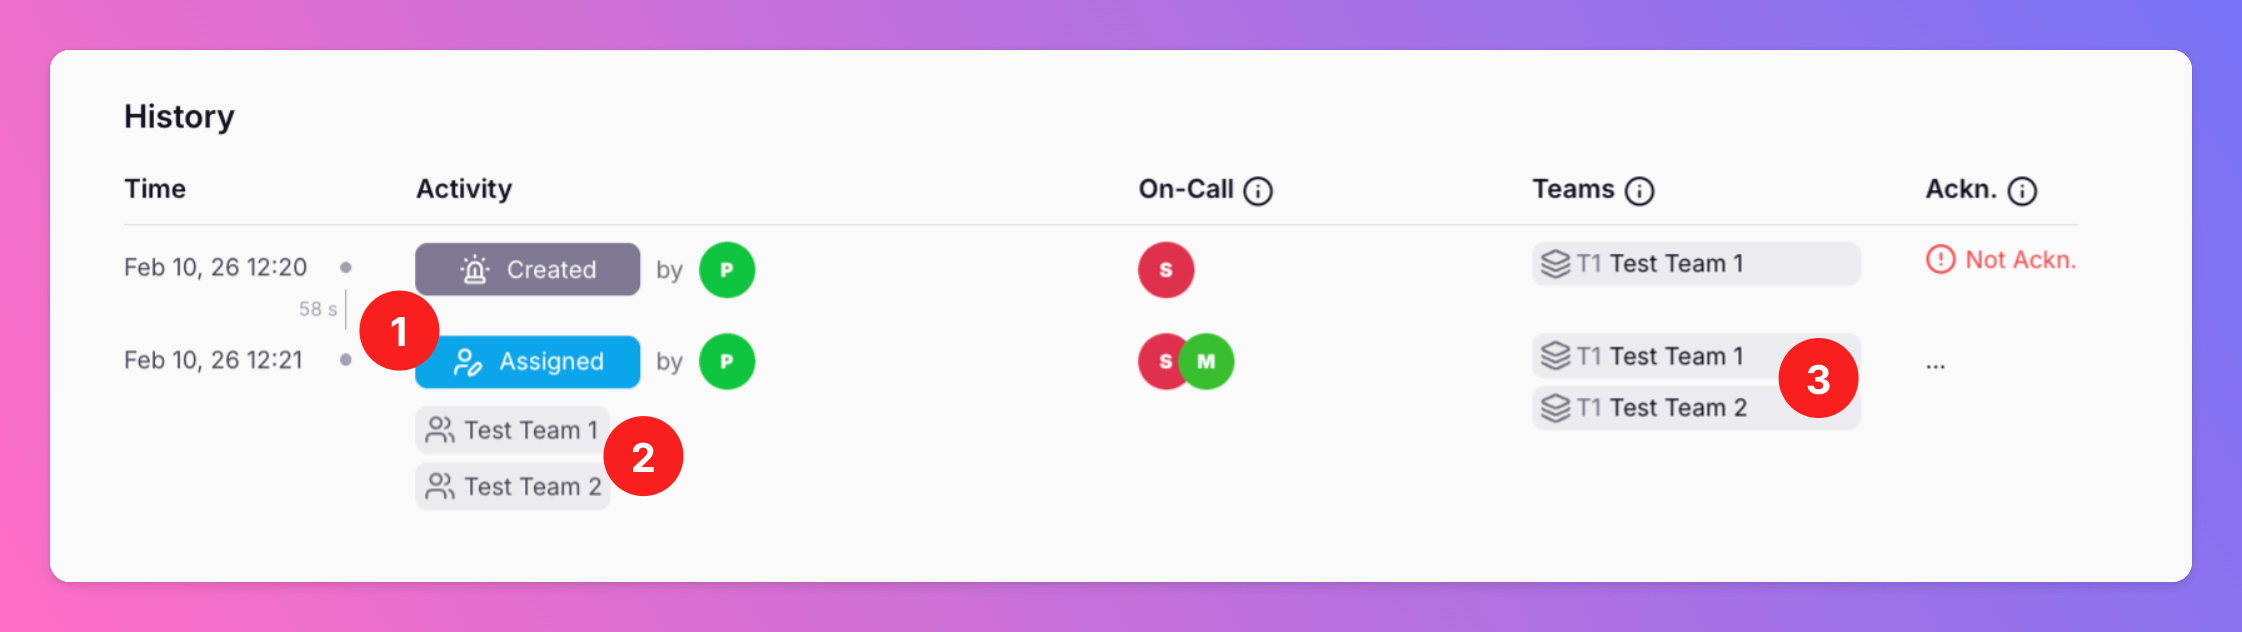 Using "assign to teams" can have an impact on the team(s) auto-escalations. Learn more, [here](/essentials/escalations#impact-on-auto-escalations)
#### Assign to User
Need assistance from a specific colleague? No worries! With the `Assign to User` action, you can notify them anytime.
This part focuses on assigning an existing incident to a specific user. Want to create a **new incident** for a specific user? Learn [more](/essentials/incident#manually-create-an-incident).
1. Click the Assign button to view all users in your organization and select the user(s) you want to assign the incident to. You can either add them to the existing assigned teams and users or reassign the incident to different users entirely (see screenshot below).
2. Select whether the Assign action should notify all assigned users and teams or only those that are newly assigned (default).
3. Confirm with `Assign` to reassign the incident to the selected users(s). The selected user(s) will be notified about the inciden, no matter if they are on-call or not.
Using "assign to teams" can have an impact on the team(s) auto-escalations. Learn more, [here](/essentials/escalations#impact-on-auto-escalations)
#### Assign to User
Need assistance from a specific colleague? No worries! With the `Assign to User` action, you can notify them anytime.
This part focuses on assigning an existing incident to a specific user. Want to create a **new incident** for a specific user? Learn [more](/essentials/incident#manually-create-an-incident).
1. Click the Assign button to view all users in your organization and select the user(s) you want to assign the incident to. You can either add them to the existing assigned teams and users or reassign the incident to different users entirely (see screenshot below).
2. Select whether the Assign action should notify all assigned users and teams or only those that are newly assigned (default).
3. Confirm with `Assign` to reassign the incident to the selected users(s). The selected user(s) will be notified about the inciden, no matter if they are on-call or not.
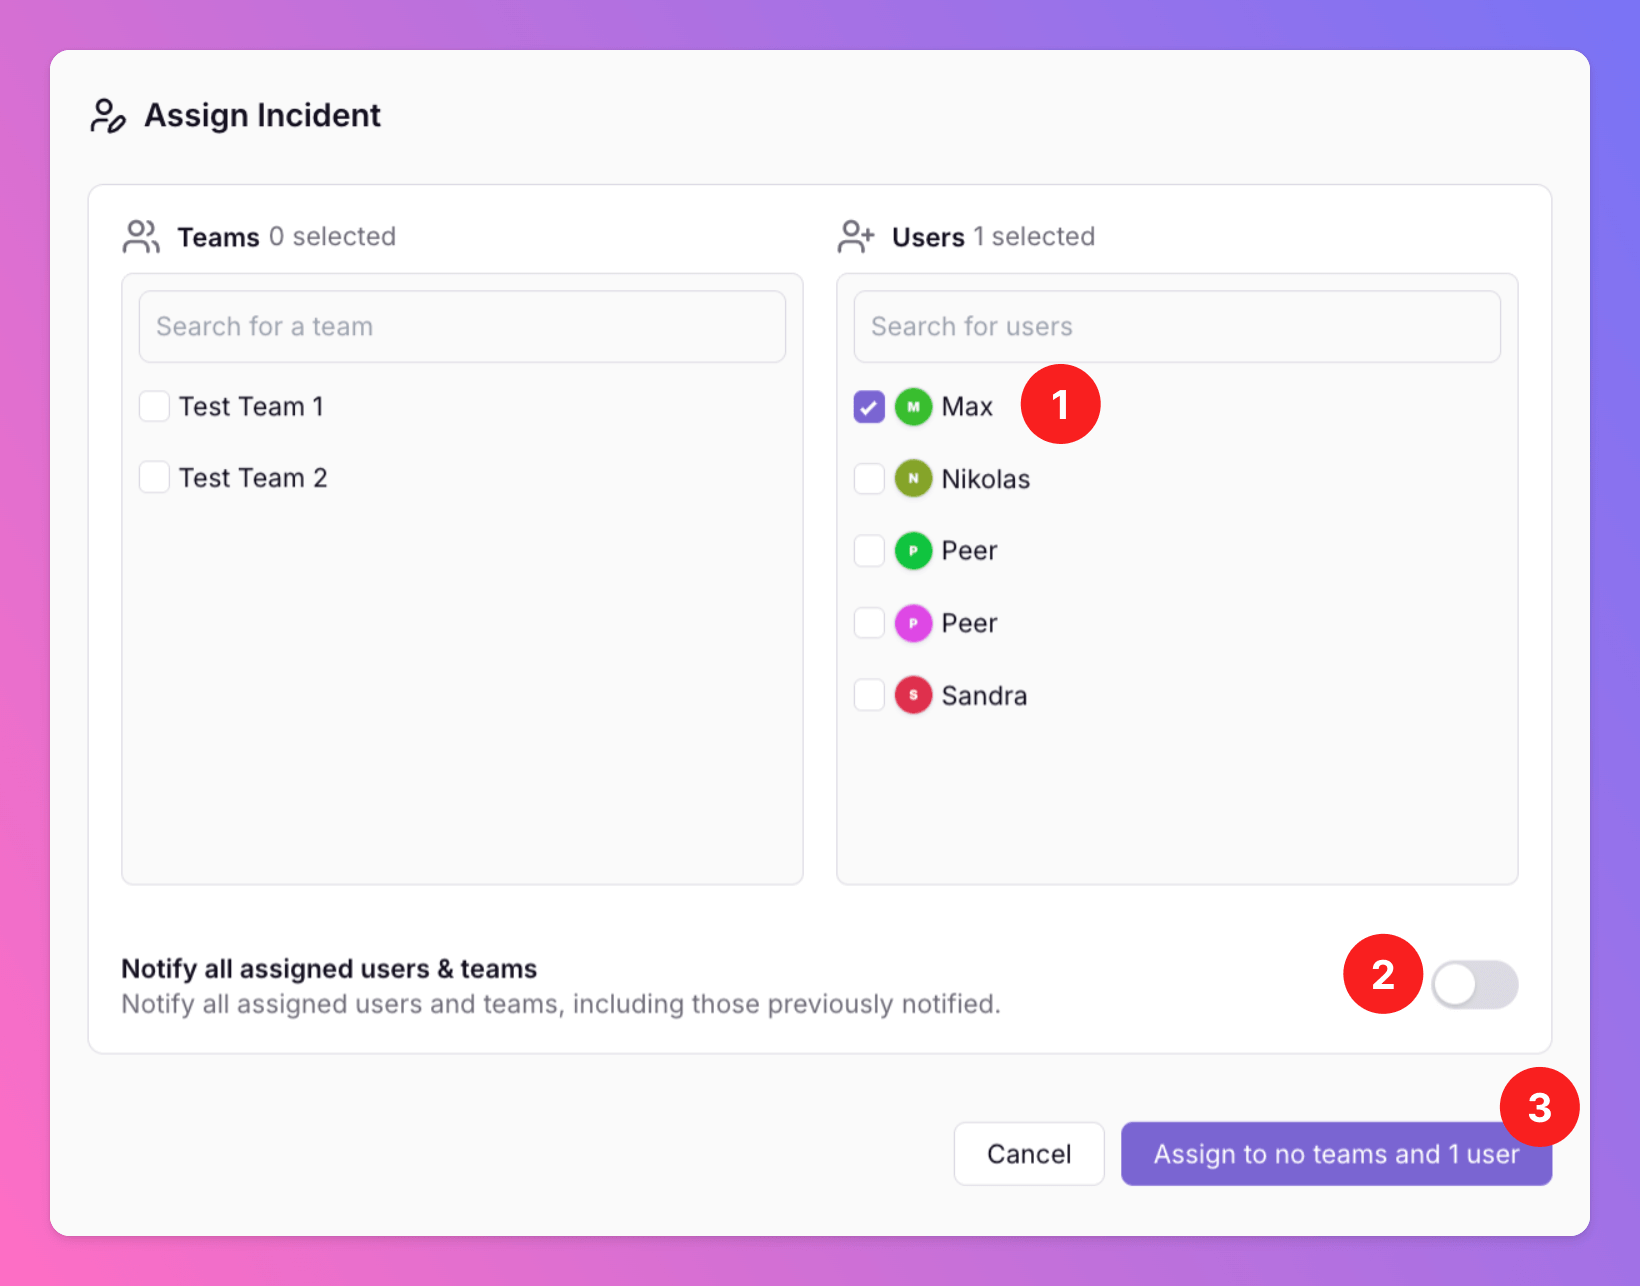 On the incident details view
1. You can see the assign action in the history. Note that the incident was assigned to one specific user and isn't assigned to any teams anymore.
2. You can view which users(s) is/are currently in charge of the incident. If the incident is assigned to several teams and / or users, all notified colleagues are listed, here.
3. Since only one user is now responsible, with no teams assigned, auto-escalations are halted.
On the incident details view
1. You can see the assign action in the history. Note that the incident was assigned to one specific user and isn't assigned to any teams anymore.
2. You can view which users(s) is/are currently in charge of the incident. If the incident is assigned to several teams and / or users, all notified colleagues are listed, here.
3. Since only one user is now responsible, with no teams assigned, auto-escalations are halted.
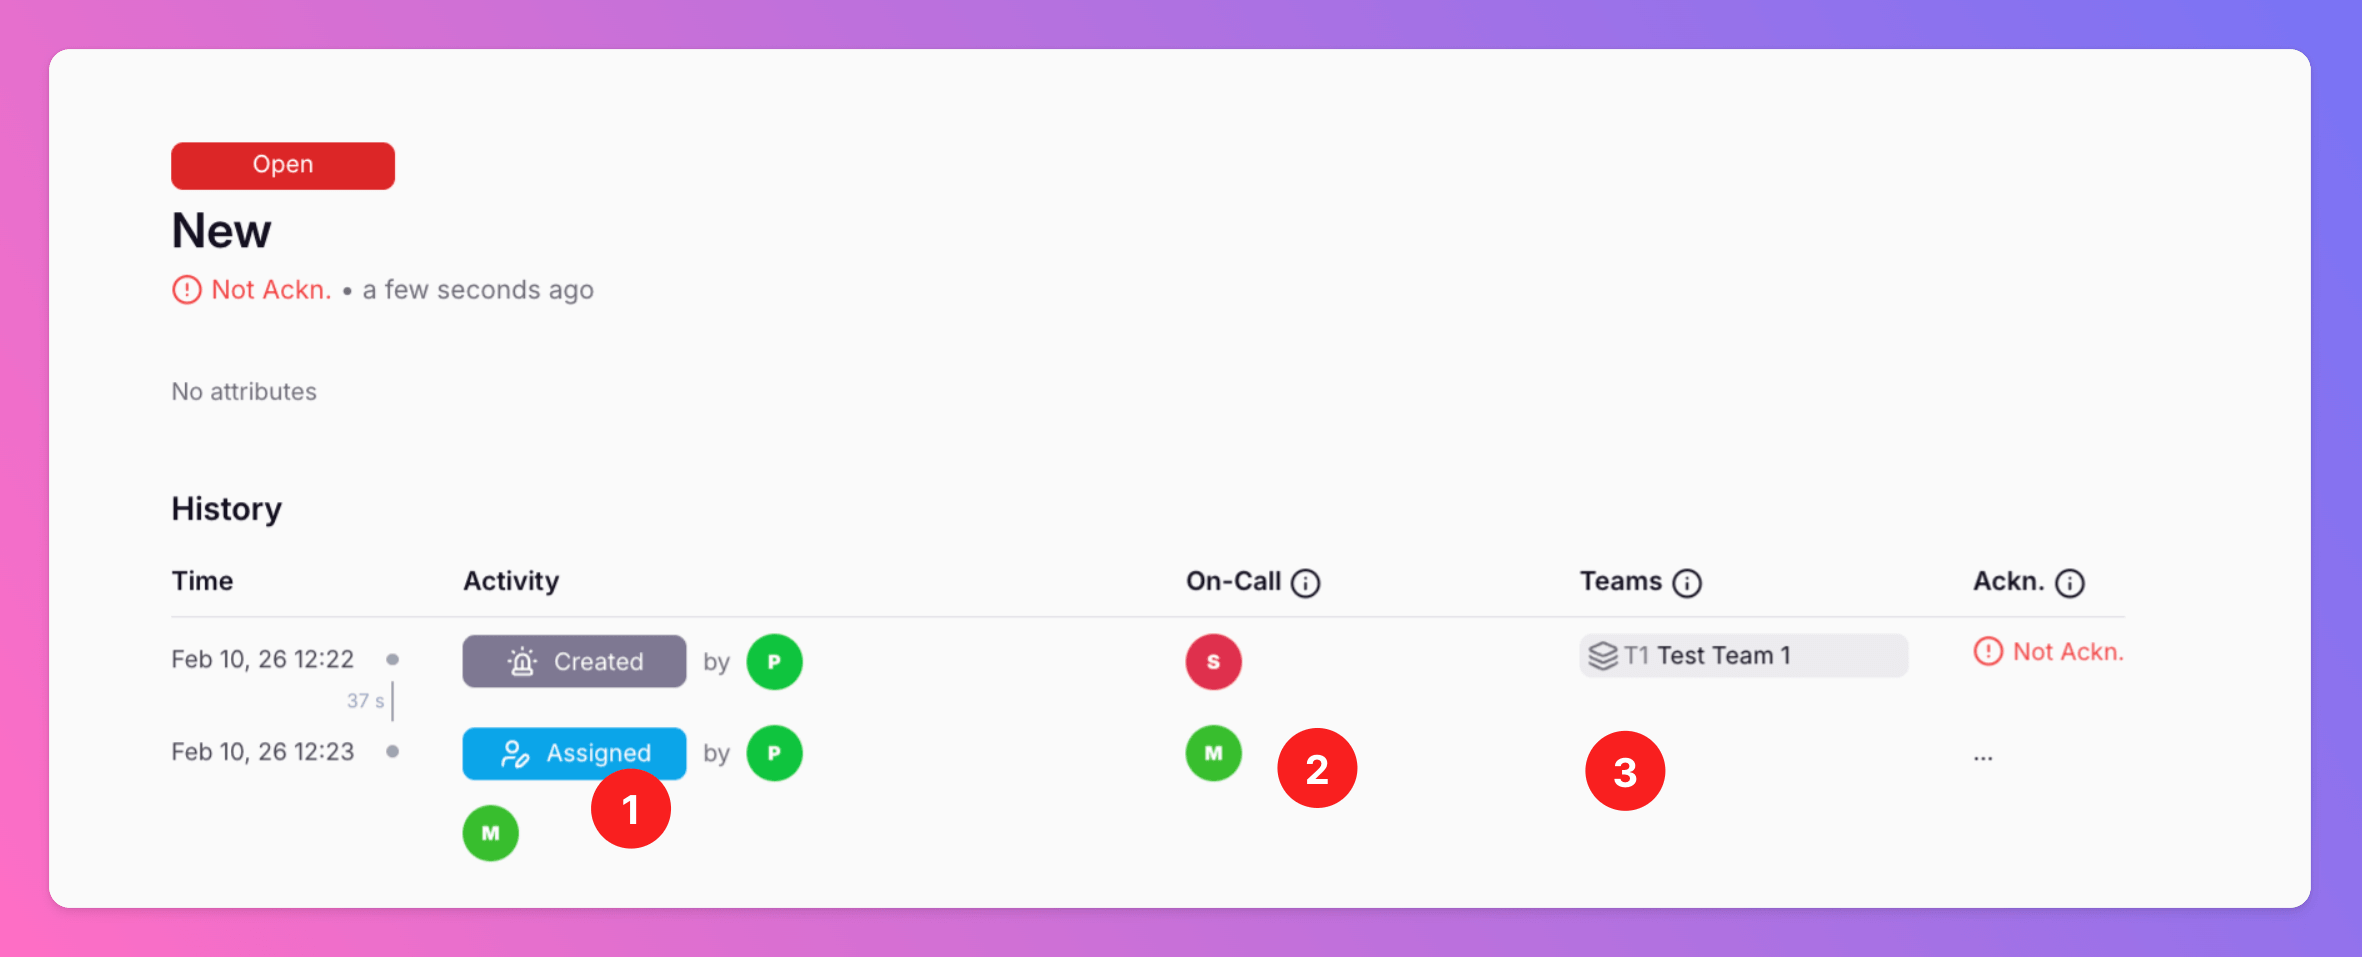 Of course, assign to user and assign to team can be combined.
### Manually Snooze / Unsnooze
If you need time to investigate an incident and want to temporarily stop alerts, use the **Snooze** action to pause escalations.
You can snooze
1. for a pre-defined time
2. until a certain date and time
3. or indefinitely
Of course, assign to user and assign to team can be combined.
### Manually Snooze / Unsnooze
If you need time to investigate an incident and want to temporarily stop alerts, use the **Snooze** action to pause escalations.
You can snooze
1. for a pre-defined time
2. until a certain date and time
3. or indefinitely
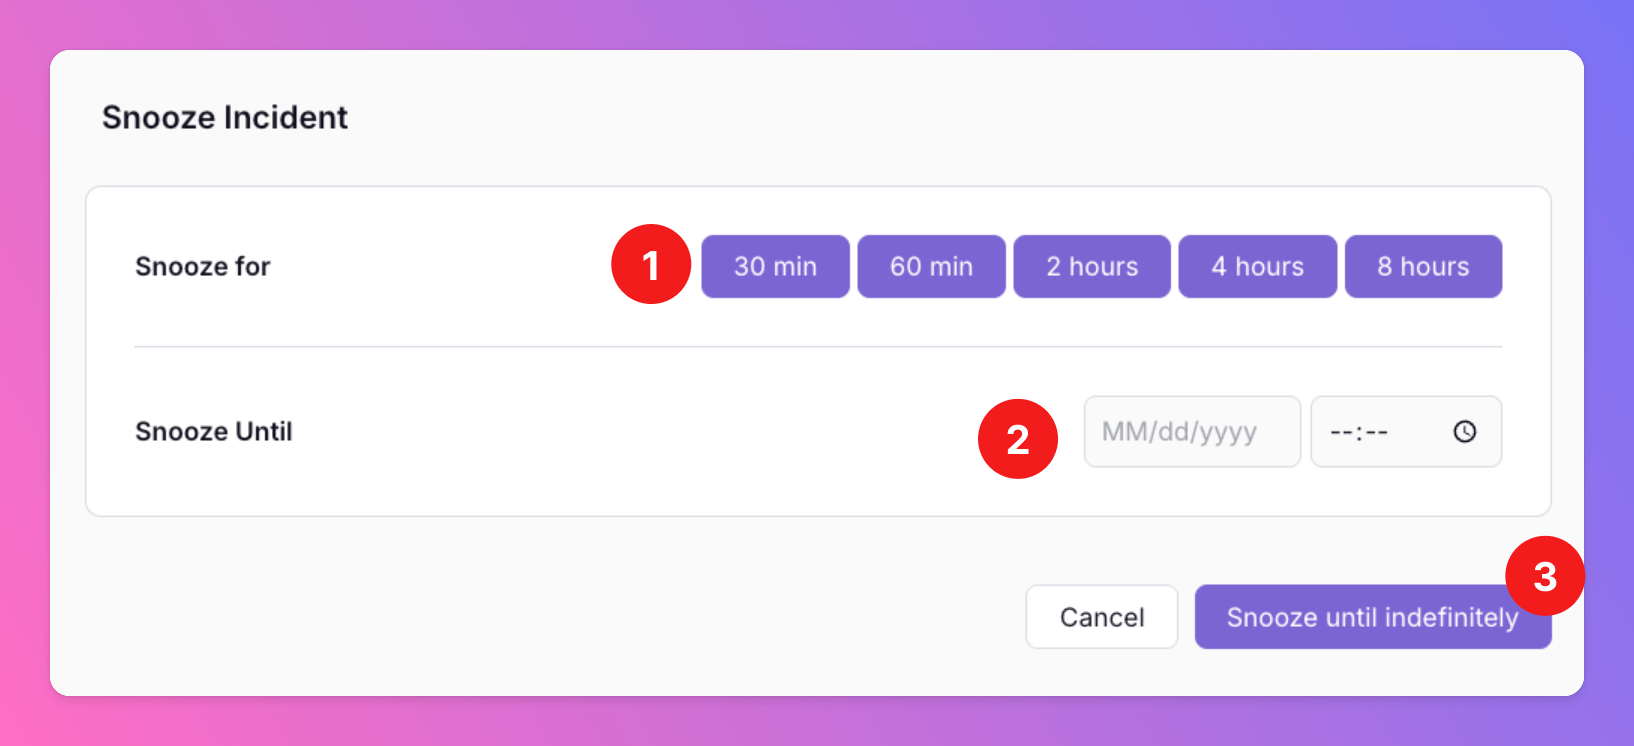 The incident is automatically unsnoozed when the snooze window ends — the same outcome as clicking the Unsnooze button.
The **Unsnooze** button is available if you manually snoozed the incident or if [auto-snooze is enabled](/essentials/inbound#snoozing-inbound-integrations) for the integration and the incident is still within the snooze window.
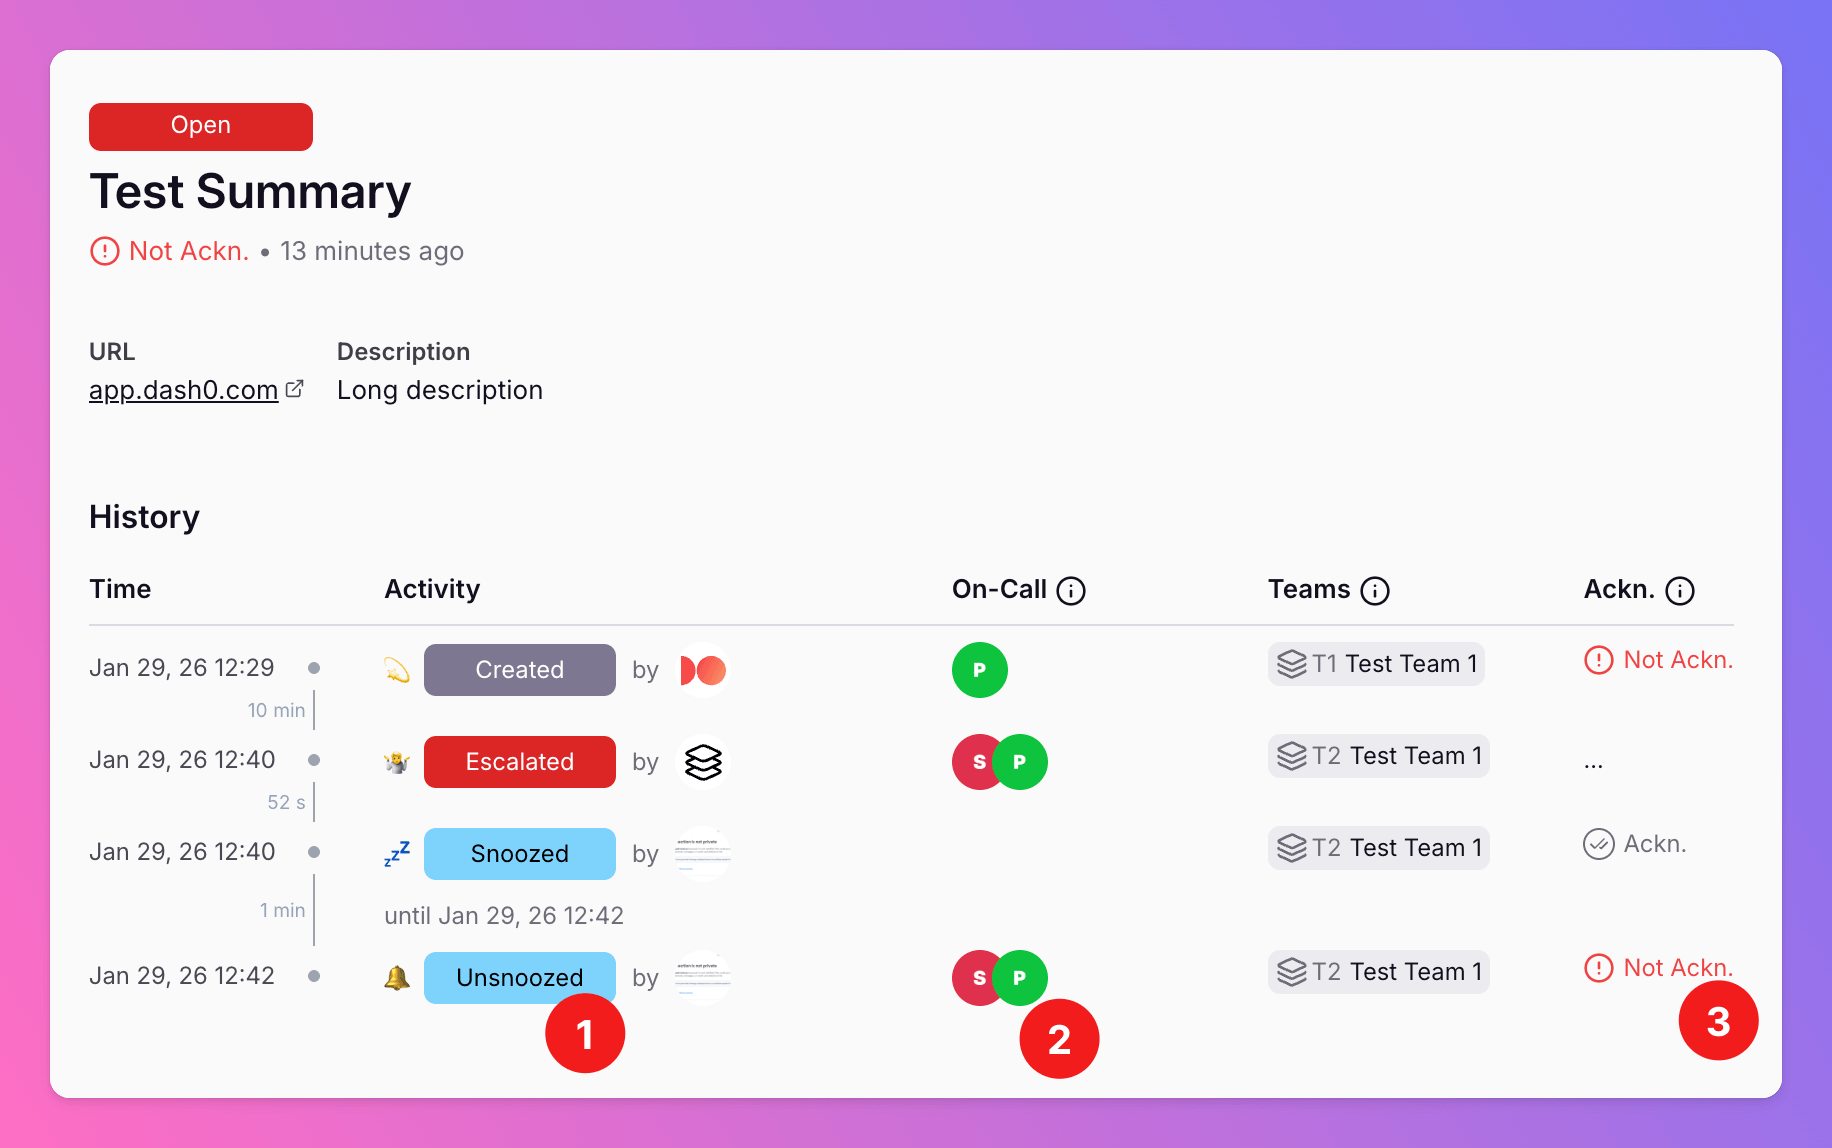
Clicking Unsnooze (or reaching the end of the snooze window) triggers the following:
1. The incident is unsnoozed.
2. Current Tier members are notified.
3. The incident is marked as `not acknowledged`, and escalations either start (if snoozed via [integration settings](/essentials/inbound#snoozing-inbound-integrations)) or continue (if manually snoozed).
The incident is automatically unsnoozed when the snooze window ends — the same outcome as clicking the Unsnooze button.
The **Unsnooze** button is available if you manually snoozed the incident or if [auto-snooze is enabled](/essentials/inbound#snoozing-inbound-integrations) for the integration and the incident is still within the snooze window.
Clicking Unsnooze (or reaching the end of the snooze window) triggers the following:
1. The incident is unsnoozed.
2. Current Tier members are notified.
3. The incident is marked as `not acknowledged`, and escalations either start (if snoozed via [integration settings](/essentials/inbound#snoozing-inbound-integrations)) or continue (if manually snoozed).
 ### Archiving
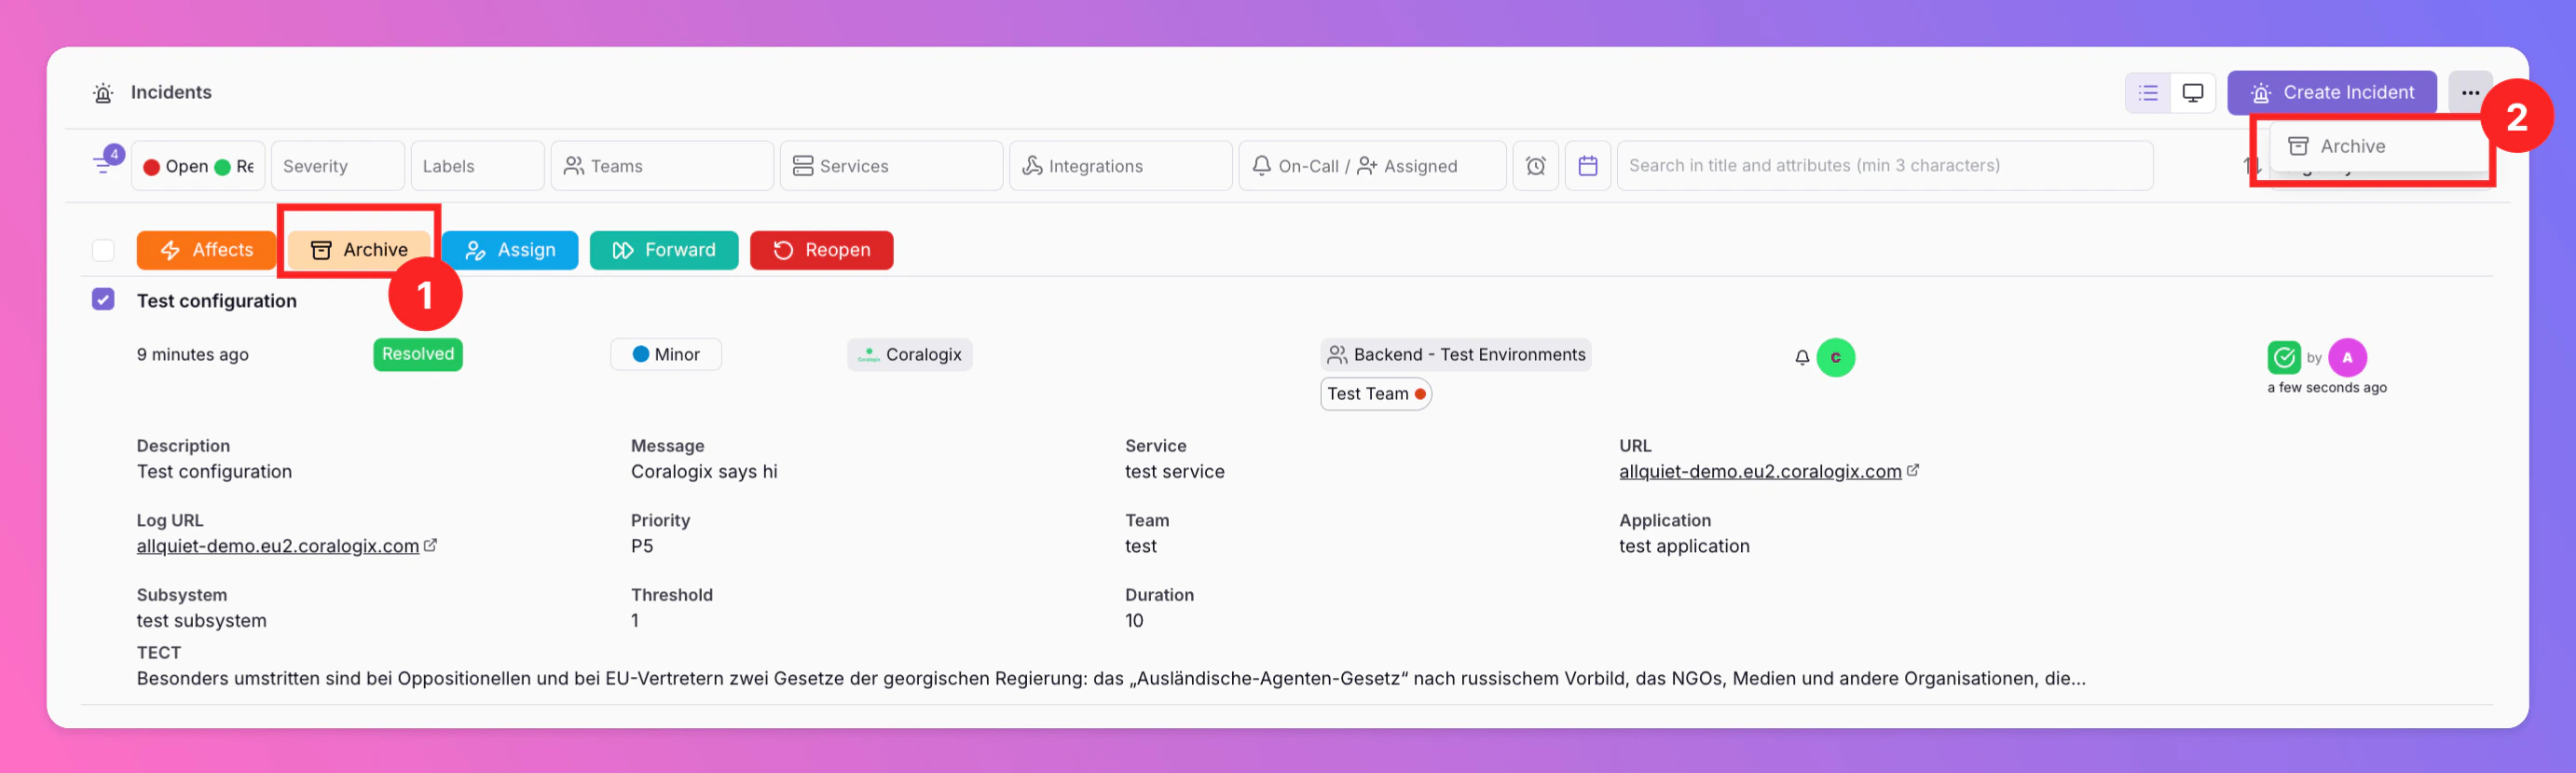
If you want to clean up your incidents overview, you can `archive` incidents. Archiving incidents does not change their resolution state, only moves them from the incidents overview to the archive.
1. `Archive` Intent
2. You can always open the archive via the three-dot-menu next to `Create Incident` on the incidents overview.
Archiving marks an incident as acknowledged and possibly stops auto-escalations, depending on your [settings](/essentials/escalations#automatic-escalation).
### Archiving
If you want to clean up your incidents overview, you can `archive` incidents. Archiving incidents does not change their resolution state, only moves them from the incidents overview to the archive.
1. `Archive` Intent
2. You can always open the archive via the three-dot-menu next to `Create Incident` on the incidents overview.
Archiving marks an incident as acknowledged and possibly stops auto-escalations, depending on your [settings](/essentials/escalations#automatic-escalation).
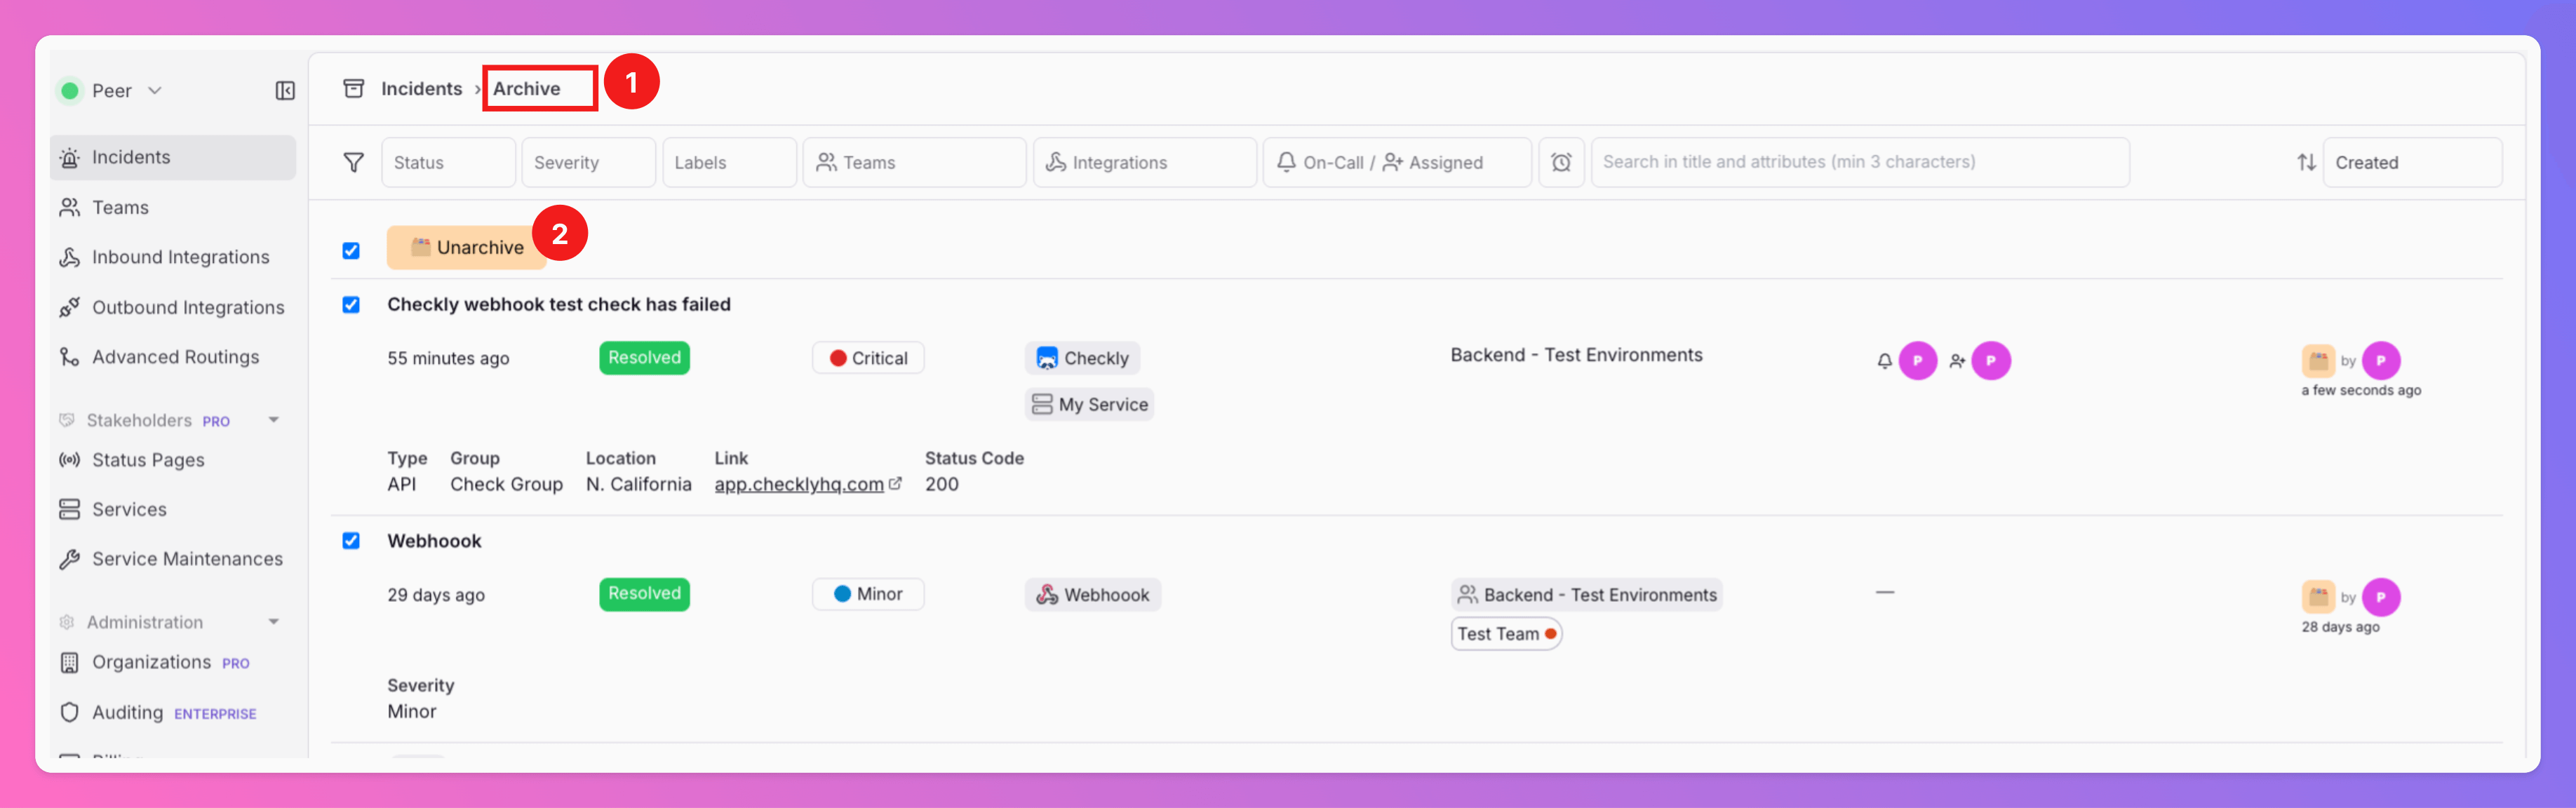
 1. Archive view --> All archived incidents.
2. Archived incidents can always be `Unarchived`. Then, they will be visible on the incidents overview, again.
1. Archive view --> All archived incidents.
2. Archived incidents can always be `Unarchived`. Then, they will be visible on the incidents overview, again.
 ### Deleting Incidents
All Quiet automatically removes incidents after a retention period. In addition, administrators can permanently delete archived incidents before that date.
#### Automatic Deletion
Incidents are deleted automatically based on where they were created:
| Context | Retention period |
| -------------------------------------------------------------------------------- | -------------------------------------------------------------------------------------------------- |
| **Standard plan** (incidents outside an [organization](/advanced/organizations)) | **6 months** after creation |
| **Organization incidents** ([Pro and Enterprise](/advanced/organizations) plans) | **12 months** after creation |
| **Enterprise** (custom agreement) | **Custom** retention period possible — contact [support@allquiet.app](mailto:support@allquiet.app) |
The scheduled deletion date is shown for each incident in the **Properties** sidebar on the incident details page, so you can see when an incident will be removed.
Automatic deletion applies regardless of whether an incident is open, resolved, or archived.
#### Manual Deletion
Manual deletion is available to **Organization Owners**, **Organization Administrators**, and **Team Administrators** for incidents in teams they administer.
To permanently remove an incident before its scheduled deletion date:
1. [Archive](/essentials/incident#archiving) the incident.
2. Open the incident in the **details** view (the incident must be archived).
3. Use the **Delete** action (🗑️ trash bin icon next to the deletion date in the Properties sidebar).
4. Confirm the deletion in the confirmation modal.
Deleting an incident is permanent. The incident and its history are removed and cannot be recovered. If you only want to hide an incident from the overview, solely [archive](/essentials/incident#archiving) it instead.
## Reopening Incidents
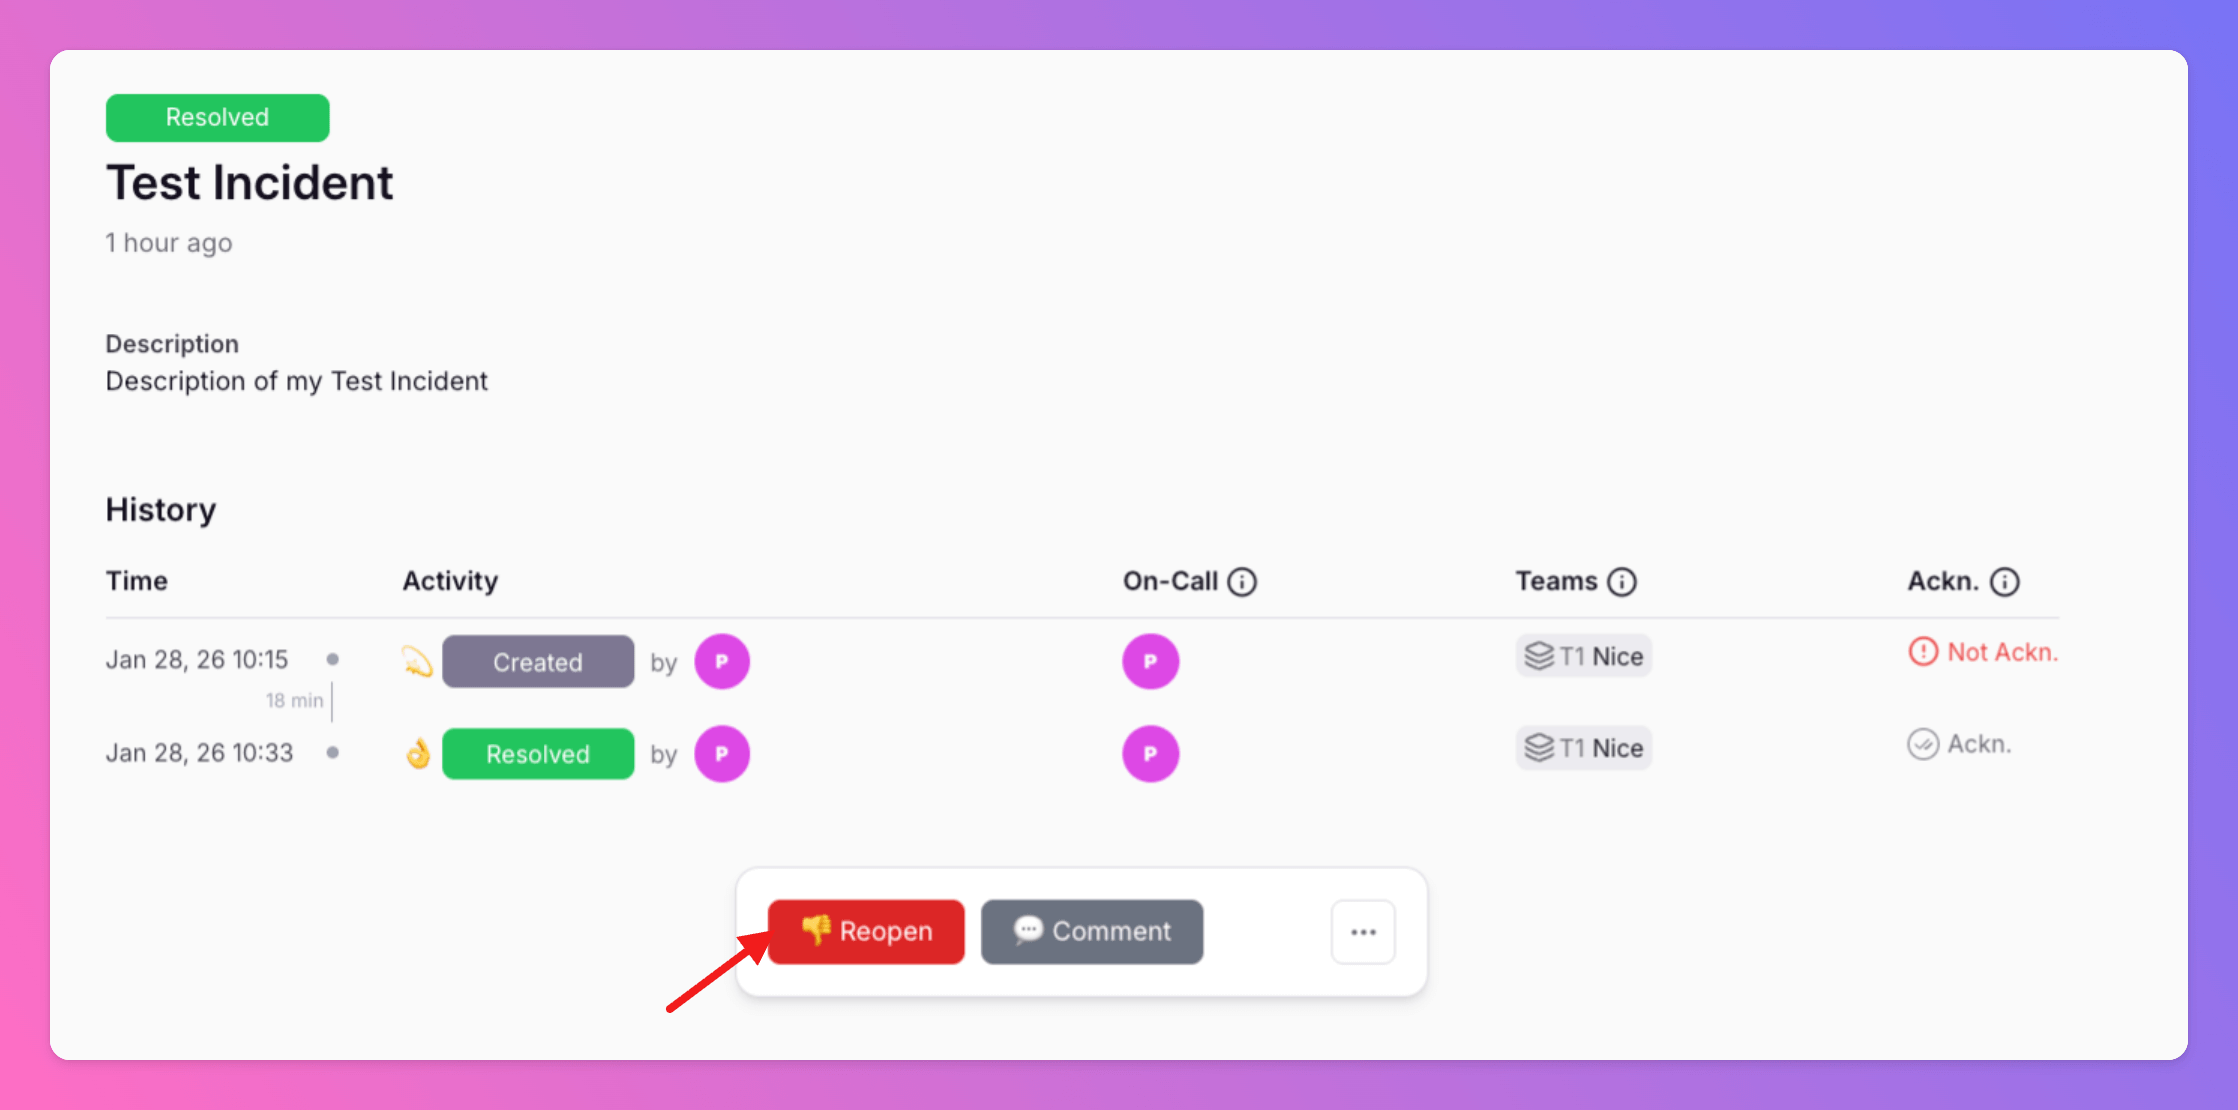
Sometimes you need to re-open an incident that is already marked as resolved. You can simply do this by clicking the red `Reopen` button on a resolved incident.
You can also add a [comment](/essentials/incident#action-with-comment).
Reopening an incident will inform the current Tier 1 on-call users of the involved teams. It will also **restart the auto-escalations** of the involved team(s).
For [status page](/advanced/status-pages) users: If an incident is currently [affecting](/essentials/incident#affects-services) at least one service, reopening it will also automatically update the related services and status pages.
### Deleting Incidents
All Quiet automatically removes incidents after a retention period. In addition, administrators can permanently delete archived incidents before that date.
#### Automatic Deletion
Incidents are deleted automatically based on where they were created:
| Context | Retention period |
| -------------------------------------------------------------------------------- | -------------------------------------------------------------------------------------------------- |
| **Standard plan** (incidents outside an [organization](/advanced/organizations)) | **6 months** after creation |
| **Organization incidents** ([Pro and Enterprise](/advanced/organizations) plans) | **12 months** after creation |
| **Enterprise** (custom agreement) | **Custom** retention period possible — contact [support@allquiet.app](mailto:support@allquiet.app) |
The scheduled deletion date is shown for each incident in the **Properties** sidebar on the incident details page, so you can see when an incident will be removed.
Automatic deletion applies regardless of whether an incident is open, resolved, or archived.
#### Manual Deletion
Manual deletion is available to **Organization Owners**, **Organization Administrators**, and **Team Administrators** for incidents in teams they administer.
To permanently remove an incident before its scheduled deletion date:
1. [Archive](/essentials/incident#archiving) the incident.
2. Open the incident in the **details** view (the incident must be archived).
3. Use the **Delete** action (🗑️ trash bin icon next to the deletion date in the Properties sidebar).
4. Confirm the deletion in the confirmation modal.
Deleting an incident is permanent. The incident and its history are removed and cannot be recovered. If you only want to hide an incident from the overview, solely [archive](/essentials/incident#archiving) it instead.
## Reopening Incidents
Sometimes you need to re-open an incident that is already marked as resolved. You can simply do this by clicking the red `Reopen` button on a resolved incident.
You can also add a [comment](/essentials/incident#action-with-comment).
Reopening an incident will inform the current Tier 1 on-call users of the involved teams. It will also **restart the auto-escalations** of the involved team(s).
For [status page](/advanced/status-pages) users: If an incident is currently [affecting](/essentials/incident#affects-services) at least one service, reopening it will also automatically update the related services and status pages.
 ## Copy as Markdown
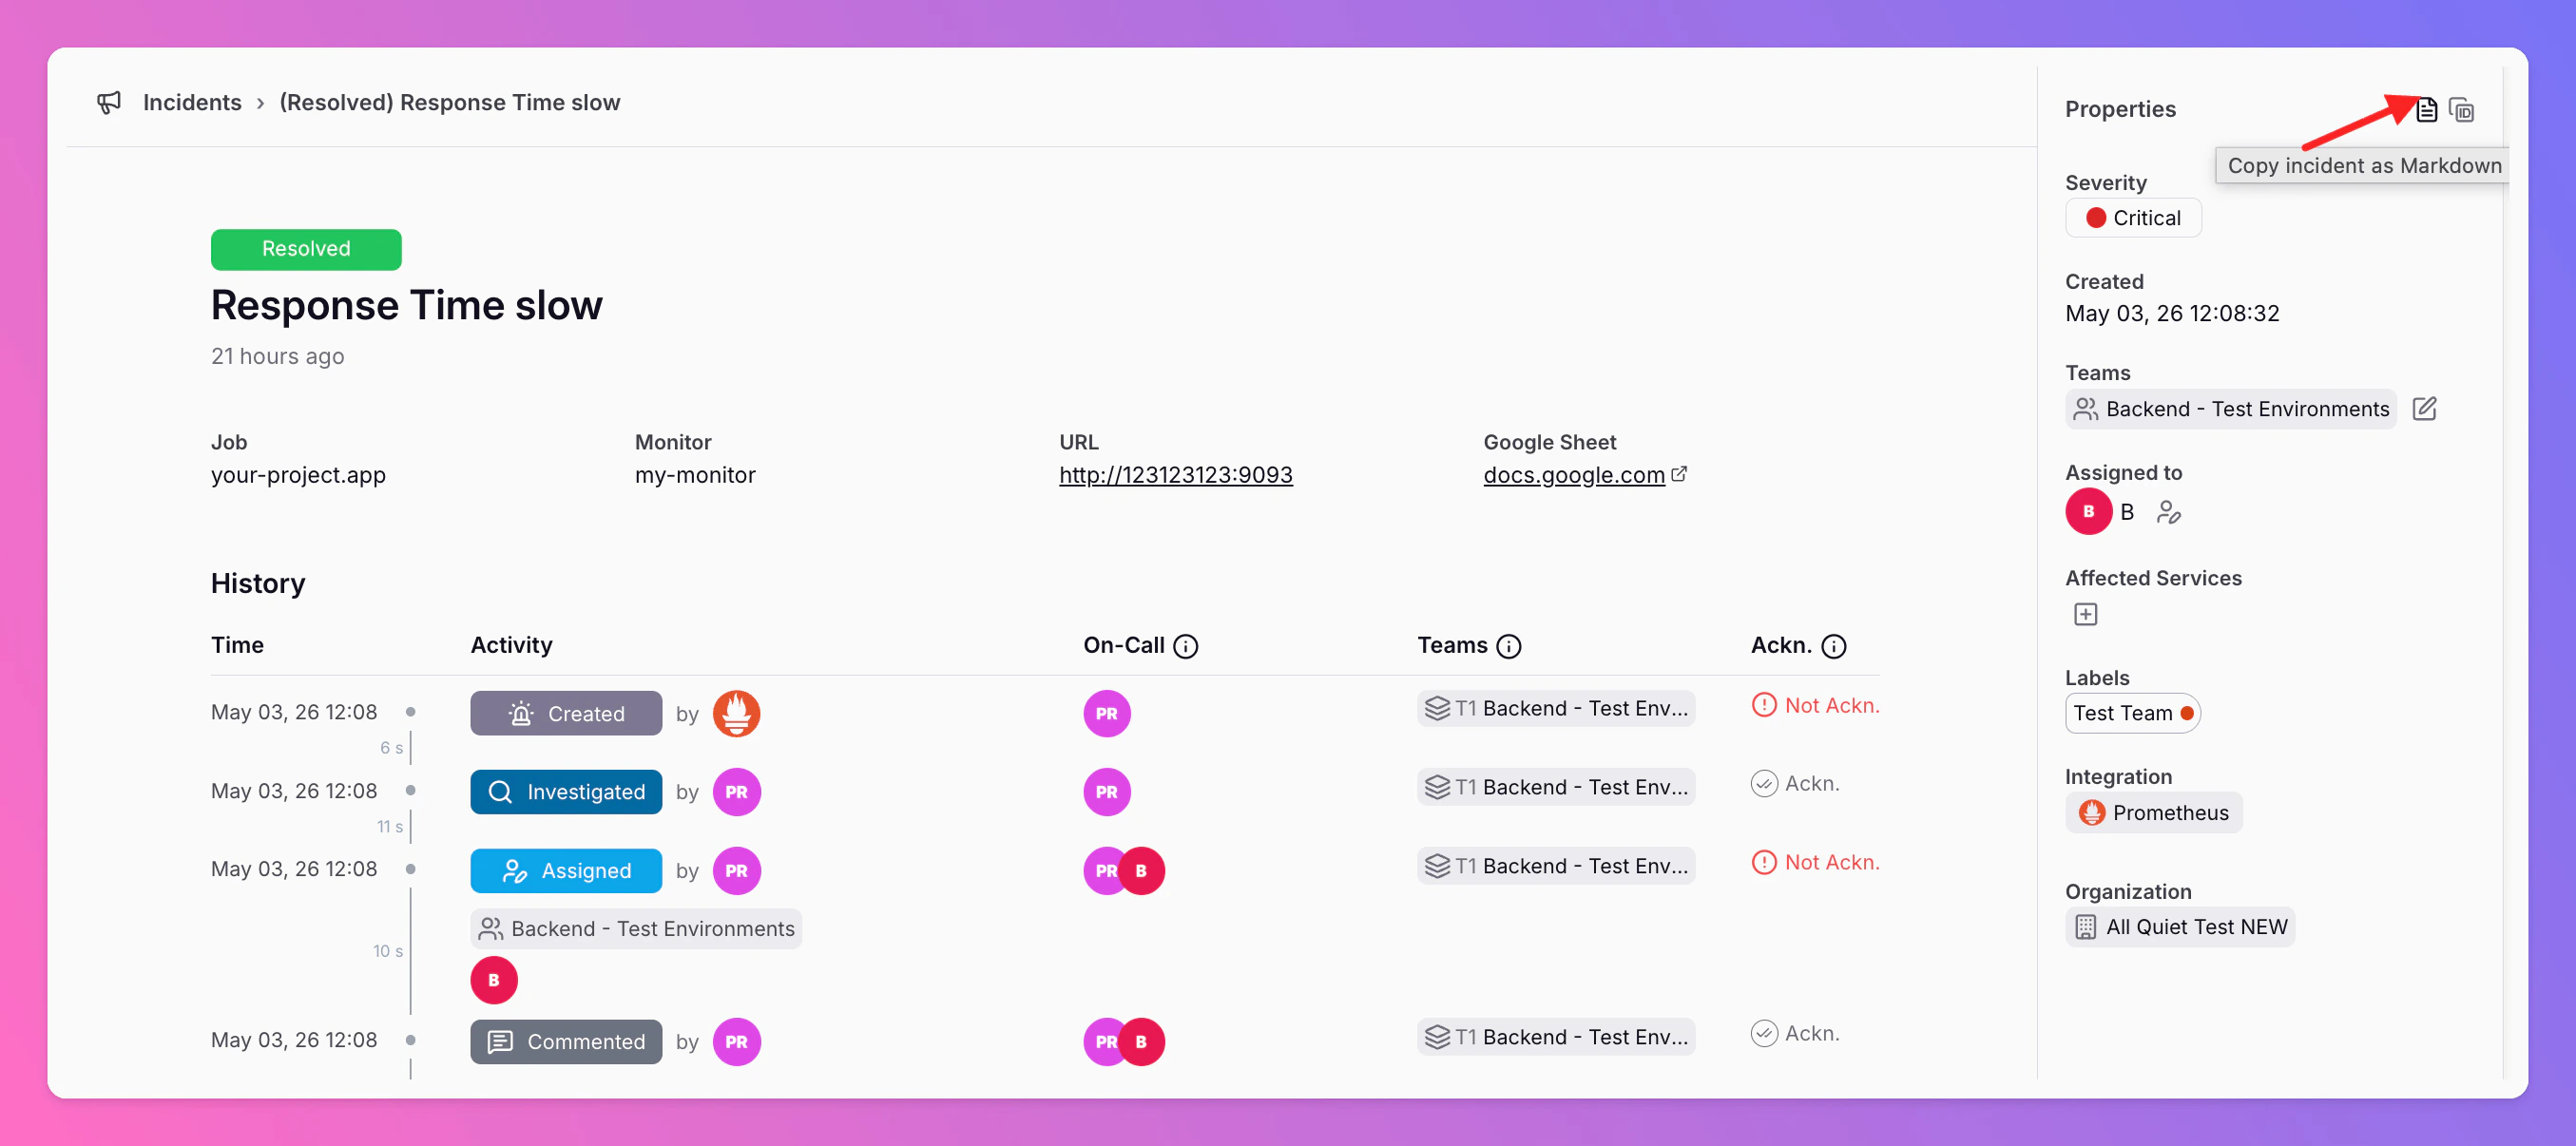
You can copy the **entire incident**, including its **events** (history and activity), as **Markdown**. That is useful when you want to paste a structured summary into internal documentation, a ticket, or run it through an **internal LLM** for analysis or drafting.
Open the incident’s **details** view and use the copy-to-Markdown action from there (see screenshot).
## Copy as Markdown
You can copy the **entire incident**, including its **events** (history and activity), as **Markdown**. That is useful when you want to paste a structured summary into internal documentation, a ticket, or run it through an **internal LLM** for analysis or drafting.
Open the incident’s **details** view and use the copy-to-Markdown action from there (see screenshot).
 For automation or custom pipelines, you can also retrieve incident data through the [Public API](/advanced/api) instead of copying from the UI.
## Incident History
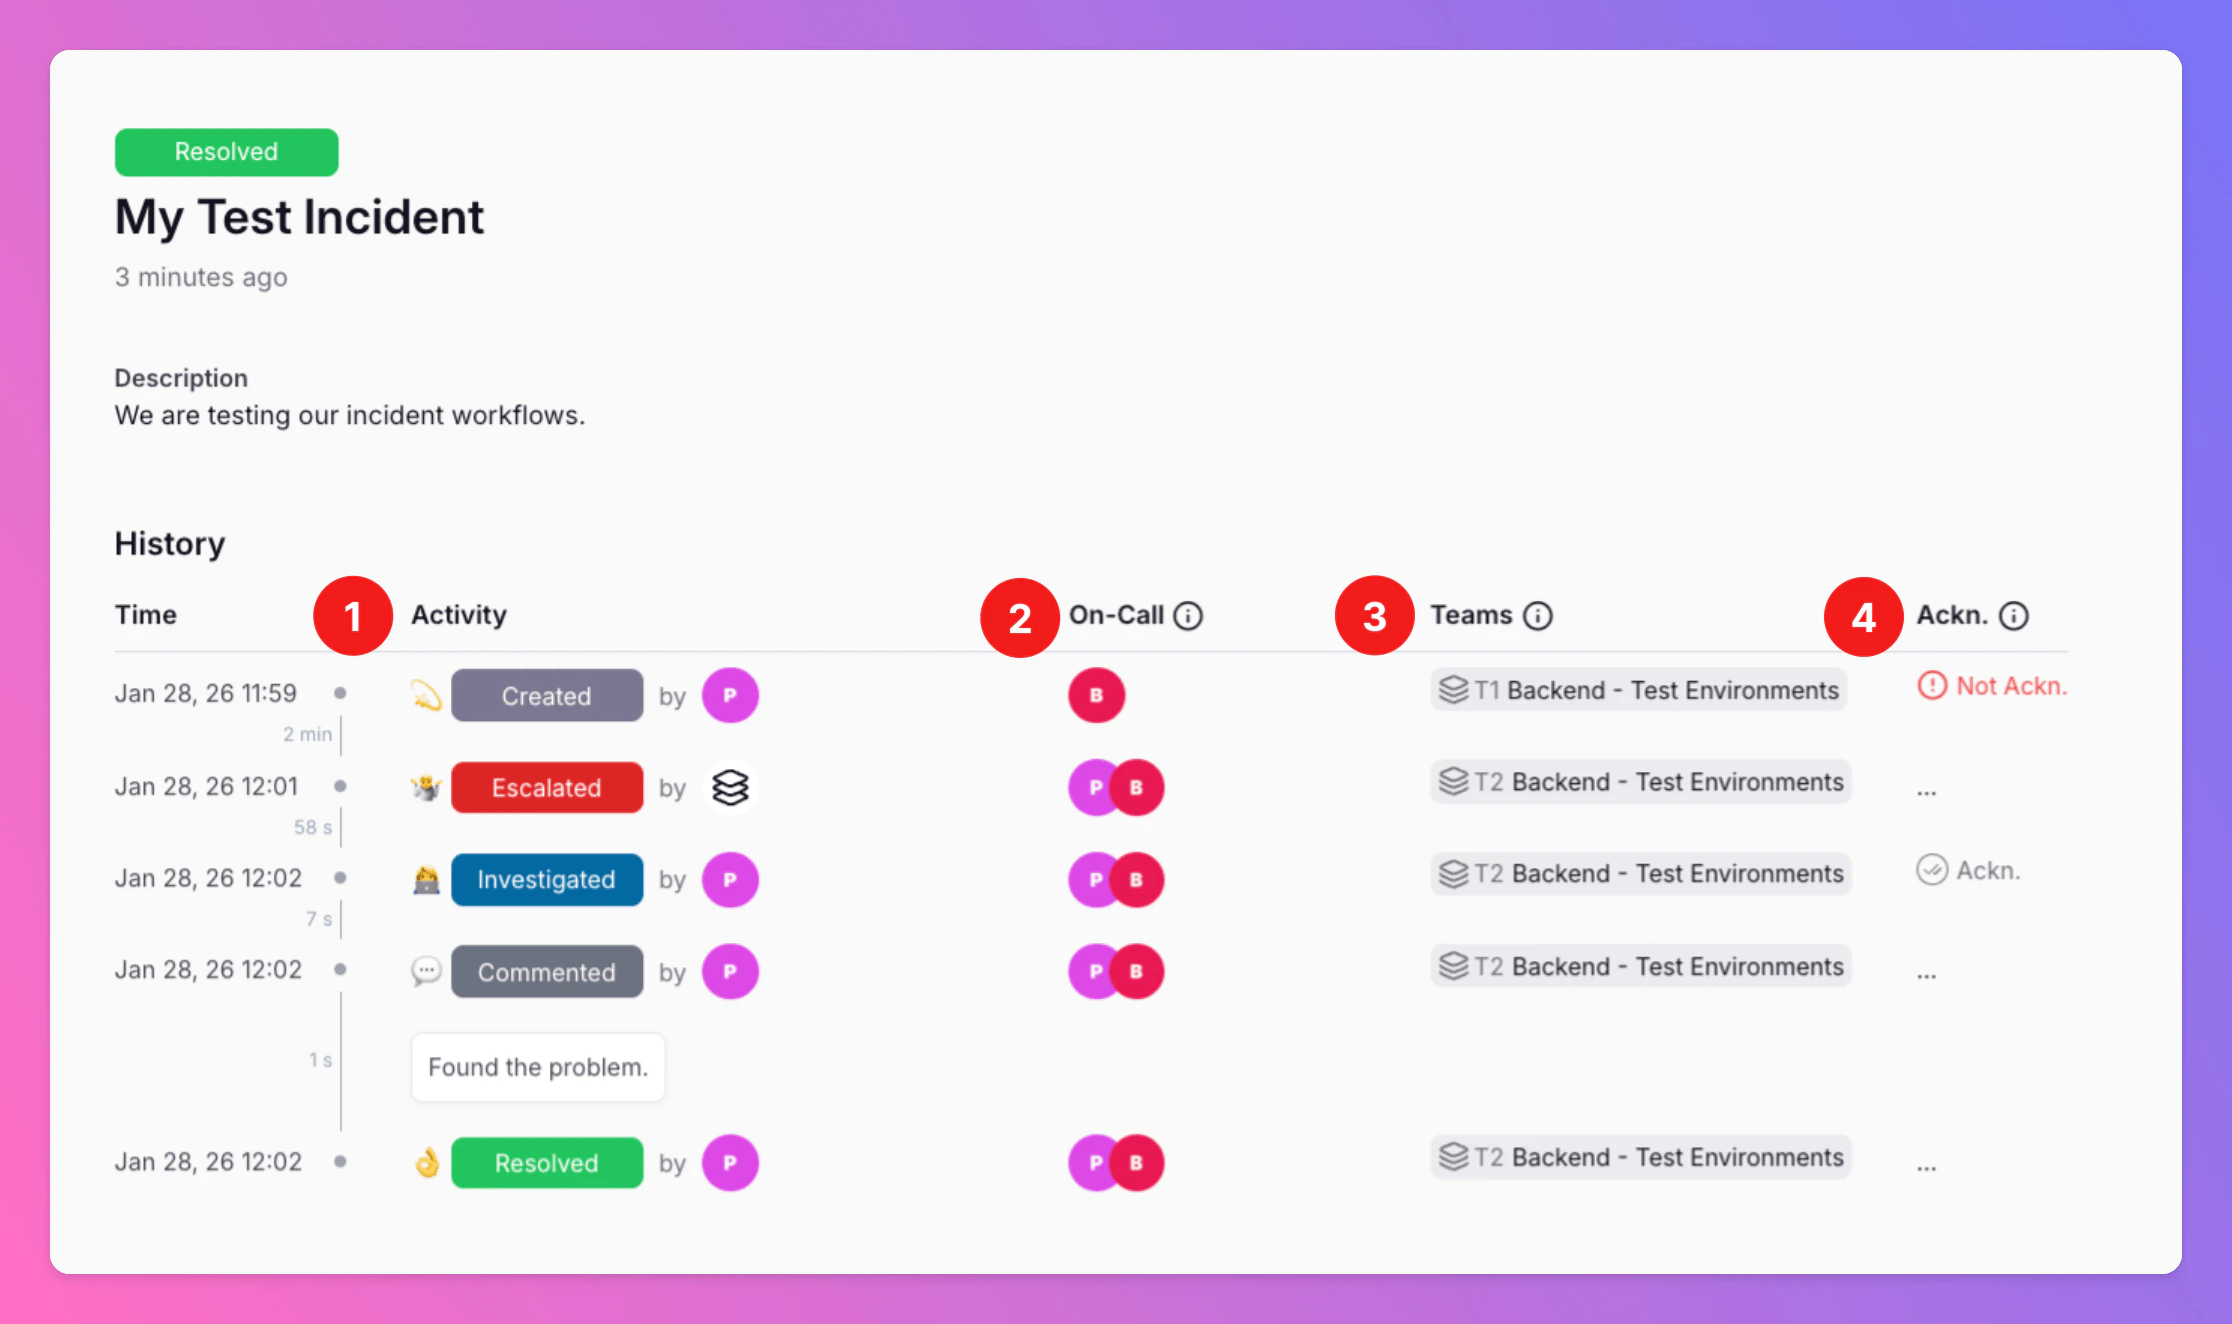
The "History" section in the incident details transparently shows you all details of the incident response.
It is split in 4 sections.
* Activity (1)
* On-Call Users (2)
* Teams (3)
* Whether the incident was already acknowledged or not (4)
For automation or custom pipelines, you can also retrieve incident data through the [Public API](/advanced/api) instead of copying from the UI.
## Incident History
The "History" section in the incident details transparently shows you all details of the incident response.
It is split in 4 sections.
* Activity (1)
* On-Call Users (2)
* Teams (3)
* Whether the incident was already acknowledged or not (4)
 ### History - Activity
This section chronologically lists all events related to an incident, including updated values for attributes based on subsequent payloads linked to the incident. It also shows the user, advanced routing rule or integration that created the event.
### History - On-Call
Shows all users that were on-call during the related event. The rotations, escalation tiers as well as any personal overrides that were active at the event are taken into account. If events happen during maintenance windows or while the integration is muted, we don't show any on-call users as nobody is notified.
### History - Teams
For each incident event, we list the teams and their specific escalation tiers that got notified about the event.
### History - Acknowledged
Shows the events that marked an incident as **acknowledged** or **not acknowledged**.
After an incident is `Created`, Tier 1 members are alerted and, if configured in your on-call schedule, auto-escalations start.
After somebody `Investigates`, `Comments`, `Snoozes`, `Archives` or `Resolves` an incident, is gets **marked as acknowledged**.
If your settings stop auto-escalations if [**incident is acknowledged**](/essentials/escalations#automatic-escalation), any potential auto-escalations are stopped. If your settings stop auto-escalations if [**incident is resolved**](/essentials/escalations#automatic-escalation), any potential auto-escalations are only stopped if somebody `Resolves` an incident.
For a previously acknowledged incident, `Escalating`, `Reopening`, `Unsnoozing` or `Assigning` it to a new / extra team / person **re-marks** the incident as **not acknowledged** and reactivates any potential auto-escalations.
The actions `Affects`, `Forward` and `Unarchive` have **no influence** on the current acknowledgement state and, therefore, on your auto-escalations.
## Incident Grouping
Are you experiencing a cascade of connected alerts for certain incidents that occur in your system? Our incident grouping feature helps cut through the noise, keeping your team focused on resolving the issue.
Easily consolidate multiple related incidents into a single event by matching key attributes, streamlining collaboration and speeding up resolution.
To enable this functionality, you must first configure grouping in the payload mapping section of your integration. Learn how to do this using `isGroupingKey` [here](/essentials/inbound#optional-additional-attribute-keys).
Once set up, incidents with matching values for the defined grouping key attributes will be grouped as long as the group is `Open`.
On the incident overview, grouped incidents can be identified by a little label that includes a count of the number of incidents grouped in this incident.
### History - Activity
This section chronologically lists all events related to an incident, including updated values for attributes based on subsequent payloads linked to the incident. It also shows the user, advanced routing rule or integration that created the event.
### History - On-Call
Shows all users that were on-call during the related event. The rotations, escalation tiers as well as any personal overrides that were active at the event are taken into account. If events happen during maintenance windows or while the integration is muted, we don't show any on-call users as nobody is notified.
### History - Teams
For each incident event, we list the teams and their specific escalation tiers that got notified about the event.
### History - Acknowledged
Shows the events that marked an incident as **acknowledged** or **not acknowledged**.
After an incident is `Created`, Tier 1 members are alerted and, if configured in your on-call schedule, auto-escalations start.
After somebody `Investigates`, `Comments`, `Snoozes`, `Archives` or `Resolves` an incident, is gets **marked as acknowledged**.
If your settings stop auto-escalations if [**incident is acknowledged**](/essentials/escalations#automatic-escalation), any potential auto-escalations are stopped. If your settings stop auto-escalations if [**incident is resolved**](/essentials/escalations#automatic-escalation), any potential auto-escalations are only stopped if somebody `Resolves` an incident.
For a previously acknowledged incident, `Escalating`, `Reopening`, `Unsnoozing` or `Assigning` it to a new / extra team / person **re-marks** the incident as **not acknowledged** and reactivates any potential auto-escalations.
The actions `Affects`, `Forward` and `Unarchive` have **no influence** on the current acknowledgement state and, therefore, on your auto-escalations.
## Incident Grouping
Are you experiencing a cascade of connected alerts for certain incidents that occur in your system? Our incident grouping feature helps cut through the noise, keeping your team focused on resolving the issue.
Easily consolidate multiple related incidents into a single event by matching key attributes, streamlining collaboration and speeding up resolution.
To enable this functionality, you must first configure grouping in the payload mapping section of your integration. Learn how to do this using `isGroupingKey` [here](/essentials/inbound#optional-additional-attribute-keys).
Once set up, incidents with matching values for the defined grouping key attributes will be grouped as long as the group is `Open`.
On the incident overview, grouped incidents can be identified by a little label that includes a count of the number of incidents grouped in this incident.
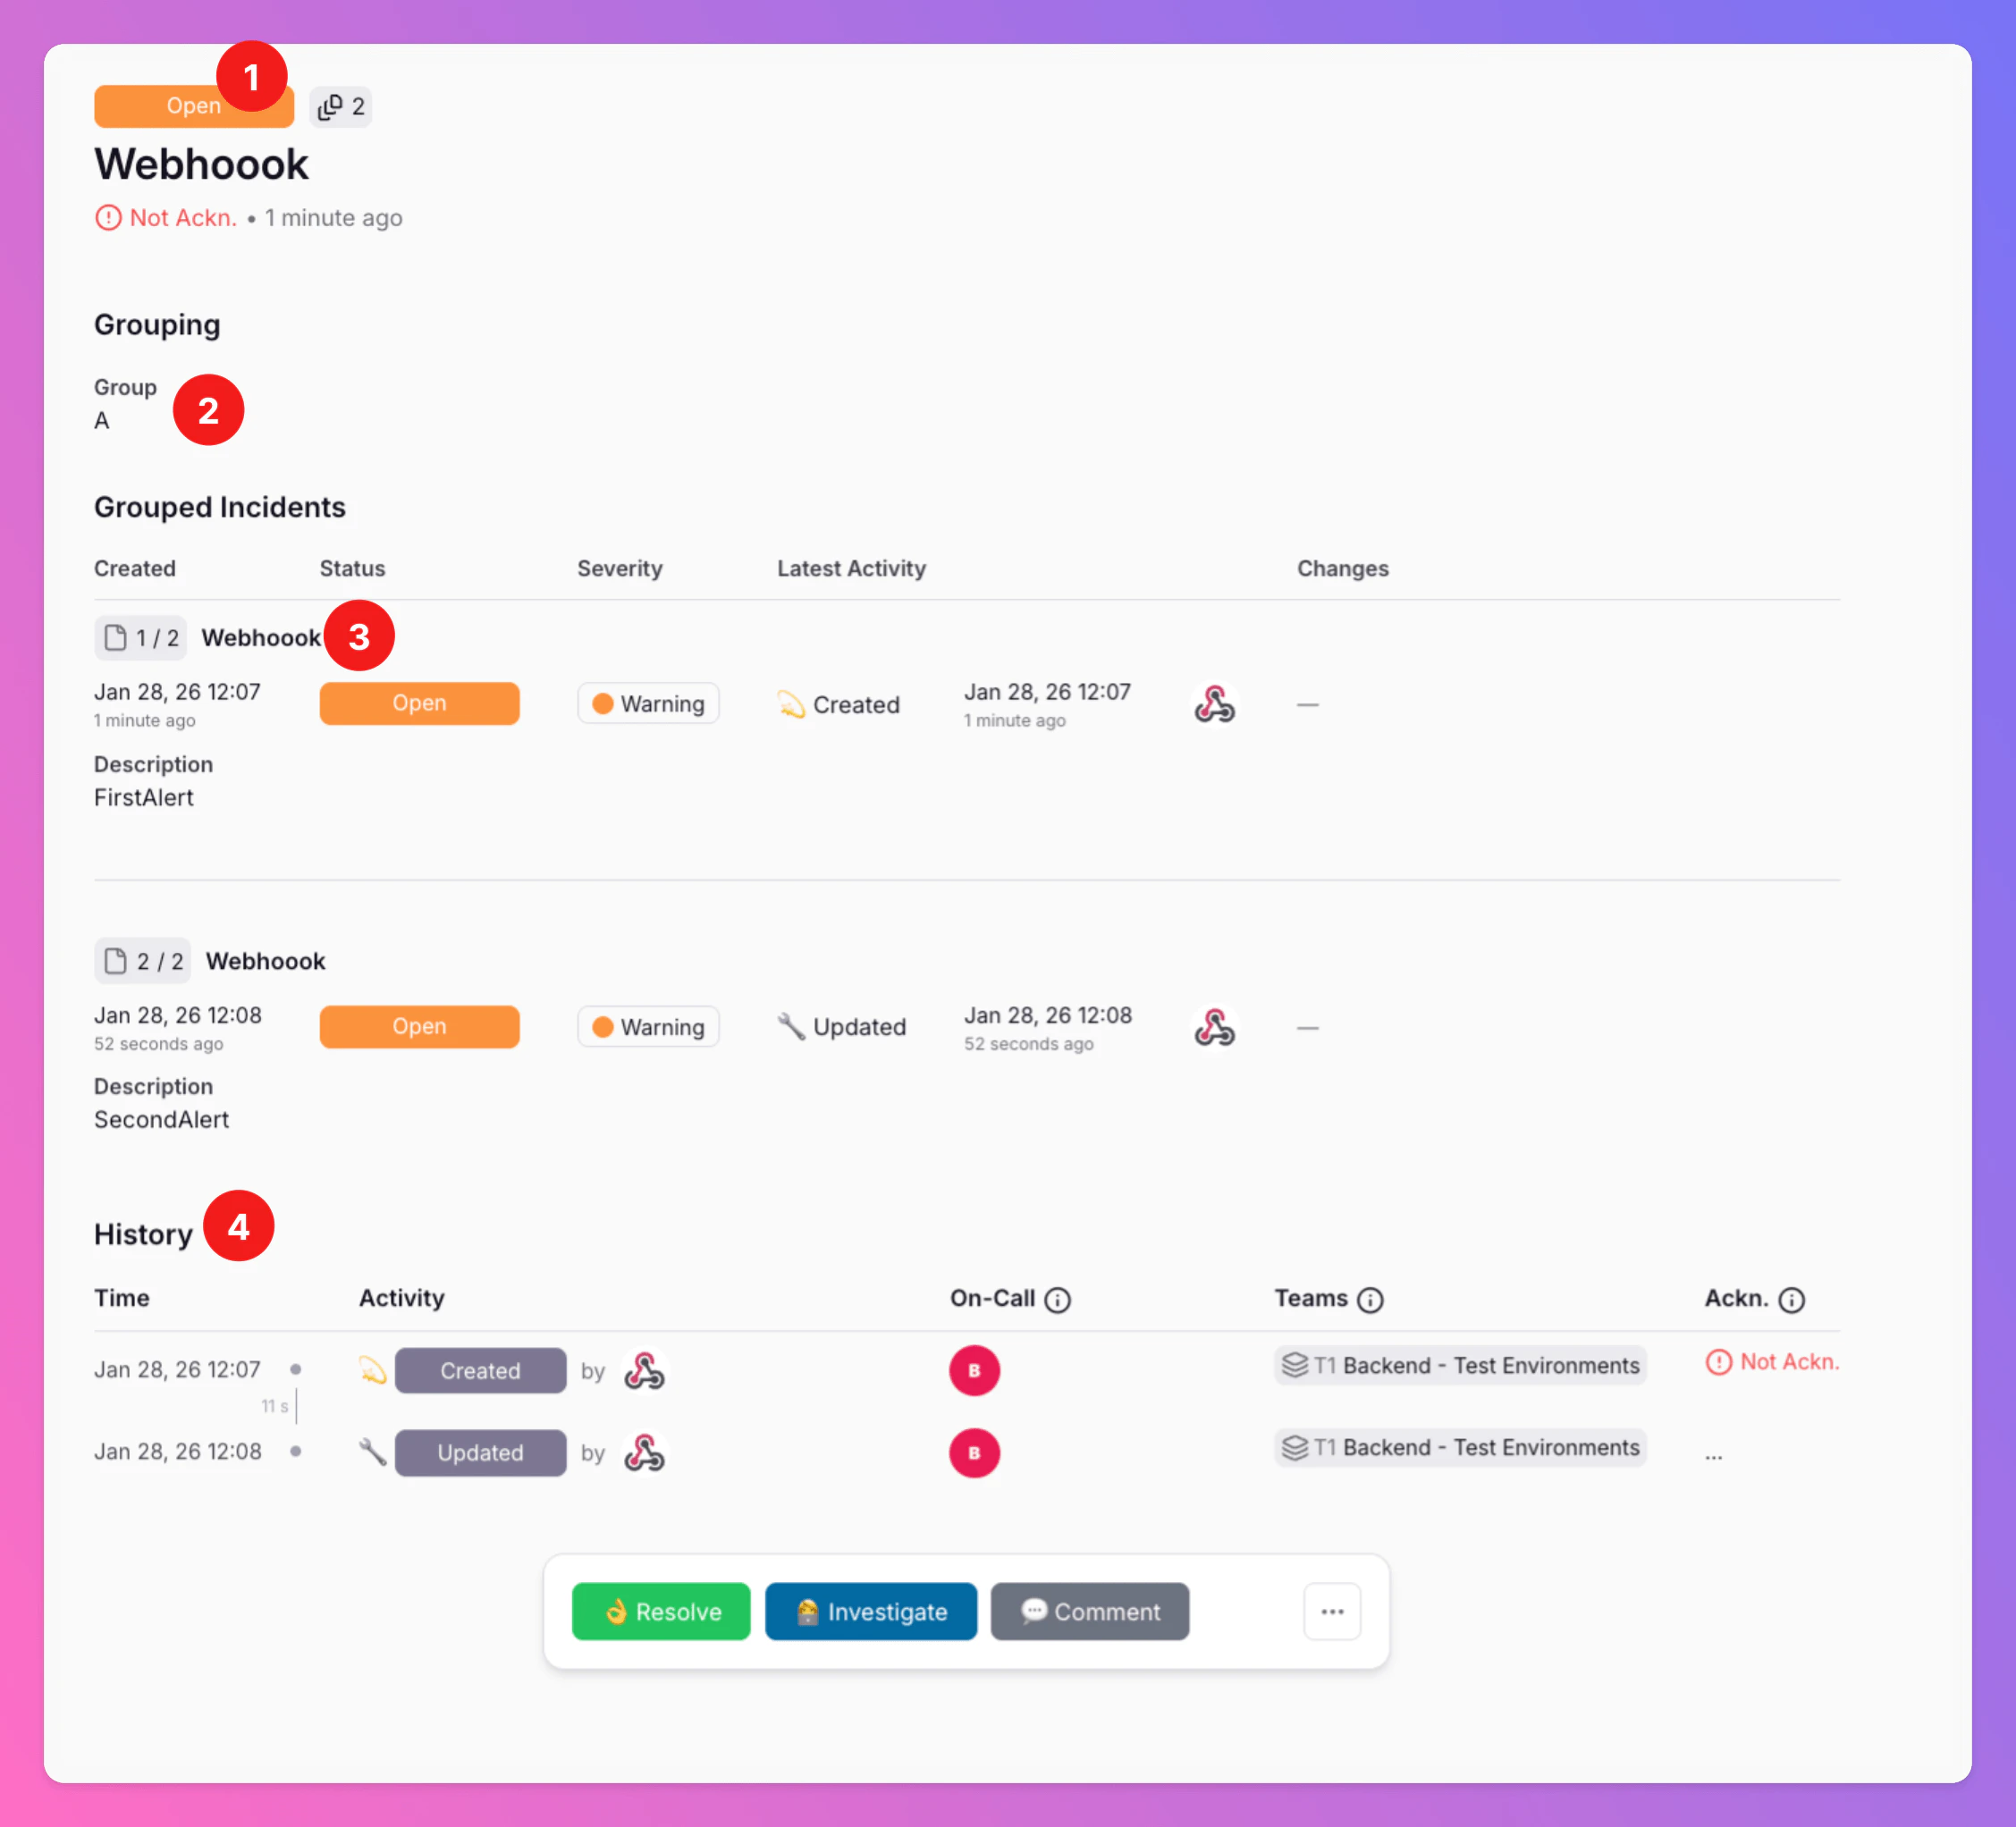
 On the incident details view
1. You can view the overall status of the entire incident group. The group remains open until all incidents within it are resolved or until it is manually resolved.
2. Grouping is determined by the criteria set using `isGroupingKey` in the incident mapping of the integration. As long as the incident group remains `Open`, any new incidents matching the defined criteria (e.g., attribute `Group` = A) will be added to the group. After the group is `Resolved`, new incidents will create a new group and alert your teammates again.
Exception: When using [groupingWindowInSeconds](/essentials/inbound#optional%2C-additional-attribute-keys), new incidents will only be grouped as long as they are created within the defined `groupingWindowInSeconds`. After the window has ended, incidents will create new groups and alert your on-call colleagues again, regardless of the group's status (`Open` or `Resolved`).
3. You can see all single incidents that are part of the group with their status & attributes. If there were attribute changes to the subincident due to subsequent payloads, they are also listed in this section.
* **Special behavior for group incidents:**
* New subincidents can only increase the group’s severity.
* If the group is at `Warning` and a new subincident arrives with `Minor`, the group stays at `Warning`.
* New subincidents never lower the group’s severity.
* Existing subincidents can lower the group’s severity if they are updated later and all subincidents now have a lower severity than the group incident. Exception: The group severity was previously [set manually](/essentials/incident#how-to-change-incident-severity), or set by [routing rules](/advanced/routing#configure-actions).
4. The [history](/essentials/incident#incident-history) of the incident group. The first incident with a grouping attribute creates the group and starts auto-escalations. All collaboration takes part on group level, no seperate alerting for new incidents - this reduces the noise and keeps the focus on resolution. After the group is resolved, the next matching incidents will create a new incident group.
On the incident details view
1. You can view the overall status of the entire incident group. The group remains open until all incidents within it are resolved or until it is manually resolved.
2. Grouping is determined by the criteria set using `isGroupingKey` in the incident mapping of the integration. As long as the incident group remains `Open`, any new incidents matching the defined criteria (e.g., attribute `Group` = A) will be added to the group. After the group is `Resolved`, new incidents will create a new group and alert your teammates again.
Exception: When using [groupingWindowInSeconds](/essentials/inbound#optional%2C-additional-attribute-keys), new incidents will only be grouped as long as they are created within the defined `groupingWindowInSeconds`. After the window has ended, incidents will create new groups and alert your on-call colleagues again, regardless of the group's status (`Open` or `Resolved`).
3. You can see all single incidents that are part of the group with their status & attributes. If there were attribute changes to the subincident due to subsequent payloads, they are also listed in this section.
* **Special behavior for group incidents:**
* New subincidents can only increase the group’s severity.
* If the group is at `Warning` and a new subincident arrives with `Minor`, the group stays at `Warning`.
* New subincidents never lower the group’s severity.
* Existing subincidents can lower the group’s severity if they are updated later and all subincidents now have a lower severity than the group incident. Exception: The group severity was previously [set manually](/essentials/incident#how-to-change-incident-severity), or set by [routing rules](/advanced/routing#configure-actions).
4. The [history](/essentials/incident#incident-history) of the incident group. The first incident with a grouping attribute creates the group and starts auto-escalations. All collaboration takes part on group level, no seperate alerting for new incidents - this reduces the noise and keeps the focus on resolution. After the group is resolved, the next matching incidents will create a new incident group.
 [Advanced Routing Rules](/advanced/routing) will always be applied, even if they are based on non-grouping attributes.
There's currently a limit of 128 subincidents per group.
## Incident Details: Notification History
The Incident Notification History is available to *Team Administrators*, *Organization Administrators* and *Organization Owners*.
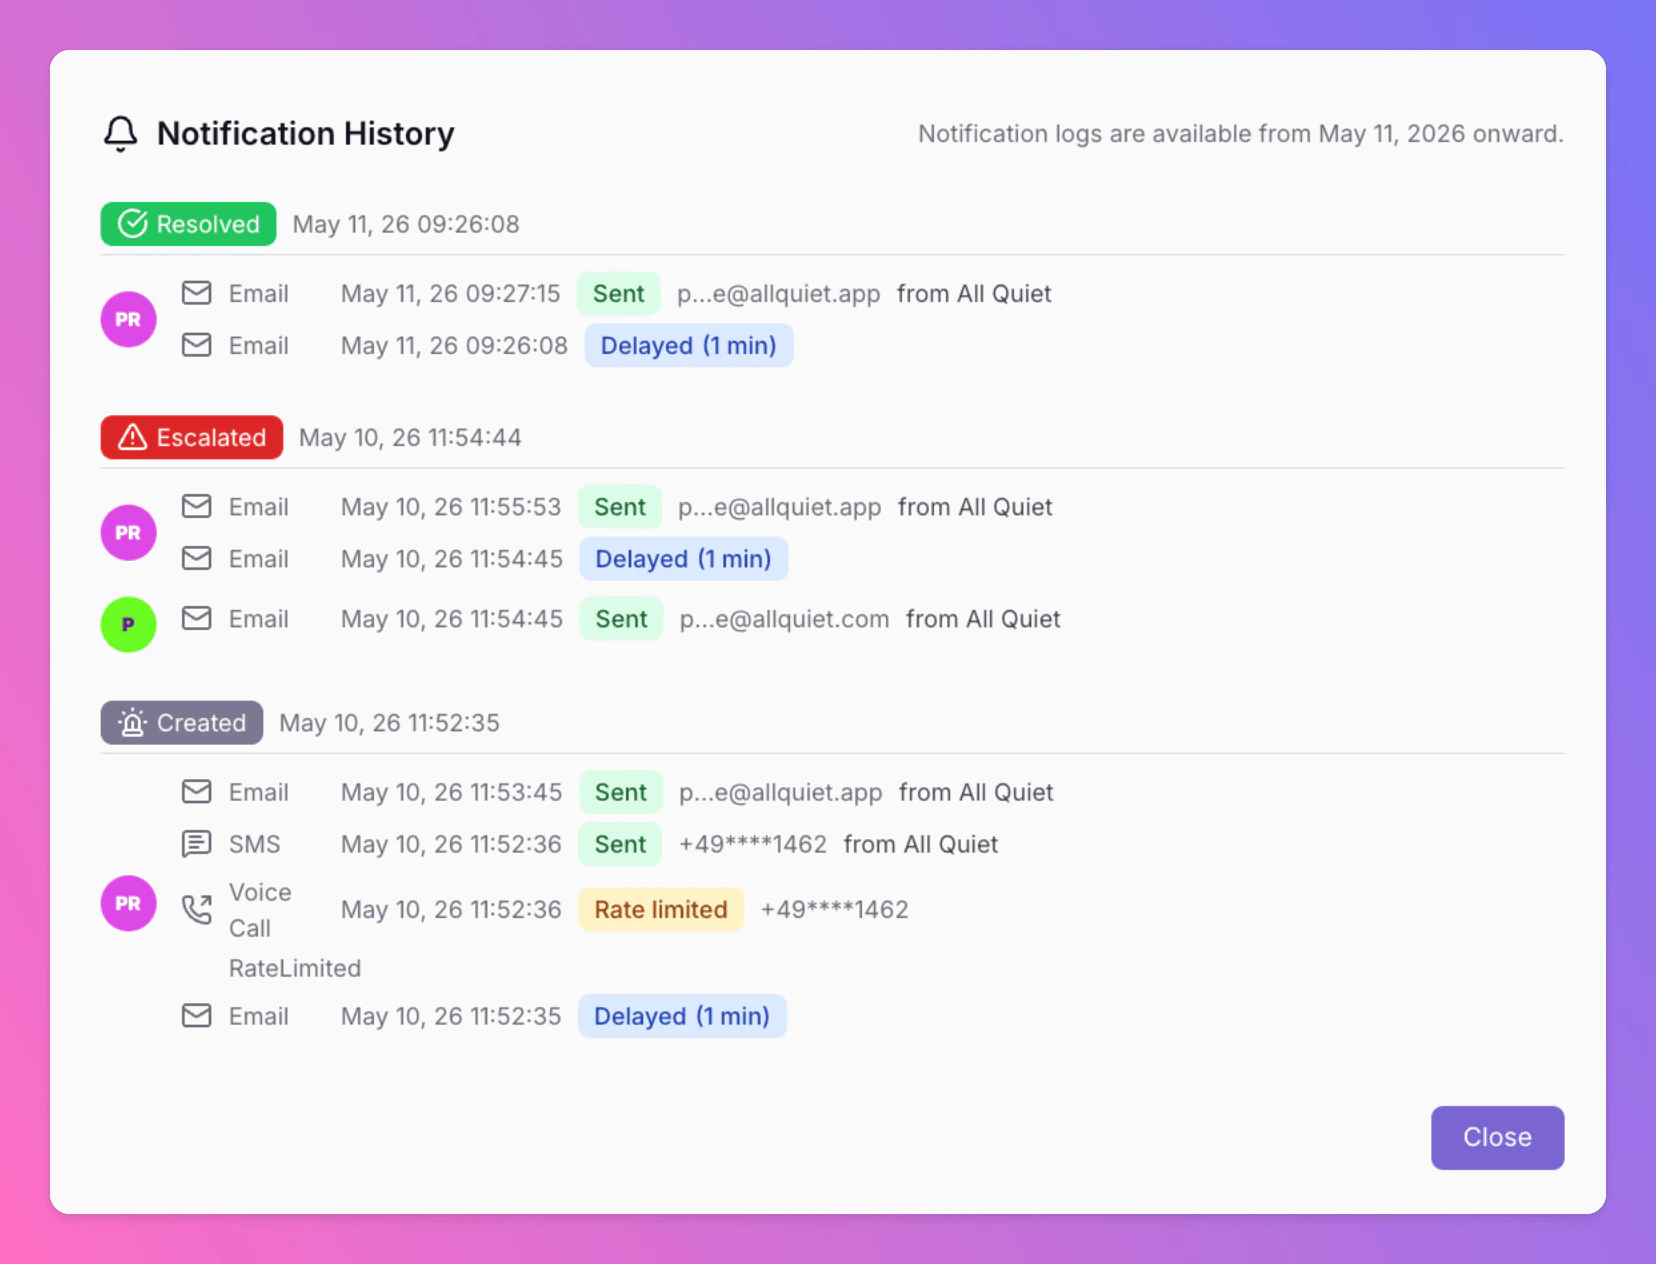
The Incident Details view includes a **Notification History** overlay (modal) that shows **exactly which notifications were attempted/sent**, grouped by incident event, and broken down per user.
This is meant for:
* verifying who was notified,
* understanding why somebody did *not* receive a notification,
* troubleshooting delays, invalid recipients, rate limits, or discards.
The same administrators can open **[Outbound Integration Activity](#incident-details-outbound-integration-activity)** in the Properties sidebar to troubleshoot Slack, Jira, webhooks, and other outbound integrations for the incident.
### Where to Find it
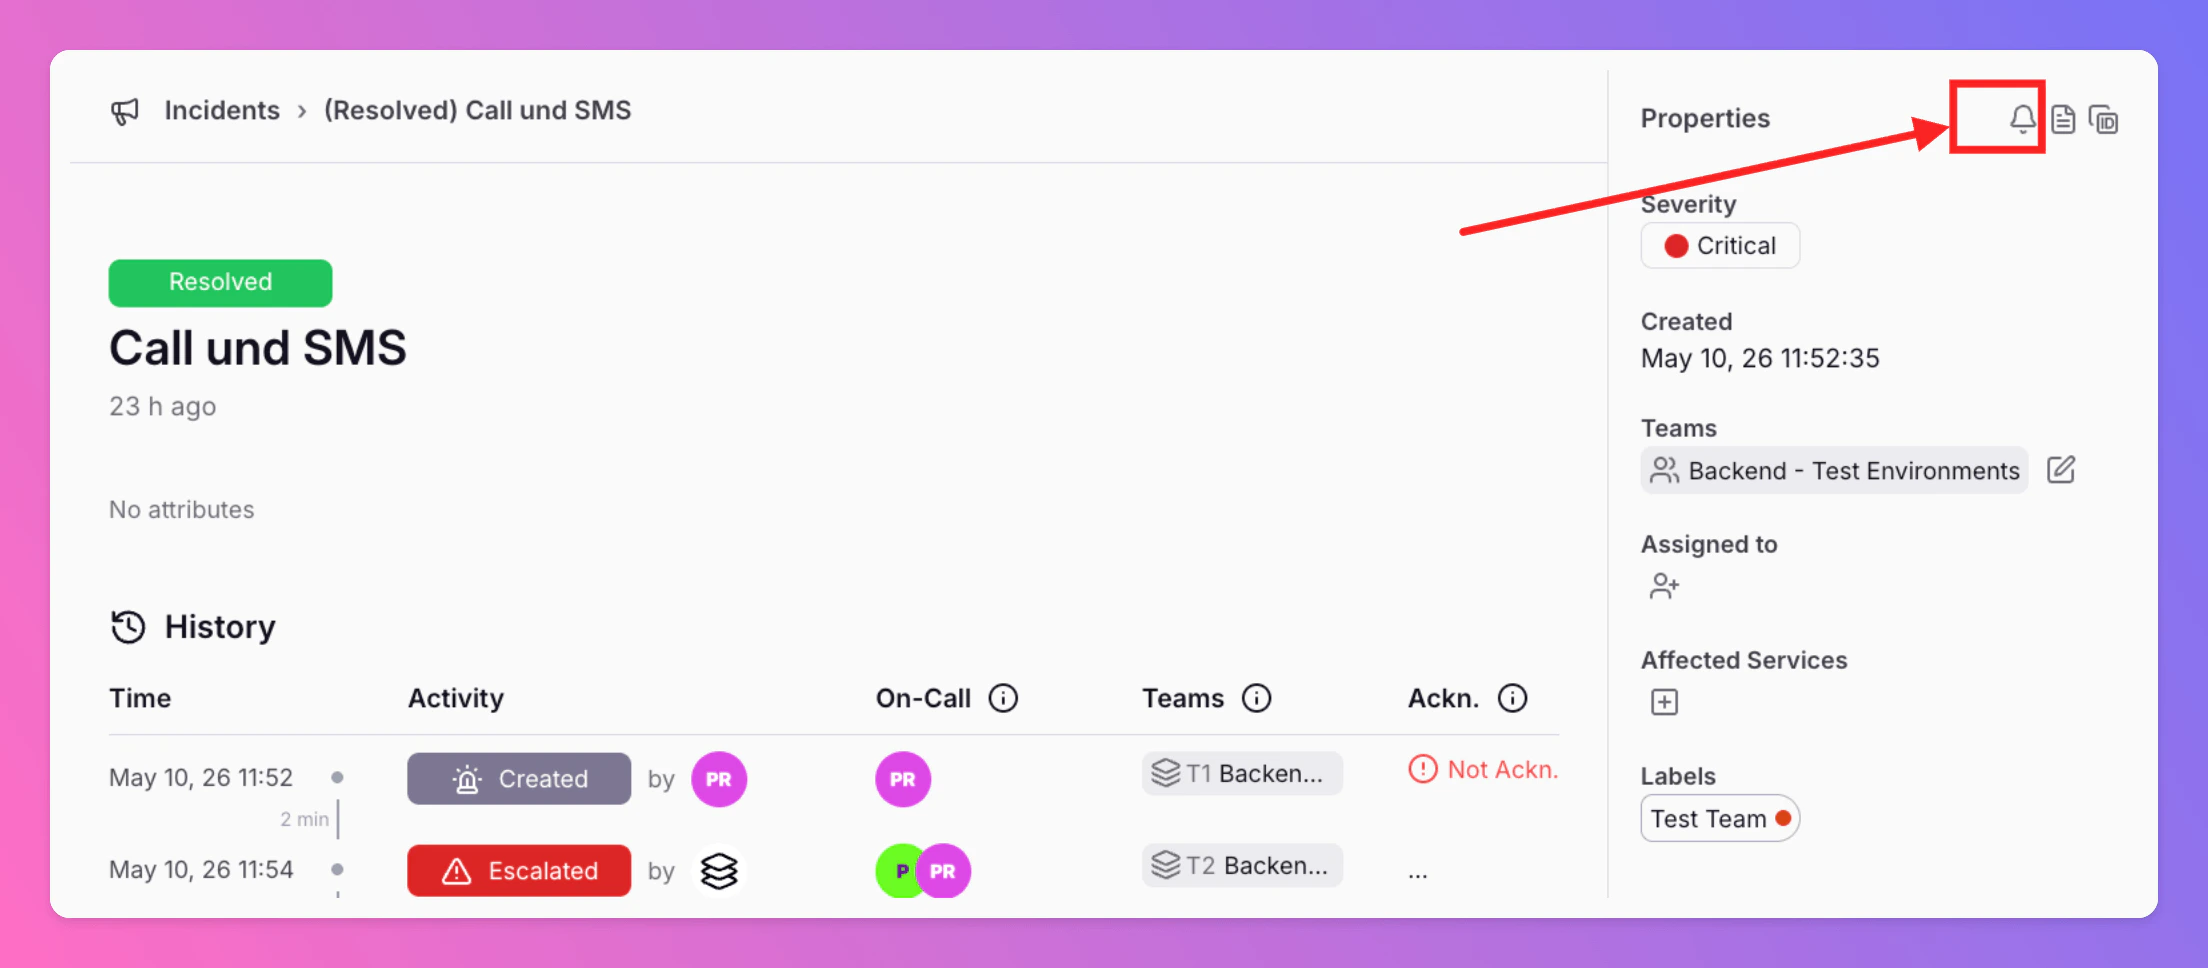
Inside an incident’s details page, open the **Notification History** overlay via the **bell icon** in the top right corner.
[Advanced Routing Rules](/advanced/routing) will always be applied, even if they are based on non-grouping attributes.
There's currently a limit of 128 subincidents per group.
## Incident Details: Notification History
The Incident Notification History is available to *Team Administrators*, *Organization Administrators* and *Organization Owners*.
The Incident Details view includes a **Notification History** overlay (modal) that shows **exactly which notifications were attempted/sent**, grouped by incident event, and broken down per user.
This is meant for:
* verifying who was notified,
* understanding why somebody did *not* receive a notification,
* troubleshooting delays, invalid recipients, rate limits, or discards.
The same administrators can open **[Outbound Integration Activity](#incident-details-outbound-integration-activity)** in the Properties sidebar to troubleshoot Slack, Jira, webhooks, and other outbound integrations for the incident.
### Where to Find it
Inside an incident’s details page, open the **Notification History** overlay via the **bell icon** in the top right corner.
 ### What the Overlay Shows
* **Grouped by incident event**: each group corresponds to a triggering event/intent with a timestamp.
* **Per-user breakdown**: for each affected user, it lists every notification attempt (channel + result).
* **Errors**: if a notification didn’t succeed and errors are present, they’re shown inline under the result.
The overlay uses the same status set as the personal notification logs. See **[Notification Result Glossary](/essentials/channels#notification-result-glossary)**.
### What the Overlay Shows
* **Grouped by incident event**: each group corresponds to a triggering event/intent with a timestamp.
* **Per-user breakdown**: for each affected user, it lists every notification attempt (channel + result).
* **Errors**: if a notification didn’t succeed and errors are present, they’re shown inline under the result.
The overlay uses the same status set as the personal notification logs. See **[Notification Result Glossary](/essentials/channels#notification-result-glossary)**.
Incident Details: Outbound Integration Activity
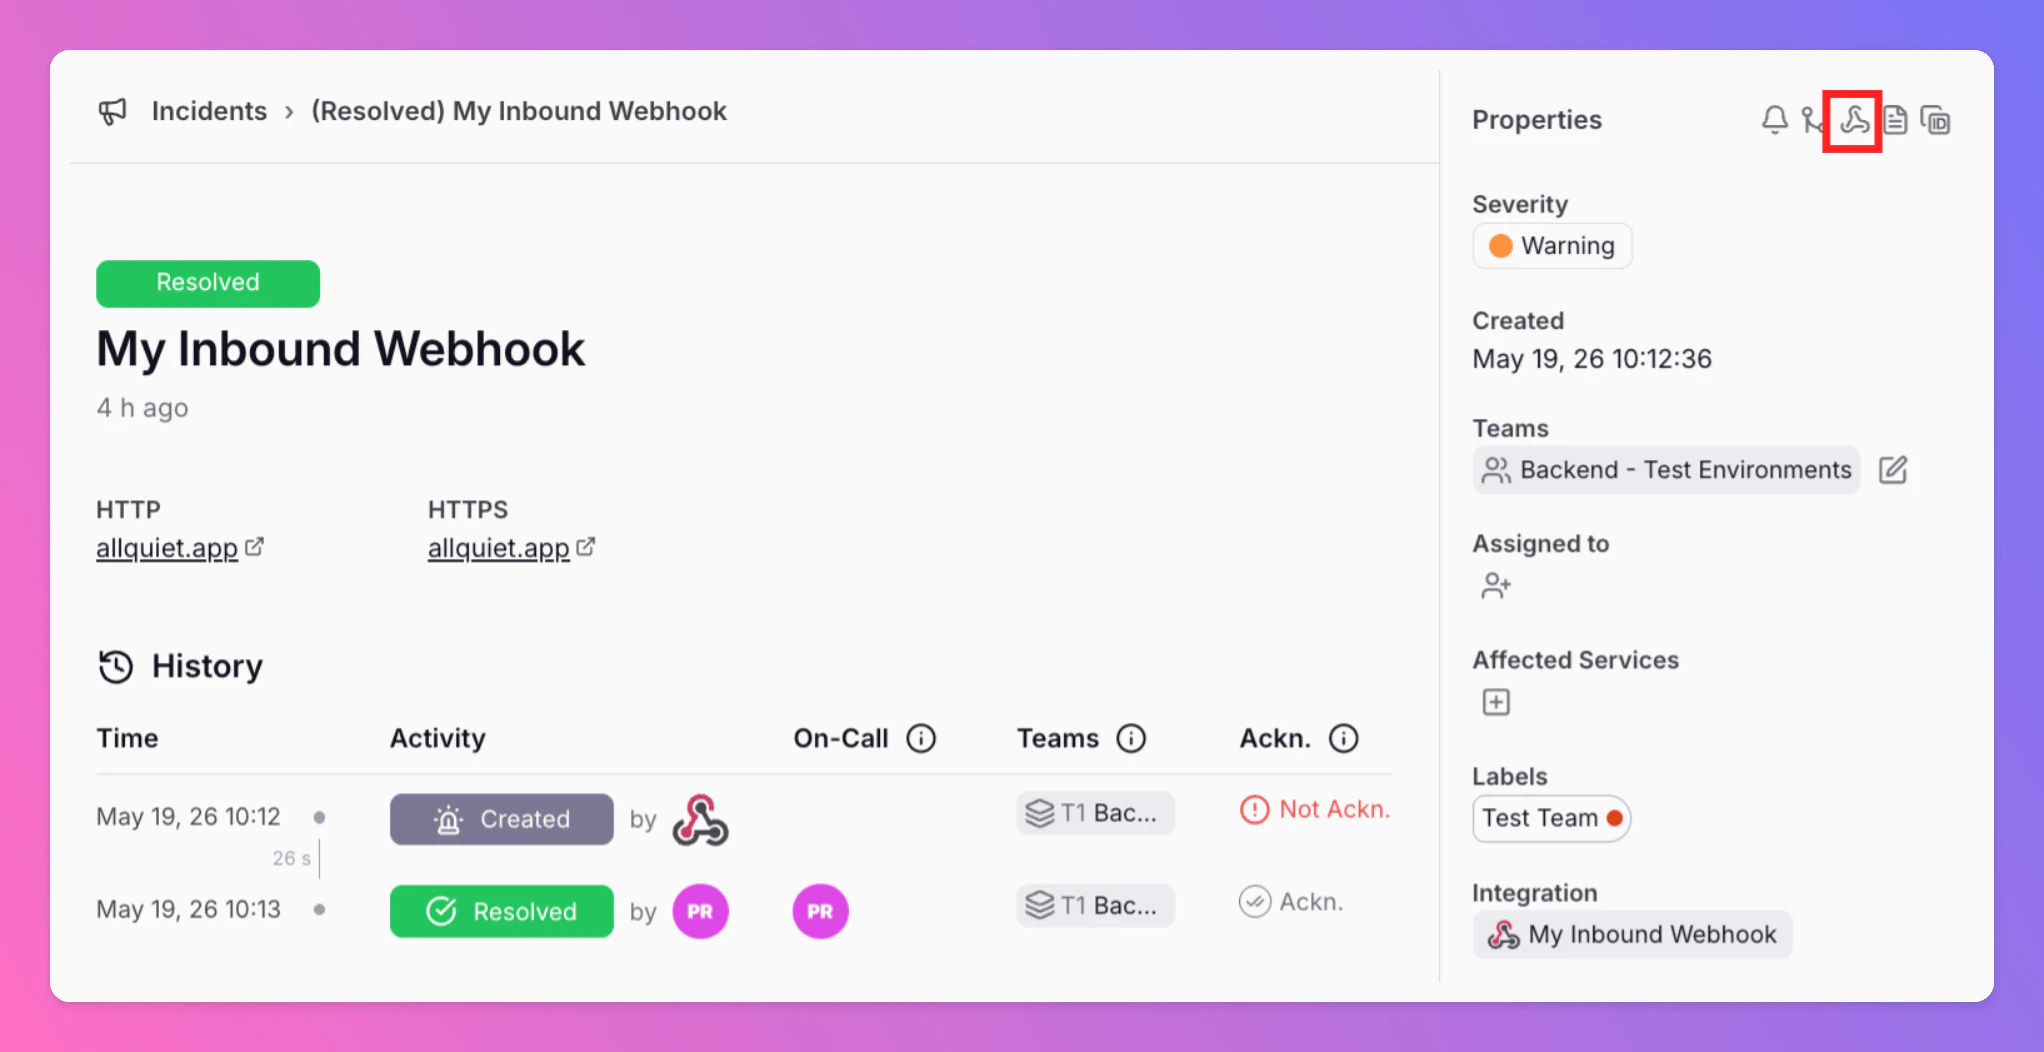
Outbound Integration Activity uses the same permissions as [Notification History](#incident-details-notification-history): **Organization Owners**, **Organization Administrators** (for the incident’s organization), and **Team Administrators** for any team tied to the incident. Regular team members and users without incident access do not see the control.
All Quiet records **outbound integration activity** for each incident: processing, webhooks, ticket and message updates, forwards, and chat interactions. This is **integration diagnostics**—not the incident’s main **[History](/essentials/incident#incident-history)** timeline (comments, assignments, and lifecycle events).
The same log records appear on each outbound integration’s **[Activity history](/essentials/outbound#outbound-history)** tab, scoped by integration instead of by incident.
### Where to Find it
On an incident’s **details** page, open the **Properties** sidebar. Next to the incident ID and other diagnostic actions, eligible users see a **webhook** icon labeled **Outbound Integration Activity**. This opens a modal titled **Outbound Integration Activity** (not a separate page tab).
 ### What the Modal Shows
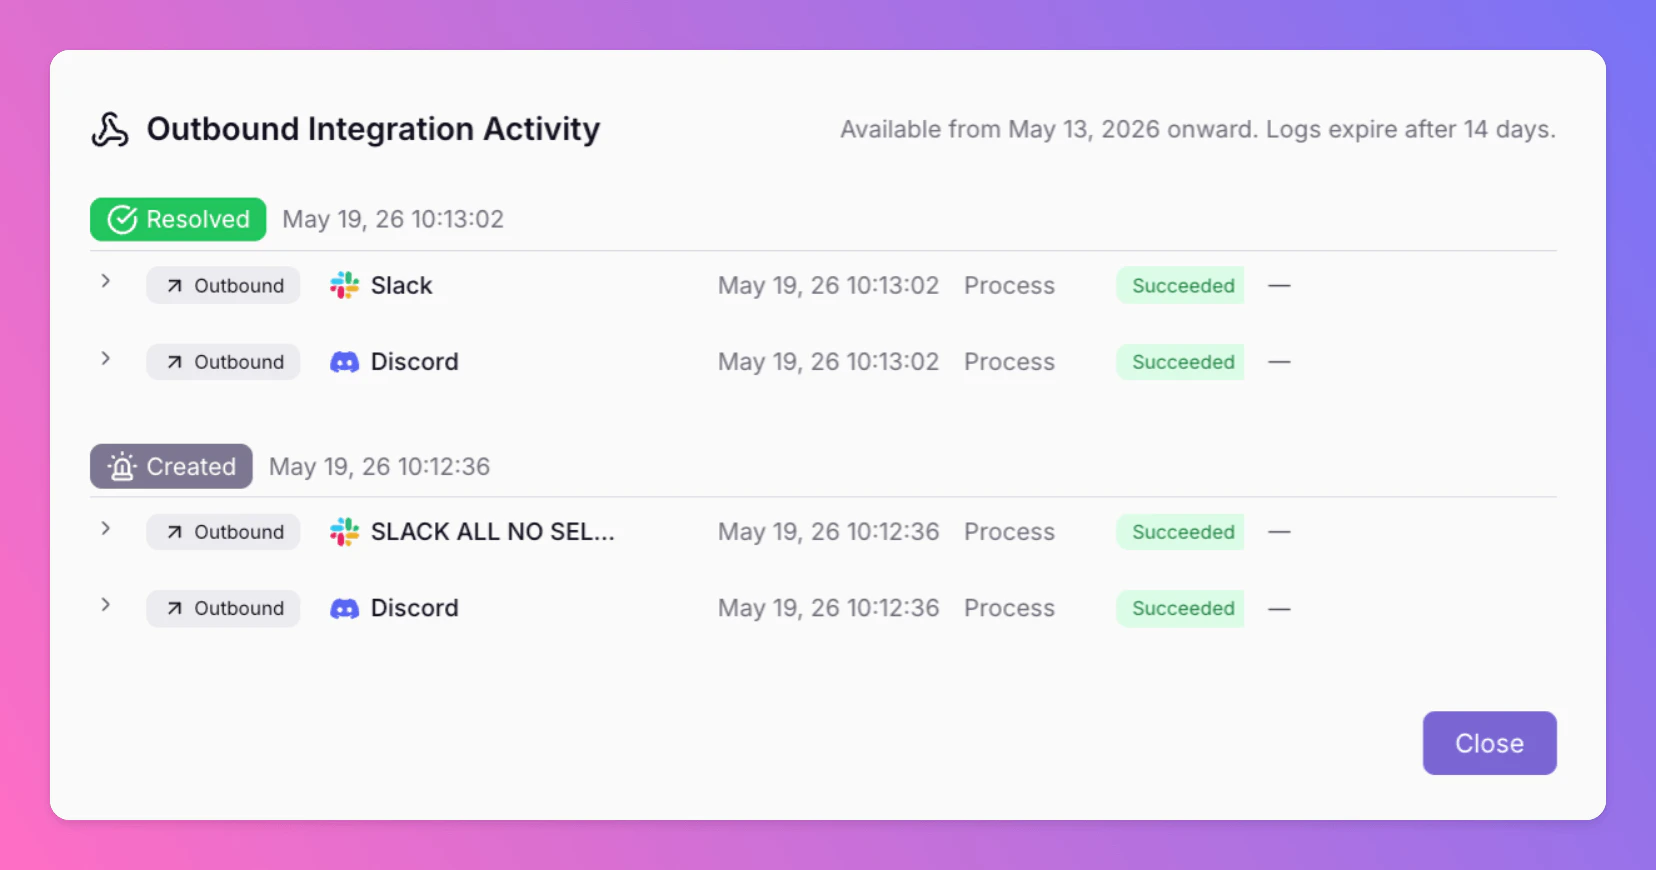
Logs are **grouped by incident event** (each row in the incident timeline). For each group:
* **Intent badge** and **timestamp** of the incident event (for example Triggered, Acknowledged, Resolved).
* Under that, one row per log entry, with:
* **Direction** — **Inbound** or **Outbound**
* **Integration** — display name and type; links to that integration’s settings when known
* **Processed** — when All Quiet recorded the log entry
* **Operation** — see [Operations](/essentials/outbound#operations)
* **Outcome** — see [Outcomes](/essentials/outbound#outcomes)
* **Code** — short machine-oriented reason (especially for failures and skips)
Rows with extra detail can be **expanded** to show **Description**, **HTTP status** (when applicable), **Errors** (duplicate description lines are omitted), and **Payload details** (integration-specific context such as issue keys, channel IDs, or webhook URL and method).
### What the Modal Shows
Logs are **grouped by incident event** (each row in the incident timeline). For each group:
* **Intent badge** and **timestamp** of the incident event (for example Triggered, Acknowledged, Resolved).
* Under that, one row per log entry, with:
* **Direction** — **Inbound** or **Outbound**
* **Integration** — display name and type; links to that integration’s settings when known
* **Processed** — when All Quiet recorded the log entry
* **Operation** — see [Operations](/essentials/outbound#operations)
* **Outcome** — see [Outcomes](/essentials/outbound#outcomes)
* **Code** — short machine-oriented reason (especially for failures and skips)
Rows with extra detail can be **expanded** to show **Description**, **HTTP status** (when applicable), **Errors** (duplicate description lines are omitted), and **Payload details** (integration-specific context such as issue keys, channel IDs, or webhook URL and method).
 Up to **1,000** log entries per incident may be returned (newest first within each event group).
**Retention:** Available from **May 20, 2026** onward; logs expire after **14 days**.
If nothing has been recorded yet, the modal shows: *“No outbound integration activity has been recorded for this incident yet.”*
Up to **1,000** log entries per incident may be returned (newest first within each event group).
**Retention:** Available from **May 20, 2026** onward; logs expire after **14 days**.
If nothing has been recorded yet, the modal shows: *“No outbound integration activity has been recorded for this incident yet.”*
Incident Details: Routing Rule Executions
Routing Rule Executions are available to all users that have access to the incident.
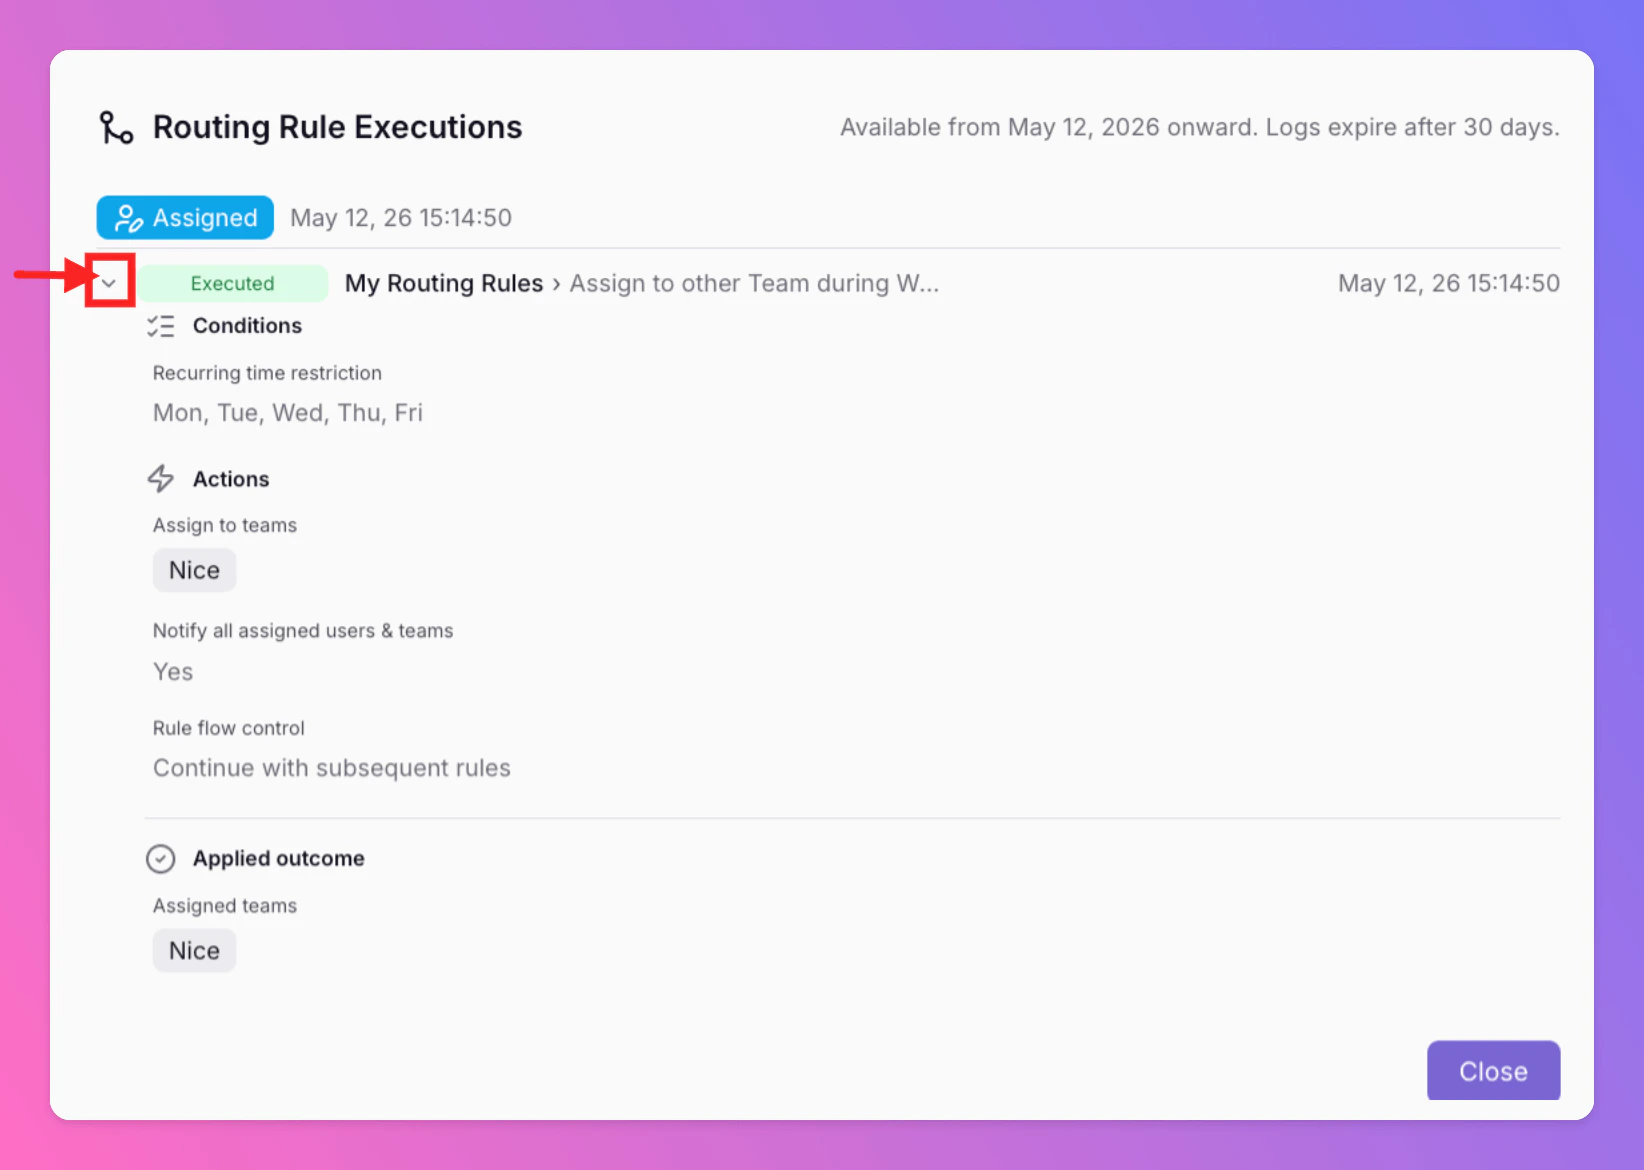
All Quiet records **routing rule executions**: whenever advanced routing is evaluated for an incident, the system can log **which routing and rule** were involved, **what outcome** occurred (for example executed, delayed, or discarded), and a **snapshot** of the rule’s conditions, actions, and channels plus the **effect that actually applied** (teams, severity, discard, forwards, snooze, attributes, notification mute flags, and similar).
This is **routing engine diagnostics**. It is **not** the same as the incident’s main **History** timeline in the details view—that timeline is **[incident lifecycle events](/essentials/incident#incident-history)** (comments, assignments, status changes, and related activity). **Routing rule executions** and the routing editor’s **[Execution history](/advanced/routing#routing-execution-history-history-tab)** tab show the same underlying logs, scoped either **by incident** (here) or **by routing** (there).
### Where to Find it
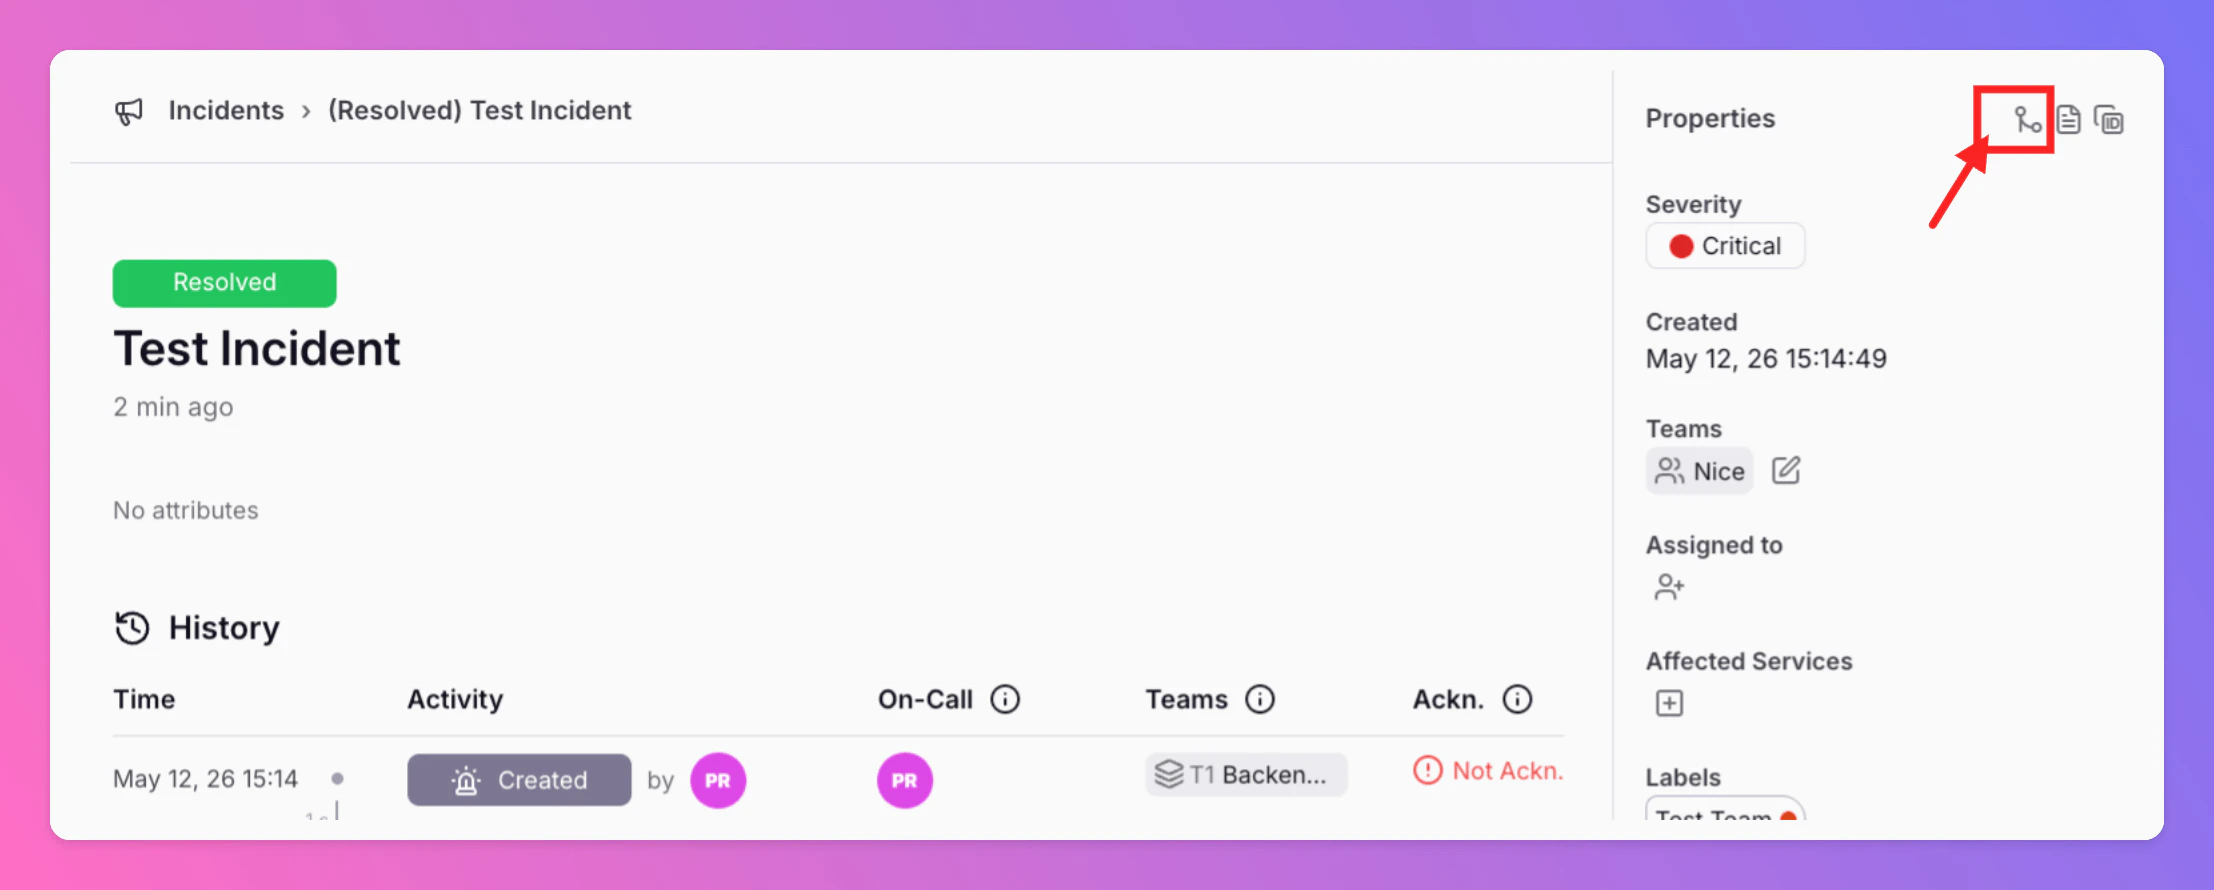
Open an incident’s **details**, then the **Properties** sidebar. Use the **Routing rule executions** control (the same general area as [Notification History](/essentials/incident#incident-details-notification-history)).
 ### What the Modal Shows
Executions for **this incident** are listed **grouped by incident event** so you can relate routing runs to what changed on the timeline.
**Per group**
* **Incident event** context: **intent** (for example created, escalated) and **event time** when the group can be matched to an event.
**Per execution line**
* **Routing State** badge — **Executed**, **Delayed**, **Delay expired**, or other applicable [states](/advanced/routing#routing-states).
* **Routing › rule** names; if the rule still exists, you can **open that rule** in the routing editor.
* For delayed runs, **delay duration** (for example “delayed N minutes”) when applicable.
* **Execution time**.
* **Expand** for **Conditions**, **Actions**, **Channels**, and **Applied outcome** — the same panels as on the **routing execution history** tab ([expanded row details](/advanced/routing#expanded-row-details)).
If nothing has been recorded yet for this incident, the modal explains that no routing rule executions exist yet.
### What the Modal Shows
Executions for **this incident** are listed **grouped by incident event** so you can relate routing runs to what changed on the timeline.
**Per group**
* **Incident event** context: **intent** (for example created, escalated) and **event time** when the group can be matched to an event.
**Per execution line**
* **Routing State** badge — **Executed**, **Delayed**, **Delay expired**, or other applicable [states](/advanced/routing#routing-states).
* **Routing › rule** names; if the rule still exists, you can **open that rule** in the routing editor.
* For delayed runs, **delay duration** (for example “delayed N minutes”) when applicable.
* **Execution time**.
* **Expand** for **Conditions**, **Actions**, **Channels**, and **Applied outcome** — the same panels as on the **routing execution history** tab ([expanded row details](/advanced/routing#expanded-row-details)).
If nothing has been recorded yet for this incident, the modal explains that no routing rule executions exist yet.
Incident Details: Call Logs
Call Logs are available to all Team and Organization Administrators and Organization Owners that have access to an incident that was created from [Live Call Routing](/advanced/live-call-routing) — for example **Accepted** calls or **Voicemail** recordings. See [Incidents vs. call logs](/advanced/live-call-routing#incidents-vs-call-logs) for when a call creates an incident.
All Quiet links each qualifying inbound call to its incident. From the incident details page you can open the **call session** and its step-by-step **log timeline** without leaving the incident — the same data as on the Call Routing Number’s **[Call Logs](/advanced/live-call-routing#call-logs)** tab, scoped to this incident.
This is meant for:
* reviewing how the call was routed (welcome message, keypad choice, dial chain, accept attempts, voicemail),
* downloading the voicemail recording when one was captured,
* troubleshooting “what happened on the phone?” alongside the incident’s main **[History](/essentials/incident#incident-history)** timeline.
### Where to Find it
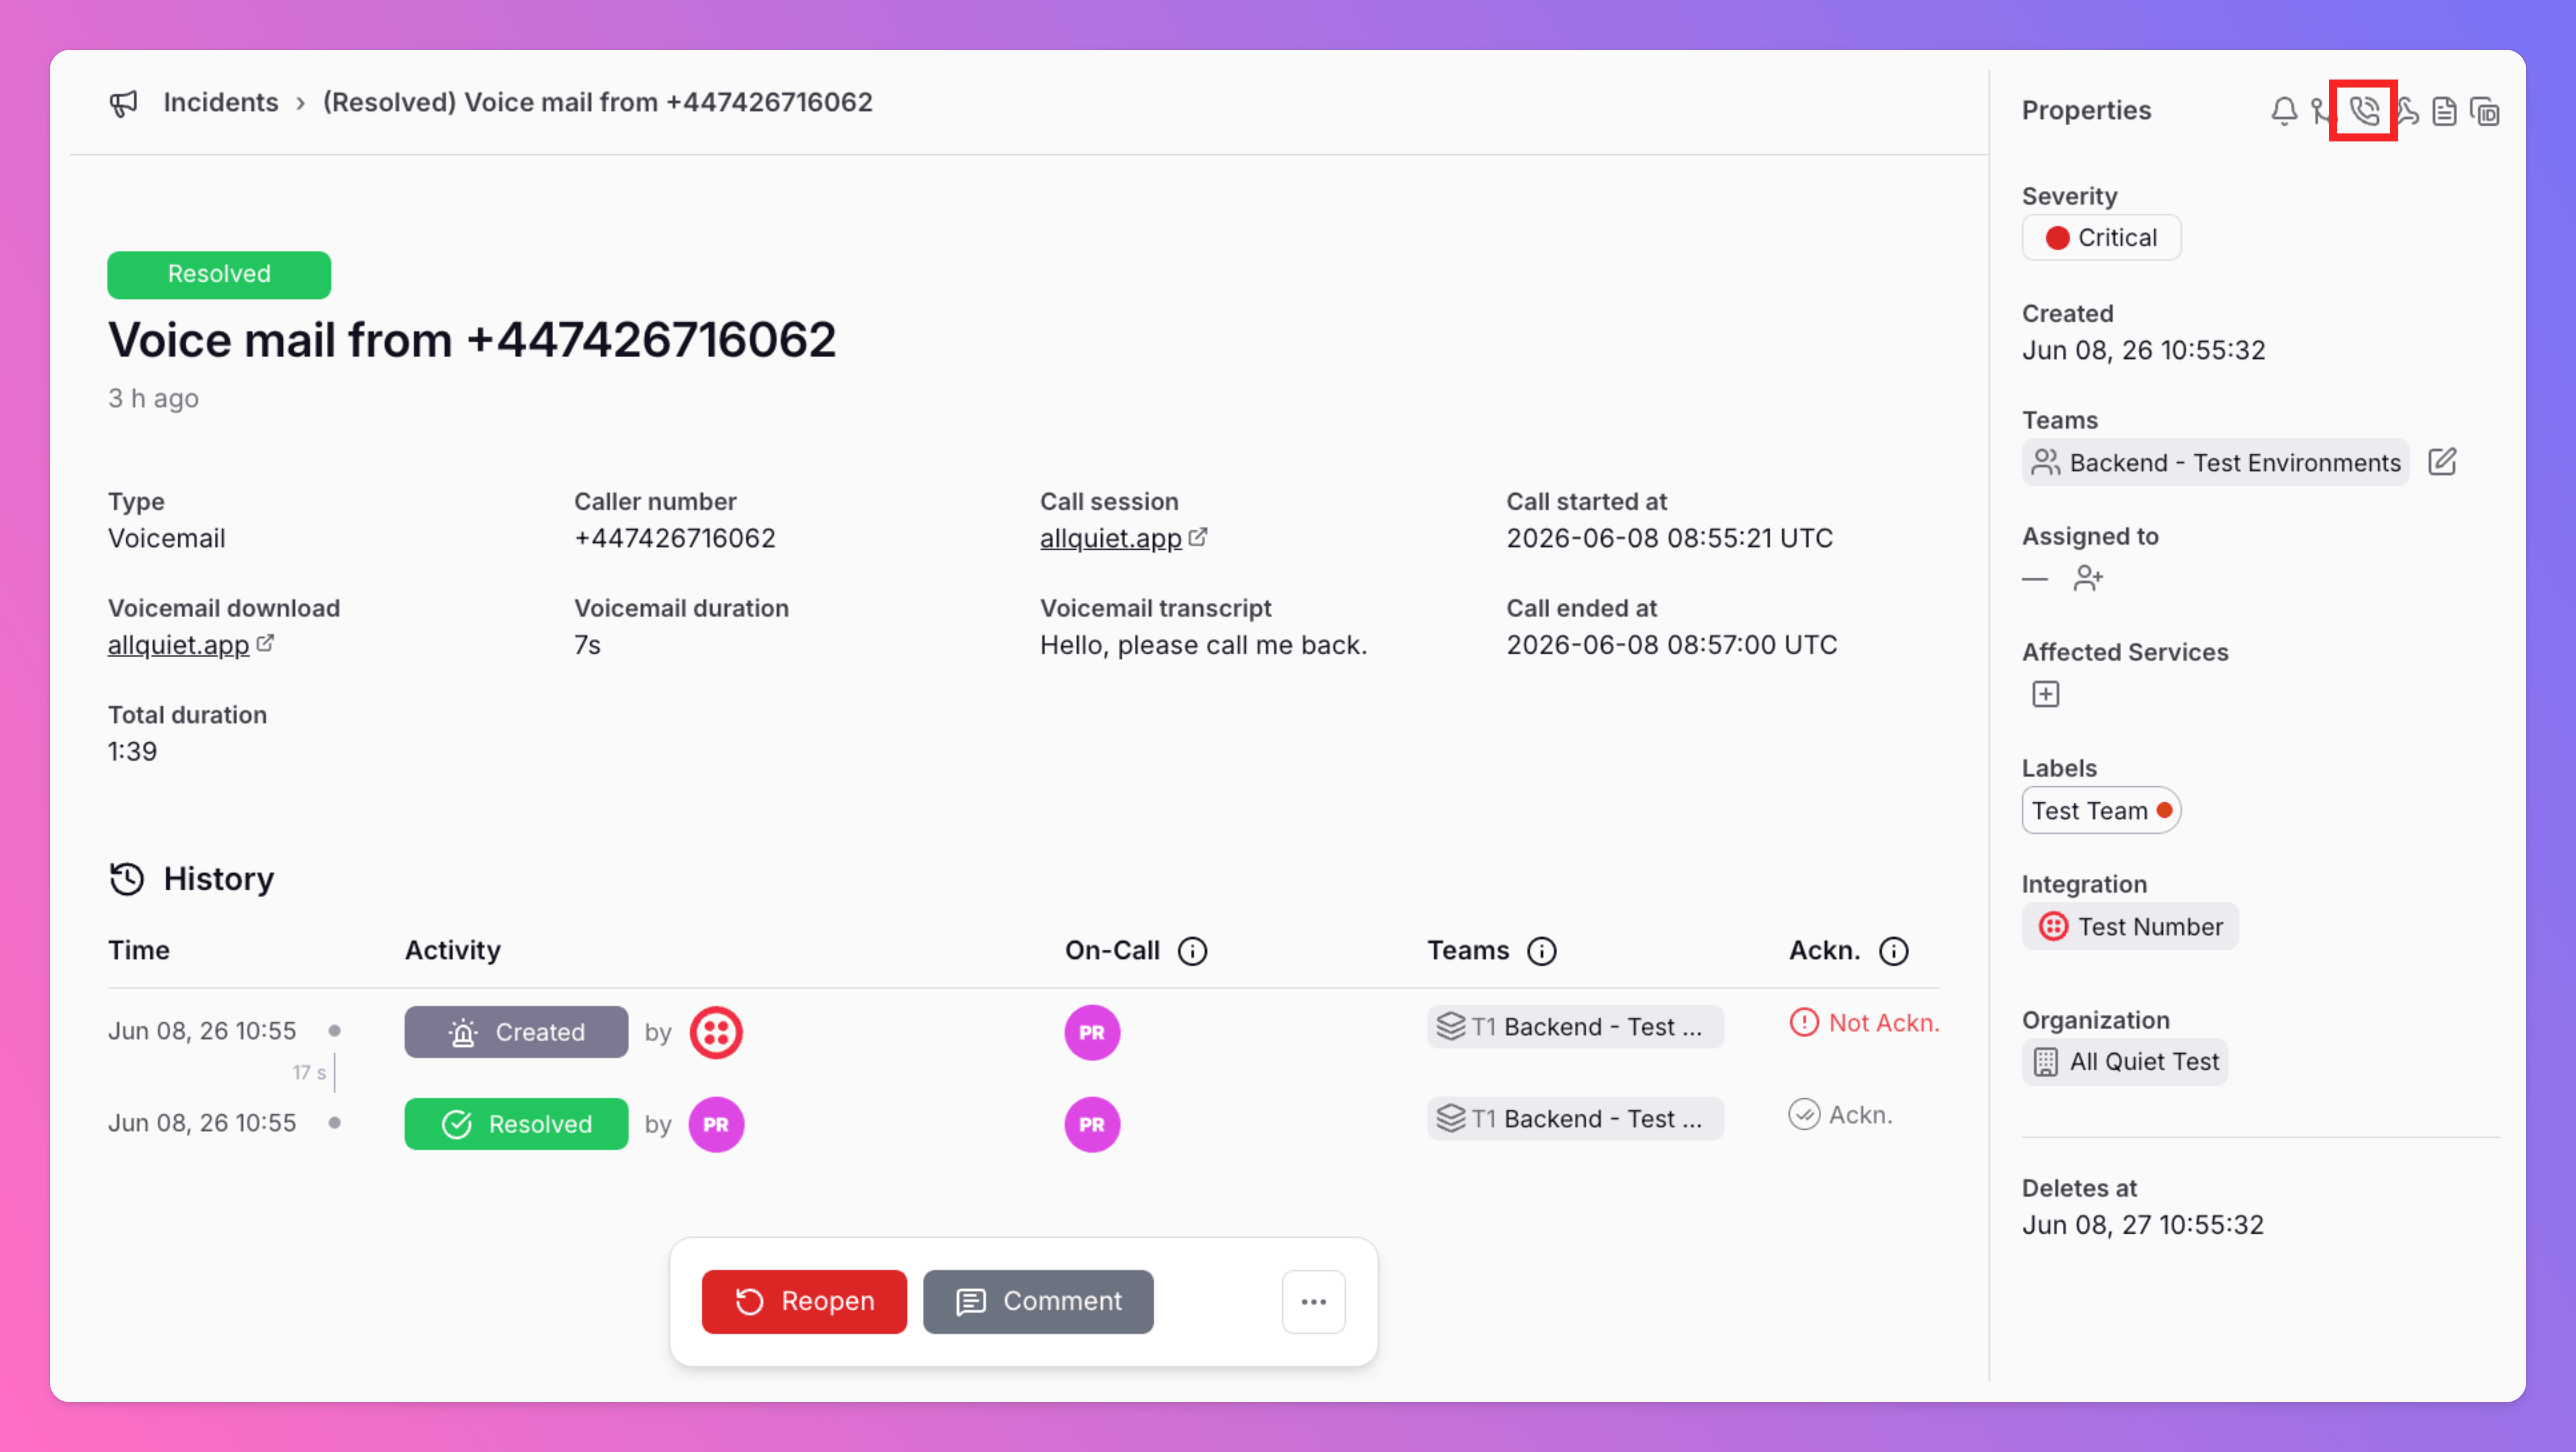
On an incident’s **details** page, open the **Properties** sidebar. Eligible incidents show a **phone** icon for **Call Logs** — in the same area as [Routing rule executions](/essentials/incident#incident-details-routing-rule-executions) and [Outbound Integration Activity](#incident-details-outbound-integration-activity).
 ### What the Modal Shows
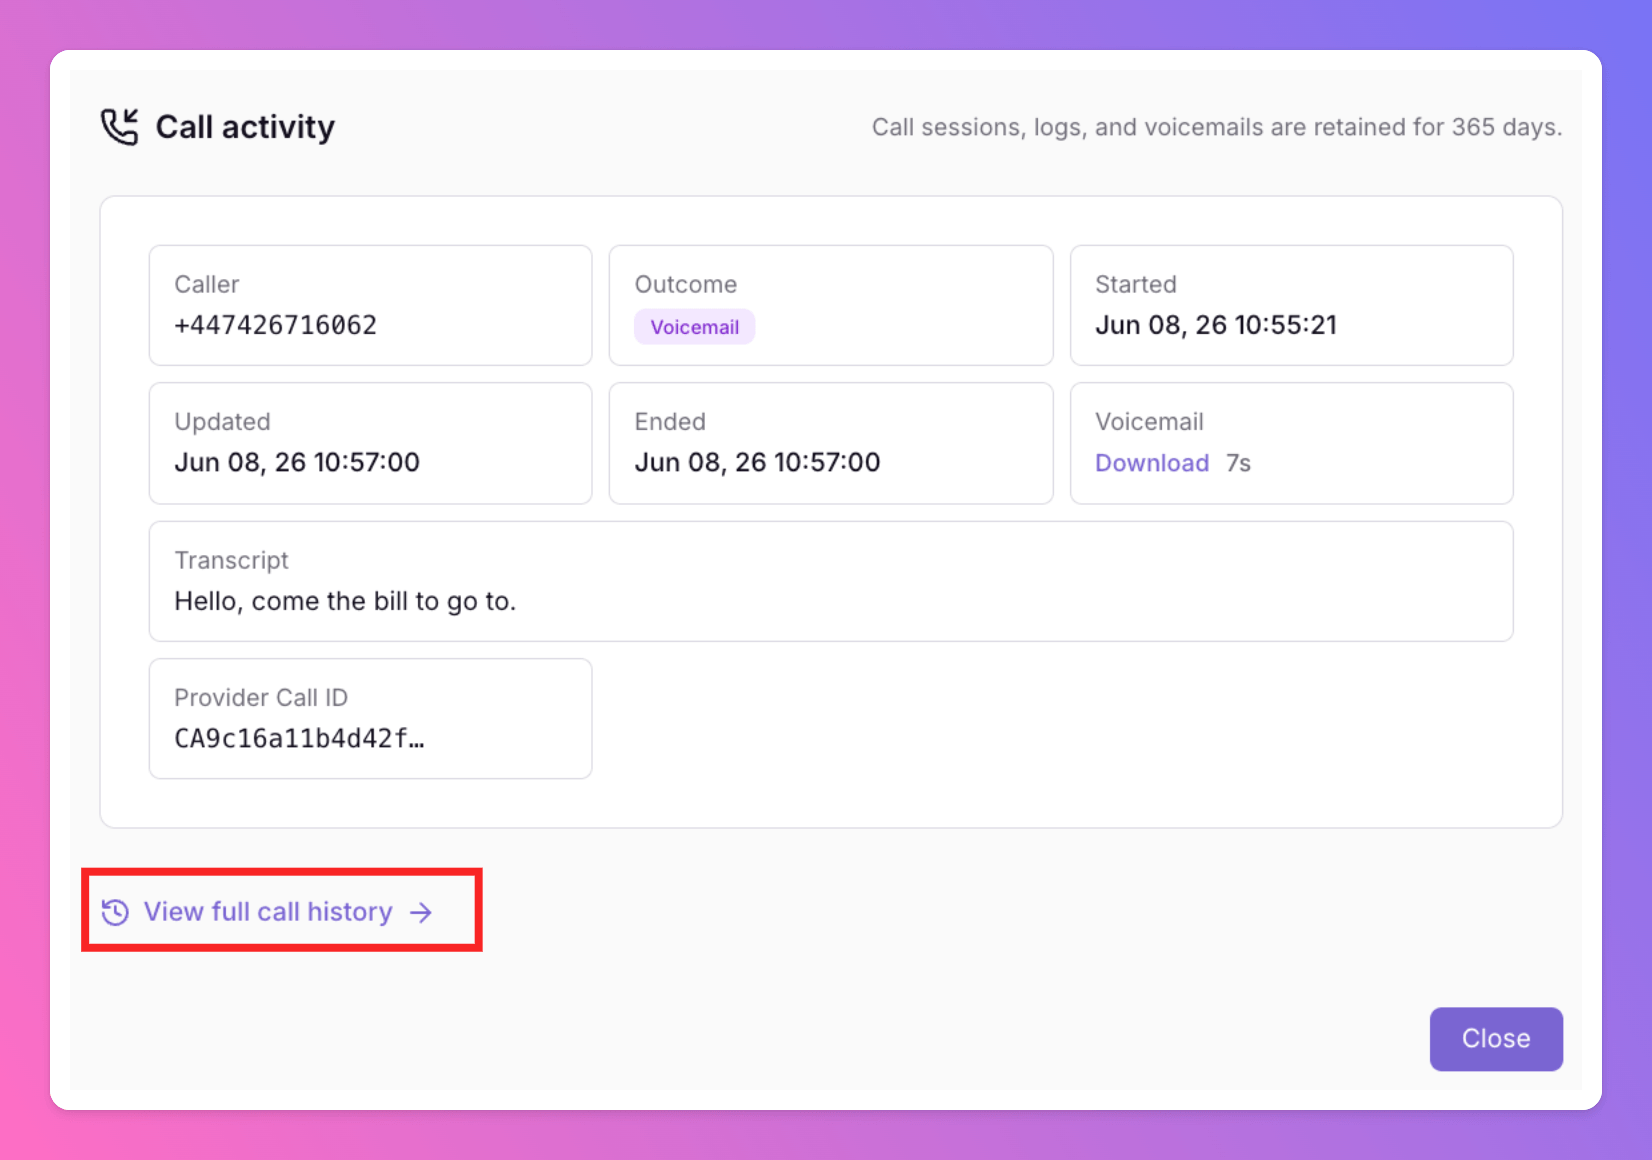
The overlay opens the **call session** linked to this incident:
1. **Session summary** — caller number, **outcome** badge (**Accepted**, **Voicemail**, **Missed**, **Ongoing**, or **Failed**), start/end time, duration, and provider call ID.
2. **Voicemail** — download link when a recording was captured (same **365-day** retention as integration-level call logs).
3. **Detailed timeline** — chronological log entries for this call: dial chain resolution, each dial attempt, accept-call prompts, voicemail steps, and hang-up. See [Reading the log timeline](/advanced/live-call-routing#reading-the-log-timeline) for how to interpret **Step**, **Action**, and **Result** on each row.
### What the Modal Shows
The overlay opens the **call session** linked to this incident:
1. **Session summary** — caller number, **outcome** badge (**Accepted**, **Voicemail**, **Missed**, **Ongoing**, or **Failed**), start/end time, duration, and provider call ID.
2. **Voicemail** — download link when a recording was captured (same **365-day** retention as integration-level call logs).
3. **Detailed timeline** — chronological log entries for this call: dial chain resolution, each dial attempt, accept-call prompts, voicemail steps, and hang-up. See [Reading the log timeline](/advanced/live-call-routing#reading-the-log-timeline) for how to interpret **Step**, **Action**, and **Result** on each row.
 **Retention:** Detailed log entries follow the same rules as on the Call Routing Number — **365 days** for the step-by-step timeline. The call session summary on the incident is subject to that same expiry.
If no call session is linked to this incident, the **Call Logs** control is not shown.
**Retention:** Detailed log entries follow the same rules as on the Call Routing Number — **365 days** for the step-by-step timeline. The call session summary on the incident is subject to that same expiry.
If no call session is linked to this incident, the **Call Logs** control is not shown.