> ## Documentation Index
> Fetch the complete documentation index at: https://docs.allquiet.app/llms.txt
> Use this file to discover all available pages before exploring further.
# Terraform Provider
> Terraform is available on Pro and Enterprise plans. Terraform is an Infrastructure as Code (IaC) tool. After setting up our Terraform provider, you can manage All Quiet via your Infrastructure.
## Set up All Quiet Terraform Provider
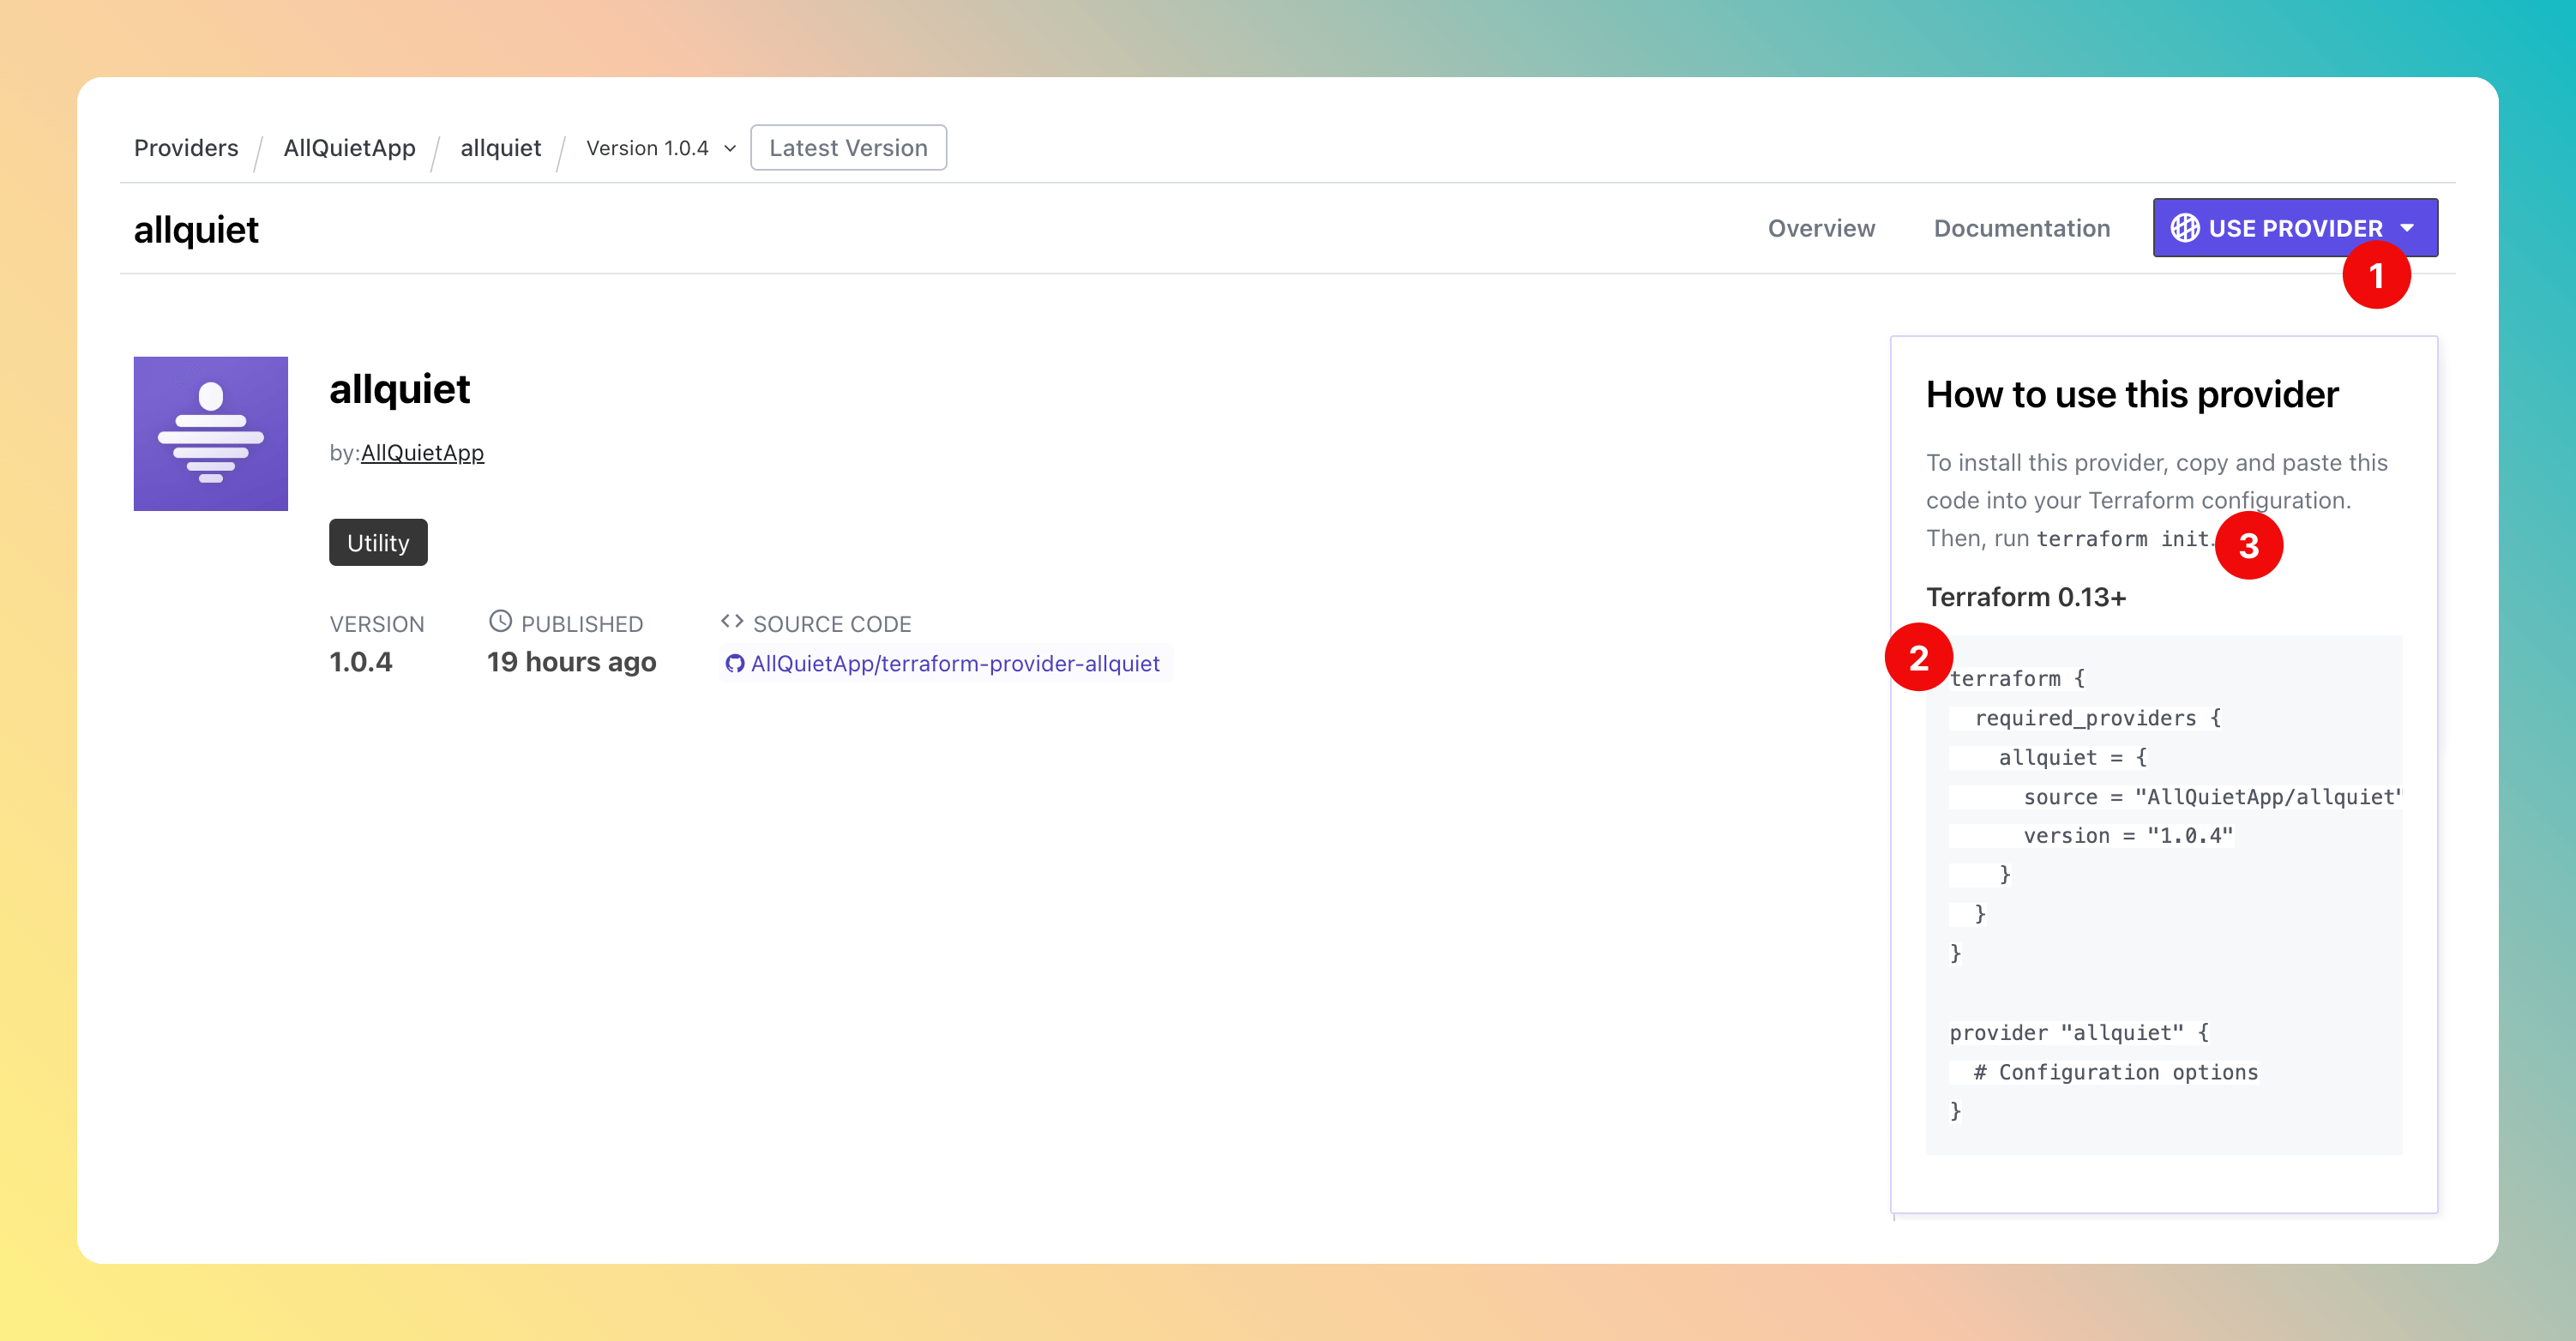
Open the latest version of the [All Quiet Terraform Provider](https://registry.terraform.io/providers/AllQuietApp/allquiet/latest).
1. Click on `Use Provider`.
2. Copy the code and paste it into your terraform configuration file. If you haven't set up a terraform file yet, follow the instructions on [Terraform's website](https://developer.hashicorp.com/terraform/tutorials/aws-get-started/install-cli).
3. Run `terraform init` in your terminal.
 To use our Terraform provider, you need to create an API Key, next.
### Create API Key
Creating an API Key requires you to be the Owner or Administrator of an Organization. To set up an Organization, please follow the related [documentation](/advanced/organizations).
The account that creates the Organization cannot be provisioned via Terraform. Therefore, we recommend to create the Organization with a root user that is not bound to a specific employee, like [admin@allquiet.app](mailto:admin@allquiet.app). This way, you ensure all "real" on-call users and employee accounts can be provisioned.
If you already set up the Org with your personal account, you can change your account's email address via the Web app on /app/account to a root user email and later provision your personal email and account via Terraform.
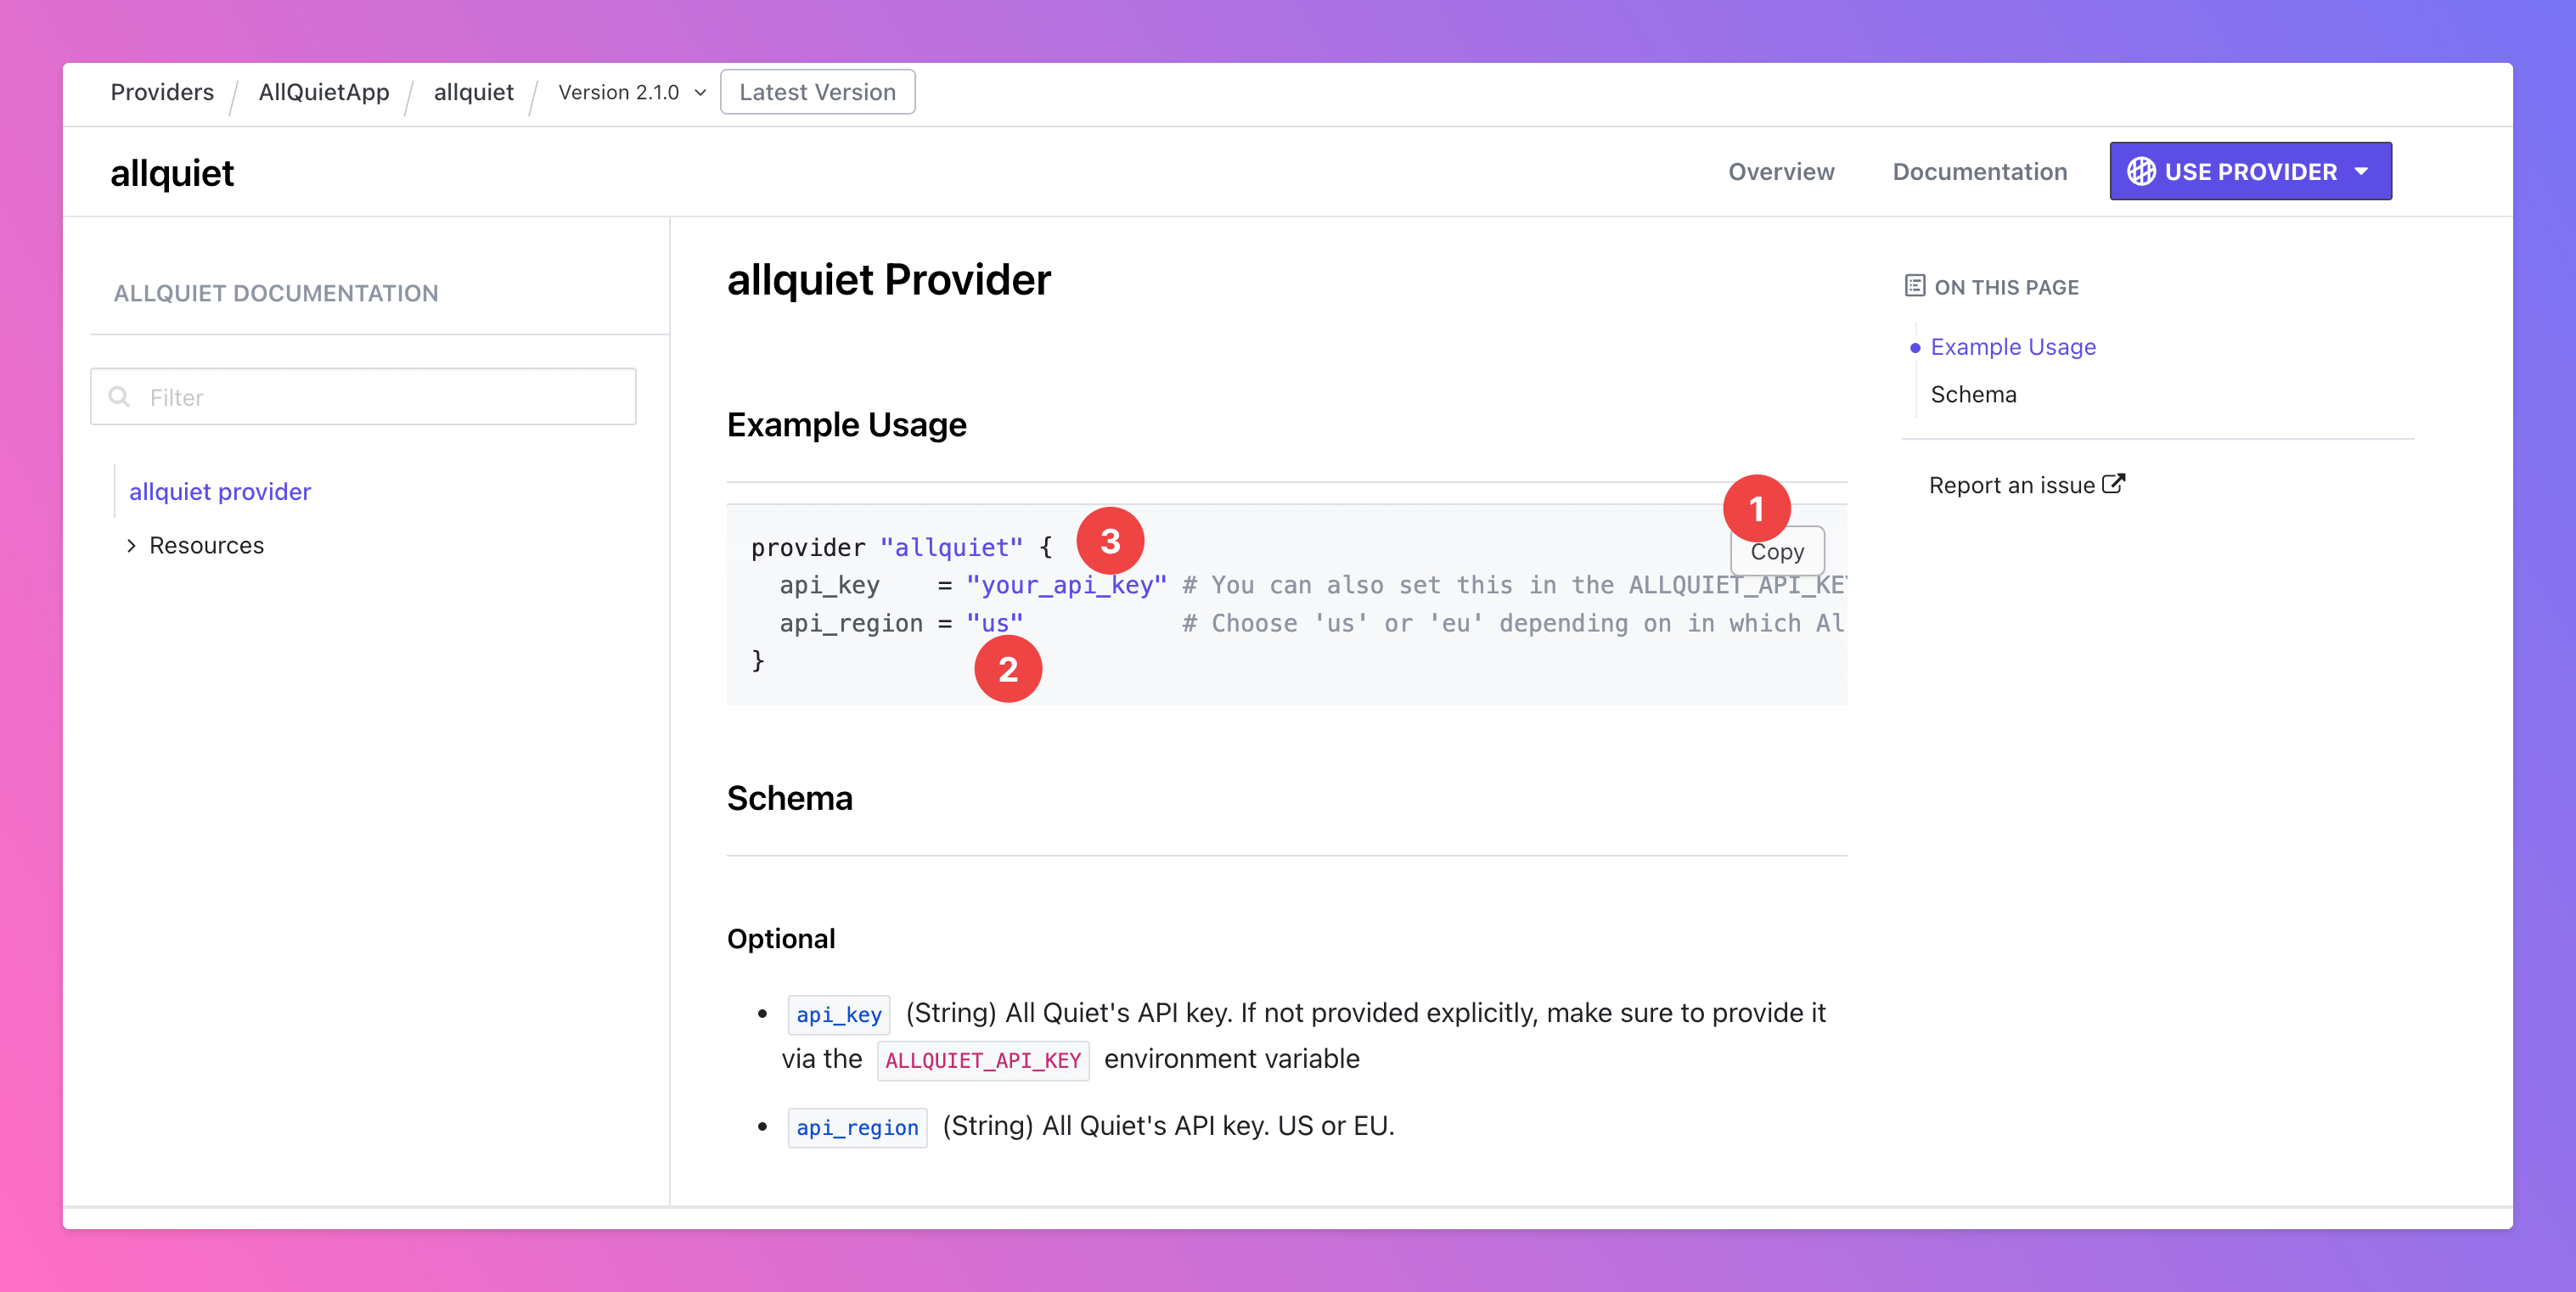
Open our [All Quiet Terraform Provider Documentation](https://registry.terraform.io/providers/AllQuietApp/allquiet/latest/docs).
1. Copy the code snippet and paste it into your configuration file.
2. In the file, set your `api_region` depending on your organization's data storage region.
3. Next, you need to generate "your\_api\_key".
To use our Terraform provider, you need to create an API Key, next.
### Create API Key
Creating an API Key requires you to be the Owner or Administrator of an Organization. To set up an Organization, please follow the related [documentation](/advanced/organizations).
The account that creates the Organization cannot be provisioned via Terraform. Therefore, we recommend to create the Organization with a root user that is not bound to a specific employee, like [admin@allquiet.app](mailto:admin@allquiet.app). This way, you ensure all "real" on-call users and employee accounts can be provisioned.
If you already set up the Org with your personal account, you can change your account's email address via the Web app on /app/account to a root user email and later provision your personal email and account via Terraform.
Open our [All Quiet Terraform Provider Documentation](https://registry.terraform.io/providers/AllQuietApp/allquiet/latest/docs).
1. Copy the code snippet and paste it into your configuration file.
2. In the file, set your `api_region` depending on your organization's data storage region.
3. Next, you need to generate "your\_api\_key".
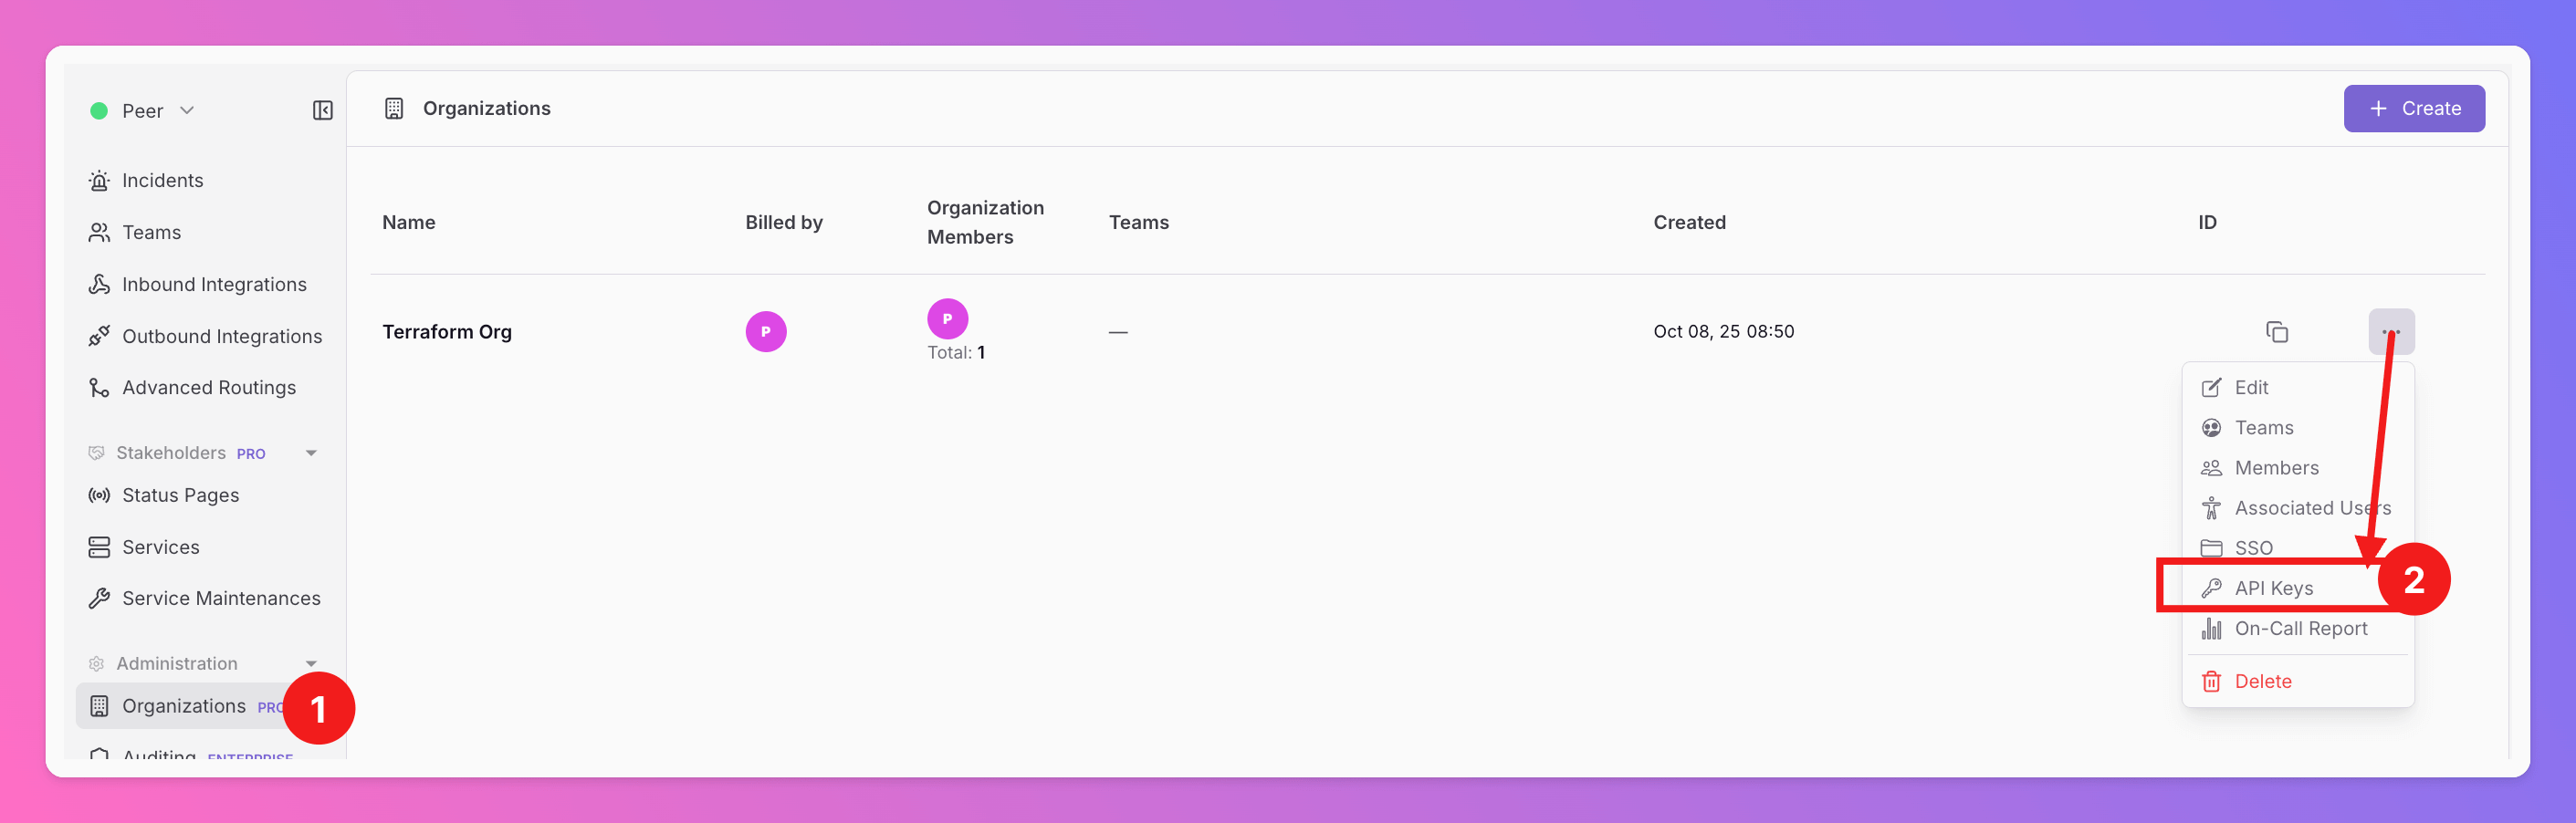
 Generating the API key has to be done in the [All Quiet Web App](https://allquiet.app/app/organizations). Afterwards, you can set up everything via our Terraform Provider.
1. In the Web App, open `Organizations`.
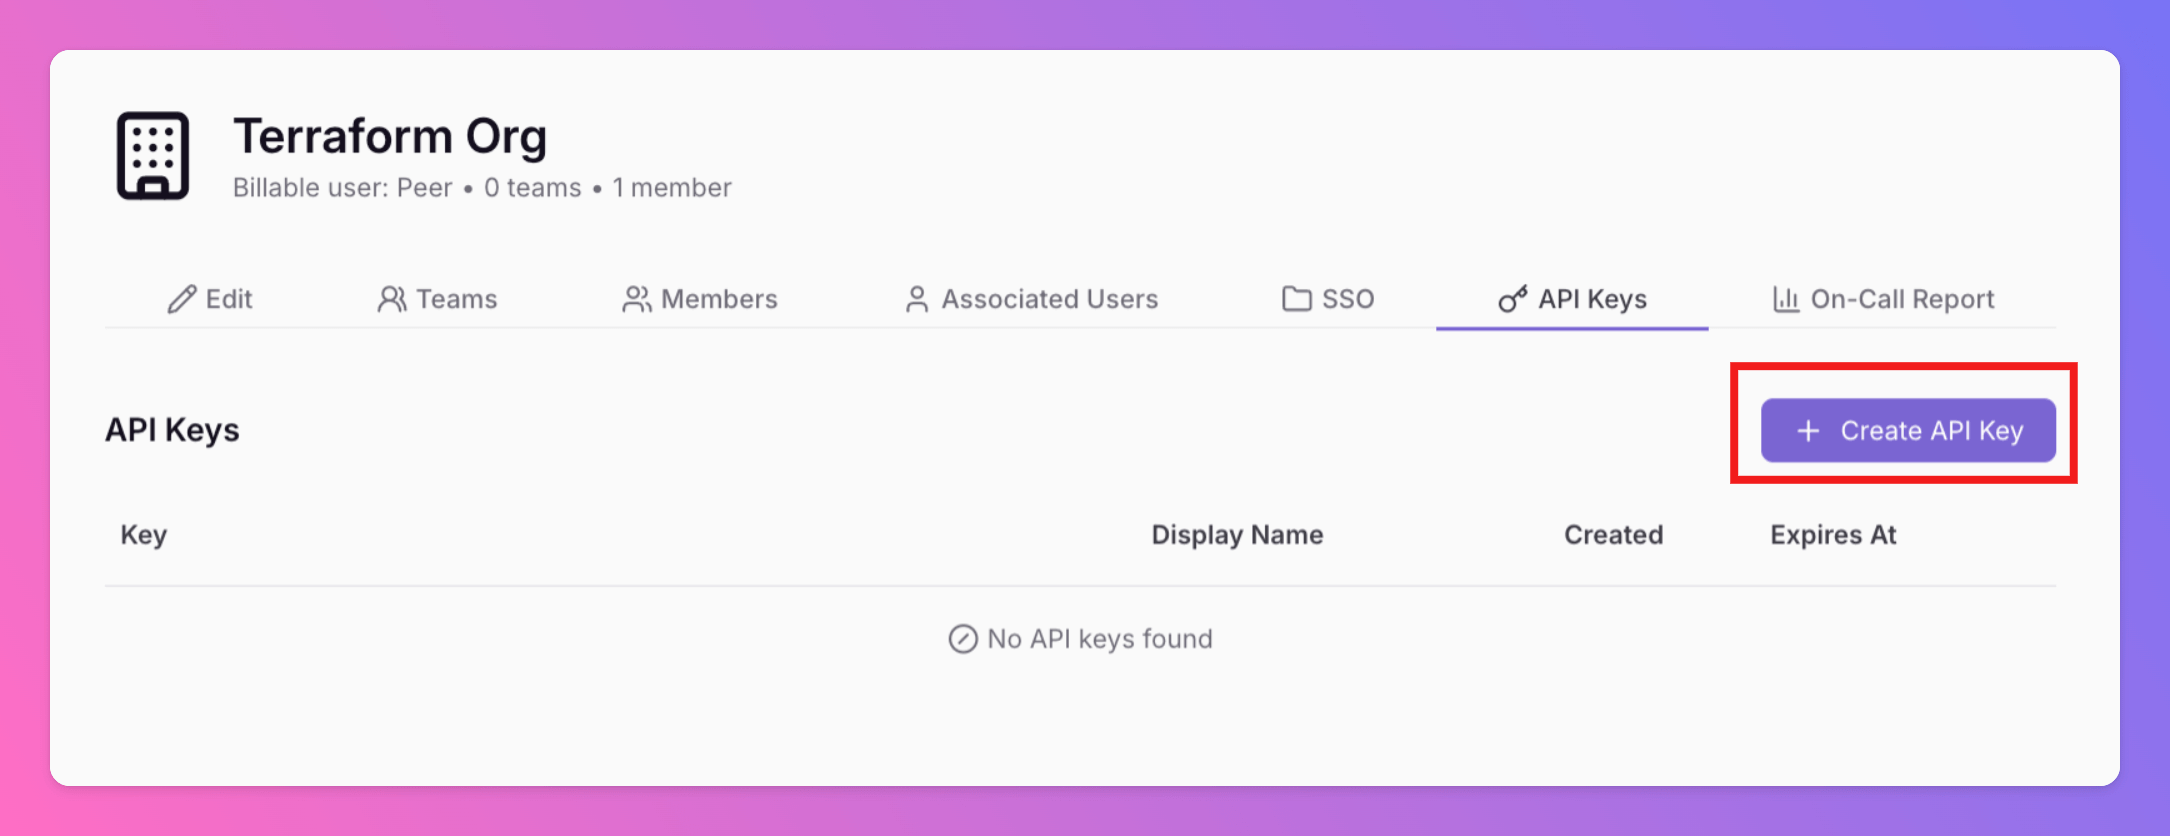
2. Select the correct Organization and click `API Keys`
Generating the API key has to be done in the [All Quiet Web App](https://allquiet.app/app/organizations). Afterwards, you can set up everything via our Terraform Provider.
1. In the Web App, open `Organizations`.
2. Select the correct Organization and click `API Keys`
 Click `+Create API Key`
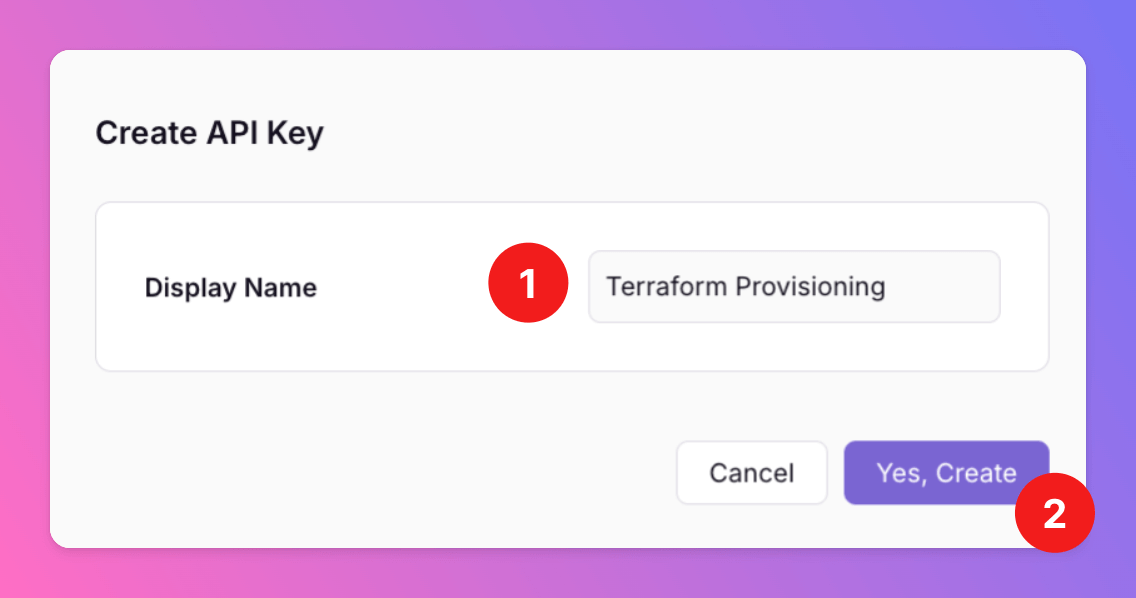
 1. Add a `Display Name` for your API Key.
2. Approve the API Key creation by clicking `Yes, Create`.
1. Add a `Display Name` for your API Key.
2. Approve the API Key creation by clicking `Yes, Create`.
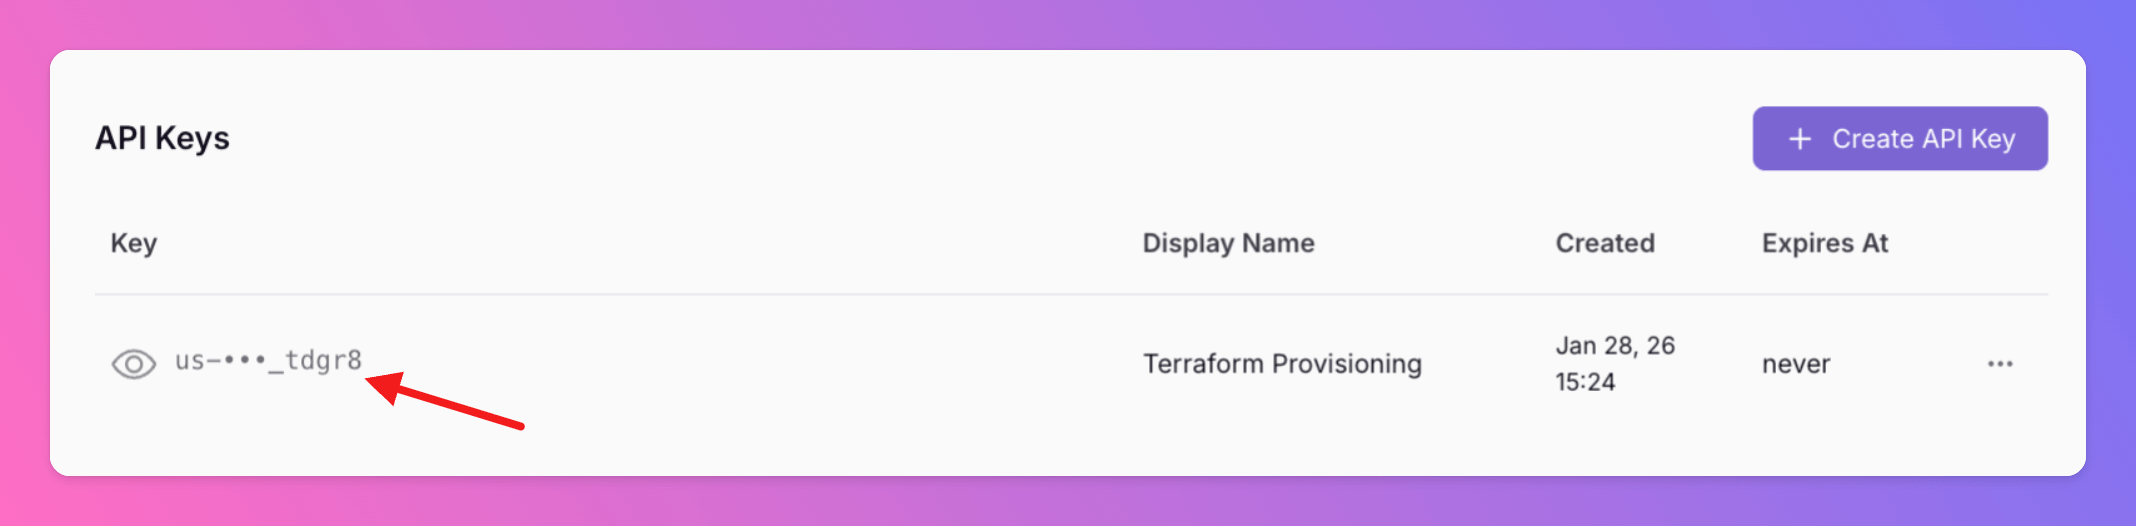
 Now, copy the generated API Key...
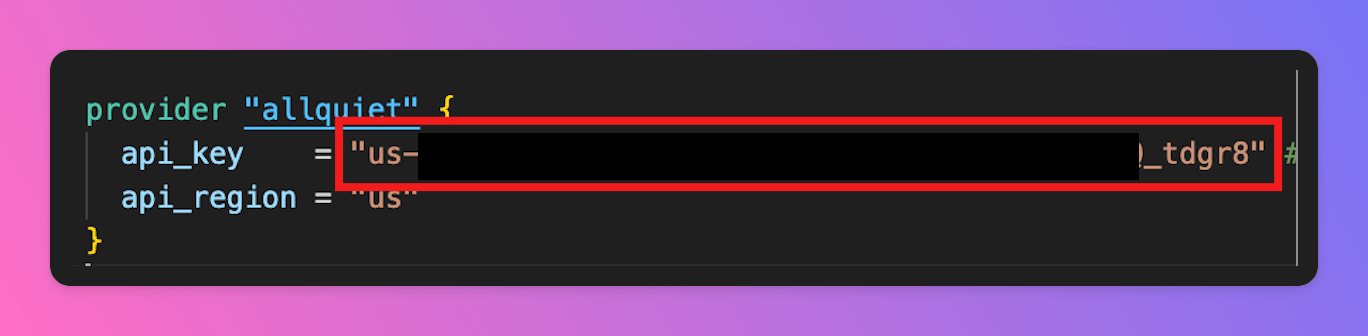
 ...and paste it into your configuration file
 Congrats, your good to go and can use All Quiet via Terraform!
### All Quiet Resources in Terraform
Please find the documentation of our resources attached.
* [allquiet\_user](https://registry.terraform.io/providers/AllQuietApp/allquiet/latest/docs/resources/user)
* When provisioning users and you want them use OIDC, Google or Microsoft login, we first need to setup [OIDC](/miscellaneous/sso#openid-connect-oidc) before they can log in. If you want them to use password login on All Quiet, this will work out of the box.
* [allquiet\_user\_incident\_notification\_settings](https://registry.terraform.io/providers/AllQuietApp/allquiet/latest/docs/resources/user_incident_notification_settings)
* Since Terraform Provider `v3.0.0`, incident notification settings are managed via this dedicated resource. It replaces `incident_notification_settings` previously configured inside the `allquiet_user` resource.
* [allquiet\_team](https://registry.terraform.io/providers/AllQuietApp/allquiet/latest/docs/resources/team)
* [allquiet\_team\_memberships](https://registry.terraform.io/providers/AllQuietApp/allquiet/latest/docs/resources/team_membership)
* [allquiet\_team\_escalations](https://registry.terraform.io/providers/AllQuietApp/allquiet/latest/docs/resources/team_escalations)
* [allquiet\_on\_call\_override](https://registry.terraform.io/providers/AllQuietApp/allquiet/latest/docs/resources/on_call_override)
* [allquiet\_integration](https://registry.terraform.io/providers/AllQuietApp/allquiet/latest/docs/resources/integration)
* [allquiet\_integration\_mapping](https://registry.terraform.io/providers/AllQuietApp/allquiet/latest/docs/resources/integration_mapping)
* If you don't use this resource, your integrations will implicitly follow our default mappings. If you want to adjust the mapping, we've prepared template `allquiet_integration_mapping`.
* Template Download (Example with Integration\_ID = "Datadog"): [https://allquiet.app/api/integrations/terraform/default/Datadog.tf](https://allquiet.app/api/integrations/terraform/default/Datadog.tf).
* Each Integration\_ID can be found here: [https://allquiet.app/api/public/v1/inbound-integration/types](https://allquiet.app/api/public/v1/inbound-integration/types)
* [allquiet\_integration\_maintenance\_window](https://registry.terraform.io/providers/AllQuietApp/allquiet/latest/docs/resources/integration_maintenance_window)
* [allquiet\_outbound\_integration](https://registry.terraform.io/providers/AllQuietApp/allquiet/latest/docs/resources/outbound_integration)
* [allquiet\_routing](https://registry.terraform.io/providers/AllQuietApp/allquiet/latest/docs/resources/routing)
* [allquiet\_organization\_membership](https://registry.terraform.io/providers/AllQuietApp/allquiet/latest/docs/resources/organization_membership)
* There's no `allquiet_organization` resource as the [API Key](/advanced/terraform#create-api-key) you use for your Terraform config is always bound to a specific organization. All `allquiet_organization_membership` resources are bound to this organization
* [allquiet\_service](https://registry.terraform.io/providers/AllQuietApp/allquiet/latest/docs/resources/service)
* [allquiet\_status\_page](https://registry.terraform.io/providers/AllQuietApp/allquiet/latest/docs/resources/status_page)
To learn more about Terraform commands, please check their [tutorials](https://developer.hashicorp.com/terraform/tutorials).
#### Provisioned Resources Cannot Be Edited Via Web App
To ensure that the resources managed by your Terraform provider stay in sync with your setup, we lock provisioned resources within the Web App. This means these resources cannot be edited or deleted directly through the Web App's interface.
Provisioned resources are marked with an icon, and hovering over it will display a message explaining why the resource is locked and cannot be modified via the Web App.
Congrats, your good to go and can use All Quiet via Terraform!
### All Quiet Resources in Terraform
Please find the documentation of our resources attached.
* [allquiet\_user](https://registry.terraform.io/providers/AllQuietApp/allquiet/latest/docs/resources/user)
* When provisioning users and you want them use OIDC, Google or Microsoft login, we first need to setup [OIDC](/miscellaneous/sso#openid-connect-oidc) before they can log in. If you want them to use password login on All Quiet, this will work out of the box.
* [allquiet\_user\_incident\_notification\_settings](https://registry.terraform.io/providers/AllQuietApp/allquiet/latest/docs/resources/user_incident_notification_settings)
* Since Terraform Provider `v3.0.0`, incident notification settings are managed via this dedicated resource. It replaces `incident_notification_settings` previously configured inside the `allquiet_user` resource.
* [allquiet\_team](https://registry.terraform.io/providers/AllQuietApp/allquiet/latest/docs/resources/team)
* [allquiet\_team\_memberships](https://registry.terraform.io/providers/AllQuietApp/allquiet/latest/docs/resources/team_membership)
* [allquiet\_team\_escalations](https://registry.terraform.io/providers/AllQuietApp/allquiet/latest/docs/resources/team_escalations)
* [allquiet\_on\_call\_override](https://registry.terraform.io/providers/AllQuietApp/allquiet/latest/docs/resources/on_call_override)
* [allquiet\_integration](https://registry.terraform.io/providers/AllQuietApp/allquiet/latest/docs/resources/integration)
* [allquiet\_integration\_mapping](https://registry.terraform.io/providers/AllQuietApp/allquiet/latest/docs/resources/integration_mapping)
* If you don't use this resource, your integrations will implicitly follow our default mappings. If you want to adjust the mapping, we've prepared template `allquiet_integration_mapping`.
* Template Download (Example with Integration\_ID = "Datadog"): [https://allquiet.app/api/integrations/terraform/default/Datadog.tf](https://allquiet.app/api/integrations/terraform/default/Datadog.tf).
* Each Integration\_ID can be found here: [https://allquiet.app/api/public/v1/inbound-integration/types](https://allquiet.app/api/public/v1/inbound-integration/types)
* [allquiet\_integration\_maintenance\_window](https://registry.terraform.io/providers/AllQuietApp/allquiet/latest/docs/resources/integration_maintenance_window)
* [allquiet\_outbound\_integration](https://registry.terraform.io/providers/AllQuietApp/allquiet/latest/docs/resources/outbound_integration)
* [allquiet\_routing](https://registry.terraform.io/providers/AllQuietApp/allquiet/latest/docs/resources/routing)
* [allquiet\_organization\_membership](https://registry.terraform.io/providers/AllQuietApp/allquiet/latest/docs/resources/organization_membership)
* There's no `allquiet_organization` resource as the [API Key](/advanced/terraform#create-api-key) you use for your Terraform config is always bound to a specific organization. All `allquiet_organization_membership` resources are bound to this organization
* [allquiet\_service](https://registry.terraform.io/providers/AllQuietApp/allquiet/latest/docs/resources/service)
* [allquiet\_status\_page](https://registry.terraform.io/providers/AllQuietApp/allquiet/latest/docs/resources/status_page)
To learn more about Terraform commands, please check their [tutorials](https://developer.hashicorp.com/terraform/tutorials).
#### Provisioned Resources Cannot Be Edited Via Web App
To ensure that the resources managed by your Terraform provider stay in sync with your setup, we lock provisioned resources within the Web App. This means these resources cannot be edited or deleted directly through the Web App's interface.
Provisioned resources are marked with an icon, and hovering over it will display a message explaining why the resource is locked and cannot be modified via the Web App.
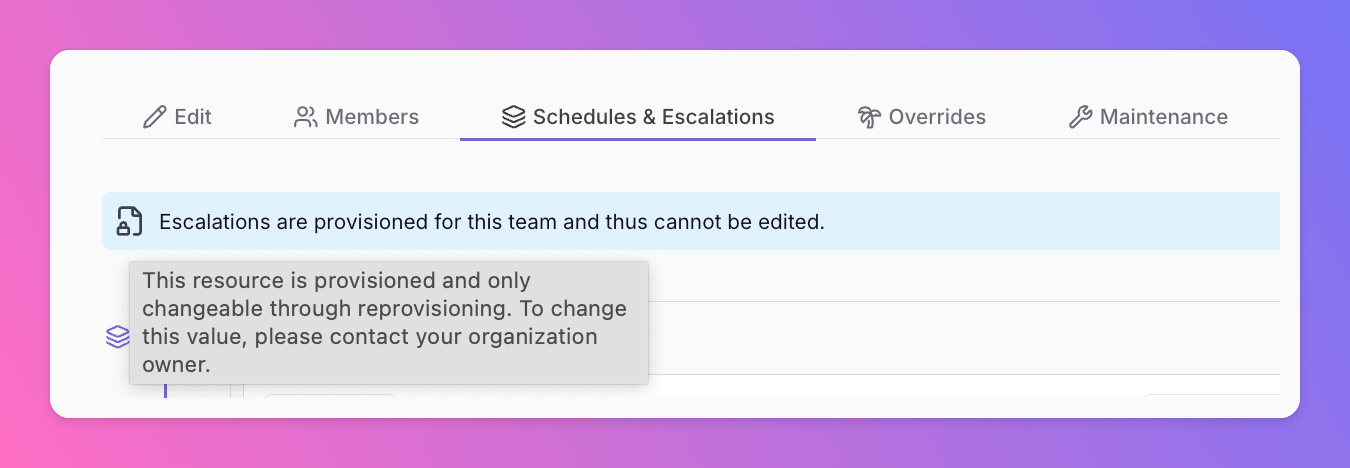 Our Terraform provider is designed to help you configure and manage your standard setup seamlessly. However, temporary changes — such as on-call schedule overrides or maintenance windows — will always be able to be added via the Web's interface.
#### Find Provisioned Users in All Quiet
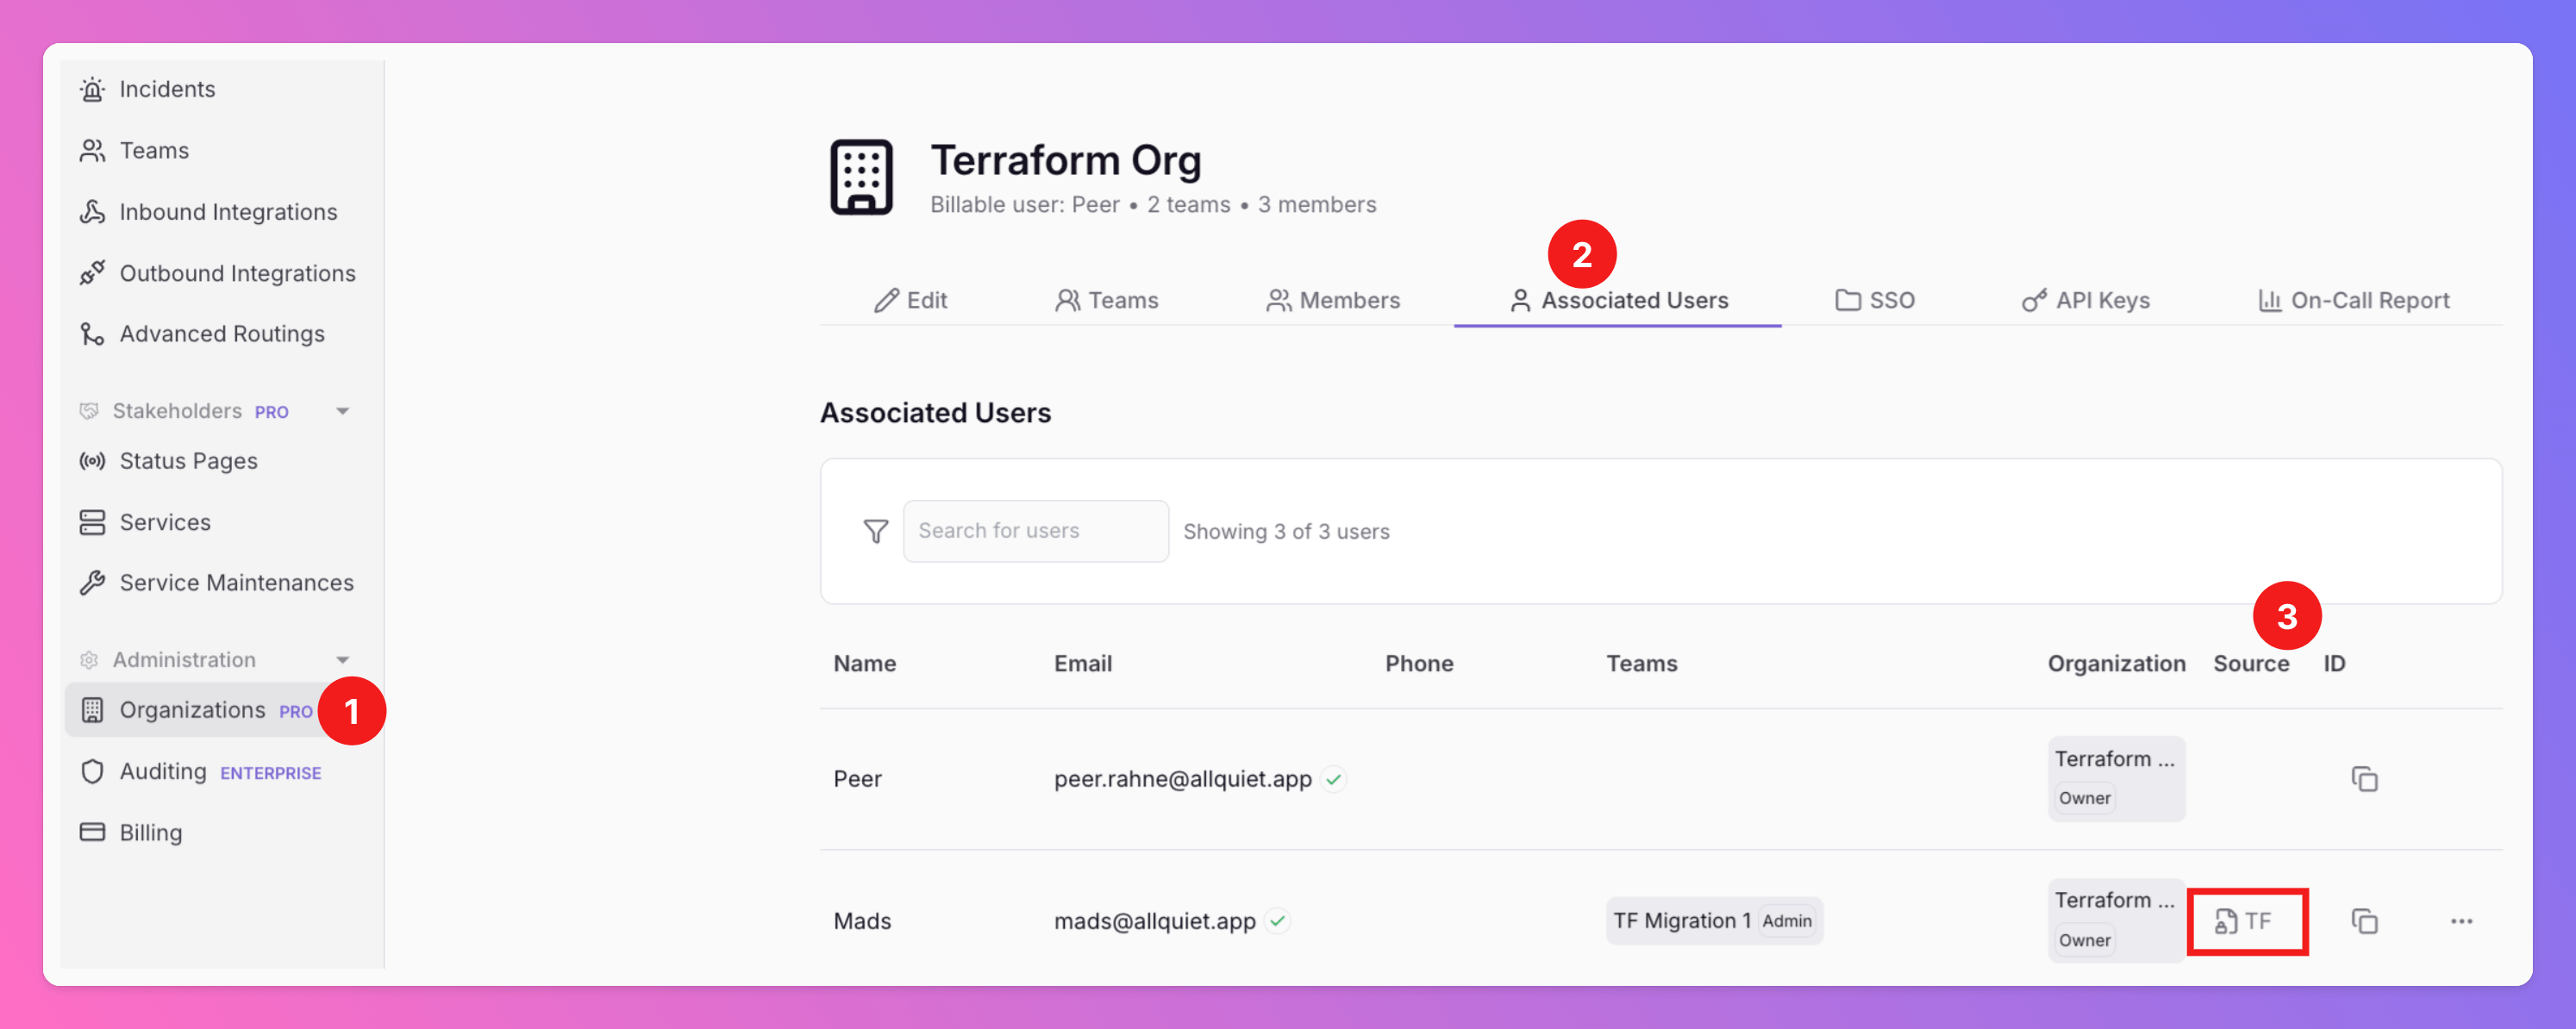
To see the users currently provisioned via Terraform in All Quiet,
1. Select your [Organization](/advanced/organizations)
2. Open the `Associated Users` tab. Here, you can see all users of your organization.
3. Users provisioned via Terraform can be identified by `Source` = TF
If you provision the phone numbers of your users via Terraform, they still have to confirm their phone number via [notification settings](/essentials/channels#sms-and-phone-calls).
Our Terraform provider is designed to help you configure and manage your standard setup seamlessly. However, temporary changes — such as on-call schedule overrides or maintenance windows — will always be able to be added via the Web's interface.
#### Find Provisioned Users in All Quiet
To see the users currently provisioned via Terraform in All Quiet,
1. Select your [Organization](/advanced/organizations)
2. Open the `Associated Users` tab. Here, you can see all users of your organization.
3. Users provisioned via Terraform can be identified by `Source` = TF
If you provision the phone numbers of your users via Terraform, they still have to confirm their phone number via [notification settings](/essentials/channels#sms-and-phone-calls).