> ## Documentation Index
> Fetch the complete documentation index at: https://docs.allquiet.app/llms.txt
> Use this file to discover all available pages before exploring further.
# Status Pages
> Learn how to share incident updates instantly with your customers, using our Status Pages.
Status Pages are available on Pro and Enterprise plans.
Status Pages are public by default. Switch any page to private and manage access controls from the **Access Control & Private Status Page** section.
## Set Up Your Status Pages
Your Status Pages will show the current states of your Services. At All Quiet, each of your Services will receive a unique status graph that you can add to your Status Pages. So in order to create a Status Page, we need to create a Service, first.
### Create a Service
Only *Organization Owners* and *Organization Administrators* have the permissions to create and edit Services. *Organization Members* can edit maintenances for the Services and have view-only access to the Services overviews.
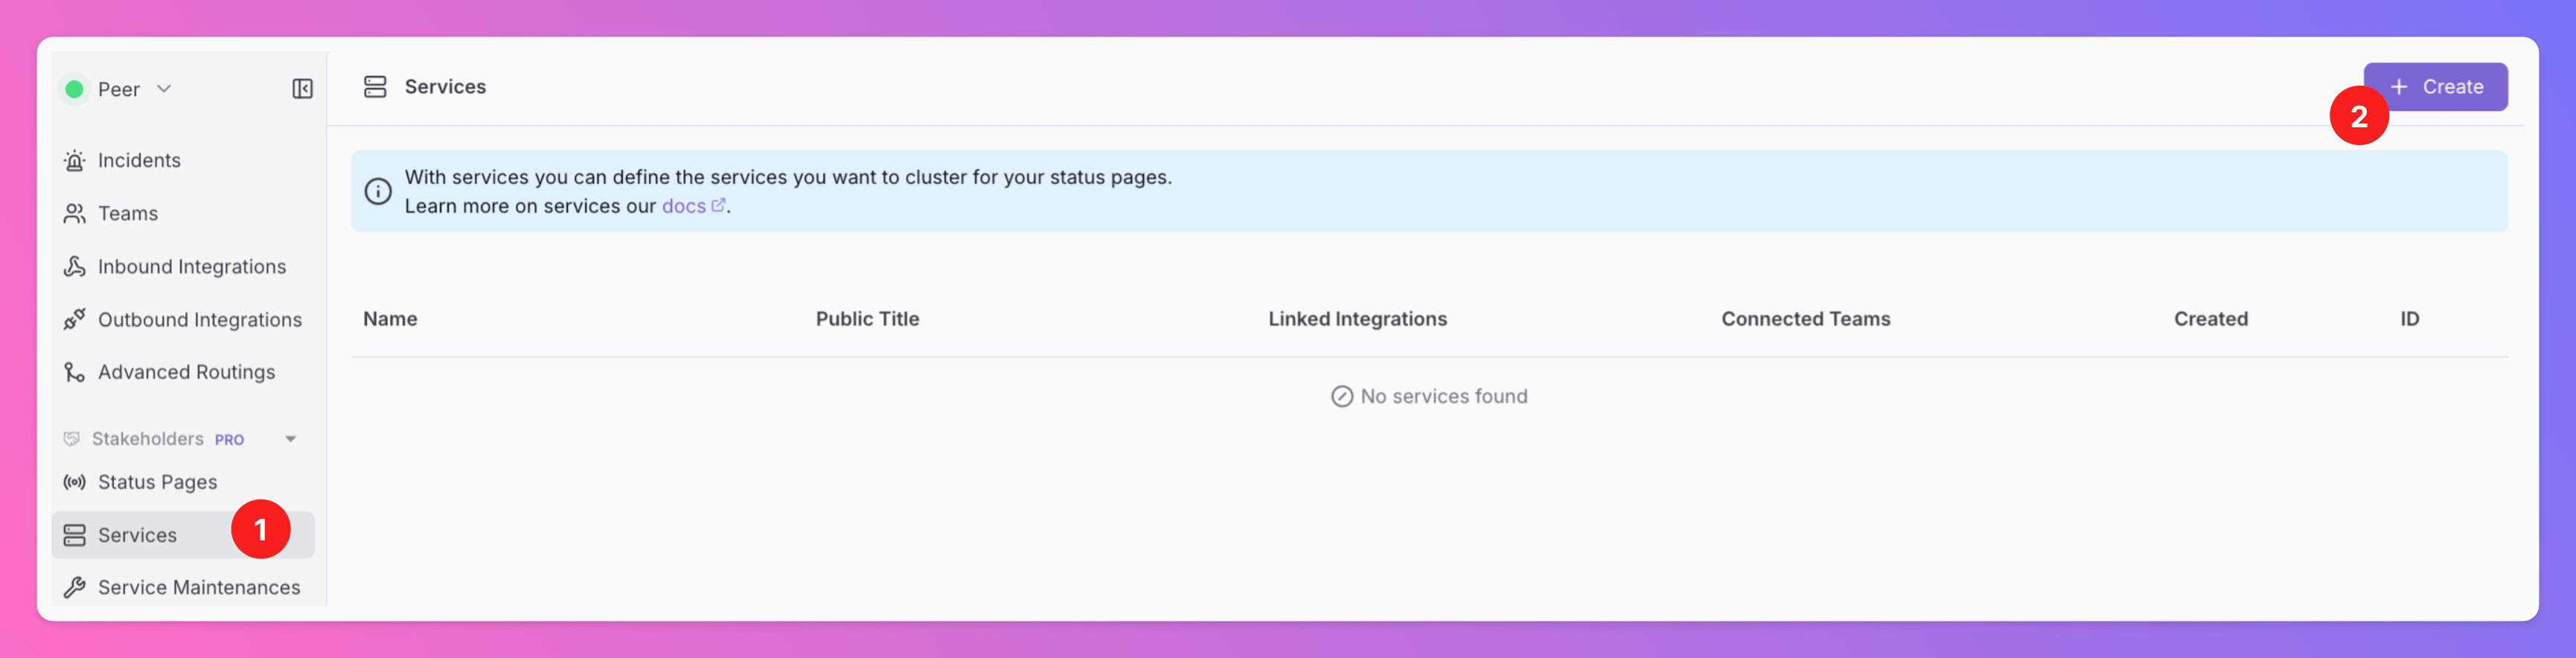
To create a Service, you first need to create an [organization](/advanced/organizations).
1. Then, select `Services` in the Web App.
2. Click `+ Create`
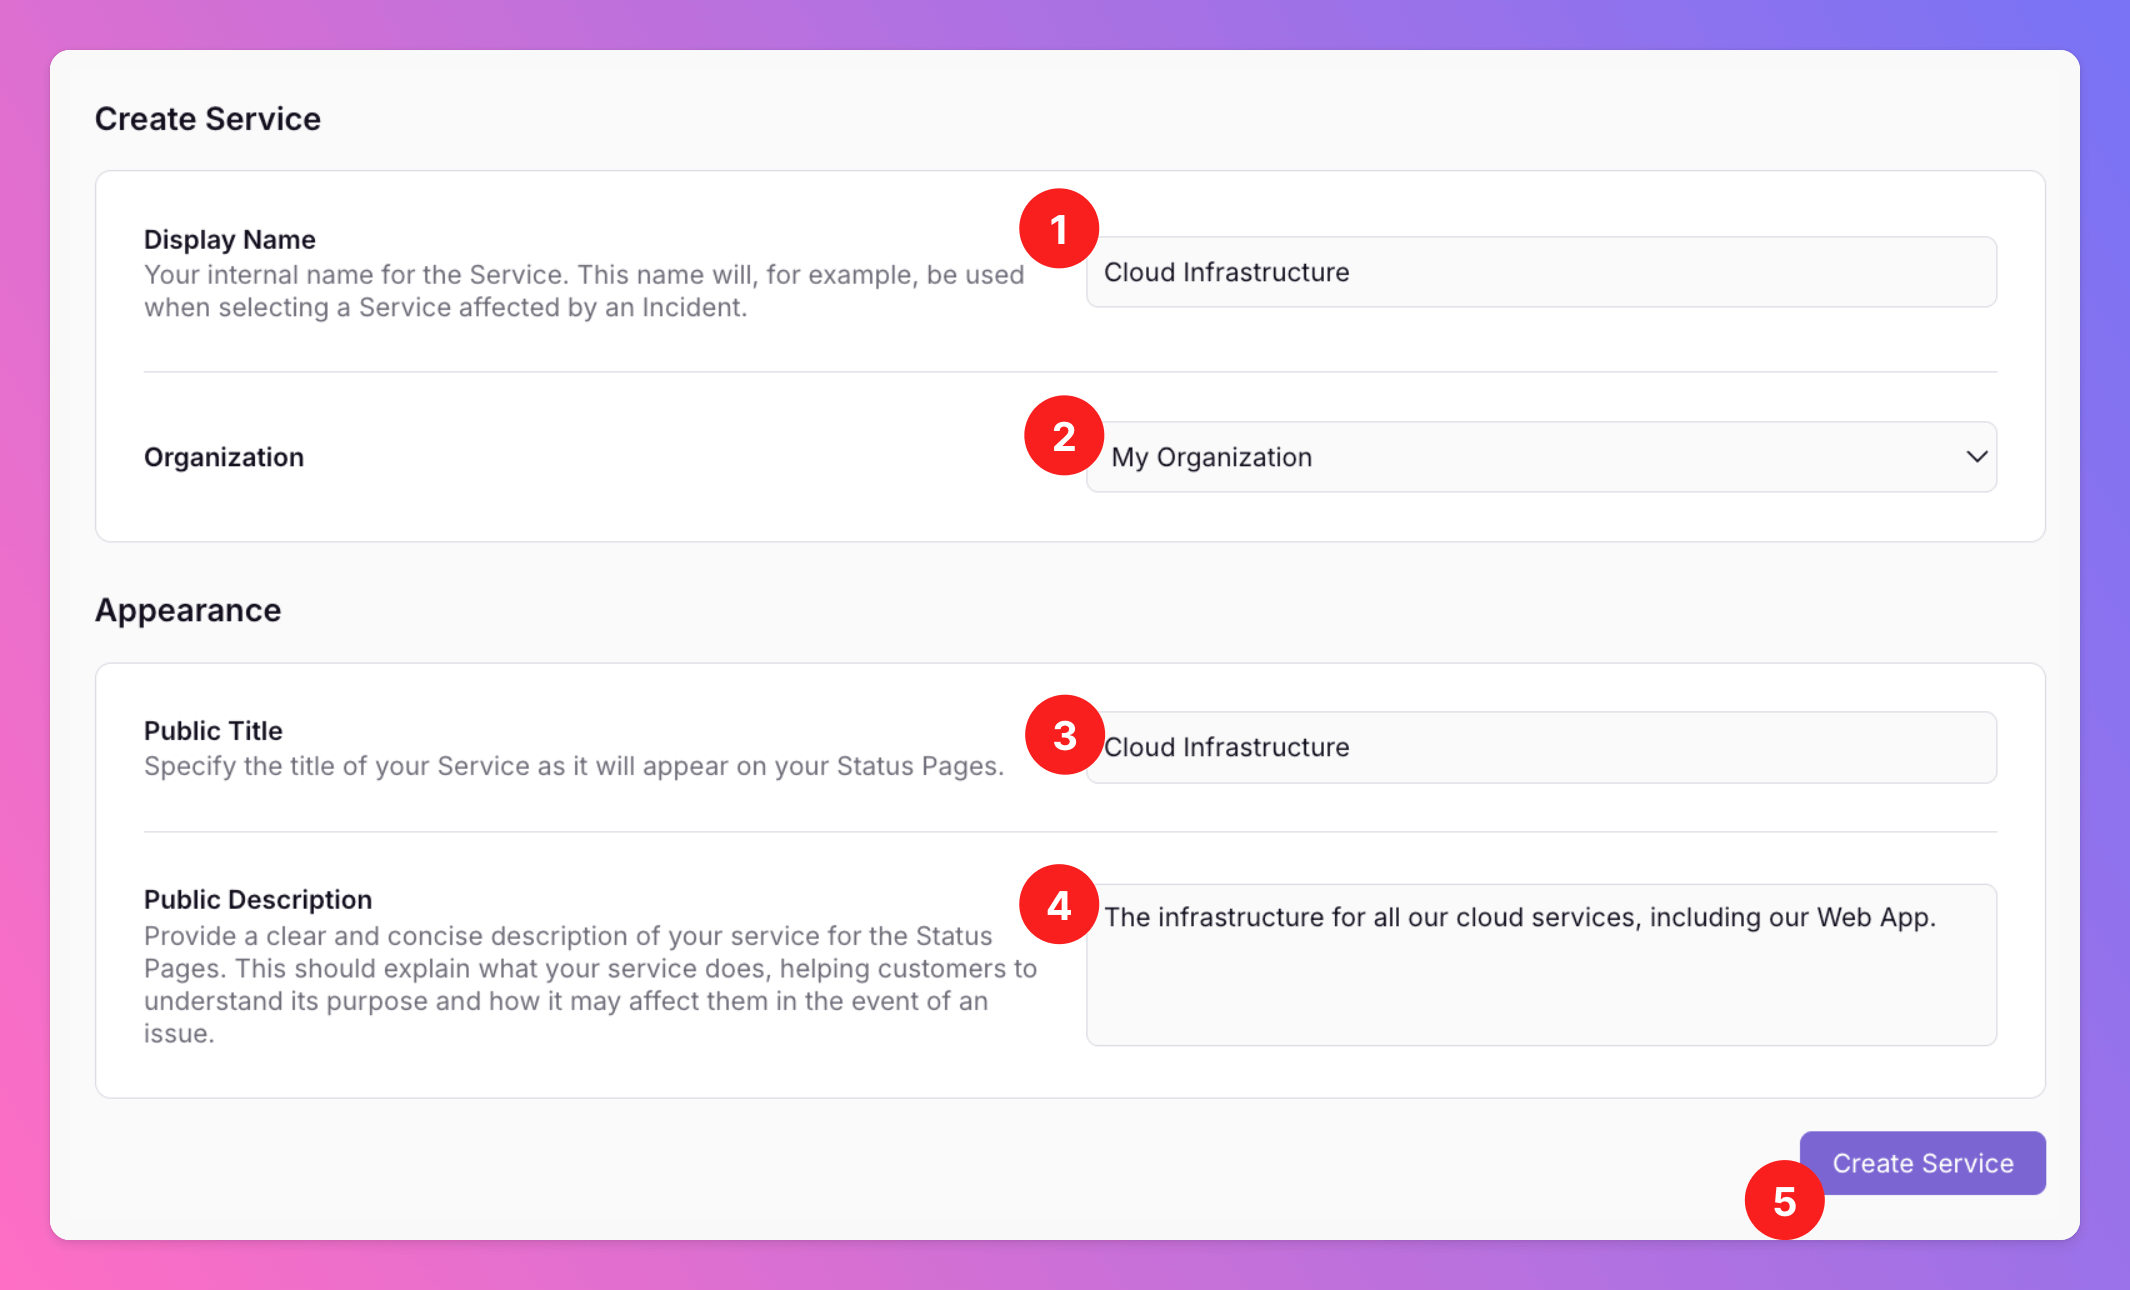
 To create a Service, fill out the following form.
1. Select a `Display Name` for the Service. It will only be used internally, not publicly on your Status Pages.
2. Select the `Organization` of the Service. Only Incidents created in Teams that belong to this organization can [affect](/essentials/incident#affects-services) this Service.
3. Select the `Public Title` of the Service. When adding this Service to a Status Page, this name will [appear](/advanced/status-pages#your-public-status-page) on the Status Page and in incident update emails to Status Page subscribers.
4. Add a `Public Description` of your Service, [visible](/advanced/status-pages#your-public-status-page) on the Status Page, next to the status graph of the Service.
5. `Create Service`
To create a Service, fill out the following form.
1. Select a `Display Name` for the Service. It will only be used internally, not publicly on your Status Pages.
2. Select the `Organization` of the Service. Only Incidents created in Teams that belong to this organization can [affect](/essentials/incident#affects-services) this Service.
3. Select the `Public Title` of the Service. When adding this Service to a Status Page, this name will [appear](/advanced/status-pages#your-public-status-page) on the Status Page and in incident update emails to Status Page subscribers.
4. Add a `Public Description` of your Service, [visible](/advanced/status-pages#your-public-status-page) on the Status Page, next to the status graph of the Service.
5. `Create Service`
 #### Auto-Connect Incidents with Your Services and Status Pages
Keep your customers informed effortlessly and automatically let incidents from your integrations [affect](/essentials/incident#affects-services) your Services on your Status Pages, ensuring real-time updates without manual effort.
You can find the `Linked Integrations` section at the bottom of the corresponding Service’s page of the Web App.
#### Auto-Connect Incidents with Your Services and Status Pages
Keep your customers informed effortlessly and automatically let incidents from your integrations [affect](/essentials/incident#affects-services) your Services on your Status Pages, ensuring real-time updates without manual effort.
You can find the `Linked Integrations` section at the bottom of the corresponding Service’s page of the Web App.
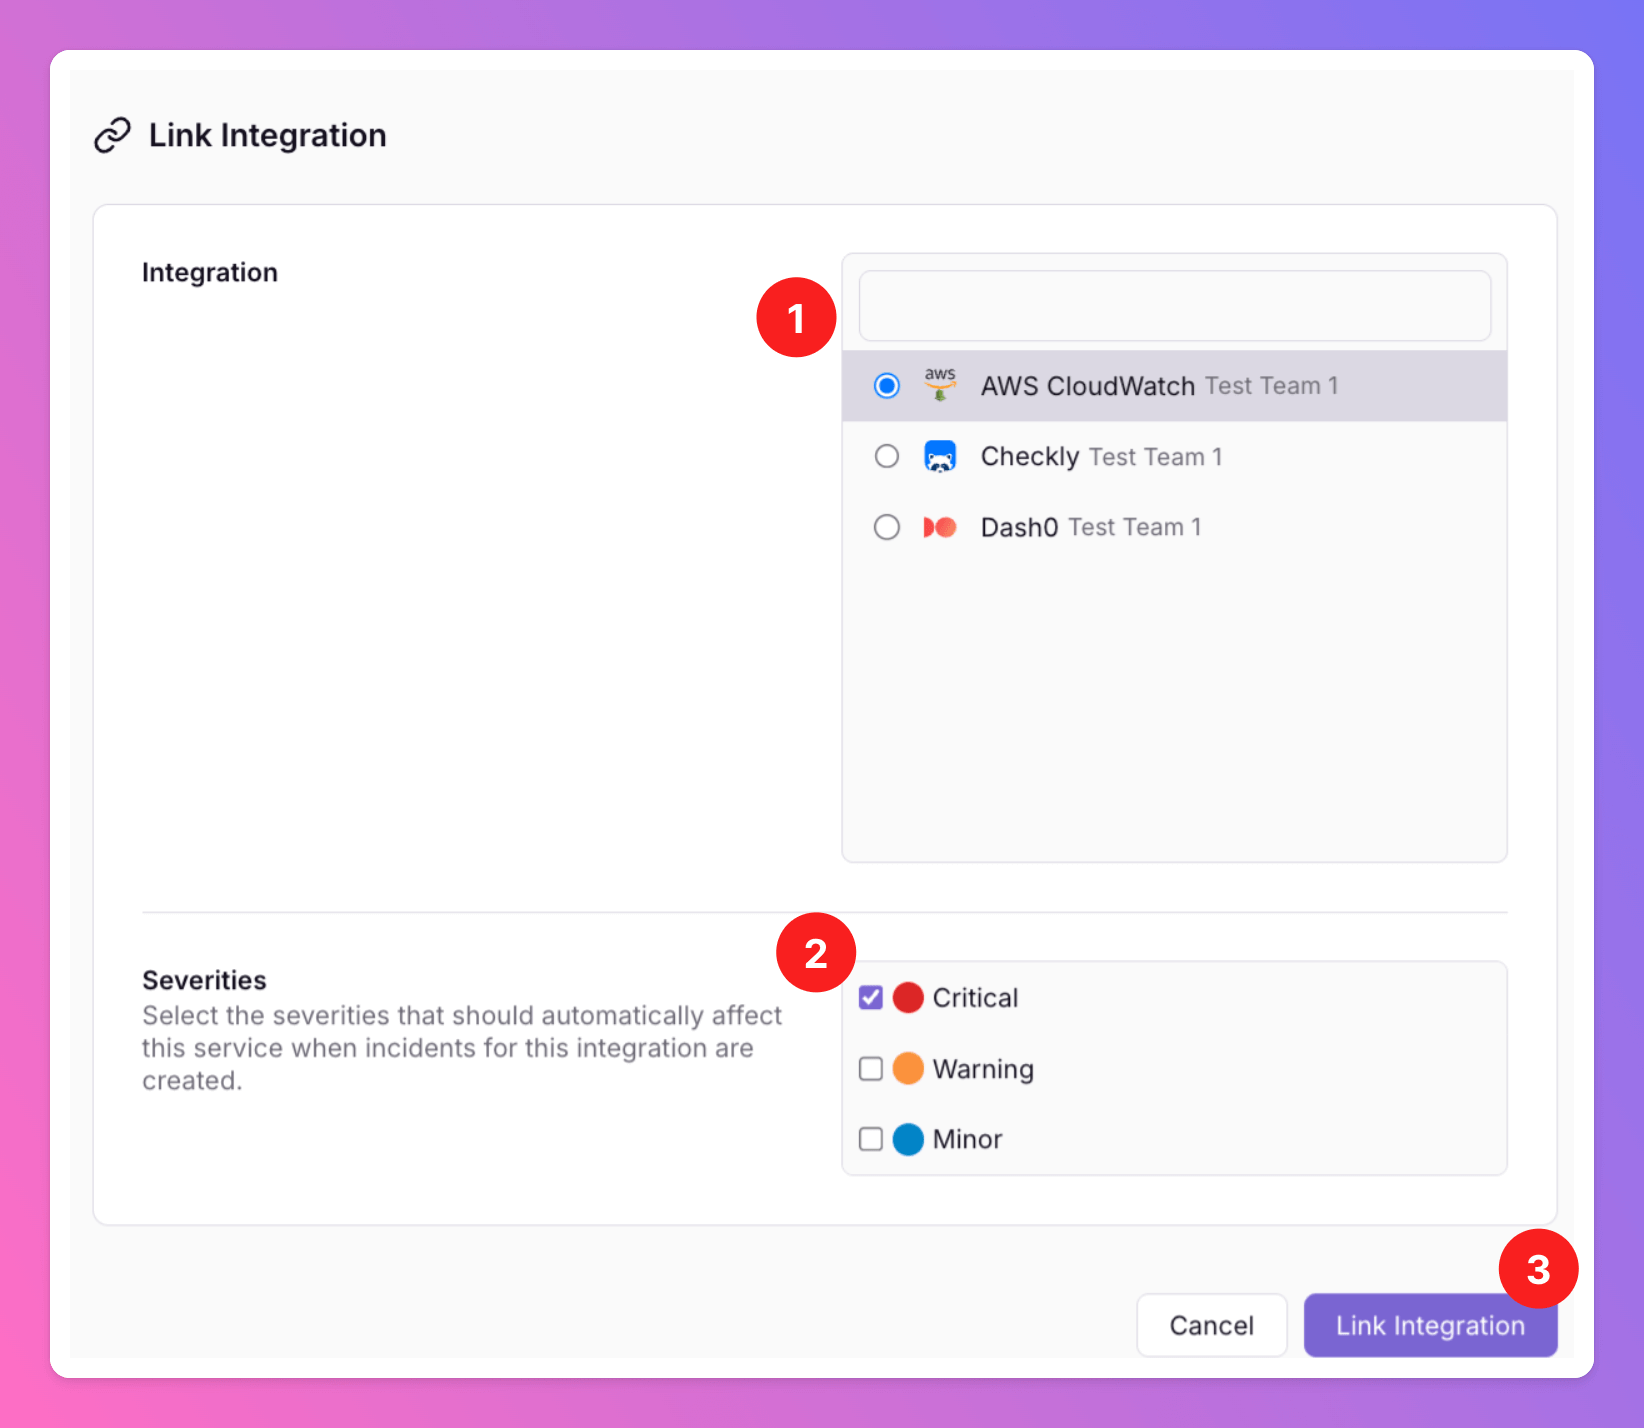
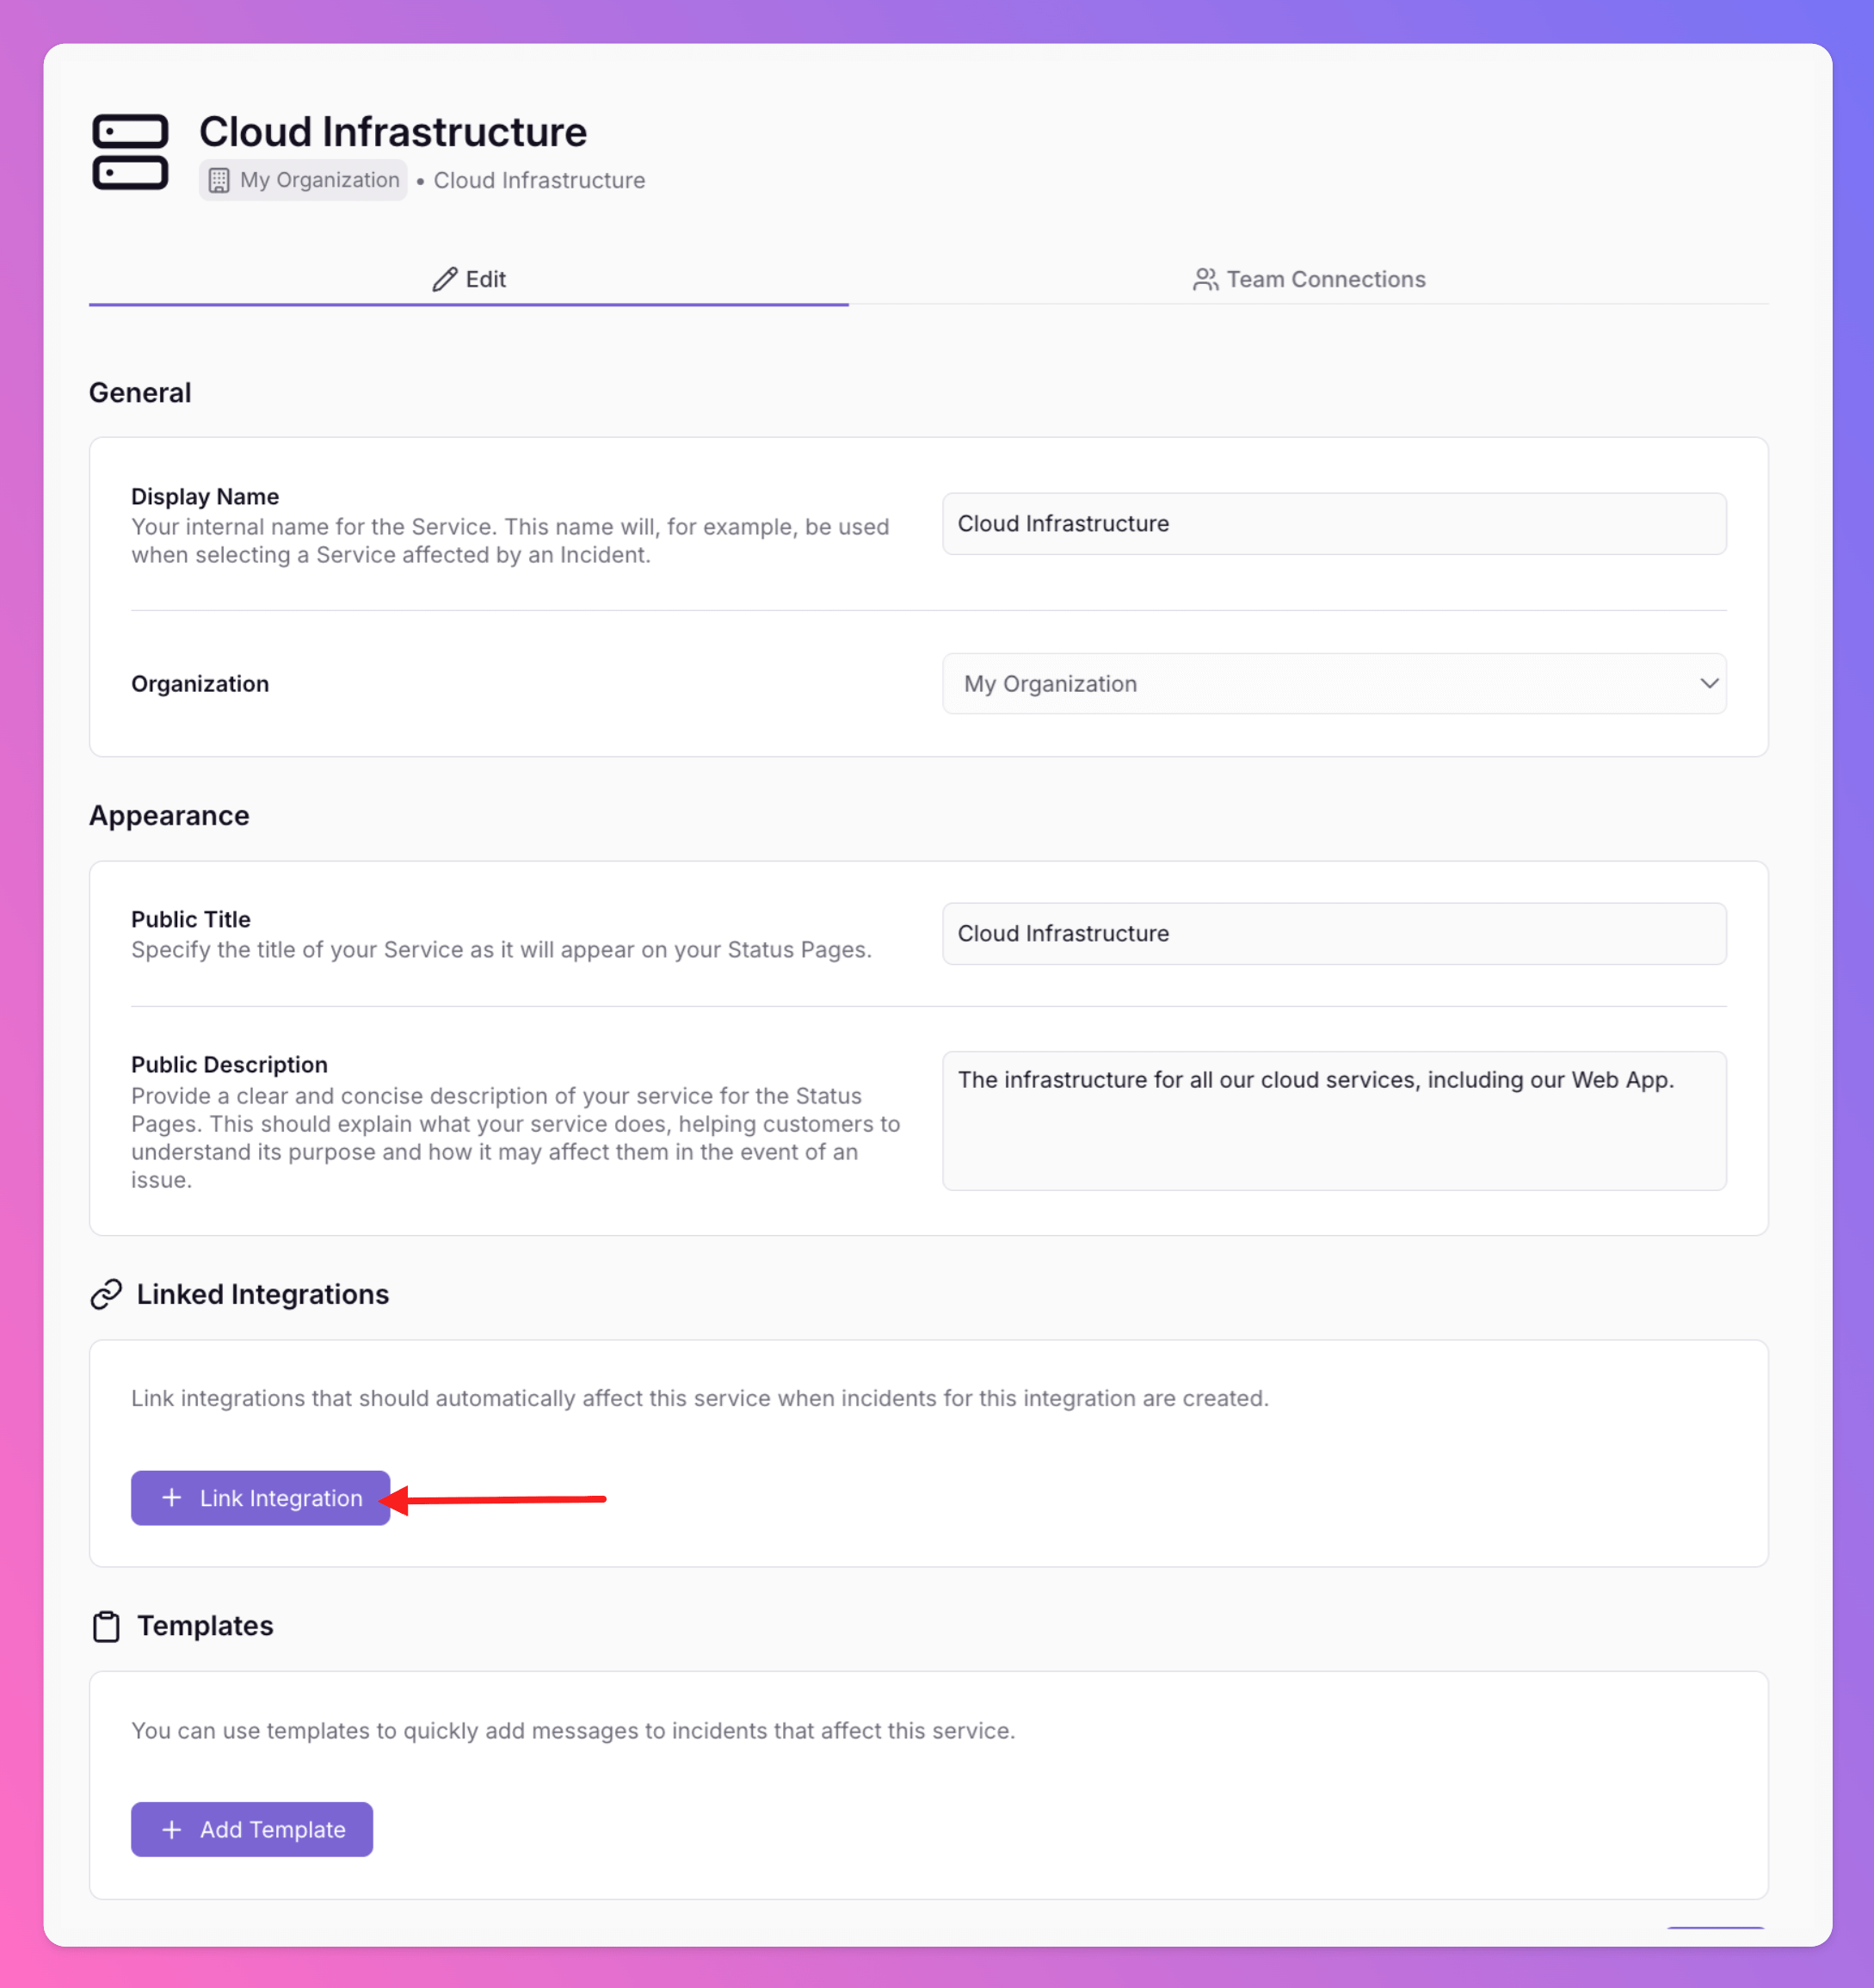 Clicking the `+ Link Integration` button opens an overlay.
1. Select the integration that you want to link with this Service.
2. Select the incident severities that should automatically affect this Service when incidents for this integration are created.
We only consider the initial severity set when the incident is created. Manually changing the severity later will not affect the link between the incident, the Service, and the associated Status Pages.
3. Click `Link Integration` to save your changes.
From now on, incidents from this integration will auto-affect your Service and will be visible on Service's Status Pages. You will see the auto-affect as a [routing rule](/advanced/routing) in the [incident's history](/essentials/incident#incident-history)
Clicking the `+ Link Integration` button opens an overlay.
1. Select the integration that you want to link with this Service.
2. Select the incident severities that should automatically affect this Service when incidents for this integration are created.
We only consider the initial severity set when the incident is created. Manually changing the severity later will not affect the link between the incident, the Service, and the associated Status Pages.
3. Click `Link Integration` to save your changes.
From now on, incidents from this integration will auto-affect your Service and will be visible on Service's Status Pages. You will see the auto-affect as a [routing rule](/advanced/routing) in the [incident's history](/essentials/incident#incident-history)
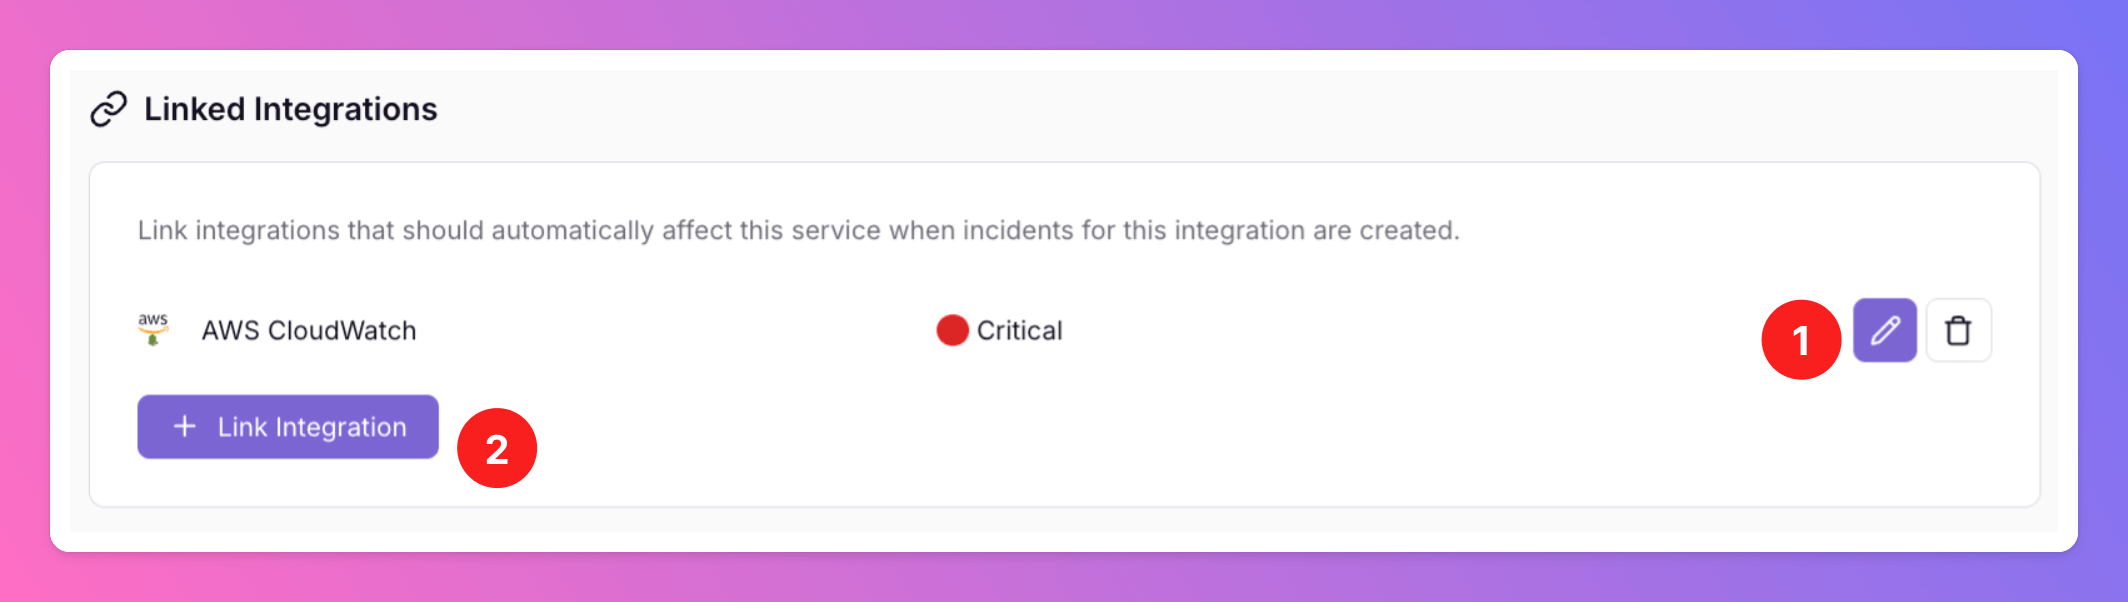
 You can edit (1) and add (2) your Service's linked integrations, anytime.
 #### Team Connections for Services
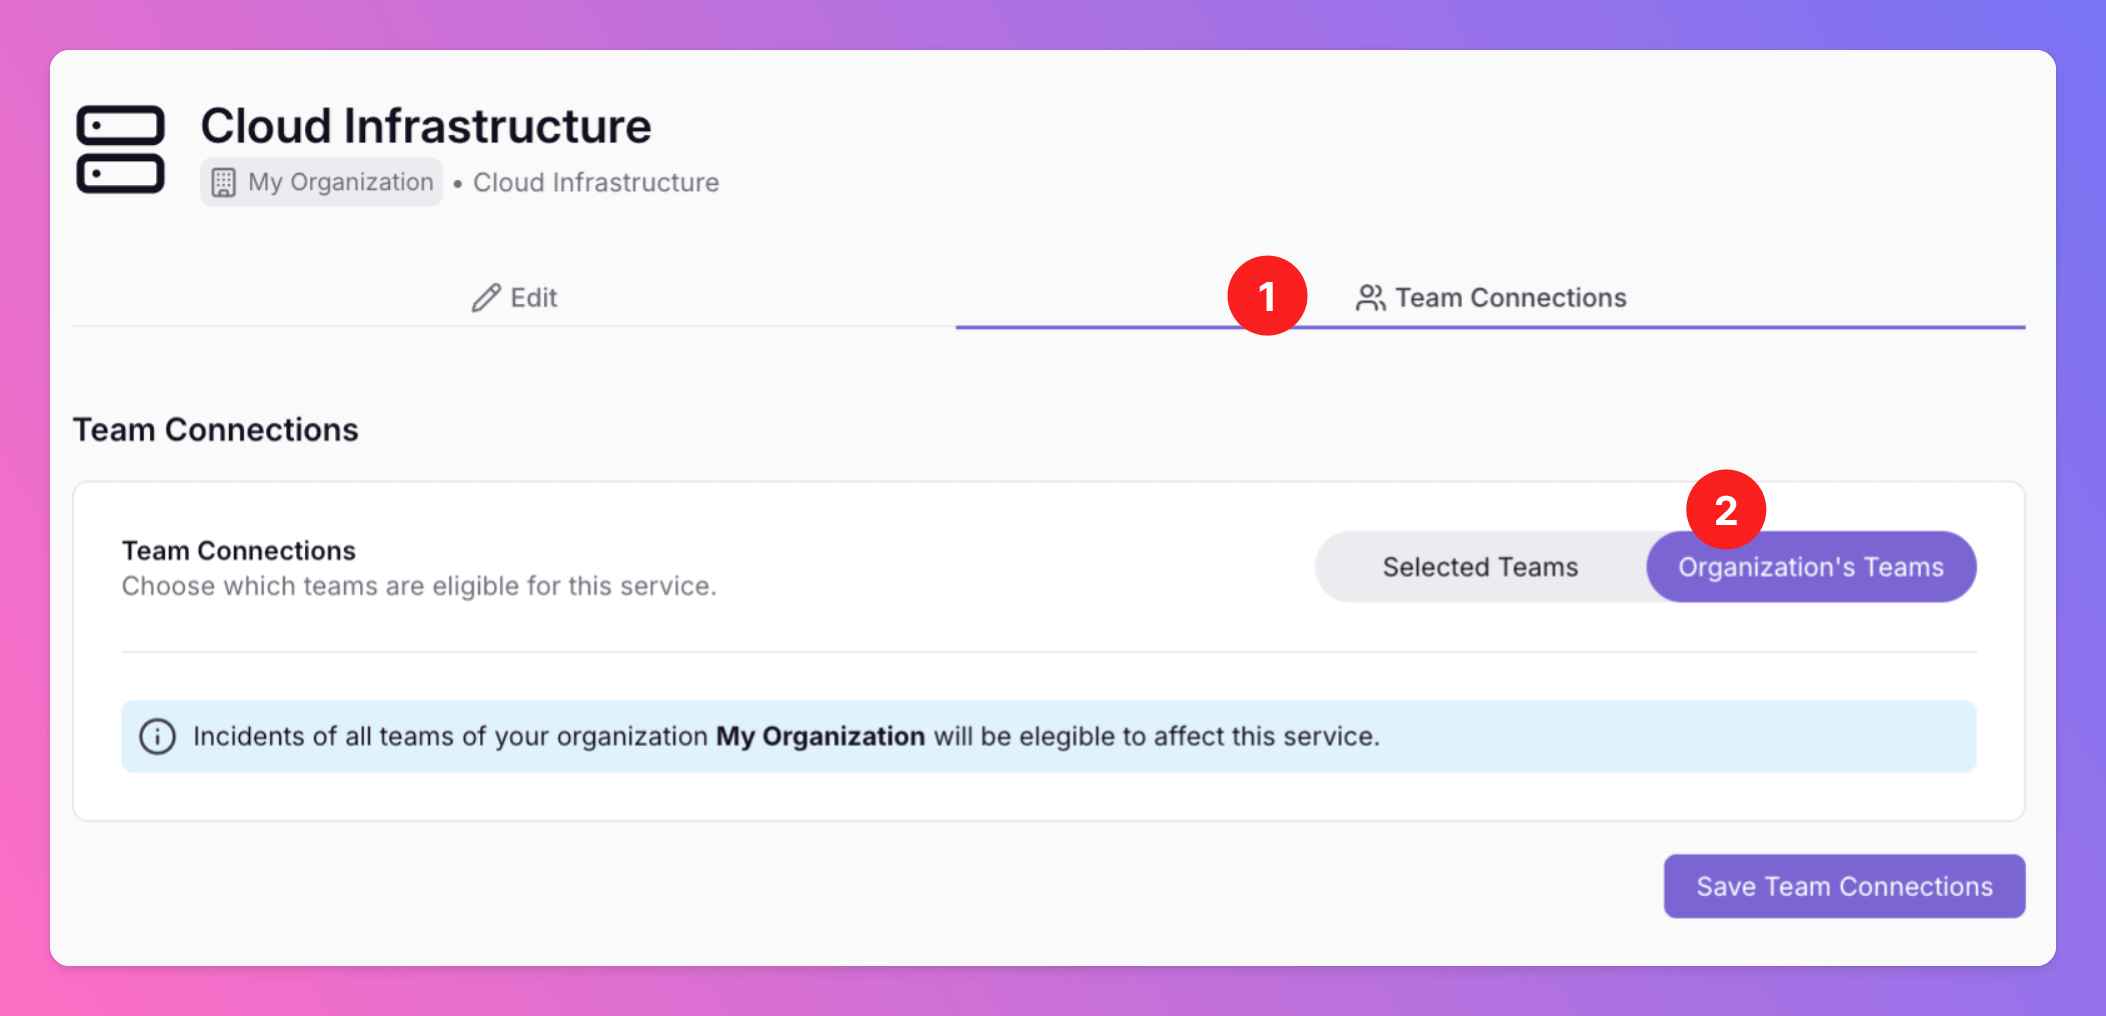
By **default**, each Service is **automatically connected to all Teams within your Organization**.
You can customize these connections using the **Team Connections** tab for any selected Service. Once configured, future incidents can only affect the Service if they are associated with the connected Teams.
#### Team Connections for Services
By **default**, each Service is **automatically connected to all Teams within your Organization**.
You can customize these connections using the **Team Connections** tab for any selected Service. Once configured, future incidents can only affect the Service if they are associated with the connected Teams.
 * Removing a team connection from a Service will also **disable routing rules** for that team that previously affected this Service (see [Routing](/advanced/routing))
* When [assigning](/essentials/incident#assign-to-team) an incident that is already [affecting](/essentials/incident#affects-services) a Service from a team that is connected to the Service to a non-connected team, the incident will continue to affect the Service.
#### Add Message Templates to Service
In the case of an incident, Status Pages offer real-time updates for your customers. To give more context, you might want to add a message if an incident is [affecting](/essentials/incident#affects-services) a Service.
As every second counts during the incident response, you can create message templates that you can easily copy and paste in the event of an incident.
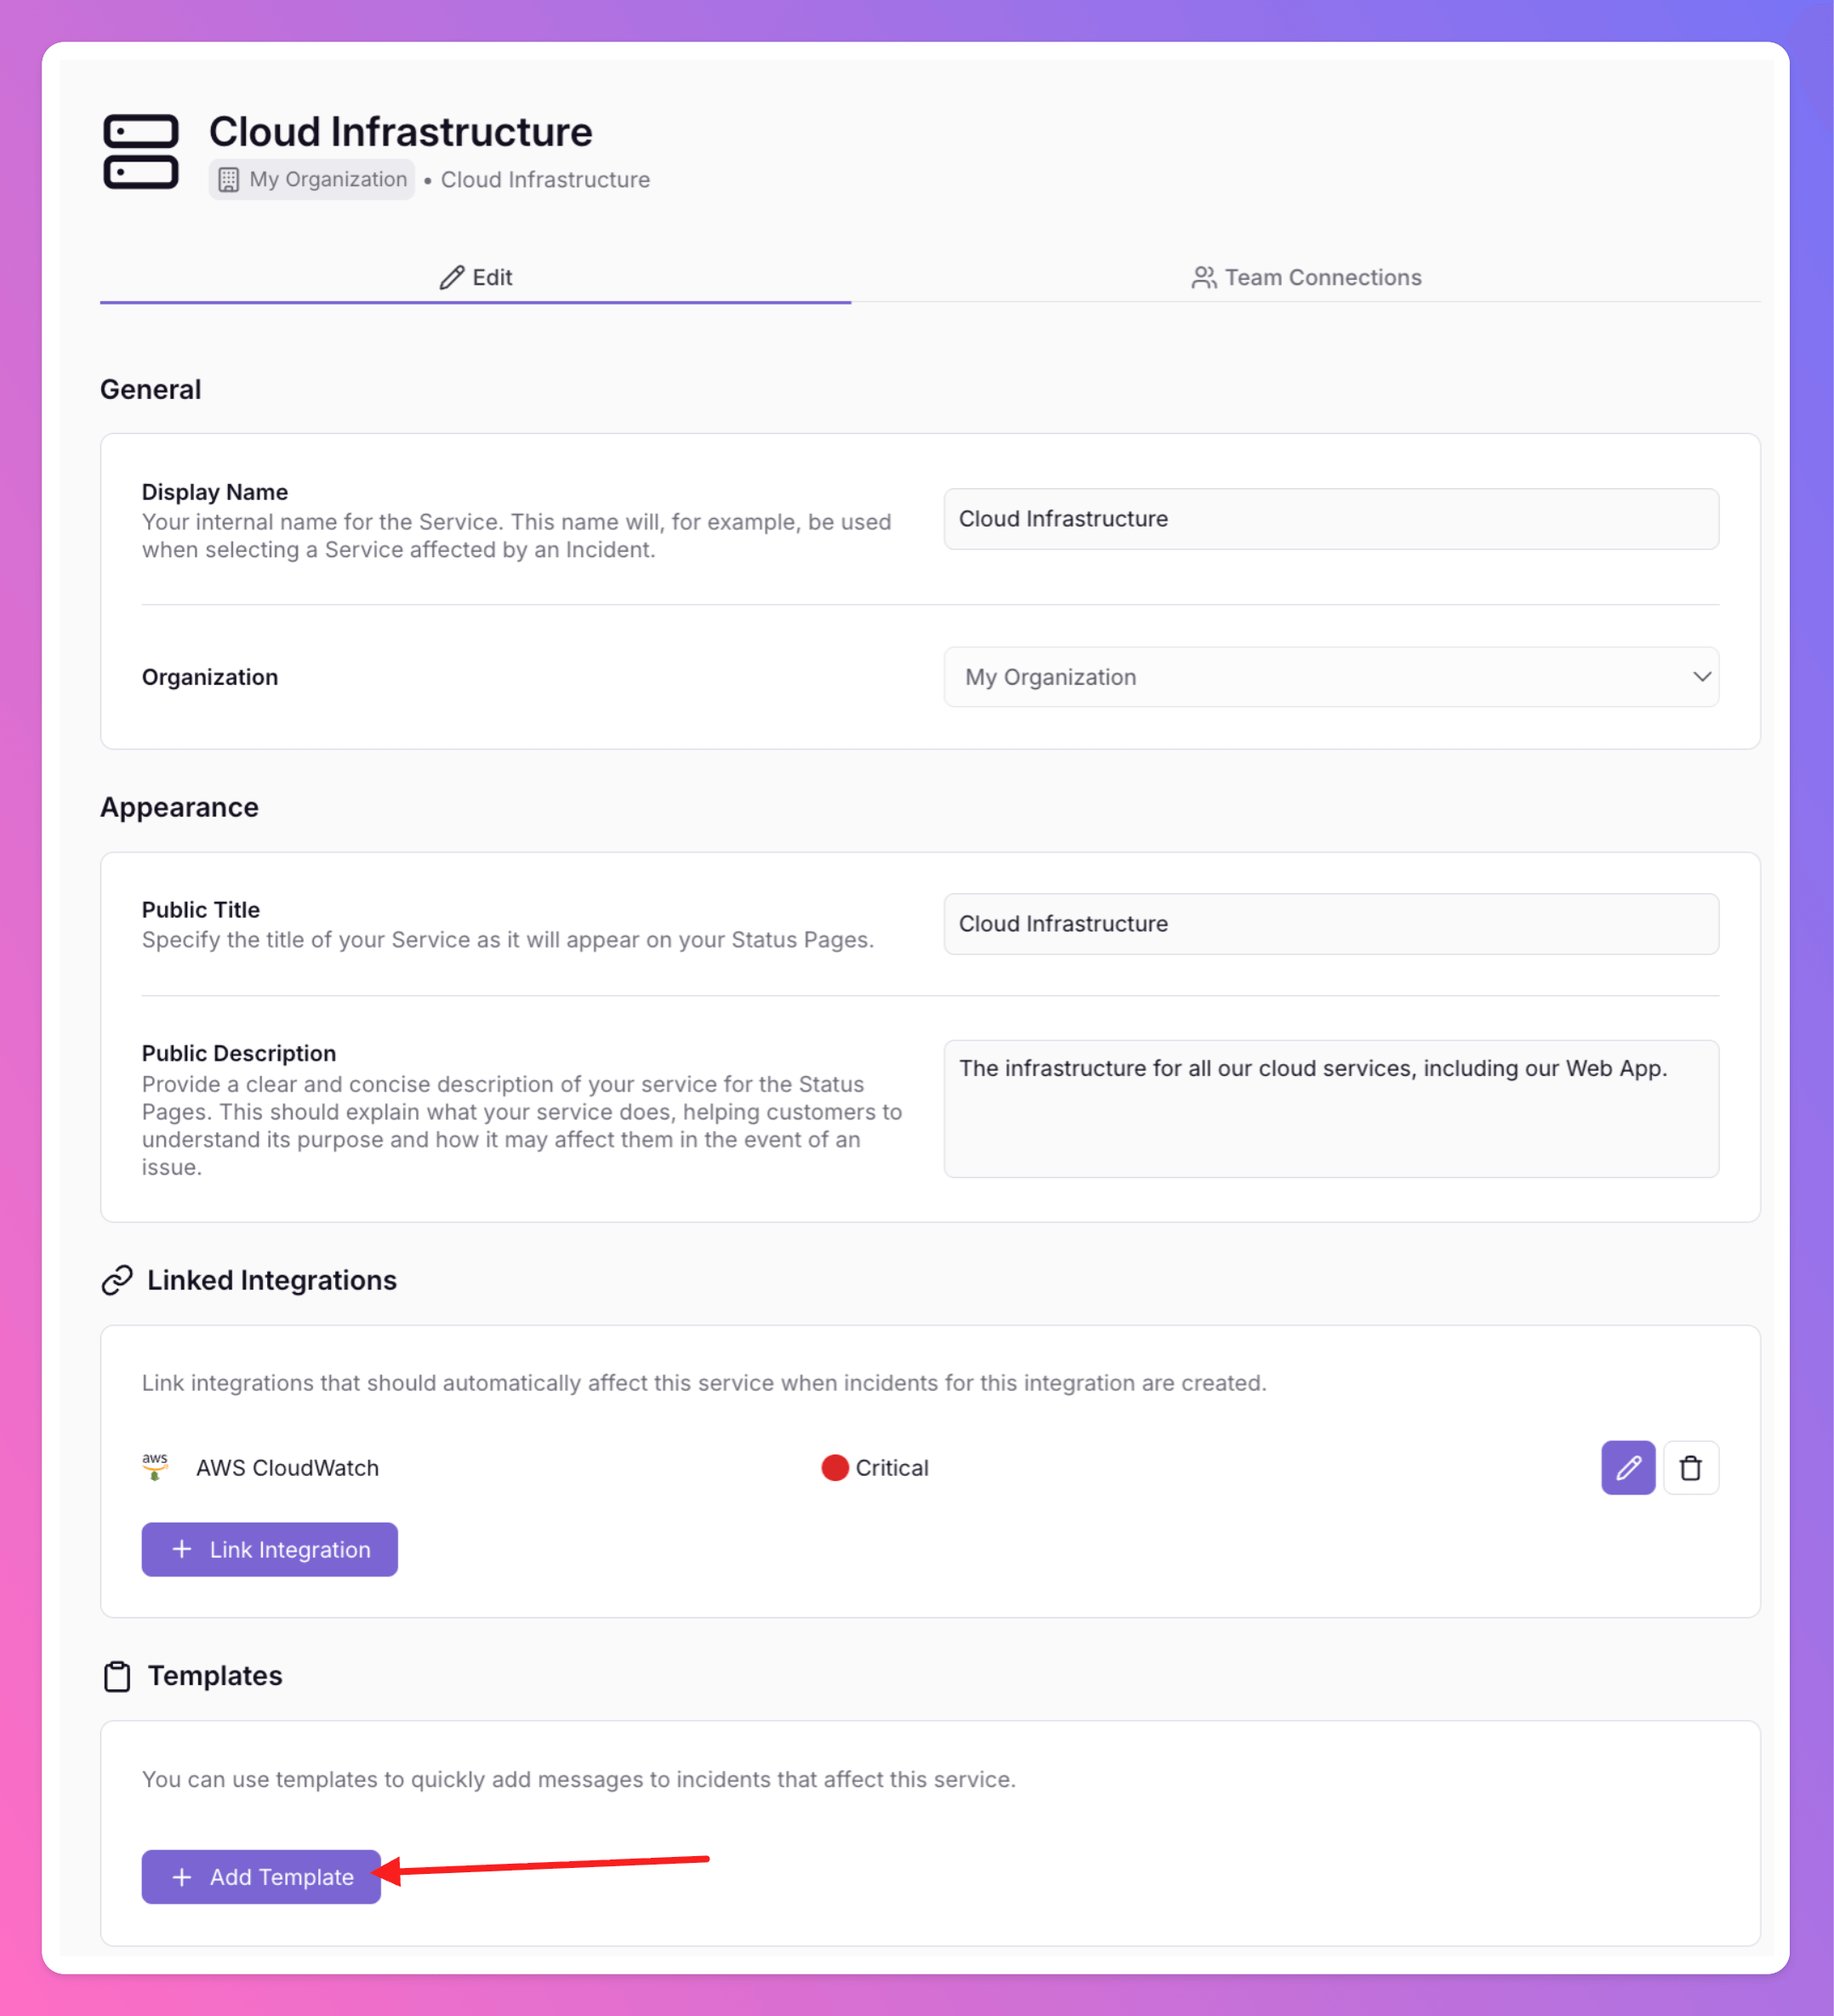
You can find the `Template` section at the bottom of the corresponding Service's page of your web app.
To add a new template, click `+ Add Template`.
* Removing a team connection from a Service will also **disable routing rules** for that team that previously affected this Service (see [Routing](/advanced/routing))
* When [assigning](/essentials/incident#assign-to-team) an incident that is already [affecting](/essentials/incident#affects-services) a Service from a team that is connected to the Service to a non-connected team, the incident will continue to affect the Service.
#### Add Message Templates to Service
In the case of an incident, Status Pages offer real-time updates for your customers. To give more context, you might want to add a message if an incident is [affecting](/essentials/incident#affects-services) a Service.
As every second counts during the incident response, you can create message templates that you can easily copy and paste in the event of an incident.
You can find the `Template` section at the bottom of the corresponding Service's page of your web app.
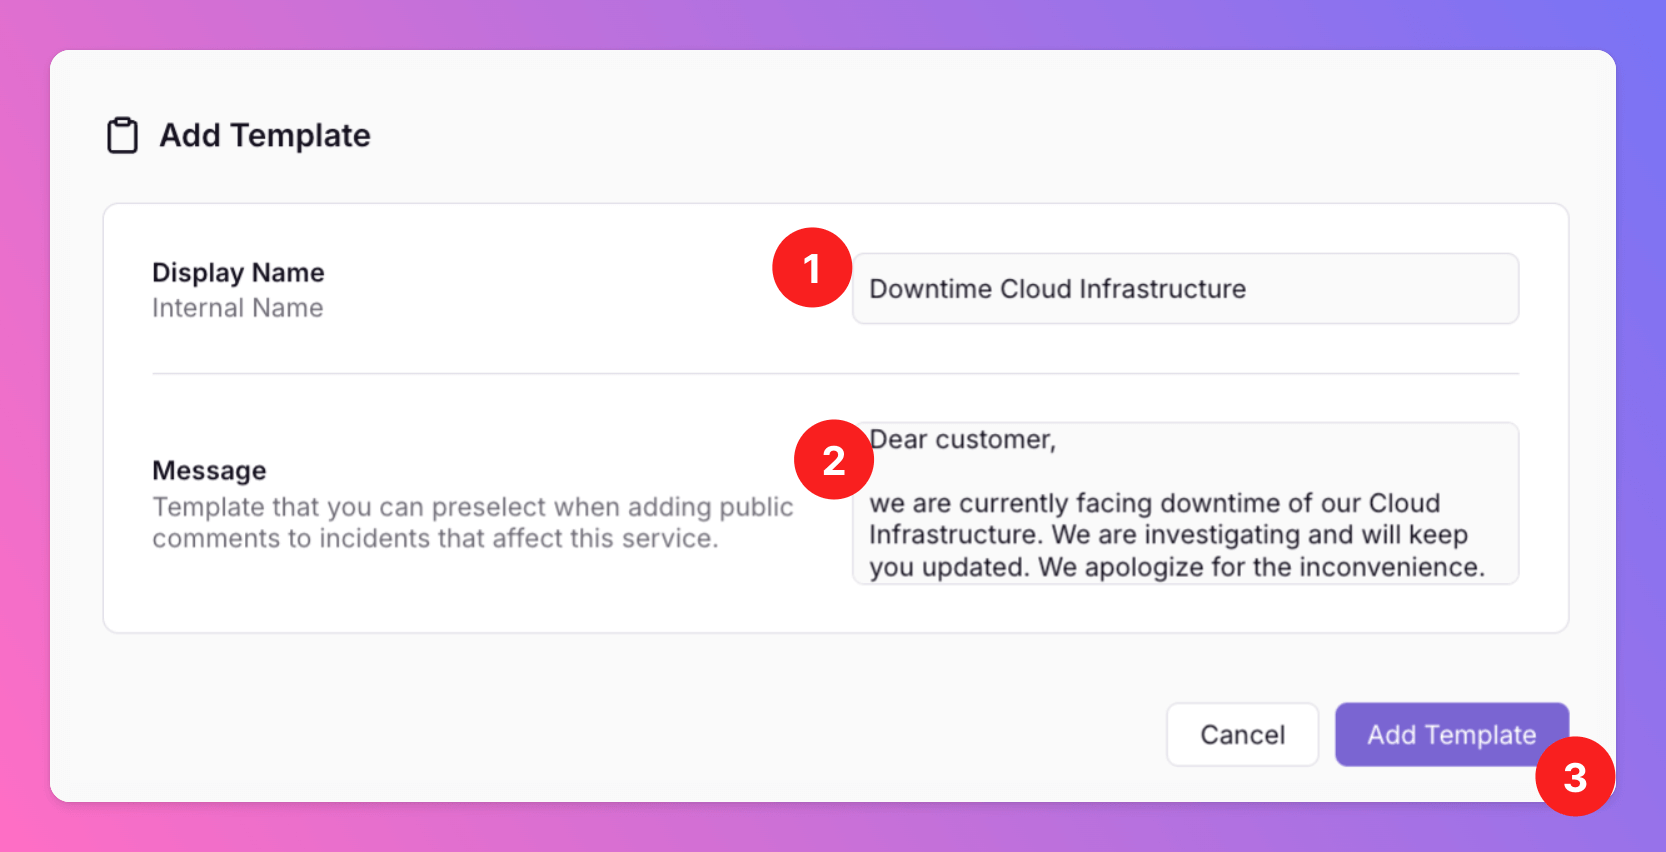
To add a new template, click `+ Add Template`.
 1. Add a `Display Name`, that will be used internally.
2. Prepare the message template that can be used when an incident [affects](/essentials/incident#affects-services) this Service.
3. Click `Add Template`
1. Add a `Display Name`, that will be used internally.
2. Prepare the message template that can be used when an incident [affects](/essentials/incident#affects-services) this Service.
3. Click `Add Template`
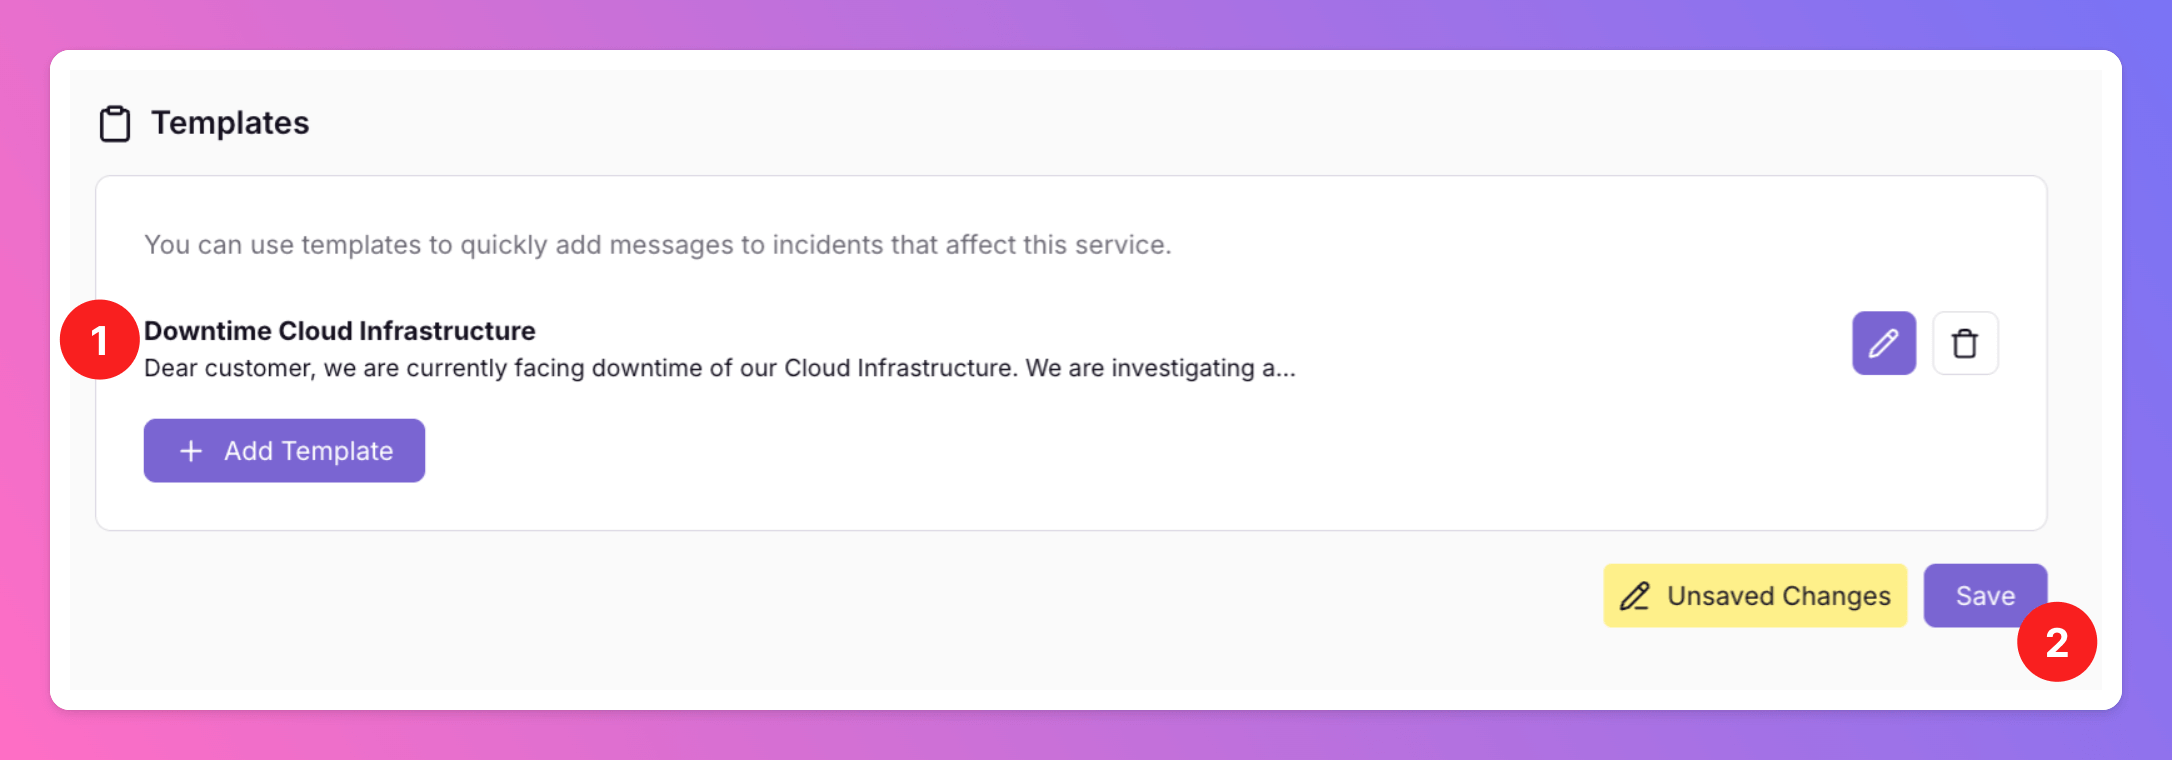
 1. You can see the template you created.
2. `Save` your changes.
1. You can see the template you created.
2. `Save` your changes.
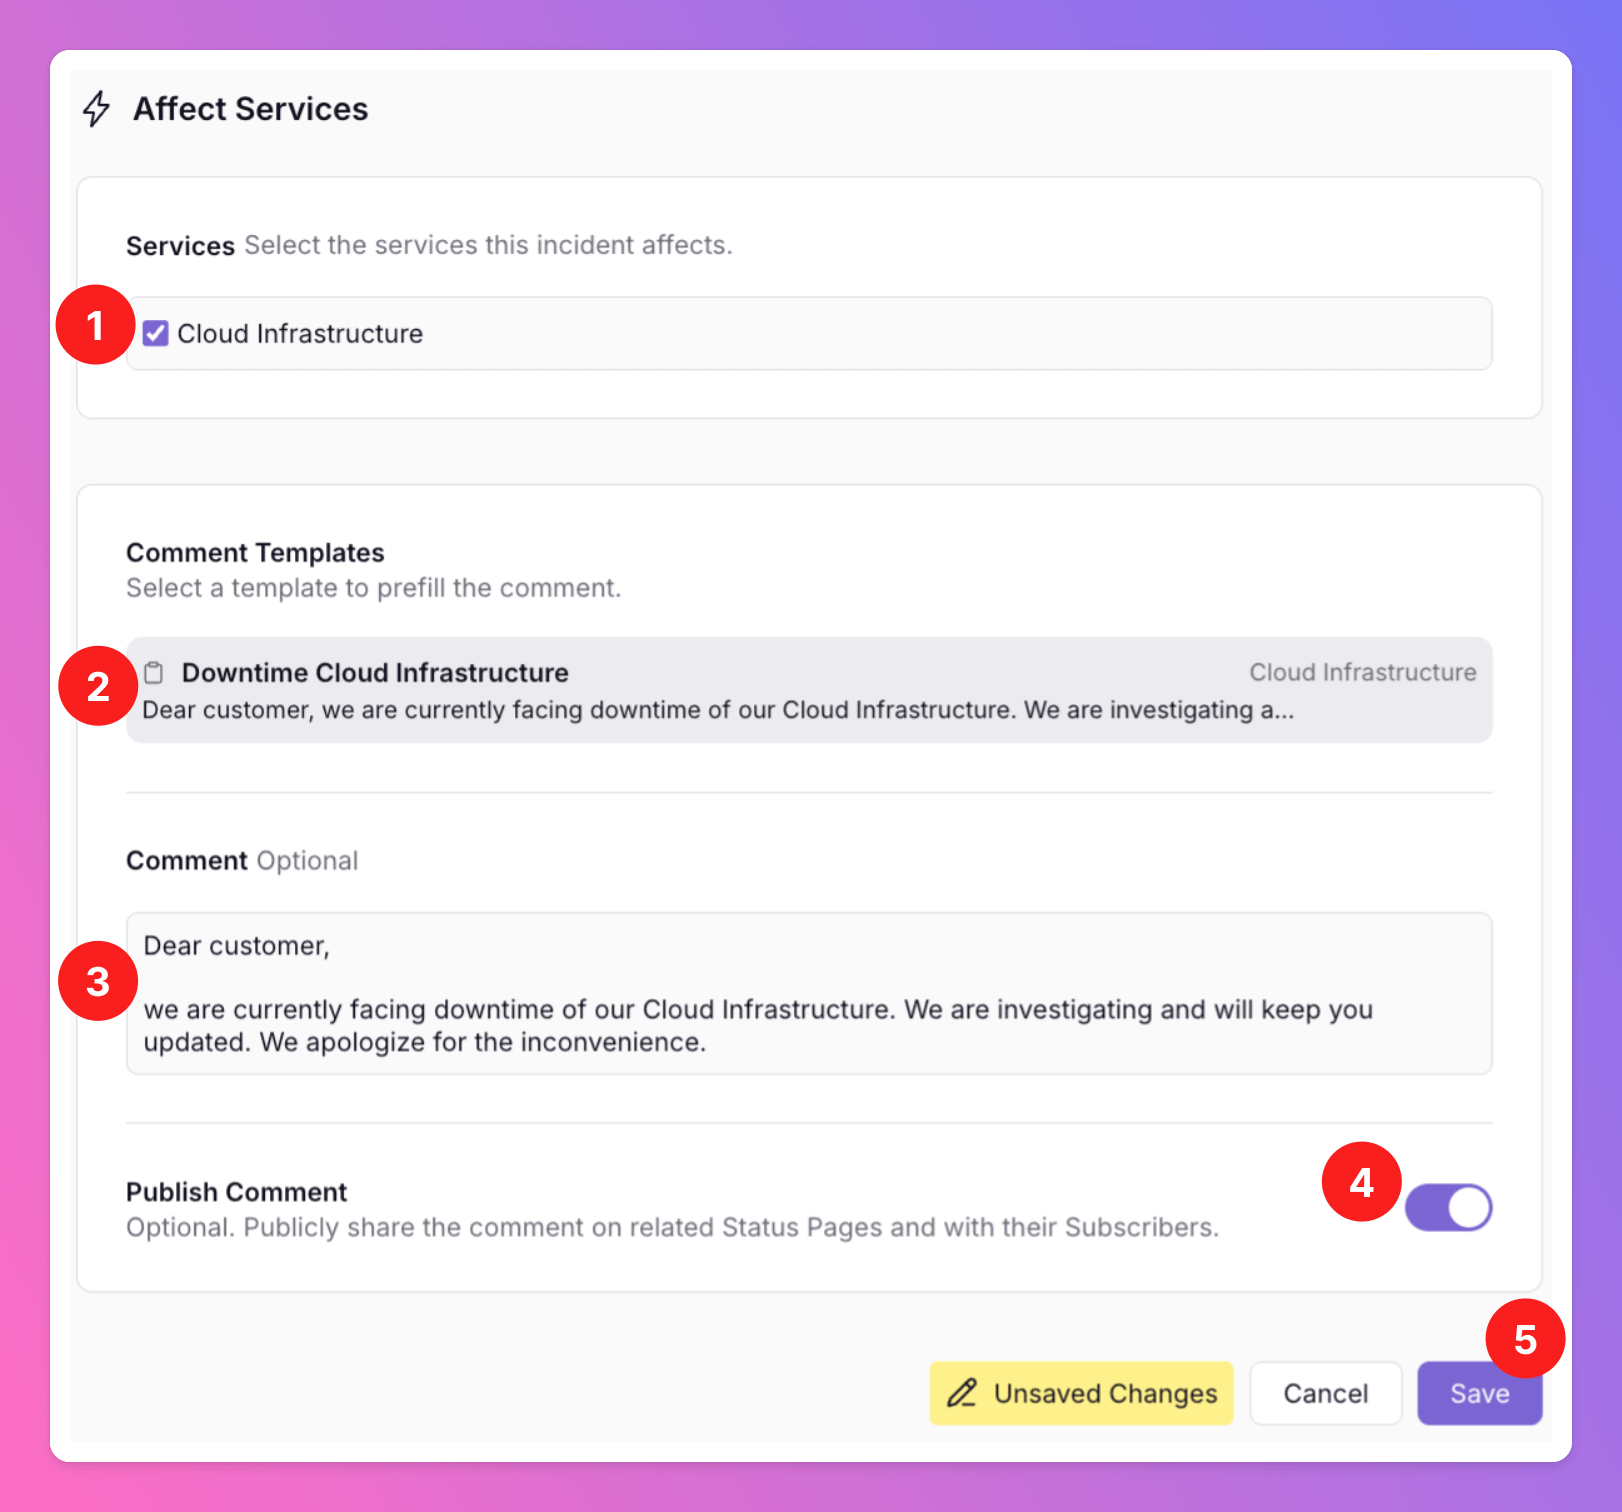
 Next time when selecting the [affect](/essentials/incident#affects-services) action for an incidents, you will see the Template.
1. Select the Service that you created the template for
2. You will see the related templates.
3. Per click, you can add the text from the template as commment.
4. Select `Publish Comment` to publish the comment on your Status Pages and send it in an email to your subscribers.
Next time when selecting the [affect](/essentials/incident#affects-services) action for an incidents, you will see the Template.
1. Select the Service that you created the template for
2. You will see the related templates.
3. Per click, you can add the text from the template as commment.
4. Select `Publish Comment` to publish the comment on your Status Pages and send it in an email to your subscribers.
 ### Create a Status Page
Only *Organization Owners* and *Organization Administrators* have the permissions to create and edit Status Pages. *Organization Members* can edit maintenances for the Services and have view-only access to the Status Page. They cannot see the Status Page's subscribers.
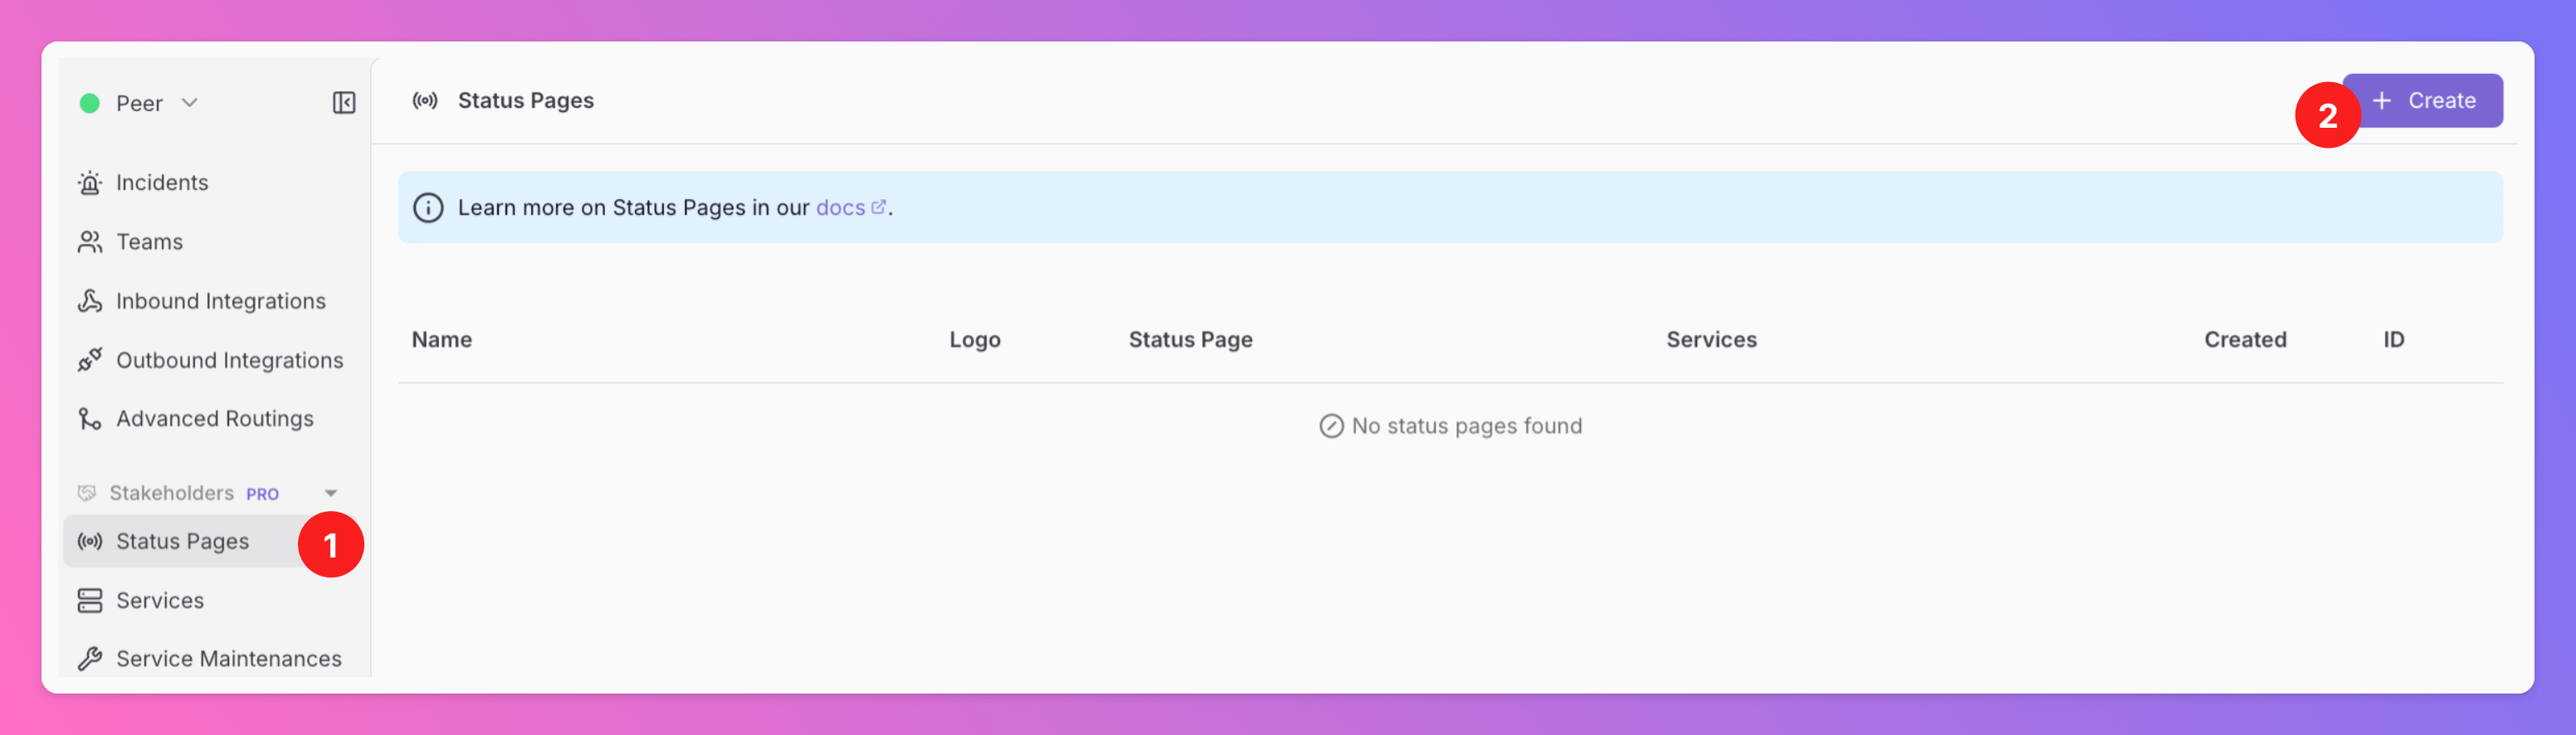
After creating at least 1 Service, we can create our first Status Page.
1. Select `Status Pages` in the Web App.
2. Click `+ Create`
### Create a Status Page
Only *Organization Owners* and *Organization Administrators* have the permissions to create and edit Status Pages. *Organization Members* can edit maintenances for the Services and have view-only access to the Status Page. They cannot see the Status Page's subscribers.
After creating at least 1 Service, we can create our first Status Page.
1. Select `Status Pages` in the Web App.
2. Click `+ Create`
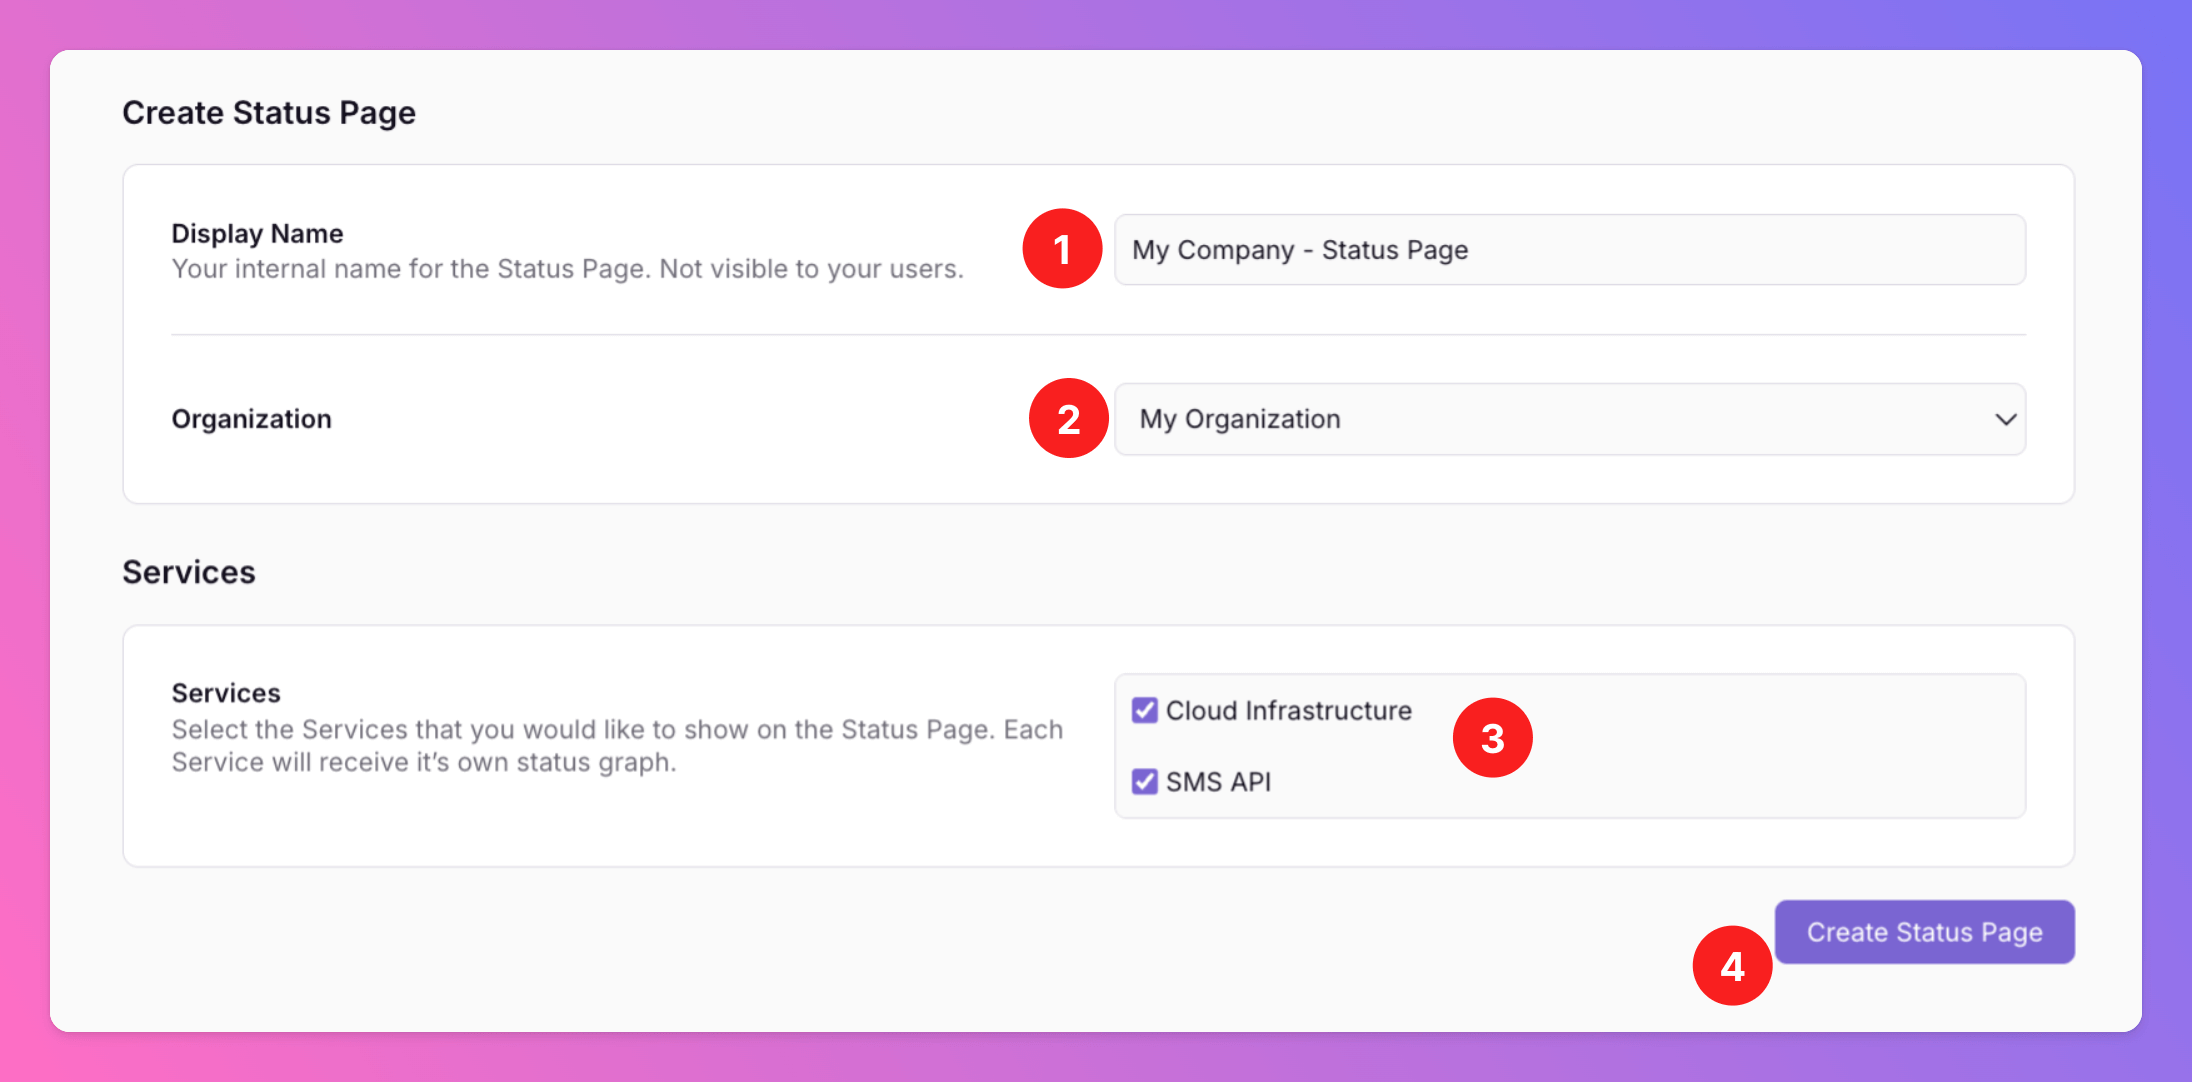
 To create a Status Page, fill out the following form.
1. Select a `Display Name` for the Status Page. It is used **only inside All Quiet** (not on the public page). If you **do not** set a **Public Title** under [Public Appearance](/advanced/status-pages#public-appearance-of-status-page), this Display Name is used as a **fallback in emails and SMS** to subscribers when the Status Page must be named in those messages.
2. Select the `Organization` of the Status Page. Only Services belonging to this organization can be displayed on the Status Page.
3. Select the Services that you want to display on your Status Page. Each Service will be visible with it's own status graph, showing it's current status and historical data.
You can add / remove Services via the [`Structure`](/advanced/status-pages#structure-of-status-page) section of your Status Page, anytime.
4. Next, select `Create Status Page`.
To create a Status Page, fill out the following form.
1. Select a `Display Name` for the Status Page. It is used **only inside All Quiet** (not on the public page). If you **do not** set a **Public Title** under [Public Appearance](/advanced/status-pages#public-appearance-of-status-page), this Display Name is used as a **fallback in emails and SMS** to subscribers when the Status Page must be named in those messages.
2. Select the `Organization` of the Status Page. Only Services belonging to this organization can be displayed on the Status Page.
3. Select the Services that you want to display on your Status Page. Each Service will be visible with it's own status graph, showing it's current status and historical data.
You can add / remove Services via the [`Structure`](/advanced/status-pages#structure-of-status-page) section of your Status Page, anytime.
4. Next, select `Create Status Page`.
 ### Edit Status Page
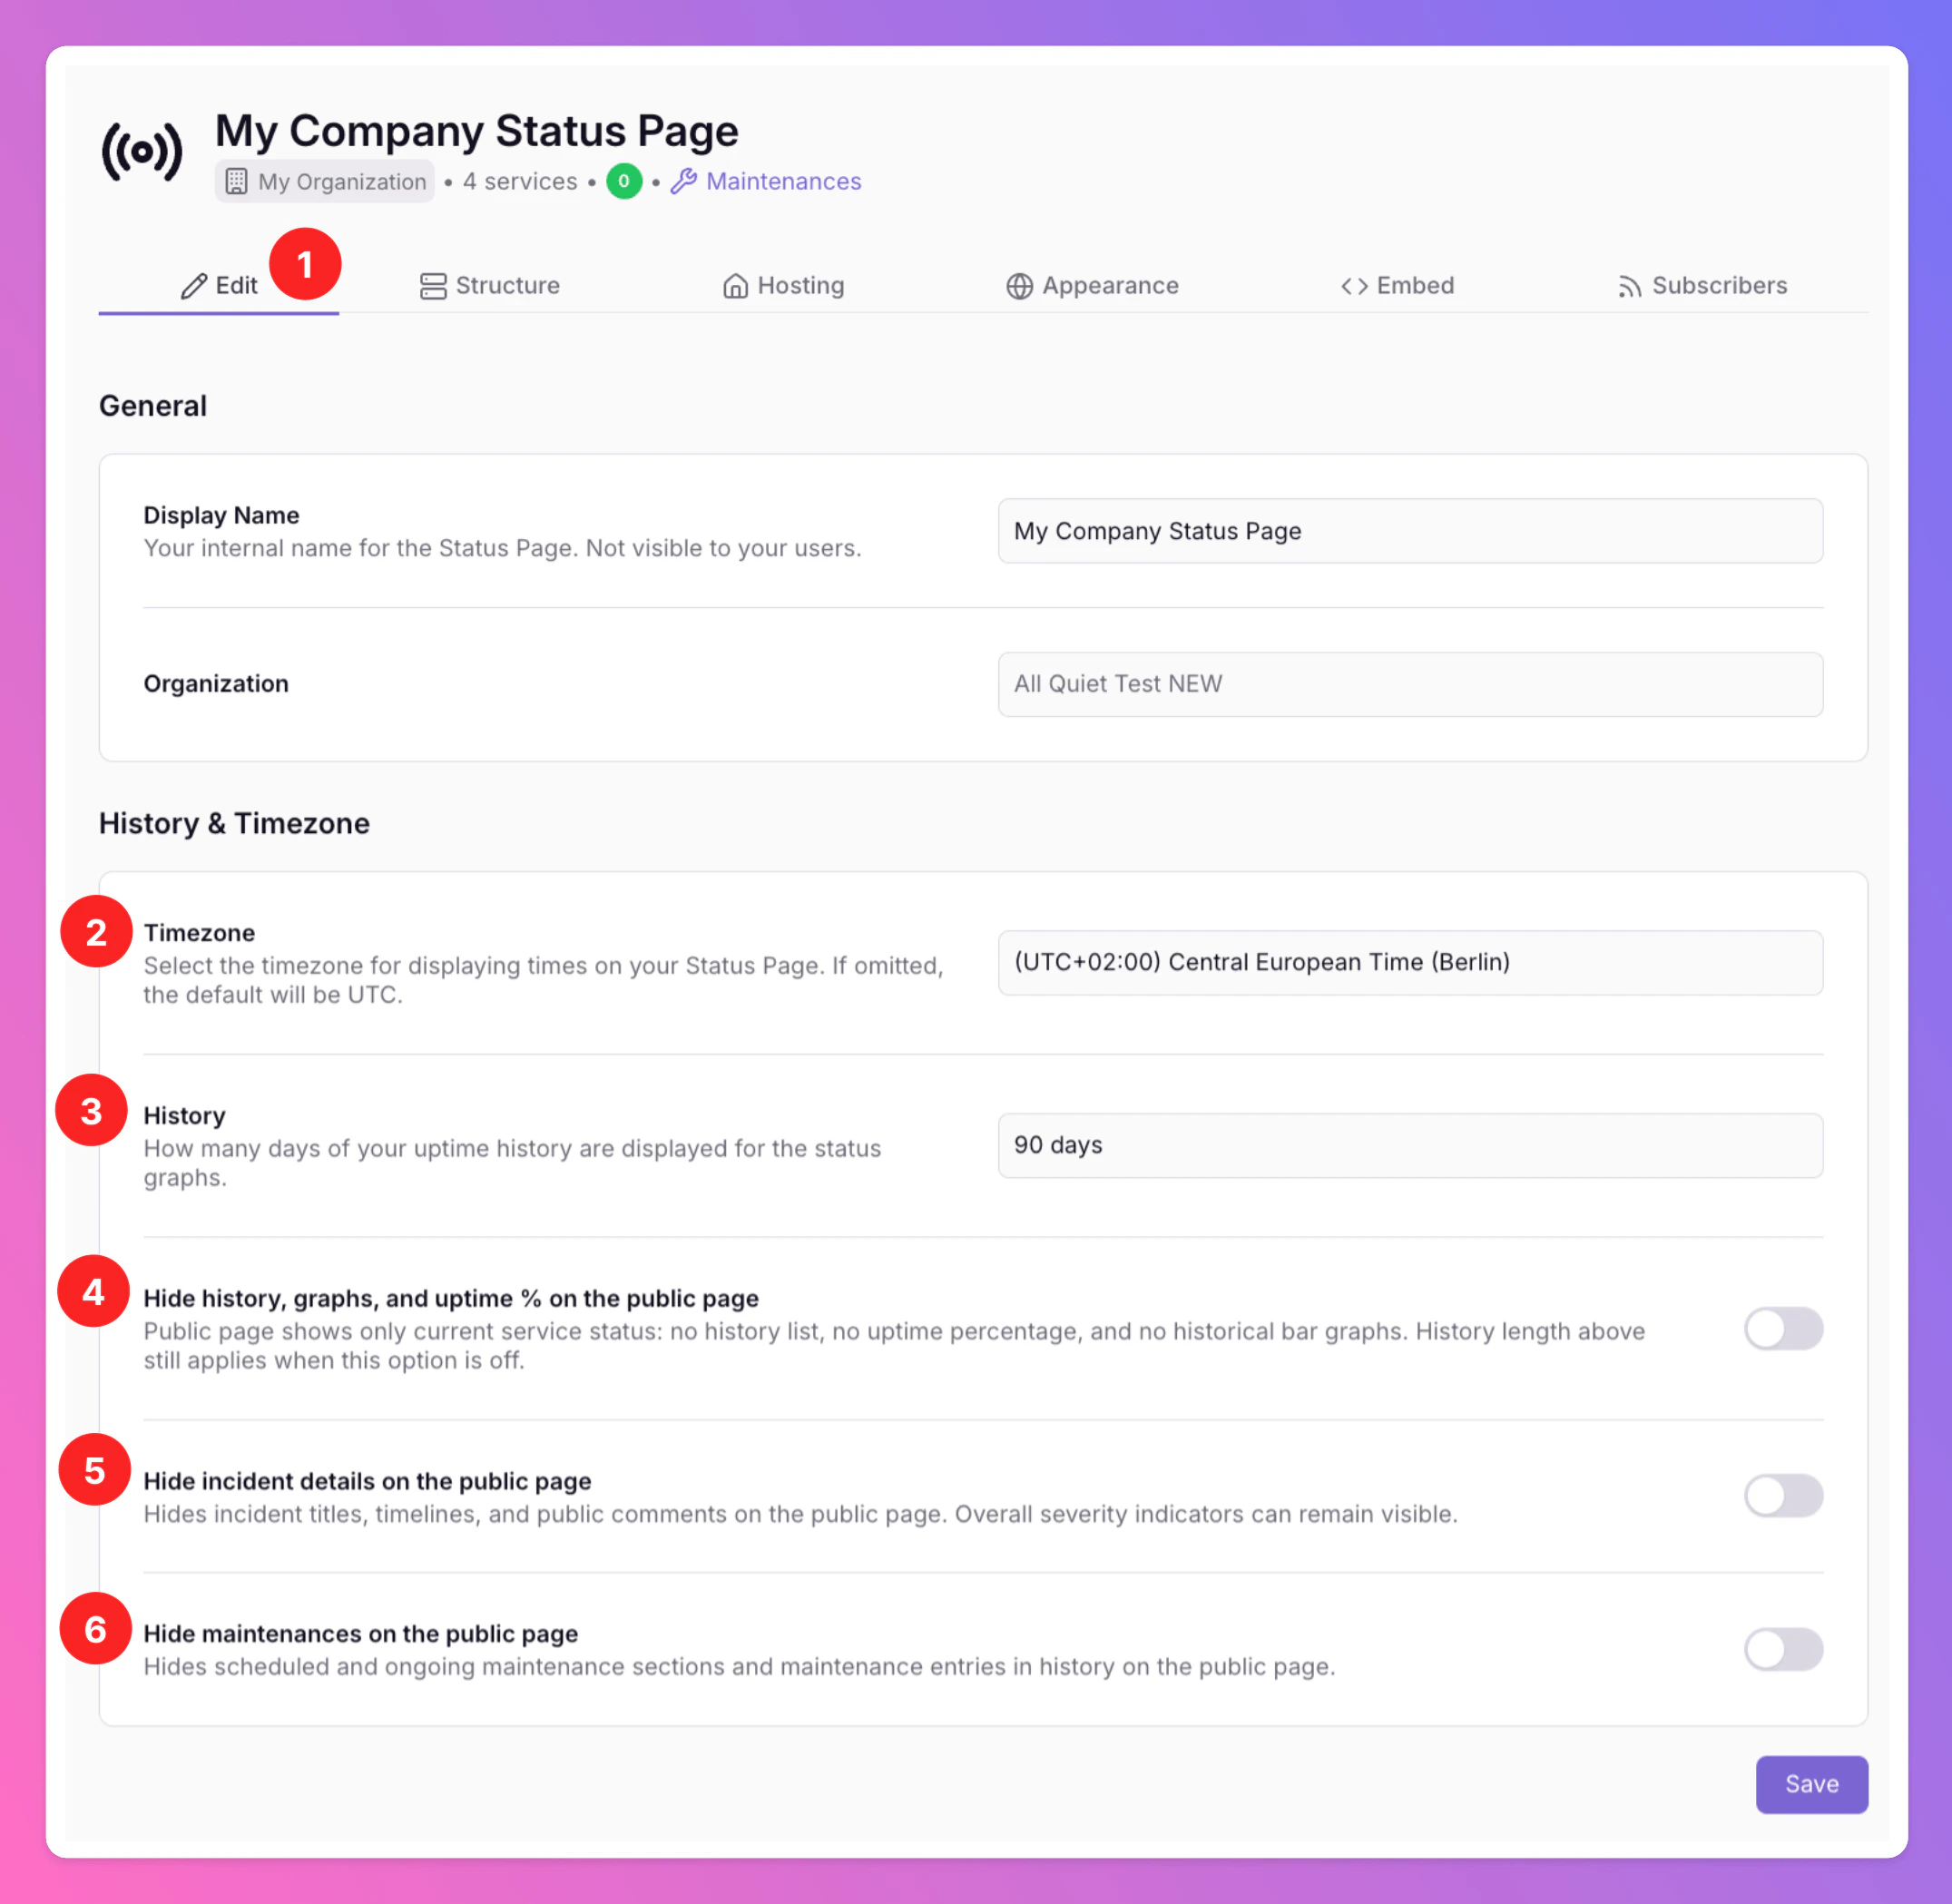
Next, you will find the following menu:
1. There are six different tabs to configure your Status Page, [Edit](/advanced/status-pages#edit-status-page), [Structure](/advanced/status-pages#structure-of-status-page), [Hosting](/advanced/status-pages#hosting-of-status-page), [Public Appearance](/advanced/status-pages#public-appearance-of-status-page), [Embed](/advanced/status-pages#embed-status-page) and [Subscribers](/advanced/status-pages#manage-subscribers-of-status-page). In the **Edit** tab, you will find the information you entered to create the Status Page. You can change it anytime.
2. Select the `Timezone` for displaying times on your Status Page. If omitted, the default timezone is UTC.
3. Select how many days of uptime history you want to display for your Services on the Status Page. Select between different timeframes, ranging from last 7 days to the whole last year.
4. `Hide history, graphs, and uptime % on the public page`: Public page shows only current service status—no uptime percentage and no historical bar graphs. Incident history pages (opened by clicking the status graph) are also hidden. The history length above still applies when this option is off.
5. `Hide incident details on the public page`: Hides incident titles, timelines, and public comments on the public page and hides incident history pages. Overall severity indicators remain visible.
6. `Hide maintenances on the public page`: Hides scheduled and ongoing maintenance sections on the public page, and hides history of maintenances on incident history pages.
Don't forget to `Save` your changes.
As soon as you defined a URL for your Status Page in the [hosting section](/advanced/status-pages#hosting-of-status-page), you will find it in the header.
### Edit Status Page
Next, you will find the following menu:
1. There are six different tabs to configure your Status Page, [Edit](/advanced/status-pages#edit-status-page), [Structure](/advanced/status-pages#structure-of-status-page), [Hosting](/advanced/status-pages#hosting-of-status-page), [Public Appearance](/advanced/status-pages#public-appearance-of-status-page), [Embed](/advanced/status-pages#embed-status-page) and [Subscribers](/advanced/status-pages#manage-subscribers-of-status-page). In the **Edit** tab, you will find the information you entered to create the Status Page. You can change it anytime.
2. Select the `Timezone` for displaying times on your Status Page. If omitted, the default timezone is UTC.
3. Select how many days of uptime history you want to display for your Services on the Status Page. Select between different timeframes, ranging from last 7 days to the whole last year.
4. `Hide history, graphs, and uptime % on the public page`: Public page shows only current service status—no uptime percentage and no historical bar graphs. Incident history pages (opened by clicking the status graph) are also hidden. The history length above still applies when this option is off.
5. `Hide incident details on the public page`: Hides incident titles, timelines, and public comments on the public page and hides incident history pages. Overall severity indicators remain visible.
6. `Hide maintenances on the public page`: Hides scheduled and ongoing maintenance sections on the public page, and hides history of maintenances on incident history pages.
Don't forget to `Save` your changes.
As soon as you defined a URL for your Status Page in the [hosting section](/advanced/status-pages#hosting-of-status-page), you will find it in the header.
 ### Structure of Status Page
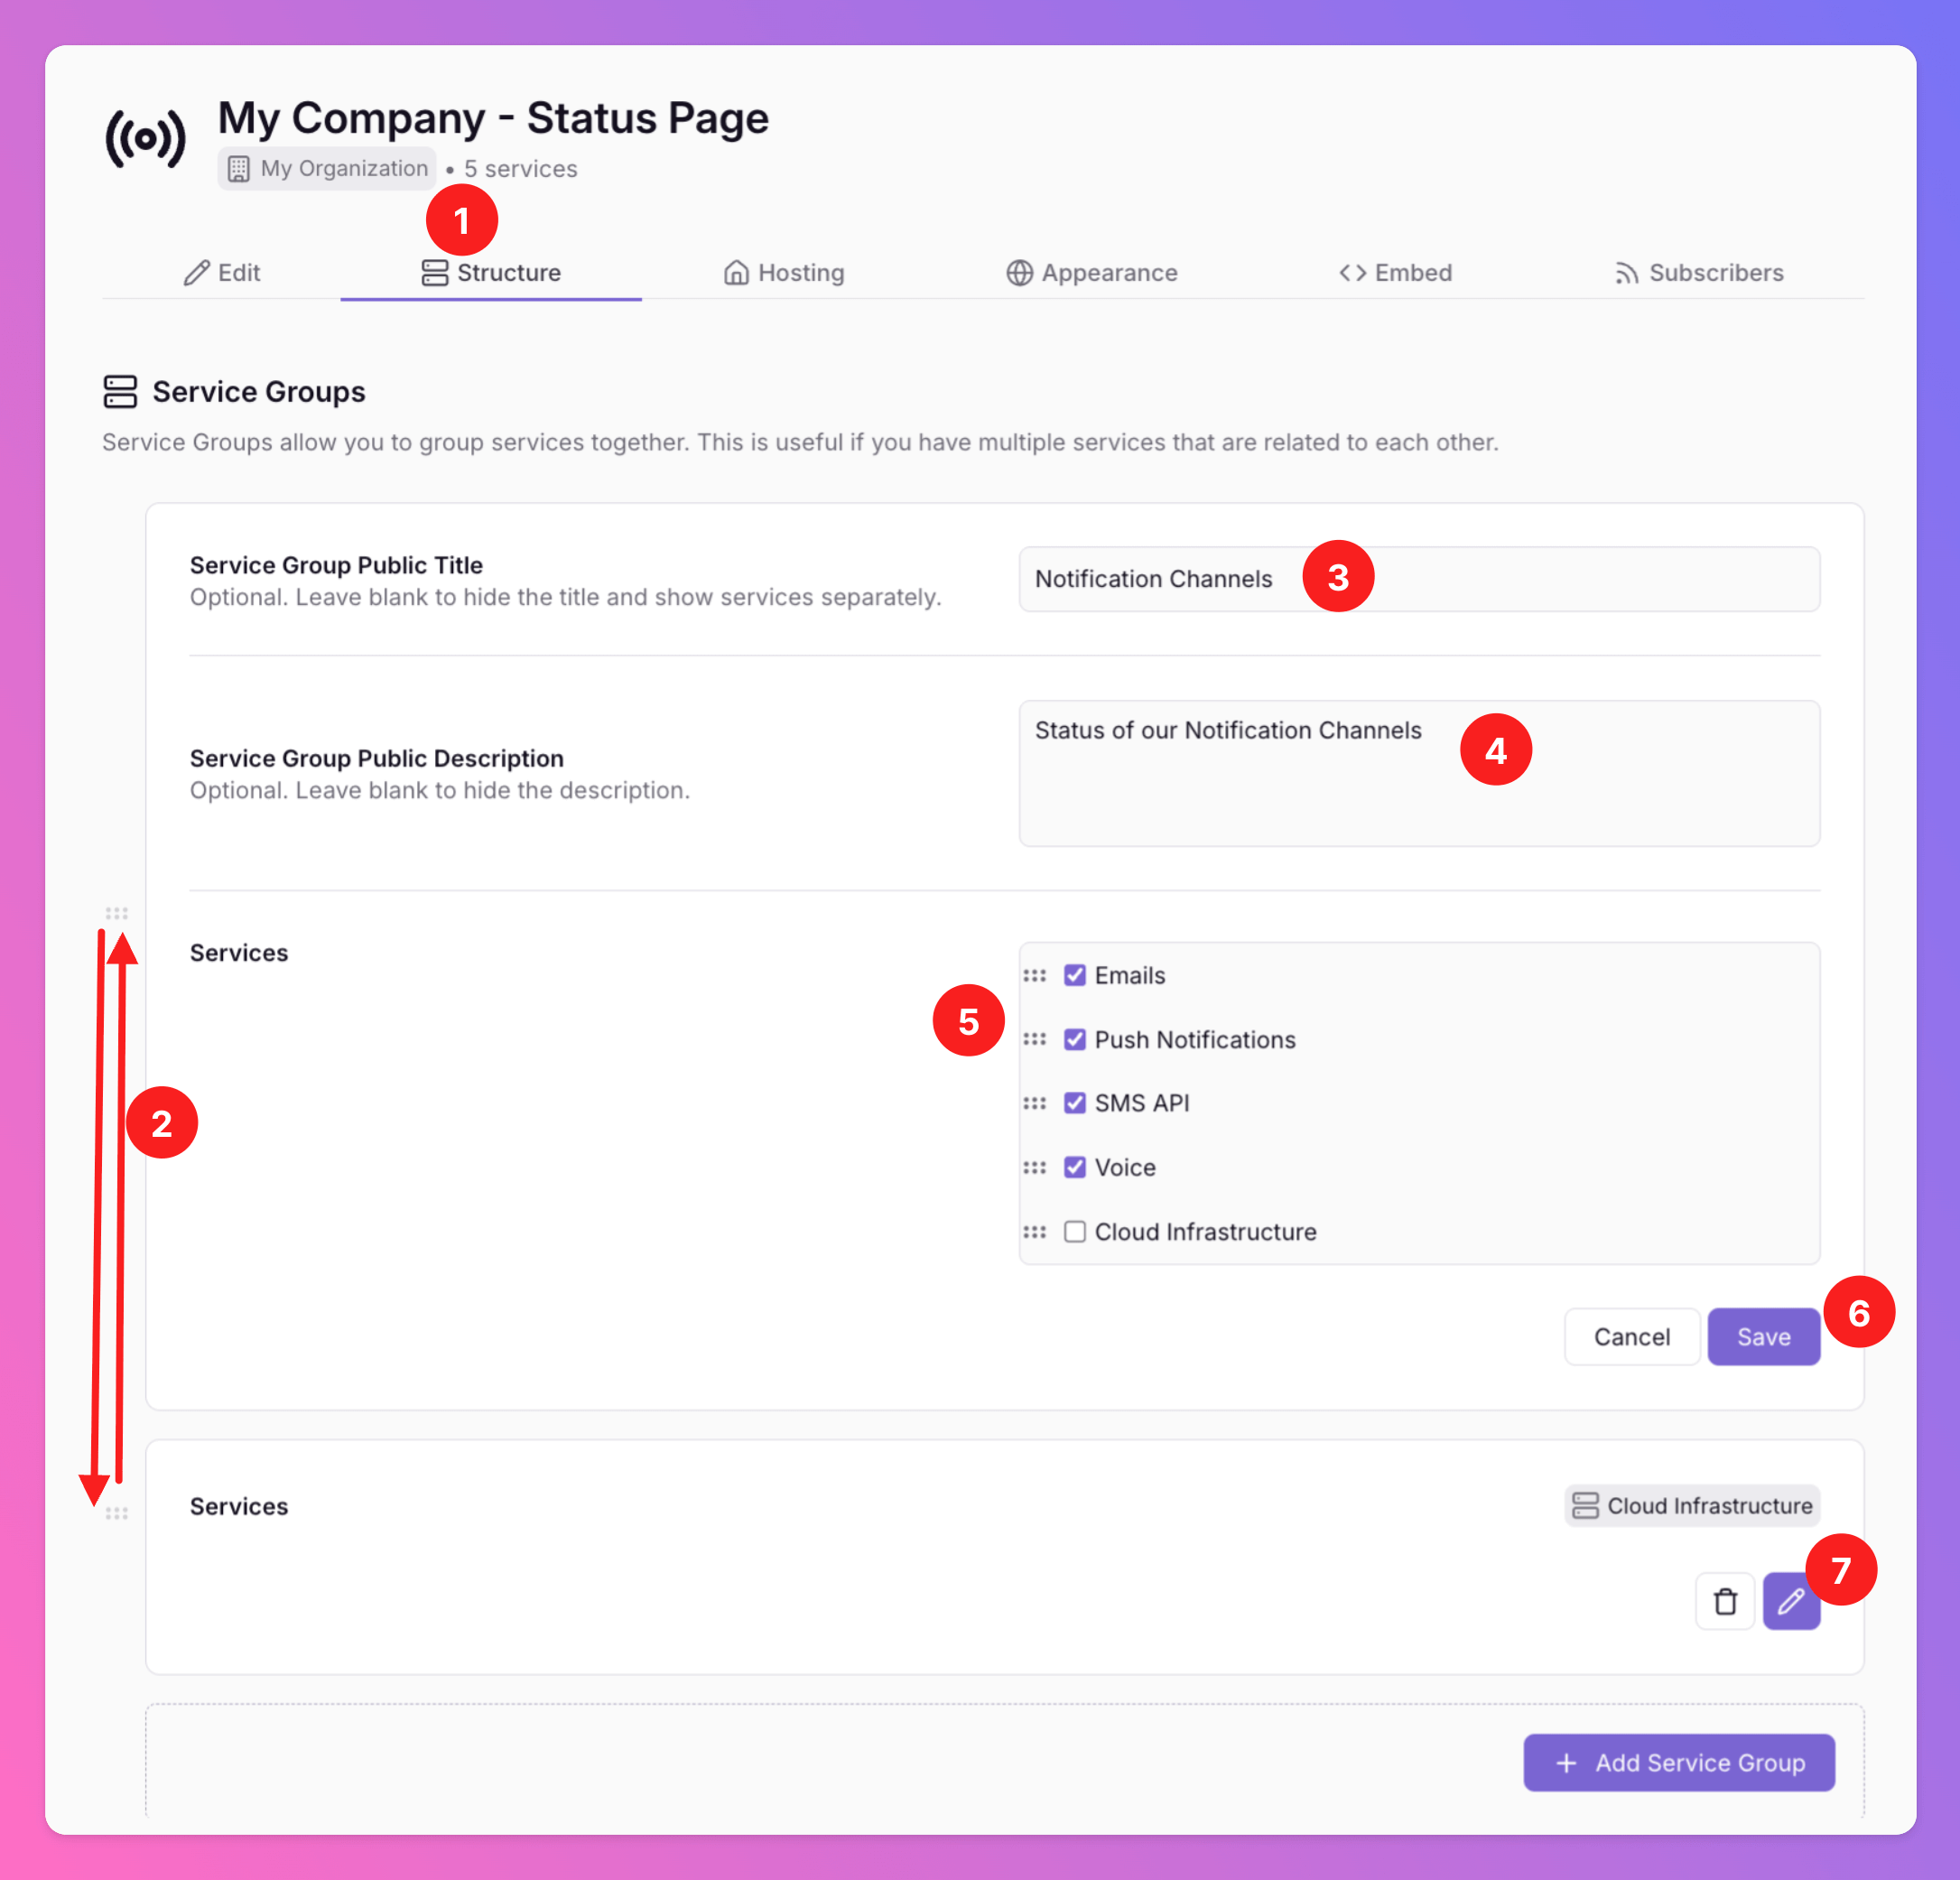
Next, define how your Status Pages are organized — including how related Services are grouped and ordered on the page.
1. This can be done via the `Structure` tab.
2. In this example, there are two separate Service groups. You can rearrange their order using drag-and-drop.
3. When editing a group, you can set a `Service Group Public Title`. If a title is set, all Services in the group will be collapsed under this heading on the Status Page. If no title is provided, each Service will be displayed individually (see below).
4. You may add a `Service Group Public Description` if a `Service Group Public Title` is set.
5. You can also add, remove and sort Services within one group.
6. Don't forget to save your changes.
7. Example for a Service group with one Service and without `Service Group Public Title`.
Add additional groups using the `+ Add Service Group` button at the buttom of the page.
### Structure of Status Page
Next, define how your Status Pages are organized — including how related Services are grouped and ordered on the page.
1. This can be done via the `Structure` tab.
2. In this example, there are two separate Service groups. You can rearrange their order using drag-and-drop.
3. When editing a group, you can set a `Service Group Public Title`. If a title is set, all Services in the group will be collapsed under this heading on the Status Page. If no title is provided, each Service will be displayed individually (see below).
4. You may add a `Service Group Public Description` if a `Service Group Public Title` is set.
5. You can also add, remove and sort Services within one group.
6. Don't forget to save your changes.
7. Example for a Service group with one Service and without `Service Group Public Title`.
Add additional groups using the `+ Add Service Group` button at the buttom of the page.
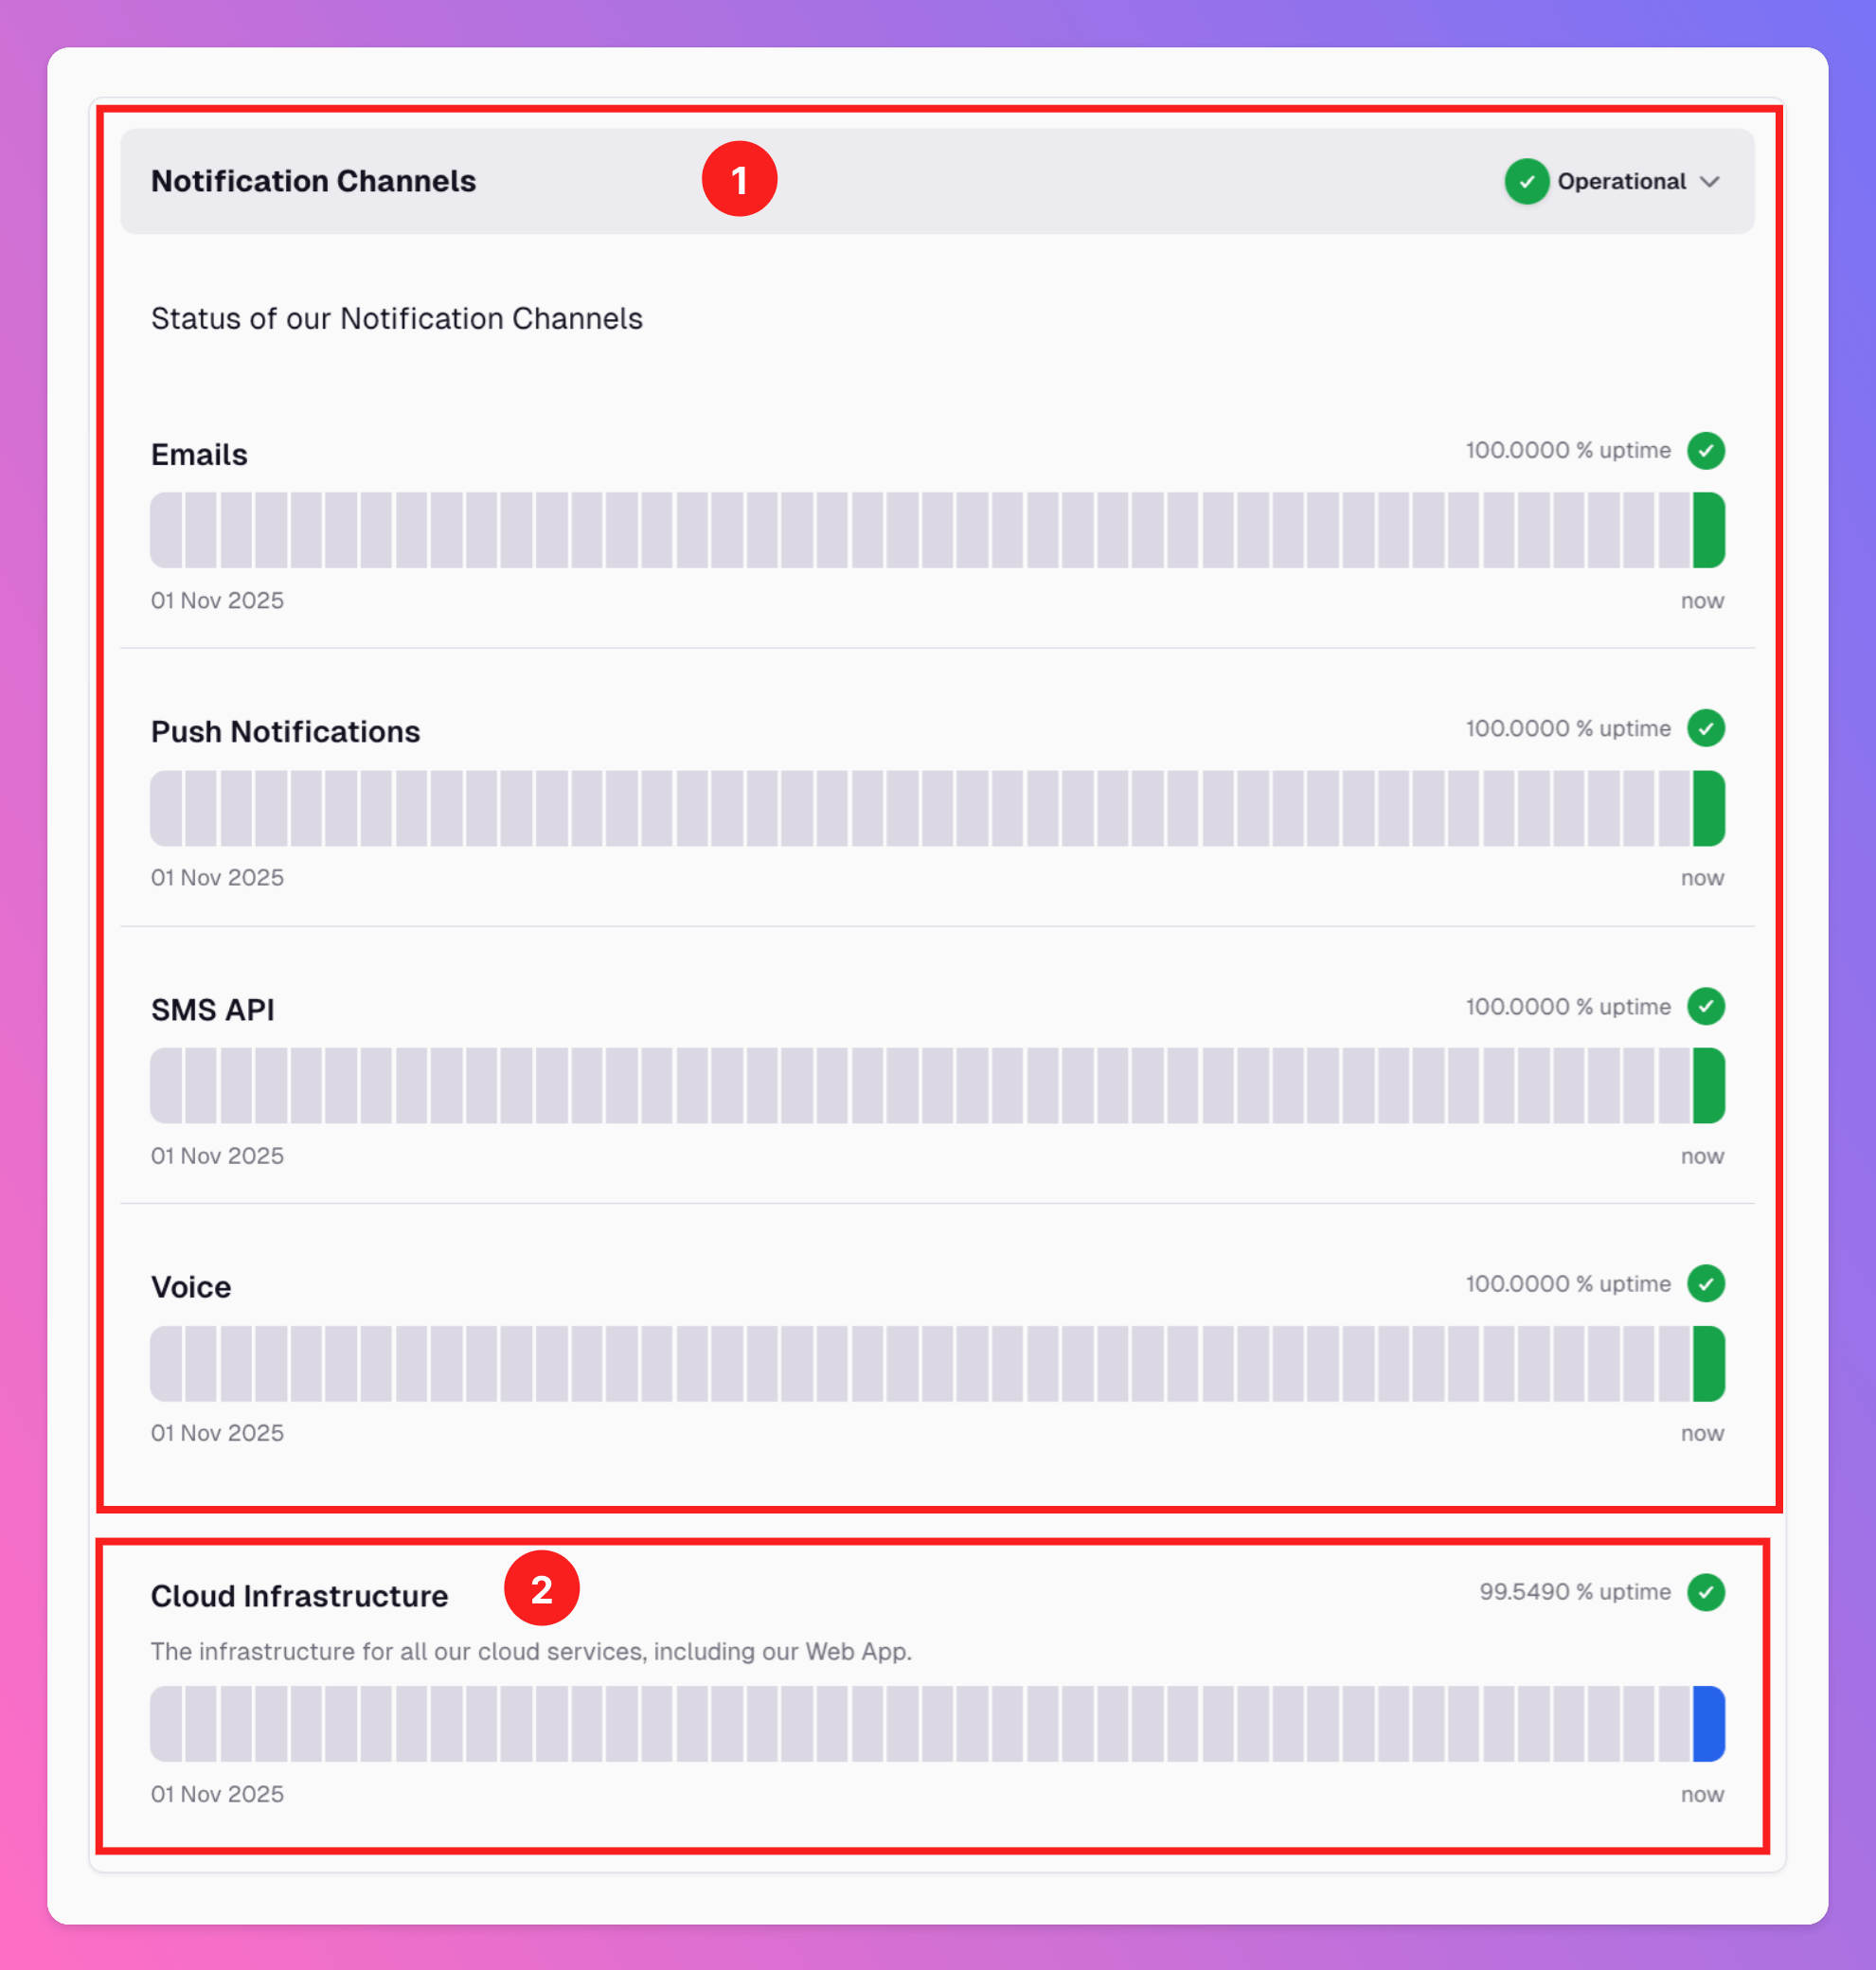
 Once you’ve activated your Status Page in the [Hosting](/advanced/status-pages#hosting-of-status-page) section, your setup will appear like this on the live page.
1. Service Group **with** `Service Group Public Title` (expanded).
2. Service Group **without** `Service Group Public Title`.
Once you’ve activated your Status Page in the [Hosting](/advanced/status-pages#hosting-of-status-page) section, your setup will appear like this on the live page.
1. Service Group **with** `Service Group Public Title` (expanded).
2. Service Group **without** `Service Group Public Title`.
 ### Hosting of Status Page
You can either host your Status Pages on our domain or host them on your own custom domain (cname).
#### Hosted on All Quiet
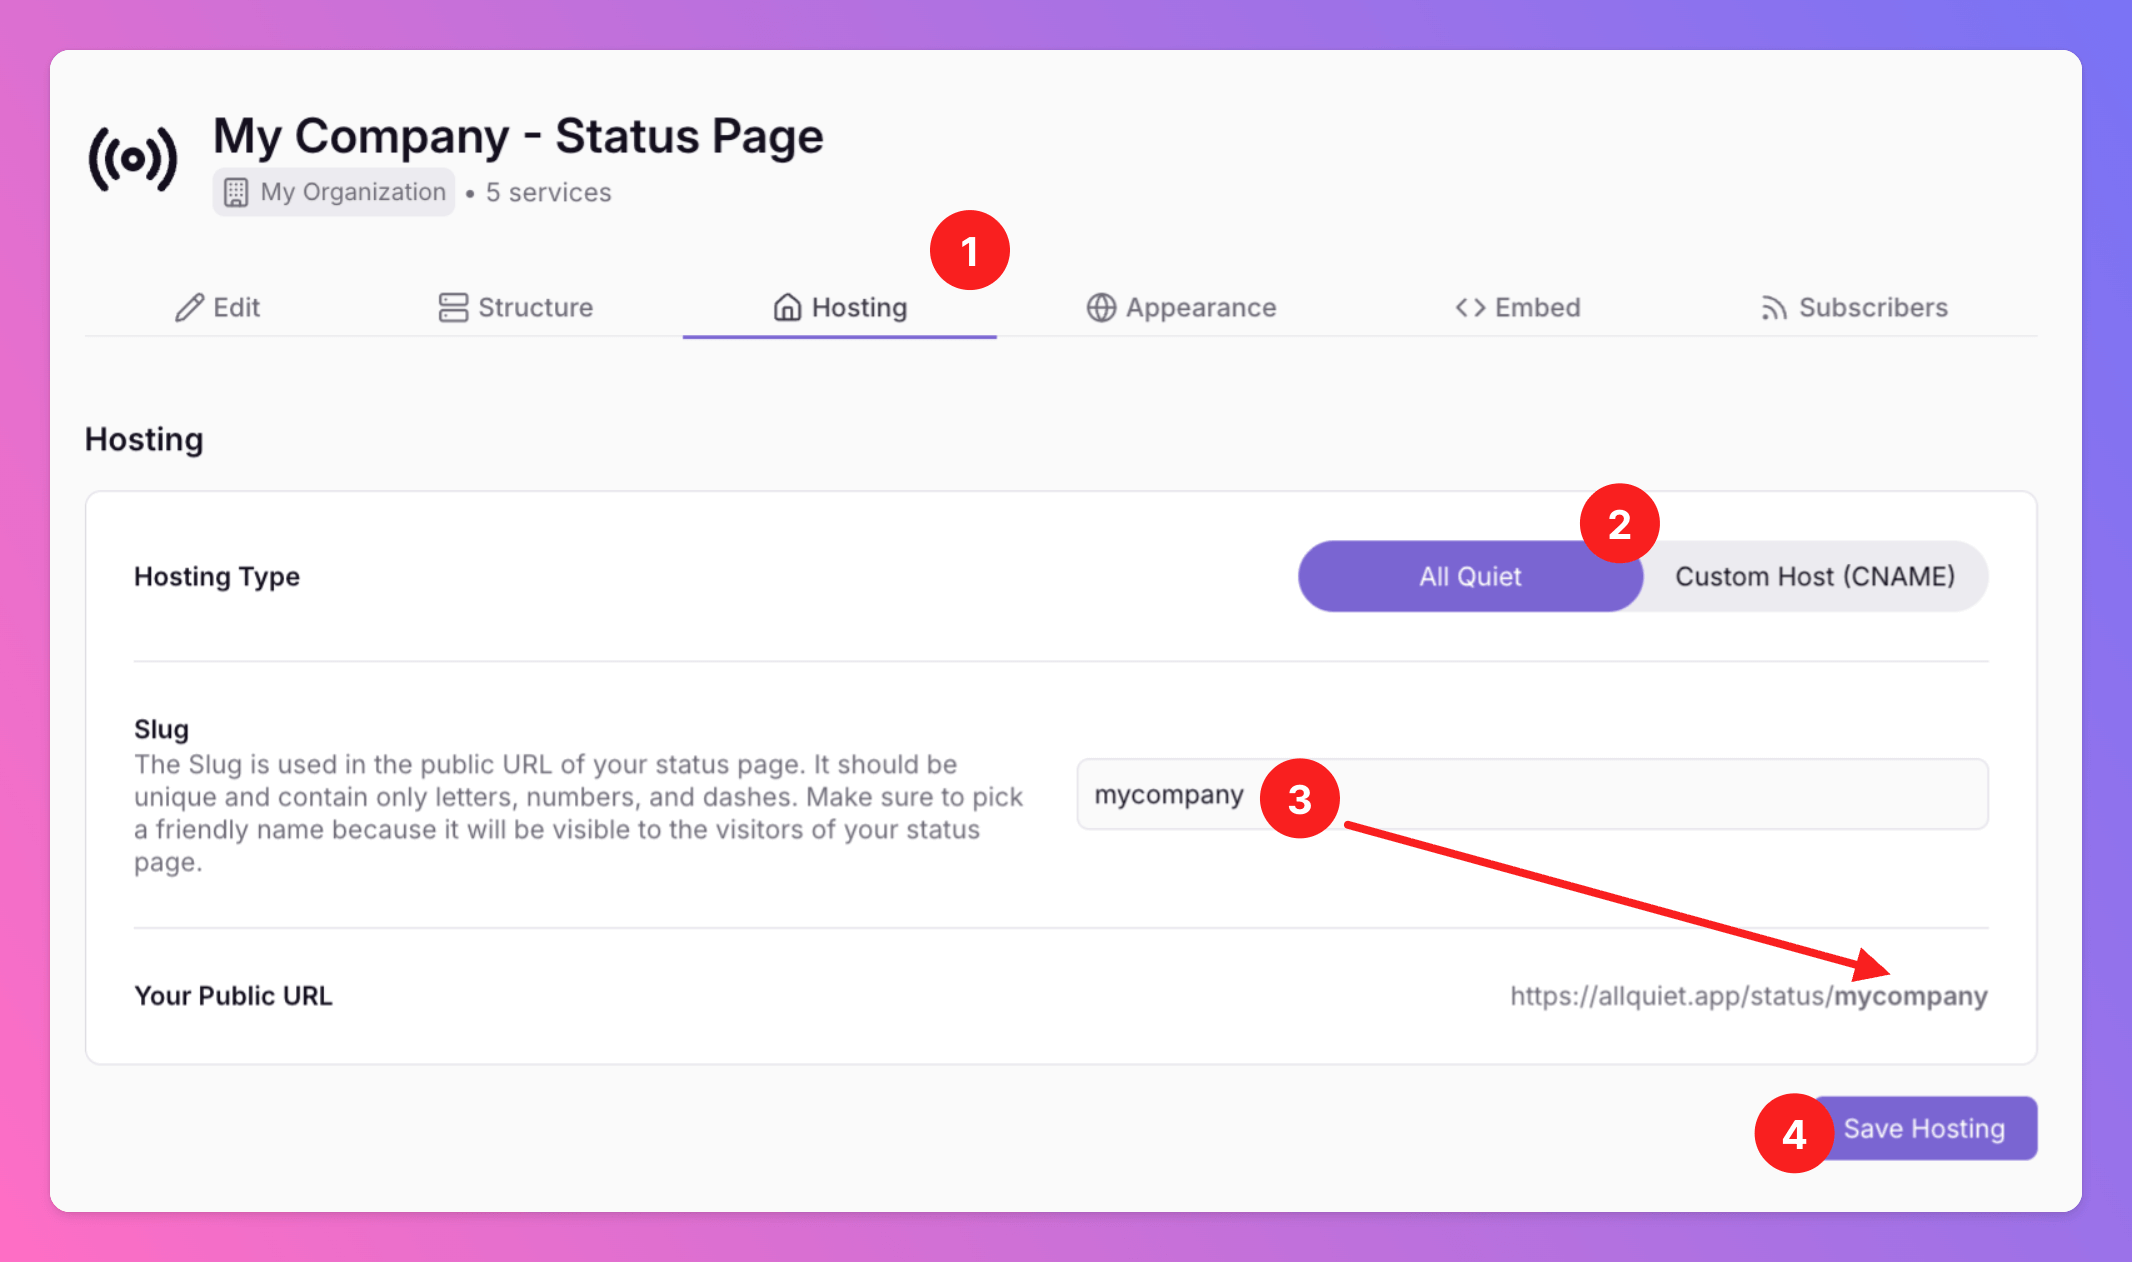
1. Open the `Hosting` tab.
2. Select hosting type `All Quiet`.
3. Select the URL slug for your Status Page.
4. Click `Save Hosting` to save.
### Hosting of Status Page
You can either host your Status Pages on our domain or host them on your own custom domain (cname).
#### Hosted on All Quiet
1. Open the `Hosting` tab.
2. Select hosting type `All Quiet`.
3. Select the URL slug for your Status Page.
4. Click `Save Hosting` to save.
 #### Hosted on Your Custom Domain
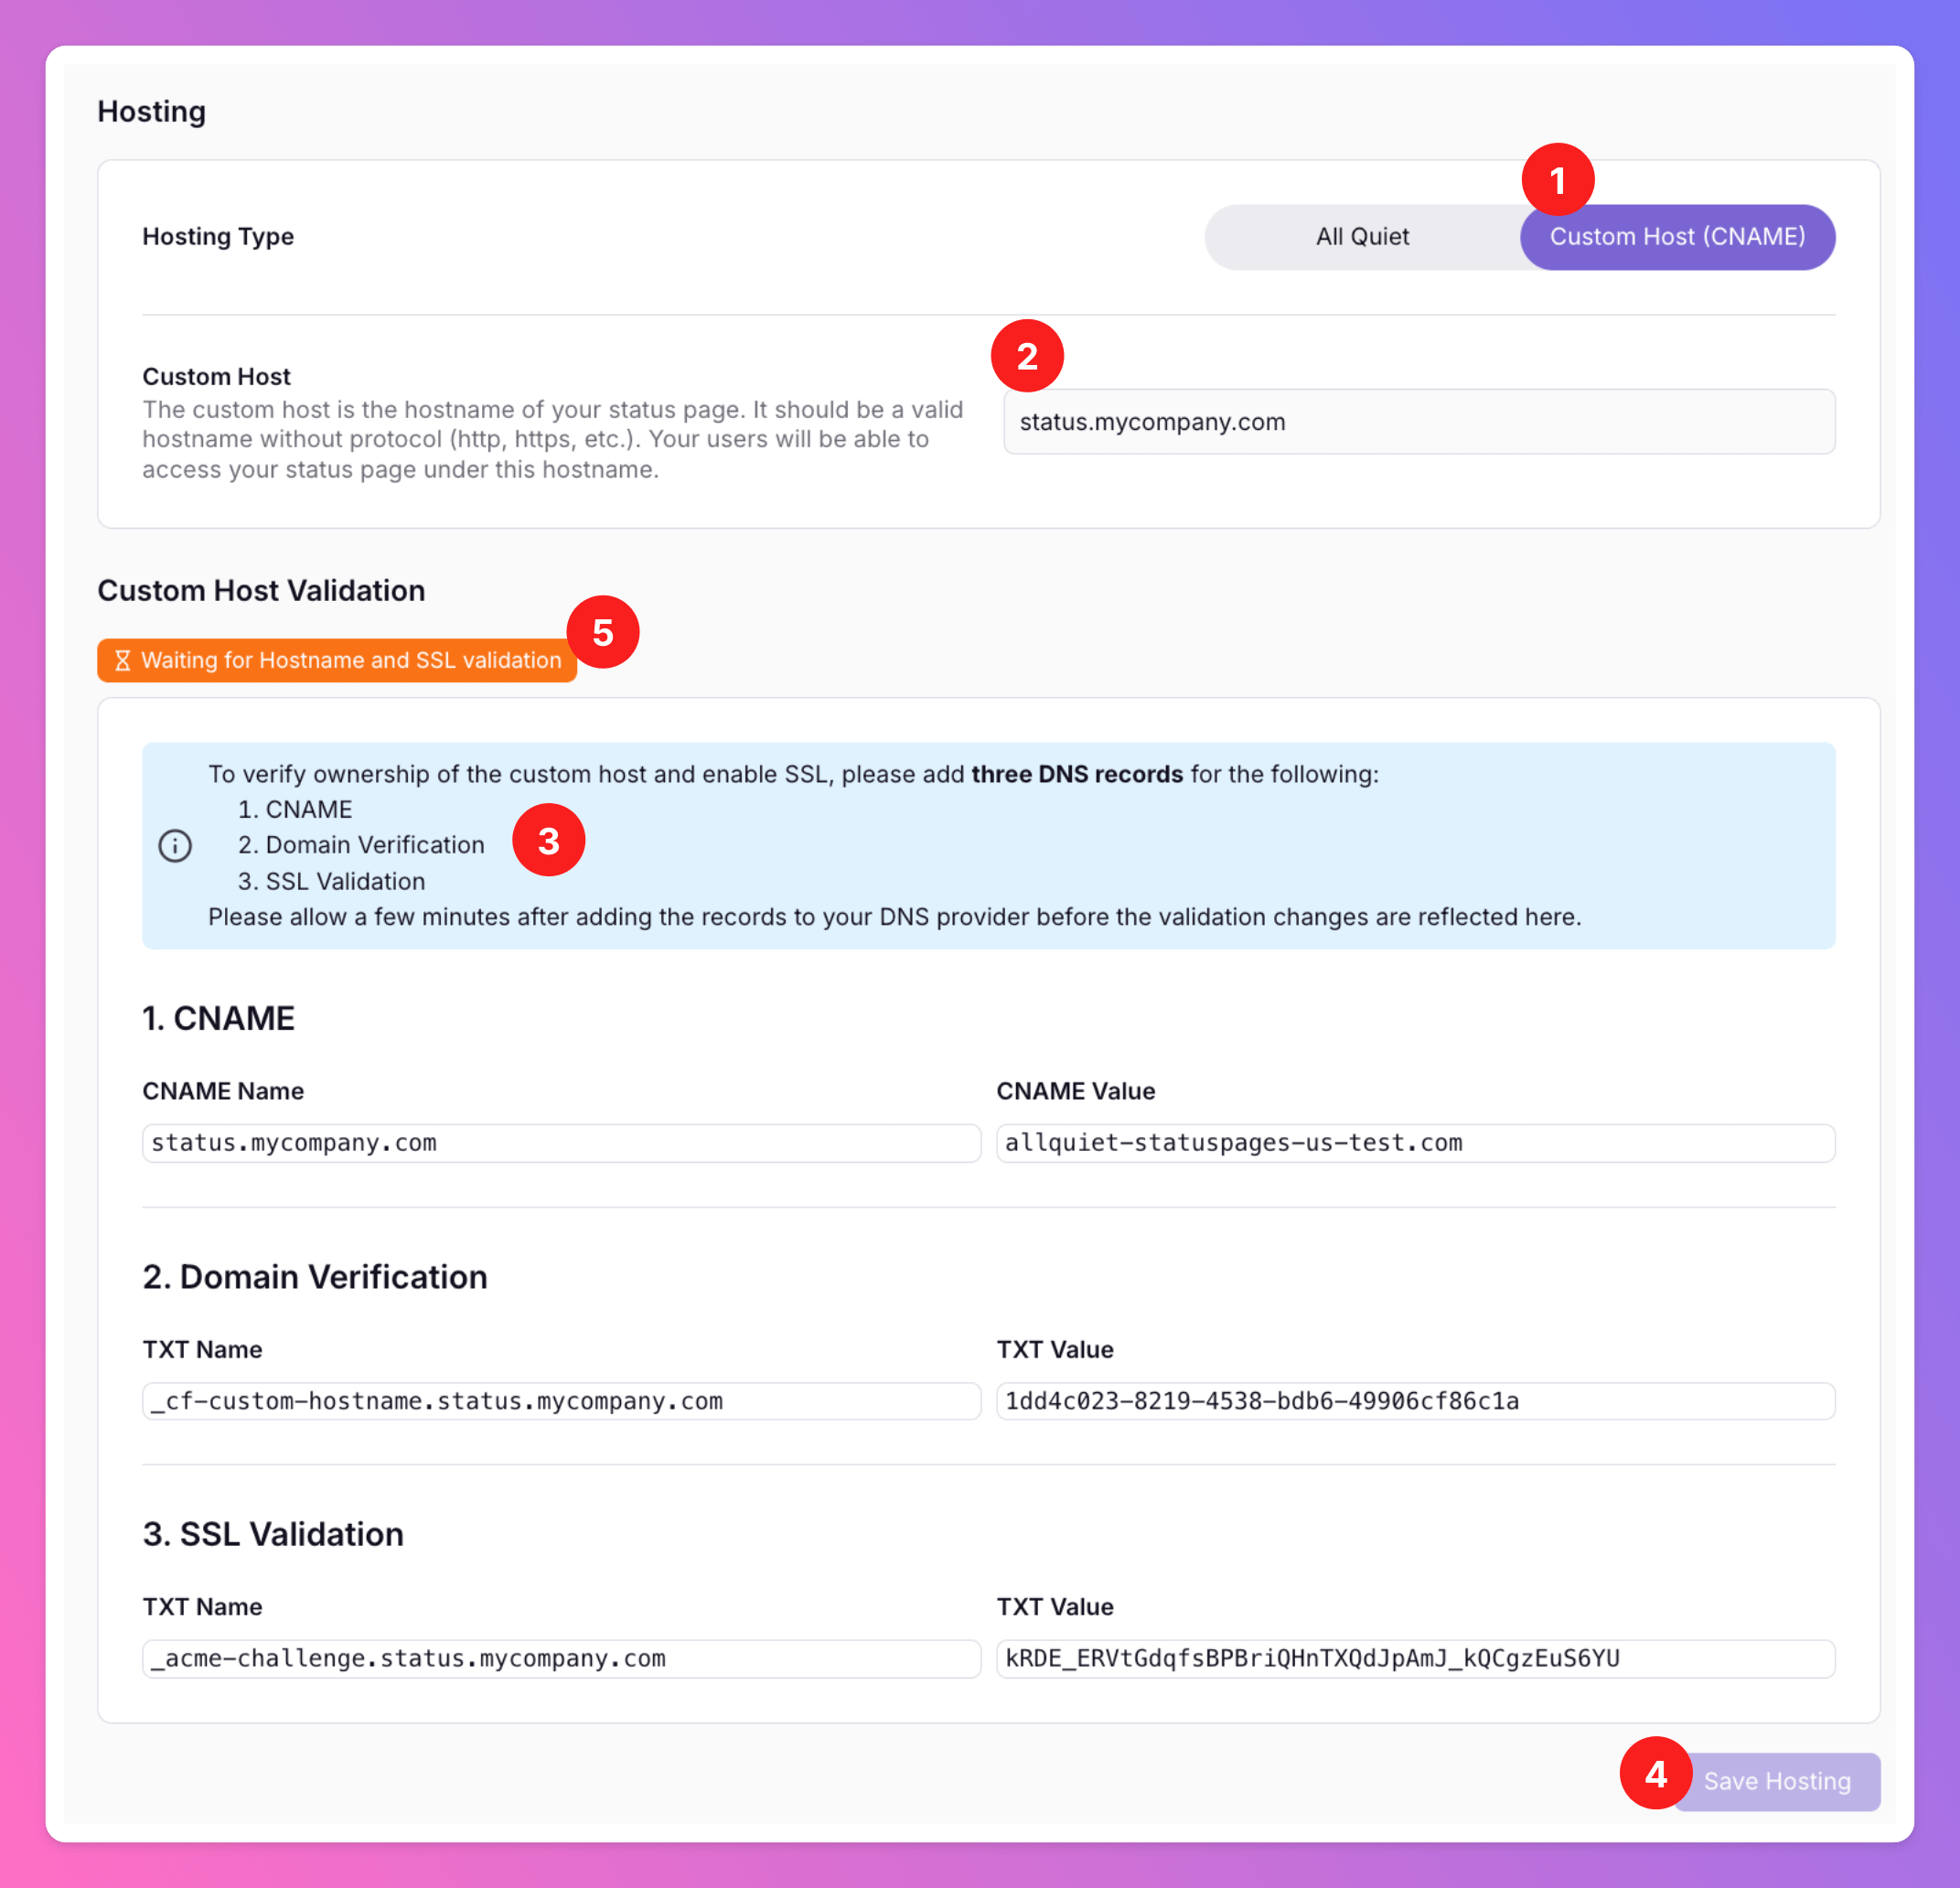
1. Select `Custom Host (CNAME)`
2. Define the custom host. This will be the URL of your Status Page on your custom domain.
3. You now need to copy and past the names and values for CNAME, Domain Verification and SSL Validation to your DNS provider to verify ownership of the custom host.
4. Afterwards, click `Update Hosting`.
5. Validation takes a few minutes. Until validated, you'll see a yellow label `Waiting for Validation`. Once validated, you'll see a green label `Hostname successfully set up`.
Depending on your DNS provider and DNS propagation, it can take up to **48 hours** until All Quiet receives verification that the Hostname and SSL validation have been confirmed.
#### Hosted on Your Custom Domain
1. Select `Custom Host (CNAME)`
2. Define the custom host. This will be the URL of your Status Page on your custom domain.
3. You now need to copy and past the names and values for CNAME, Domain Verification and SSL Validation to your DNS provider to verify ownership of the custom host.
4. Afterwards, click `Update Hosting`.
5. Validation takes a few minutes. Until validated, you'll see a yellow label `Waiting for Validation`. Once validated, you'll see a green label `Hostname successfully set up`.
Depending on your DNS provider and DNS propagation, it can take up to **48 hours** until All Quiet receives verification that the Hostname and SSL validation have been confirmed.
 #### Access Control & Private Status Page
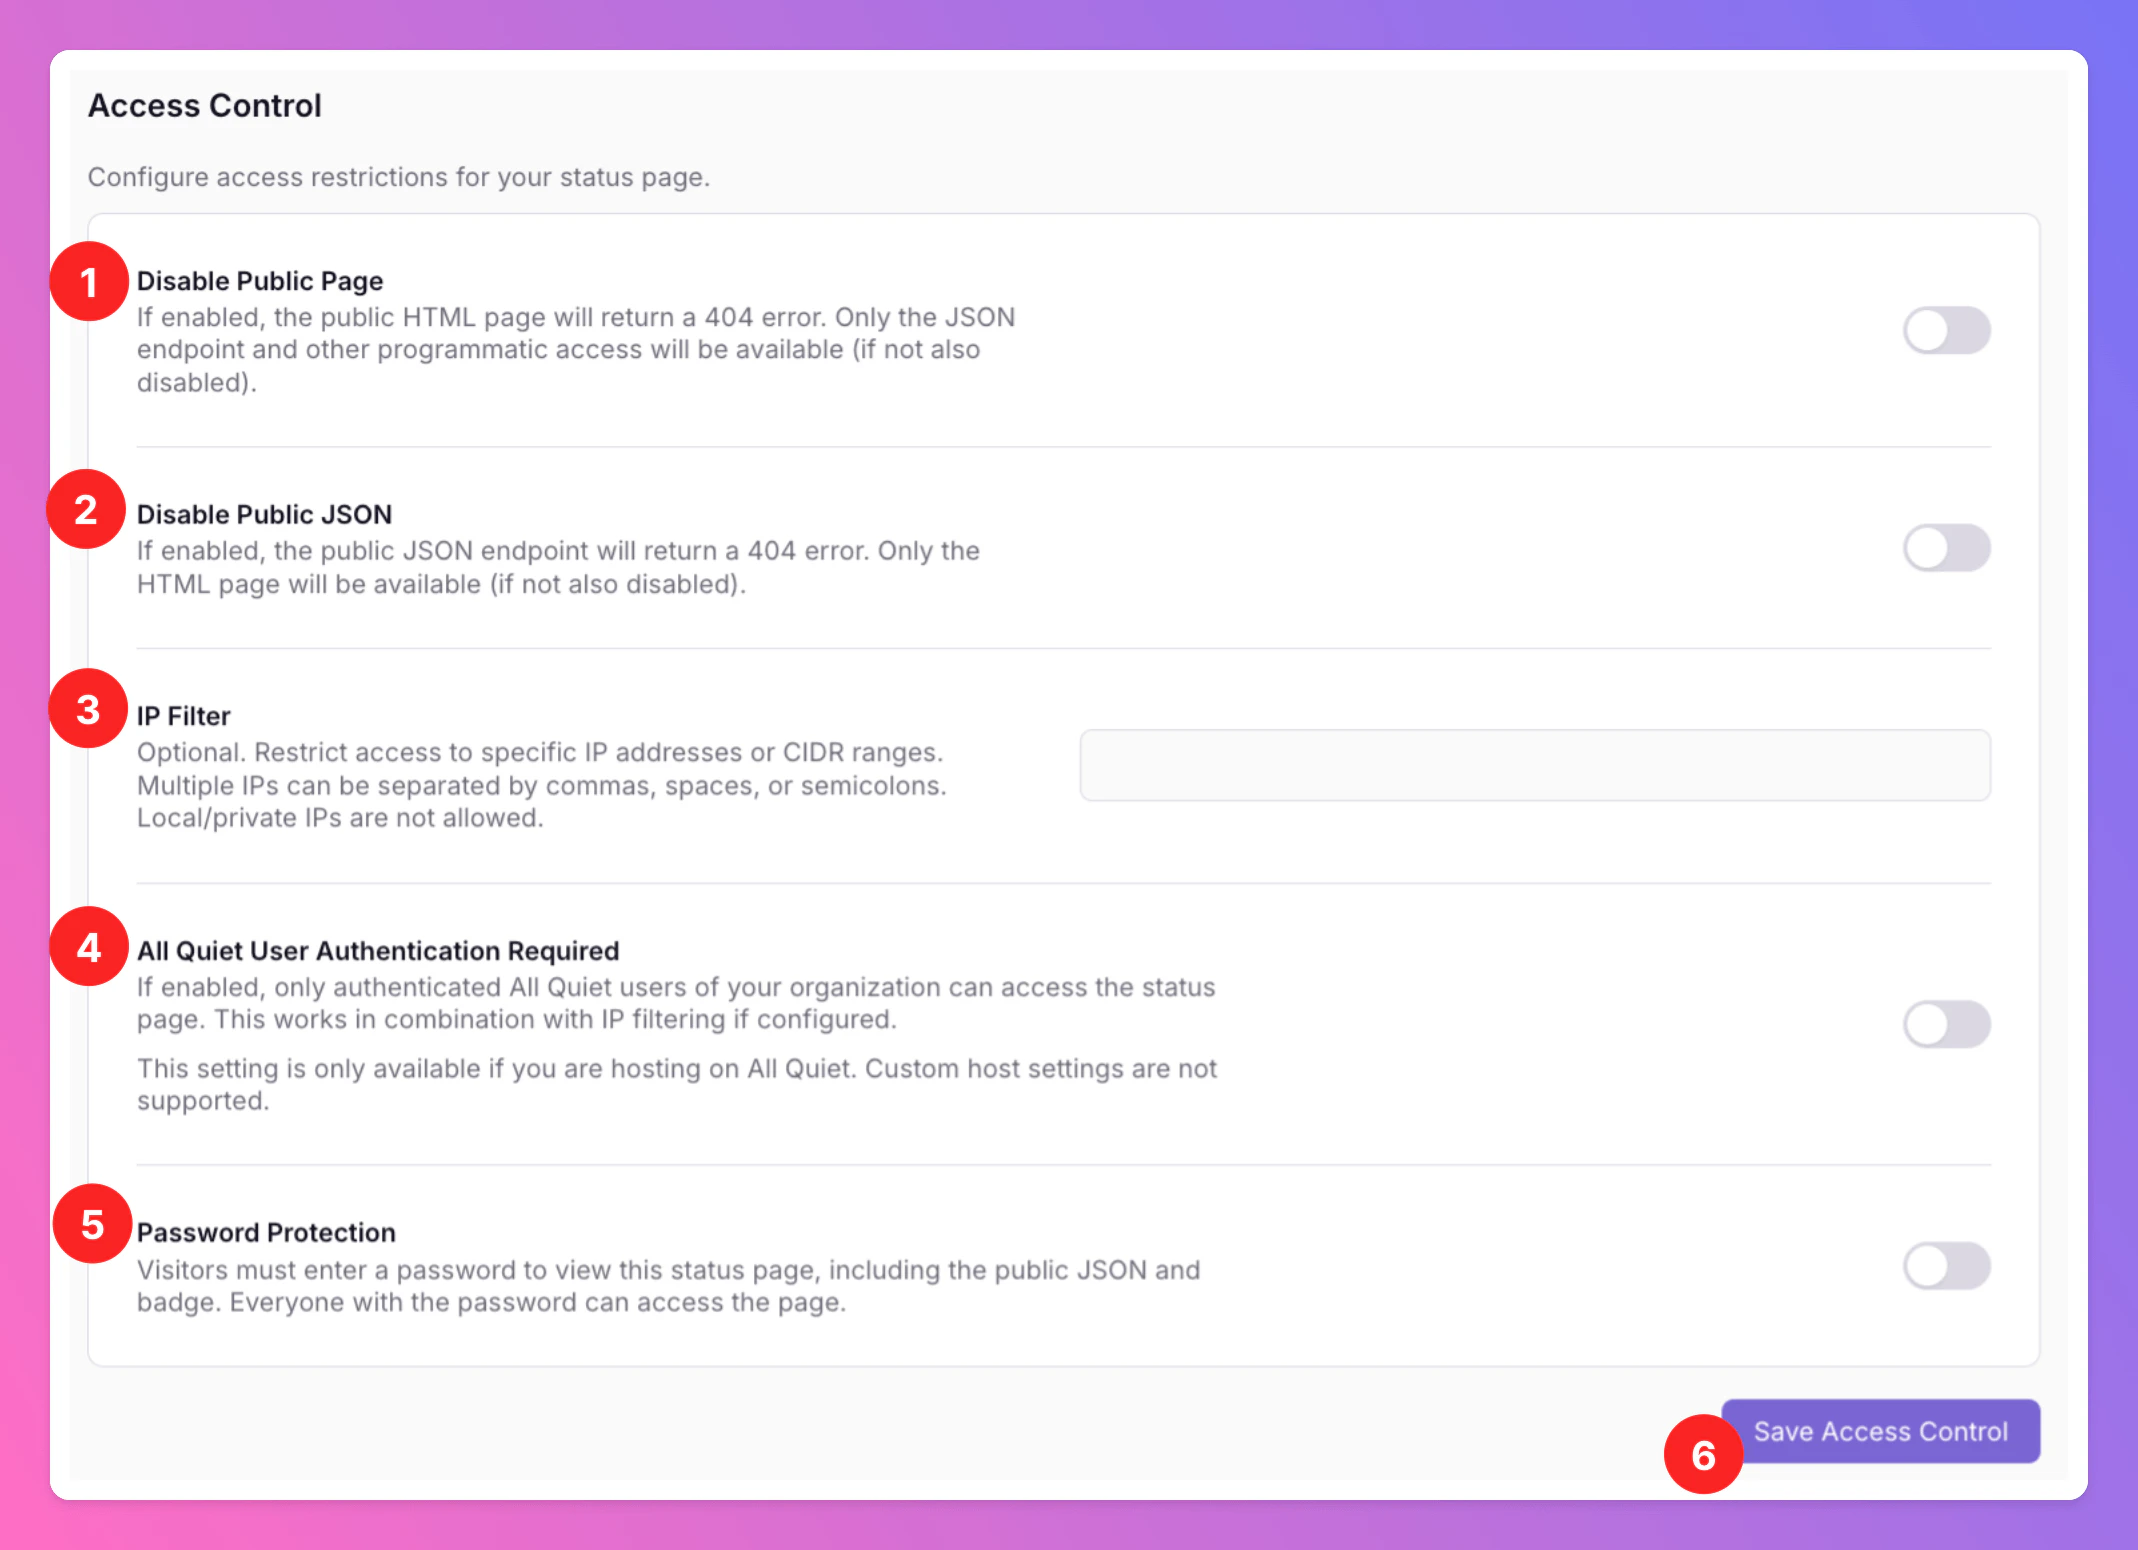
Use the `Access Control` panel on the `Hosting` tab to transform a public page into a private, access-restricted view.
1. Activate `Disable Public Page`. When enabled, the public HTML will return a 404 error.
2. Activate `Disable Public JSON`. When enabled, the public JSON endpoint will return a 404 error.
3. And an `IP Filter` to restrict access to specific IP addresses or CIDR ranges and make the Status Page private.
4. Activate `User Authentication Required`. When enabled, the page will only be accessible to All Quiet users associated with the Status Page's [organization](/advanced/organizations).
`User Authentication Required` is not available for Status Pages hosted on your own custom domain (CNAME).
5. `Password Protection`: Visitors must enter a password to view this status page, including the public JSON and badge. Everyone with the password can access the page.
* Password must be **at least 6 characters**
* Password is **stored encrypted**
* When changing other access control settings, leave the password blank to **keep the current password**
6. Make sure to `Save Access Control` to apply your changes.
#### Access Control & Private Status Page
Use the `Access Control` panel on the `Hosting` tab to transform a public page into a private, access-restricted view.
1. Activate `Disable Public Page`. When enabled, the public HTML will return a 404 error.
2. Activate `Disable Public JSON`. When enabled, the public JSON endpoint will return a 404 error.
3. And an `IP Filter` to restrict access to specific IP addresses or CIDR ranges and make the Status Page private.
4. Activate `User Authentication Required`. When enabled, the page will only be accessible to All Quiet users associated with the Status Page's [organization](/advanced/organizations).
`User Authentication Required` is not available for Status Pages hosted on your own custom domain (CNAME).
5. `Password Protection`: Visitors must enter a password to view this status page, including the public JSON and badge. Everyone with the password can access the page.
* Password must be **at least 6 characters**
* Password is **stored encrypted**
* When changing other access control settings, leave the password blank to **keep the current password**
6. Make sure to `Save Access Control` to apply your changes.
 ### Public Appearance of Status Page
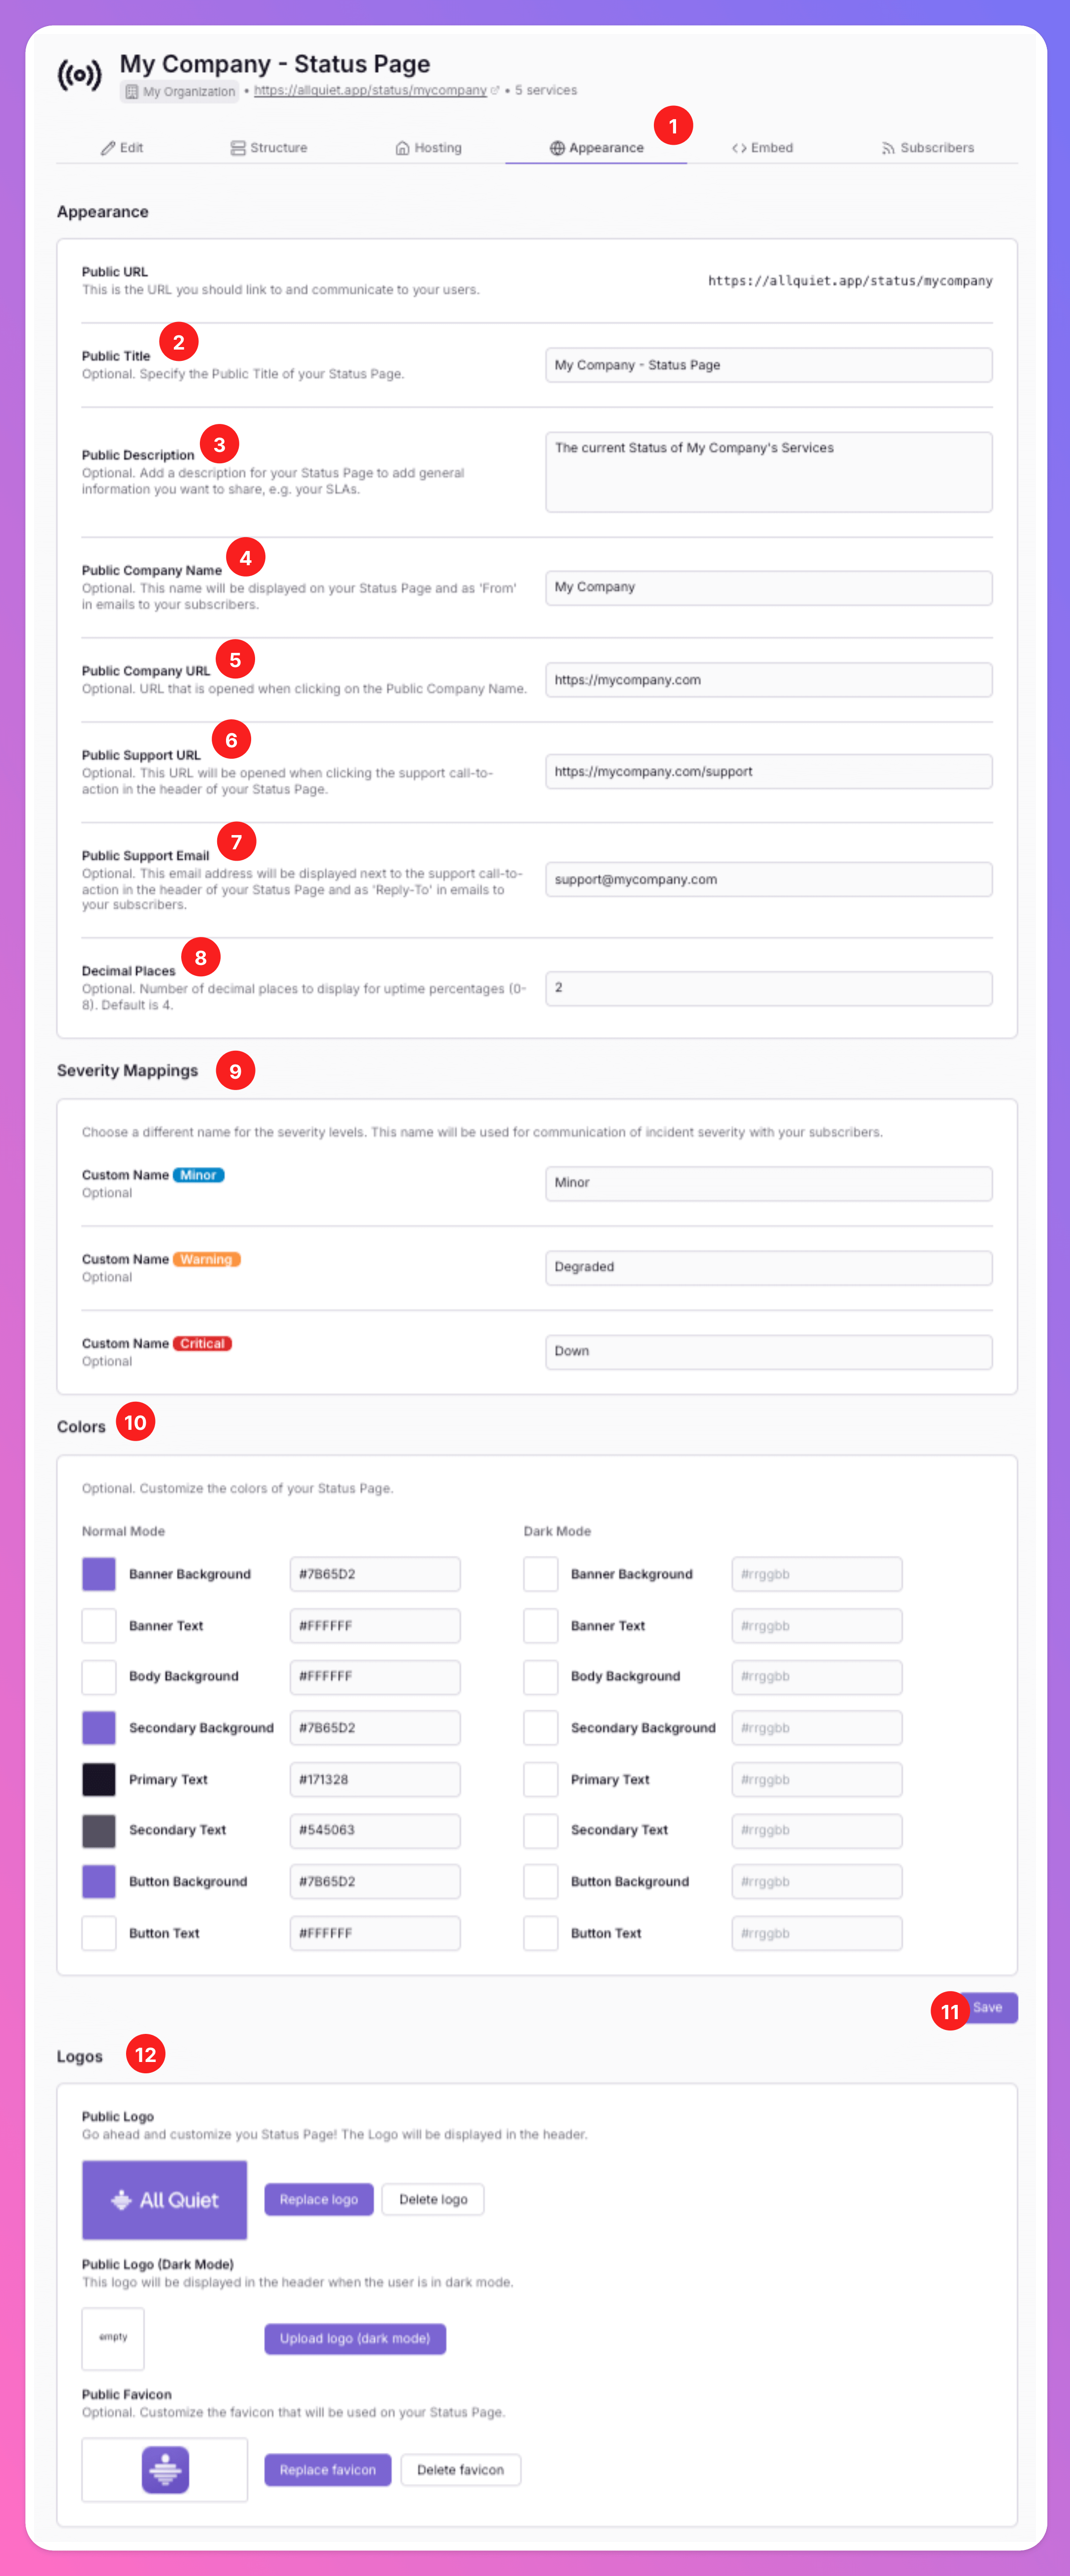
Here's how you can configure and change the public appearance of your Status Page.
1. Select the `Appearance` tab.
2. Enter the `Public Title`, shown on your Status Page. If you leave it empty, the Status Page **Display Name** (from creation / the Edit tab) is used as a **fallback in emails and SMS** to subscribers. Set **Public Title** to control the name customers see on the page and in those notifications.
3. Enter a `Public Description`, that will be visible below the `Public Title`
4. Enter a `Public Company Name`, that will be diplayed in header and footer of the Status Page. Moreover, it will be used as the "From" name in the emails to subscribers of your Status Page.
5. You can enter a `Public Company URL`, opened when clicking the `Public Company Name` on your Status Pages.
6. Add a `Public Support URL` for your customers.
7. Your `Public Support Email` will be diplayed on the Status Pages, plus will be used as email address to reply to in Status Page update emails.
8. Optionally, you may define the number of `Decimal Places` that is displayed for your Service's uptime.
9. You may want to create public, less technical titles for our incident severities `Critical`, `Warning` and `Minor`. If omitted, we will use our severities for incidents on the Status Page and in corresponding emails.
10. You can customize the colors of your Status Page and may add extra colors for dark mode. If omitted, we use the same colors for light and dark mode.
11. To save the changes, click `Save`.
12. You can add a `Logo`, `Logo (Dark Mode)` and `Favicon`, visible on the Status Page. Uploads are saved automatically. If you don't upload a Logo for dark mode, we use the same logo for light and dark mode. You can use .png, .jpg or .svg format.
### Public Appearance of Status Page
Here's how you can configure and change the public appearance of your Status Page.
1. Select the `Appearance` tab.
2. Enter the `Public Title`, shown on your Status Page. If you leave it empty, the Status Page **Display Name** (from creation / the Edit tab) is used as a **fallback in emails and SMS** to subscribers. Set **Public Title** to control the name customers see on the page and in those notifications.
3. Enter a `Public Description`, that will be visible below the `Public Title`
4. Enter a `Public Company Name`, that will be diplayed in header and footer of the Status Page. Moreover, it will be used as the "From" name in the emails to subscribers of your Status Page.
5. You can enter a `Public Company URL`, opened when clicking the `Public Company Name` on your Status Pages.
6. Add a `Public Support URL` for your customers.
7. Your `Public Support Email` will be diplayed on the Status Pages, plus will be used as email address to reply to in Status Page update emails.
8. Optionally, you may define the number of `Decimal Places` that is displayed for your Service's uptime.
9. You may want to create public, less technical titles for our incident severities `Critical`, `Warning` and `Minor`. If omitted, we will use our severities for incidents on the Status Page and in corresponding emails.
10. You can customize the colors of your Status Page and may add extra colors for dark mode. If omitted, we use the same colors for light and dark mode.
11. To save the changes, click `Save`.
12. You can add a `Logo`, `Logo (Dark Mode)` and `Favicon`, visible on the Status Page. Uploads are saved automatically. If you don't upload a Logo for dark mode, we use the same logo for light and dark mode. You can use .png, .jpg or .svg format.
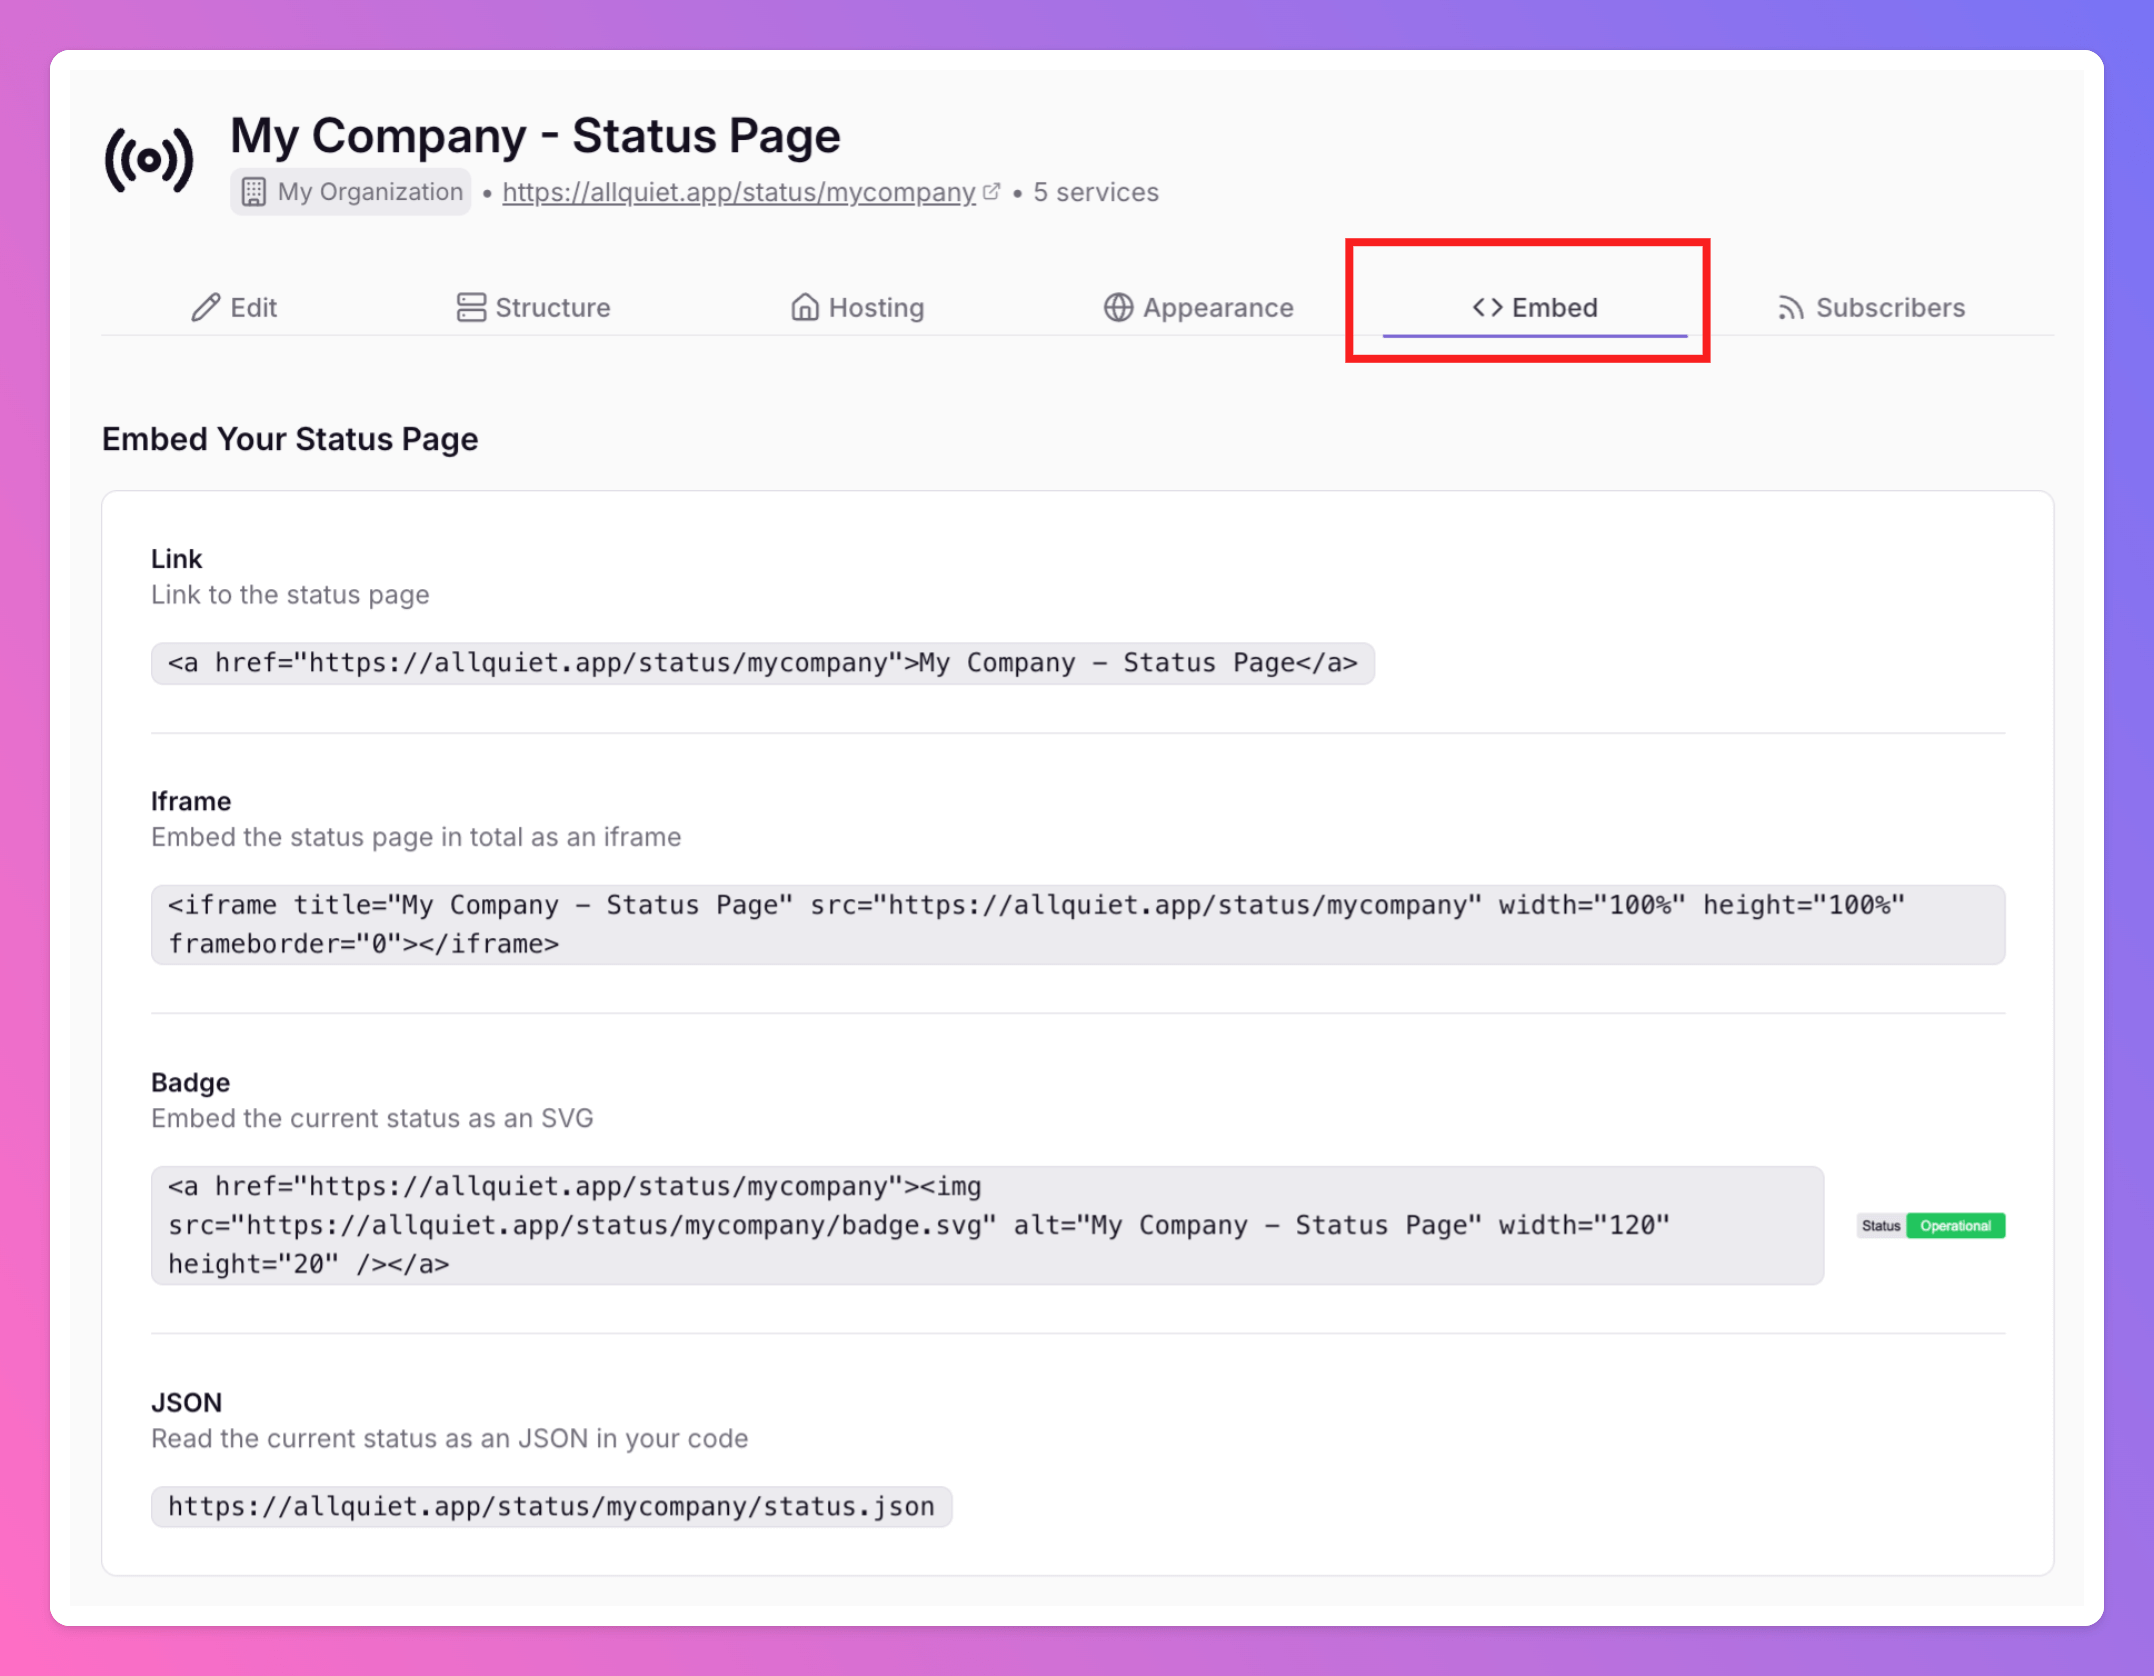
 ### Embed Status Page
Select between different options to embed your Status Page on your website. You can simply embed the **Link**, embed the Status Page in an **Iframe**, use our **Badge**, or read the current status via **JSON** and build a custom frontend.
### Embed Status Page
Select between different options to embed your Status Page on your website. You can simply embed the **Link**, embed the Status Page in an **Iframe**, use our **Badge**, or read the current status via **JSON** and build a custom frontend.
 ### Manage Subscribers of Status Page
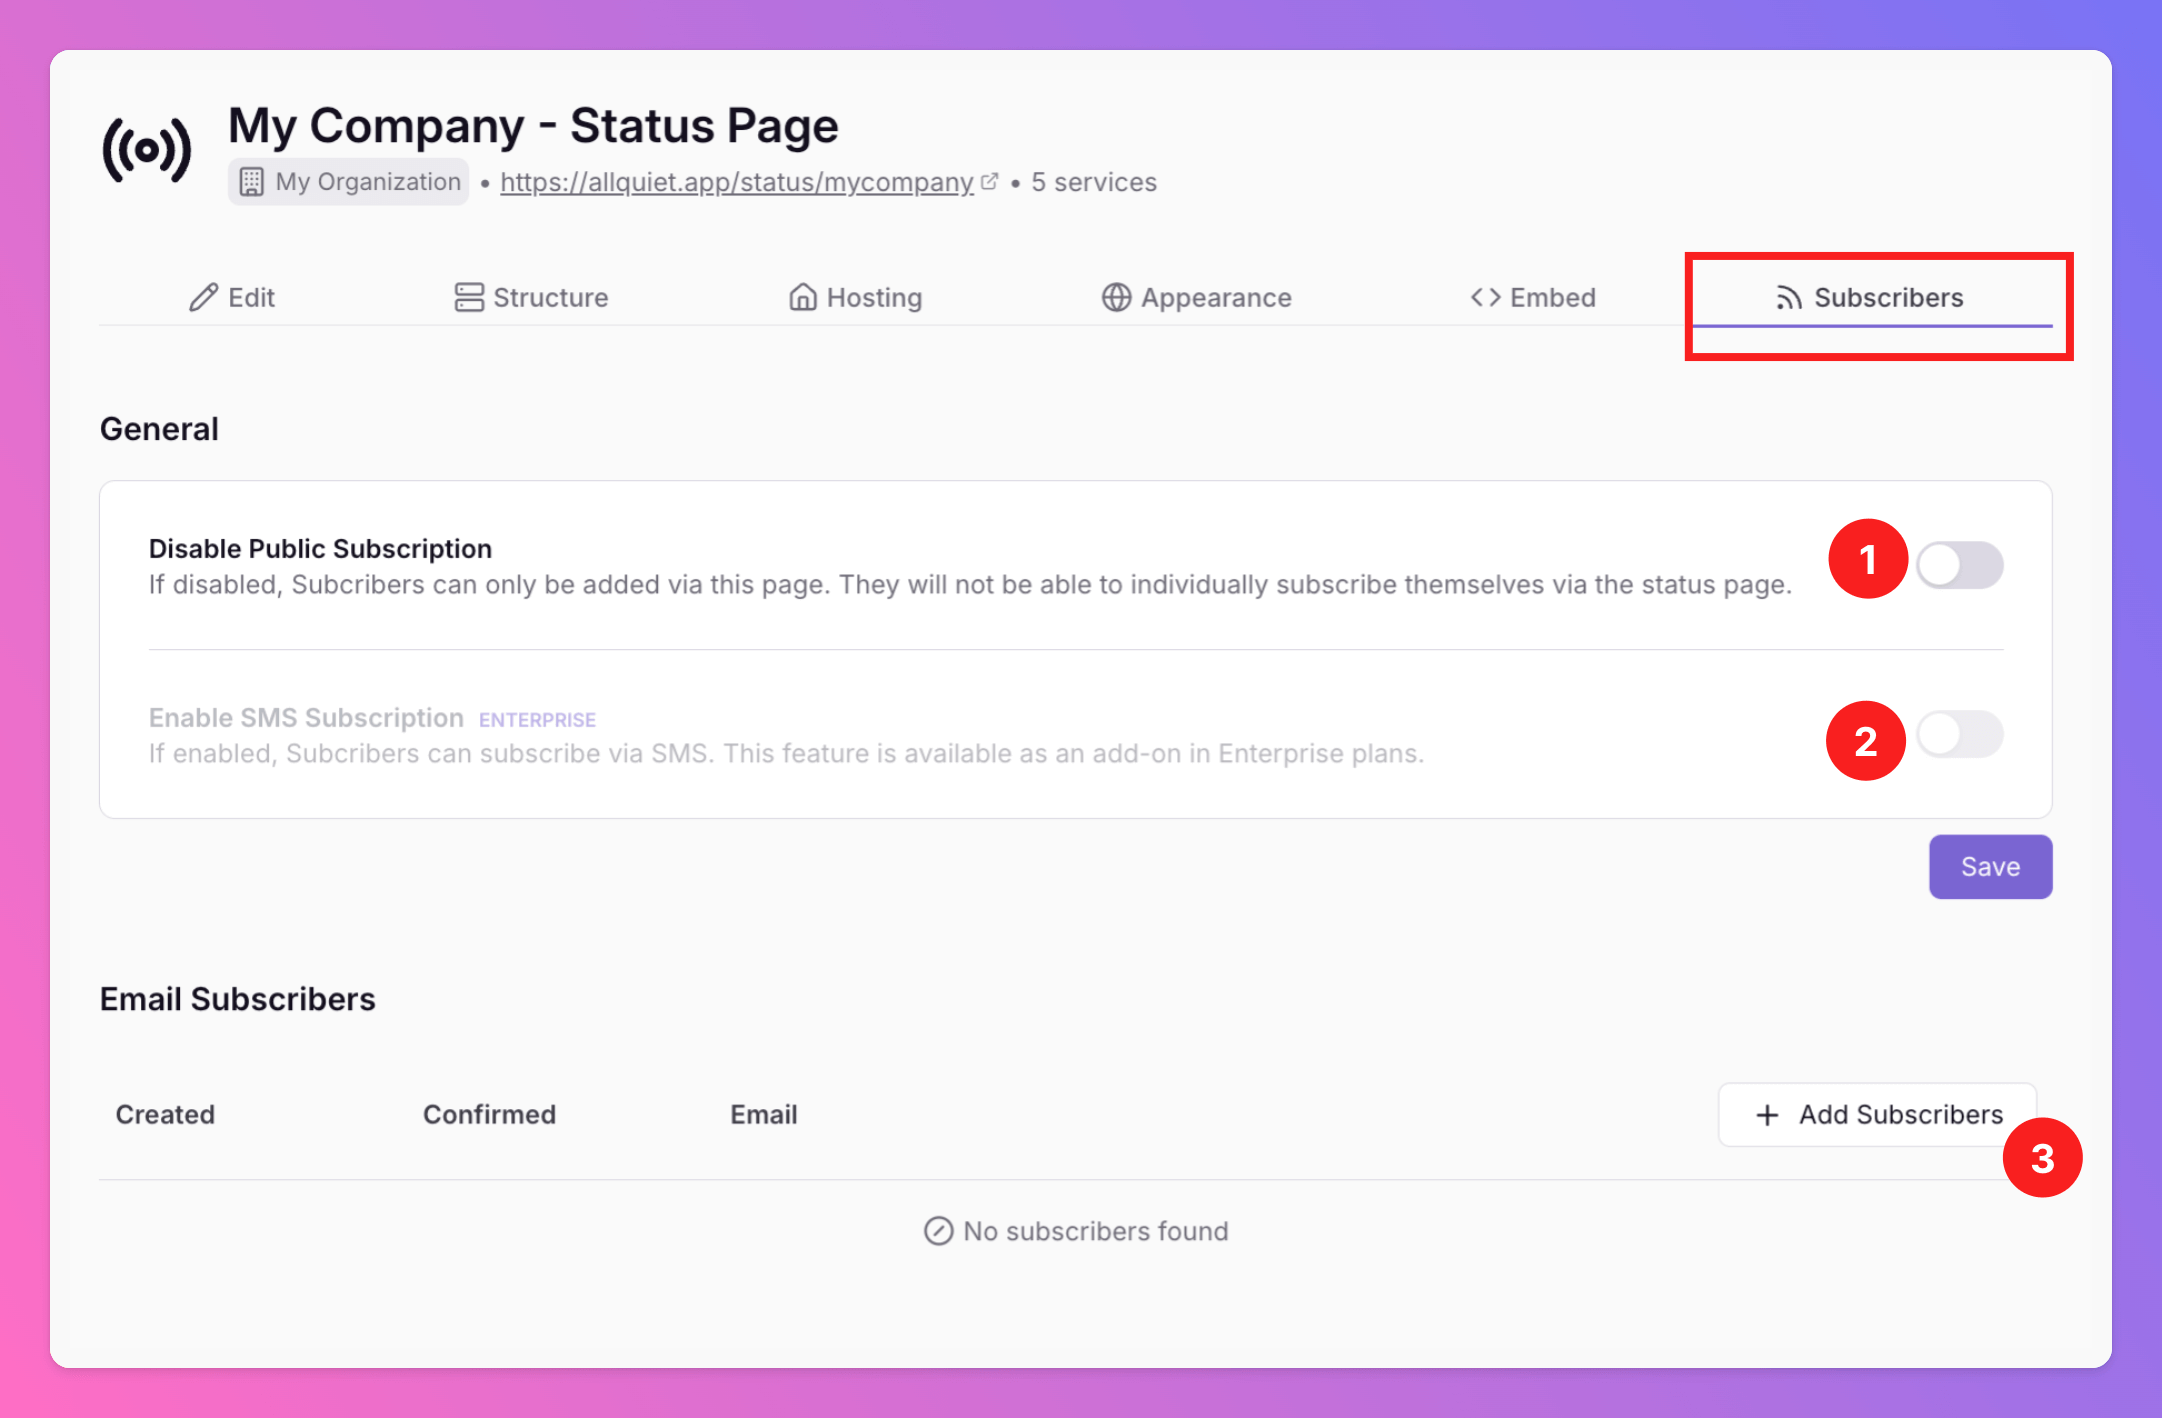
The `Subscribers` tab allows you to manage and oversee the subscribers of your Status Page.
1. `Disable Public Subscription`: When enabled, users can not subscribe via your Status Page (we remove the `Subscribe` button). New subscribers can only be added via this page.
2. `Enable SMS Subscription`: Available as an add-on in an individual Enterprise deal.
3. To add new subscribers, click `+ Add Subscribers`
### Manage Subscribers of Status Page
The `Subscribers` tab allows you to manage and oversee the subscribers of your Status Page.
1. `Disable Public Subscription`: When enabled, users can not subscribe via your Status Page (we remove the `Subscribe` button). New subscribers can only be added via this page.
2. `Enable SMS Subscription`: Available as an add-on in an individual Enterprise deal.
3. To add new subscribers, click `+ Add Subscribers`
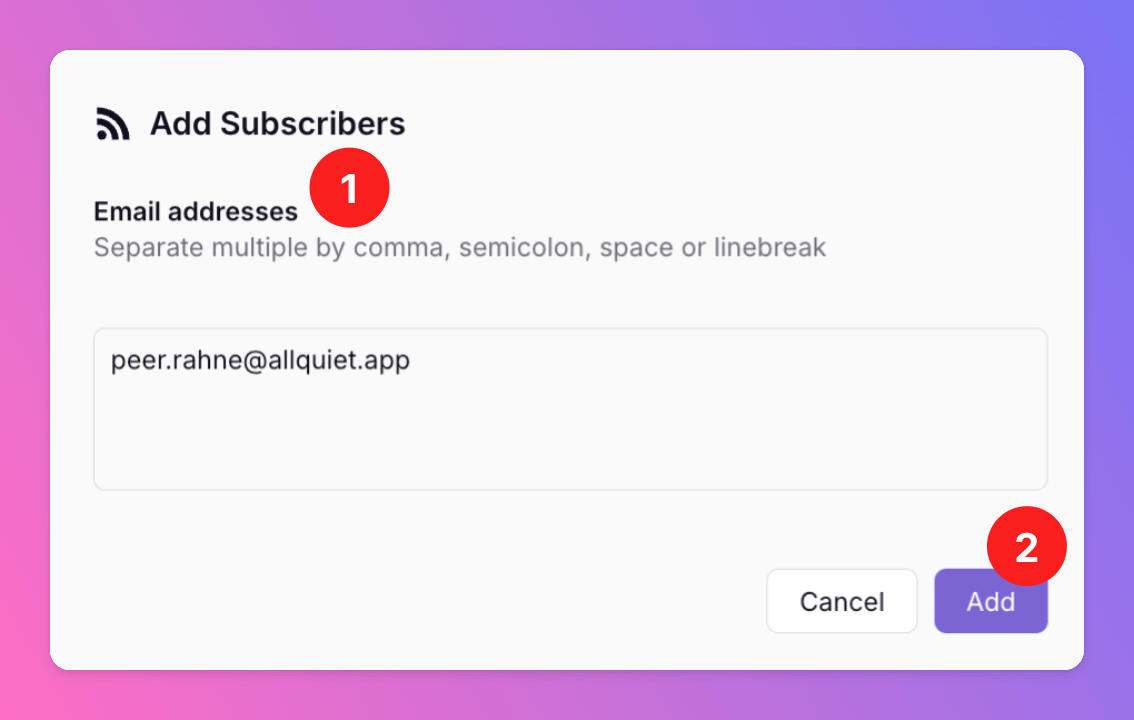
 1. Enter the email addresses you want to add as subscribers.
2. Click `Add` to invite email addresses to subscribe.
1. Enter the email addresses you want to add as subscribers.
2. Click `Add` to invite email addresses to subscribe.
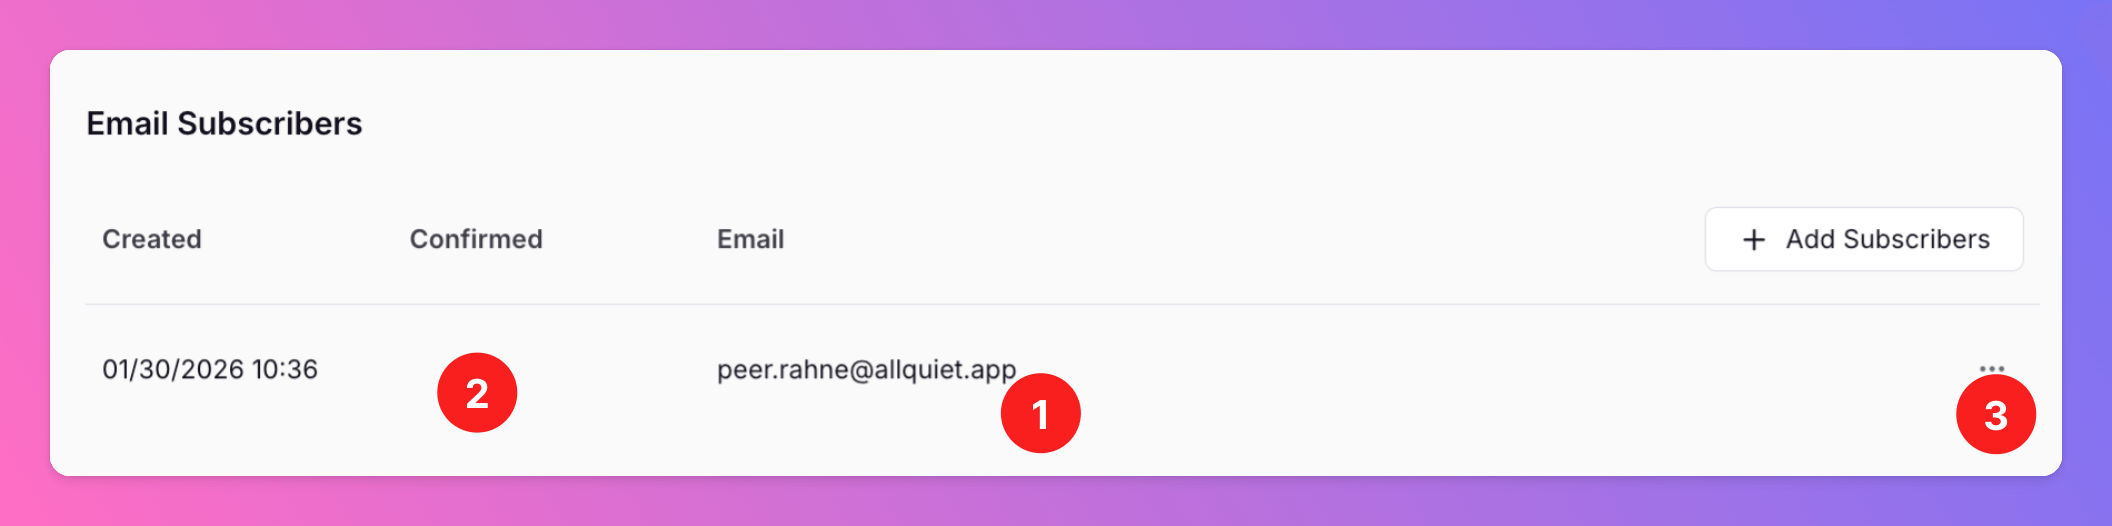
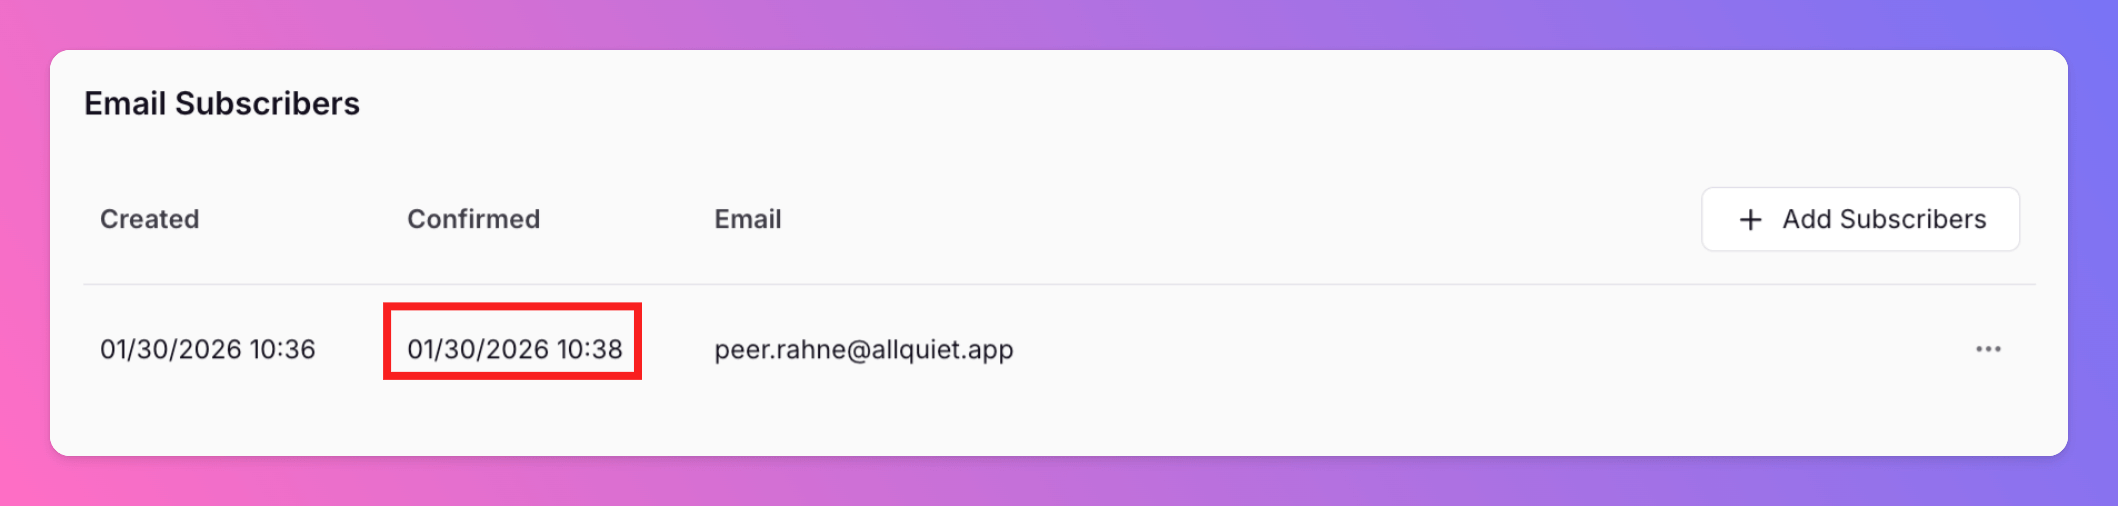
 1. You will find the invited email addresses in the list.
2. `Confirmed` is empty as long as the owner of the email address hasn't confirmed the subscription. The email address will not receive any Status Page updates until confirmation.
3. You can remove subscribers by clicking the 3-Dot-Menu and choosing `Delete`. Subscribers themselves can always unsubscribe via links in the Status Page update emails or via the Status Page itself (the latter is not possible when `Disable Public Subscription` is active).
1. You will find the invited email addresses in the list.
2. `Confirmed` is empty as long as the owner of the email address hasn't confirmed the subscription. The email address will not receive any Status Page updates until confirmation.
3. You can remove subscribers by clicking the 3-Dot-Menu and choosing `Delete`. Subscribers themselves can always unsubscribe via links in the Status Page update emails or via the Status Page itself (the latter is not possible when `Disable Public Subscription` is active).
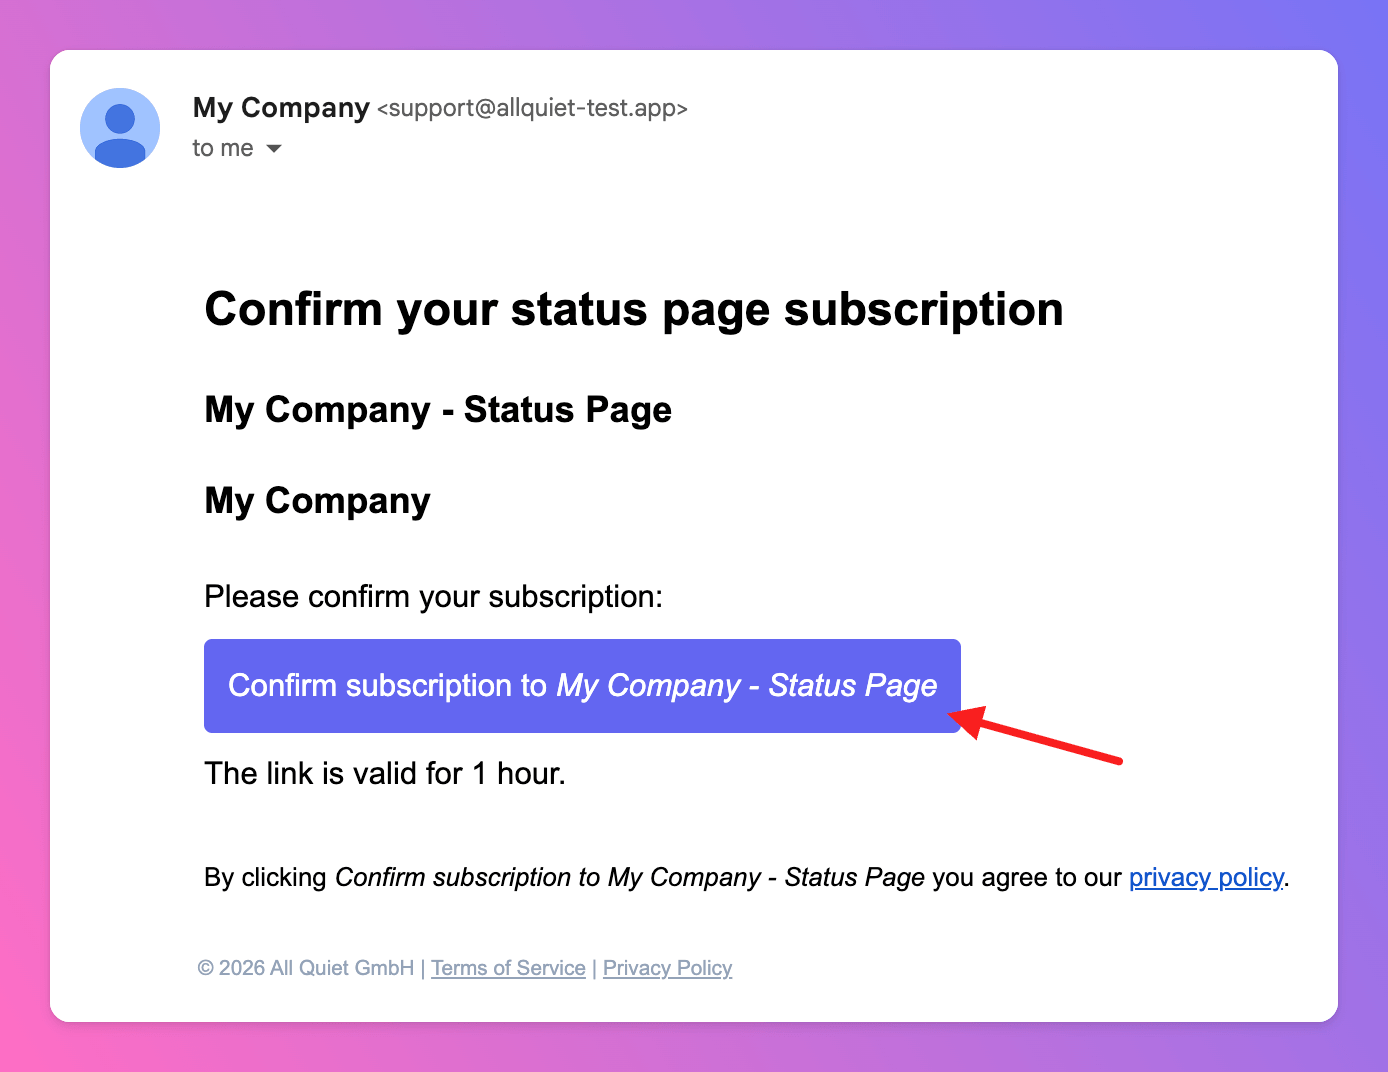
 After adding email address as subscribers, the owner of the email address will receive this email.
1. Notice that the [Public Company Name](/advanced/status-pages#edit-status-page) is used as the "From".
2. Owner of the email address needs to confirm the subscription.
After adding email address as subscribers, the owner of the email address will receive this email.
1. Notice that the [Public Company Name](/advanced/status-pages#edit-status-page) is used as the "From".
2. Owner of the email address needs to confirm the subscription.
 Aftwerwards, you will find the "confirmed" timestamp in the `Subscribers` tab.
 You have successfully configured your first Status Page! Now, let's have a look what it can do.
## Your Public Status Page
Next, open your Status Page to see the changes. If you uploaded a favicon, you should see it in your browser tab. If not, delete your cache and try again.
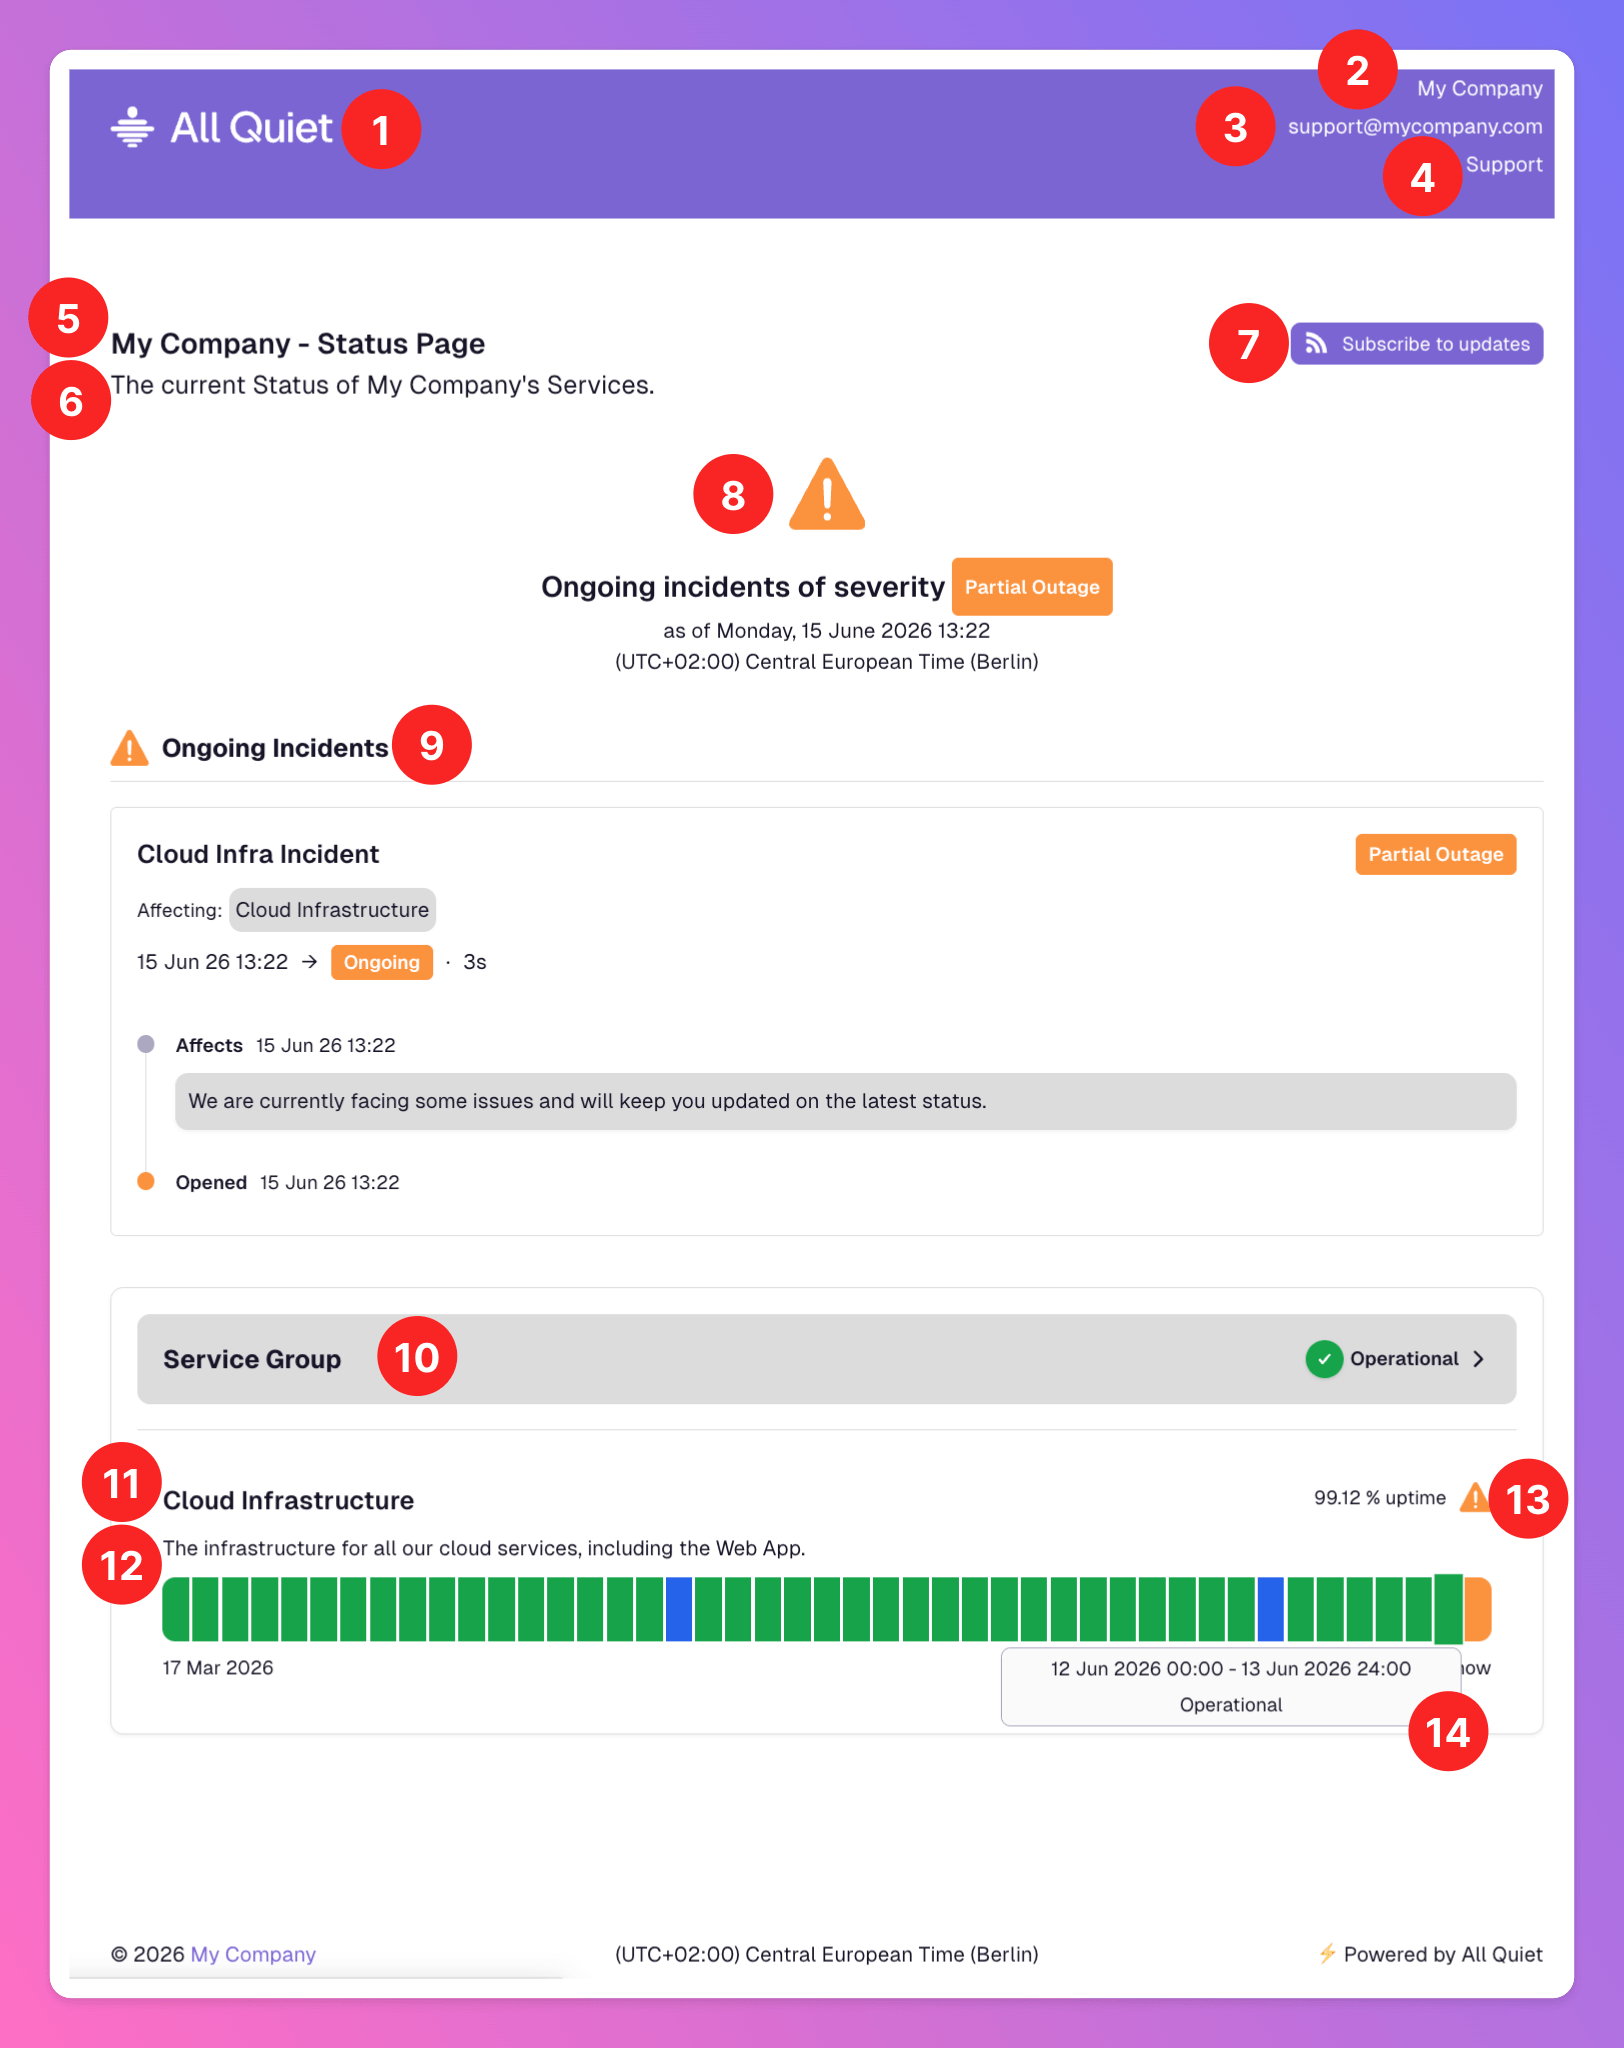
On the page, you will find the following
1. Uploaded `Logo`
2. Your `Public Company Name`. Clicking it will open the `Public Company URL`.
3. In case you added a `Public Support Email`, users will find it here.
4. In case you added a `Public Support URL`, users will find a "Support" link.
5. The `Public Title` of the Status Page.
6. The `Public Description` of the Status Page.
7. The `Subscribe` button, only visible when public subscription is enabled.
8. The current status of the Services listed on the Status Page.
9. **Ongoing incidents** affecting a Service, displayed above that Service's status graph—similar to how [ongoing maintenances](/advanced/status-pages#communication-of-service-maintenances-on-status-pages) are shown.
10. An example of a Service Group with `Public Service Group Title`, collapsed, showing the overall status of the Services within the group.
11. The `Public Title` of a Service without `Public Service Group Title`. Each Service listed on this Status Page will receive it's own status graph.
12. The `Public Description` of the Service.
13. The historic uptime & the current status of the Service.
14. The status graph of the Service. If there's no historic data, the chart elements are coloured grey. Click any interval to open the [incident history](/advanced/status-pages#public-incident-history) for that time period—including [past maintenances](/advanced/status-pages#communication-of-service-maintenances-on-status-pages).
More about sections 9 & 14 in section [Communication of Incidents on Status Pages](/advanced/status-pages#communication-of-incidents-on-status-pages)
You have successfully configured your first Status Page! Now, let's have a look what it can do.
## Your Public Status Page
Next, open your Status Page to see the changes. If you uploaded a favicon, you should see it in your browser tab. If not, delete your cache and try again.
On the page, you will find the following
1. Uploaded `Logo`
2. Your `Public Company Name`. Clicking it will open the `Public Company URL`.
3. In case you added a `Public Support Email`, users will find it here.
4. In case you added a `Public Support URL`, users will find a "Support" link.
5. The `Public Title` of the Status Page.
6. The `Public Description` of the Status Page.
7. The `Subscribe` button, only visible when public subscription is enabled.
8. The current status of the Services listed on the Status Page.
9. **Ongoing incidents** affecting a Service, displayed above that Service's status graph—similar to how [ongoing maintenances](/advanced/status-pages#communication-of-service-maintenances-on-status-pages) are shown.
10. An example of a Service Group with `Public Service Group Title`, collapsed, showing the overall status of the Services within the group.
11. The `Public Title` of a Service without `Public Service Group Title`. Each Service listed on this Status Page will receive it's own status graph.
12. The `Public Description` of the Service.
13. The historic uptime & the current status of the Service.
14. The status graph of the Service. If there's no historic data, the chart elements are coloured grey. Click any interval to open the [incident history](/advanced/status-pages#public-incident-history) for that time period—including [past maintenances](/advanced/status-pages#communication-of-service-maintenances-on-status-pages).
More about sections 9 & 14 in section [Communication of Incidents on Status Pages](/advanced/status-pages#communication-of-incidents-on-status-pages)
 ### Communication of Incidents on Status Pages
This section is designed to explain how incidents and incident updates are displayed on Status Pages. Moreover, we will add more context about the emails that your Status Pages' subscribers will receive.
#### Status Graph
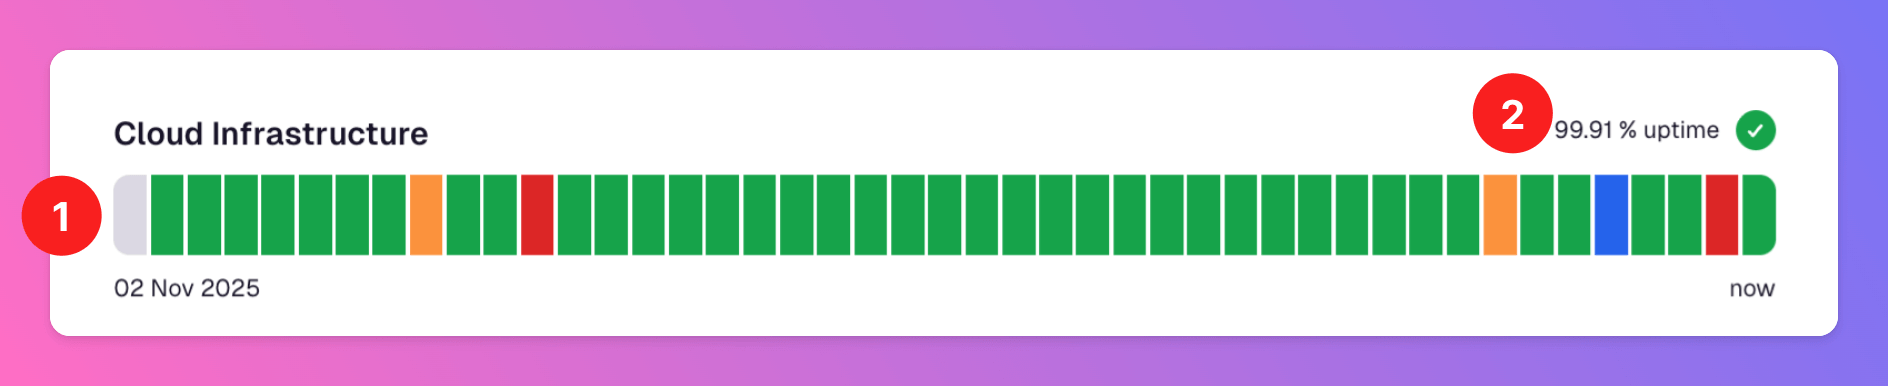
The status graph of each Service on your Status Page shows both, historical and real-time information about the status of the Service.
1. The historical information can be retained from the color codes of the time intervals.
1. **Green** = Service operational, no incidents that affected the Services.
2. **Blue** = At least on incident with `Minor` severity during this interval.
3. **Yellow** = At least on incident with `Warning` severity during this interval.
4. **Red** = At least on incident with `Critical` severity during this interval.
5. **Grey** = no data available
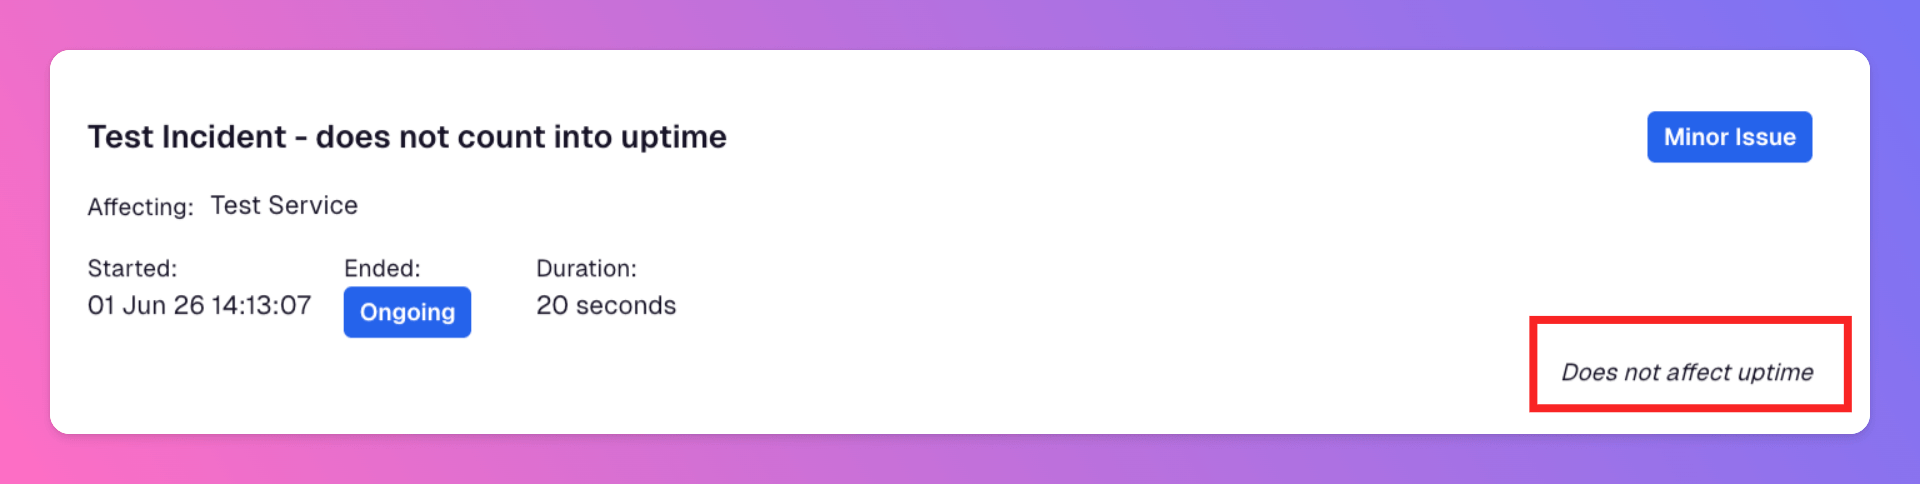
2. You can also see the current state of the Service (here: operational) and the historic uptime for the considered history. By default, affecting incidents of all severities lower the uptime—it is the percentage of incident-free time. If [**Affects Uptime**](/essentials/incident#affects-services) is **disabled** for an incident, it can still appear on the Status Page but does **not** count toward downtime or reduce the uptime percentage. See [Affects Uptime on Status Pages](/advanced/status-pages#affects-uptime) below.
3. **Click any interval** on the graph to open the [incident history](/advanced/status-pages#public-incident-history) for that time period—all incidents that affected the Service during the interval, plus any [past maintenances](/advanced/status-pages#communication-of-service-maintenances-on-status-pages) that overlap with it.
### Communication of Incidents on Status Pages
This section is designed to explain how incidents and incident updates are displayed on Status Pages. Moreover, we will add more context about the emails that your Status Pages' subscribers will receive.
#### Status Graph
The status graph of each Service on your Status Page shows both, historical and real-time information about the status of the Service.
1. The historical information can be retained from the color codes of the time intervals.
1. **Green** = Service operational, no incidents that affected the Services.
2. **Blue** = At least on incident with `Minor` severity during this interval.
3. **Yellow** = At least on incident with `Warning` severity during this interval.
4. **Red** = At least on incident with `Critical` severity during this interval.
5. **Grey** = no data available
2. You can also see the current state of the Service (here: operational) and the historic uptime for the considered history. By default, affecting incidents of all severities lower the uptime—it is the percentage of incident-free time. If [**Affects Uptime**](/essentials/incident#affects-services) is **disabled** for an incident, it can still appear on the Status Page but does **not** count toward downtime or reduce the uptime percentage. See [Affects Uptime on Status Pages](/advanced/status-pages#affects-uptime) below.
3. **Click any interval** on the graph to open the [incident history](/advanced/status-pages#public-incident-history) for that time period—all incidents that affected the Service during the interval, plus any [past maintenances](/advanced/status-pages#communication-of-service-maintenances-on-status-pages) that overlap with it.
Affects Uptime on Status Pages
When an incident [affects](/essentials/incident#affects-services) a Service, **Affects Uptime** controls whether that incident counts toward **downtime** and the displayed **uptime percentage**:
* **Enabled** (default): The incident is included in downtime calculations and lowers historic uptime, and the status graph reflects the incident severity for the affected intervals.
* **Disabled**: The incident does **not** count as downtime and does not reduce uptime. It can still appear on the Status Page (including in incident history pages) and affect the current service status when open.
**Affects Uptime** is enabled by default when you [manually create](/essentials/incident#manually-create-an-incident) or [**Affect**](/essentials/incident#affects-services) an incident. To change it, use the create or affect overlay in the Web App—see the [incident guide](/essentials/incident#affects-services).
 #### Public Incident History
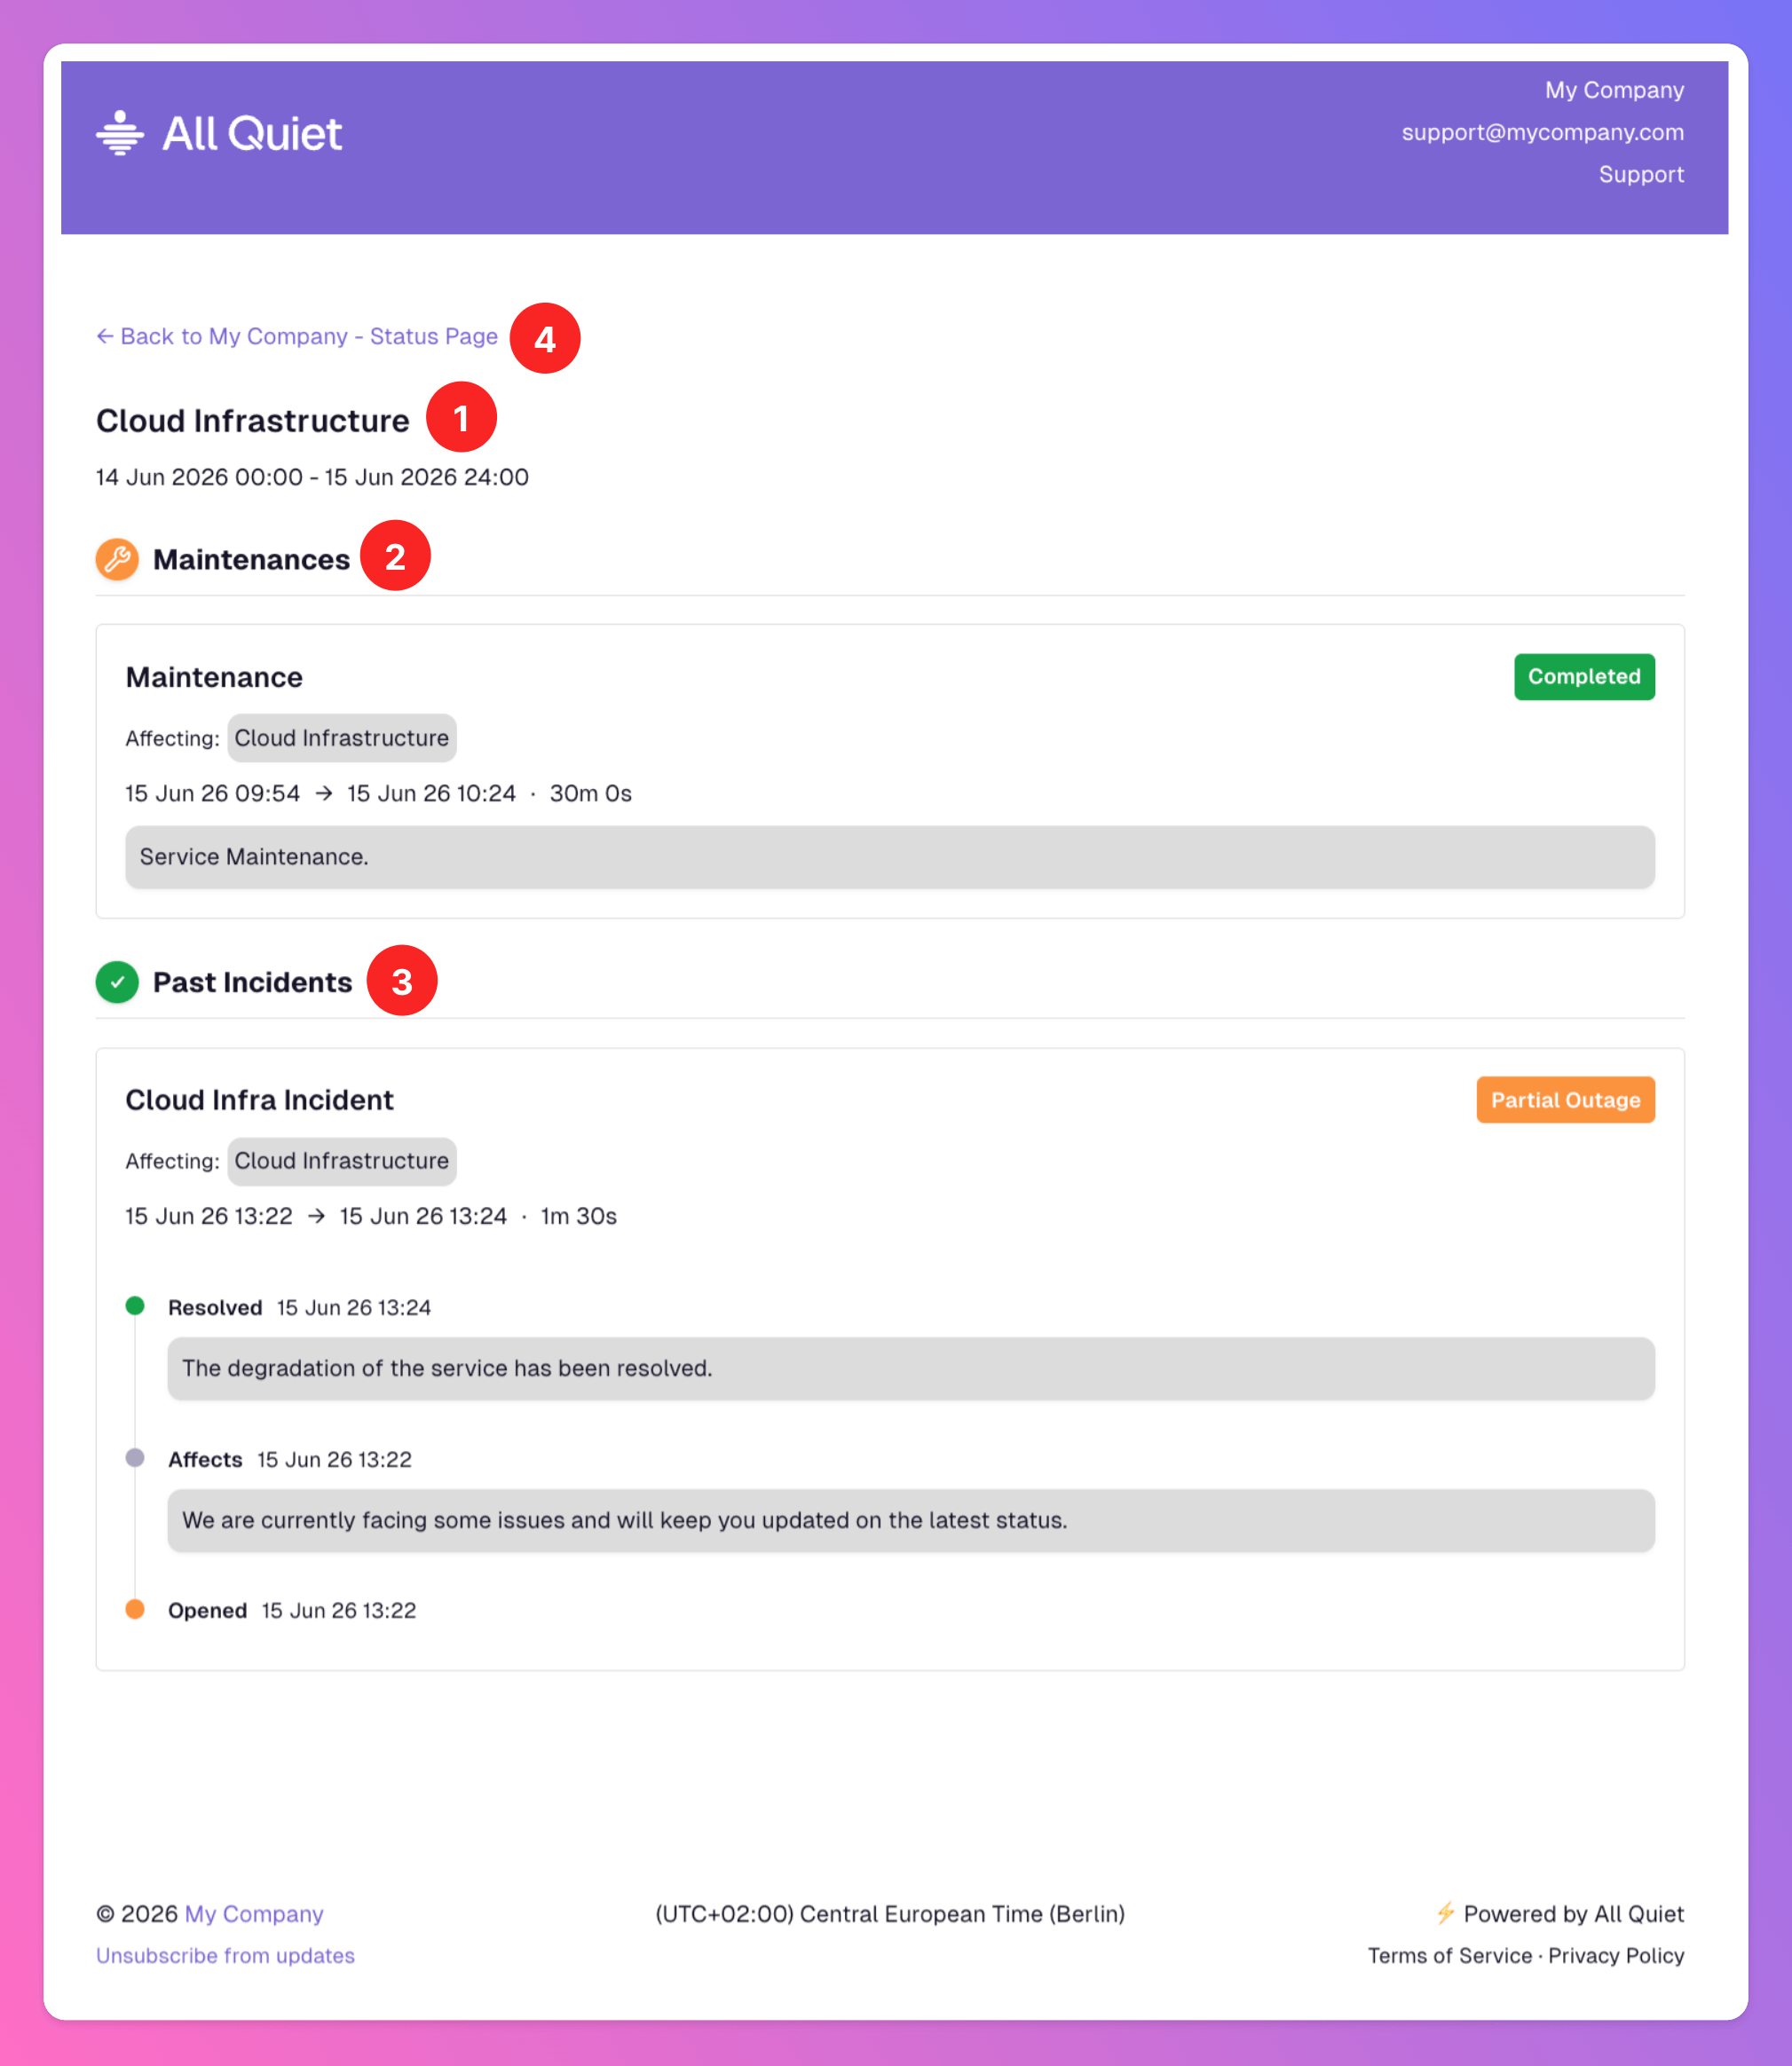
**Ongoing incidents** are displayed above the affected Services' status graphs. **Upcoming** and **ongoing** [maintenances](/advanced/status-pages#maintenances-of-Services) follow the layout described in [Communication of Service Maintenances on Status Pages](/advanced/status-pages#communication-of-service-maintenances-on-status-pages).
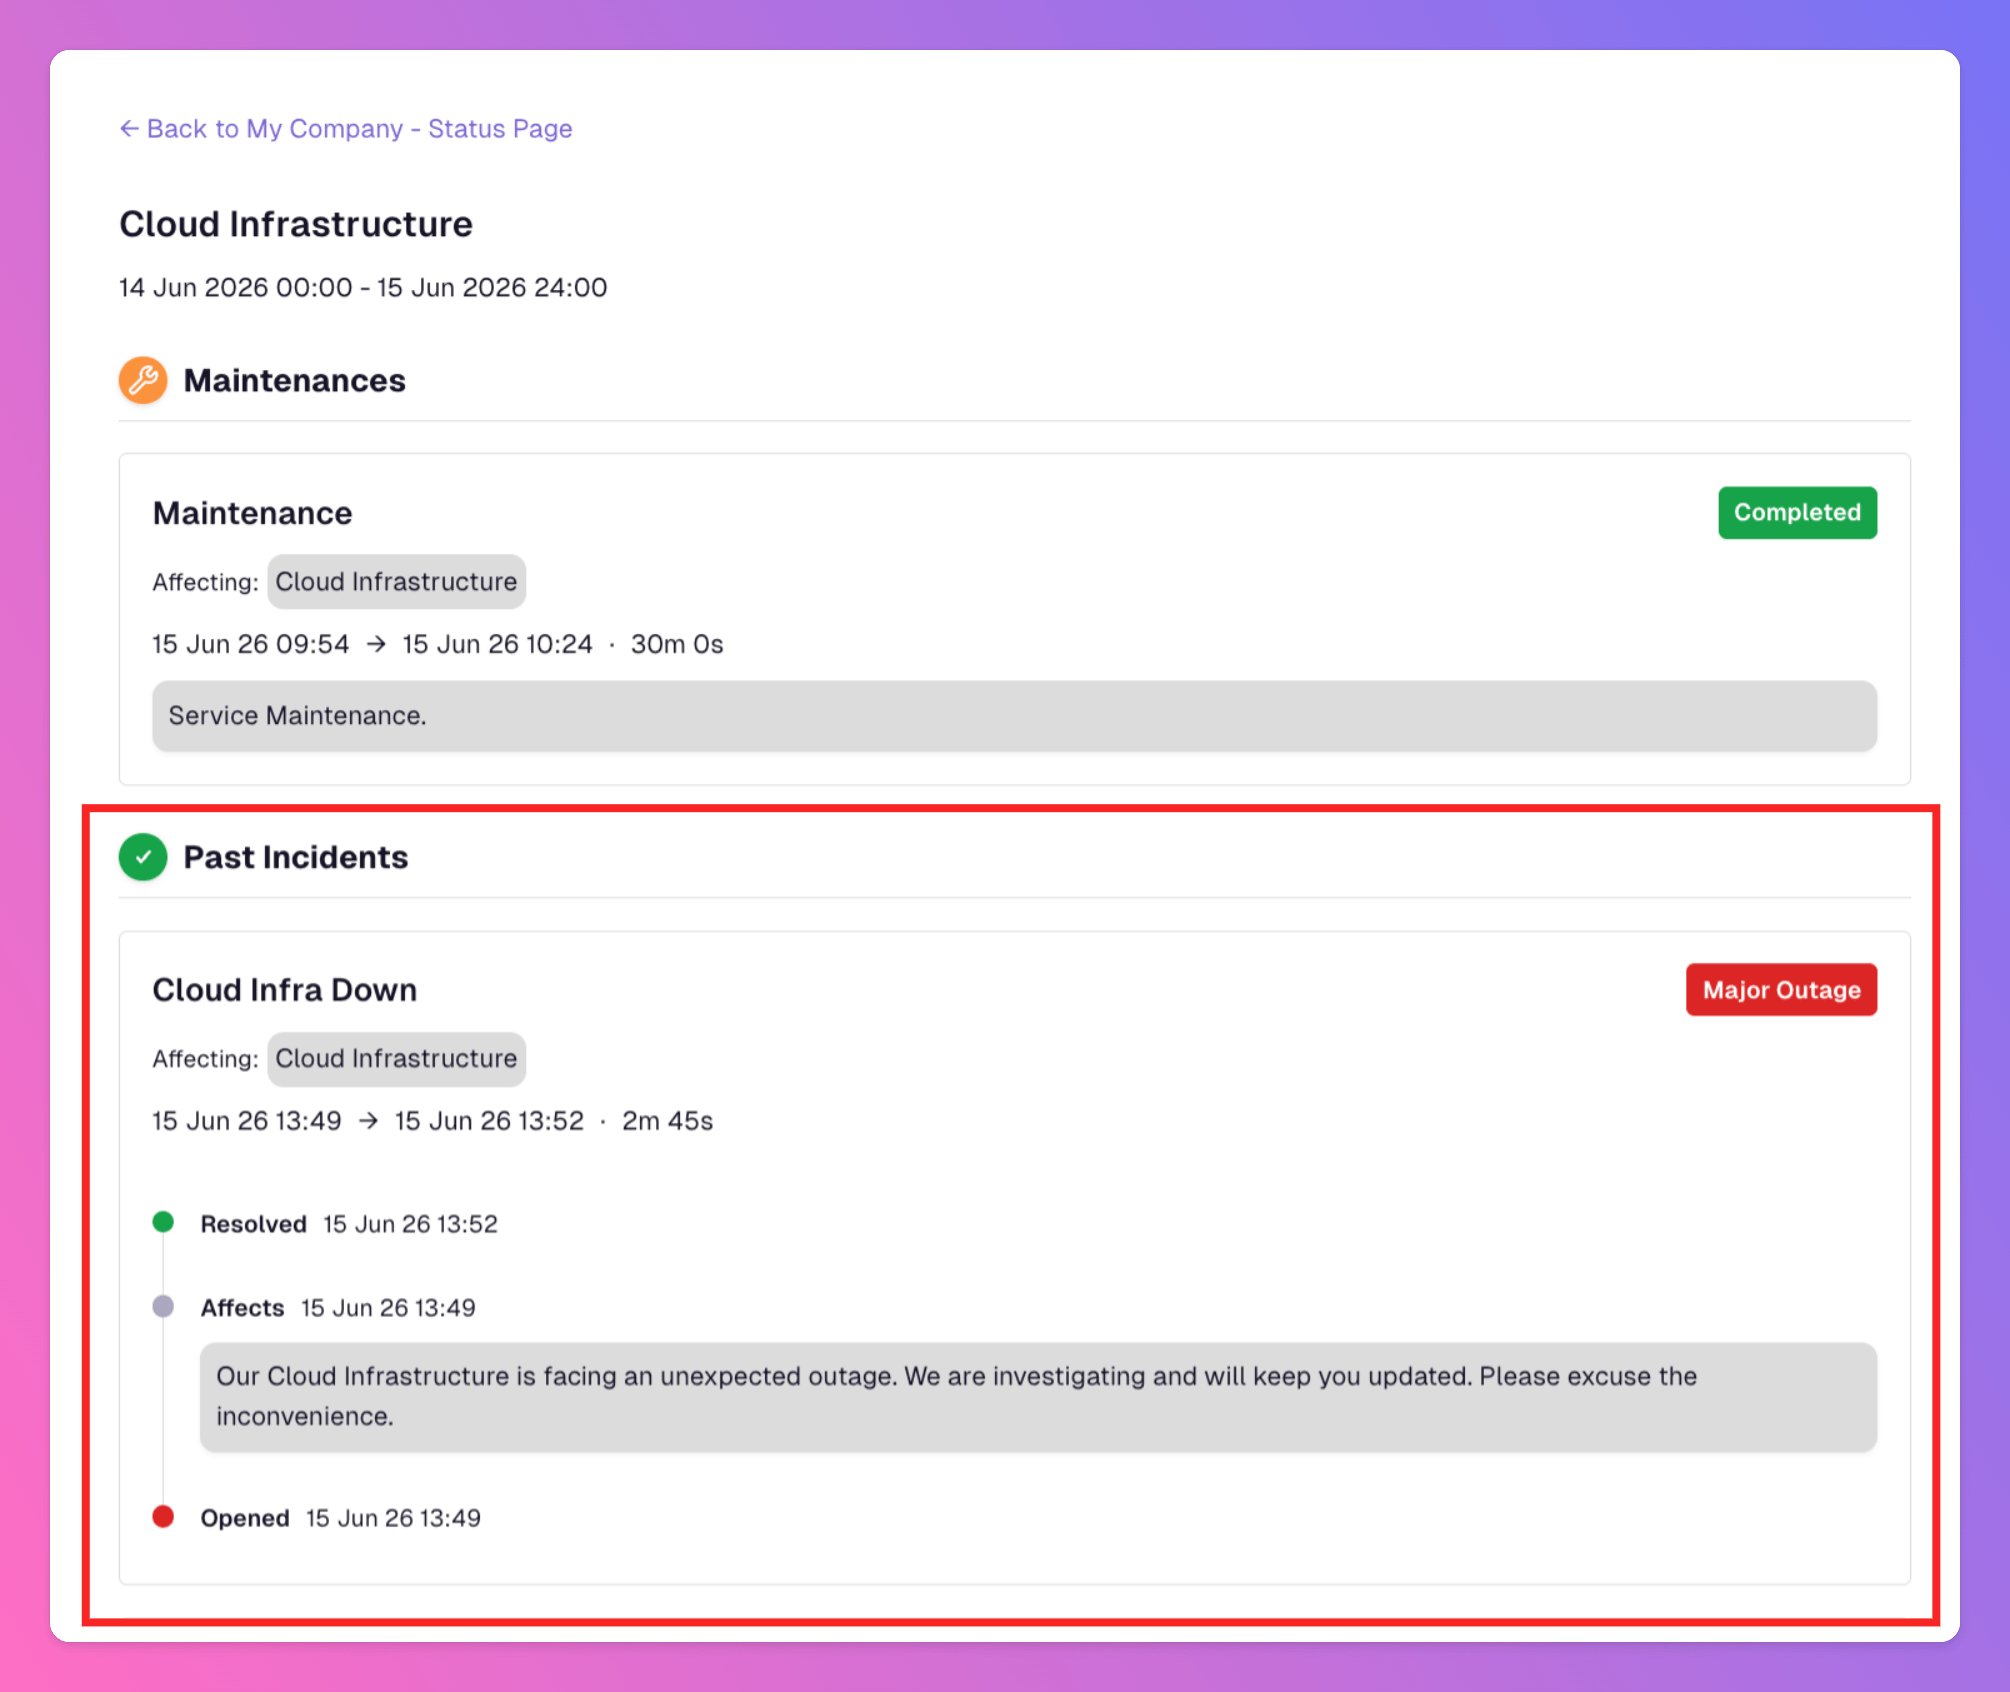
To view past incidents, **click an interval** on a Service's status graph. This opens an **incident history page** for that time period, listing all incidents that affected the Service—and any overlapping **past maintenances**.
1. It depicts the service's status during the considered time period.
2. It lists all maintenances that overlapped with the considered time period (if history graphs are enabled and `Hide maintenances on the public page` is disabled).
3. It lists all incidents that affected the Service during the considered time period, including all public comments and details that lead to the resolution of the incident (if history graphs are enabled and `Hide incident details on the public page` is disabled).
4. It includes a link back to the status page.
#### Public Incident History
**Ongoing incidents** are displayed above the affected Services' status graphs. **Upcoming** and **ongoing** [maintenances](/advanced/status-pages#maintenances-of-Services) follow the layout described in [Communication of Service Maintenances on Status Pages](/advanced/status-pages#communication-of-service-maintenances-on-status-pages).
To view past incidents, **click an interval** on a Service's status graph. This opens an **incident history page** for that time period, listing all incidents that affected the Service—and any overlapping **past maintenances**.
1. It depicts the service's status during the considered time period.
2. It lists all maintenances that overlapped with the considered time period (if history graphs are enabled and `Hide maintenances on the public page` is disabled).
3. It lists all incidents that affected the Service during the considered time period, including all public comments and details that lead to the resolution of the incident (if history graphs are enabled and `Hide incident details on the public page` is disabled).
4. It includes a link back to the status page.
 Public incident history is limited to **30 incidents per calendar day** (using the Status Page [timezone](/advanced/status-pages#edit-status-page)). When more than 30 incidents apply to a single day, the page shows 30 and a line: **"N additional incidents not shown."** (where **N** is how many incidents for that day are not listed).
#### Example - Incident Affects Service
To see what happens when an incident affects a Service, we can best look at an example.
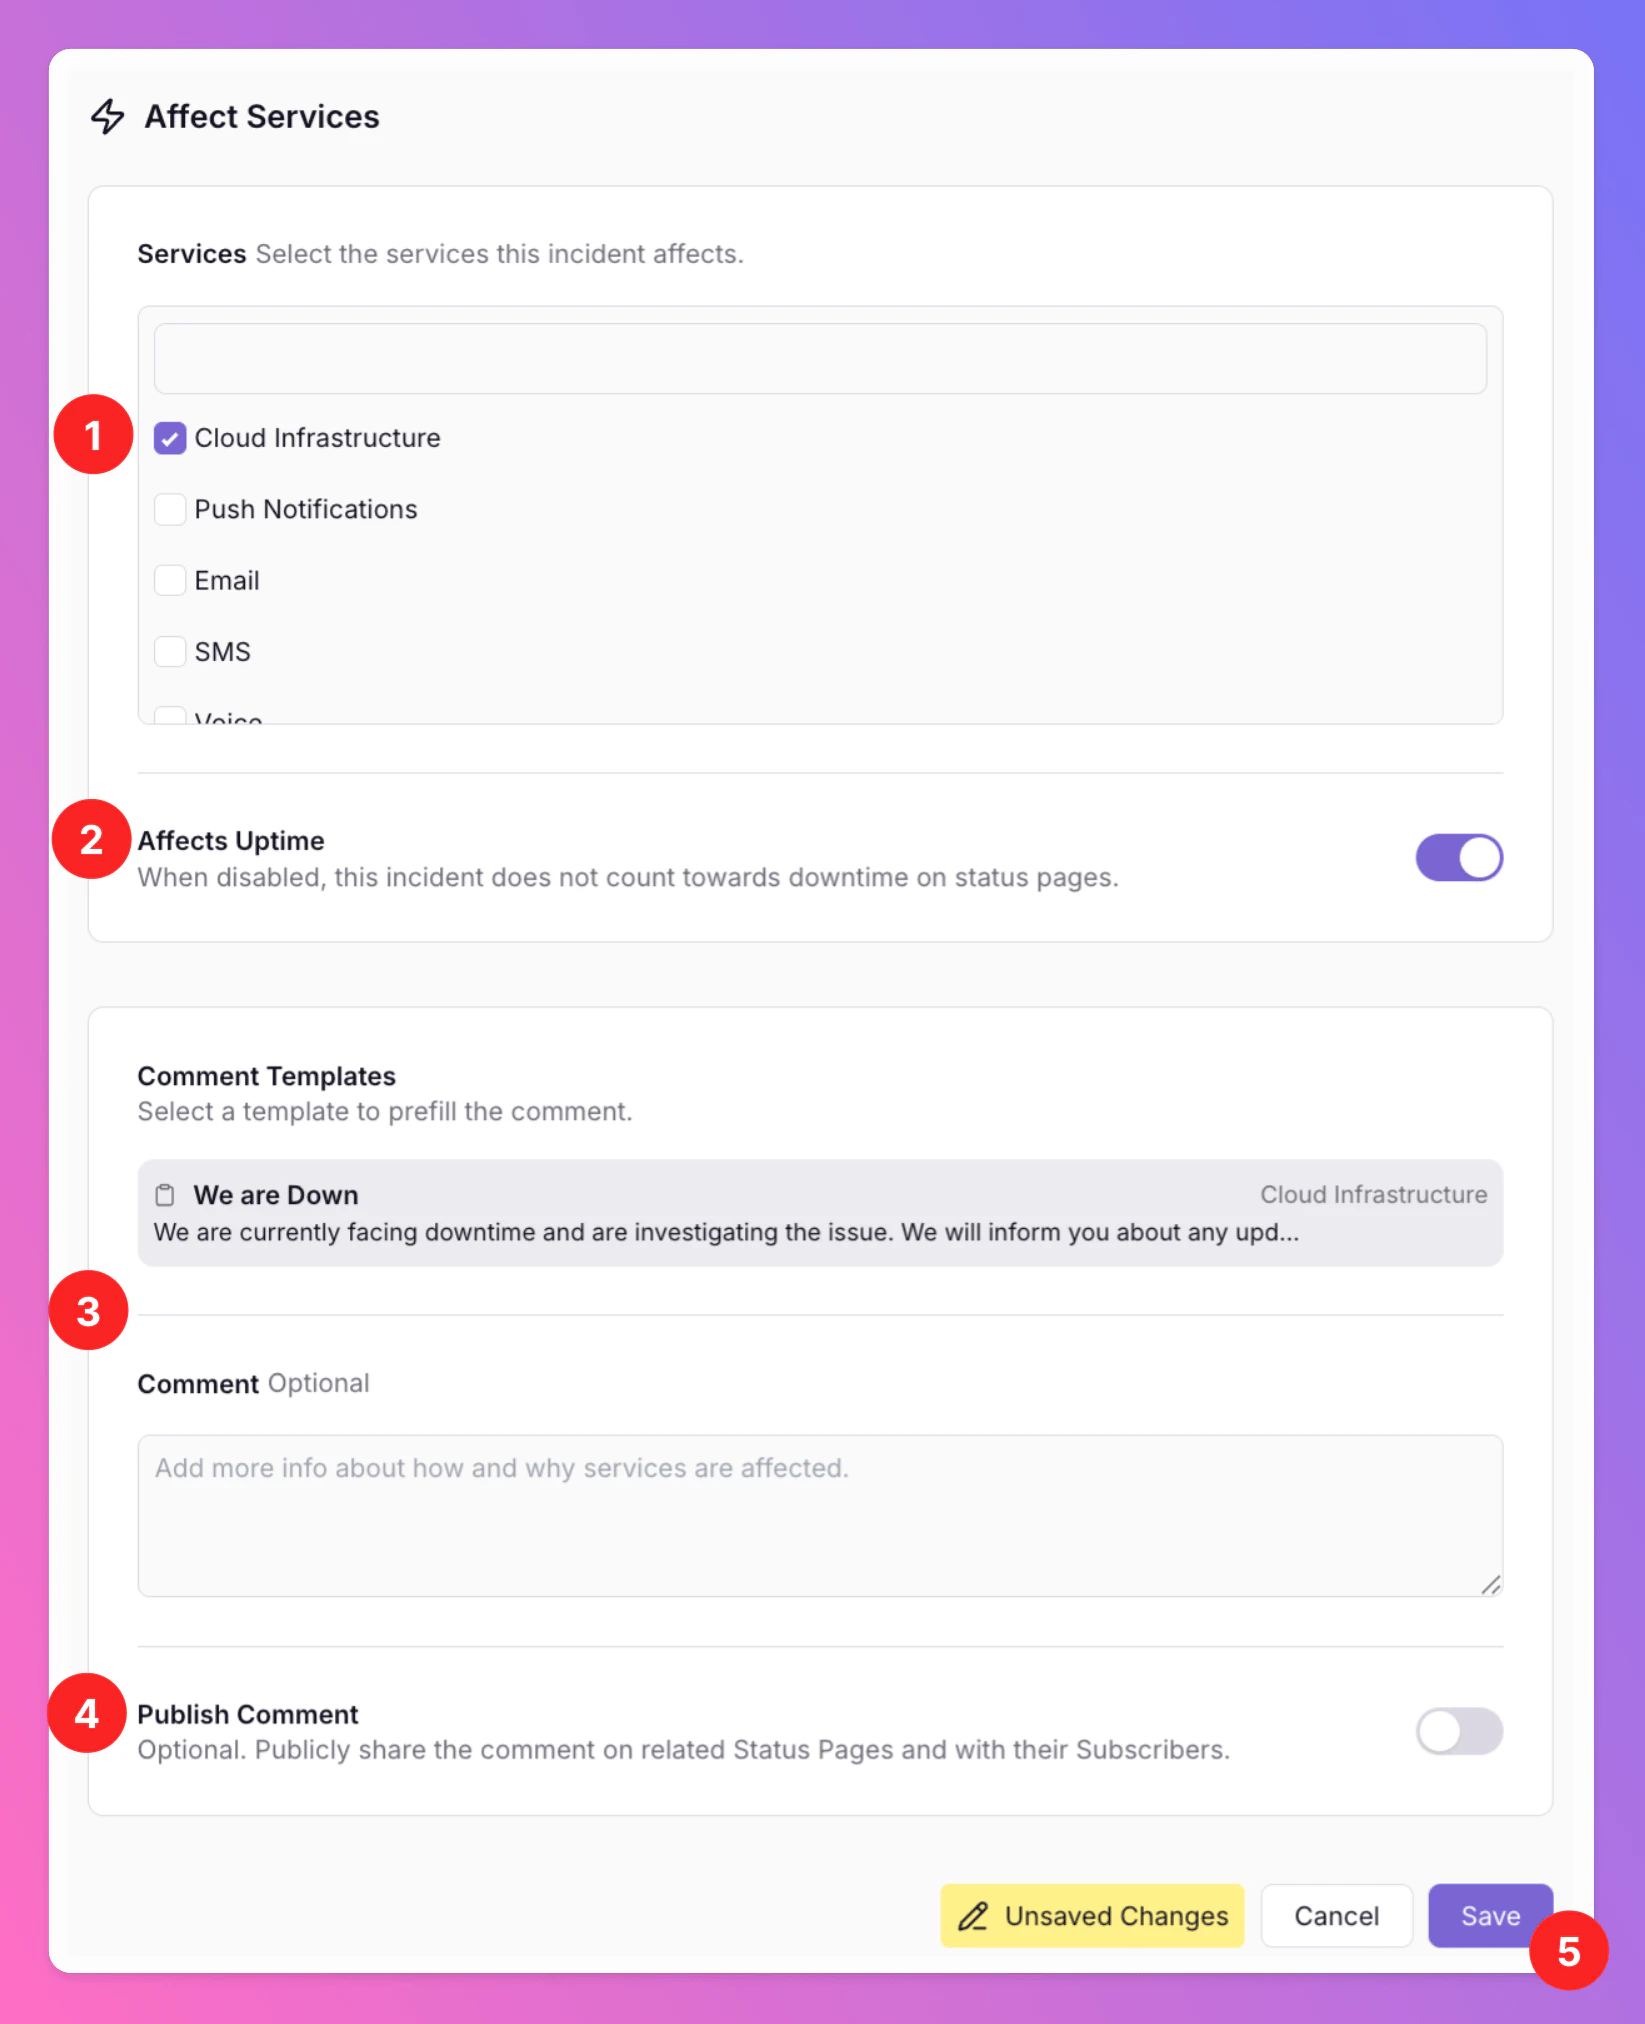
We know that an incident affects one of our Services. So we select the [affect](/essentials/incident#affects-services) action.
1. In the overlay, we select the affected Service.
2. [**Affects Uptime**](/essentials/incident#affects-uptime) is enabled by default—disable it if you want subscribers to see the incident without it counting toward [downtime](/advanced/status-pages#affects-uptime).
3. Next, we can add a comment. If previously created, we can make use of our [Service Message Templates](/advanced/status-pages#add-message-templates-to-Service), here.
4. When an incident affects a Service, we will inform the subscribers of your Status Page in any case. You can decide if you want to share a public comment with them, too.
5. To finish the action, click `Save`.
Public incident history is limited to **30 incidents per calendar day** (using the Status Page [timezone](/advanced/status-pages#edit-status-page)). When more than 30 incidents apply to a single day, the page shows 30 and a line: **"N additional incidents not shown."** (where **N** is how many incidents for that day are not listed).
#### Example - Incident Affects Service
To see what happens when an incident affects a Service, we can best look at an example.
We know that an incident affects one of our Services. So we select the [affect](/essentials/incident#affects-services) action.
1. In the overlay, we select the affected Service.
2. [**Affects Uptime**](/essentials/incident#affects-uptime) is enabled by default—disable it if you want subscribers to see the incident without it counting toward [downtime](/advanced/status-pages#affects-uptime).
3. Next, we can add a comment. If previously created, we can make use of our [Service Message Templates](/advanced/status-pages#add-message-templates-to-Service), here.
4. When an incident affects a Service, we will inform the subscribers of your Status Page in any case. You can decide if you want to share a public comment with them, too.
5. To finish the action, click `Save`.
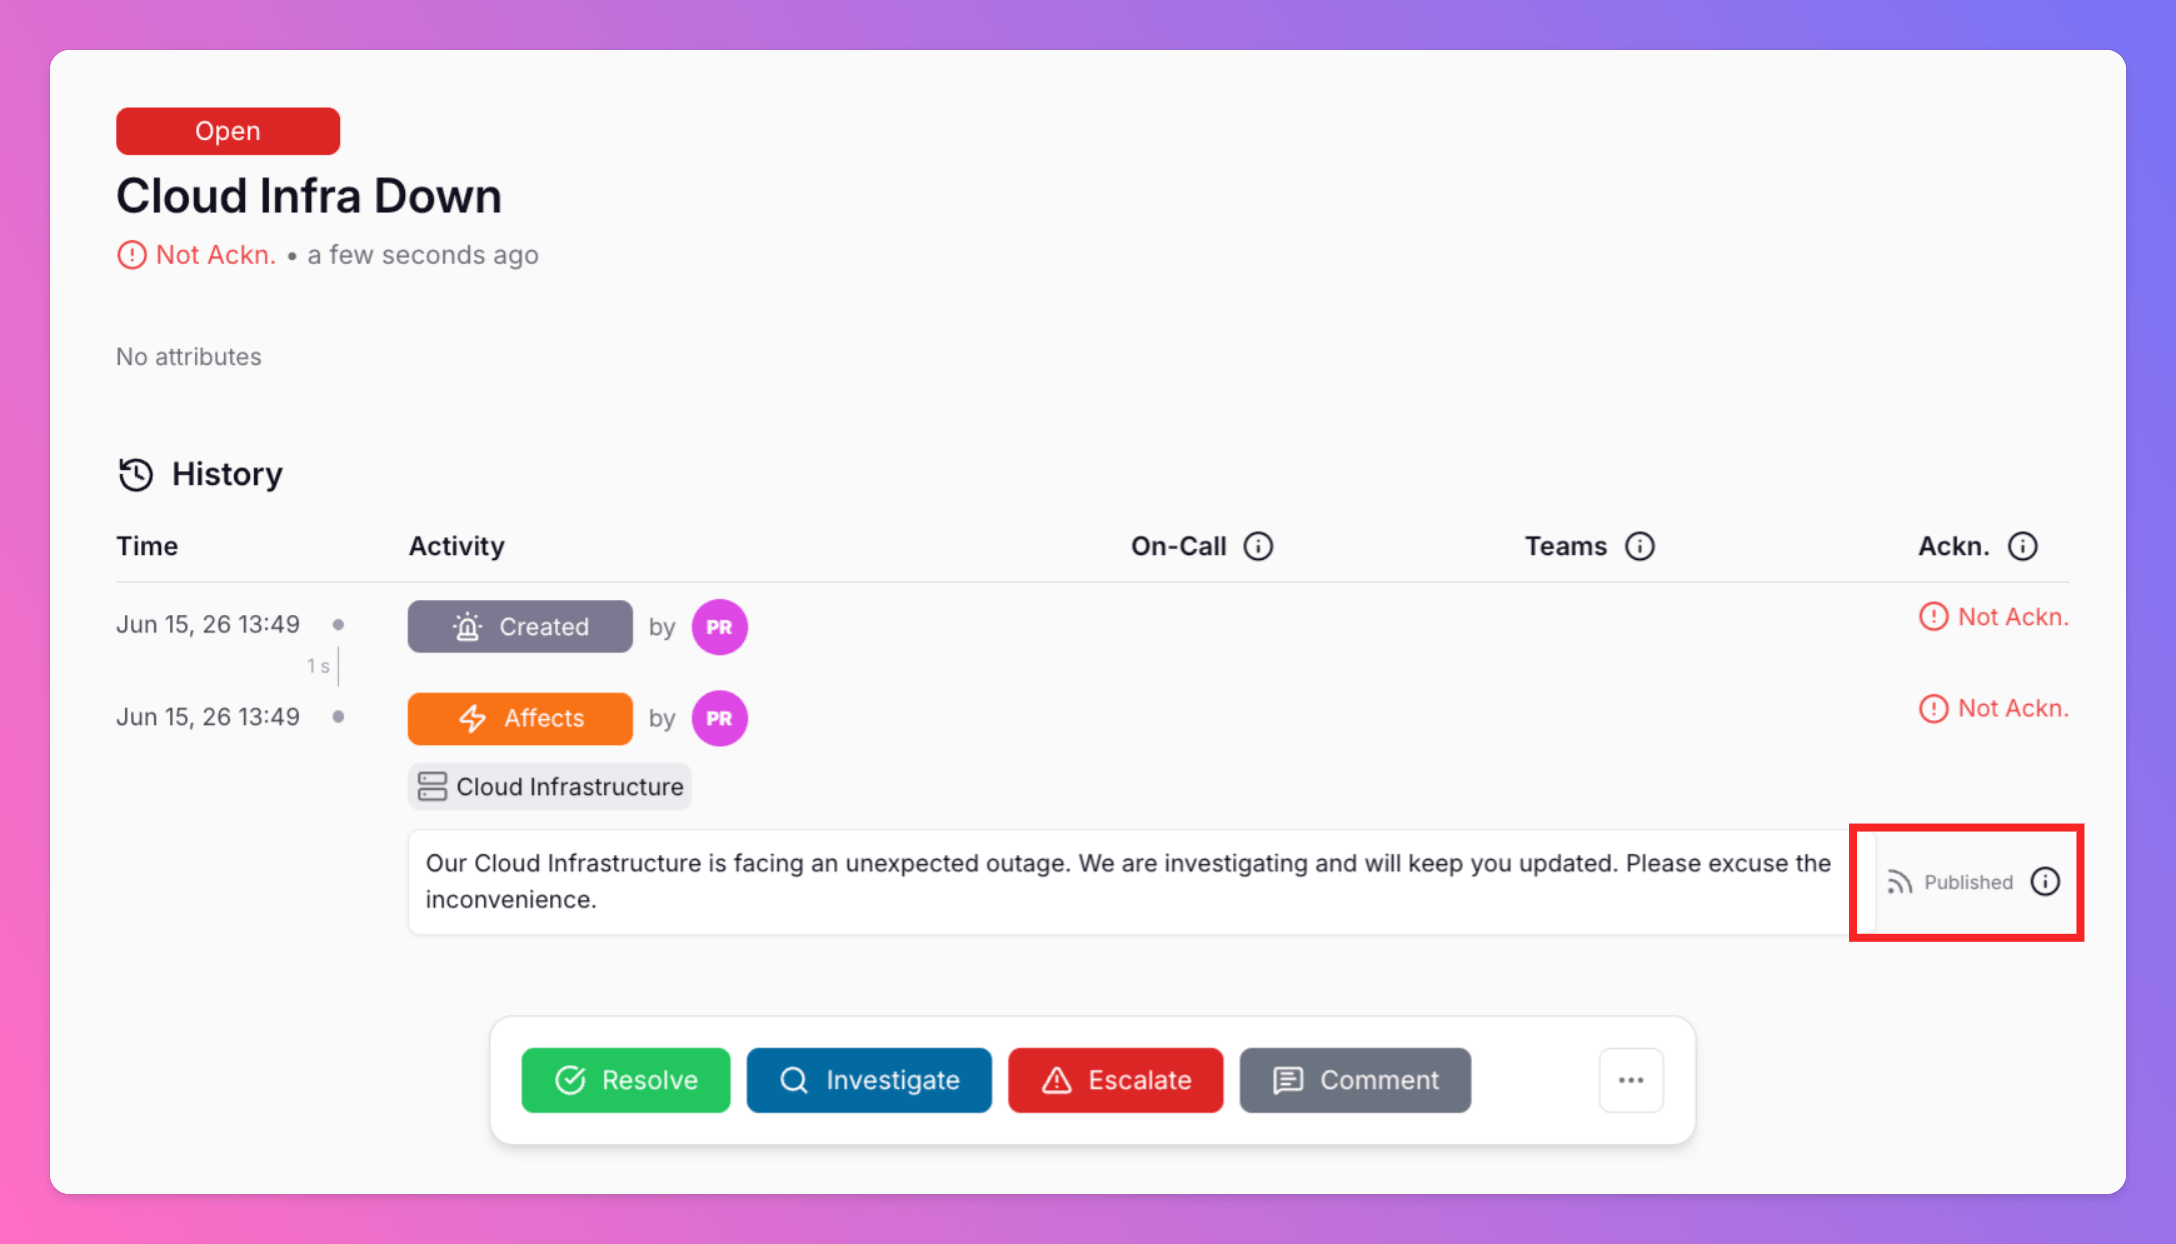
 Here, we added the message template to the incident and [published the comment](/essentials/incident#action-with-comment).
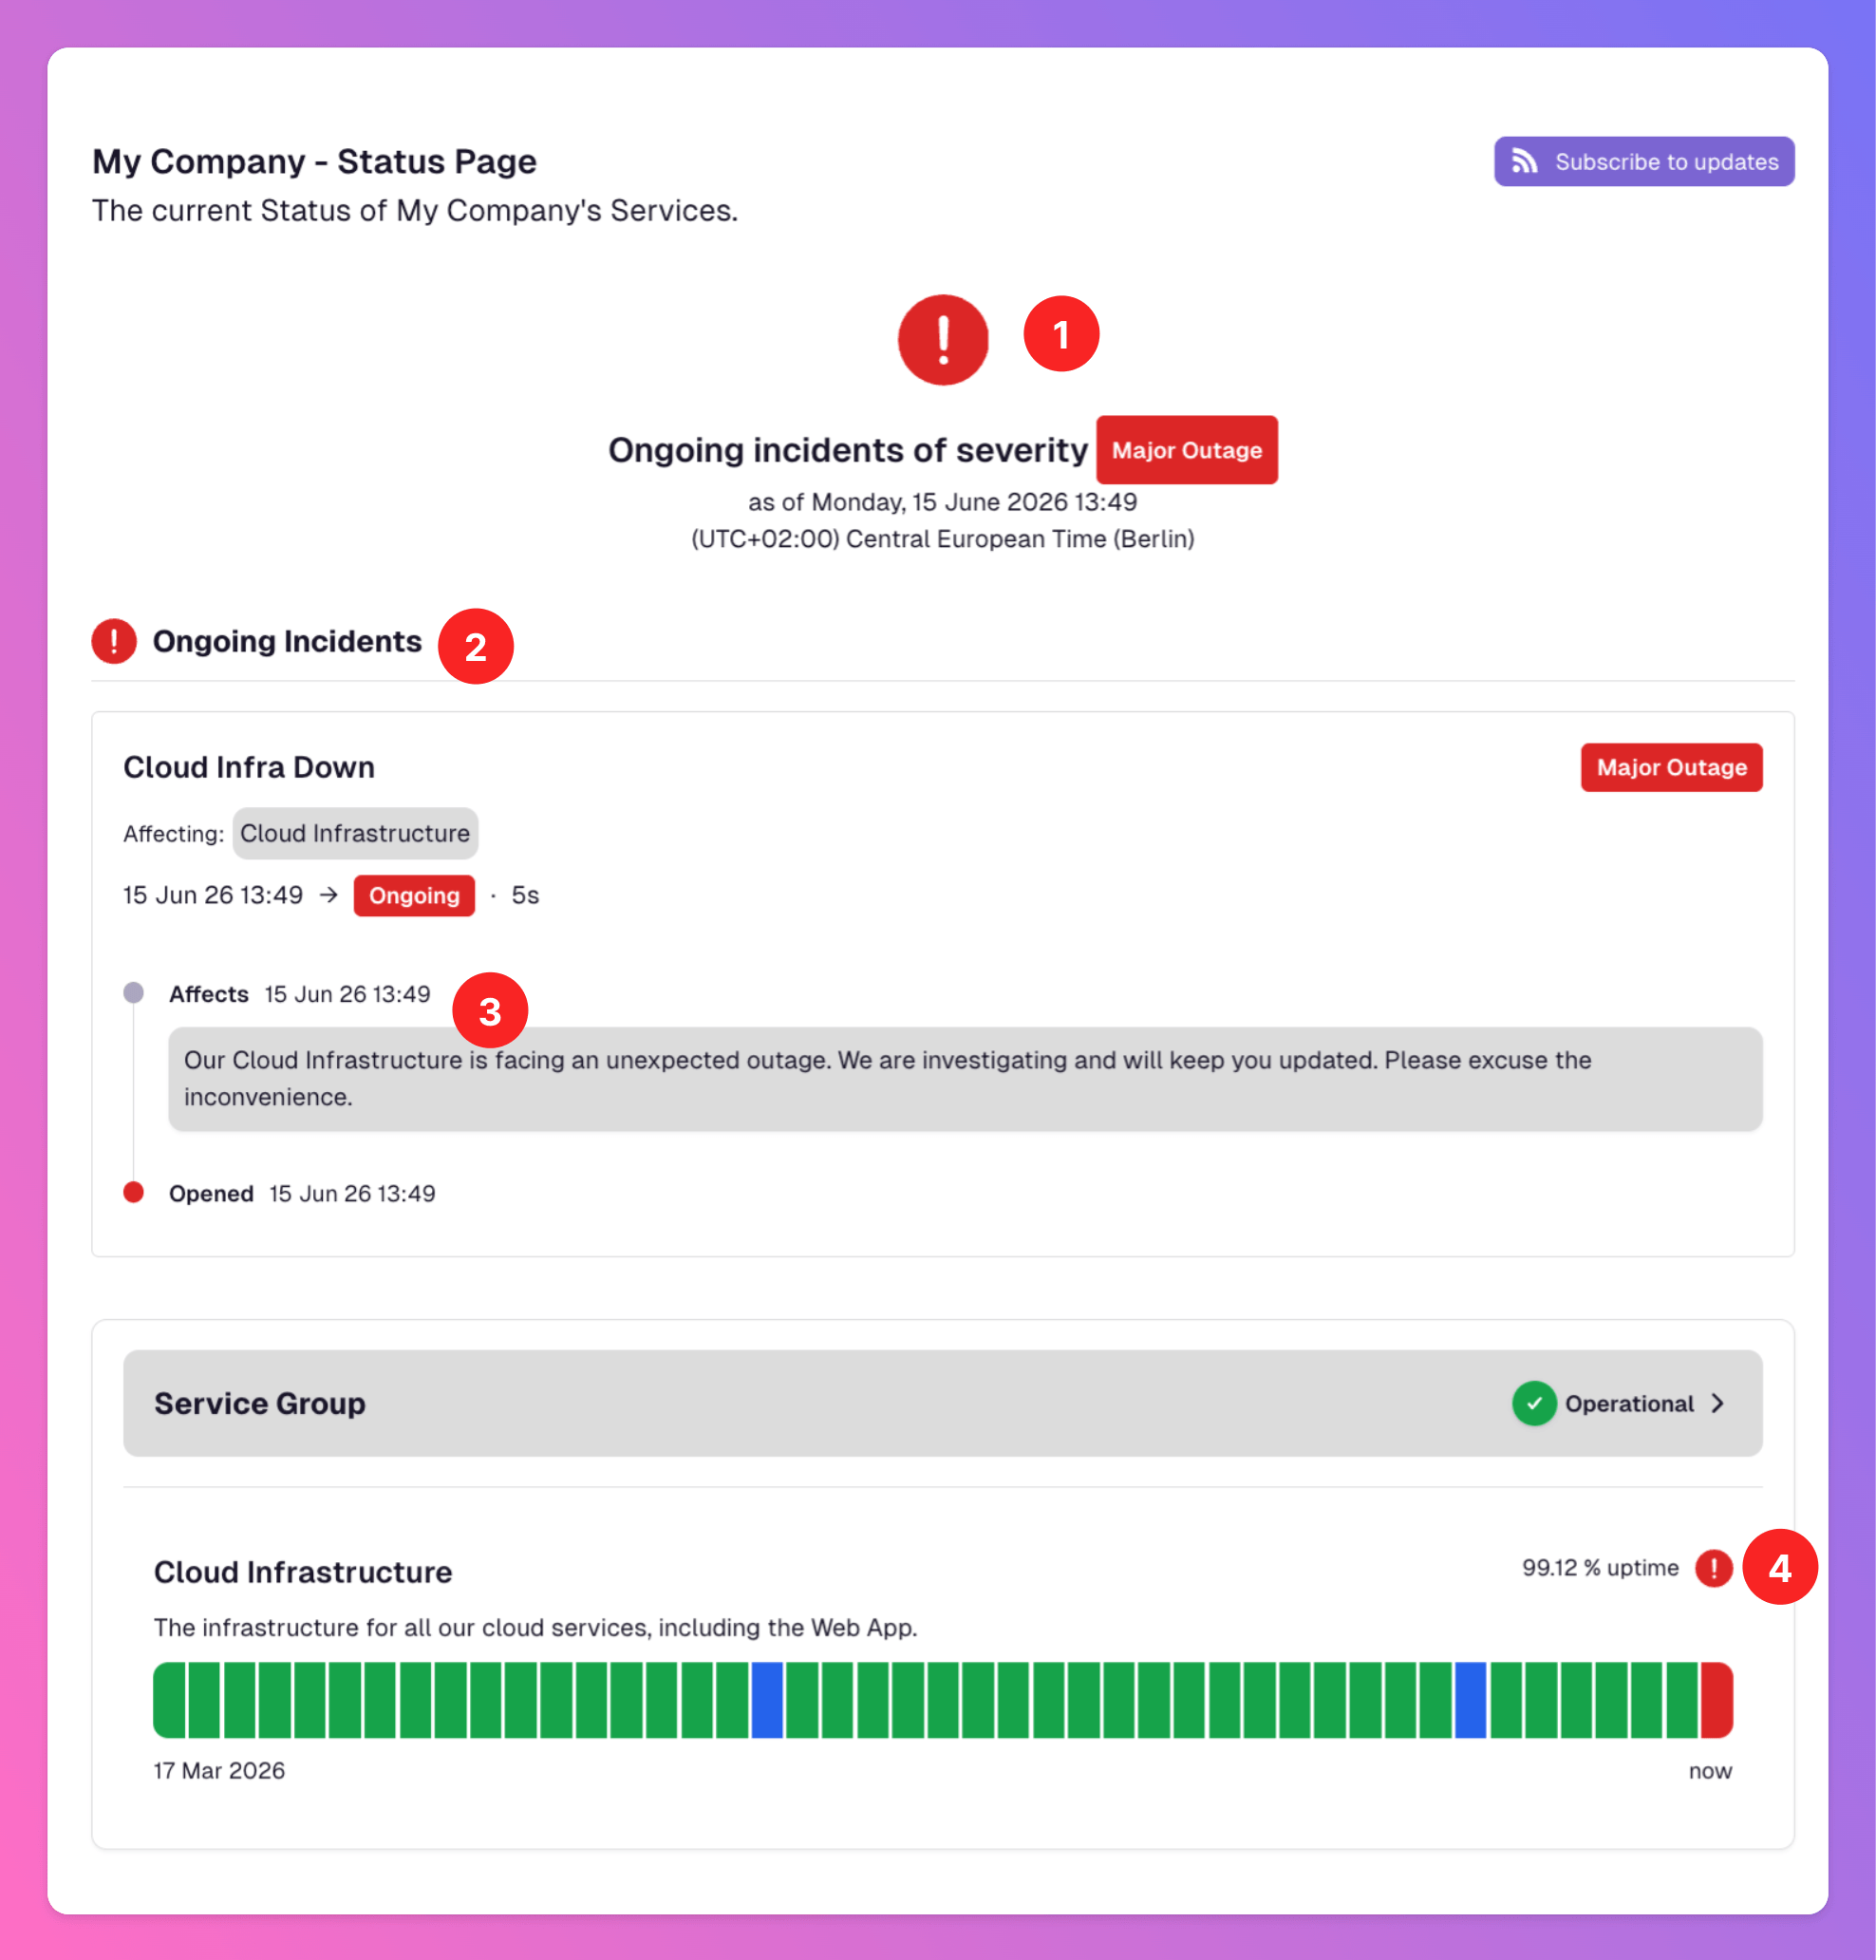
 On the status page, the ongoing incident is reflected as follows:
1. The summary section shows there's and incident ongoing (1).
2. You can see the ongoing incident on the Status Page, displayed **above** the Service's status graph. As the incident is of critical severity and we [mapped it](/advanced/status-pages#public-appearance-of-status-page) to the public name **Major Outage**, this is what status page subscribers will see.
3. The ongoing incident's history is displayed, including the public comment and the related action.
4. The status graph shows that the Service is currently not operational, and the latest time interval is filled red.
On the status page, the ongoing incident is reflected as follows:
1. The summary section shows there's and incident ongoing (1).
2. You can see the ongoing incident on the Status Page, displayed **above** the Service's status graph. As the incident is of critical severity and we [mapped it](/advanced/status-pages#public-appearance-of-status-page) to the public name **Major Outage**, this is what status page subscribers will see.
3. The ongoing incident's history is displayed, including the public comment and the related action.
4. The status graph shows that the Service is currently not operational, and the latest time interval is filled red.
 Status Page subscribers receive an update about the new incident per email, including the public comment and the related action.
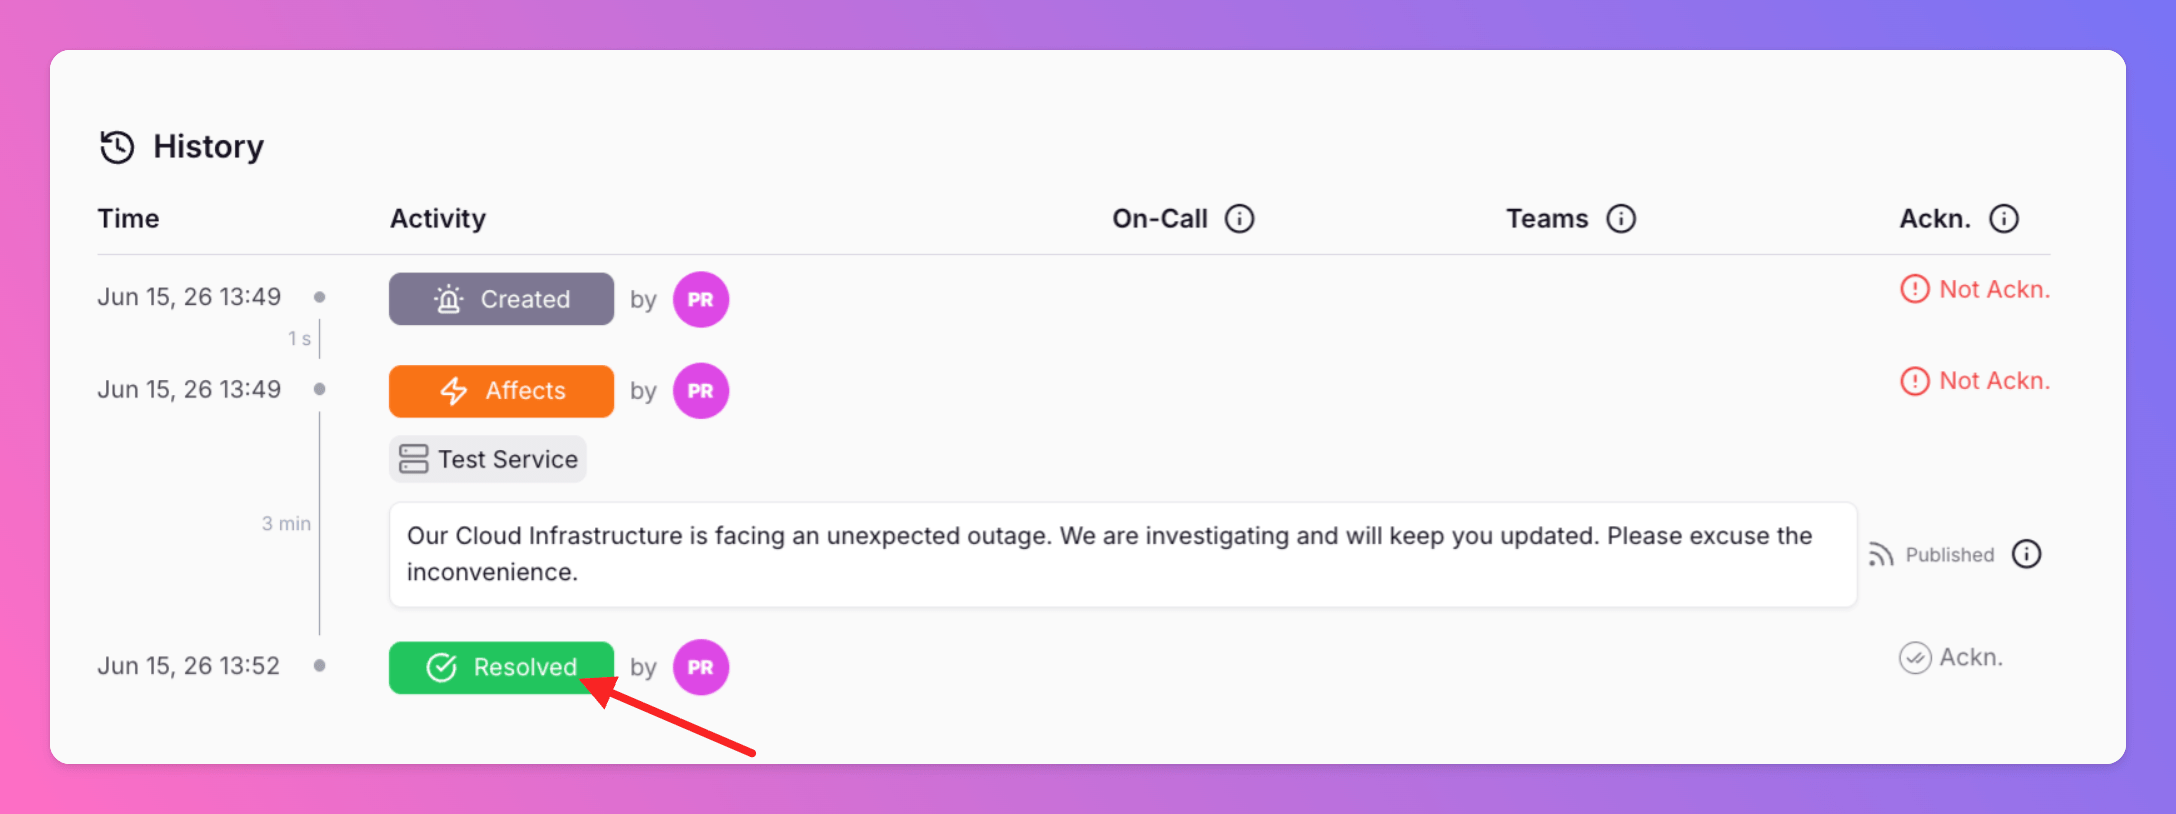
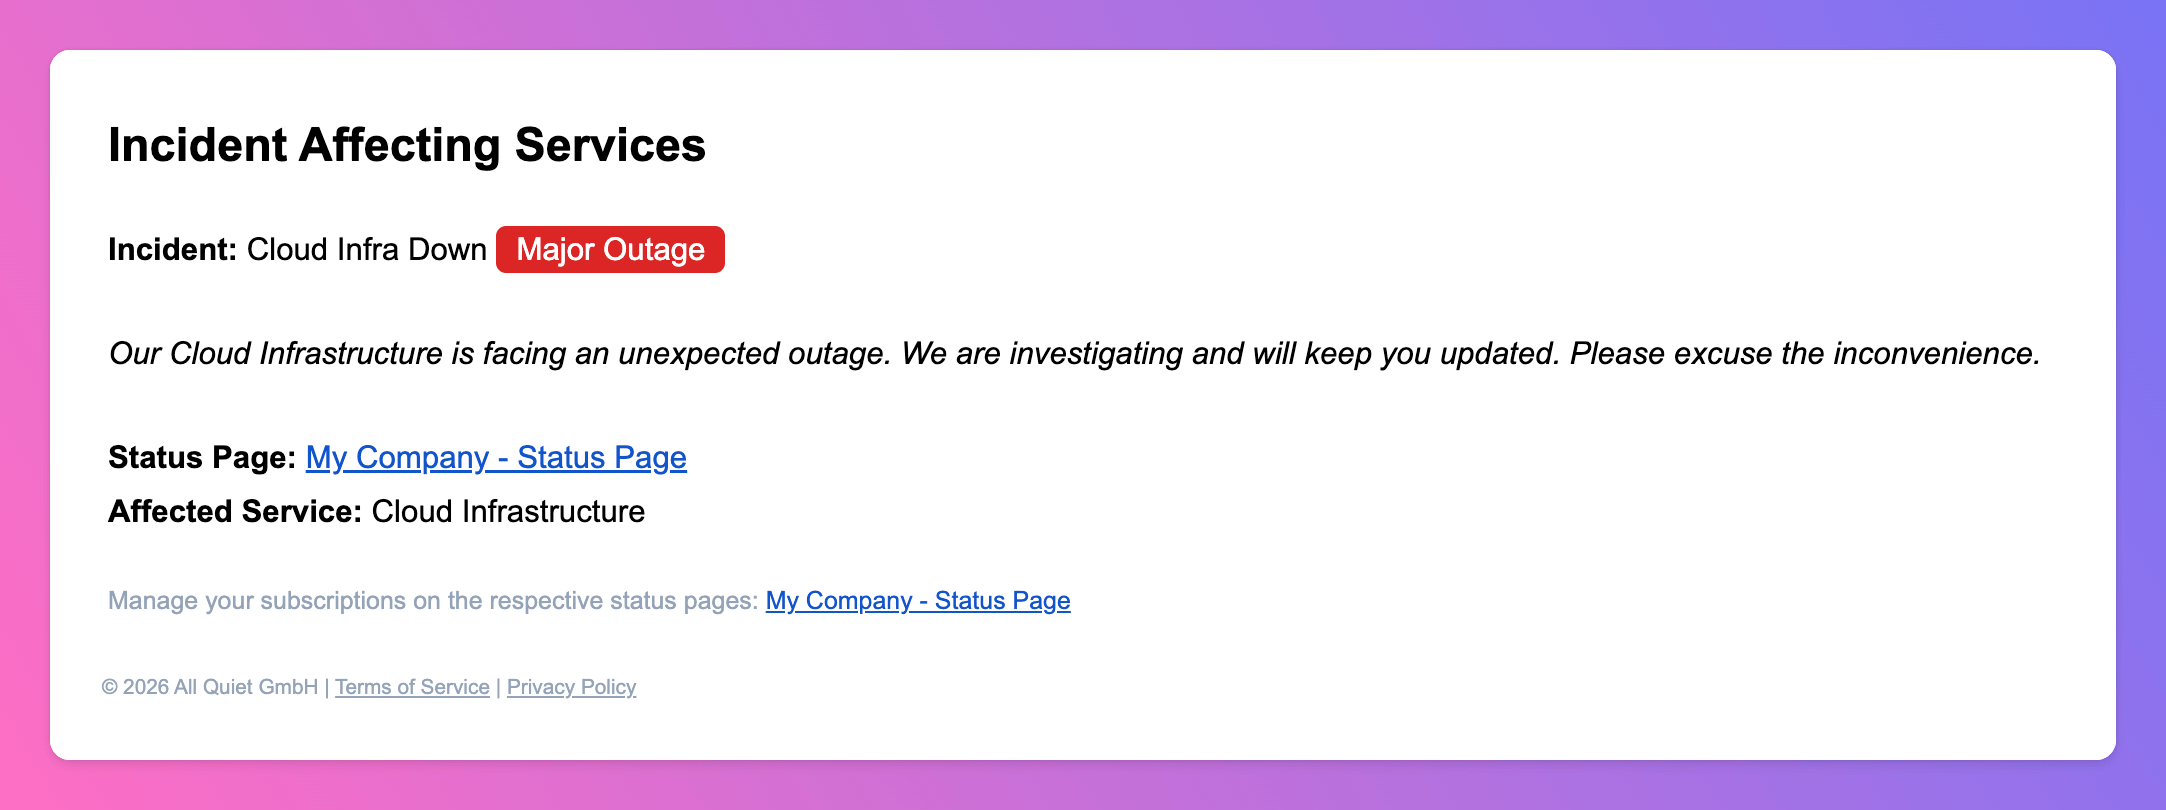 Next, the incident is resolved. Subscribers receive an update about the resolved incident per email, including the public comment and the related action.
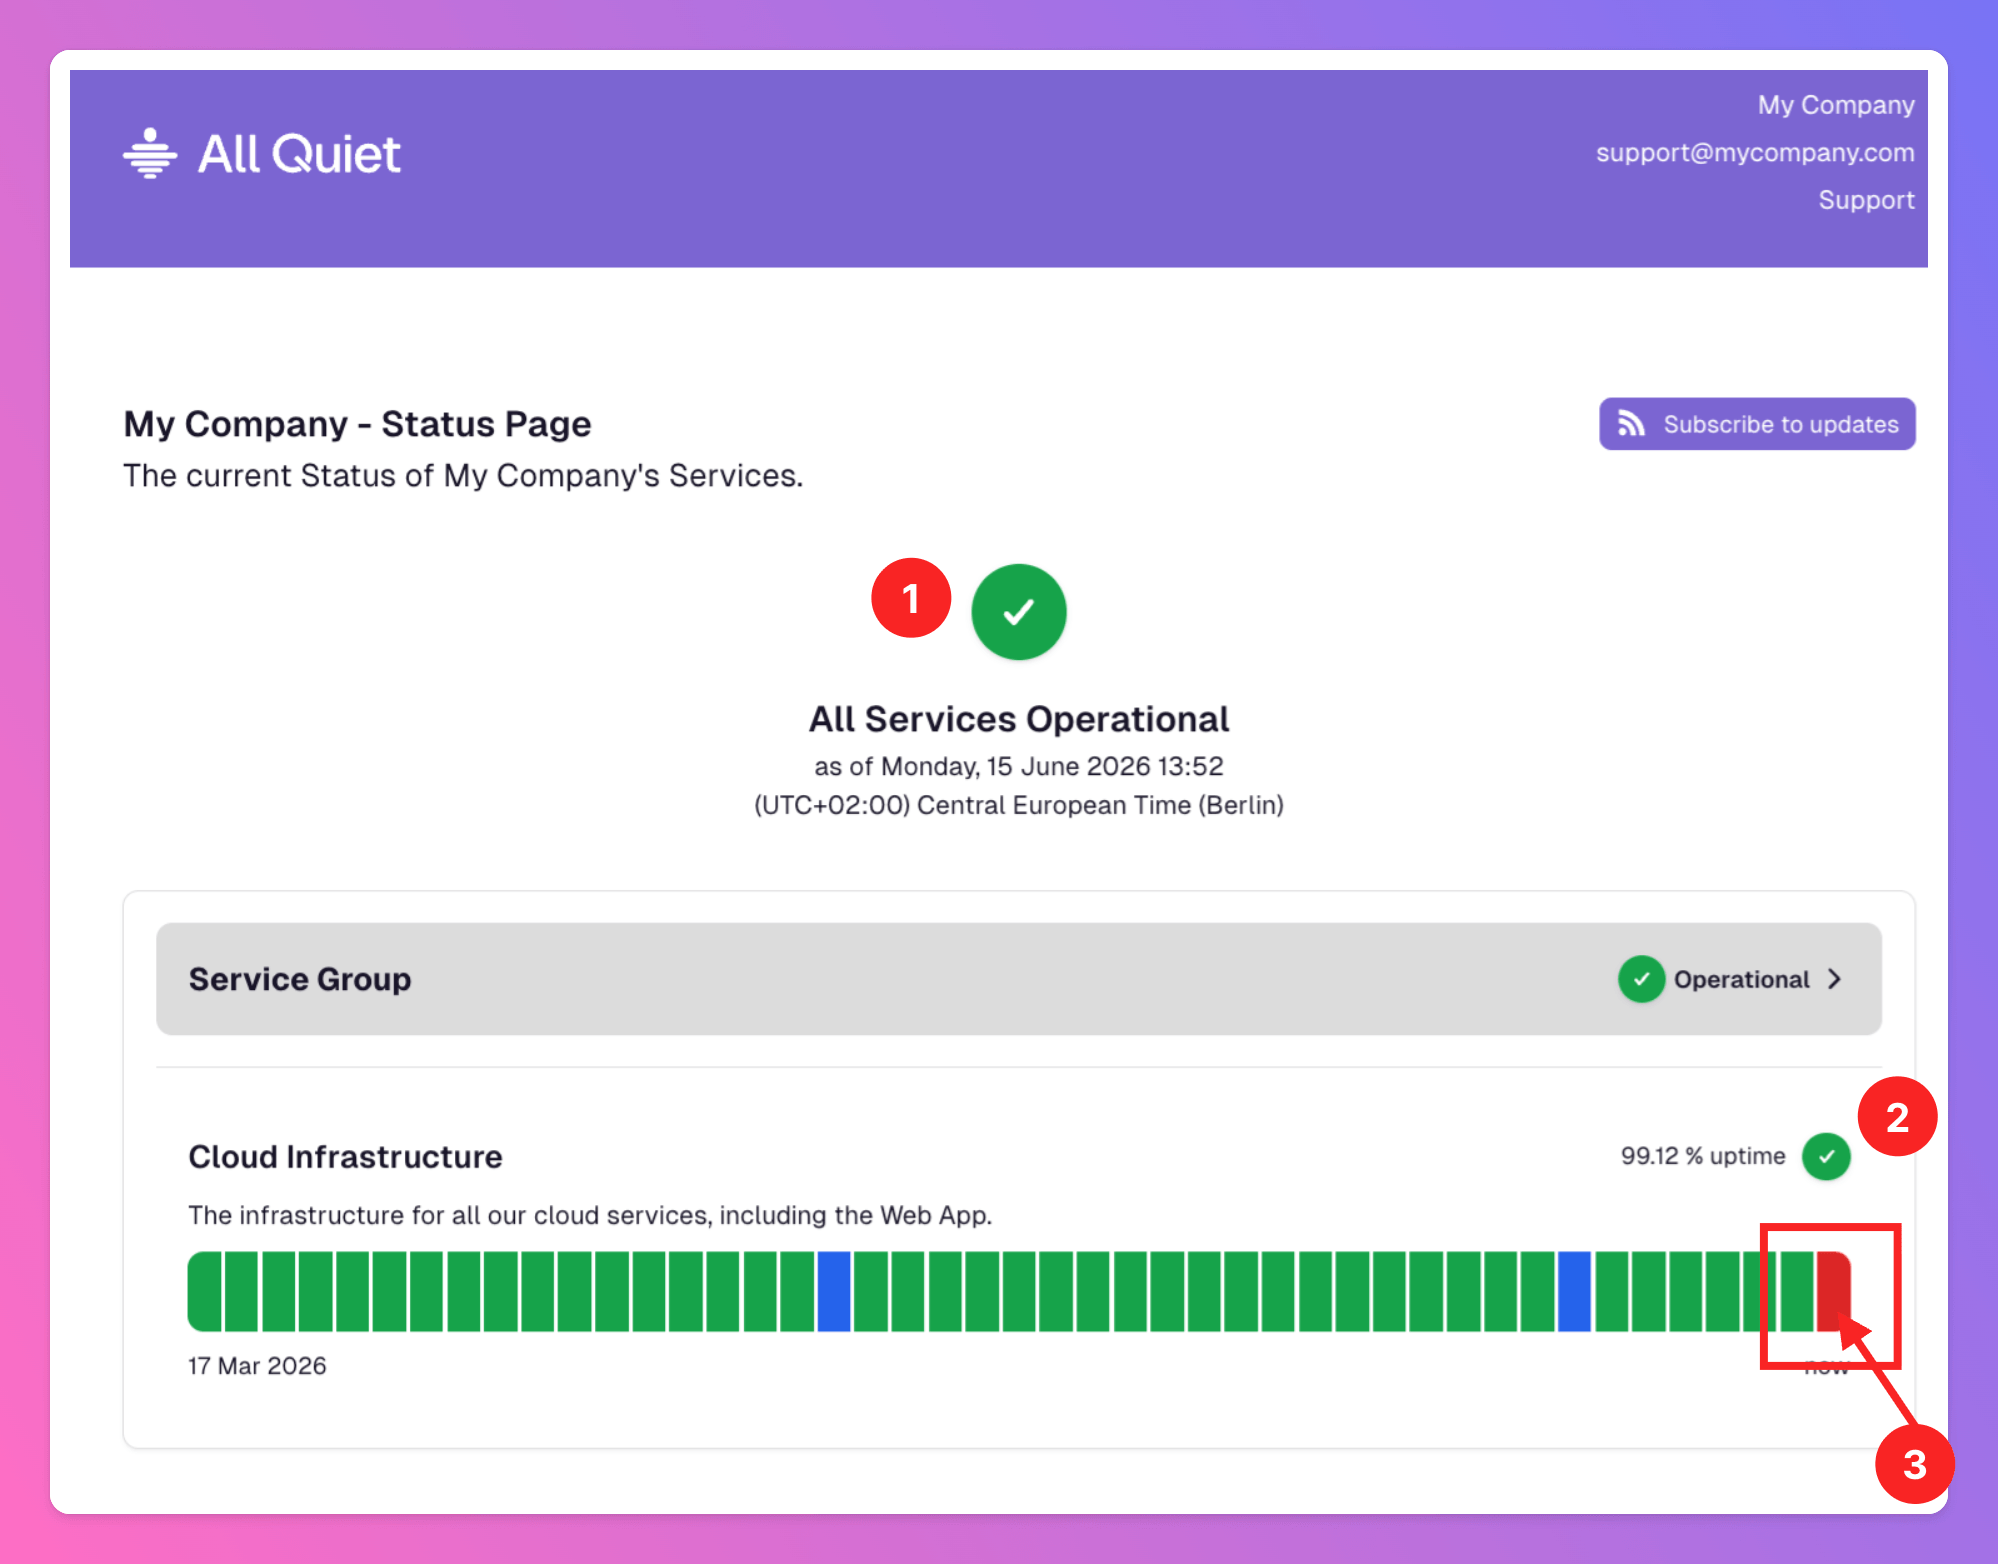
 After the resolution, the status page reflects that the incident has ended.
1. The ongoing incident section above the graph is cleared. If there are no open incidents affecting this or other Services, the Status Page now correctly displays all Services as operational.
2. The status graph demonstrates that the Service is operational again. The affected interval remains red.
3. Click that interval to view the resolved incident in the [incident history](/advanced/status-pages#public-incident-history) for that period.
After the resolution, the status page reflects that the incident has ended.
1. The ongoing incident section above the graph is cleared. If there are no open incidents affecting this or other Services, the Status Page now correctly displays all Services as operational.
2. The status graph demonstrates that the Service is operational again. The affected interval remains red.
3. Click that interval to view the resolved incident in the [incident history](/advanced/status-pages#public-incident-history) for that period.
 The resolved incident is now reflected in the public incident history page for that period.
 #### List of Incident Actions that Update The Status Page
Below you can find a table that shows which [incident actions](/essentials/incident#quick-actions) are shared publicly on the Status Pages.
**Each action that is shared publicly is also shared per email with subscribers**.
| Incident Action | Shared Publicly? | Implication if Shared Publicly? |
| :-------------- | :---------------------------------------------------------------------------------------------- | :------------------------------------------------------------------------------------- |
| `Affects` | Yes. Additional public comment is optional. | Incident is added to Status Page, Services are affected. |
| `Resolve` | Automatically, if incident affects a Service. Additional public comment is optional. | Affected Services are operational, again. Public comment is added to incident history. |
| `Investigate` | Only if incident affects a Service + a public comment is created with the `Investigate` action. | Public comment + `Investigate` action are added to the incident history. |
| `Escalate` | Only if incident affects a Service + a public comment is created with the `Escalate` action. | Public comment + `Escalate` action are added to the incident history. |
| `Comment` | Only if incident affects a Service + comment is made public. | Public comment is added to incident history. |
| `Reopen` | Automatically, if incident affects a Service. Additional public comment is optional. | Incident is reopened on Status Page, Services are affected, again. |
## Maintenances of Services
*Organization Owners*, *Organization Administrators* and *Organization Members* have the permissions to create and edit maintenances for the Services.
Maintenances are a necessity. To keep your customers in the loop, we've a added a `Maintenance` feature for status ages, allowing you to inform customers about plannend maintenances in advance, as well as keeping them in the loop during a maintenance.
Incidents that occur during a maintenance and [affect](/essentials/incident#affects-services) a Service will not be visible on Status Pages and not count as downtime. To keep an incident visible but exclude it from uptime calculations outside of maintenance, disable [**Affects Uptime**](/essentials/incident#affects-services) on the incident instead—see [Affects Uptime on Status Pages](/advanced/status-pages#affects-uptime).
### Create Maintenance for Services
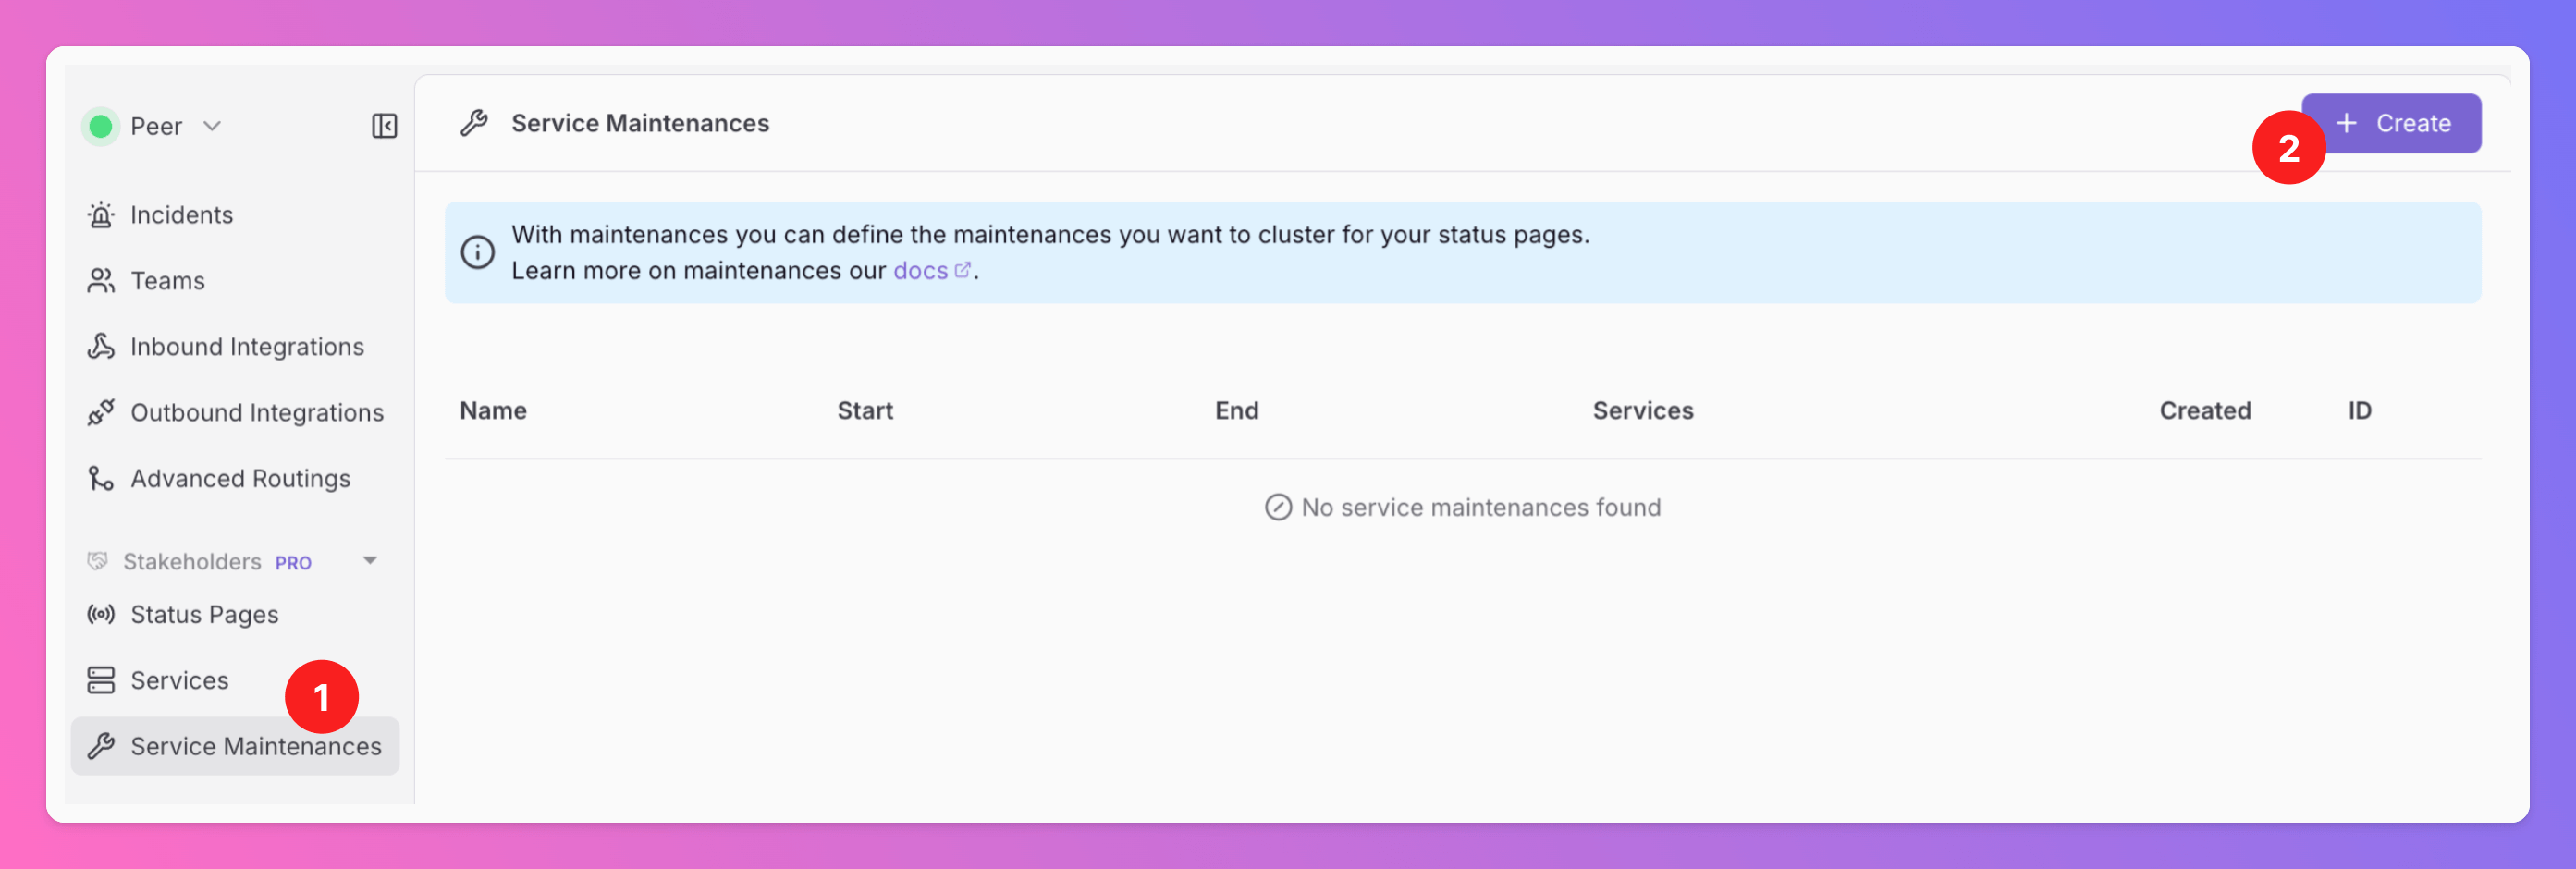
To be able to create a maintenance, you first need to [create a Service](/advanced/status-pages#create-a-Service).
1. Then, select `Service Maintenances‚` in the Web App.
2. Click `+ Create`.
#### List of Incident Actions that Update The Status Page
Below you can find a table that shows which [incident actions](/essentials/incident#quick-actions) are shared publicly on the Status Pages.
**Each action that is shared publicly is also shared per email with subscribers**.
| Incident Action | Shared Publicly? | Implication if Shared Publicly? |
| :-------------- | :---------------------------------------------------------------------------------------------- | :------------------------------------------------------------------------------------- |
| `Affects` | Yes. Additional public comment is optional. | Incident is added to Status Page, Services are affected. |
| `Resolve` | Automatically, if incident affects a Service. Additional public comment is optional. | Affected Services are operational, again. Public comment is added to incident history. |
| `Investigate` | Only if incident affects a Service + a public comment is created with the `Investigate` action. | Public comment + `Investigate` action are added to the incident history. |
| `Escalate` | Only if incident affects a Service + a public comment is created with the `Escalate` action. | Public comment + `Escalate` action are added to the incident history. |
| `Comment` | Only if incident affects a Service + comment is made public. | Public comment is added to incident history. |
| `Reopen` | Automatically, if incident affects a Service. Additional public comment is optional. | Incident is reopened on Status Page, Services are affected, again. |
## Maintenances of Services
*Organization Owners*, *Organization Administrators* and *Organization Members* have the permissions to create and edit maintenances for the Services.
Maintenances are a necessity. To keep your customers in the loop, we've a added a `Maintenance` feature for status ages, allowing you to inform customers about plannend maintenances in advance, as well as keeping them in the loop during a maintenance.
Incidents that occur during a maintenance and [affect](/essentials/incident#affects-services) a Service will not be visible on Status Pages and not count as downtime. To keep an incident visible but exclude it from uptime calculations outside of maintenance, disable [**Affects Uptime**](/essentials/incident#affects-services) on the incident instead—see [Affects Uptime on Status Pages](/advanced/status-pages#affects-uptime).
### Create Maintenance for Services
To be able to create a maintenance, you first need to [create a Service](/advanced/status-pages#create-a-Service).
1. Then, select `Service Maintenances‚` in the Web App.
2. Click `+ Create`.
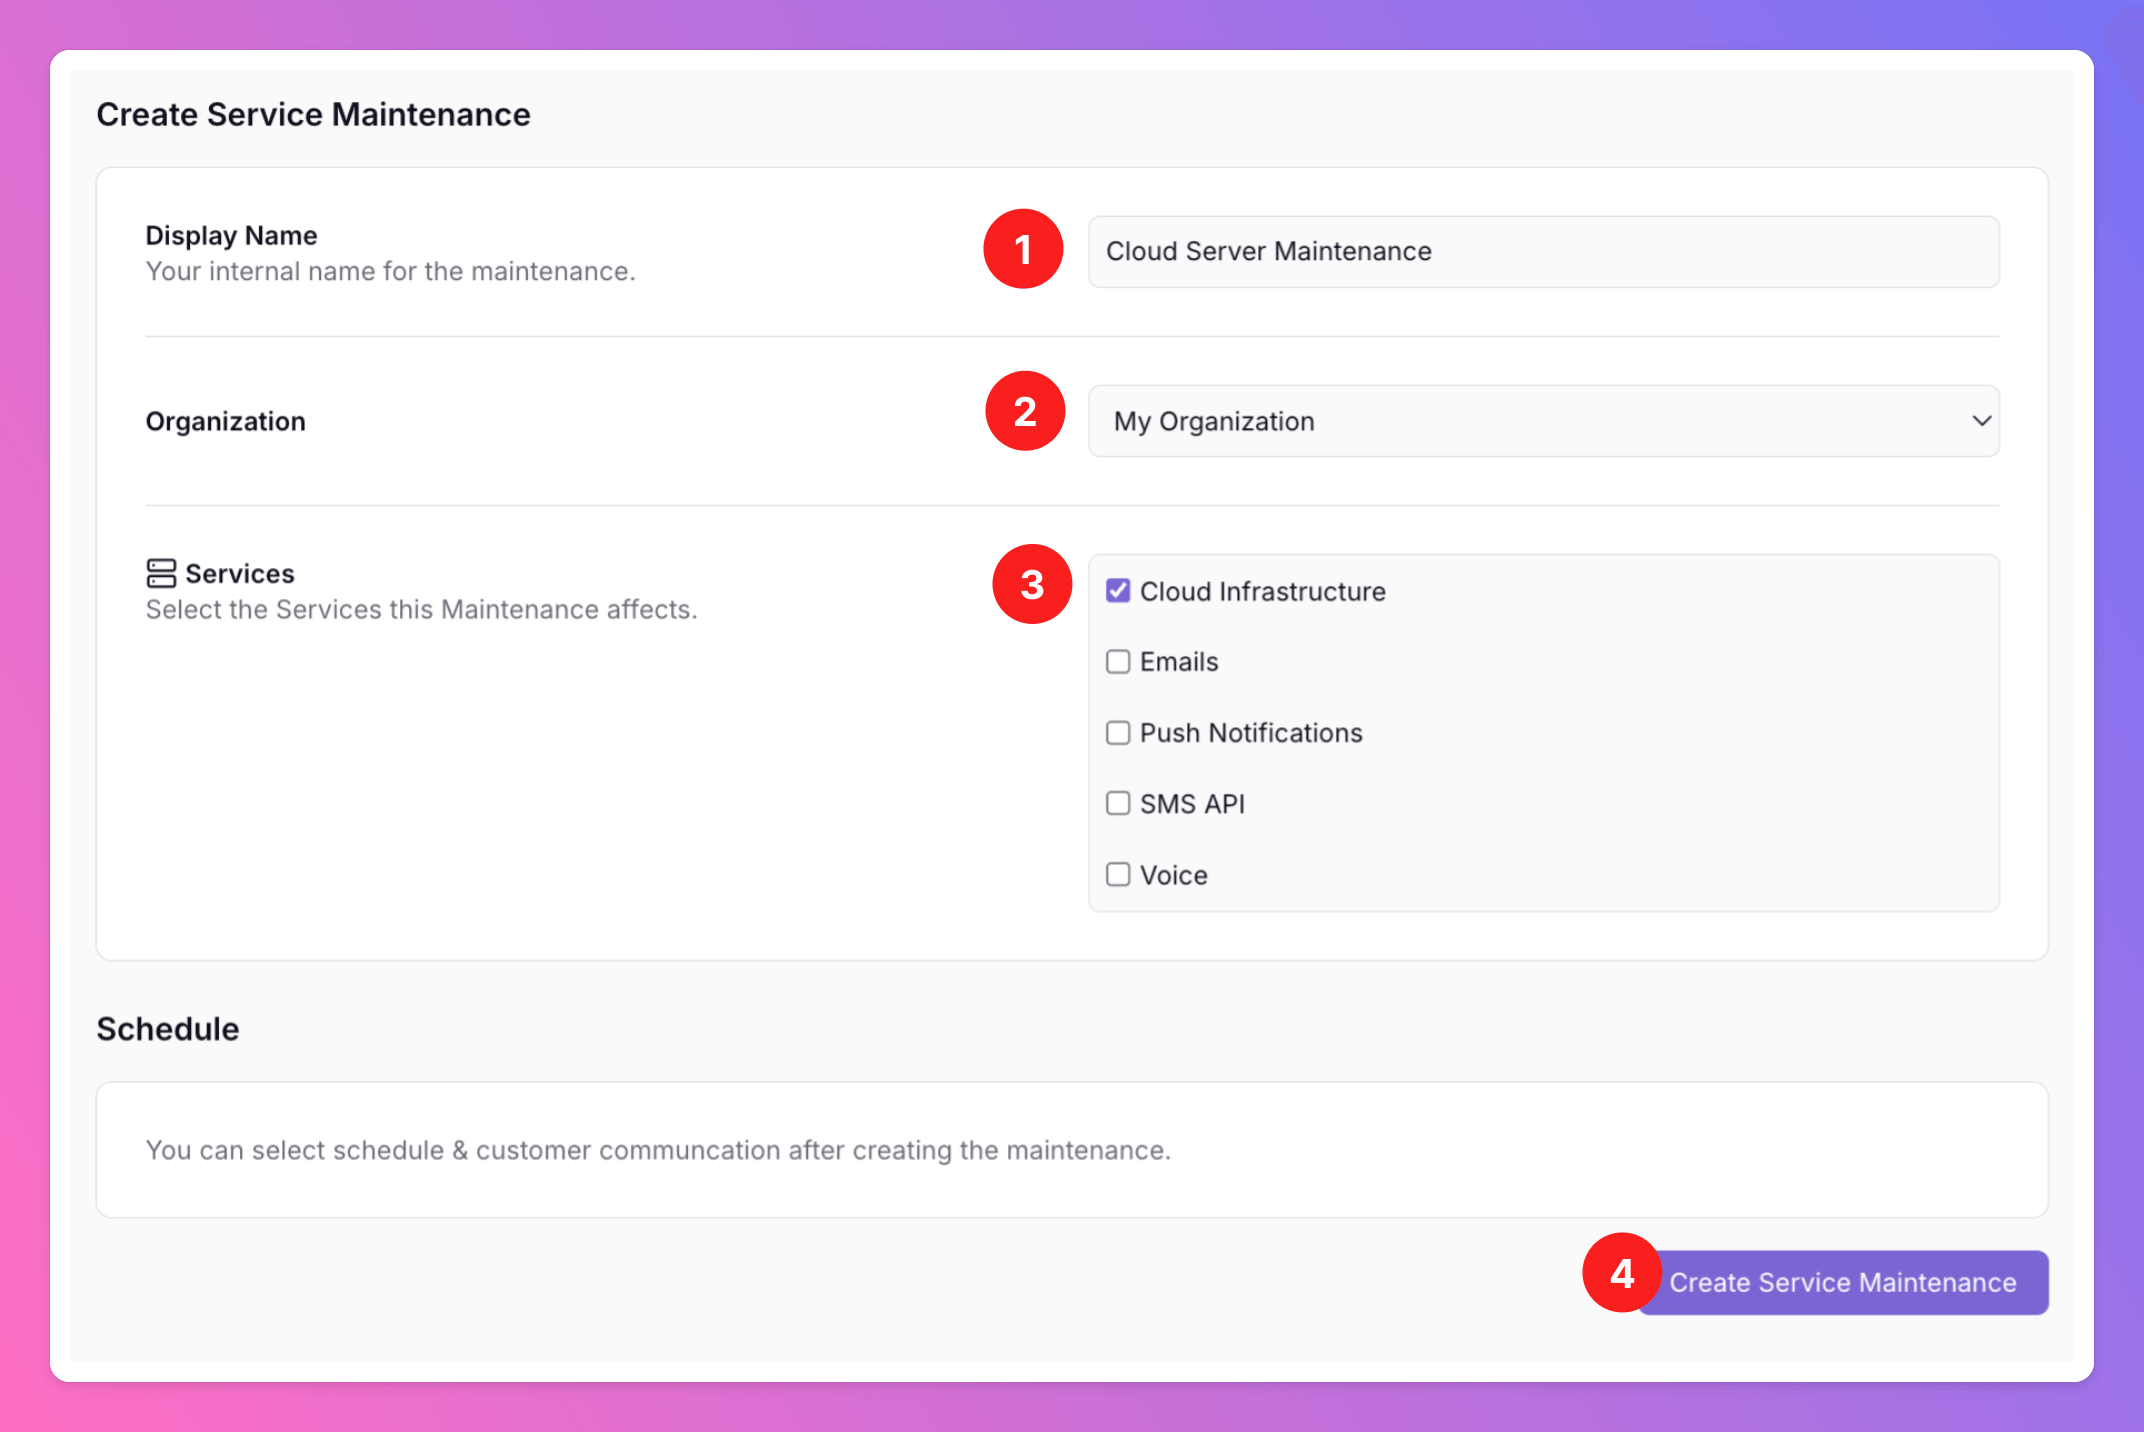
 1. Create an internal `Display Name` for the Maintenance. It won't be shared publicly.
2. Select the `Organization` of the maintenance. Only Services belonging to this organization can be selected for maintenance.
3. Select the `Services` affected by the maintenance.
4. To save, click `Create Maintenance`.
1. Create an internal `Display Name` for the Maintenance. It won't be shared publicly.
2. Select the `Organization` of the maintenance. Only Services belonging to this organization can be selected for maintenance.
3. Select the `Services` affected by the maintenance.
4. To save, click `Create Maintenance`.
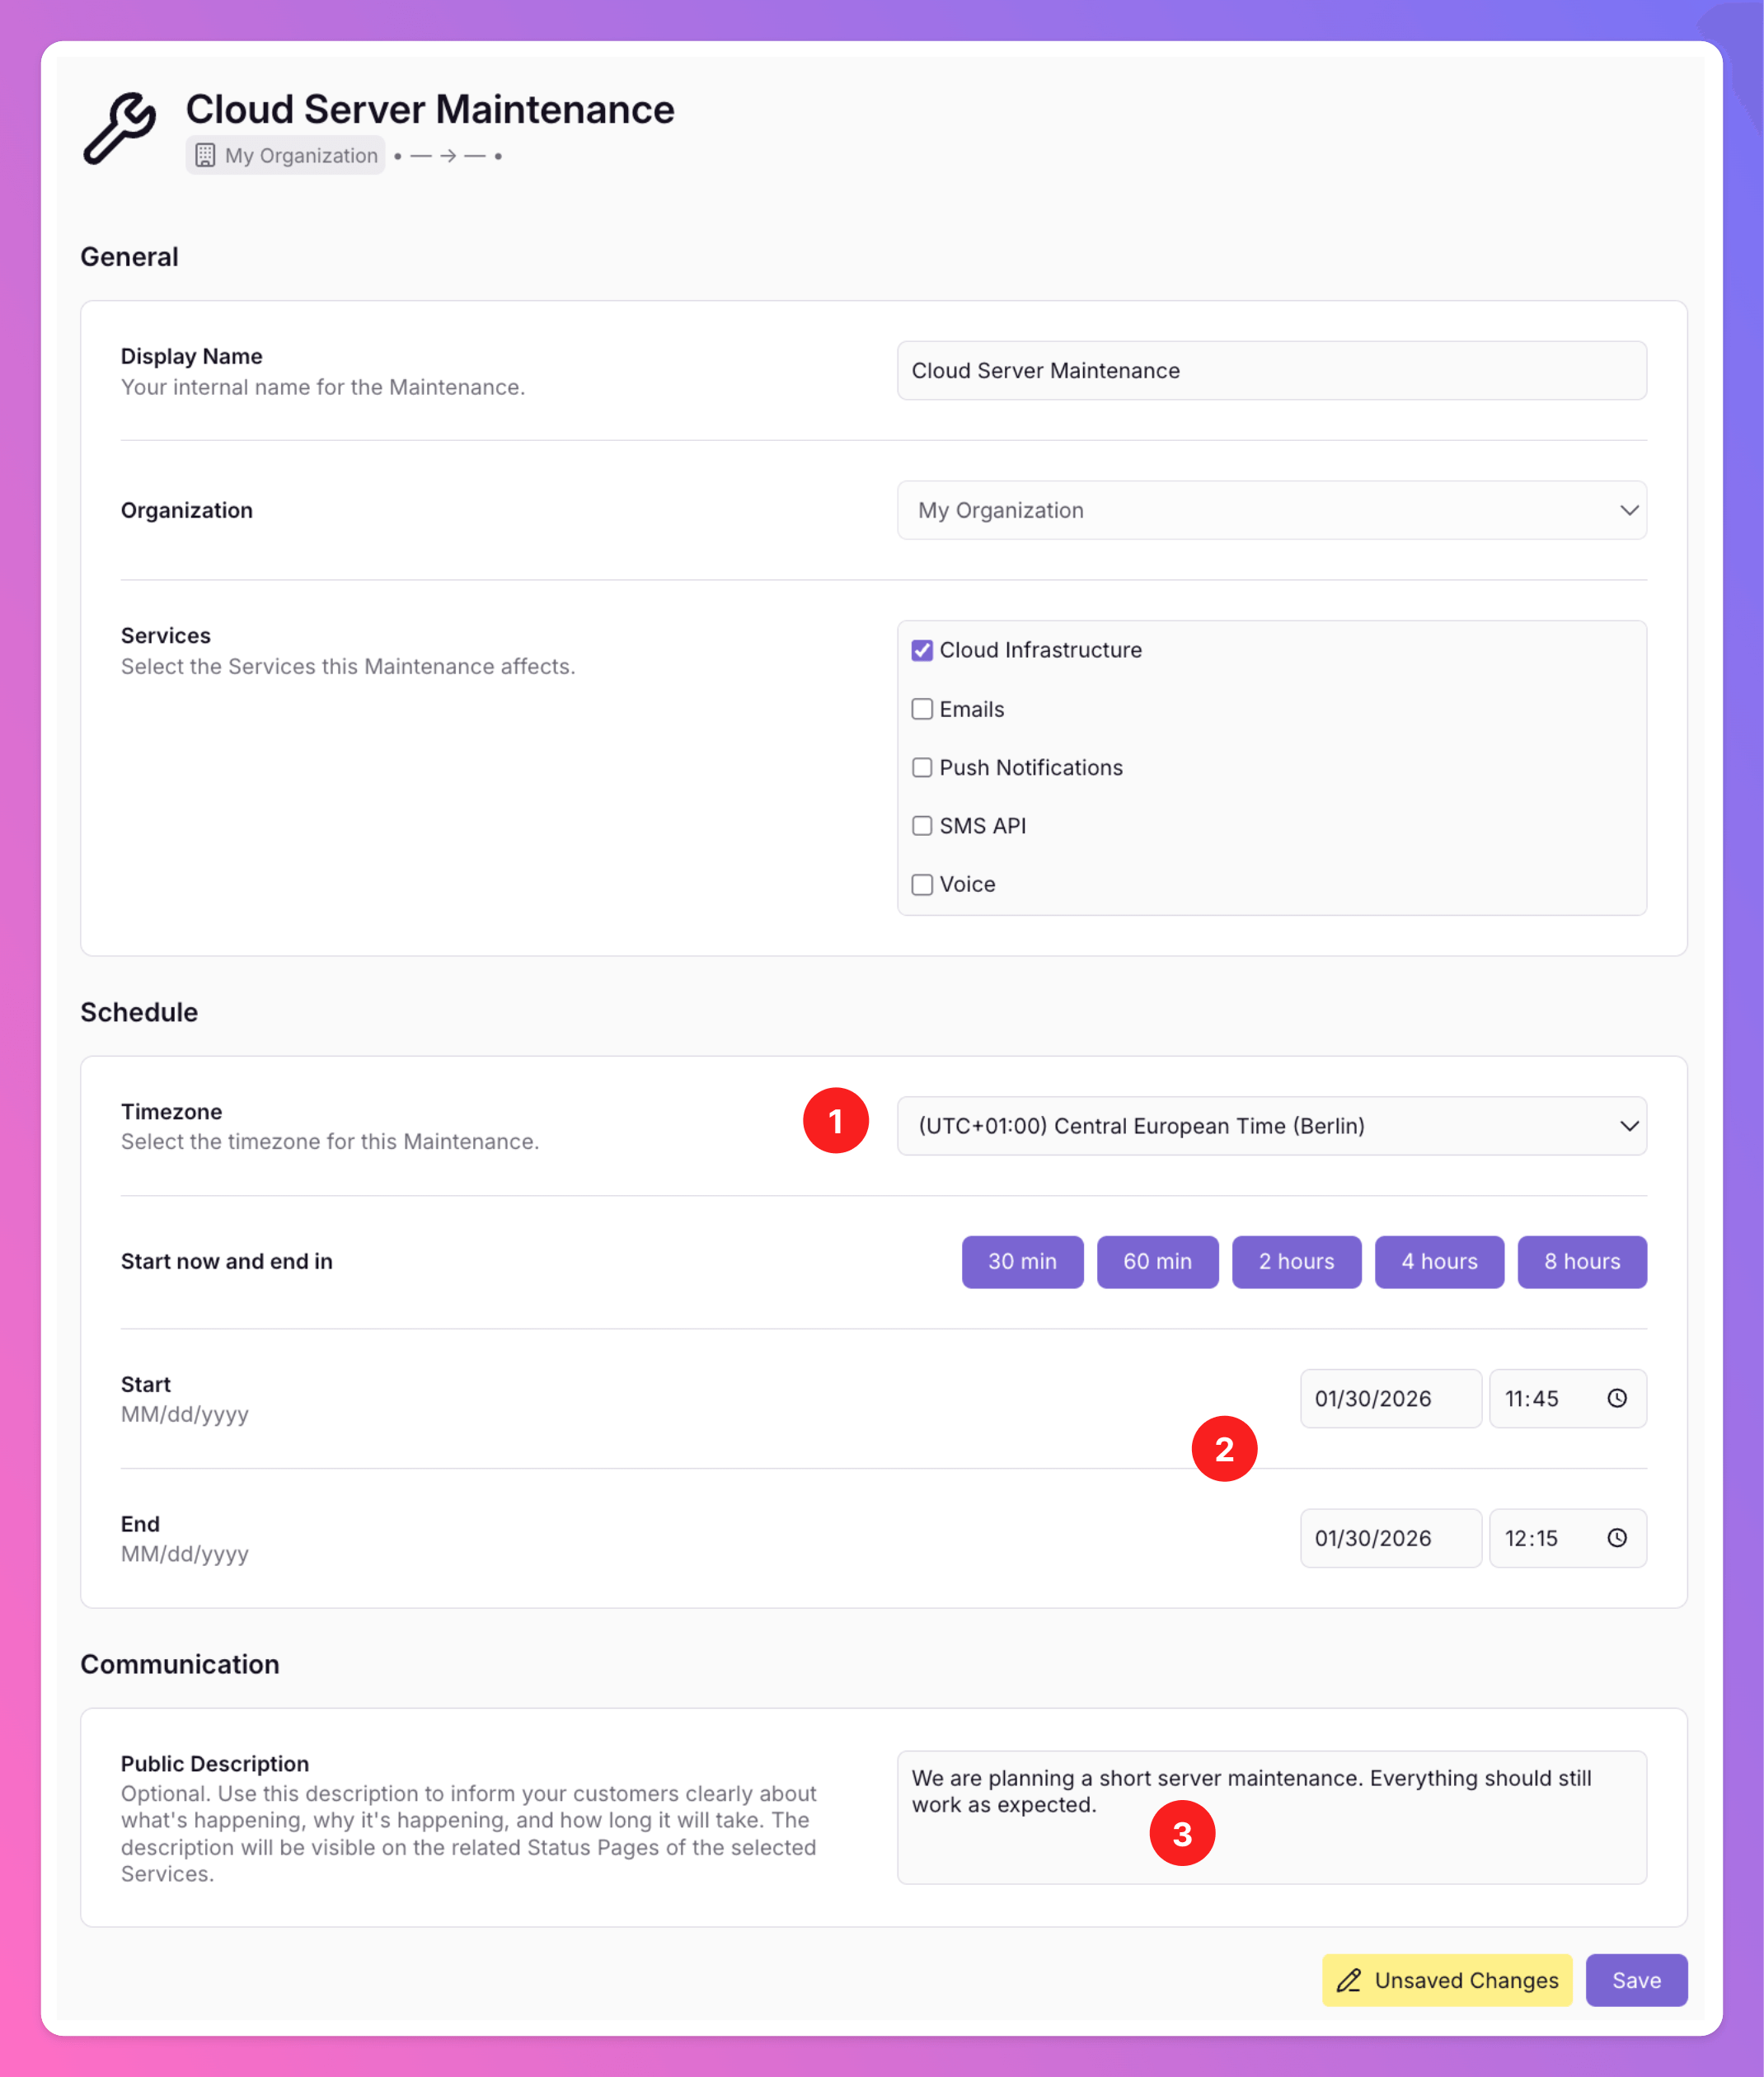
 Next, you can plan the maintenance.
1. Select the maintenance's timezone.
2. Schedule the maintenance.
3. Add a `Public Description` for the maintenance, visible on your Status Pages that feature the affected Service(s) and in the update emails for your status page's subscribers.
Don't forget to `save` your settings.
Next, you can plan the maintenance.
1. Select the maintenance's timezone.
2. Schedule the maintenance.
3. Add a `Public Description` for the maintenance, visible on your Status Pages that feature the affected Service(s) and in the update emails for your status page's subscribers.
Don't forget to `save` your settings.
 On `/app/Service-maintenance` in the Web App, you can see all your maintenances. From here, you can edit and delete them.
Caution: Don't delete past maintenances. They will vanish from incident history pages (and no longer appear when clicking the status graph), and incidents that occured during the deleted maintenance will count as downtime for the affected Services. Rescheduling a past maintenance for the future has the same effect. Instead, we recommend to create a new maintenance and copy the content from the past to the new maintenance.
On `/app/Service-maintenance` in the Web App, you can see all your maintenances. From here, you can edit and delete them.
Caution: Don't delete past maintenances. They will vanish from incident history pages (and no longer appear when clicking the status graph), and incidents that occured during the deleted maintenance will count as downtime for the affected Services. Rescheduling a past maintenance for the future has the same effect. Instead, we recommend to create a new maintenance and copy the content from the past to the new maintenance.
 ### Communication of Service Maintenances on Status Pages
In general, Service maintenances are communicated via two channels
* They are displayed on the Status Pages that feature the Services in maintenance
* There are emails informing subscribers of Status Pages about the Service maintenances. You can find an [email list](/advanced/status-pages#emails-for-maintenances) at bottom of the page for more information.
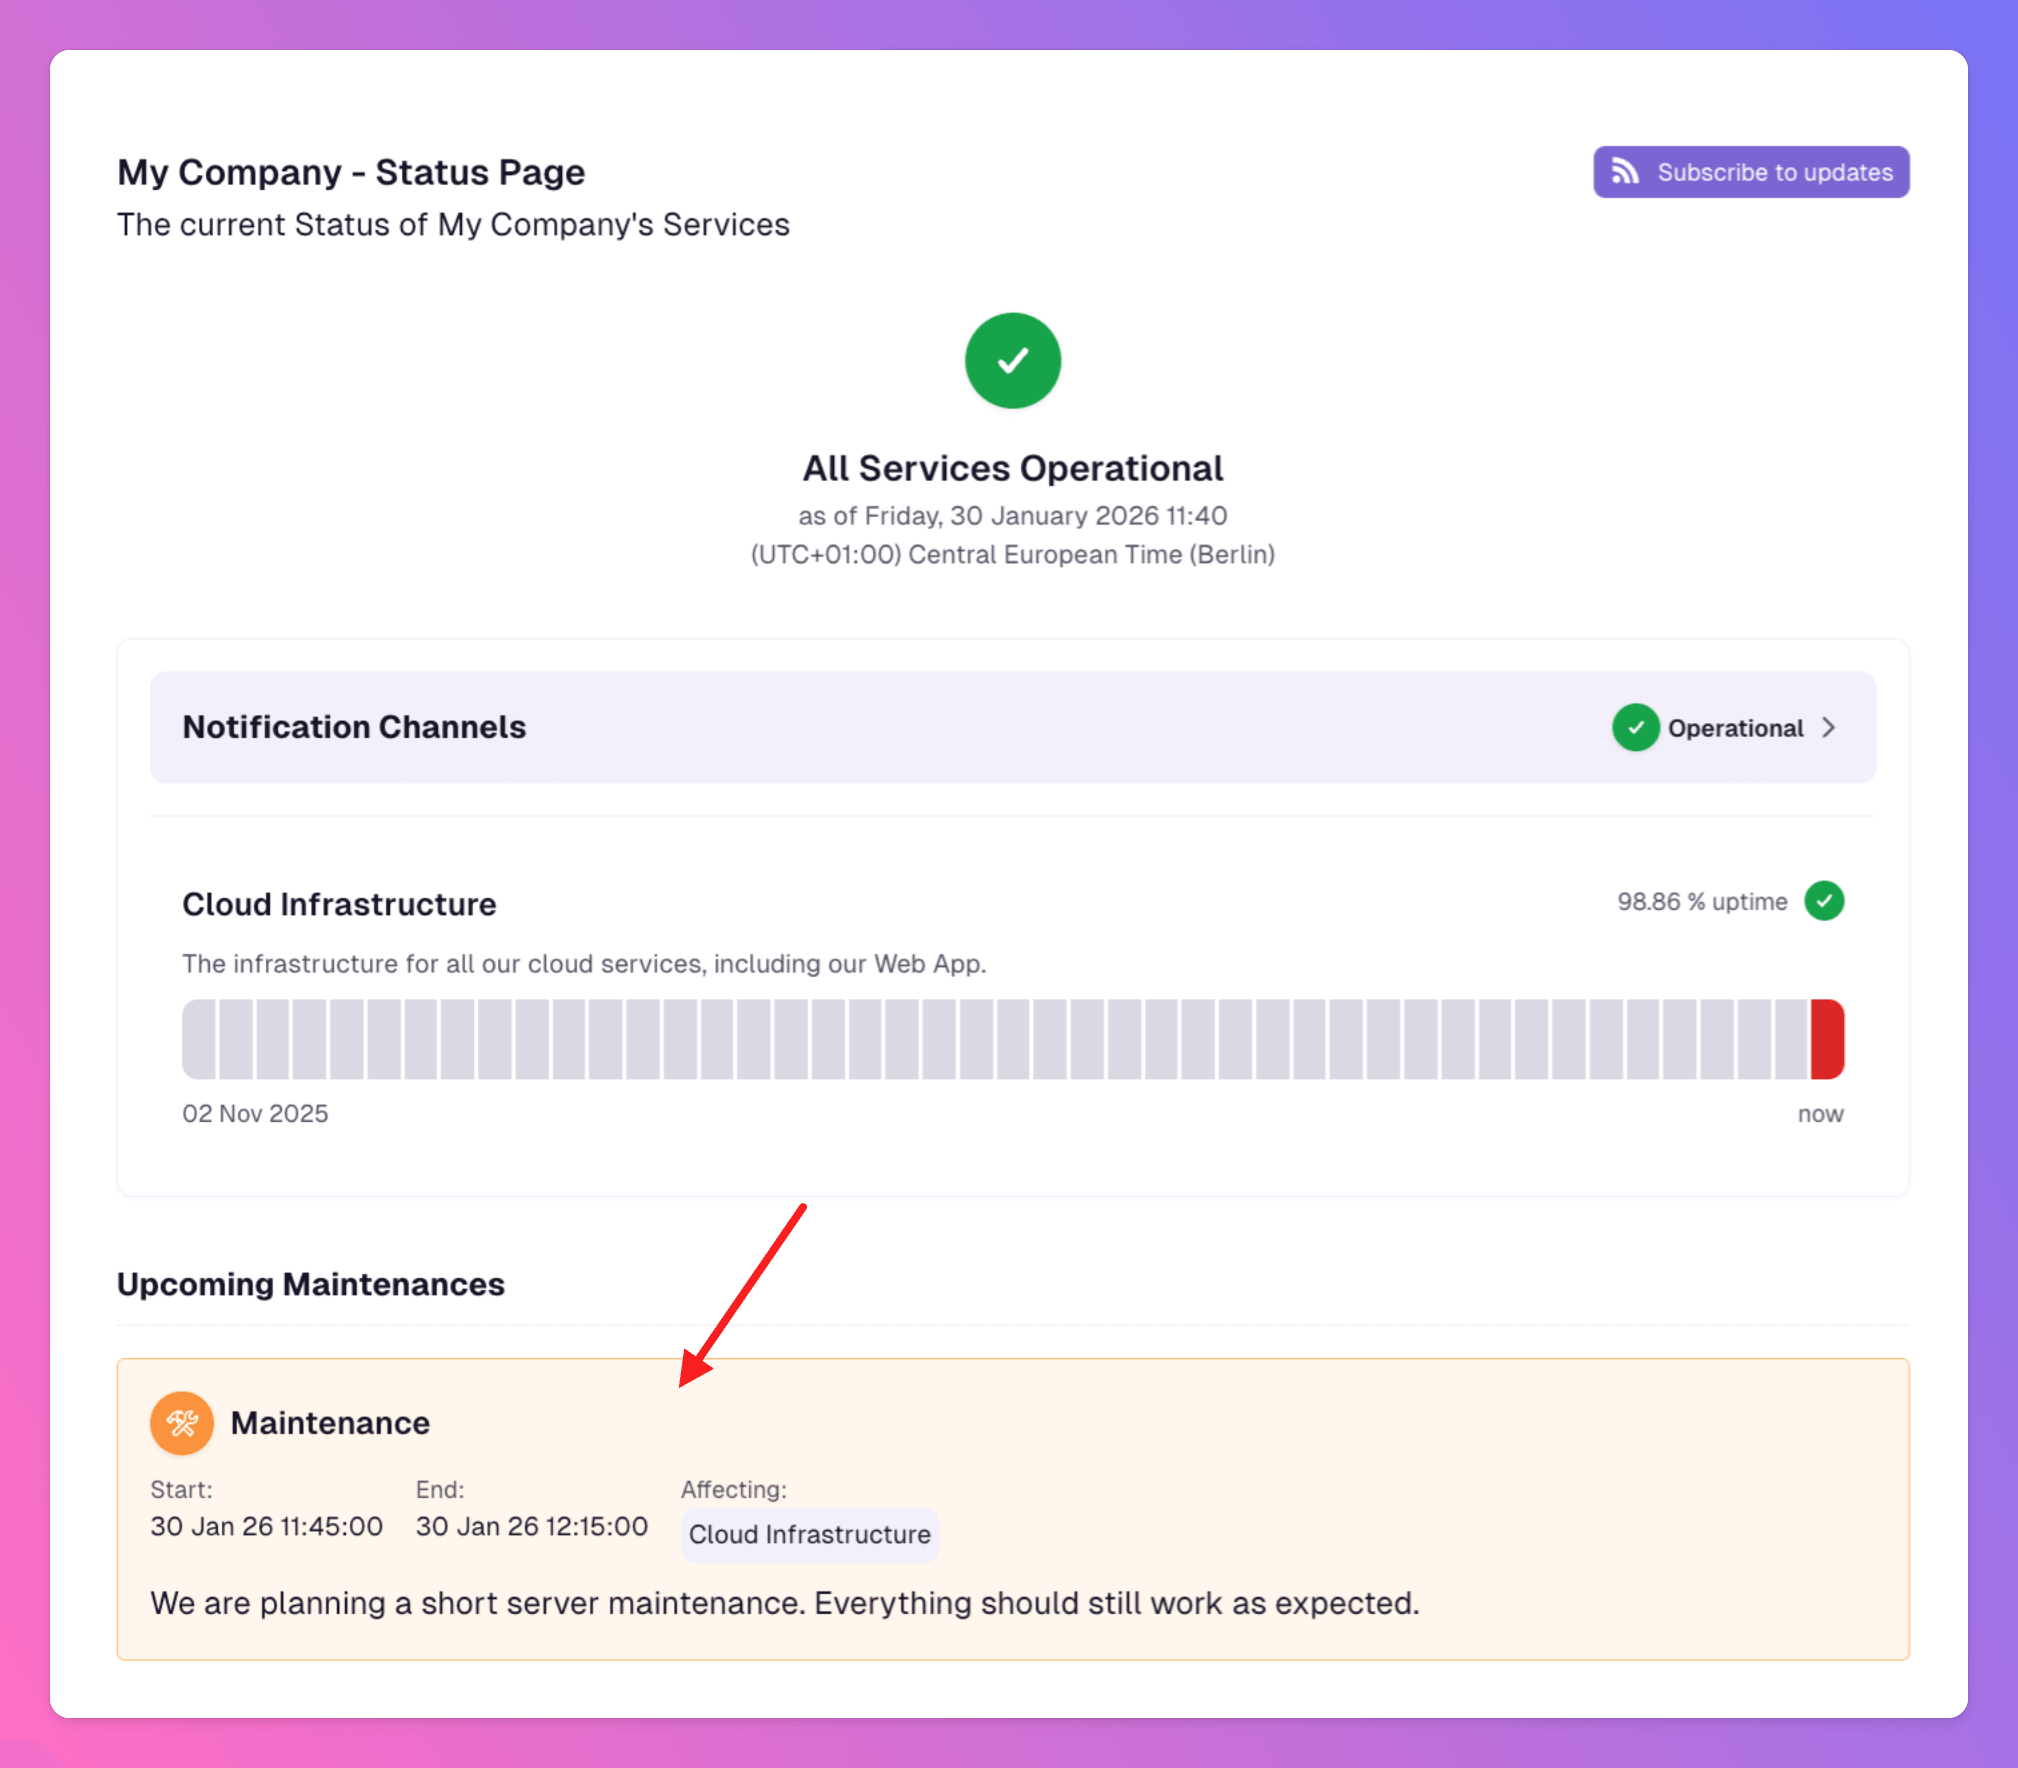
On the Status Pages, an **Upcoming Maintenance** for a Service is displayed directly below the status graphs.
### Communication of Service Maintenances on Status Pages
In general, Service maintenances are communicated via two channels
* They are displayed on the Status Pages that feature the Services in maintenance
* There are emails informing subscribers of Status Pages about the Service maintenances. You can find an [email list](/advanced/status-pages#emails-for-maintenances) at bottom of the page for more information.
On the Status Pages, an **Upcoming Maintenance** for a Service is displayed directly below the status graphs.
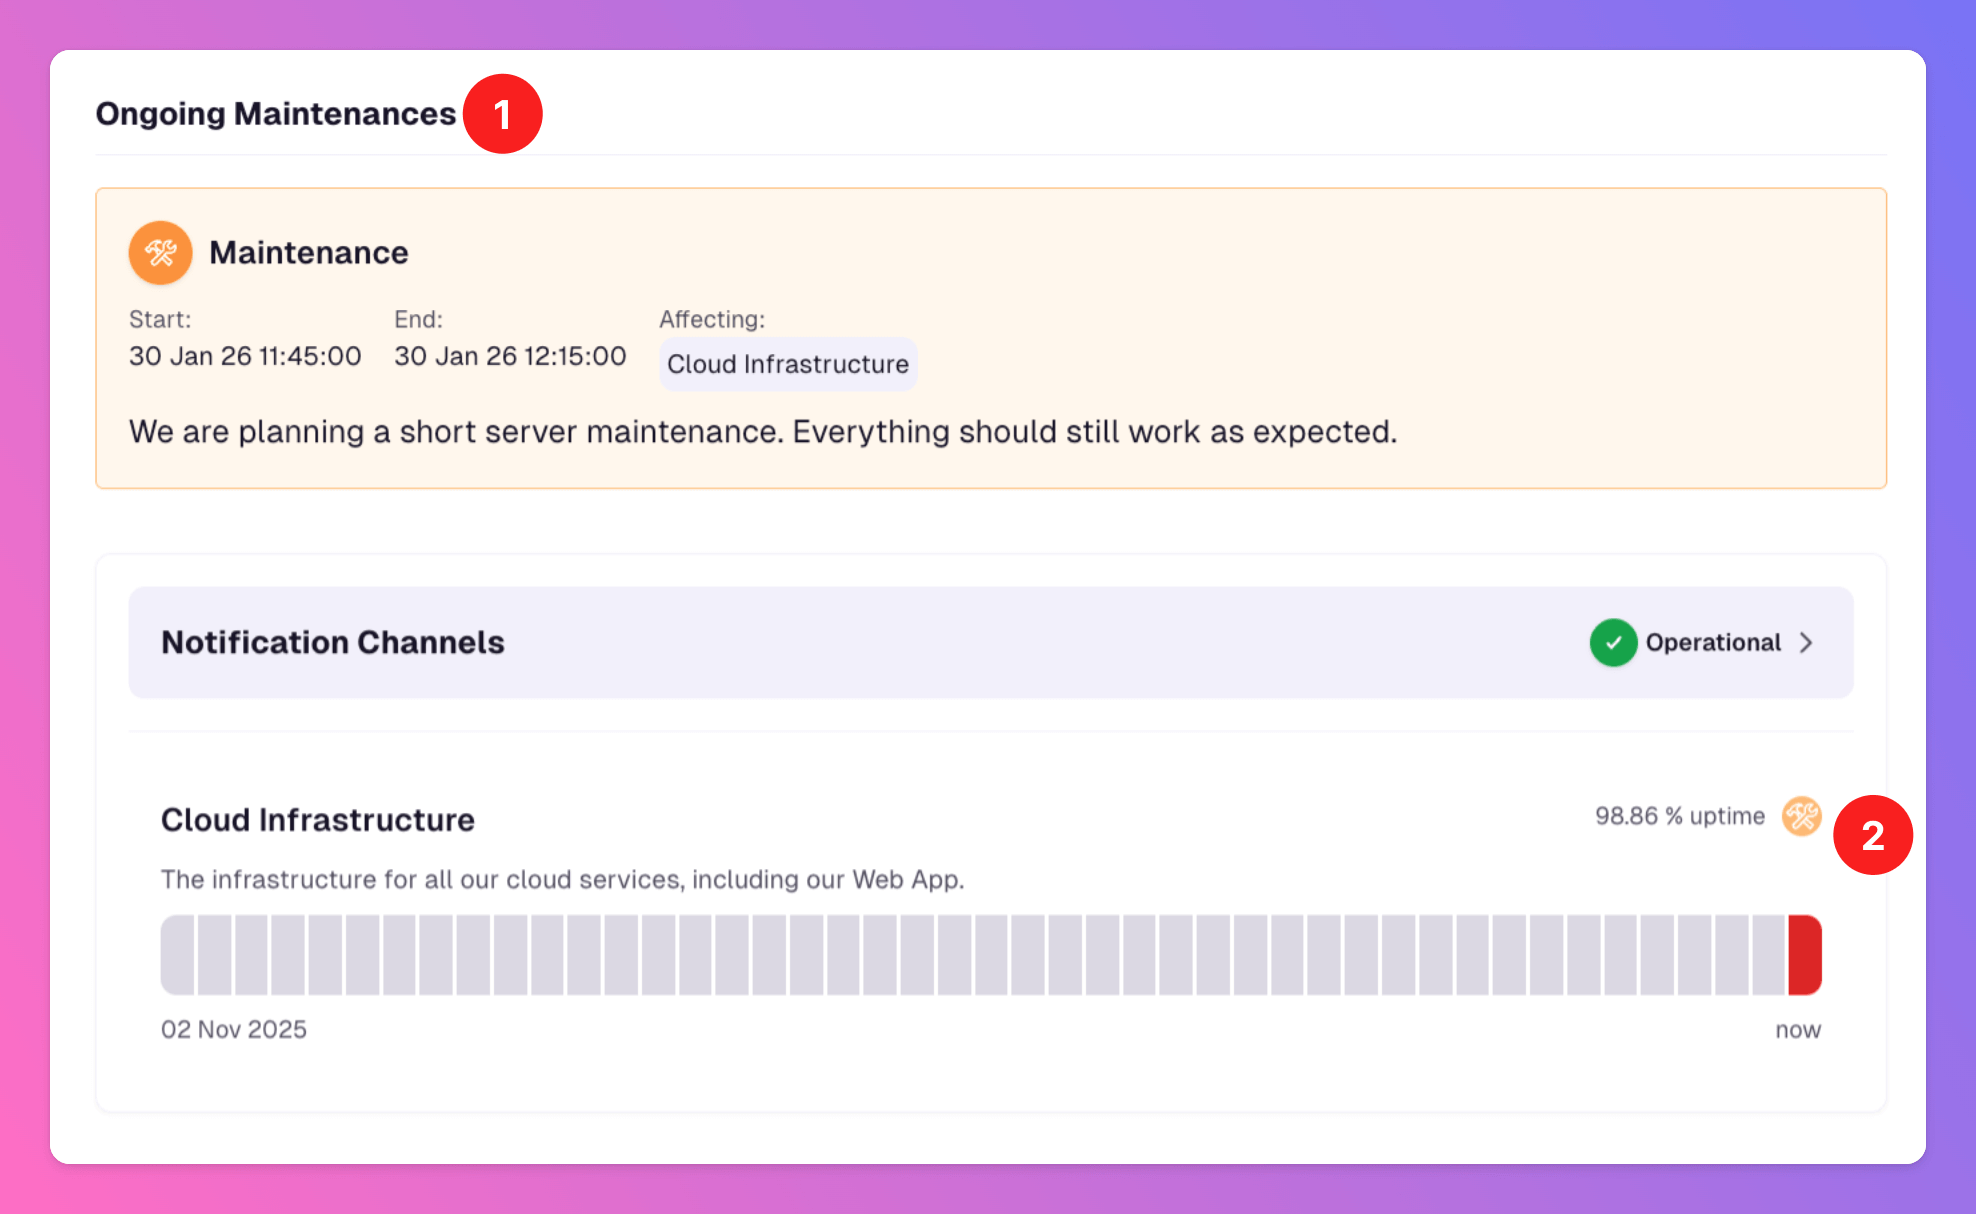
 For **Ongoing Maintenances**:
1. There is be a banner on top of the Status Page, even above the status graphs.
2. The status graphs of the Services in maintenance show the maintenance icon.
For **Ongoing Maintenances**:
1. There is be a banner on top of the Status Page, even above the status graphs.
2. The status graphs of the Services in maintenance show the maintenance icon.
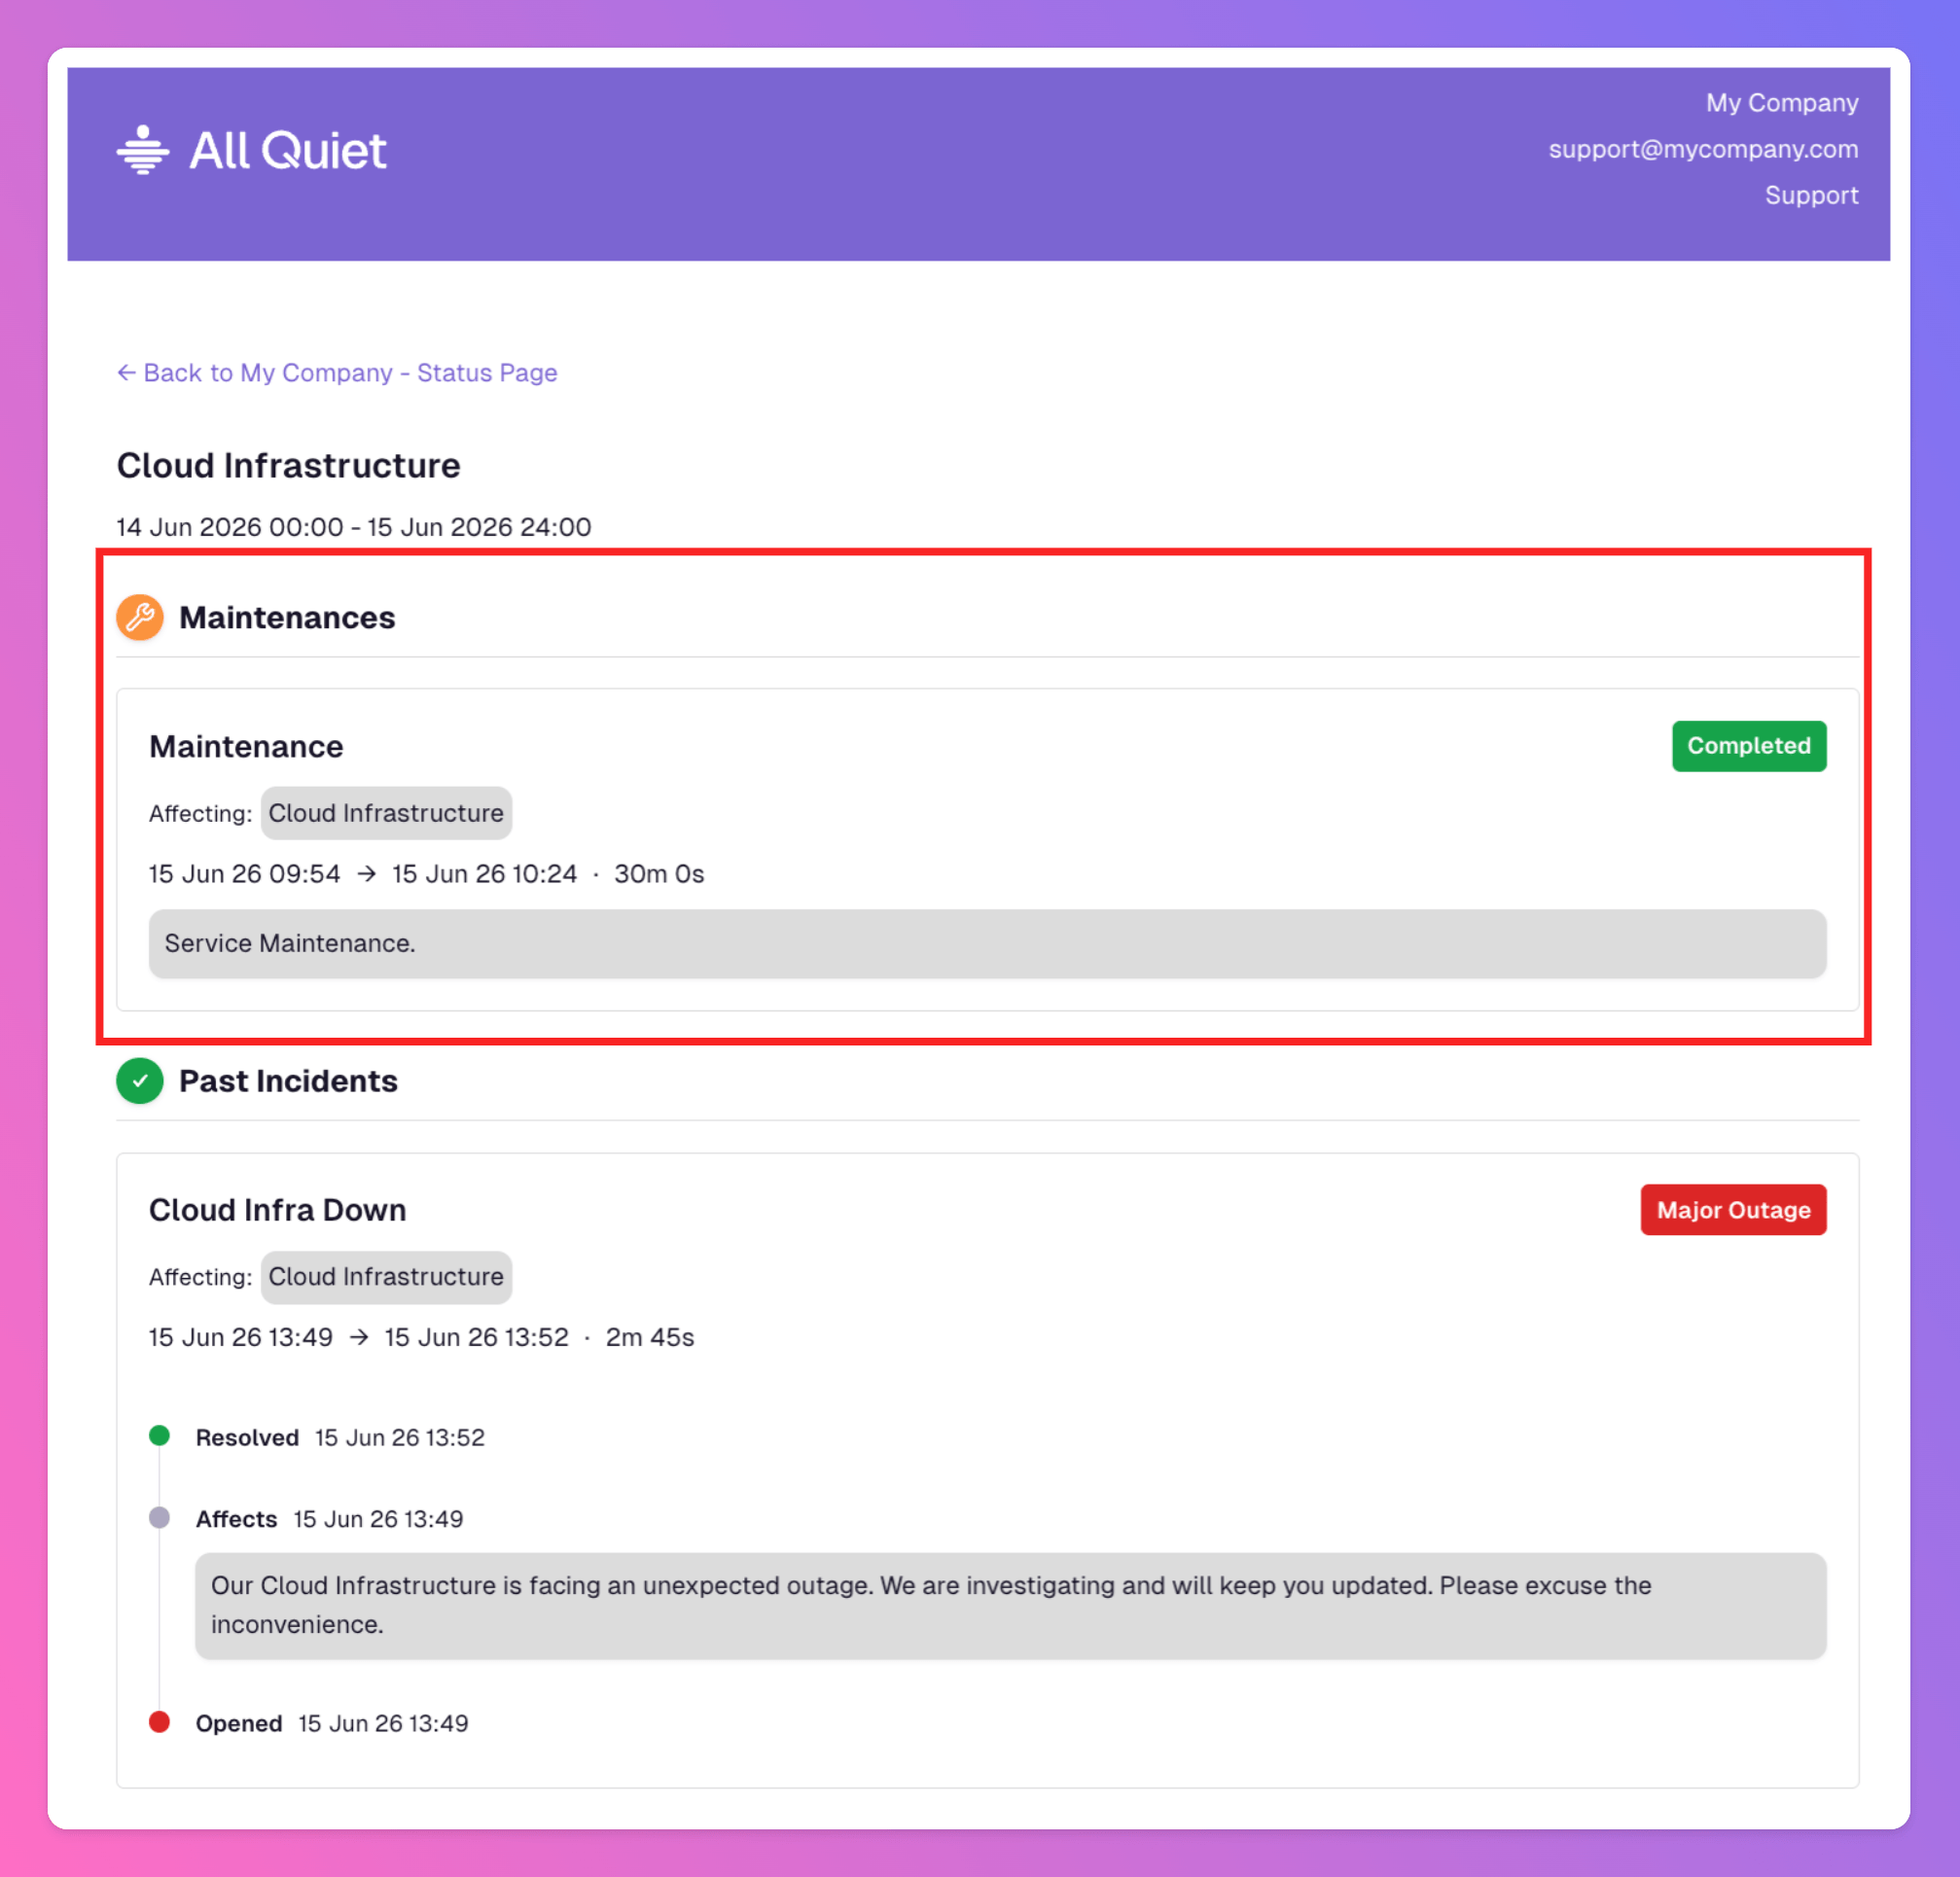
 To find **Past Maintenances**, click the corresponding interval on the Service's status graph—the [incident history](/advanced/status-pages#public-incident-history) for that period also lists maintenances that overlapped with it.
 #### Emails for Maintenances
Below you can find a list of emails that are sent out to subscribers in context of Service maintenances.
| Email Copy | Email Headline | Trigger |
| :------------------------------------ | :---------------------- | :--------------------------------------------------------------------------------------- |
| `Maintenance scheduled for "Service"` | `Maintenance Scheduled` | The schedule of the maintenance is created or changed. Not sent for ad-hoc maintenances. |
| `Maintenance started for "Service"` | `Maintenance Started` | The maintenance starts. |
| `Maintenance ended for "Service"` | `Maintenance Ended` | The maintenance has ended. |
| `Maintenance cancelled for "Service"` | `Maintenance Cancelled` | The maintenance has been deleted. |
**Email Body**
The body of the email is always the same, only copy and headline change. It always features the `Public Description` of the maintenance.
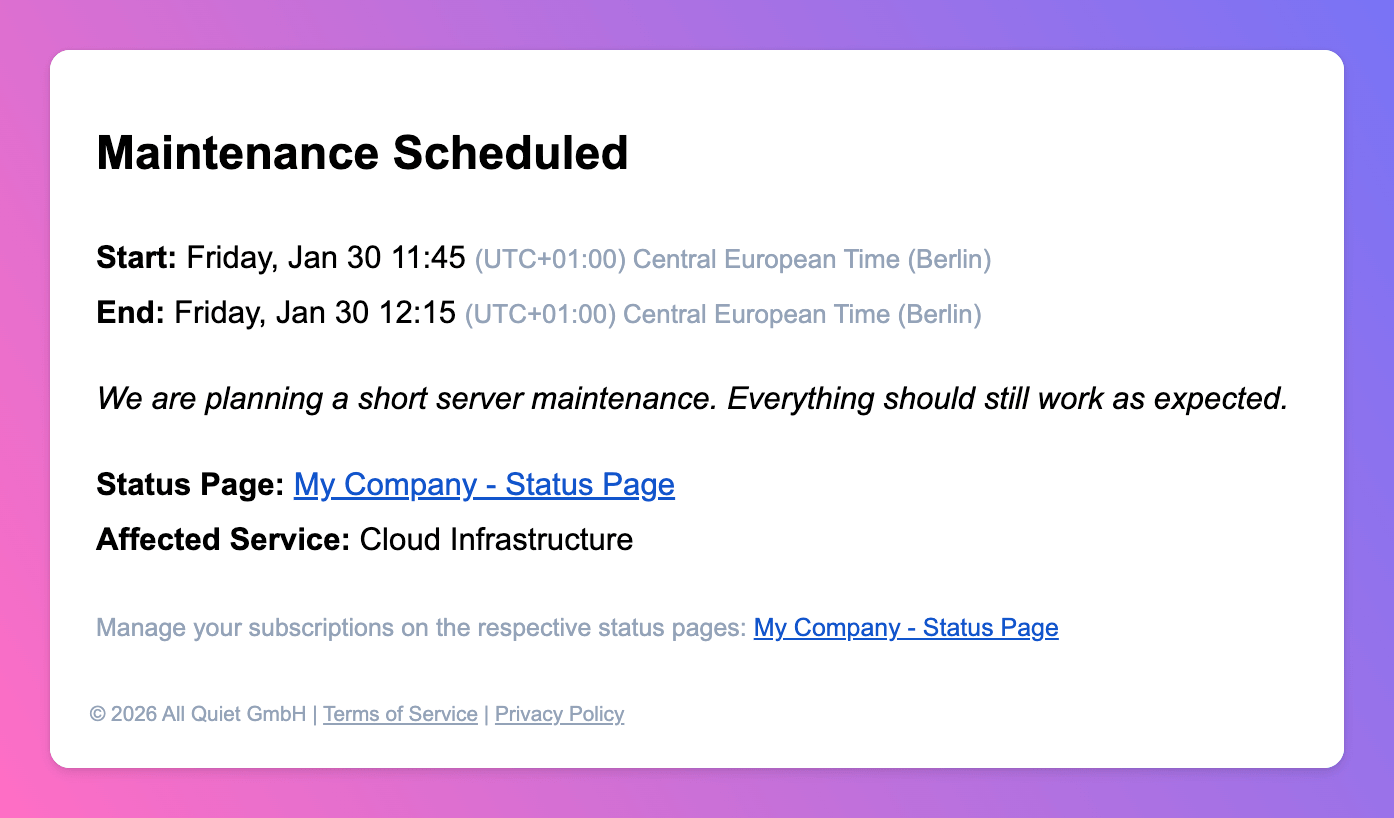
Below, you can find an example.
#### Emails for Maintenances
Below you can find a list of emails that are sent out to subscribers in context of Service maintenances.
| Email Copy | Email Headline | Trigger |
| :------------------------------------ | :---------------------- | :--------------------------------------------------------------------------------------- |
| `Maintenance scheduled for "Service"` | `Maintenance Scheduled` | The schedule of the maintenance is created or changed. Not sent for ad-hoc maintenances. |
| `Maintenance started for "Service"` | `Maintenance Started` | The maintenance starts. |
| `Maintenance ended for "Service"` | `Maintenance Ended` | The maintenance has ended. |
| `Maintenance cancelled for "Service"` | `Maintenance Cancelled` | The maintenance has been deleted. |
**Email Body**
The body of the email is always the same, only copy and headline change. It always features the `Public Description` of the maintenance.
Below, you can find an example.