> ## Documentation Index
> Fetch the complete documentation index at: https://docs.allquiet.app/llms.txt
> Use this file to discover all available pages before exploring further.
# Advanced Incident Routing
> Add Advanced Incident Routing Rules to Customize your Workflows
Advance Routing rules can be created an edited by *Organization Owners*, *Organization Administrators* (in Organizations) and *Team Administrators* with Billable User rights (if there are no Organizations). *Team Members* and *Organization Members* have view-only access.
Advanced incident routing in All Quiet allows technical teams to streamline their workflows by customizing how incidents are handled based on specific conditions and actions. This feature ensures that alerts are managed and escalated efficiently, tailored to the severity and nature of the incident.
Best practice: create **one** routing per team and put all routing rules into that routing. Avoid having multiple routings connected to the same team with overlapping rules—if two routings match the same incident type, we can’t infer your business priority and it becomes ambiguous which routing should apply first.
Two popular use cases are:
1. Mute channels when `Environment = "TEST"` -> reduce noise for Development/Testing Environments
2. Trigger an outbound webhook only for incidents that have been escalated
You can check out the [examples](/advanced/routing#examples) on this page.
# Setting Up Your Advanced Incident Routing
## Step 1: Create New Routing
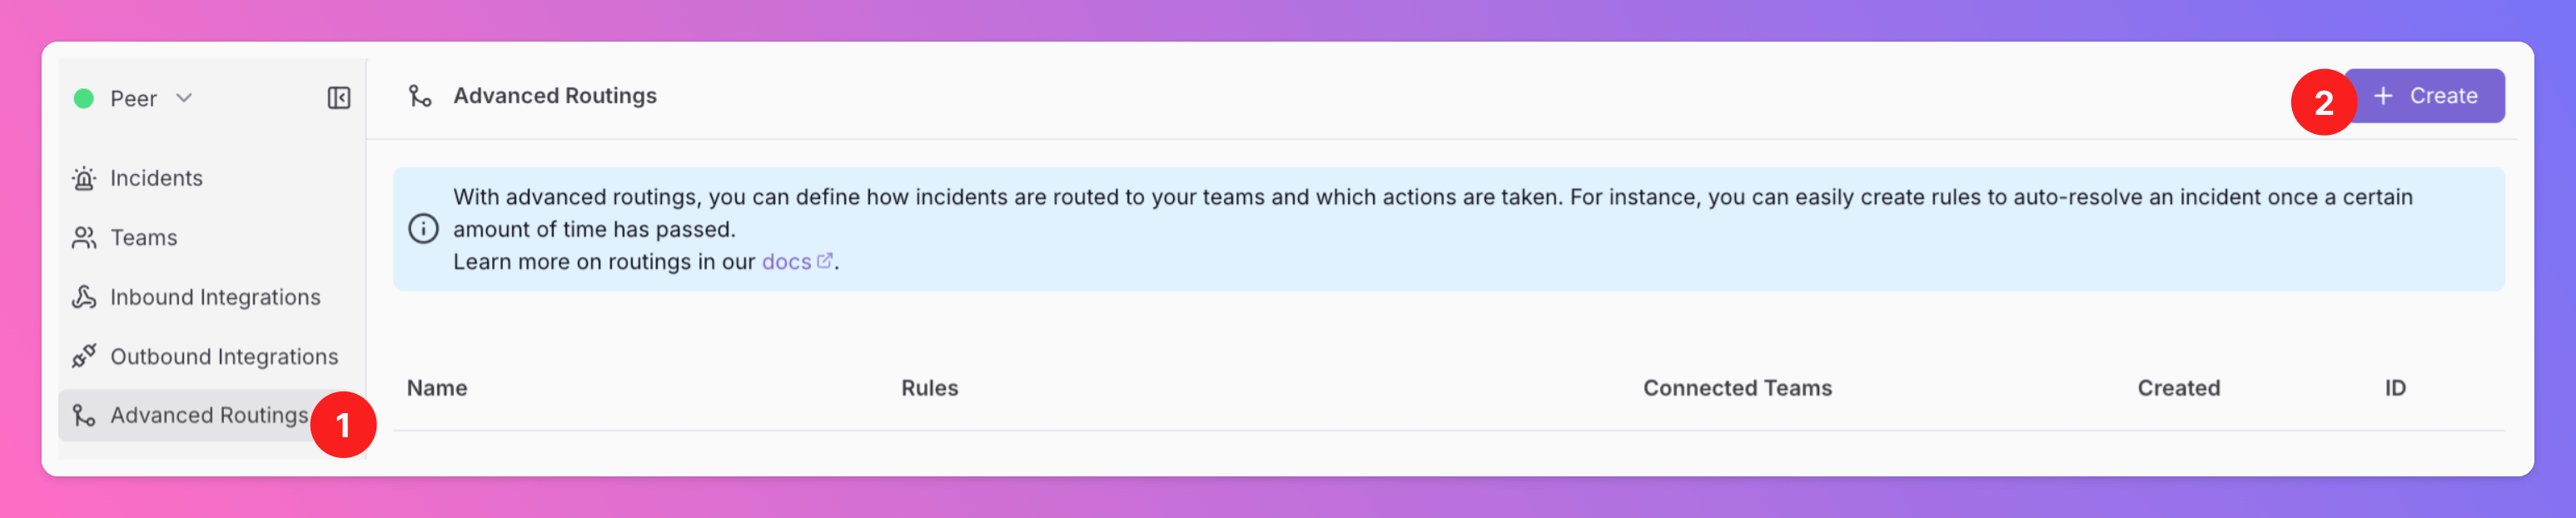
To begin setting up your incident routing, navigate to the `Advanced Routings` section in the sidebar and click on `+ Create`.
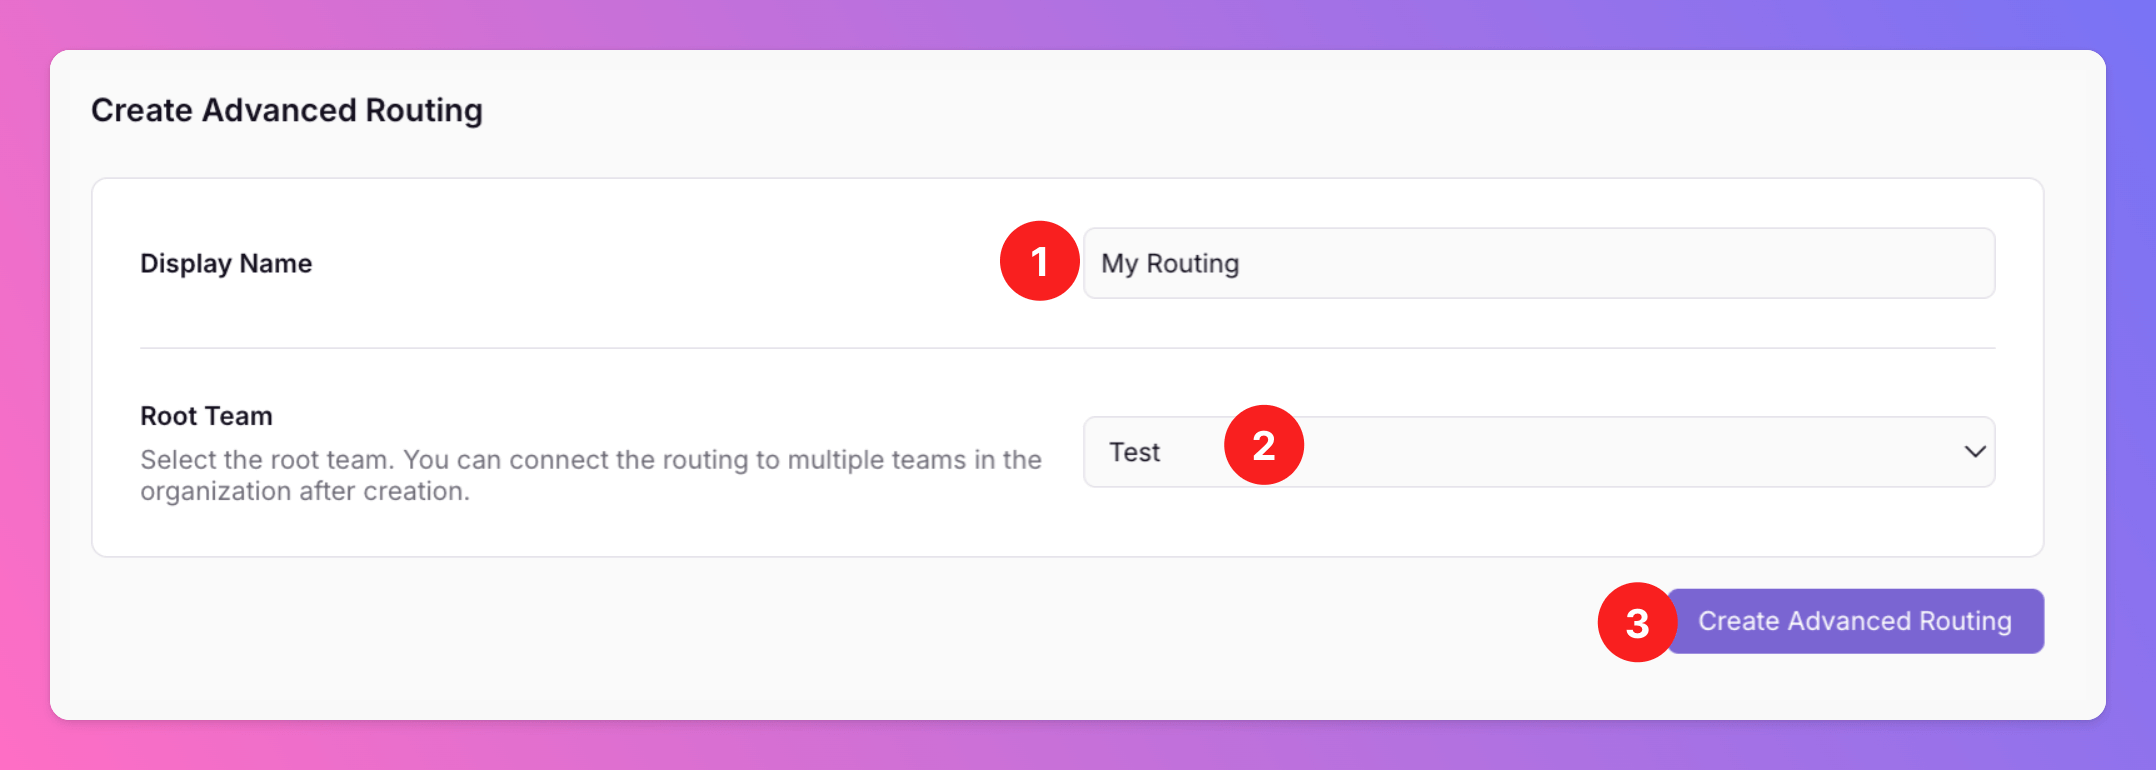
1. Under `Display Name` enter the name for your routing like "My Routing".
2. Select the [Team](/essentials/teams) the routing should be applied to. **Pro and Enterprise plan users**: Select the root team of the routing. Later, you may add the routing to further teams within the root team’s organization.
3. Click `Create Advanced Routing`.
## Step 2: Select the Teams
This step is only relevant for Pro and Enterprise plan users. Standard plan users can skip it.
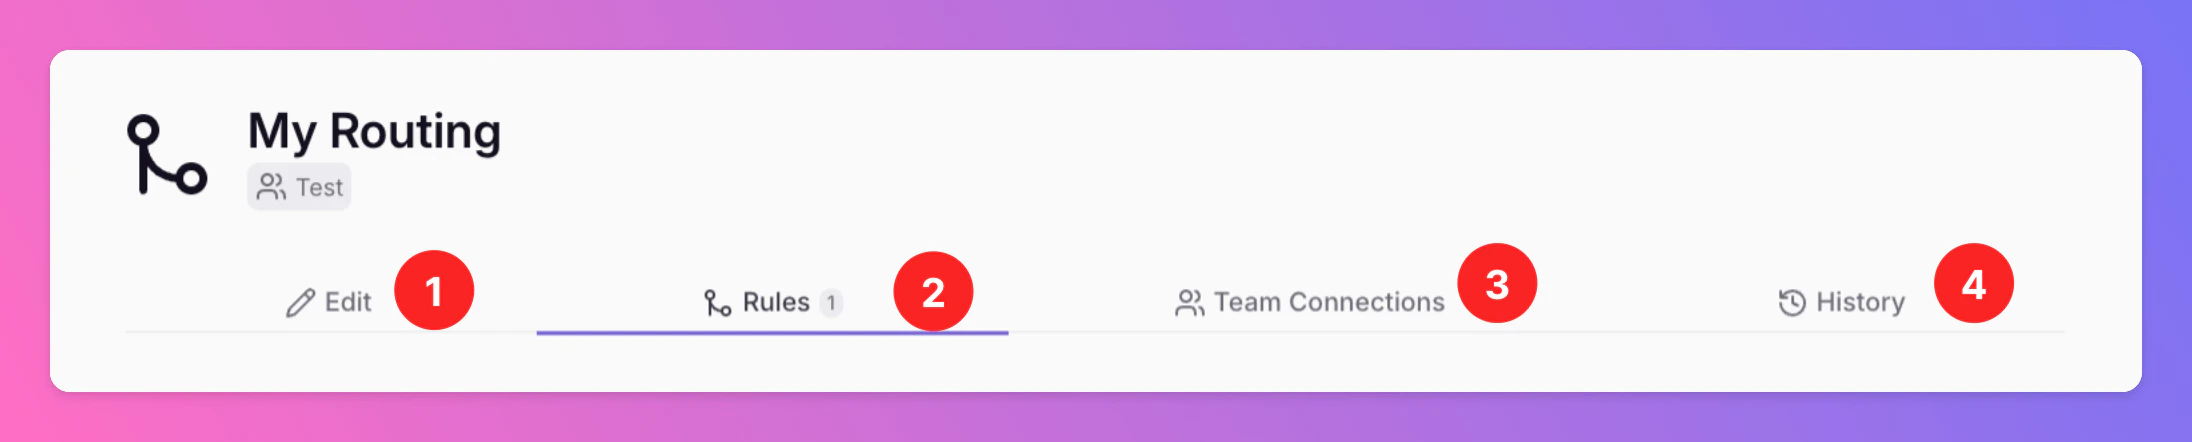
After creation of the routing, you can see several tabs.
1. `Edit`, where you can change the Routings Display Name
2. `Rules`, where you can add the actual routing rules.
3. `Team Connections`, where you can manage the connected teams.
4. `History`, where you can review [routing execution history](#routing-execution-history-history-tab) for this routing (newest first, with paging).
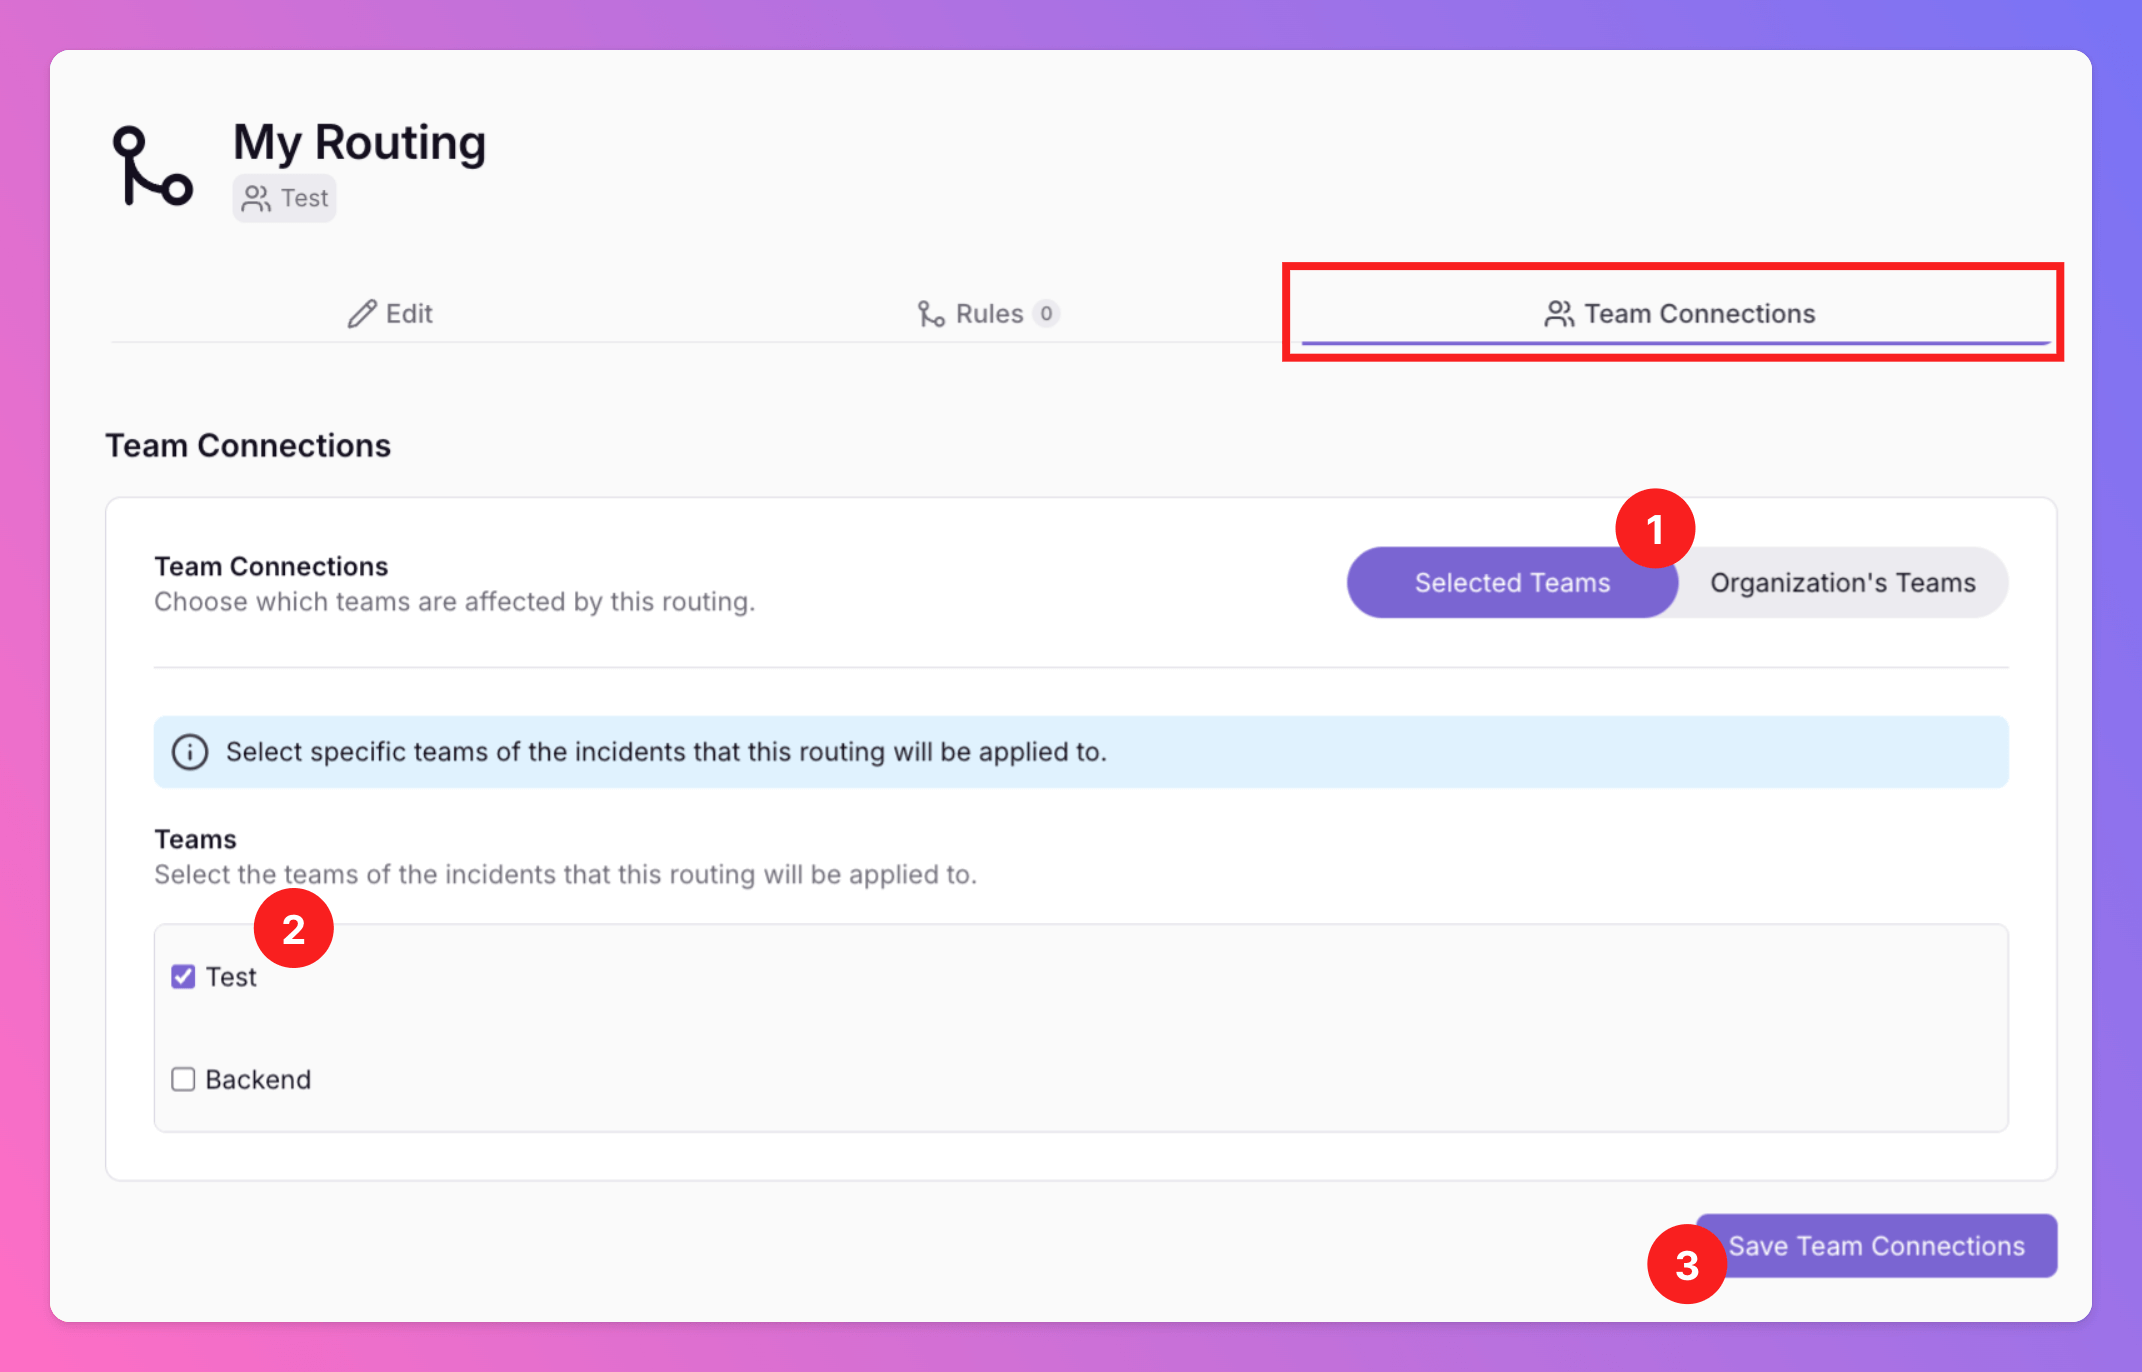
In `Team Connections`, you can see that the routing's Root Team is pre-selected. You can add the routing to further Teams within the root Team’s organization. *Team Administrators* can add / remove those Teams they are an admin in, *Organization Administrators* & *Organization Owners* can manage the connections to all Teams of the Organization.
## Step 3: Add Rules
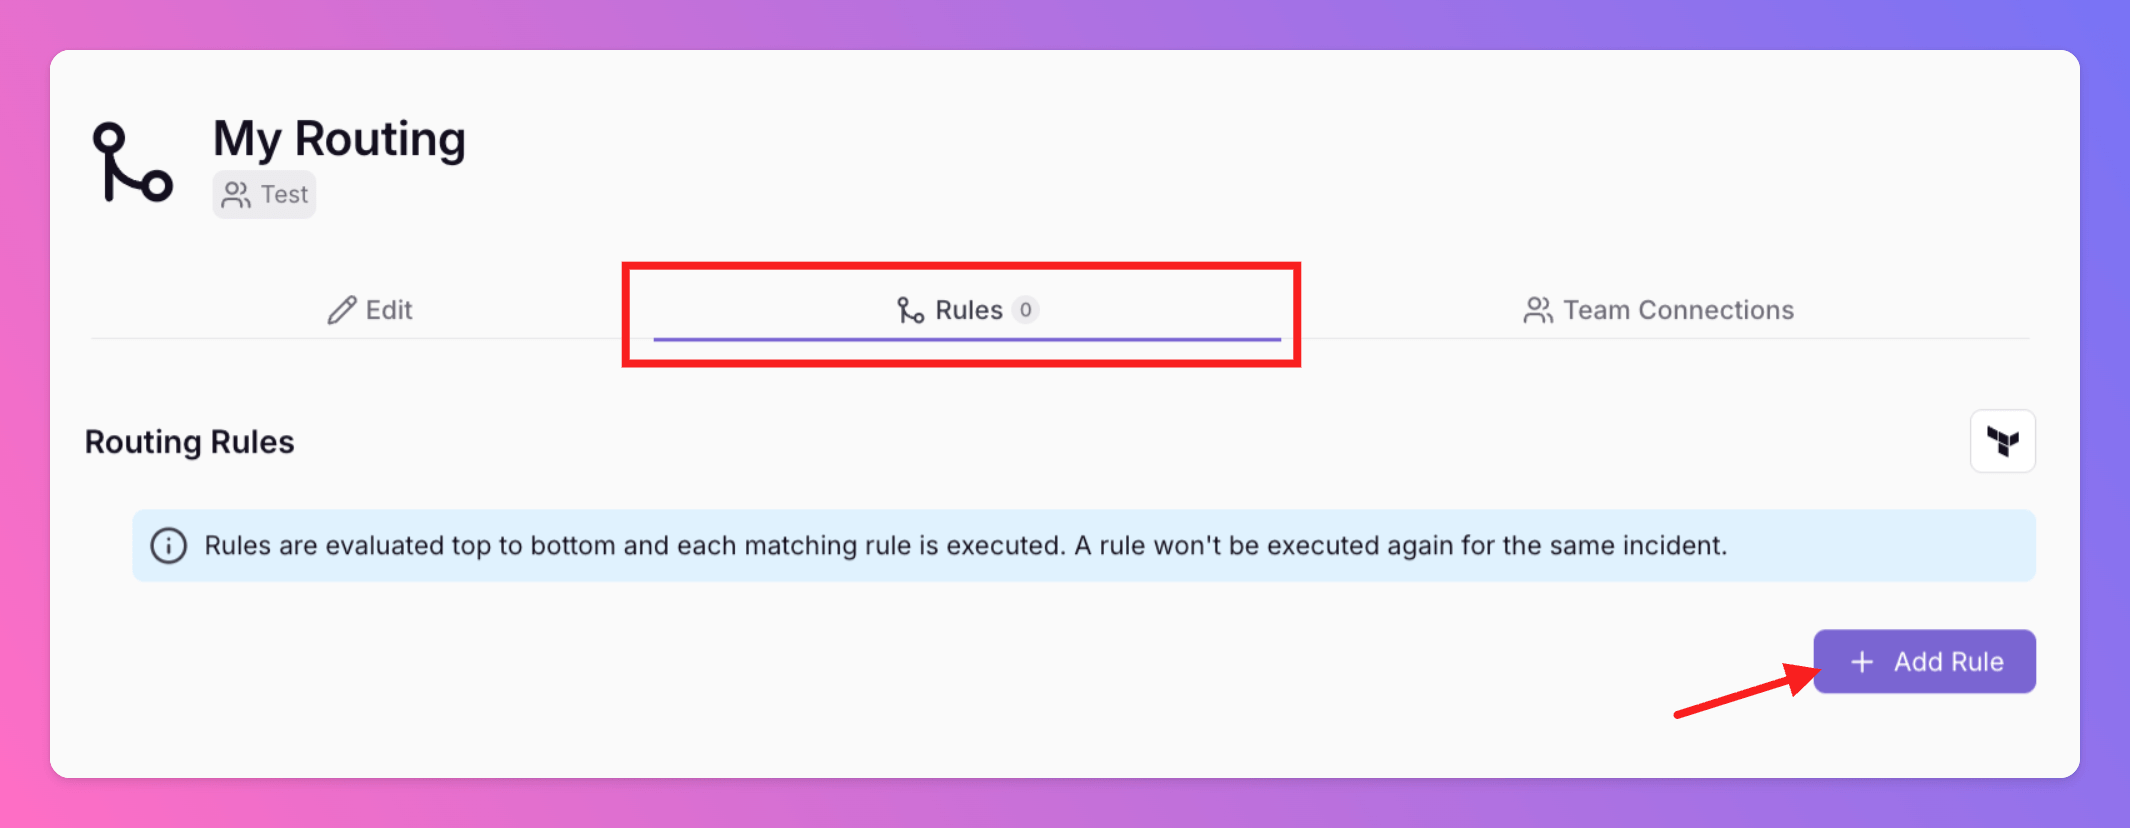
Now you can start configuring your Advanced Incident Routing by clicking on `+ Add Rule` and configuring your routing rules.
A pop-up with 3 tabs will appear. [Conditions](/advanced/routing#define-conditions), [Actions](/advanced/routing#configure-actions), [Channels](/advanced/routing#choos-channels). We will walk you through each of them with examples, below.
### Define Conditions
Specify the conditions under which your routing rule should trigger. You can configure the following parameters:
* **Statuses:** Choose between `Open` or `Resolved`.
* **Severities:** Select the severity level such as `Minor`, `Warning`, or `Critical`.
* **Integrations:** Pick the integrated tools that should trigger the rule.
* **Services:** Only for users of [status pages](/advanced/status-pages). Pick the affected services that should trigger the rule. If the routing's team or organization has no [services](/advanced/status-pages#create-a-service) yet, you will see a hint to create one first. On plans without Status Pages, a **PRO** badge is shown.
* **Intents:** Filter by the incident's current state, like `resolved`, `escalated`, etc.
If enabled on integration level, [Snoozing](/essentials/inbound#snoozing-inbound-integrations) is applied before routing rules are evaluated, so by the time rules run, the incident is no longer in the “Created” state but already “Snoozed”. So if you want to run a rule once an incident is "created", you might want to include “snoozed” as an additional intent so the rule applies regardless of whether the incident is newly created or already snoozed.
* **Labels**: Require labels that appear on the routing team and/or the source integration of the incident. Use Match All (AND) or Match Any (OR) across the labels you list. If this filter is off, all incidents are eligible regardless of labels.
* **Attribute Conditions:** Select the attributes that will trigger this rule. Depending on your selection, the incident's attributes will be matched using **all** (AND logic) or **any** (OR logic) of your selected attributes. Choose from different operators, like `=` , `contrains`, `>` and `<=` to build rules based your attributes' values. In the routing engine, both the attribute name and attribute value comparisons are **not case-sensitive**.
For [Incident Groups](/essentials/incident#incident-grouping): Use the `SubIncidentsCount` attribute to perform actions based on the number of subincidents in a main incident.
* **Recurring Time Restrictions:** Restrict the routing rule to certain weekdays and times. Incidents outside this range will not be evaluated by this rule.
* **Absolute Date Restrictions:** Enable a time range in which the rule will be activated. Incidents outside this range will not be evaluated by this rule.
### Configure Actions
Define the Actions to be executed if the Conditions are met:
* **Discard:** Choose to discard the incident immediately if it meets the defined Conditions.
* **Auto-Discard In:** Optional setting on **Discard** that controls when a discarded incident is removed from the database. Only available when **Discard** is enabled. Overrides the [Deletion Date](/essentials/incident#automatic-deletion) of the incident. The incident will still exist until `Deleted At`.
* **Change Severity:** Update the incident's severity level.
* **Add Interaction:** Run an incident interaction when the rule matches—for example `Resolve`, `Investigate`, `Reopen`, `Escalate`, `Affects`, `Comment`, `Forward`, or `Snooze`.
* **Comment:** Shown for `Resolve`, `Investigate`, `Reopen`, `Escalate`, `Affects`, and `Comment` when that interaction is selected. Required only for `Comment`; optional for the others.
* **Publish Comment:** Appears once comment text is entered. When enabled and the rule runs, the comment is added to the incident. For interactions such as `Affects` or `Resolve`, the comment is published on [status pages](/advanced/status-pages) only if the incident affects a service—the same behavior as when you [publish a comment](/essentials/incident#action-with-comment) manually. Saving with **Publish Comment** on but no comment text is blocked in the UI and rejected by the API.
* **Affects Services:** Only if `Affects` was selected as Interaction Select the affected Service(s). If the team or organization has no services yet, you will see a hint to [create a service](/advanced/status-pages#create-a-service) first (on non-Pro plans, with a **PRO** badge).
* **Affects Uptime:** Only if `Affects` was selected and at least one service is selected Controls whether the incident counts toward [downtime](/advanced/status-pages#affects-uptime). Enabled by default; disable to affect services without lowering uptime.
* **Forward to:** Only if `Forwarded` was selected as Interaction Select the Outbound Integration the incident should be forwarded to.
* **Snooze for (minutes) & Snooze until:** Only if `Snooze` was selected as Interaction Select whether the integration should be snoozed for a certain duration or until a certain point in time.
* **Assign to Teams:** Directs the incident to specified teams. Selecting this option replaces the original incident's team assignment. To retain the original team alongside new assignments, explicitly include it in the selection. Learn more about this incident action [here](/essentials/incident#assign-to-team).
* **Notify all assigned users & teams**: Decide whether you only want to notify newly assigned users with the "Assign" action or all assigned users and teams, including those previously notified about the incident.
Assign to Teams is only available if the routing's team is associated with an organization. Organizations are available on Pro and Enterprise plans.
* **Add/Set Attributes:** Add attributes to the incident or adjust the value of an attribute under certain conditions. You can also do this in the [payload mapping](/essentials/inbound#mapping-payloads) section of each inbound integration.
* **Delay Actions (min.):** Decide whether to delay the defined actions by a certain number of minutes or not. The delayed action will only be executed if the Conditions of this rule are still met at the point in time where the action should be triggered.
* **Rule Flow Control:** Decide whether to continue with subsequent rules or whether all subsequent rules should be skipped if this rule is triggered.
### Choose Channels
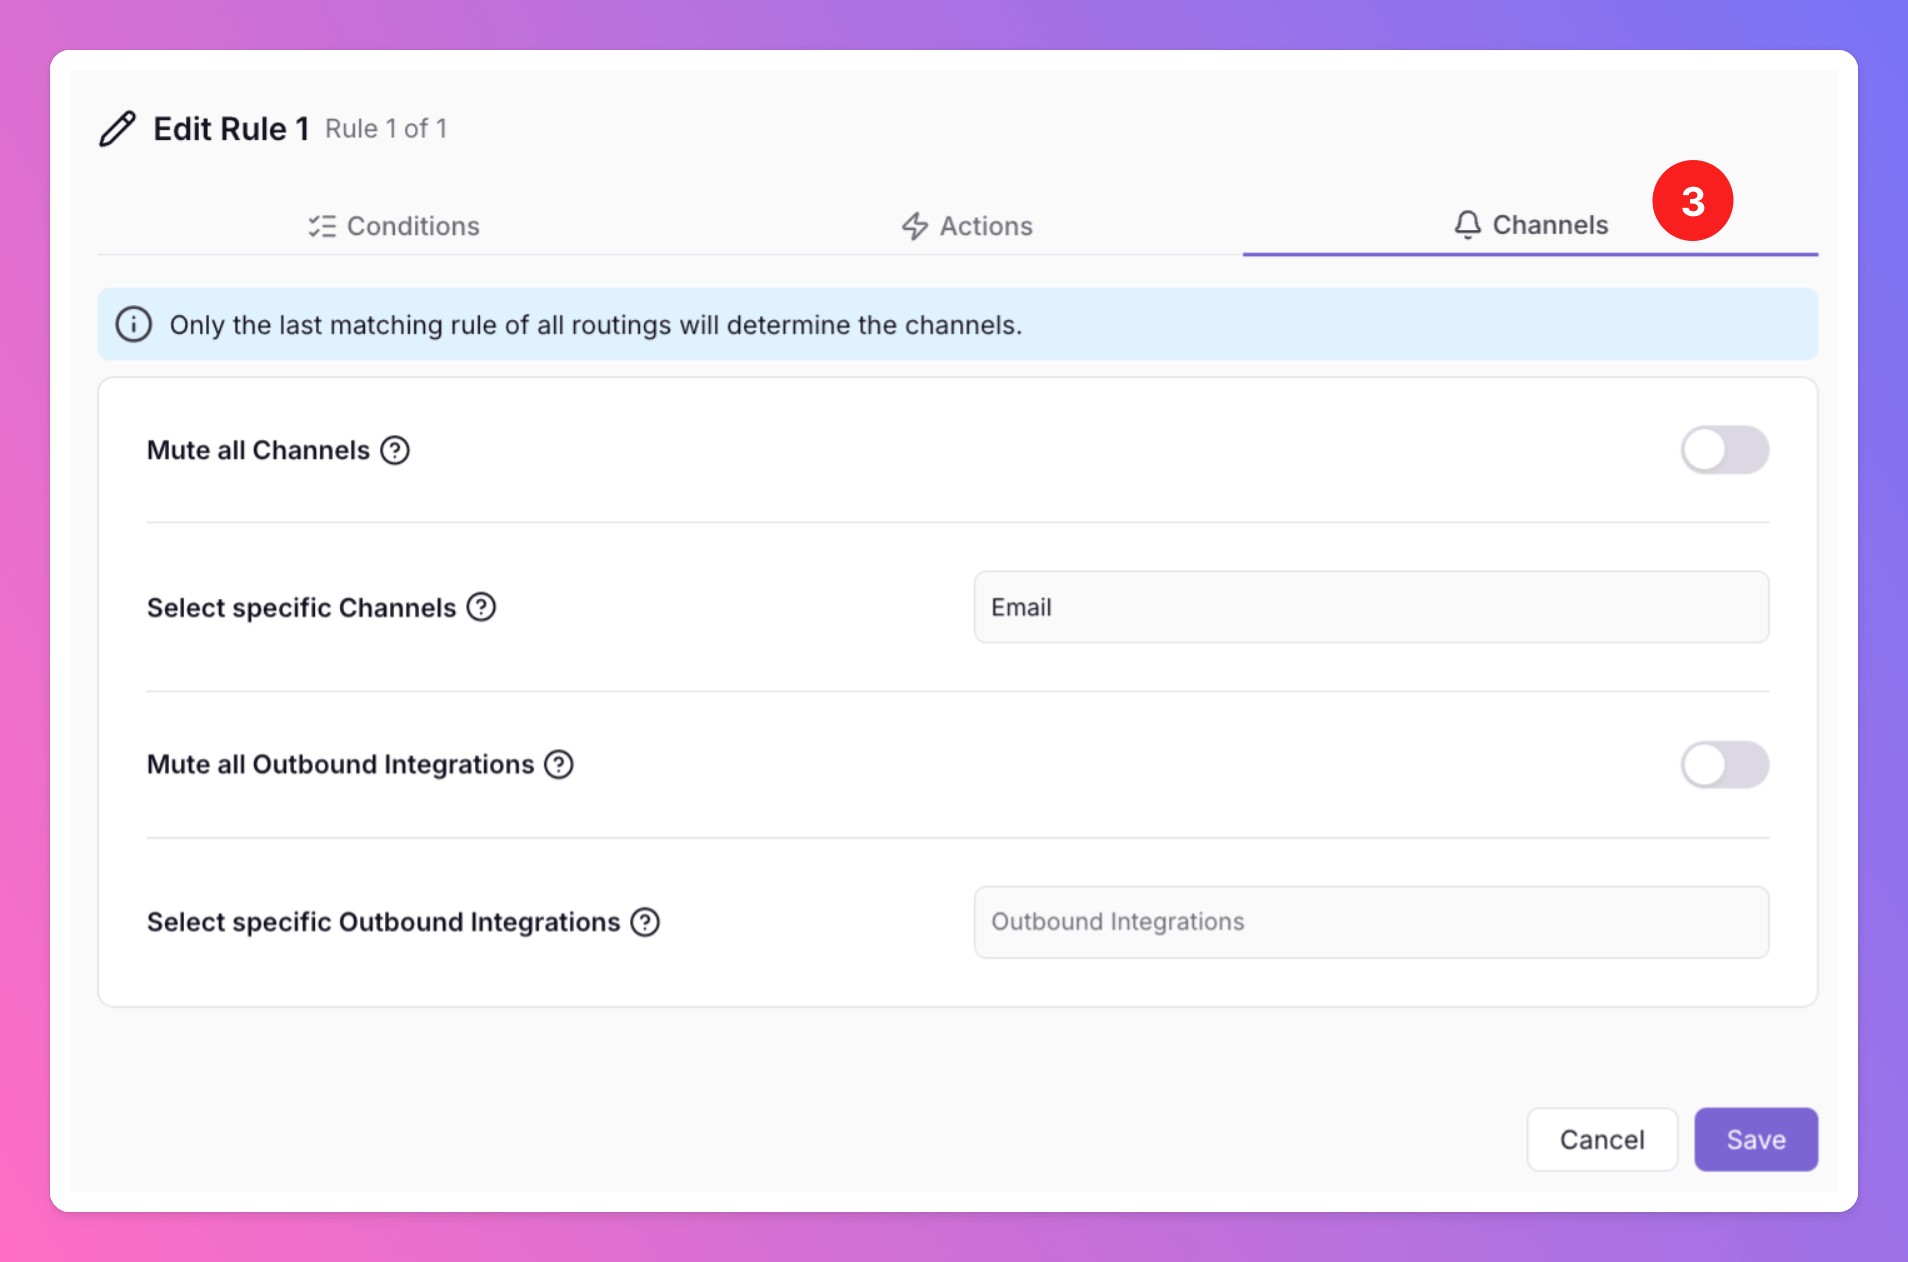
Determine how notifications are sent out by configuring Channels based on the Conditions:
* **Mute all Channels:** Silence notifications across all channels (not including outbound integrations, see below).
* **Channels:** Select only specific channels (SMS, Email, Voice Call, Push Notification) that should be triggered when conditions are met, e.g. you can define that only for the conditions you set an SMS is sent.
* **Mute all Integrations:** Silence notifications across all **outbound integration**.
* **Outbound Integrations:** Select only specific outbound integrations that should be triggered when conditions are met, e.g. you can define that only for the conditions you set a generic outbound is triggered.
### Examples
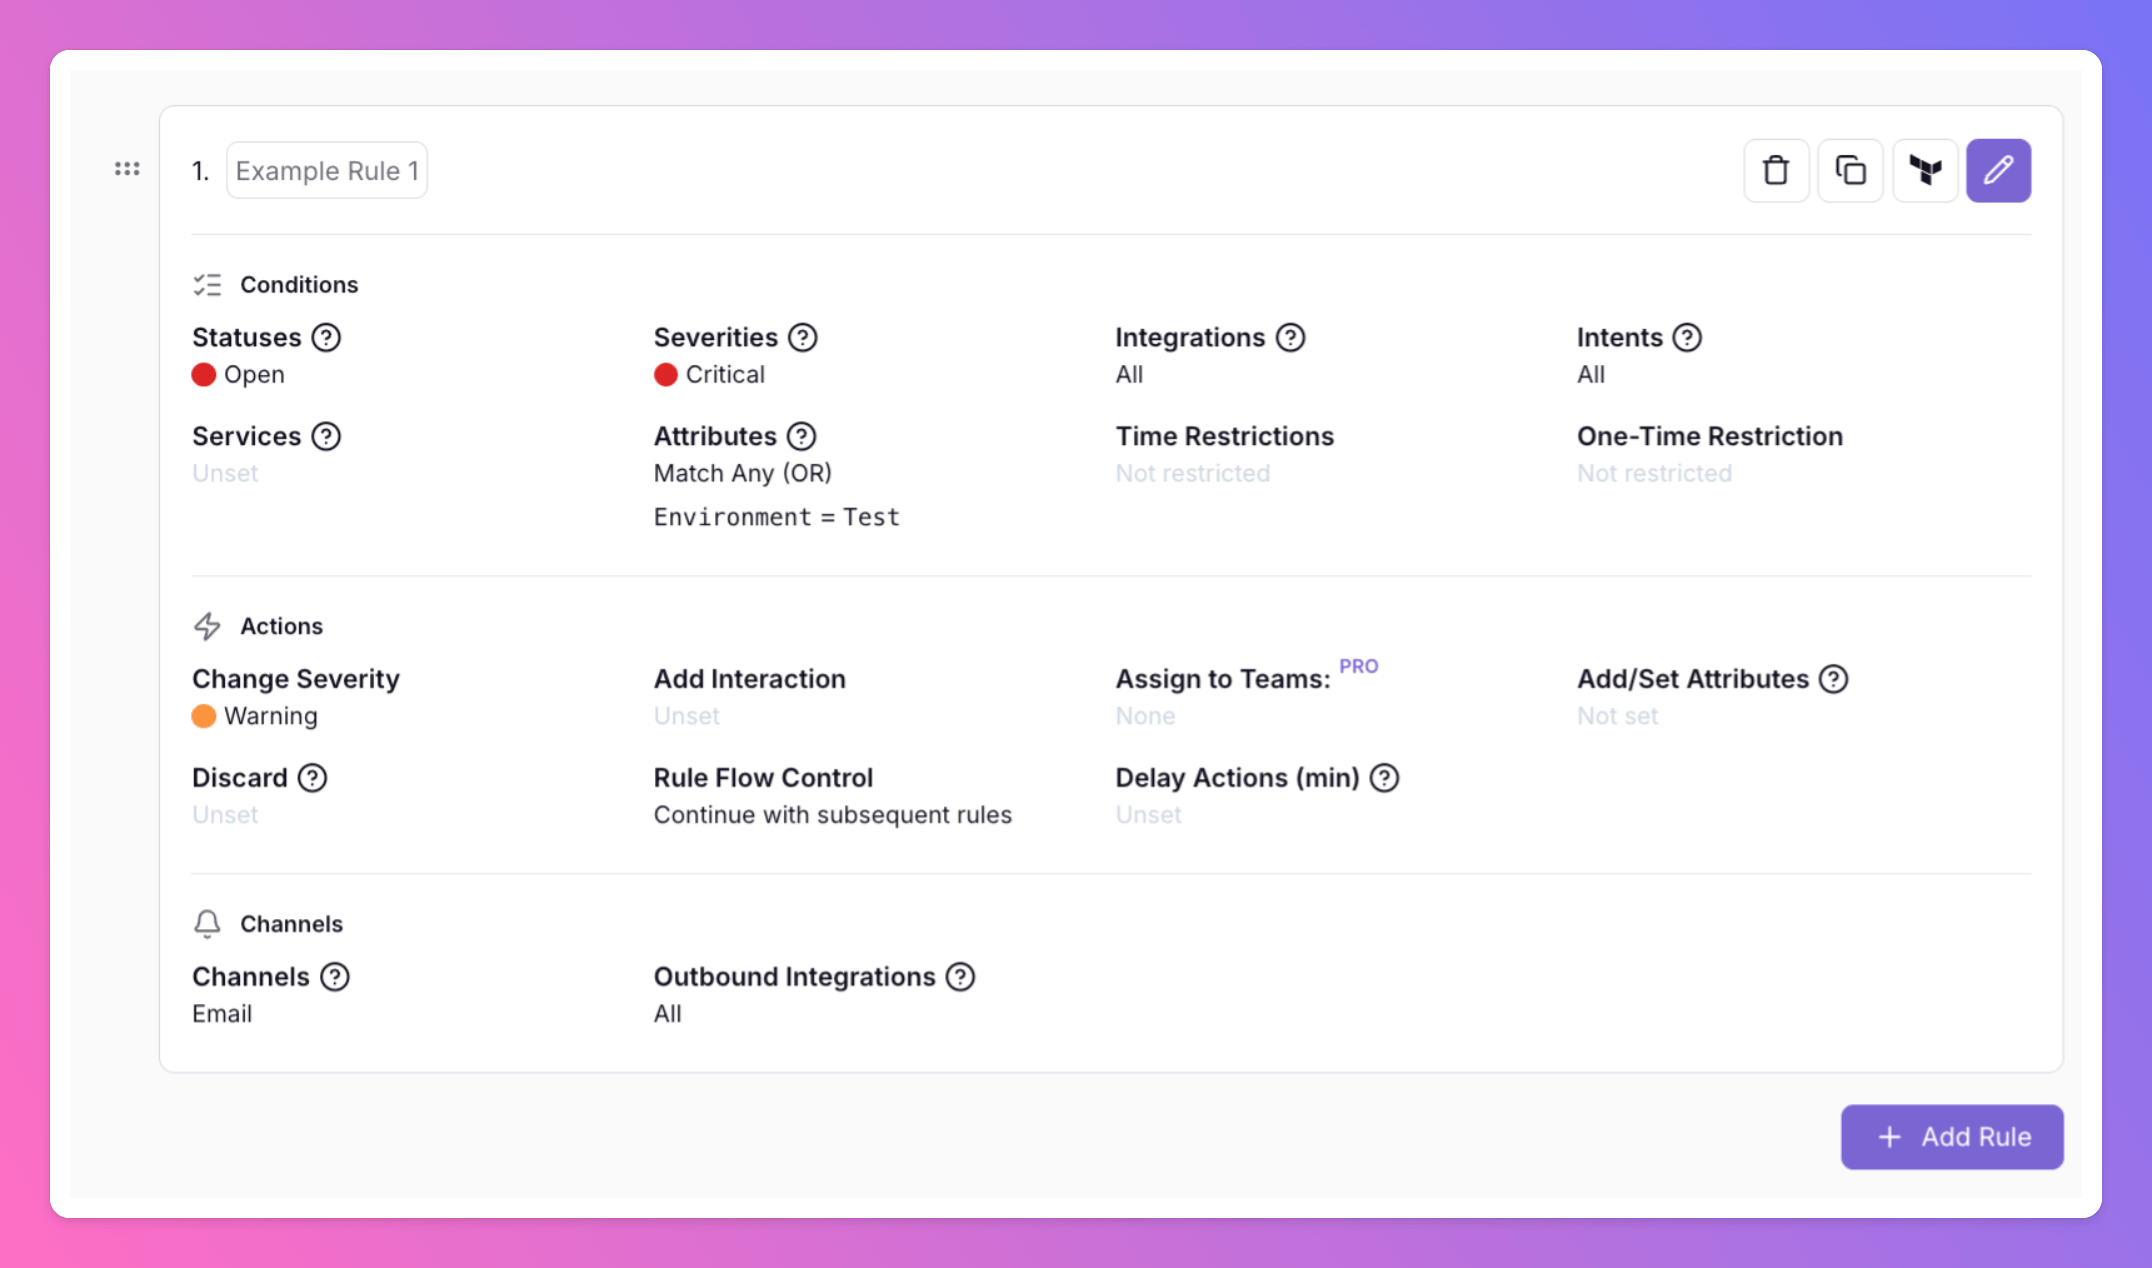
Here are two examples of how teams are setting up Advanced Incident Routing with All Quiet
In this example:
* The Conditions are
* Status is `Open`
* Severity is `Critical`
* The attribute condition is: Attribute `Environment` = `Test`.
* Actions are
* Change Severity to `Warning`
* Channels chosen are
* Only `Email` Channel is chosen
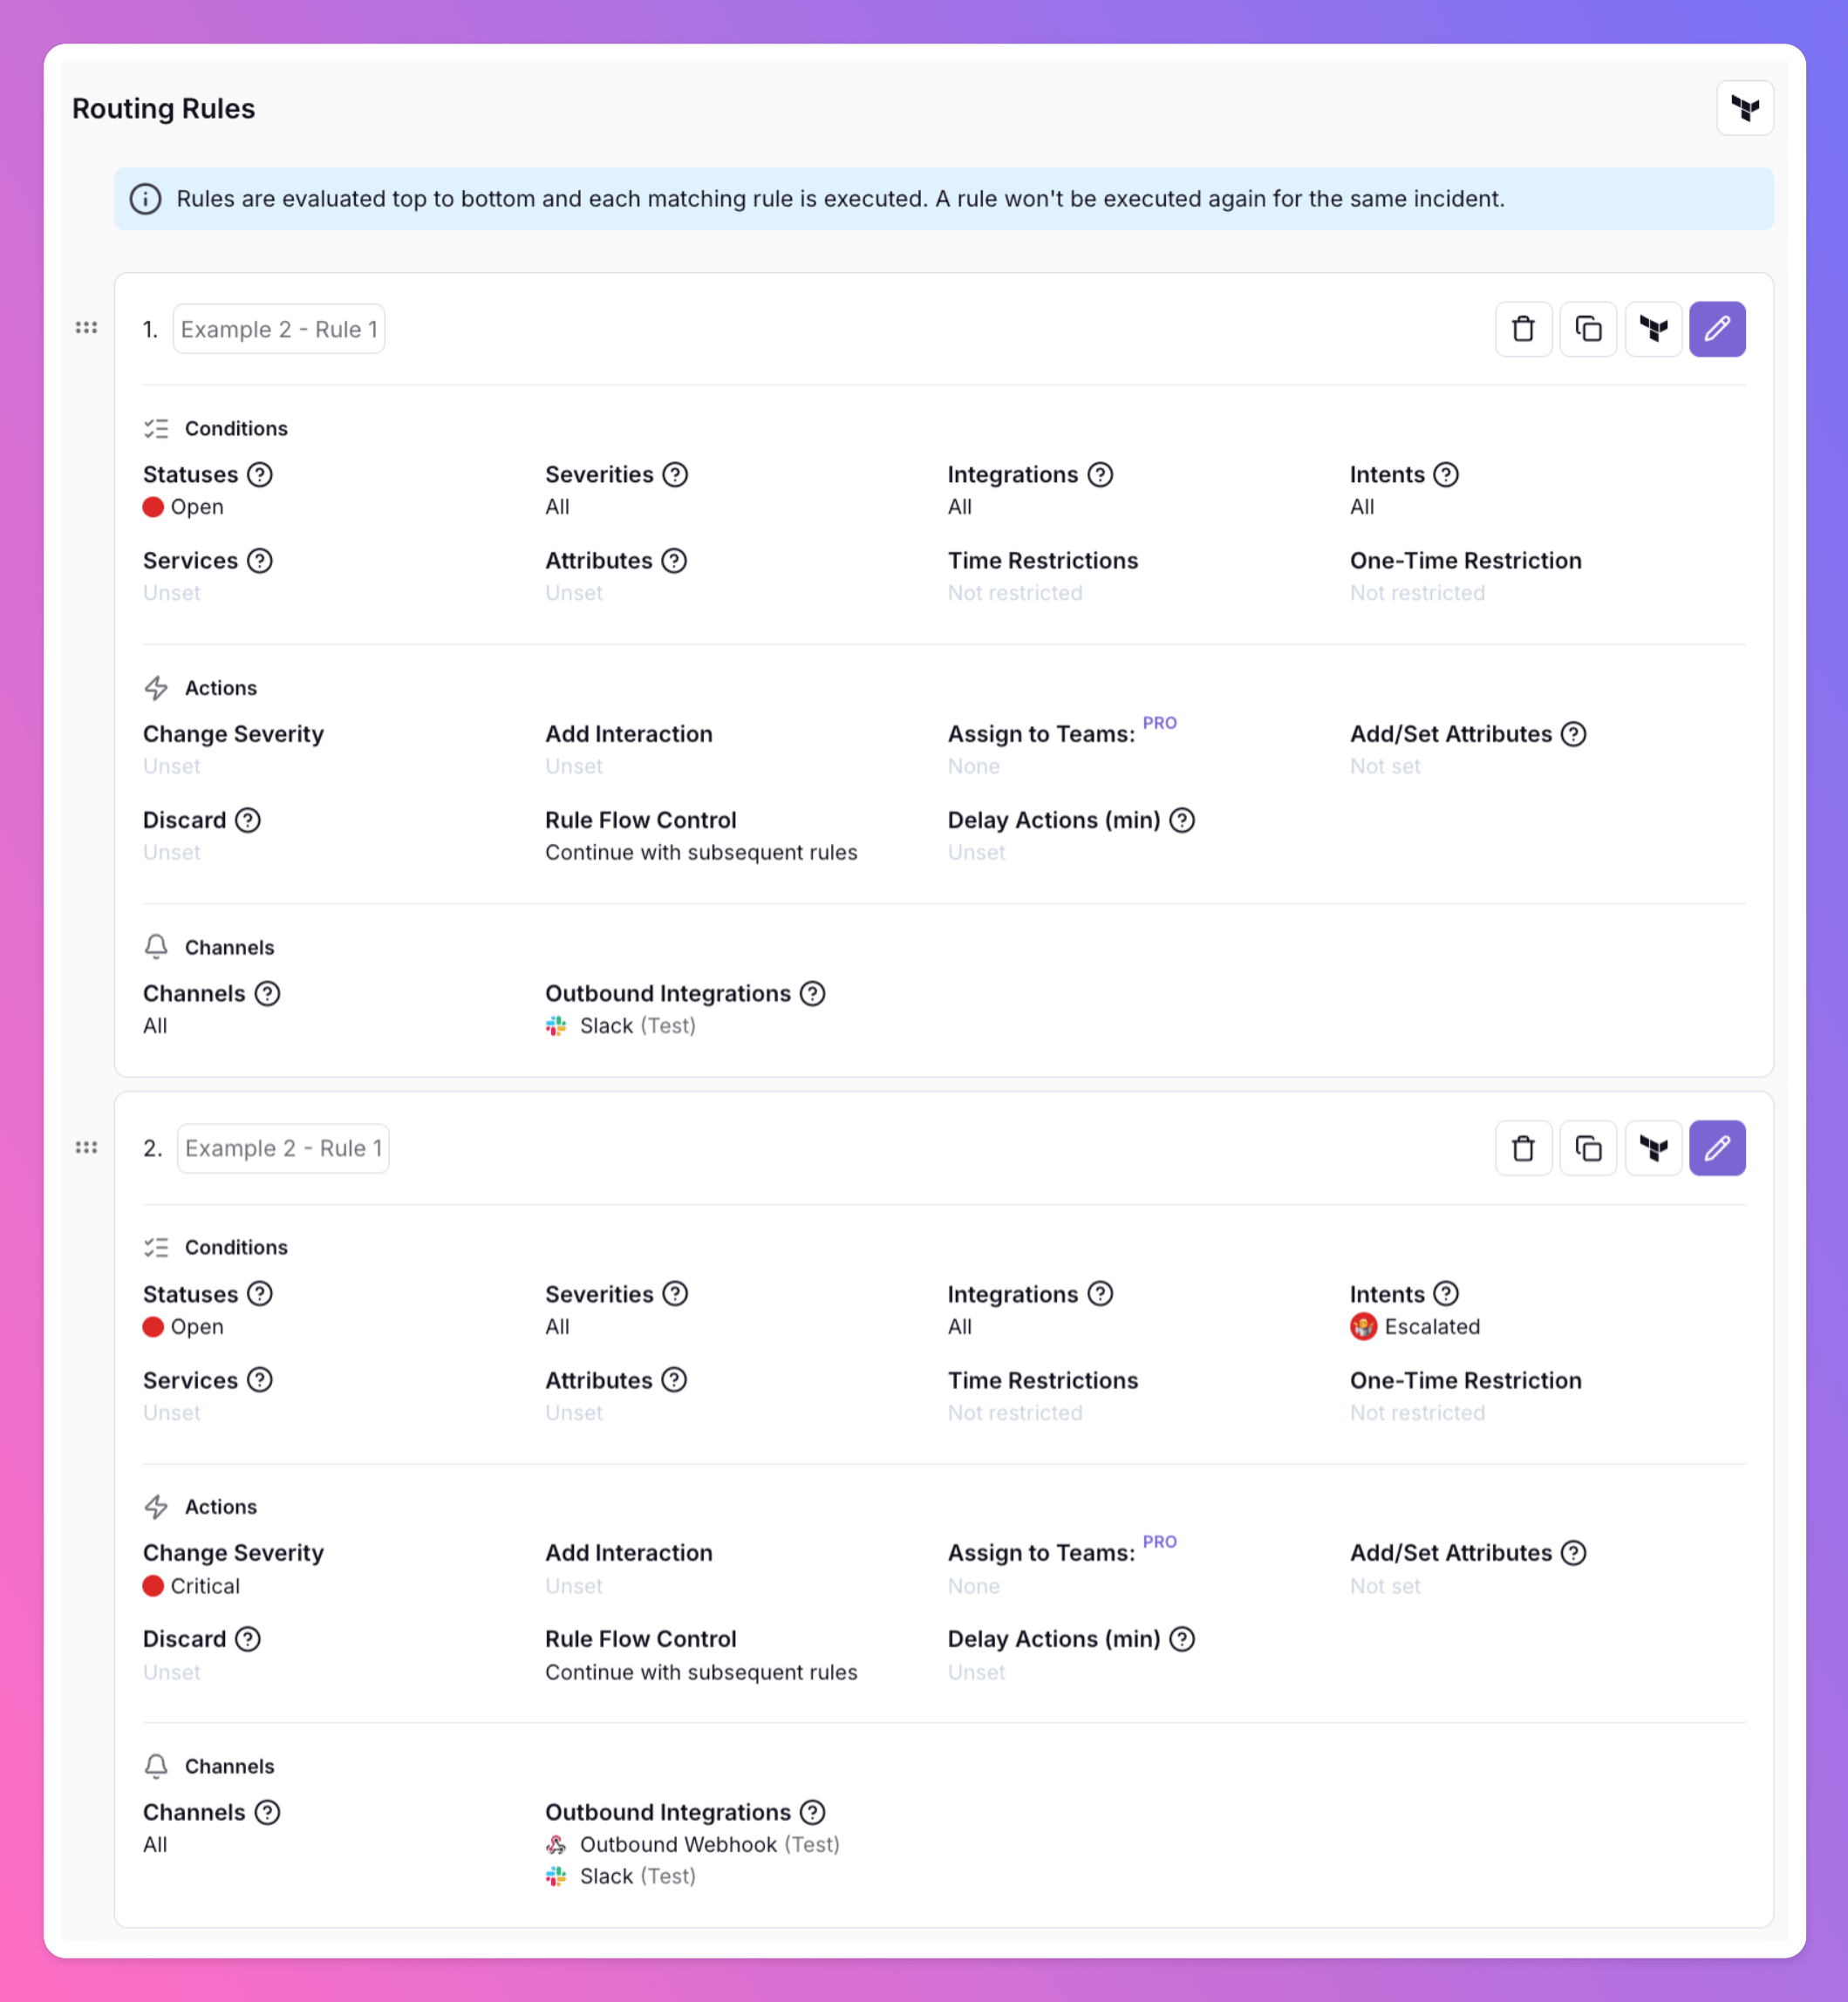
In this example we set two rules in order to only trigger our webhook outbound integration for incidents that have been escalated.
**Our first rule:**
* Condition is that an incident is `Open`
* For Channels we select only our Slack integration and not our Webhook integration
* We select `Continue with subsequent rules`
**Our second rule:**
* Condition is that incidents are `Open` & `Escalated`
* Action is that we change the Severity to `Critical`
* We now select both Channels, our Slack integration and our Webhook outbound integration
This means that only once an incident has been escalated (both manually and automatically) the status will automatically change to `Critical` and we will trigger our outbound webhook integration.
## Step 4: Finalize Your Incident Routing
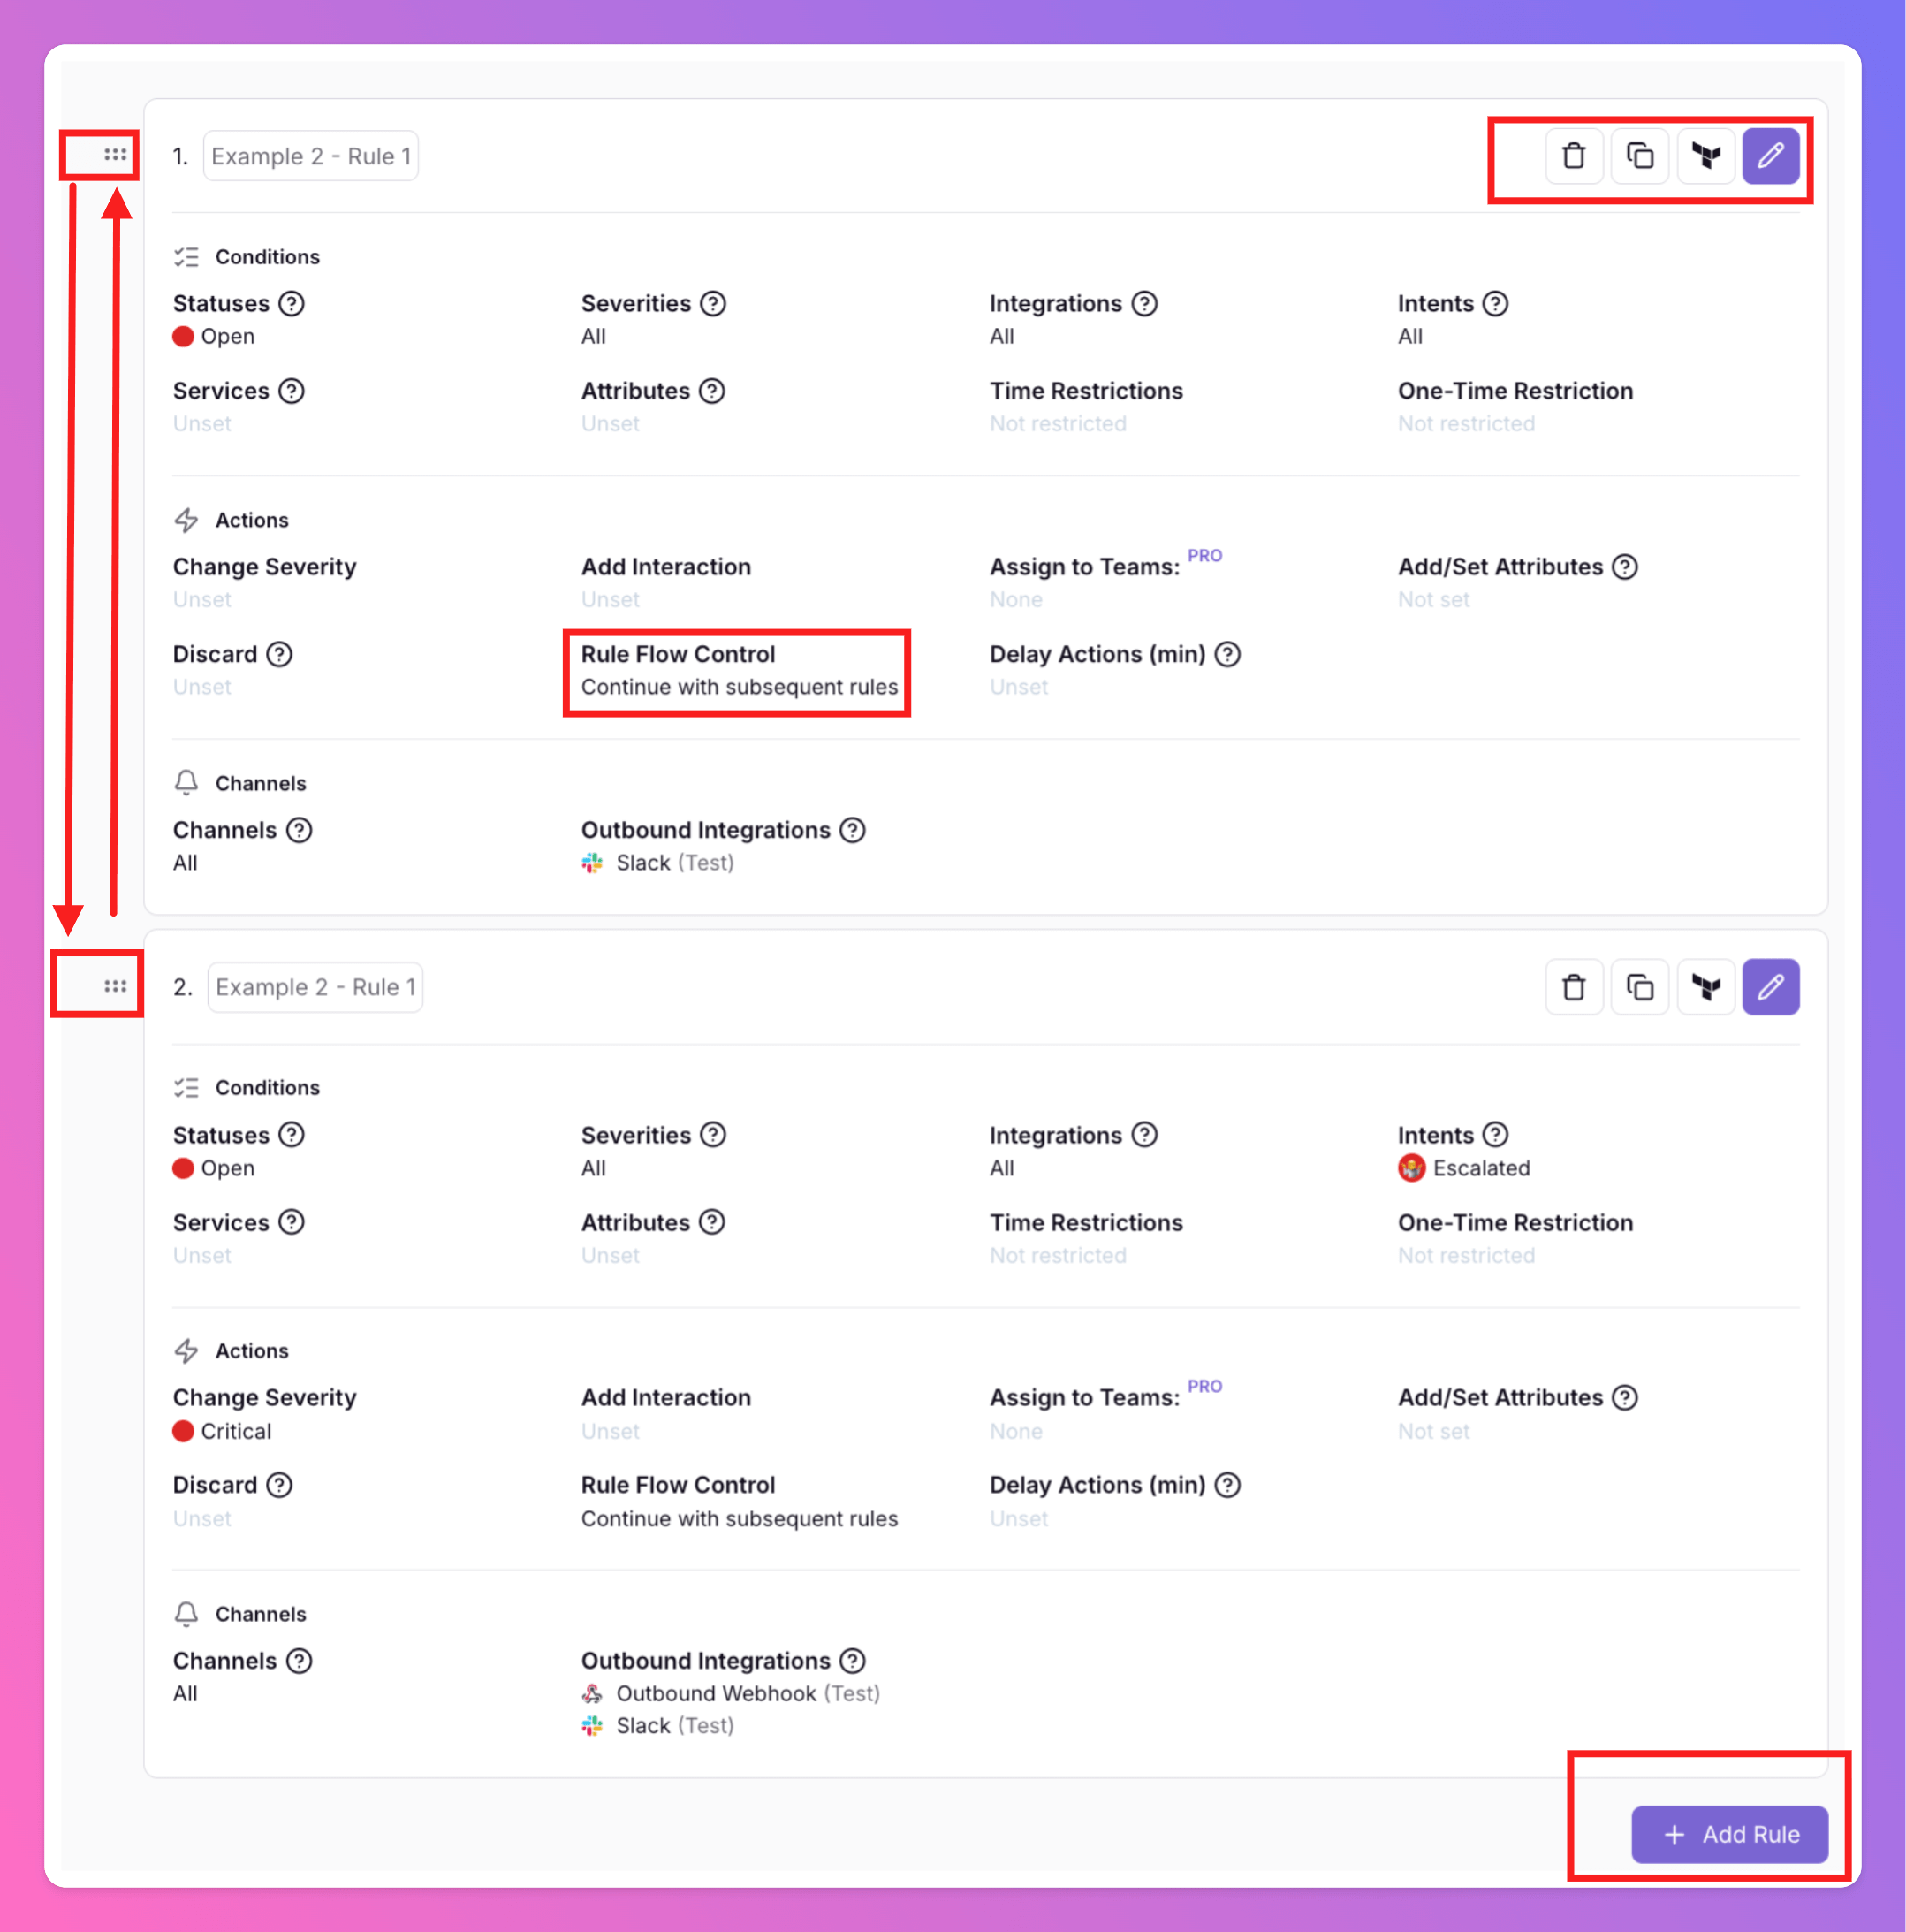
You can add multiple rules and connect them with either `Continue with subsequent rules` or `Skip subsequent rules`. Rules are evaluated top to bottom and each matching rule is executed once per incident. The order can be changed per drag-and-drop, anytime. You can edit, clone or delete individual rules and reorder the rules you have defined to create custom workflows and make All Quiet work for your team.
Give each rule a unique display name. This way, you can see exactly which rule of the route was triggered during an incident.All rules can be exported in Terraform format.
## Routing execution history (History tab)
Routing execution history is available to all users that have view or edit access to the routing.
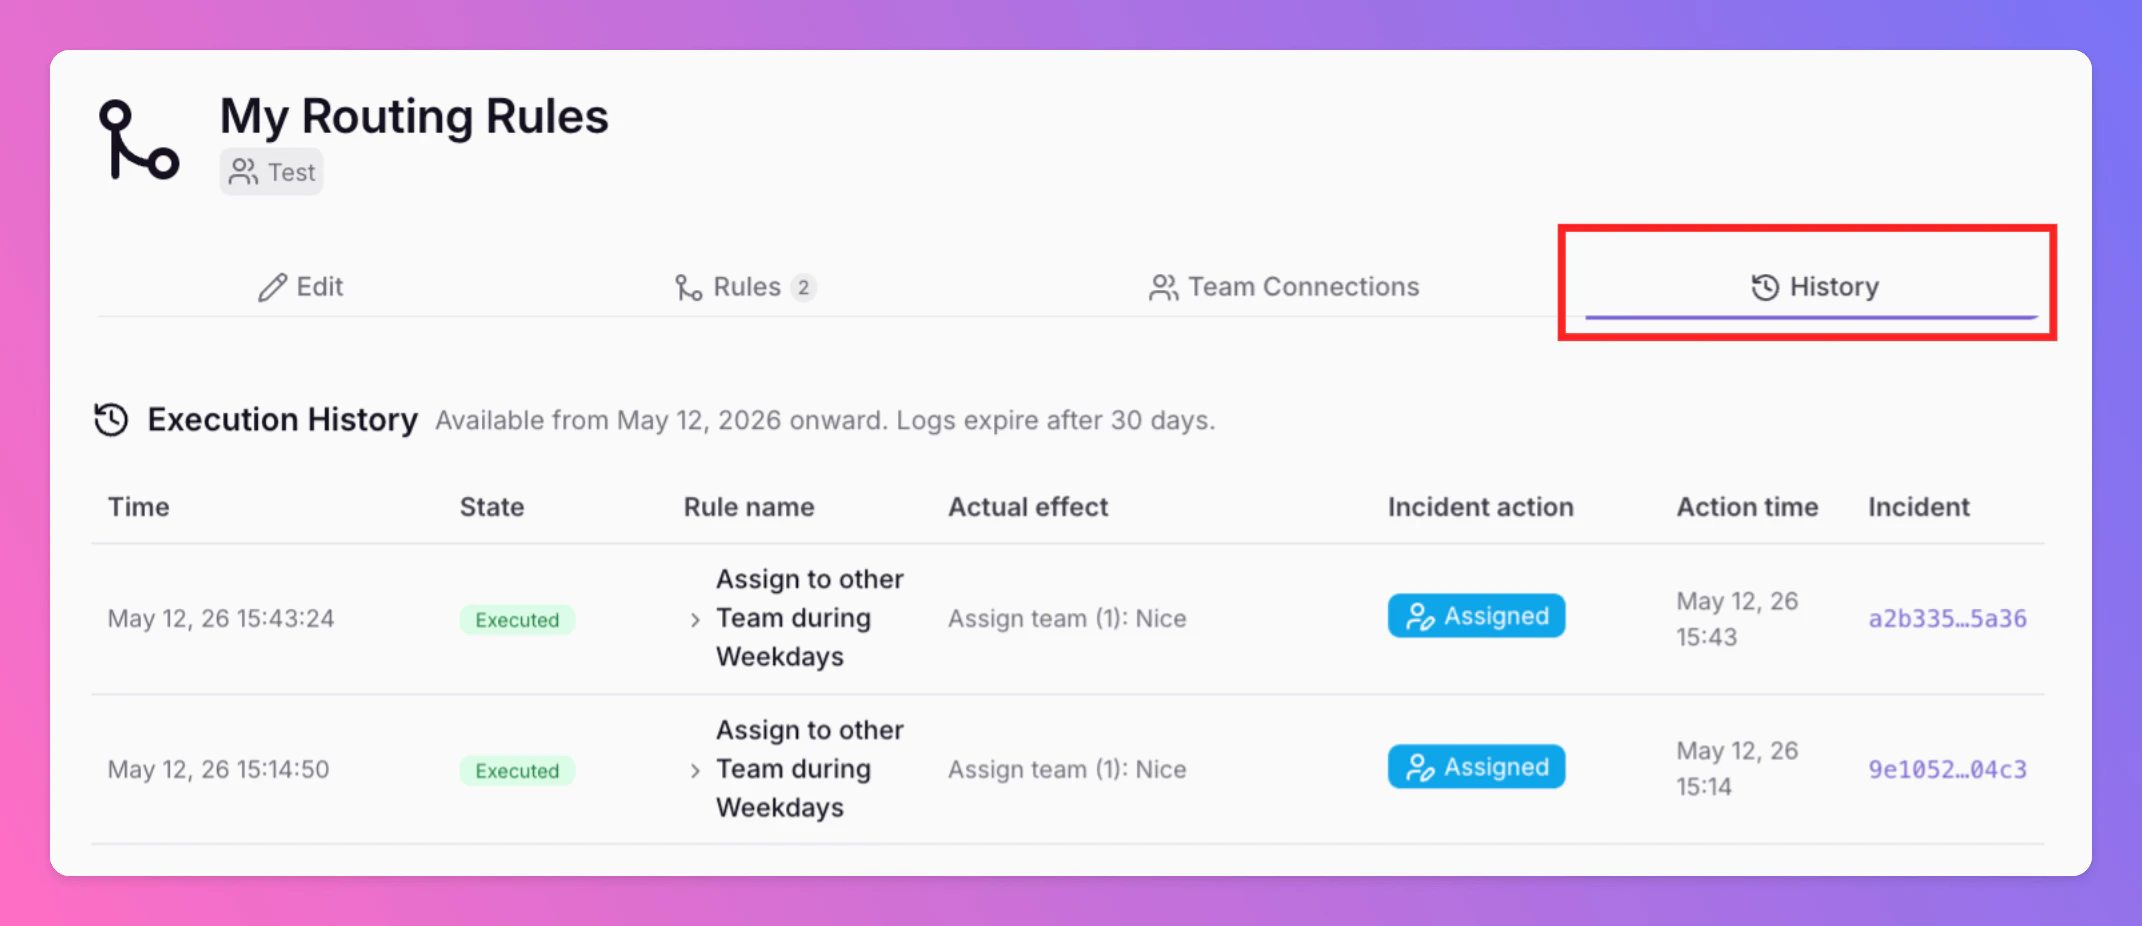
To open the routing execution history, go to **Advanced Routings**, open a routing, and select the **History** tab (alongside **Edit**, **Rules**, and **Team Connections** where your plan shows it).
All Quiet records **routing rule executions**: whenever advanced routing logic is evaluated for an incident, the system can log **which routing and rule** were involved, **what outcome** occurred (for example executed, delayed, or discarded), and a **snapshot** of the rule’s conditions, actions, and channels plus the **effect that actually applied** (teams, severity, discard, notification mute flags, and so on).
You can inspect this in two places that show the **same underlying execution logs**, scoped either **by routing** (this tab) or **by incident** ([Routing rule executions](/essentials/incident#incident-details%3A-routing-rule-executions) in incident details).
### What the Routing Execution History Shows
Executions for **this routing** across all incidents are listed **newest first**, with **Load more** paging. Starting May 12, 2026, logs are kept for **30 days** from creation of each entry, then removed automatically.
| Column | What you see |
| ------------------- | ------------------------------------------------------------------------------------------------------------------------------------------ |
| **Time** | When the execution was recorded. |
| **State** | Outcome of the run, for example **Executed**, **Delayed**, **Delay expired**, or other outcomes such as discarded where applicable. |
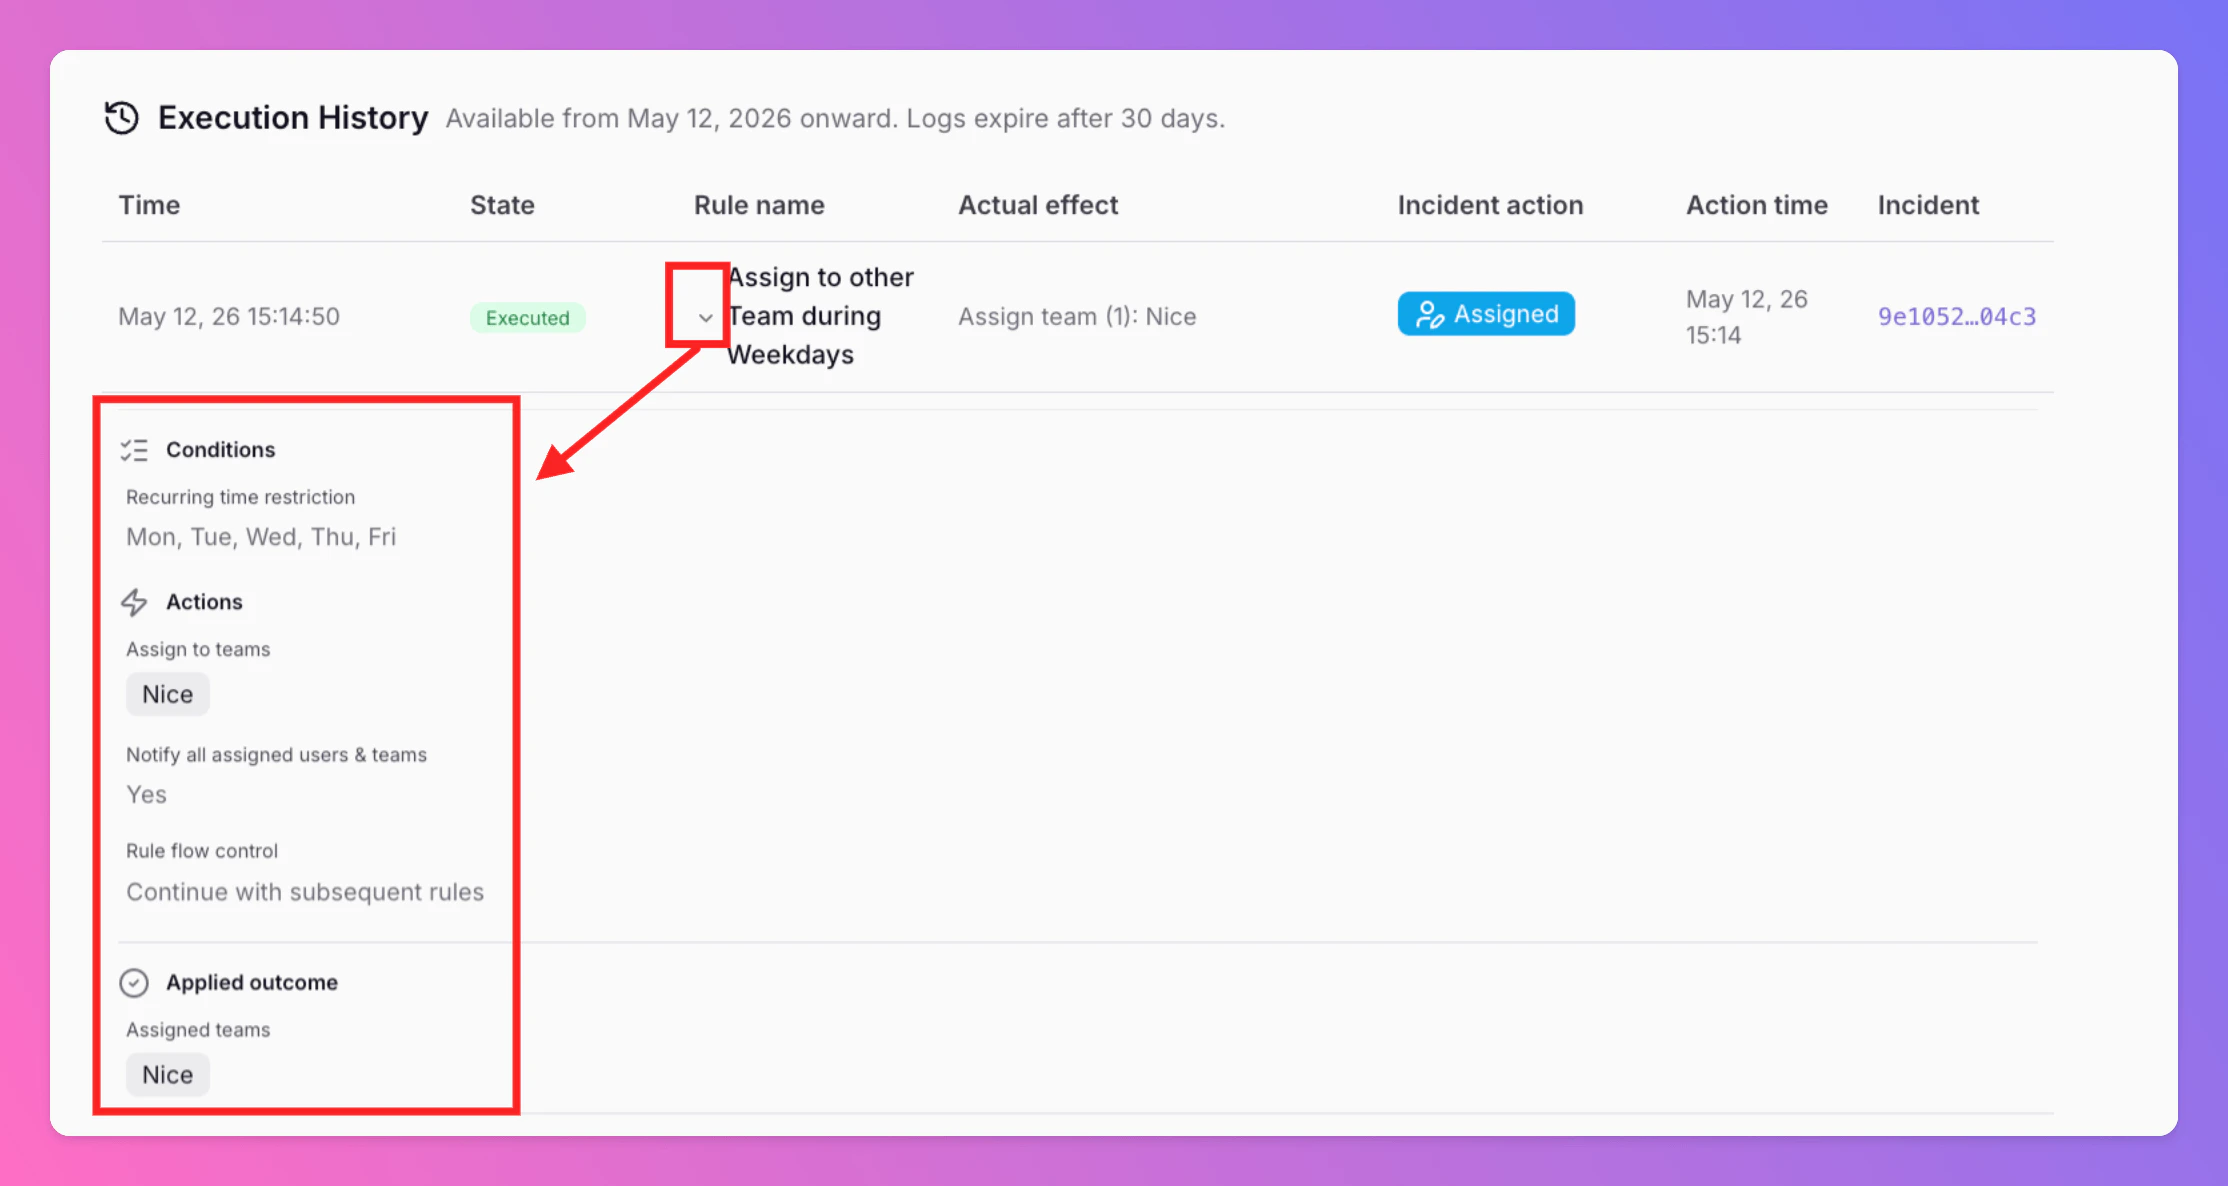
| **Rule name** | Which rule ran; rows can be [**expanded**](/advanced/routing#expanded-row-details) for the full **rule snapshot** and **applied outcome**. |
| **Actual effect** | Short summary of what changed (assignments, discard, severity, forwards, snooze, attributes, and similar). |
| **Incident action** | The incident **intent** tied to that execution when present (for example assigned, escalated). |
| **Action time** | Timestamp of the related incident event when present. |
| **Incident** | Link to the incident; the app can open the incident’s routing-executions view from there, if the user has access to the incident. |
#### Routing States
The **State** column summarizes what happened when the rule was evaluated:
| State | What it means |
| ----------------- | -------------------------------------------------------------------------------------------------------------------------------------------------------------------- |
| **Executed** | The rule’s **Conditions** matched and its **Actions** and **Channels** were applied to the incident. |
| **Delayed** | The rule matched, but its actions are scheduled to run later because **Delay Actions (min.)** is set. The actual changes have not happened yet. |
| **Delay expired** | A previously **Delayed** run reached its scheduled time but **did not execute** — typically because the rule’s conditions were no longer met when the delay elapsed. |
| **Discarded** | The rule matched and **Discard** removed the incident immediately (Auto-Discard In = **Immediately**), so no further routing or notifications applied for that pass. |
For **Delayed** runs, expand the row to see the configured delay in minutes; for **Delay expired**, the **Applied outcome** panel explains that no changes were made on the incident.When **Discard** uses a delayed **Auto-Discard In**, the execution is logged as **Executed** (the incident still exists until `DeletedAt`). The **Actual effect** summarizes the scheduled removal (for example “Incident scheduled for discard in 1 hour”).
### Expanded Row Details
Expanding a row shows the same structure as in the incident modal:
* **Conditions** — statuses, severities, integrations, intents, services, labels, attributes, time and date restrictions, and so on, as captured at execution time (with names resolved where possible).
* **Actions** — for example assign teams, change severity, add interaction (snooze, forward, and similar), set attributes, discard, auto-discard in (when discard uses a delay), rule flow (continue versus skip subsequent rules), **delay actions** (minutes).
* **Channels** — notification channels (or muted) and outbound integrations (or muted).
* **Applied outcome** — what actually happened on the incident after the rule was applied: discard, severity change, assigned teams, affected services, forwards, snooze until, added interaction, set attributes, notification mute flags, and similar.
### Who Can See Execution History
| Location | Access |
| -------------------------------------- | ----------------------------------------------------------------------------------------------------------------------------------------------------------------------------------------------------------------------------------- |
| **Routing → History** | Only users who may **access the team that owns the routing** can open the routing and its execution history. Routing is authorized **per team**. |
| **Incident → Routing rule executions** | Only users who may **view that incident** can open incident details and load executions. The sidebar entry appears when the incident is returned for an **authorized** incident view, consistent with other incident-only features. |
Users who have **View** (read-only) access to a routing still see the **History** tab; it is not limited to editors.
 In `Team Connections`, you can see that the routing's Root Team is pre-selected. You can add the routing to further Teams within the root Team’s organization. *Team Administrators* can add / remove those Teams they are an admin in, *Organization Administrators* & *Organization Owners* can manage the connections to all Teams of the Organization.
 ## Step 3: Add Rules
Now you can start configuring your Advanced Incident Routing by clicking on `+ Add Rule` and configuring your routing rules.
## Step 3: Add Rules
Now you can start configuring your Advanced Incident Routing by clicking on `+ Add Rule` and configuring your routing rules.
 A pop-up with 3 tabs will appear. [Conditions](/advanced/routing#define-conditions), [Actions](/advanced/routing#configure-actions), [Channels](/advanced/routing#choos-channels). We will walk you through each of them with examples, below.
### Define Conditions
Specify the conditions under which your routing rule should trigger. You can configure the following parameters:
* **Statuses:** Choose between `Open` or `Resolved`.
* **Severities:** Select the severity level such as `Minor`, `Warning`, or `Critical`.
* **Integrations:** Pick the integrated tools that should trigger the rule.
* **Services:**
A pop-up with 3 tabs will appear. [Conditions](/advanced/routing#define-conditions), [Actions](/advanced/routing#configure-actions), [Channels](/advanced/routing#choos-channels). We will walk you through each of them with examples, below.
### Define Conditions
Specify the conditions under which your routing rule should trigger. You can configure the following parameters:
* **Statuses:** Choose between `Open` or `Resolved`.
* **Severities:** Select the severity level such as `Minor`, `Warning`, or `Critical`.
* **Integrations:** Pick the integrated tools that should trigger the rule.
* **Services:** 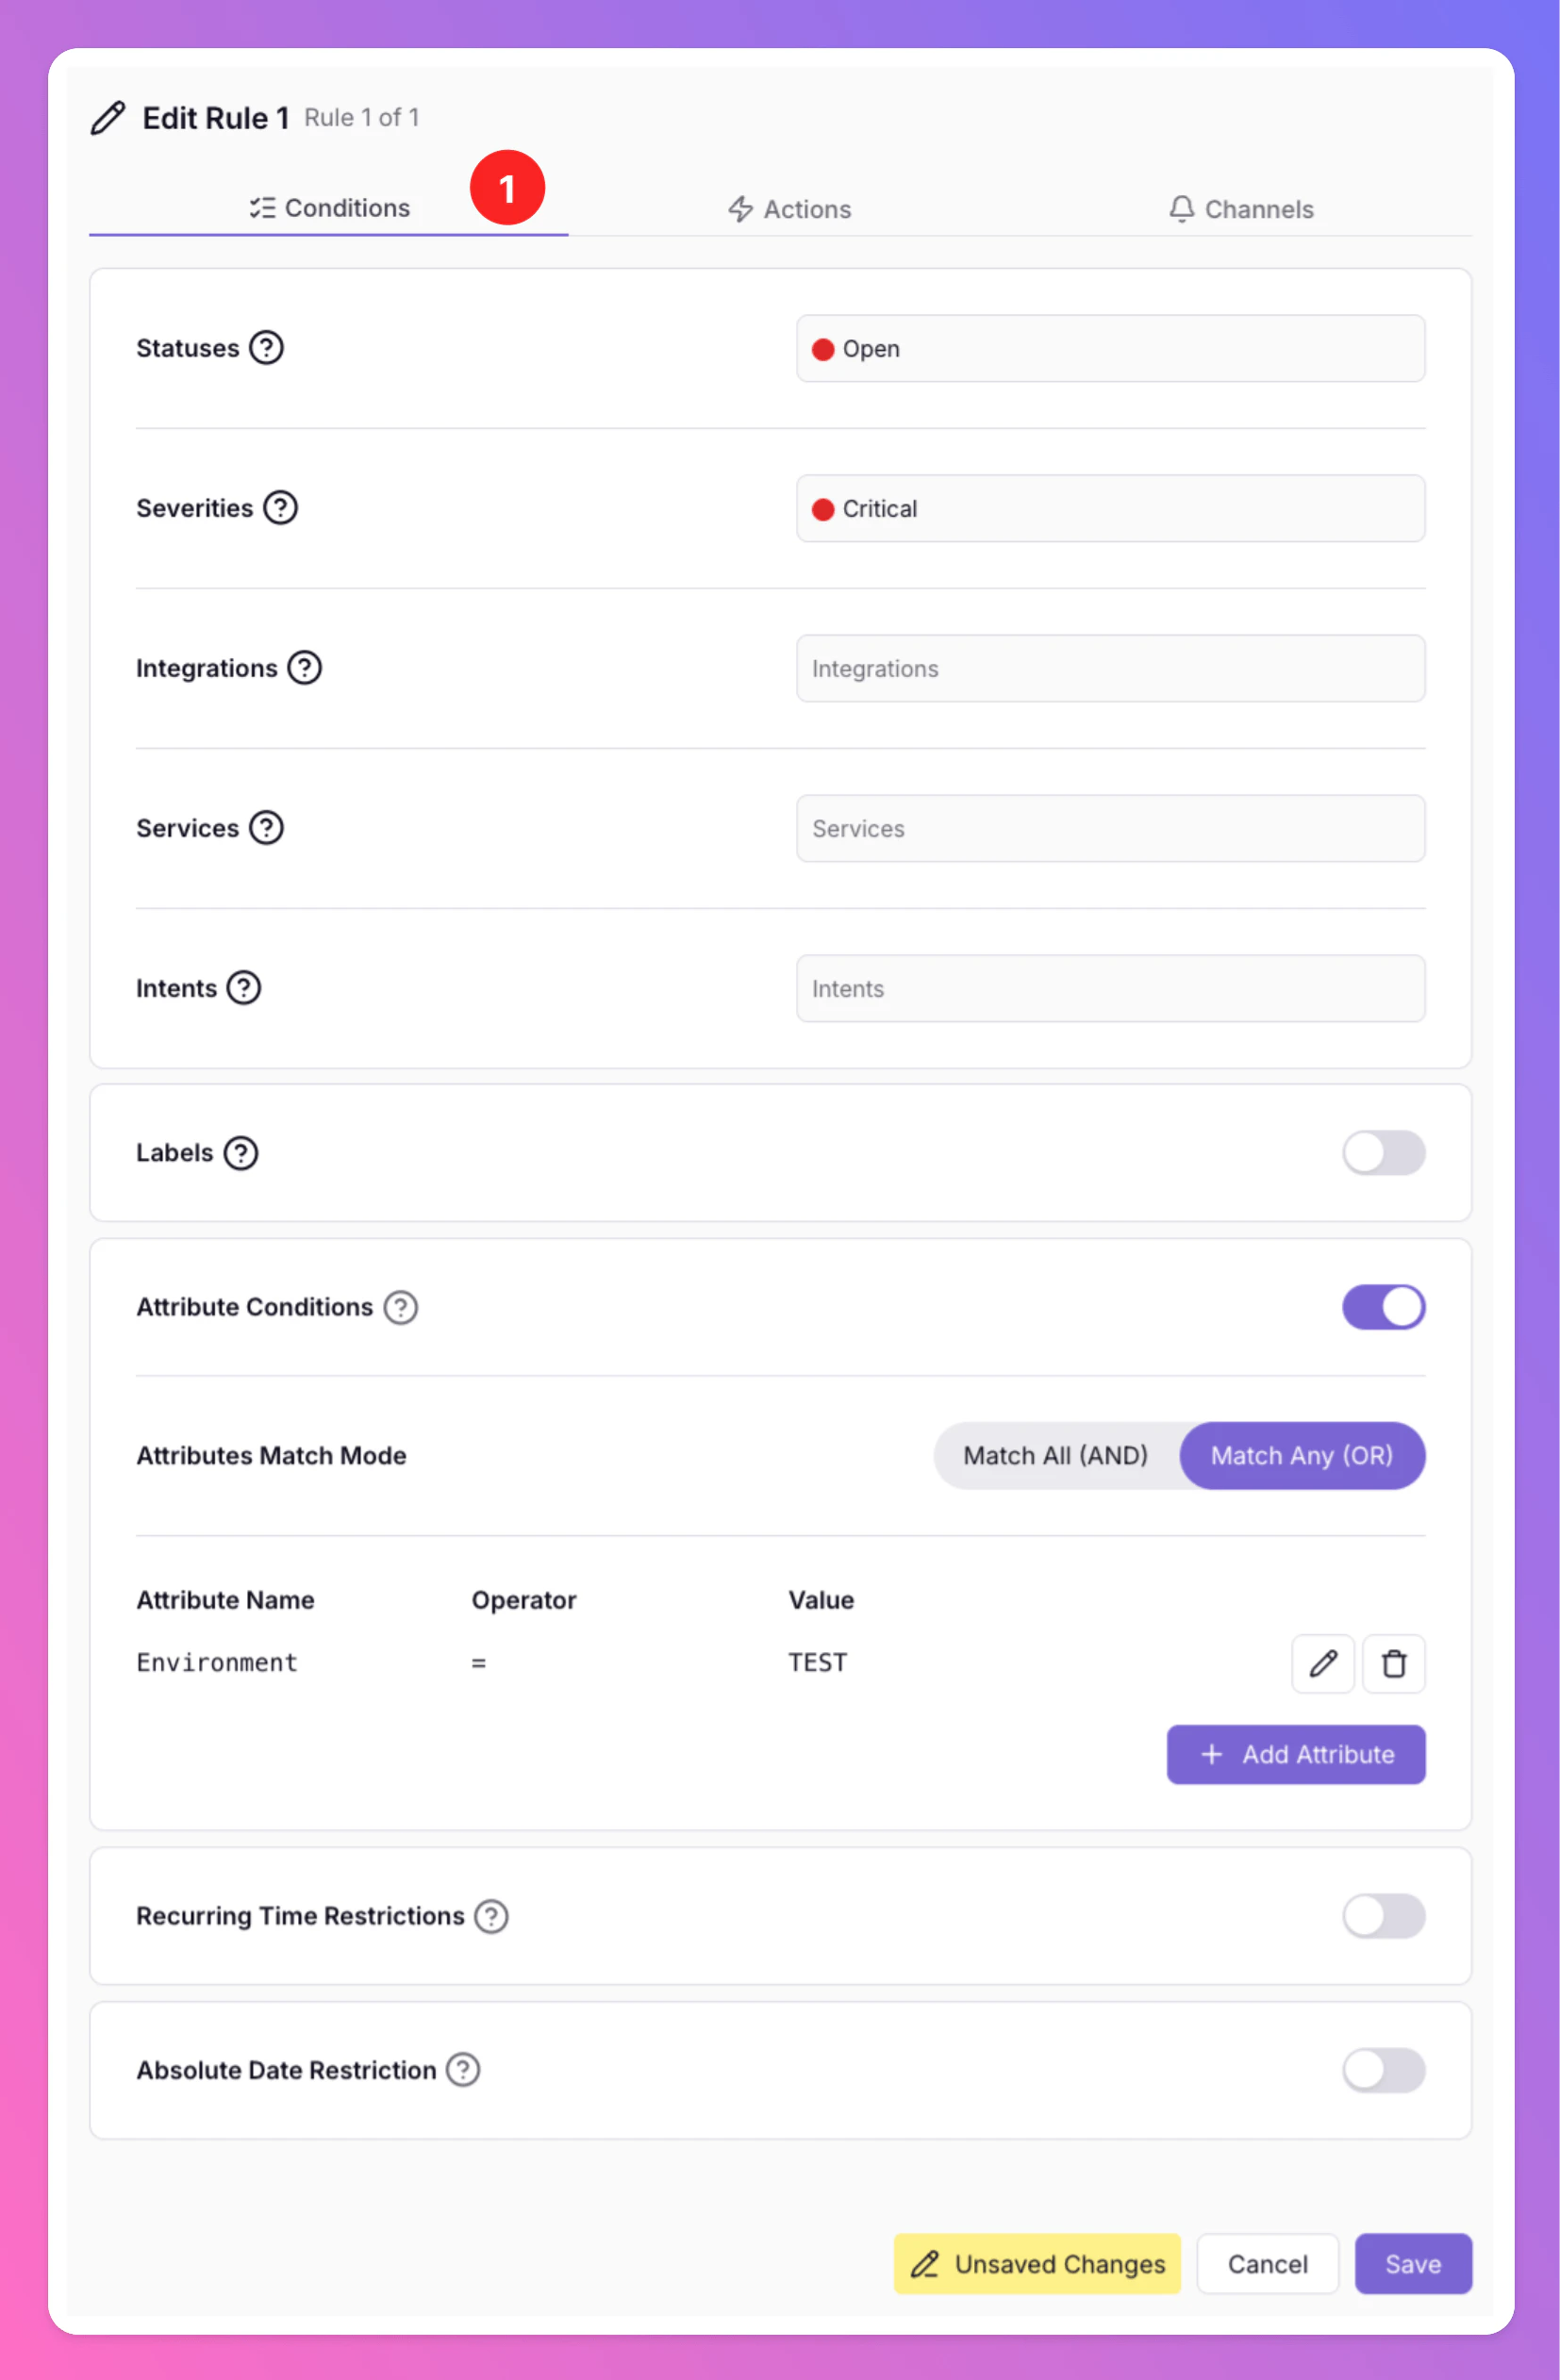 ### Configure Actions
Define the Actions to be executed if the Conditions are met:
* **Discard:** Choose to discard the incident immediately if it meets the defined Conditions.
* **Auto-Discard In:** Optional setting on **Discard** that controls when a discarded incident is removed from the database. Only available when **Discard** is enabled. Overrides the [Deletion Date](/essentials/incident#automatic-deletion) of the incident. The incident will still exist until `Deleted At`.
* **Change Severity:** Update the incident's severity level.
* **Add Interaction:** Run an incident interaction when the rule matches—for example `Resolve`, `Investigate`, `Reopen`, `Escalate`, `Affects`, `Comment`, `Forward`, or `Snooze`.
* **Comment:** Shown for `Resolve`, `Investigate`, `Reopen`, `Escalate`, `Affects`, and `Comment` when that interaction is selected. Required only for `Comment`; optional for the others.
* **Publish Comment:** Appears once comment text is entered. When enabled and the rule runs, the comment is added to the incident. For interactions such as `Affects` or `Resolve`, the comment is published on [status pages](/advanced/status-pages) only if the incident affects a service—the same behavior as when you [publish a comment](/essentials/incident#action-with-comment) manually. Saving with **Publish Comment** on but no comment text is blocked in the UI and rejected by the API.
* **Affects Services:**
### Configure Actions
Define the Actions to be executed if the Conditions are met:
* **Discard:** Choose to discard the incident immediately if it meets the defined Conditions.
* **Auto-Discard In:** Optional setting on **Discard** that controls when a discarded incident is removed from the database. Only available when **Discard** is enabled. Overrides the [Deletion Date](/essentials/incident#automatic-deletion) of the incident. The incident will still exist until `Deleted At`.
* **Change Severity:** Update the incident's severity level.
* **Add Interaction:** Run an incident interaction when the rule matches—for example `Resolve`, `Investigate`, `Reopen`, `Escalate`, `Affects`, `Comment`, `Forward`, or `Snooze`.
* **Comment:** Shown for `Resolve`, `Investigate`, `Reopen`, `Escalate`, `Affects`, and `Comment` when that interaction is selected. Required only for `Comment`; optional for the others.
* **Publish Comment:** Appears once comment text is entered. When enabled and the rule runs, the comment is added to the incident. For interactions such as `Affects` or `Resolve`, the comment is published on [status pages](/advanced/status-pages) only if the incident affects a service—the same behavior as when you [publish a comment](/essentials/incident#action-with-comment) manually. Saving with **Publish Comment** on but no comment text is blocked in the UI and rejected by the API.
* **Affects Services:** 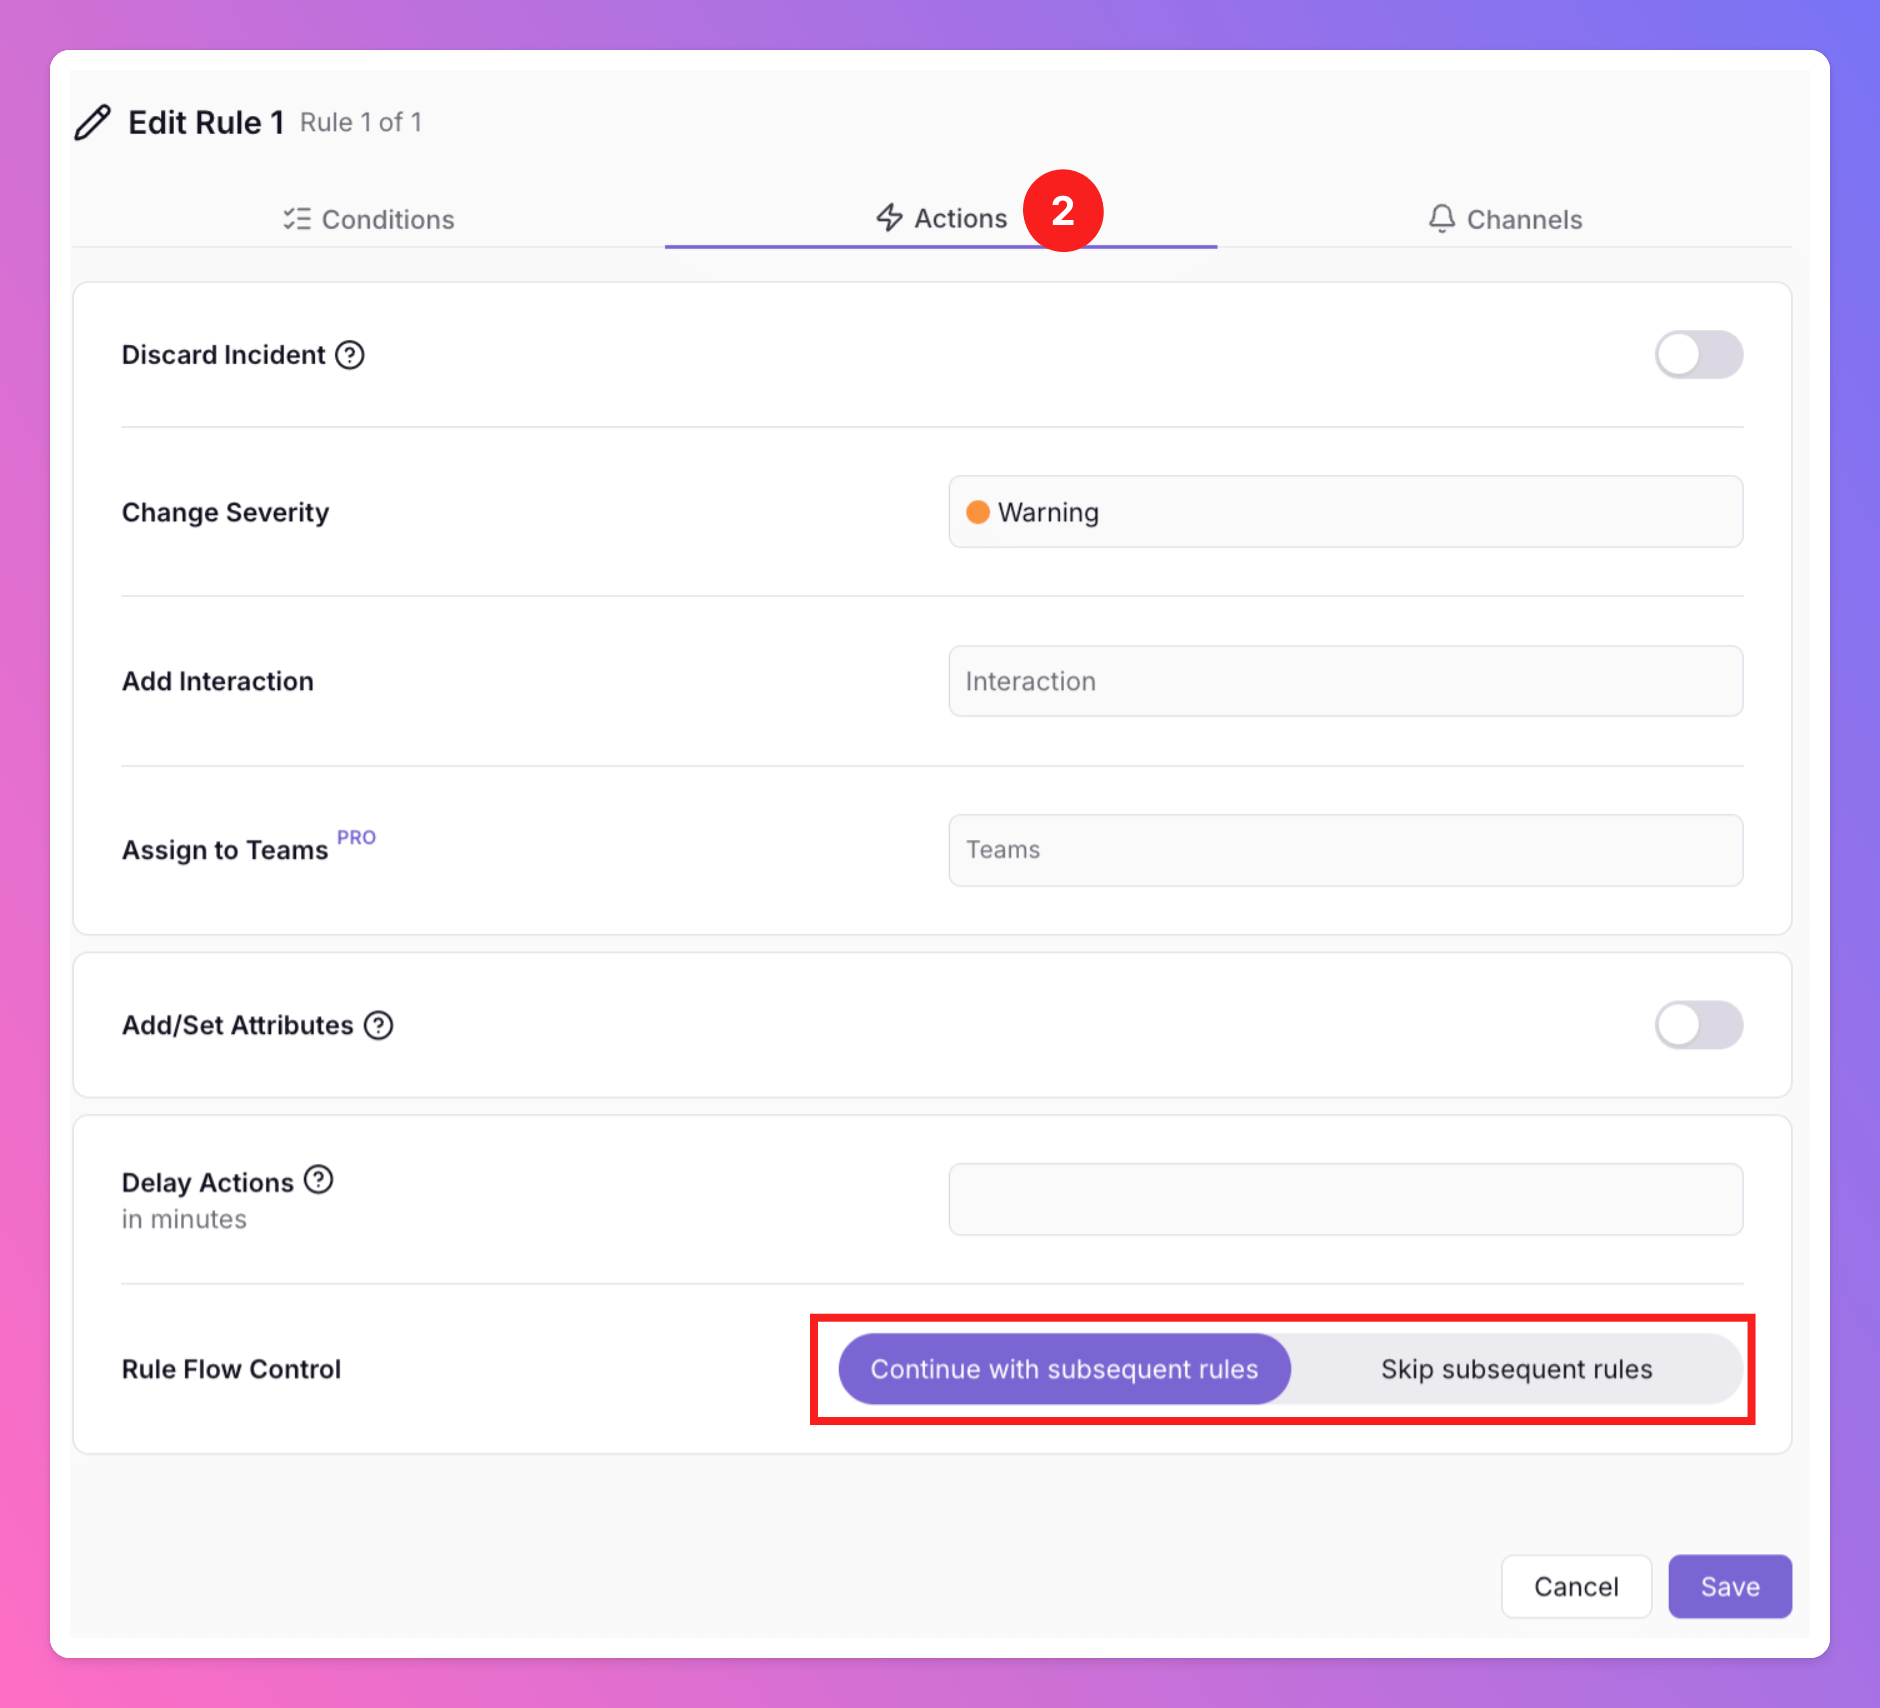 ### Choose Channels
Determine how notifications are sent out by configuring Channels based on the Conditions:
* **Mute all Channels:** Silence notifications across all channels (not including outbound integrations, see below).
* **Channels:** Select only specific channels (SMS, Email, Voice Call, Push Notification) that should be triggered when conditions are met, e.g. you can define that only for the conditions you set an SMS is sent.
* **Mute all Integrations:** Silence notifications across all **outbound integration**.
* **Outbound Integrations:** Select only specific outbound integrations that should be triggered when conditions are met, e.g. you can define that only for the conditions you set a generic outbound is triggered.
### Choose Channels
Determine how notifications are sent out by configuring Channels based on the Conditions:
* **Mute all Channels:** Silence notifications across all channels (not including outbound integrations, see below).
* **Channels:** Select only specific channels (SMS, Email, Voice Call, Push Notification) that should be triggered when conditions are met, e.g. you can define that only for the conditions you set an SMS is sent.
* **Mute all Integrations:** Silence notifications across all **outbound integration**.
* **Outbound Integrations:** Select only specific outbound integrations that should be triggered when conditions are met, e.g. you can define that only for the conditions you set a generic outbound is triggered.
 ### Examples
Here are two examples of how teams are setting up Advanced Incident Routing with All Quiet
### Examples
Here are two examples of how teams are setting up Advanced Incident Routing with All Quiet
 #### Routing States
The **State** column summarizes what happened when the rule was evaluated:
| State | What it means |
| ----------------- | -------------------------------------------------------------------------------------------------------------------------------------------------------------------- |
| **Executed** | The rule’s **Conditions** matched and its **Actions** and **Channels** were applied to the incident. |
| **Delayed** | The rule matched, but its actions are scheduled to run later because **Delay Actions (min.)** is set. The actual changes have not happened yet. |
| **Delay expired** | A previously **Delayed** run reached its scheduled time but **did not execute** — typically because the rule’s conditions were no longer met when the delay elapsed. |
| **Discarded** | The rule matched and **Discard** removed the incident immediately (Auto-Discard In = **Immediately**), so no further routing or notifications applied for that pass. |
#### Routing States
The **State** column summarizes what happened when the rule was evaluated:
| State | What it means |
| ----------------- | -------------------------------------------------------------------------------------------------------------------------------------------------------------------- |
| **Executed** | The rule’s **Conditions** matched and its **Actions** and **Channels** were applied to the incident. |
| **Delayed** | The rule matched, but its actions are scheduled to run later because **Delay Actions (min.)** is set. The actual changes have not happened yet. |
| **Delay expired** | A previously **Delayed** run reached its scheduled time but **did not execute** — typically because the rule’s conditions were no longer met when the delay elapsed. |
| **Discarded** | The rule matched and **Discard** removed the incident immediately (Auto-Discard In = **Immediately**), so no further routing or notifications applied for that pass. |
 ### Who Can See Execution History
| Location | Access |
| -------------------------------------- | ----------------------------------------------------------------------------------------------------------------------------------------------------------------------------------------------------------------------------------- |
| **Routing → History** | Only users who may **access the team that owns the routing** can open the routing and its execution history. Routing is authorized **per team**. |
| **Incident → Routing rule executions** | Only users who may **view that incident** can open incident details and load executions. The sidebar entry appears when the incident is returned for an **authorized** incident view, consistent with other incident-only features. |
Users who have **View** (read-only) access to a routing still see the **History** tab; it is not limited to editors.
### Who Can See Execution History
| Location | Access |
| -------------------------------------- | ----------------------------------------------------------------------------------------------------------------------------------------------------------------------------------------------------------------------------------- |
| **Routing → History** | Only users who may **access the team that owns the routing** can open the routing and its execution history. Routing is authorized **per team**. |
| **Incident → Routing rule executions** | Only users who may **view that incident** can open incident details and load executions. The sidebar entry appears when the incident is returned for an **authorized** incident view, consistent with other incident-only features. |
Users who have **View** (read-only) access to a routing still see the **History** tab; it is not limited to editors.